Marmot & Little Sandy Dam Removal
|
|
|
- Howard Lindsey
- 5 years ago
- Views:
Transcription


1 Marmot & Little Sandy Dam Removal Final Report August 2009 Bruce McCammon Photography NW Harding Ct. Portland, OR Contract Number AG-046W-P
2 Contents Introduction... 1 Photopoint Locations... 1 Field Technique... 4 Station identification... 4 Camera setup and photography... 5 Image Post-processing... 5 RAW conversion... 5 Directory structure... 6 File naming convention... 7 Panorama creation... 8 Results... 9 Appendix Site Reference photos Camera setup... 32
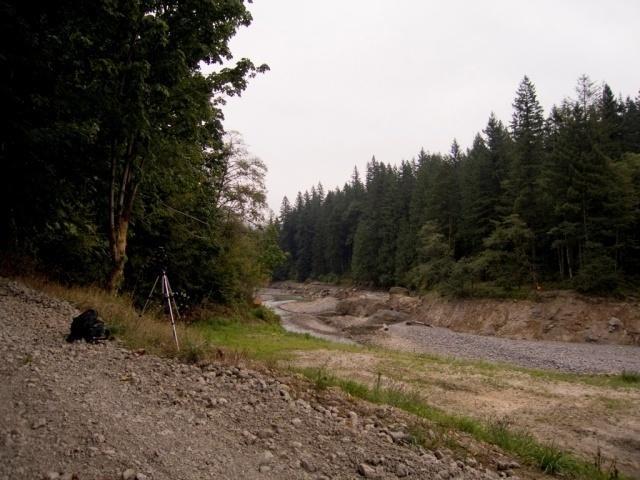
3 Introduction This report is submitted to the USDA Forest Service, Mount Hood National Forest as substantial completion of contracted work. The contract was designed to provide photographic coverage of channel, riparian and dam areas in the vicinities of the Marmot Dam and the Little Sandy Dam prior to and after dam removal. This report contains photos and information that spans the period June 2007 to September This timeframe covers the pre- and post-removal periods at the Marmot Dam site and the pre-removal and immediate post-removal periods at the Little Sandy Dam site. Additional information will be added to this report when the final set of photos is taken in August or September of The additional photos to be added will show conditions at the Little Sandy Dam area after one high flow season as well as additional photos of the Marmot Dam sites. The monitoring conducted under this contract was part of a coordinated monitoring plan involving federal, state and private organizations. The primary photopoint locations were coordinated with and accepted by the US Forest Service (Mt. Hood National Forest and Pacific Northwest Experiment Station), the USGS, the City of Portland and the Sandy River Watershed Council. The photo monitoring covered here was also coordinated with academic institutions that are involved in monitoring and analyzing the effects of the removal of the Marmot and Little Sandy dams. This contract was initiated by the Mt. Hood National Forest. Dan Shively is the designated Contracting Officer Representative. Connie Athman provided contract inspection and coordination service. Todd Parker, Zig Zag Ranger District, Mt. Hood National Forest provide valuable field information and access coordination. Photopoint locations The photo monitoring strategy was pretty simple establish a series of locations that could be revisited to allow sequential photography to record changes in the channel and riparian zones along the Sandy and Little Sandy Rivers in the vicinity of the Marmot and Little Sandy dams. One of the coordinated monitoring group partners requested that the initial set of photo point locations be increased to include shots from several bridges crossing the Sandy River and Bull Run River. Five bridges were added four crossing the Sandy River and one crossing the Bull Run River. Figure 1 shows the general location of the photo points in context with the Sandy River watershed. Locating the photo points on the ground was complicated by the robust deciduous and coniferous riparian plant community. While access to the areas is quite good, finding sites that offered visibility of the channel in both upstream and downstream directions was much more limited. Every attempt was made to locate the photo points so that the site would not be affected by channel changes after dam removal. It didn t always work that way. Two sites, M1 and M2, were totally destroyed during the removal of Marmot dam or shortly after the dam removal. 1

4 Site M1 was located above Marmot dam. The Sandy River channel adjusted tens of feet laterally and 10 to 15 feet vertically after dam removal. The bank that site M1 had been on was totally removed by these channel adjustment. Site M2 was initially located near the dam in an area believed to be safe from dam deconstruction activity. This proved to be an error since the entire site was totally regraded during dam deconstruction. The M1 and M2 sites were replaced with sites M1A and M2A, respectively. Figure 1. Photopoint locations Additionally, the first site located at the mouth of the Sandy River (SRD1) was replaced by a location downstream to provide more elevation above the river and a more encompassing view of the river and delta area. 2
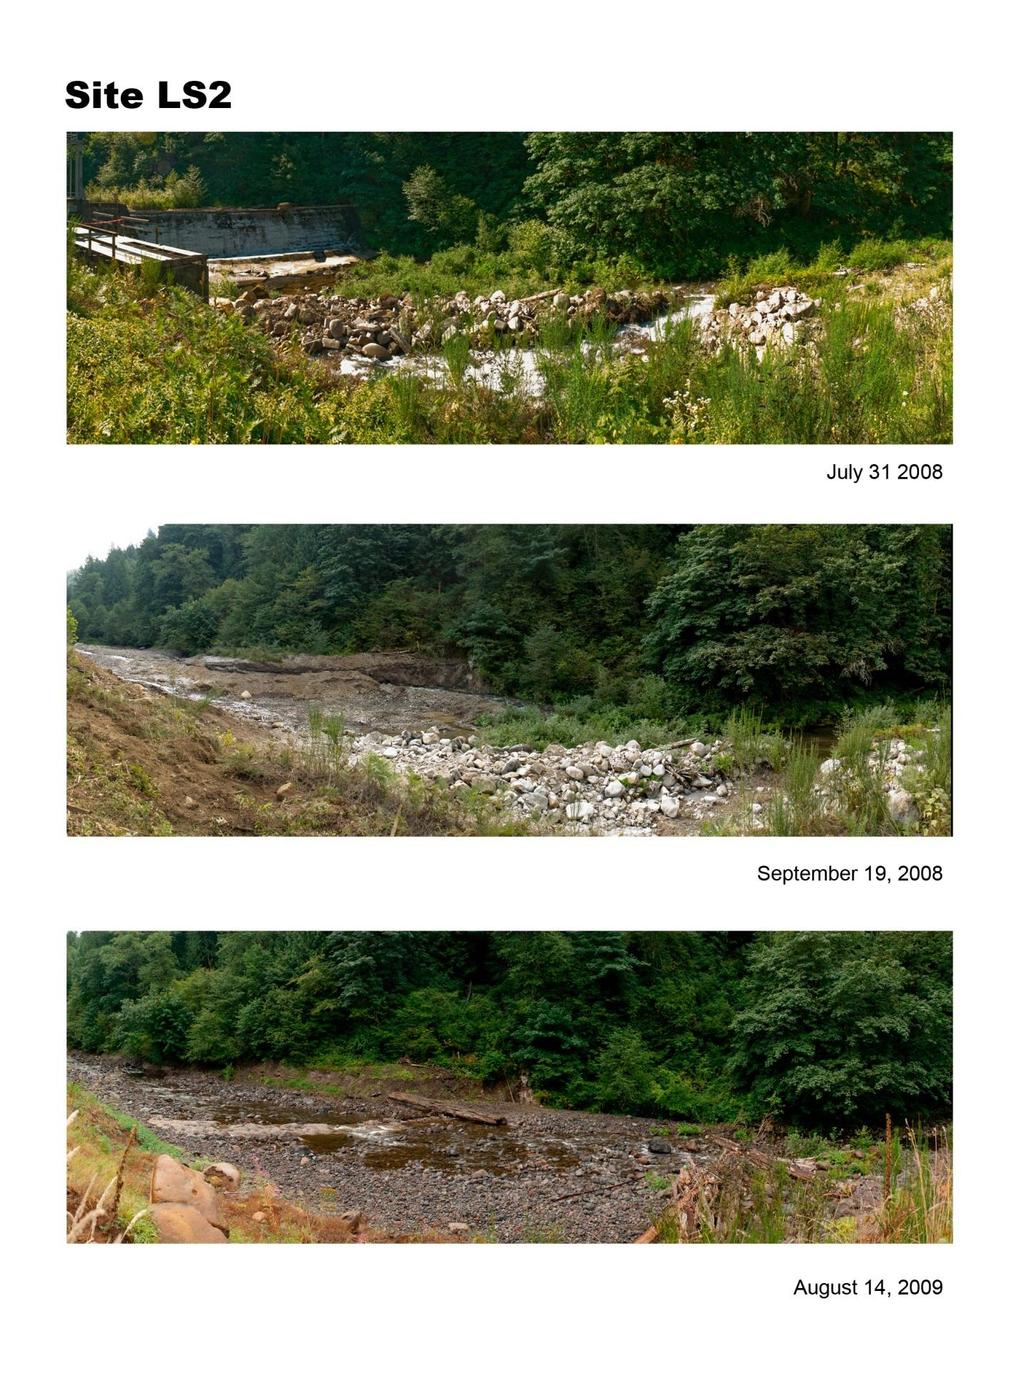
5 Station Latitude Longitude Description M1A N45⁰ W122⁰ Uppermost station on Sandy River M2A N45⁰ W122⁰ Upslope along low standard access road to site M1A; in the Marmot dam vicinity M3 N45⁰ W122⁰ Below Marmot dam near USGS gage M4 N45⁰ W122⁰ ~0.9 mile downstream from Marmot dam M4A N45⁰ W122⁰ ~ 100 yards downstream from site M4 MFB N45⁰ W122⁰ Midspan on the Marmot dam foot bridge MS1 N45⁰ W122⁰ South bank of Sandy River, upstream from Marmot dam footbridge MS2 N45⁰ W122⁰ On top of a bedrock exposure in the center of the Sandy River channel; accessible only at low flow SRD2 N45⁰ W122⁰ Near the mouth of the Sandy River; west bank LS1 N45⁰ W122⁰ On the cutbank above the Little Sandy dam LS2 N45⁰ W122⁰ Downstream from the Little Sandy dam; on a terrace above the channel LS3 N45⁰ W122⁰ At channel elevation at bottom of construction road access to channel; above dam LS4 N45⁰ W122⁰ On south bank of Little Sandy River; accessed from road above site Table 1. List of photo point locations and station location code. 3

6 All the above stations, with the exception of the Sandy River delta site, are shown in greater detail in Figure 2. Figure 2. Station Locations Field Technique Station identification A variety of markings were used to identify the photo point locations in the field. When possible a three foot piece of rebar was pounded into the ground and capped with an aluminum cap that had the site ID stamped into the top. Bridge railings were marked by filing a small notch into the railing. Paint was used to mark any site that is located on bedrock. All sites except the bridge sites had location photos taken to document the actual photo point location relative to local landmarks and topography. 4
7 Camera setup and photography Many pictures have been taken during this photo documentation. The majority of the images were made as a sequence of images panning across the scene to form a panorama of the channel area. All panorama files were made with the same camera body and lens. A Nikon D200 camera and a 20mm Nikkor lens were used exclusively for the panorama images. I occasionally used a 10.5mm Nikkor fisheye lens at the photo points. This was done to supplement the photo record and to provide a single image record of the scene rather than a panorama formed by stitching together numerous images. None of the fisheye images have been used in the results presented in this report. The fisheye image files are included on the DVD of images and can be found in the miscellaneous directory on the DVD. A Manfrotto tripod fitted with a Manfrotto leveling base and Nodal Ninja panorama head was used for the capture of all but the June 2007 images. The June 2007 images did not utilize the Nodal Ninja head. The Nodal Ninja panorama head allows for more accurate capture of the image sequence and a much better composite image after stitching. After setting the tripod over the photo point mark the tripod was leveled using the leveling base. The Nodal Ninja panorama head was checked for level across the range of the image sequence and adjustments were made as necessary to ensure that the camera was level. June 2007 images were captured with the camera in a horizontal (landscape) orientation. After post-processing these images I decided to switch to vertical (portrait) orientation for all subsequent images. This provides more scene capture in each of the individual images and allows for more of the channel area to be incorporated. Images were captured by setting the camera view to the left extent of the scene and sequentially moving the camera through the series using the detent settings on the Nodal Ninja panorama head. Image capture was made by using a cable release rather than manually pushing on the shutter. Post-processing Raw conversion All images were captured as RAW rather than JPG files. This provides a great deal of flexibility to adjust exposure or white balance prior to the creation of the panorama composite. All RAW images were converted to JPG for delivery to the Mt. Hood National Forest using Adobe Photoshop Lightroom 2.3 5
8 Directory structure The digital files that accompany this report are divided into 5 broad categories: 1. Miscellaneous files photos taken at locations other than the established photo points or with different camera bodies or lens combinations 2. Breach Sequence photos taken on October 19, 2007 during the breach operation at Marmot Dam. 3. Bridges all image files taken as either single views or panorama sequences at the Revenue Bridge, Bull Run Bridge, Dodge Park Bridge, Troutdale Bridge or the Stark Street Bridge 4. Panoramas all images that have been stitched together to form composite views of channel conditions at a given site. This set of images represents the most useful, completely processed files delivered under this contract. 5. Source files all the individual image files that were used to form the panoramas. In past delivery of image files to the Forest Service I learned that some of the files were too large to be used within some applications on the government computers. To accommodate any future use by the Forest Service I include two sets of panorama and source image files. The first set is the full size images for the stitched panoramas and the source files used in each panoramic composite. The second set is comprised of panorama and source images that have been resized to never exceed 1024 pixels horizontally or 768 pixels vertically. There are over 1800 image files on the DVDs that accompany this report. Organizing the files for future use was an important part of the entire photo documentation process. Since the files were all generated over a sequence of field visits on different days, the easiest way to store and reference the files was by day and then by station within any given day. However, the real utility of the images is to show the change at a given station over time. This required a different filing and organization strategy. The digital files included on the DVDs are filed by photo point, by year and by day within the year. An example is shown below. 6
9 Source Files o Marmot Dam Site M1A 2007 o M1A_070507_JPG o M1A _JPG_Small o M1A_071607_JPG o M1A_071607_JPG_Small o M1A_082207_JPG o M1A_082207_JPG_Small o M1A_092607_JPG o M1A _JPG_Small o M1A_102407_JPG o M1A_102407_JPG_Small 2008 o M1A_070208_JPG o M1A_070208_JPG_Small o M1A_073108_JPG o M1A_070308_JPG_Small o M1A_091908_JPG o M1A_091908_JPG_Small File naming convention The directories ending with _JPG contain the full size image files. Directories ending with _Small contain image files that have been resized to 1024 x 768 pixels. Within a directory for any date the individual files follow the same naming convention as the directory. For example: M1A_070507_001.jpg (M1A = station ID; = date of capture; _001 = sequence no.) Files in the Small directories are labeled the same and an s is appended to the file name (M1A_070507_001s.jpg) The Marmot Footbridge, Revenue and Bull Run bridge sites have directories that contain images for upstream and downstream views. The directory naming and file naming within a directory include D for downstream and U for upstream. (e.g., MFBU_091908_JPG_Small). 7

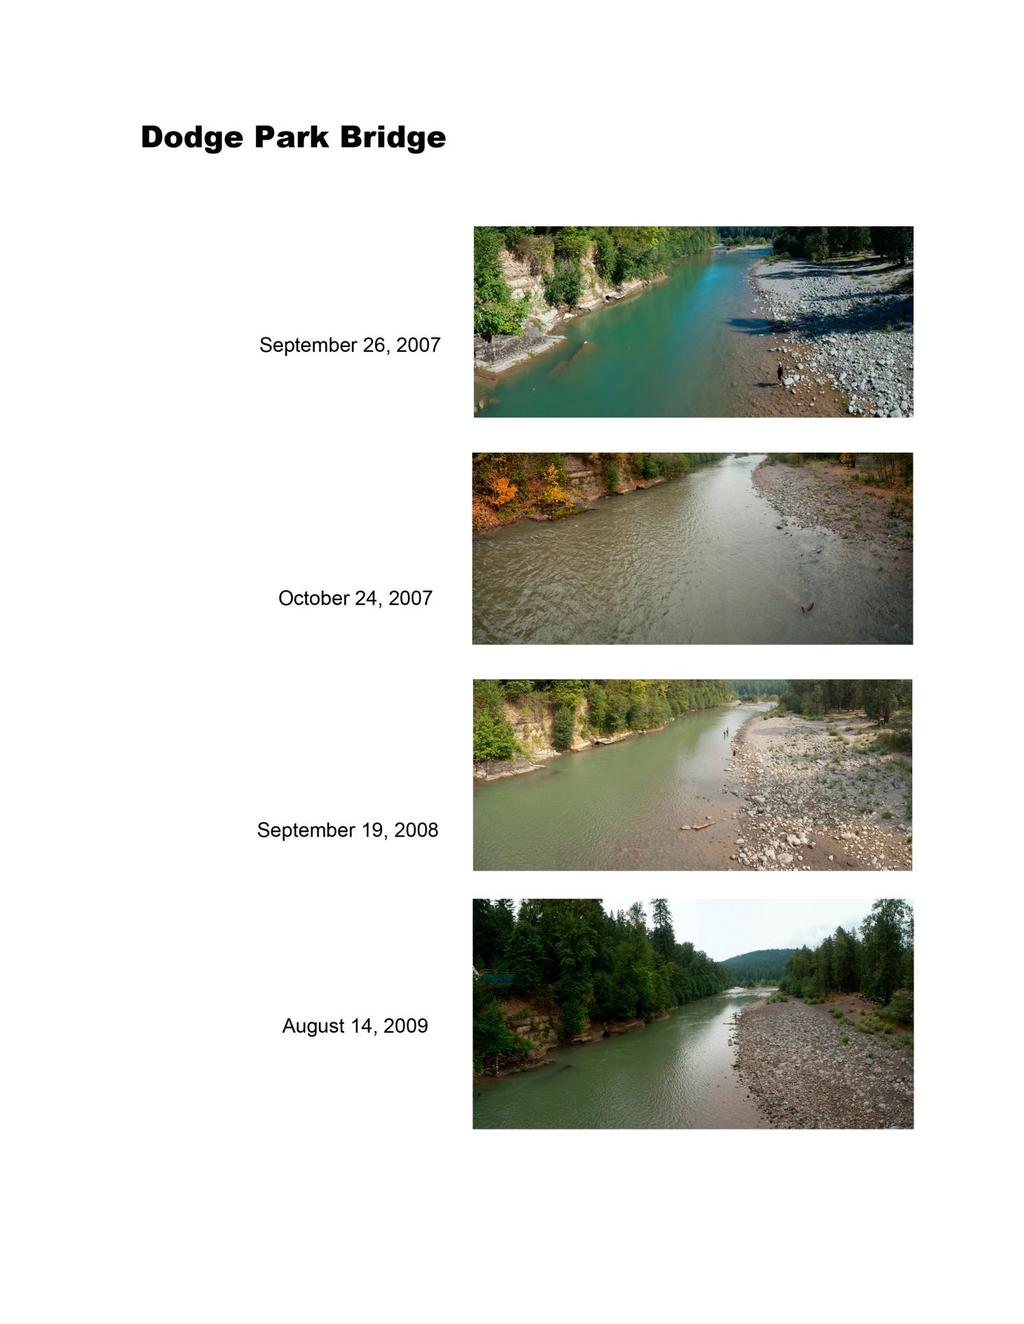
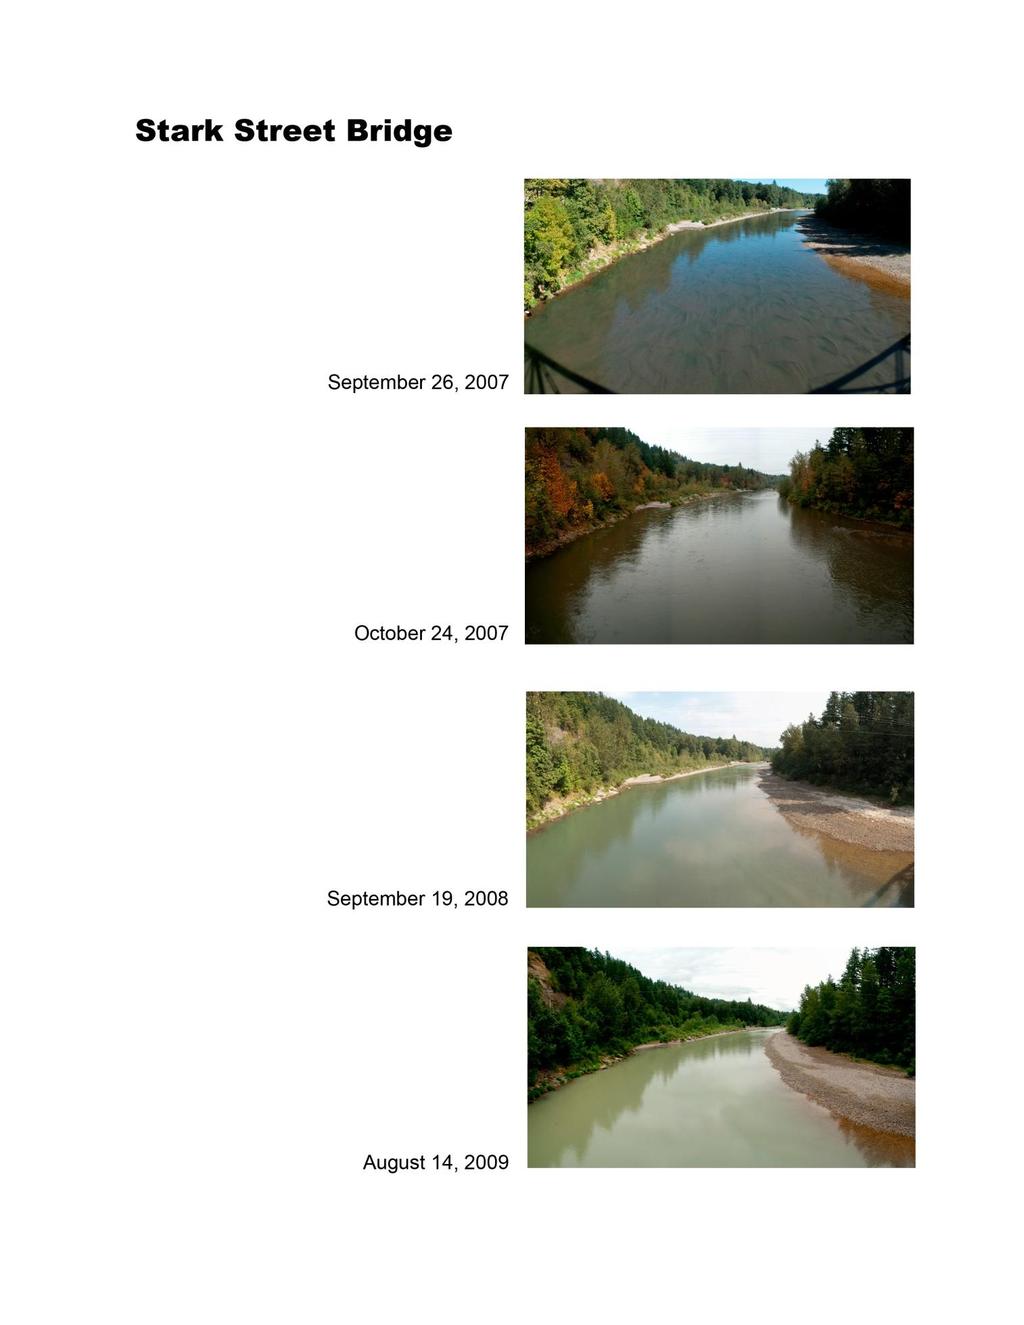
10 Naming Convention Bridges I used an abbreviation for each bridge location as follows: Abbreviation BRD BRU BBRU BBRD BDP BSS BT location Bridge Revenue, downstream Bridge Revenue, upstream Bridge Bull Run, upstream Bridge Bull Run, downstream Bridge Dodge Park Bridge Stark Street Bridge - Troutdale The date was appended to the abbreviation to form unique file names, e.g., BRD_ jpg (Bridge- Revenue- downstream view, July 16, 2007) Panorama creation Sequences of individual image files captured at each site were stitched together to form a composite panorama view. The program Panorama Maker Pro, version 4 by ArcSoft was used to perform the stitching. This program uses advanced algorithms to match and blend the image sequence into a final composite. Figure 3. Blending 8 images into a single composite Figure 3 is an example of the blending zones used to make a final panorama from site M1A after the Marmot Dam was removed. 8
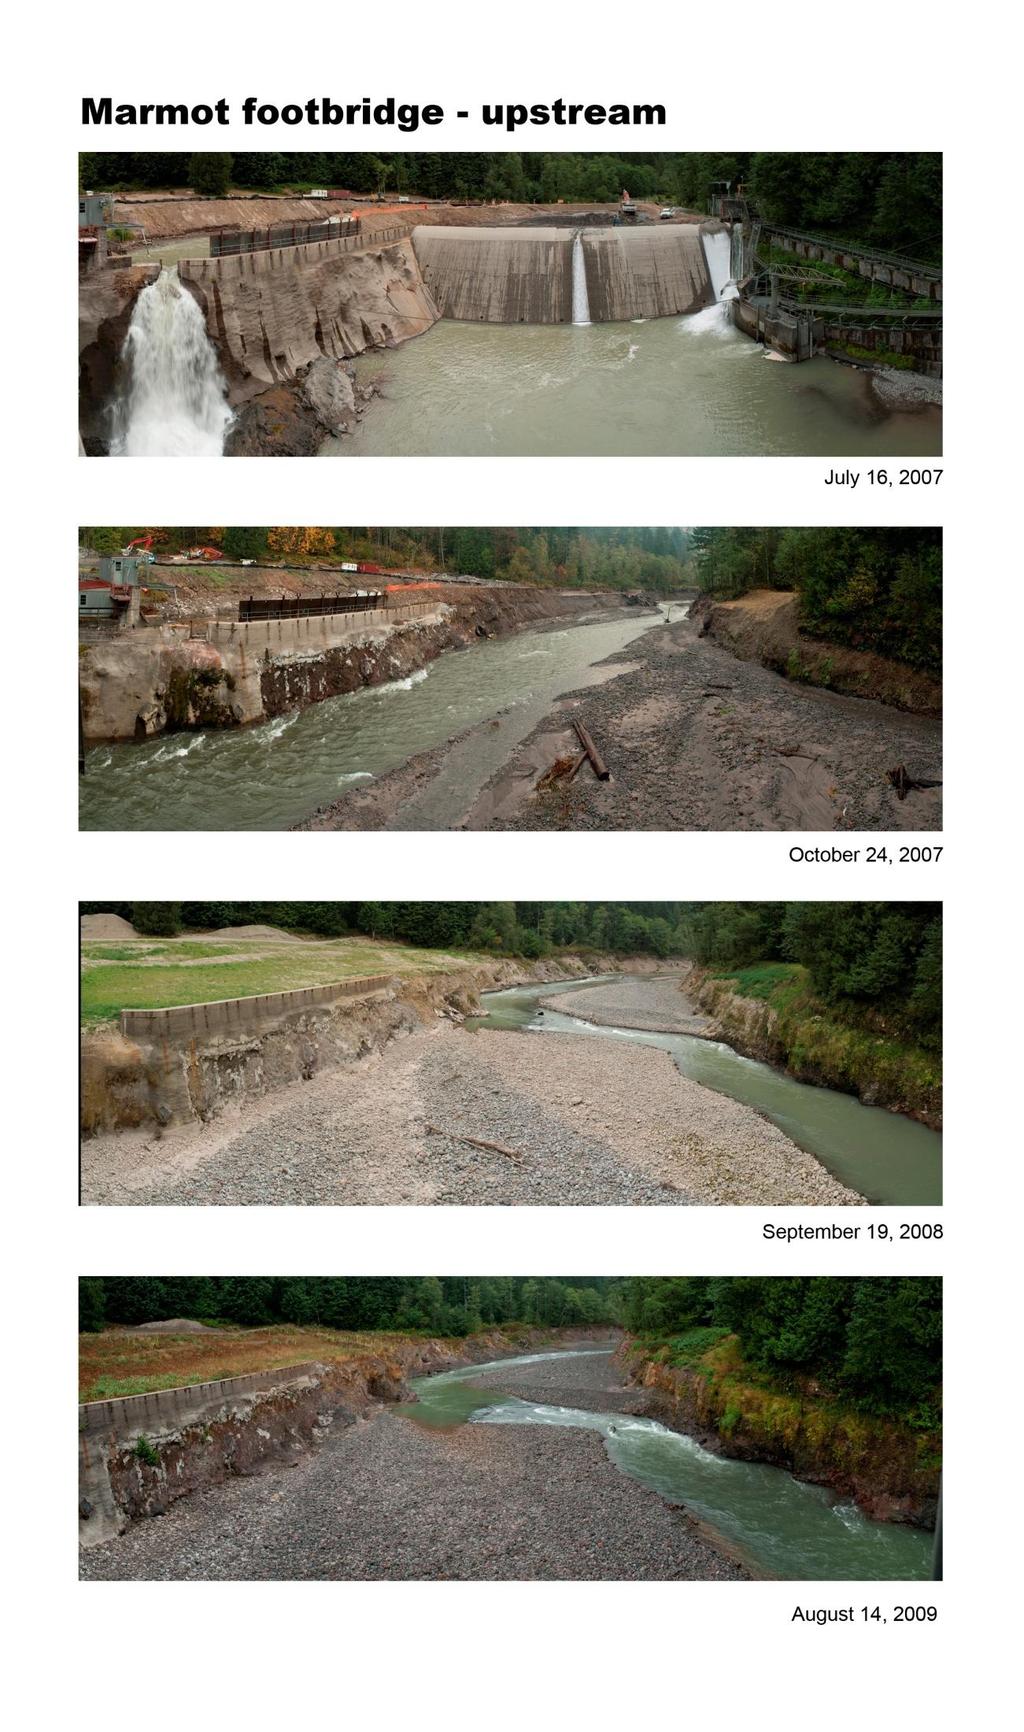
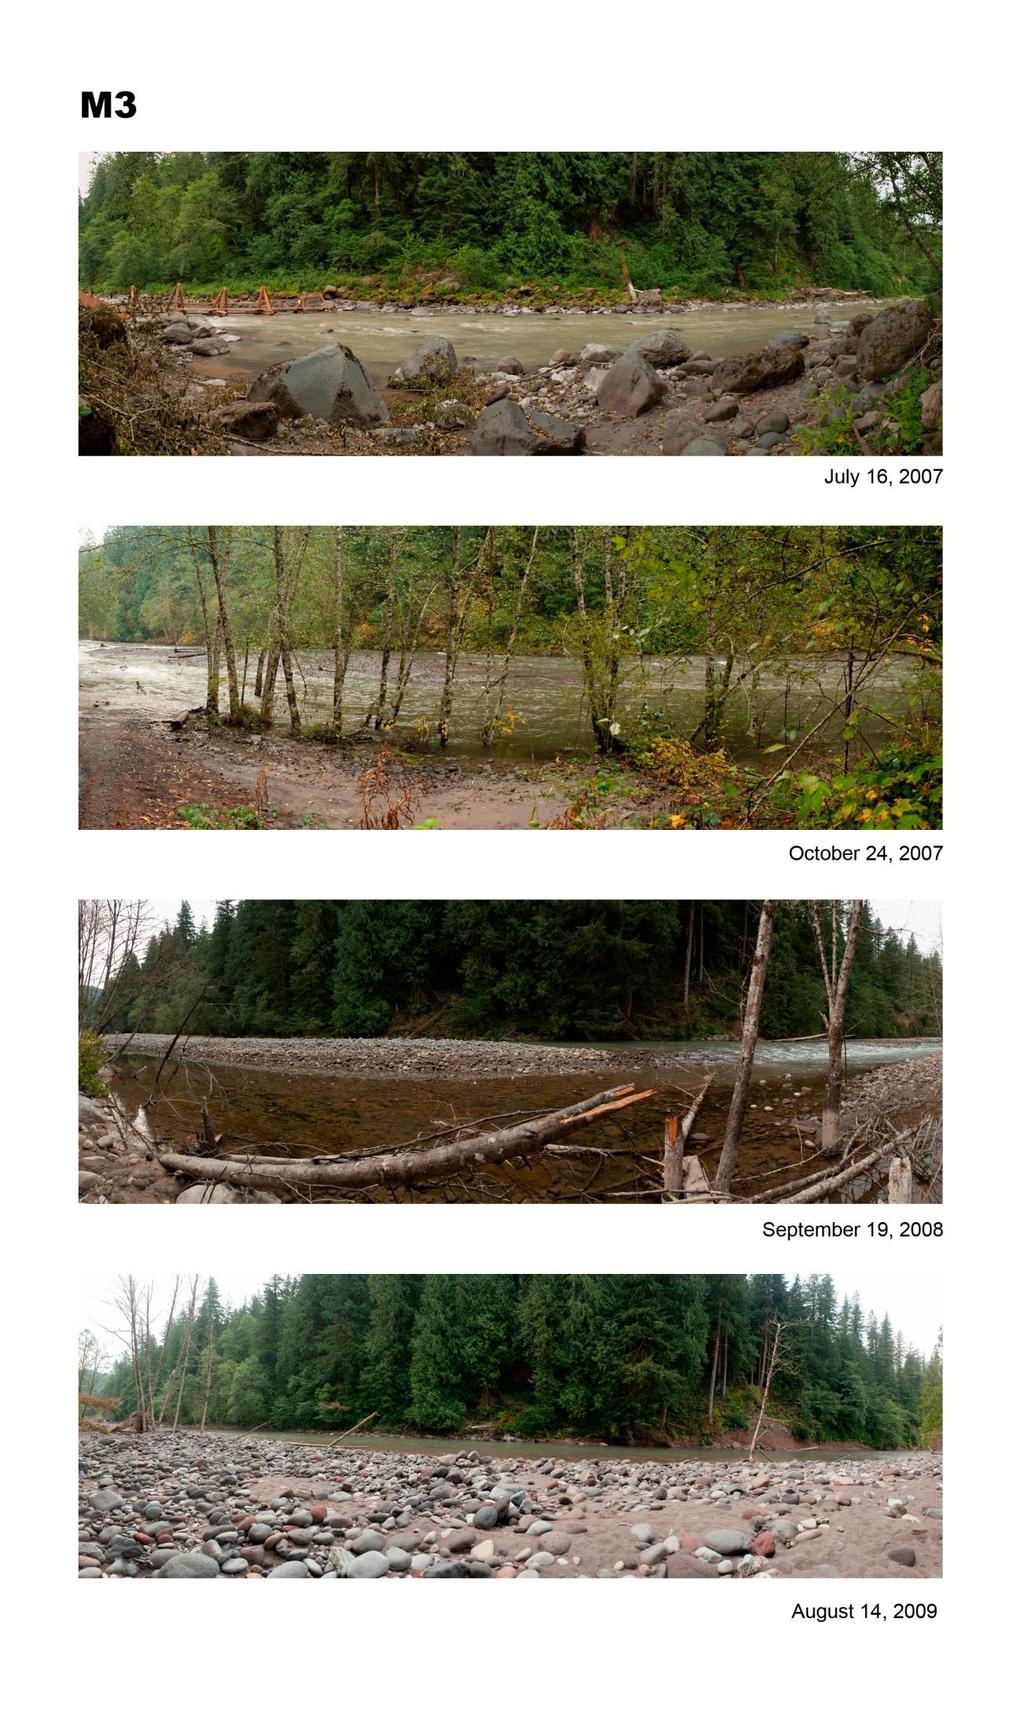
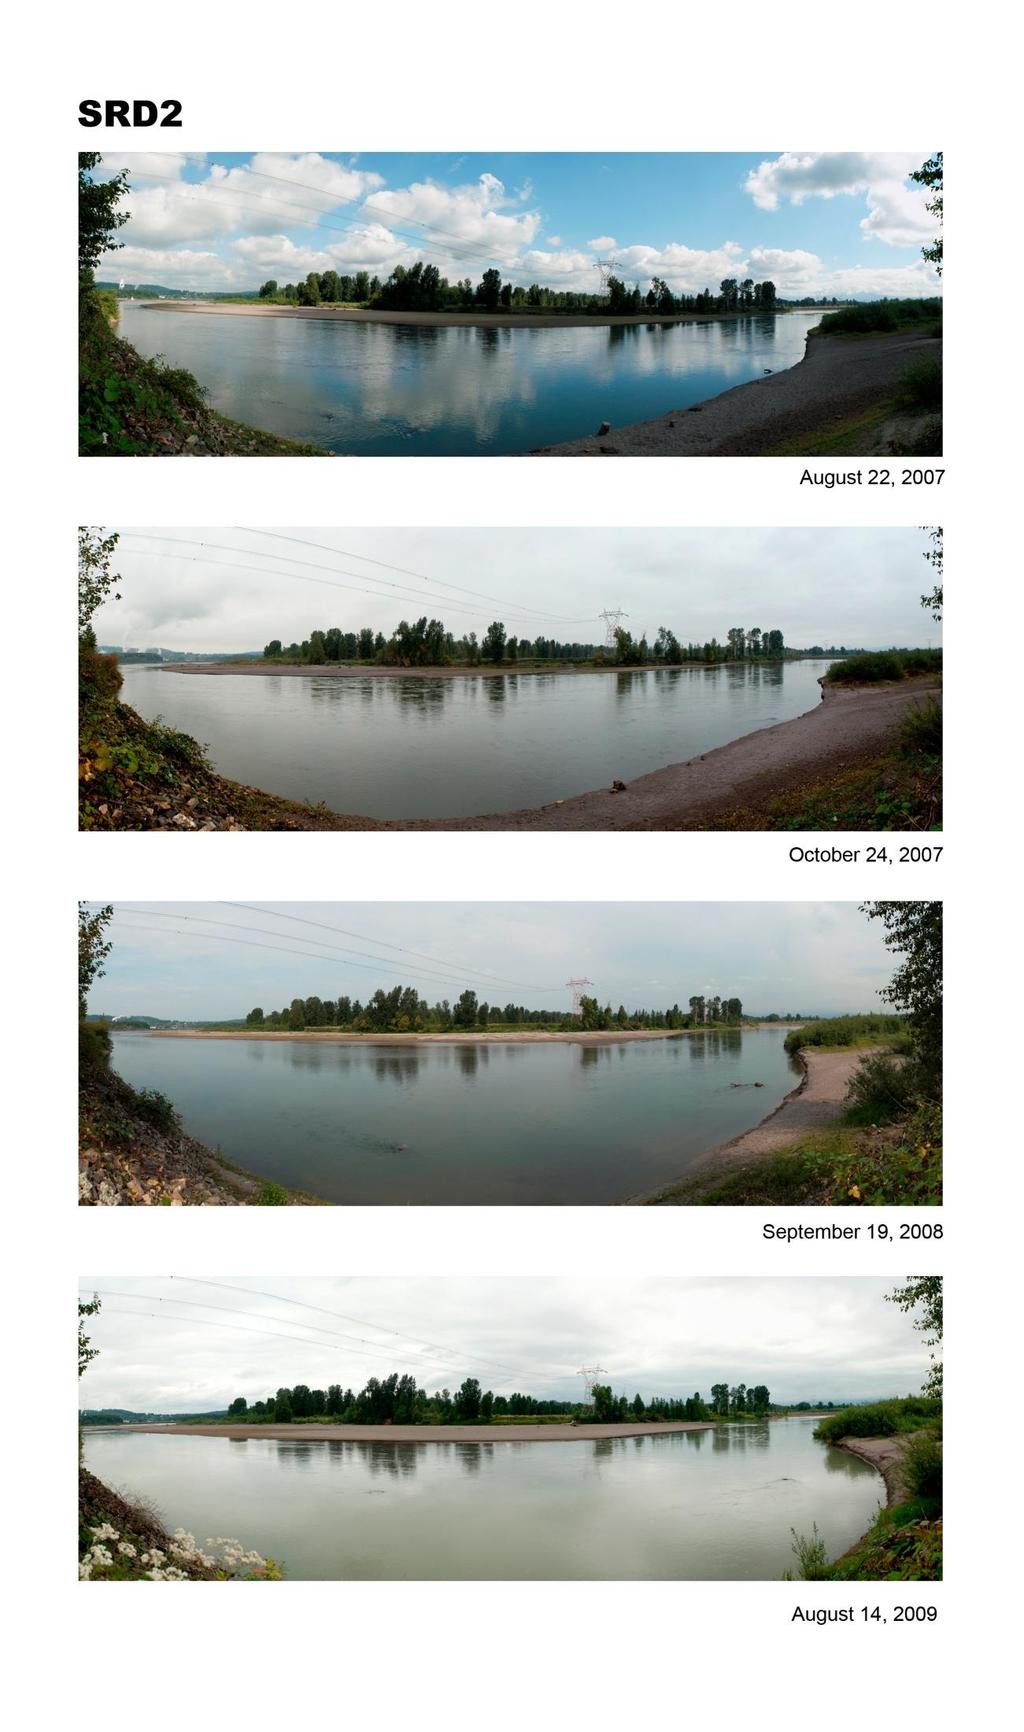
11 Results The following pages present a series of panoramic views for each station on 3 dates: July 16, 2007 (pre-breach), October 24, 2007 (5 days post-breach) and September 19, The reader is referred back to Figure 1 and Figure 2 for location information for each station. Stations M1, M2 and SRD1 are not included since these stations did not persevere over time. 9
12 10
13 11
14 12
15 13

16 14
17 15
18 16
19 17
20 18
21 19

22 20
23 21
24 22

25 23

26 24

27 25
28 26

29 27


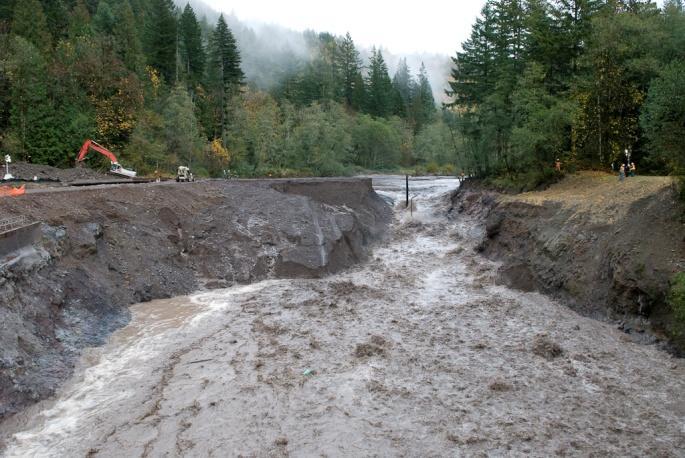

30 Marmot Dam breach October 19,
31 Appendix The following pages contain photographs taken at most of the field photo point sites. The intent is to provide some visual context for the photo point to make it easier to relocate the photo points in the future. Additionally, one photograph shows the full camera setup as used to make the panorama sequences at each photopoint. 29


32 Site Reference Photos Site 1A Site 2A Site 3 30


33 Site 4 Site 4A Site MS1 Site MS2 31

34 Nikon D200 camera Nikkor 20mm f/2.8 lens Nodal Ninja panorama head Manfrotto leveling base Bogen double bubble level Nikon cable release Bogen Manfrotto tripod 32
Panoramas. Featuring ROD PLANCK. Rod Planck DECEMBER 29, 2017 ADVANCED
 DECEMBER 29, 2017 ADVANCED Panoramas Featuring ROD PLANCK Rod Planck D700, PC-E Micro NIKKOR 85mm f/2.8d, 1/8 second, f/16, ISO 200, manual exposure, Matrix metering. When we asked the noted outdoor and
Copyright 2017 Hudson Henry All rights reserved. First edition, November Publisher: Rick LePage Design: Farnsworth Design
 Copyright 2017 Hudson Henry All rights reserved. First edition, November 2017 Publisher: Rick LePage Design: Farnsworth Design Published by Complete Digital Photography Press Portland, Oregon completedigitalphotography.com
A taste for landscapes
 A taste for landscapes NEPG workshop October 2012 Colin White 1 Main ingredients 1. Light 2. Composition 3. Kit 4. Post production 2 Light Hue, direction, dynamic range Time of day - around sunrise or
Manfrotto 303plus QTVR Pano Head
 FLAAR Reports Digital Imaging, Report on Printers, RIPs, Paper, and Inks JUNE 2004 Manfrotto 303plus QTVR Pano Head A report by Eduardo Sacayon, FLAAR+UFM Manfrotto 303plus QTVR Pano Head OVERVIEW The
Photoshop Elements 3 Panoramas
 Photoshop Elements 3 Panoramas One of the good things about digital photographs and image editing programs is that they allow us to stitch two or three photographs together to create one long panoramic
Creating a Panorama Photograph Using Photoshop Elements
 Creating a Panorama Photograph Using Photoshop Elements Following are guidelines when shooting photographs for a panorama. Overlap images sufficiently -- Images should overlap approximately 15% to 40%.
Advanced Near-Realistic 3D Lighting: Capturing, Creating, and Using Image-Based Lighting
 Advanced Near-Realistic 3D Lighting: Capturing, Creating, and Using Image-Based Lighting Christopher M Murray Autodesk Media & Entertainment DG4325 Intended for Autodesk 3ds Max 2012 and Autodesk Showcase
SPECIAL PUBLIC NOTICE
 SPECIAL PUBLIC NOTICE Draft Map and Drawing Standards for the South Pacific Division Regulatory Program August 6, 2012 Corps contacts: Sacramento District: Michael Finan (916) 557-5324 (Michael.C.Finan@usace.army.mil)
Introduction to Panoramic photography. David R. Chung Linn Area Photography Club
 Introduction to Panoramic photography David R. Chung http://www.dchung.com Linn Area Photography Club 1. What is a panoramic photograph? 2. Why panoramas? 3. Techniques 4. In the field 5. In the digital
How to combine images in Photoshop
 How to combine images in Photoshop In Photoshop, you can use multiple layers to combine images, but there are two other ways to create a single image from mulitple images. Create a panoramic image with
Map and Drawing Standards for the South Pacific Division Regulatory Program
 Map and Drawing Standards for the South Pacific Division Regulatory Program Hollis Jencks Project Manager, Nevada/Utah Section Sacramento District Regulatory Program Workshop 31 May 2018 US Army Corps
Appendix 8.2 Information to be Read in Conjunction with Visualisations
 Shepherds Rig Wind Farm EIA Report Appendix 8.2 Information to be Read in Conjunction with Visualisations Contents Contents i Introduction 1 Viewpoint Photography 1 Stitching of Panoramas and Post-Photographic
Digital Design and Communication Teaching (DiDACT) University of Sheffield Department of Landscape. Adobe Photoshop CS4 INTRODUCTION WORKSHOPS
 University of Sheffield Department of Landscape. Adobe Photoshop CS4 INTRODUCTION WORKSHOPS") Adobe Photoshop CS4 INTRODUCTION WORKSHOPS WORKSHOP 3 - Creating a Panorama Outcomes: y Taking the correct photographs needed to create a panorama. y Using photomerge to create a panorama. y Solutions
Adobe Photoshop CS4 INTRODUCTION WORKSHOPS WORKSHOP 3 - Creating a Panorama Outcomes: y Taking the correct photographs needed to create a panorama. y Using photomerge to create a panorama. y Solutions
APPENDIX E VISUAL SIMULATIONS
 APPENDIX E VISUAL SIMULATIONS VISUAL SIMULATIONS RAY MINE TAILINGS STORAGE FACILITY Prepared for: U.S. Army Corps of Engineers 3636 N Central Ave, Phoenix, Arizona 85012 Project Number: 203.51 Date: July
WORKFLOW GUIDE. Trimble TX8 3D Laser Scanner Camera and Nodal Ninja R1w/RD5 Bracket Kit
 WORKFLOW GUIDE Trimble TX8 3D Laser Scanner Camera and Nodal Ninja R1w/RD5 Bracket Kit Version 1.00 Revision A August 2014 1 Corporate Office Trimble Navigation Limited 935 Stewart Drive Sunnyvale, CA
303SPH SPHERICAL VR HEAD
 INSTRUCTIONS 303SPH SPHERICAL VR HEAD The spherical VR head is designed to allow virtual scenes to be created by Computer from a various panoramic sequences of digital or digitised photographs, taken at
How I did it by Chris Axe. Special thanks to Kim Walker
 How I did it by Chris Axe Special thanks to Kim Walker Story of this image This photo was taken in Garrapata State Park at the very first gate as you head south. It took about 15 minutes to figure out
Beacon Island Report / Notes
 Beacon Island Report / Notes Paul Bourke, ivec@uwa, 17 February 2014 During my 2013 and 2014 visits to Beacon Island four general digital asset categories were acquired, they were: high resolution panoramic
Panoramic Photo Stitching Tutorial
 Panoramic Photo Stitching Tutorial What is Photo Stitching? If you have ever shot photos on film, you might have already tried photostitching at one point or another. You would have taken 4 or 5 images
of a Panoramic Image Scene
 US 2005.0099.494A1 (19) United States (12) Patent Application Publication (10) Pub. No.: US 2005/0099494A1 Deng et al. (43) Pub. Date: May 12, 2005 (54) DIGITAL CAMERA WITH PANORAMIC (22) Filed: Nov. 10,
Which equipment is necessary? How is the panorama created?
 Congratulations! By purchasing your Panorama-VR-System you have acquired a tool, which enables you - together with a digital or analog camera, a tripod and a personal computer - to generate high quality
Film Cameras Digital SLR Cameras Point and Shoot Bridge Compact Mirror less
 Film Cameras Digital SLR Cameras Point and Shoot Bridge Compact Mirror less Portraits Landscapes Macro Sports Wildlife Architecture Fashion Live Music Travel Street Weddings Kids Food CAMERA SENSOR
North Central Camera Club Council N4C. Competition Rules and Information Summary
 North Central Camera Club Council N4C Competition Rules and Information Summary The Sioux City Camera Club (SCCC) is a member of the North Central Camera Club Council (N4C). As a large member our club
The upper rail is adjusted so that the gold ring is vertically in line with the axis of rotation as shown in the image below.
 Using PTGui with a Nikon 10.5mm Lens Preliminaries Before taking photographs, ensure that: The Nodal Ninja 3 MKII is fitted with the 45 n=8 detent ring. The lower rail is adjusted so that the centre of
PHIL MORGAN PHOTOGRAPHY
 Including: Creative shooting Manual mode Editing PHIL MORGAN PHOTOGRAPHY A free e-book to help you get the most from your camera. Many photographers begin with the naïve idea of instantly making money
Movie 7. Merge to HDR Pro
 Movie 7 Merge to HDR Pro 1 Merge to HDR Pro When shooting photographs with the intention of using Merge to HDR Pro to merge them I suggest you choose an easy subject to shoot first and follow the advice
Guide to Developing a Stream Photograph Documentation Program
 Guide to Developing a Stream Photograph Documentation Program William Robertson: MSUEWQ & BSWC Introduction Landscape photographs can offer a qualitative and, in some situations, quantitative evaluation
SPECIAL PUBLIC NOTICE
 SPECIAL PUBLIC NOTICE Draft Map and Drawing Standards for the South Pacific Division Regulatory Program March 5, 2012 Comment period: ends April 5, 2012 Corps contact: Thomas Cavanaugh (415) 503-6574 (Thomas.J.Cavanaugh@usace.army.mil)
Jeff Morgan Tel: Through My Lens. ~ Available as 1 hour, 2 hour or 3 hour talk/discussion ~
 Through My Lens ~ Available as 1 hour, 2 hour or 3 hour talk/discussion ~ In this presentation you will see a selection of the best digital images that I have captured in the last 10 years. I will discuss
RAF DRAFT. Viewpoint 11: Taken from a road within Burlescombe, looking oking south-west towards the site.
 St. Mary s Church (Grade I listed) Viewpoint 11: Taken from a road within Burlescombe, looking oking south-west towards the site. RAF Approximate location of the site obscured by existing conifers FT Viewpoint
Adding Depth. Introduction. PTViewer3D. Helmut Dersch. May 20, 2016
 Adding Depth Helmut Dersch May 20, 2016 Introduction It has long been one of my goals to add some kind of 3d-capability to panorama viewers. The conventional technology displays a stereoscopic view based
Photoshop Cs5 Hdr Manually Set Ev
 Photoshop Cs5 Hdr Manually Set Ev And while HDR techniques can accommodate a wide range of brightnesses, the end shows nine images made with the Canon 5D set on MANUAL exposure. Then it's time to let Photoshop
Camera Modes Worksheet
 Tools and Program Needed: Digital C. Computer USB Drive Bridge PhotoShop Camera Modes Worksheet Targets 1. Students will create images demonstrating an understanding of Auto Scene Modes and Creative Zone
Appendix A ACE exam objectives map
 A 1 Appendix A ACE exam objectives map This appendix covers these additional topics: A ACE exam objectives for Photoshop CS6, with references to corresponding coverage in ILT Series courseware. A 2 Photoshop
PART XIII: HYDRAULIC/ HYDROLOGY SURVEYS
 PART XIII: HYDRAULIC/ HYDROLOGY SURVEYS 13.1 Purpose and Scope Hydraulic surveys are required for flow analysis to determine bridge and culvert design characteristics. A hydraulic survey is usually but
Panoramic Photography
 Panoramic Photography By: W. Patrick Day Patrick@PatrickDayPhotography.com Panoramic Photography What is Panoramic photography? a technique, using specialized equipment or software, that captures images
Stitching Panoramas using the GIMP
 Stitching Panoramas using the GIMP Reference: http://mailman.linuxchix.org/pipermail/courses/2005-april/001854.html Put your camera in scene mode and place it on a tripod. Shoot a series of photographs,
APPENDIX E - VISUAL SIMULATIONS
 APPENDIX E - VISUAL SIMULATIONS VISUAL SIMULATIONS RAY MINE TAILINS STORAE FACILITY Prepared for: U.S. Army Corps of Engineers Prepared by: 4001 E. Paradise Falls Drive Tucson, Arizona 85712 On behalf
SpheroCam HDR. Image based lighting with. Capture light perfectly SPHERON VR. 0s 20s 40s 60s 80s 100s 120s. Spheron VR AG
 Image based lighting with SpheroCam HDR Capture light perfectly 0 60 120 180 240 300 360 0s 20s 40s 60s 80s 100s 120s SPHERON VR high dynamic range imaging Spheron VR AG u phone u internet Hauptstraße
Essential Post Processing
 Essential Post Processing By Ian Cran Preamble Getting to grips with Photoshop and Lightroom could be described in three stages. One is always learning and going through stages but there are three main
Method 1, Photoshop Image Image Size. Sizing Digital Images by Pixel Dimensions For Digital Competitions
 Sizing Digital Images by Pixel Dimensions For Digital Competitions There are several methods of correctly sizing a digital image to meet specific pixel dimensions, i.e. 1920 wide by 1080 high is the maximum
Adobe Imaging Products
 Adobe Imaging Products A Presentation to the Cary Photographic Artists Organization by Thomas Zuber February 2008 The Digital Darkroom Making a fine print digitally requires every bit of the skill and
This talk is oriented toward artists.
 Hello, My name is Sébastien Lagarde, I am a graphics programmer at Unity and with my two artist co-workers Sébastien Lachambre and Cyril Jover, we have tried to setup an easy method to capture accurate
The key to a fisheye is the relationship between latitude ø of the 3D vector and radius on the 2D fisheye image, namely a linear one where
 Fisheye mathematics Fisheye image y 3D world y 1 r P θ θ -1 1 x ø x (x,y,z) -1 z Any point P in a linear (mathematical) fisheye defines an angle of longitude and latitude and therefore a 3D vector into
Creating Stitched Panoramas
 Creating Stitched Panoramas Here are the topics that we ll cover 1. What is a stitched panorama? 2. What equipment will I need? 3. What settings & techniques do I use? 4. How do I stitch my images together
One Week to Better Photography
 One Week to Better Photography Glossary Adobe Bridge Useful application packaged with Adobe Photoshop that previews, organizes and renames digital image files and creates digital contact sheets Adobe Photoshop
8 th REDLANDS DISTRICT SCHOOLS & YOUTH EXHIBITION OF PHOTOGRAPHY 2016
 8 th REDLANDS DISTRICT SCHOOLS & YOUTH EXHIBITION OF PHOTOGRAPHY 2016 Conducted by the Redlands Uniting Churches Camera Club. Entries are invited from students resident in the Redlands, and/or Youth members
Photographing the Night Sky
 JANUARY 20, 2018 ADVANCED Photographing the Night Sky Featuring STEVE HEINER, DIANA ROBINSON, PETE SALOUTOS & DEBORAH SANDIDGE Deborah Sandidge Nikon D3, 16mm lens, 30 sec., f/2.8. Image is one of a series
Editing your digital images:
 Editing your digital images: 1 By Garry Sankowsky zodpub@rainforestmagic.com.au All images taken with a digital camera need to be edited. You will usually get software with your camera that can do at least
A short introduction to panoramic images
 A short introduction to panoramic images By Richard Novossiltzeff Bridgwater Photographic Society March 25, 2014 1 What is a panorama Some will say that the word Panorama is over-used; the better word
State Library of Queensland Digitisation Toolkit: Scanning and capture guide for image-based material
 State Library of Queensland Digitisation Toolkit: Scanning and capture guide for image-based material Introduction While the term digitisation can encompass a broad range, for the purposes of this guide,
CHAPTER 7 - HISTOGRAMS
 CHAPTER 7 - HISTOGRAMS In the field, the histogram is the single most important tool you use to evaluate image exposure. With the histogram, you can be certain that your image has no important areas that
Dynamic Range. H. David Stein
 Dynamic Range H. David Stein Dynamic Range What is dynamic range? What is low or limited dynamic range (LDR)? What is high dynamic range (HDR)? What s the difference? Since we normally work in LDR Why
Histograms and Tone Curves
 Histograms and Tone Curves We present an overview to explain Digital photography essentials behind Histograms, Tone Curves, and a powerful new slider feature called the TAT tool (Targeted Assessment Tool)
Prof. Kelly Carr Photography 1: Digital Summer (202) art department office Office Hours By Appointment
 art department office Office Hours By Appointment") Prof. Kelly Carr Photography 1: Digital Summer 2019 e-mail: kc47@georgetown.edu ARTS 130.20 MTWR 1:00 PM 3:00 PM (202) 687-7010 art department office Office Hours By Appointment Course Objective: This
Prof. Kelly Carr Photography 1: Digital Summer 2019 e-mail: kc47@georgetown.edu ARTS 130.20 MTWR 1:00 PM 3:00 PM (202) 687-7010 art department office Office Hours By Appointment Course Objective: This
How to Take RBV Site Photographs
 How to Take RBV Site Photographs CTDEEP RBV Program www.ct.gov/deep/rbv Last revised 08/16/2016 Connecticut Department of Energy and Environmental Protection How to Take RBV Site Photographs Directions:
Dusk to Dawn: Adam Woodworth Takes the Nikon D5 into Darkness
 MAY 10, 2018 ADVANCED Dusk to Dawn: Adam Woodworth Takes the Nikon D5 into Darkness Featuring ADAM WOODWORTH Sometimes it s more about the journey than the photo, theorizes landscape astrophotographer
Focus Shift, the Basics: Stacking Focus
 JANUARY 31, 2019 ADVANCED Focus Shift, the Basics: Stacking Focus Focus Shift: what it does and how to use it The D850 s handy focus shift feature is used chiefly to create the images for focus stacking,
Photography for Model Railroaders
 Photography for Model Railroaders Ted Culotta Prototype Rails August 10-12, 2019 This file will be posted to prototopics.blogspot.com What equipment to use? What do I use? The best camera is the one in
VISUALISATION STANDARDS
 VISUALISATION STANDARDS INTRODUCTION These standards have been produced to enable the Council to verify that photomontages submitted in support of planning applications and contained with Environmental
The Basic SLR
 The Basic SLR ISO Aperture Shutter Speed Aperture The lens lets in light. The aperture is located in the lens and is a set of leaf like piece of metal that can change the size of the hole that lets in
Selective Color. 112 Photographer s Guide to the Nikon Coolpix P600. Figure Selective Color Setting - Screen to Select Color
 112 Photographer s Guide to the Nikon Coolpix P600 Selective Color This setting, unlike other Special Effects options, gives you the ability to control its operation. When you first choose this option
Quad Cities Photography Club
 Quad Cities Photography Club Competition Rules Revision date: 9/6/17 Purpose: QCPC host photographic competition within its membership. The goal of the competition is to develop and improve personal photographic
DIGITAL IMAGING. 10 weeks
 DIGITAL IMAGING Overview - Digital Imaging is an advanced visual arts class to helps students effectively use a digital camera as a source for images that can be effectively represented, enhanced, corrected,
GETTING STARTED IN ASTROPHOTOGRAPHY BY JACK EYLER
 GETTING STARTED IN ASTROPHOTOGRAPHY BY JACK EYLER EQUIPMENT Digital Camera Fast Wide Angle Lens Tripod Flashlight or headlamp Cable release or use self timer Lenses Full Frame Sensor Rokinon 14mm f/2.8
Macro and Close-up Lenses
 58 Macro and Close-up Lenses y its very nature, macro photography B(and to a lesser degree close-up photography) has always caused challenges for lens manufacturers, and this is no different for digital
Concealed Wetlands: Rendering the Invisible Pierce Cedar Creek Institute Final Report
 Concealed Wetlands: Rendering the Invisible Pierce Cedar Creek Institute Final Report Taylor Bishop (BFA Candidate)- Gordon Art Fellow Professor Bill Davis - Mentor Western Michigan University October
END OF YEAR COMPETITION RULES PRINT AND DIGITAL PROJECTED IMAGES
 END OF YEAR COMPETITION RULES PRINT AND DIGITAL PROJECTED IMAGES INTRODUCTION All financial and Life Members are eligible to compete while Associate and Honorary Members may not. All images entered are
Presented by Craig Stocks Arts by Craig Stocks Arts
 Presented by Craig Stocks Arts www.craigstocksarts.com 2010 by Craig Stocks Arts Basic camera settings for point and shoot cameras (resolution, quality) Resolution - how much can you enlarge a picture?
Sincerely, Blake Rudis
 1 Thanks a lot for your purchase! If you are reading this it shows that you truly care about your photos and are ready to take them to levels you could only dream of! I have been doing HDR for 5 years.
Nodal Ninja SPH-2 User Manual. Nodal Ninja A Panoramic Tripod Head what s in your bag?
 Nodal Ninja SPH-2 User Manual Nodal Ninja A Panoramic Tripod Head what s in your bag? Table of Contents Introduction About Parallax Parallax defined Parallax Demonstrated Features Parts & Specifications
Course Outline. COURSE: DM 74 DIVISION: 50 ALSO LISTED AS: CSIS 74 TERM EFFECTIVE: Spring 2018 CURRICULUM APPROVAL DATE: 10/23/2017
 5055 Santa Teresa Blvd Gilroy, CA 95023 Course Outline COURSE: DM 74 DIVISION: 50 ALSO LISTED AS: CSIS 74 TERM EFFECTIVE: Spring 2018 CURRICULUM APPROVAL DATE: 10/23/2017 SHORT TITLE: ADVANCED PHOTOSHOP
Digital Projection Entry Instructions
 The image must be a jpg file. Raw, Photoshop PSD, Tiff, bmp and all other file types cannot be used. There are file size limitations for competition. 1) The Height dimension can be no more than 1080 pixels.
Produce stunning. Pro photographer Chris Humphreys guides you through HDR and how to create captivating natural-looking images
 Masterclass: In association with Produce stunning HDR images Pro photographer Chris Humphreys guides you through HDR and how to create captivating natural-looking images 8 digital photographer 45 masterclass4produce
Champaign County Camera Club. Competition Guidelines
 Champaign County Camera Club Competition Guidelines TABLE OF CONTENTS Section 1 Competition Divisions and Categories...1 Section 2 Selection of Images for External Competitions...2 Section 3 Projected
IMAGE ACQUISITION GUIDELINES FOR SFM
 IMAGE ACQUISITION GUIDELINES FOR SFM a.k.a. Close-range photogrammetry (as opposed to aerial/satellite photogrammetry) Basic SfM requirements (The Golden Rule): minimum of 60% overlap between the adjacent
Pacific New Media David Ulrich
 Pacific New Media David Ulrich pacimage@maui.net www.creativeguide.com 808.721.2862 Sharpening and Noise Reduction in Adobe Photoshop One of the limitations of digital capture devices and digital chips
Stitching panorama photographs with Hugin software Dirk Pons, New Zealand
 Stitching panorama photographs with Hugin software Dirk Pons, New Zealand March 2018. This work is made available under the Creative Commons license Attribution-NonCommercial 4.0 International (CC BY-NC
LEARN FROM THE EXPERTS
 The Amateur Photographer Masterclass with Tom Mackie Panoramas Tom Mackie shows three readers how to shoot and stitch fantastic panoramic images in the Yorkshire Dales. Gemma Padley joined them When photographing
Presenting... PhotoShop Elements 7 (PSE7) Photoshop LightRoom 2.3 (LR2) and High Dynamic Range Photography
 Photoshop LightRoom 2.3 (LR2) and High Dynamic Range Photography") Presenting... PhotoShop Elements 7 (PSE7) Photoshop LightRoom 2.3 (LR2) and High Dynamic Range Photography 1 Before getting into Photoshop products, I need to be sure you can process the information I
Presenting... PhotoShop Elements 7 (PSE7) Photoshop LightRoom 2.3 (LR2) and High Dynamic Range Photography 1 Before getting into Photoshop products, I need to be sure you can process the information I
1. Any wide view of a physical space. a. Panorama c. Landscape e. Panning b. Grayscale d. Aperture
 Match the words below with the correct definition. 1. Any wide view of a physical space. a. Panorama c. Landscape e. Panning b. Grayscale d. Aperture 2. Light sensitivity of your camera s sensor. a. Flash
A Guide to Image Management in Art Centres. Contact For further information about this guide, please contact
 A Guide to Image Management in Art Centres Contact For further information about this guide, please contact sam@desart.com.au. VERSION: 20 th June 2017 Contents Overview... 2 Setting the scene... 2 Digital
PHOTOGRAPHY CAMERA SETUP PAGE 1 CAMERA SETUP MODE
 PAGE 1 MODE I would like you to set the mode to Program Mode for taking photos for my assignments. The Program Mode lets us choose specific setups for your camera (explained below), and I would like you
Monday (Week 3) AM PM Introduction to Management Software and RAW processing
 AM PM Introduction to Management Software and RAW processing") (Week 3) AM 9.00-12.30 PM 1.00-5.00 Welcome and personal introductions Course objectives Recongnize the use of pixel-based image software Understanding different file formats Professional file management
(Week 3) AM 9.00-12.30 PM 1.00-5.00 Welcome and personal introductions Course objectives Recongnize the use of pixel-based image software Understanding different file formats Professional file management
Advanced Photography. Topic 3 - Exposure: Flash Photography Tricks
 Topic 3 - Exposure: Flash Photography Tricks Learning Outcomes In this lesson, we will learn about a number of ways (e.g. bouncing the light, the TTL mode, high-speed sync, using gels) in which we can
loss of detail in highlights and shadows (noise reduction)
") Introduction Have you printed your images and felt they lacked a little extra punch? Have you worked on your images only to find that you have created strange little halos and lines, but you re not sure
Introduction Have you printed your images and felt they lacked a little extra punch? Have you worked on your images only to find that you have created strange little halos and lines, but you re not sure
Photography 11 - *Approved BAA Course
 Photography 11 - *Approved BAA Course *More admin detail on BAA requirements at end of this document Course Synopsis: This course has been developed to introduce students to digital photography. Students
CHAPTER 12 - HIGH DYNAMIC RANGE IMAGES
 CHAPTER 12 - HIGH DYNAMIC RANGE IMAGES The most common exposure problem a nature photographer faces is a scene dynamic range that exceeds the capability of the sensor. We will see this in the histogram
Northern Pass. Transmission Project: Visual Simulations. The THE NORTHERN PASS SM. MAY 2011_v2
 The Northern Pass Transmission Project: Visual Simulations THE NORTHERN PASS SM Northern Pass PO Box 330 780 North Commercial Street Manchester, NH 03105-0330 800-286-7305 www.northernpass.us MAY 2011_v2
Hi there. Welcome. This PDF was designed to help you prepare some examples of your work as part of your application for entry to the Diploma course.
 Hi there. Welcome. This PDF was designed to help you prepare some examples of your work as part of your application for entry to the Diploma course. When making your application you will need to submit
# Insite RE Inc./ Verizon Wireless Special Use Permit Project Review for Planning and Zoning Commission
 #2015-52 Insite RE Inc./ Verizon Wireless Special Use Permit Project Review for Planning and Zoning Commission Meeting Date: October 21, 2015 Request: Location: A Special Use Permit for a wireless communication
KNOW YOUR CAMERA LEARNING ACTIVITY - WEEK 9
 LEARNING ACTIVITY - WEEK 9 KNOW YOUR CAMERA Tina Konradsen GRA1 QUESTION 1 After reading the appropriate section in your prescribed textbook From Snapshots to Great Shots, please answer the following questions:
SUPERFAST PORTRAIT RETOUCH SPEND LESS TIME MAKING YOUR CLIENTS LOOK AWESOME UNDER THE LOUPE DESIGN MAKEOVER
 THE ADOBE PHOTOSHOP HOW-T0 MAGAZINE MARCH 2014 Create wedding photo albums using templates or from scratch DESIGN MAKEOVER Improving Lightroom efficiency for your photographic workflow UNDER THE LOUPE
Capturing Realistic HDR Images. Dave Curtin Nassau County Camera Club February 24 th, 2016
 Capturing Realistic HDR Images Dave Curtin Nassau County Camera Club February 24 th, 2016 Capturing Realistic HDR Images Topics: What is HDR? In Camera. Post-Processing. Sample Workflow. Q & A. Capturing
Chicago Photography. One-year Certificate Program. Classes:
 Chicago Photography Academy One-year Certificate Program Classes: Digital 101 (four weeks) Intermediate Digital (four weeks) Portrait 101 (four weeks) Adobe Lightroom 101 (one day weekend) Adobe Lightroom
Here are some things to consider to achieve good quality photographic documentation for engineering reports.
 Photography for Engineering Documentation Introduction Photographs are a very important engineering tool commonly used to document explorations, observations, laboratory and field test results and as-built
PHOTOTUTOR.com.au Share the Knowledge
 THE DIGITAL WORKFLOW BY MICHAEL SMYTH This tutorial is designed to outline the necessary steps from digital capture, image editing and creating a final print. FIRSTLY, BE AWARE OF WHAT CAN AND CAN T BE
Capturing God s Creation Through The Lens. Session 3 From Snap Shots to Great Shots January 20, 2013 Donald Jin
 Capturing God s Creation Through The Lens Session 3 From Snap Shots to Great Shots January 20, 2013 Donald Jin donjin@comcast.net Course Overview Jan 6 Setting The Foundation Jan 13 Building Your Craft
1.1. Investigate the capabilities and limitations of different types of digital camera
 Unit Title: Digital photography Level: 2 OCR unit number: 217 Credit value: 5 Guided learning hours: 40 Unit reference number: D/600/9303 Unit purpose and aim This unit helps learners to understand the
CREATING YOUR PHOTOGRAPHIC WORKFLOW
 CREATING YOUR PHOTOGRAPHIC WORKFLOW Rob DeRobertis Jan. 21, 2016 (www.robde.com) Apologies I make photos with a Canon 5D Mark 3 and Canon 7D Mark 2 I sometimes use an Olympus OM-D E-M1 I process images