Congratulations! * A Trademark of THE SINGER COMPANY Copyright 1987 SINGER SEWING MACHINE COMPANY All Rights Reserved Throughout The World
|
|
|
- Magdalen Cook
- 5 years ago
- Views:
Transcription
1 \
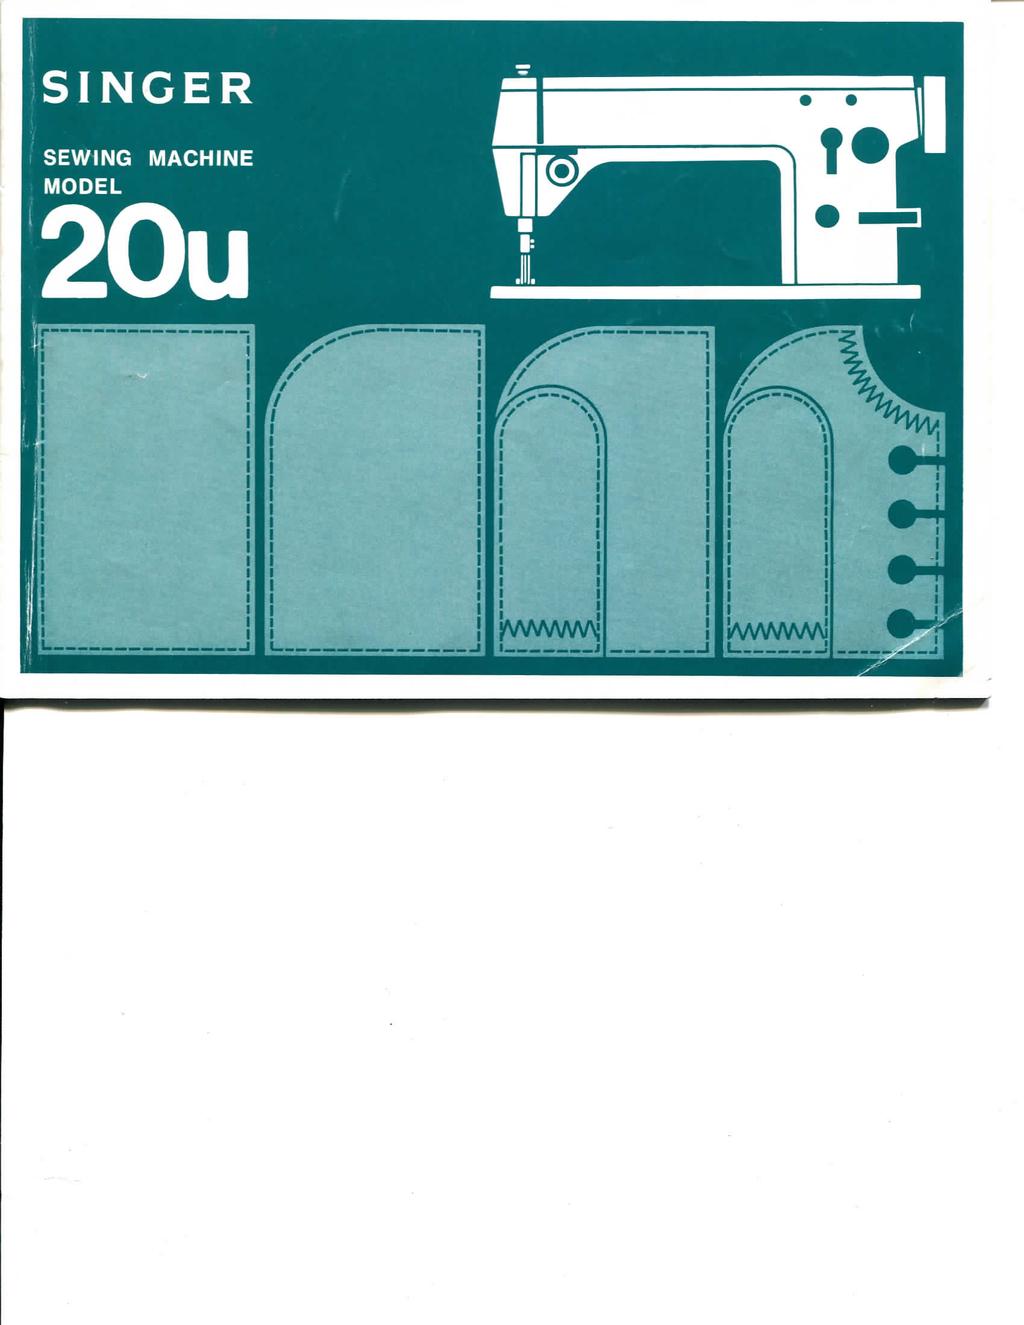
2 Congratulations! As the owner of a SINGER* artisan zigzag sewing machine Model 20U, you are about to enter a wonderful new world of sewing! From the moment you begin to sew at your Model 20U, you will be delighted with its easy dependable operation. Perfect straight stitching. Zigzag and ornamental stitching in a variety of width and stitch lengths. Superfine control of stitch length insures perfect satin stitching. Speeds up to 2,000 stitches per minute at maximum zigzag stitch width (9mm) and 2,500 stitches per minute at zigzag stitch width of 5mm or less depending on material being sewn and type of work being done. May we recommend that, before you begin to sew, you discover all the many advantages of your Model 20U by going through this instruction book step by step while seated at your machine. SINGER* Service is always close at hand. If your sewing machine should need servicing, call your local SINGER CENTER to be sure of warranted SINGER* Parts and SINGER Service. You will find the address under SINGER COMPANY in the classified telephone directory. * A Trademark of THE SINGER COMPANY Copyright 1987 SINGER SEWING MACHINE COMPANY All Rights Reserved Throughout The World
3 CONTENTS Page Principal Parts of Model 20U Machine 2 Fabric, Thread, Needle and Stitch Length Table 3 Needles and Thread 4 To Set the Needle 4 Threading the Needle 5 To Remove the Bobbin 5 To Wind the Bobbin 6 Threading the Bobbin Case 8 To Replace the Bobbin Case 9 Raising the Bobbin Thread 9 To Adjust Stitch Length 10 To Adjust Pressure 10 To Adjust Thread Tensions 11 Needle Position Selector 12 Stitch Width Regulator 12 How to Control the Width of Zigzag Stitch 13 Needle Bar Frame Clamping Device 15 Straight Stitching 15 Changing the Throat Plate and Feed Dog 16 Lever Positions for Straight Stitching 16 How to Sew a Seam 17 Page Satin Stitching 18 Zigzag Stitching 19 Lingerie Seams 19 Seams in Knit Fabrics 19 Decorative Stitches 19 Buttonholes 20 Monograms and Motifs 22 Script Lettering 22 Applique 24 Hemmer Foot 25 Plain Narrow Hems 25 Zipper Foot 26 Zipper Insertion 26 Corded Seams 27 Other Practical Applications 28 Caring for Your Machine 30 Assembling the Thread Unwinder 32 To Use the Spool Cap 33 To Use the Anti-Spill Sleeve 34 Knee Operating Stitch Width Control 35
4 PRINCIPAL PARTS OF MODEL 20U MACHINE Take-up Lever Guard Take-up Lever Pressure Regulating Thumb Screw Arm Top Cover Face Plate Thread Guard (upper) Slack Thread Regulator Needle Bar Frame Clamping Thumb Screw Thread Guard (lower) - Needle Bar Presser Foot Screw Presser Foot Bed Slide Throat Plate Thread Guide Thread Guide Holder Spool Pin Tension (complete) Needle Clamp Thumb Screw Bobbin Winder Stitch Width Regulating Plate Thumb Screw Hand Wheel Feed Regulating Dial Stitch Width Regulator Feed Reverse Lever Needle Position Selector -2-
5 FABRIC, THREAD, NEEDLE AND STITCH LENGTH TABLE Fabrics Thread sizes Needle sizes Stitches per inch Stitch length setting DELICATE tulle, chiffon, fine lace, silk, organdy, fine tricot Fine Mercerized 80 to 120 Cotton Synthetic Thread 15 to /2-1-1/4 LIGHTWEIGHT batiste, organdy, jersey, voile, taffeta, silk, crepe,, plastic film 50 Mercerized 60 to 80 Cotton A Silk Synthetic Thread 9 or to /4-1-1/2 (8 to 10 for plastic) (3-1/4 ~ 1-1/21 MEDIUM WEIGHT gingham, percale, pique, linen, chintz, faille, satin, fine corduroy, suitings 50 Mercerized 50 to 60 Cotton A Silk Synthetic Thread 11 or to /4-1-1/2 MEDIUM HEAVY gabardine, tweed, sailcloth, denim, coatings, drapery fabrics Heavy Duty Mercerized 40 to 50 Cotton Heavy Duty Mercerized 30 to 40 Cotton to /2-1-3/ to /2-2-1/2 HEAVY overcoatings, dungaree, upholstery fabrics, canvas -3-
6 NEEDLES AND THREAD This machine uses needle Catalog , available in sizes 9, 11, 14, 16 and 18. The needle you use should be straight, with a sharp point, to ensure perfect stitch formation and needle penetration through the fabric. The needle should also be fine enough to prevent the fabric from being marred with large punctures, yet heavy enough to pierce the fabric without being bent or deflected. Remember, too, that the eye of the needle must be large enough for the thread to pass through it freely; too fine a needle will cause the thread to fray. Be sure to use like threads for both needle and bobbin. TO SET THE NEEDLE 1. Raise needle bar to its highest position by turning hand wheel toward you. 2. Loosen the needle clamp screw and insert needle into clamp as far as it will go, with the long groove toward you. Then tighten the needle clamp screw. LONG GROOVE TOWARD YOU -4 -

7 THREADING THE NEEDLE 1. Turn hand wheel toward you to raise take-up lever to its highest position. 2. Raise the presser foot. 3- Lead thread from the thread unwinder through all the threading points shown. Thread the needle from front to back. 4. Draw about 3 inches of thread through eye of needle. TO REMOVE THE BOBBIN 1. Turn hand wheel toward you until needle is at its highest position. 2. Open bed slide. 3. Reach up from under the table with left hand, open bobbin case latch A, and lift out bobbin case B. 4. Release latch and remove bobbin from bobbin case. B \ 5 -
8 TO WIND THE BOBBIN 1. Stop motion of needle by loosening stop-motion screw A. Hold hand wheel with left hand and turn stop-motion screw toward you with right hand. 2. Place bobbin on bobbin winder spindle B, pushing it on as far as it will go. 3. Place thread spool on spool pin and pass the thread through thread guide G!, between tension discs D and through thread guide C2 and to the bobbin. Wind end of thread around the bobbin a few times and press latch E against bobbin, then start the machine. 4. Allow the tension discs to control flow of thread. Do not guide or hold thread when winding the bobbin. 5. Winding will stop automatically when bobbin is fully wound. 6. Remove bobbin from spindle and tighten stop-motion screw A by turning it away from you with right hand while holding the hand wheel with your left hand. -6-
9 TO WIND THE BOBBIN (cont'd) Bobbins can be wound while the machine is stiching. To wind bobbins while the machine is stiching, follow the preceding instructions only do not loosen the stop-motion screw. G F To adjust the amount of thread on the bobbin, loosen screw F on latch E and while holding stud G with a screwdriver, swing latch E away from you or toward you, as required. For more thread on bobbin, swing latch E away from you. For less thread on bobbin, swing latch E toward you. Tighten screw F if thread winds unevenly on bobbin, loosen screw H and move tension bracket I up or down, as required, then tighten screw H.
10 THREADING THE BOBBIN CASE 1. Hold bobbin so that thread unwinds in the direction shown, and put bobbin in bobbin case. 2. Pull thread into notch A and draw it under tension spring B. 3. Draw thread out from slot on end of spring and pass it through bobbin case thread guard C. Allow about 4 inches of thread to hang freely bobbin. from NOTE: When straight stitching, a better result can be obtained if bobbin-thread is not threaded through bobbin case thread guard C.
11 TO REPLACE THE BOBBIN CASE Hold bobbin case by latch A and place it on spindle of bobbin case holder B so that position finger C enters notch D at right of bobbin case holder. Release latch and press bobbin case firmly in place to assure proper position. Close bed cover. RAISING THE BOBBIN THREAD Hold needle thread lightly with left hand. Turn hand wheel so that needle enters throat plate and brings up bobbin thread. Pull end of bobbin thread up through throat plate and place both needle and bobbin threads diagonally under the presser foot. -9

12
13

14 NEEDLE POSITION SELECTOR Left, Center and Right needle position settings are available for placement of both straight and zigzag stitching. To position, push lever in and move to the desired setting. Center setting is preferred for normal sewing. Settings left and right are only used when special placement of stitching is desired. For example: buttonholes, button sewing. Do not make any needle position adjustment while the needle is in the fabric. Left Center Right L ± JILL Needle Position Selector STITCH WIDTH REGULATOR The width of zigzag stitch is controlled with the spring biased stitch width regulating lever A. This lever regulates swing of needle from its straight stitching position to maximum zigzag width of 9mm. Do not make any stitch width adjustment while the needle is in the fabric. NOTE: The stitch width regulating lever A may be turned upward, if desired, simply by loosening screw B and turning lever A upward. -12-
15 HOW TO CONTROL THE WIDTH OF ZIGZAG STITCH The two thumb screws A and B provided on front of arm allow you to control the width of zigzag stitches. Thumb screw A is used to control the width of the wider zigzag stitch and thumb screw B to control the narrower zigzag stitch. 1. To obtain minimum to maximum width (9mm) zigzag stitches, first loosen thumb screw B to permit the stitch width regulator C to return to its zero position and retighten thumb screw B. Then loosen thumb screw A, turn stitch width regulator C clockwise as far as it will go and while holding the regulator C in this position, retighten thumb screw A. You can now regulate the stitch width regulator within the range of zero to 9mm. 2. To make narrower zigzag stitches, for example, a zero to 5mm wide zigzag stitches, loosen thumb screws A and B and retighten thumb screw B as explained above. Then turn stitch width regulator C to 5mm setting and while holding regulator C, retighten thumb screw A. Setting For Zero To 9mm Wide Zigzag Stitch - 13

16 3. To sew zigzag stitches in fixed width, loosen thumb screws A and B, turn stitch width regulator C to desired stitch width and while holding regulator C in this position, tighten thumb screw B. Then tighten thumb screw A. This will lock the stitch width regulator in desired position and leave both hands free to handle the fabric. 4. For sewing two different width ornamental zigzag stitches, set the machine as instructed below. o Setting For Zero To 5mm Wide Zigzag Stitch First, loosen thumb screws A and B. Turn stitch width regulator C to desired width for the narrow zigzag stitch and while holding the regulator C, tighten thumb screw B. Then turn stitch width regulator C to desired width for the wider zigzag stitch and tighten thumb screw A. Having set the machine as instructed above, the narrow width zigzag can now be sewn without regulating the stitch width regulator C. To sew the wider zigzag, the stitch width regulator must be turned as far it will go and held in this position until the wider zigzag stitching is completed. Setting For Desired Fixed Width Zigzag Stitch This method of setting the stitch width is very convenient when sewing the side stitches and bar tacks of a buttonhole. Setting For Dual Width Ornamental Zigzag Stitch
. When zigzag stitching, be sure the clamp is released.")
17 NEEDLE BAR FRAME CLAMPING DEVICE When straight stitching, a better sewing result can be obtained by locking the needle bar frame immovable with the clamping device. To clamp the needle bar frame, turn knob clockwise as far as it will go (about 1/4 turn). When zigzag stitching, be sure the clamp is released. To release the clamp, turn knob counterclockwise as far as it will go until the white mark on the knob is located at the top. STRAIGHT STITCHING General Purpose Presser Foot, Throat Plate and Feed Dog are used for all utility sewing and where there is occasion to alternate between straight and zigzag stitching in the sewing procedure. Straight Stitch Presser Foot, Throat Plate and Feed Dog are used for straight stitching only. These Fittings are suited especially for stitching delicate or spongy fabrics, synthetics, knits and tricot. Additional maneuverability is also obtained when sewing curved and shaped seams, precision edging and hard-to-reach areas

18 CHANGING THE THROAT PLATE AND FEED DOG 1. Open bed slide; then remove throat plate. (Use screwdriver A furnished with machine for removal and replacement of throat plate and feed dog.) 2. Using a screwdriver, remove bed plate B as shown in sketch at right and remove feed dog C. 3. To replace general purpose or straight stitch feed dog, fasten feed dog to machine temporarily and replace general purpose or straight stitch throat plate. Set feed dog correctly in position so that it will not hit the edges of the feed dog slots in the throat plate. 4. Replace bed plate and press it firmly in place. LEVER POSITIONS FOR STRAIGHT STITCHING Before you begin to straight-stitch, be sure the stitch width regulator is set in position as shown in sketch. For ordinary stitching, center needle position is preferred, but a line of stitching may be placed to left or right of center when special placement of stitching is desired. The general purpose fittings must be used when placing a line of stitching to left or right of center. UJ I I I

19 r HOW TO SEW A SEAM 1. Set feed regulating dial for desired stitch length. 2. Raise take-up lever to its highest point and place fabric under presser foot. 3. Position needle in fabric, lower presser foot and stitch to end of seam. 4. To reinforce seam ends, press stitch reverse lever down to its lowest position and backstitch. 5. With take-up lever at its highest point, raise presser foot and remove fabric. 6. Cut threads on thread cutter at rear of presser bar. Most fabrics need to be guided in front of the presser foot only. Some fabrics, however, require support while being stitched. - For filmy sheers, knits, tricots, etc., apply gentle tension by holding seam in front and back of presser foot. 17 -

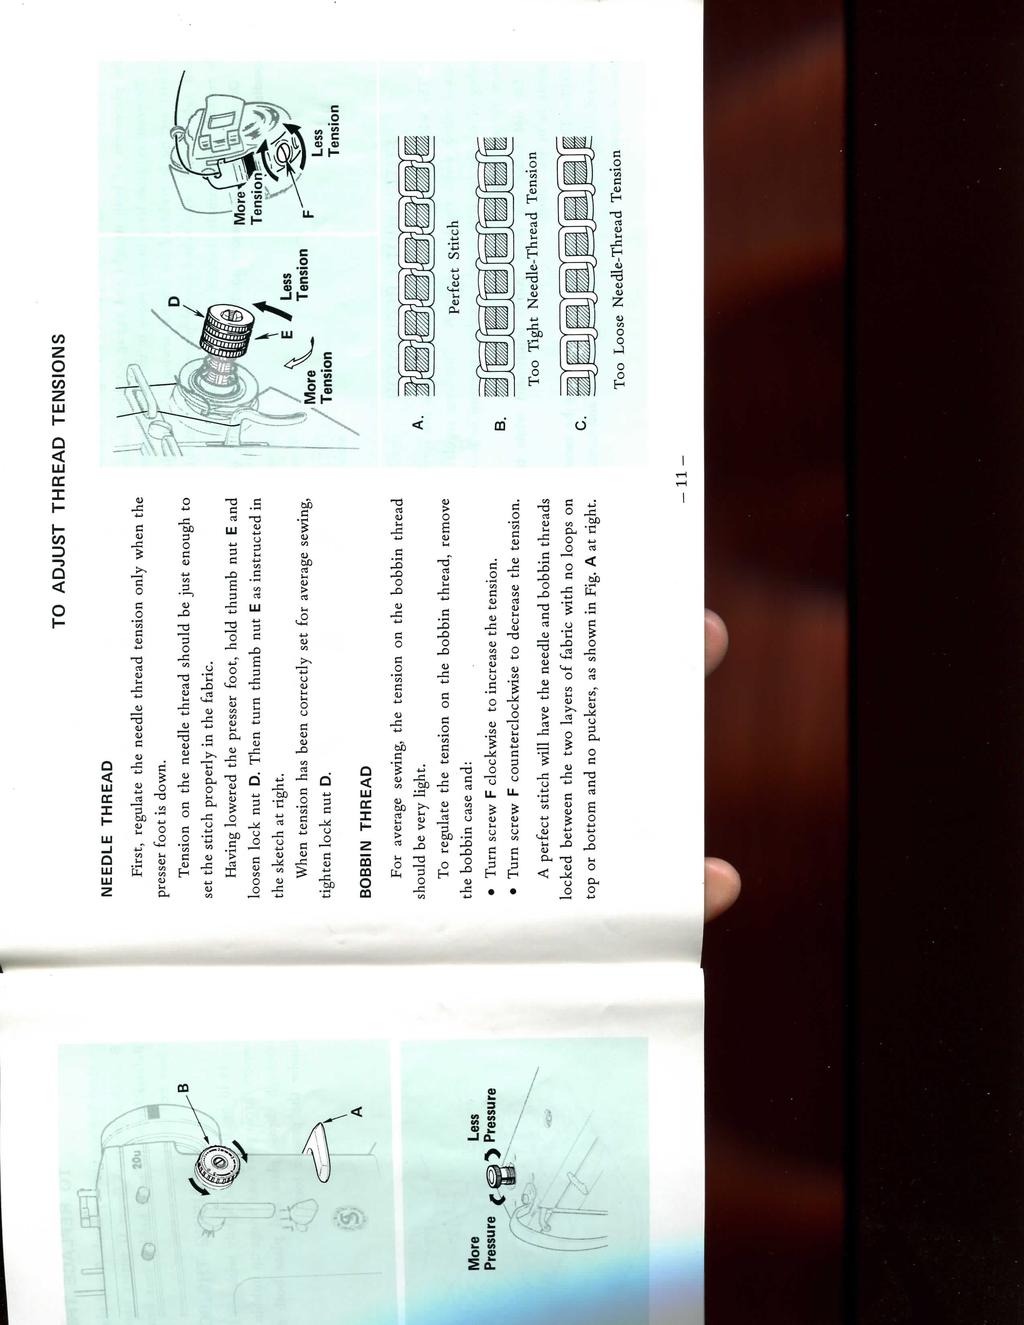
20 SATIN STITCHING Satin stitching, a series of closely spaced zigzag stitches that form a smooth, satin-like surface, is useful for both utility and decorative work. When you wish to produce a satin stitch, make a test sample first so that you can adjust the stitch length and thread tension properly. Soft fabric may require a backing to ensure firm satin stitching. Crisp organdy or lawn is suitable for this purpose. Adjusting Stitch Length for Satin Stitching If you wish a closely packed satin stitch, turn feed regulating dial clockwise until stitches are closely spaced and form a smooth surface. Adjusting Tension for Satin Stitching All zigzag stitching requires less tension than straight stitching; and satin stitching requires even less than open zigzag stitching. Furthermore, the wider the satin stitch, the lighter the tension on the thread must be. Notice the stitching on your sample. If the stitching looks too taut, or if the fabric is puckering, lower the needle-thread tension by turning the tension dial counterclockwise. A properly balanced satin stitch should lie flat across the material.

21 r ZIGZAG STITCHING LINGERIE SEAMS Dainty lingerie seams can be made durable with plain zigzag stitching. 1, After straight-stitching seam on the wrong side, press both seam allowances in the same direction. 2. From the right side, top-stitch with a fine zigzag letting the needle alternately enter the seam line and the seam thickness. SEAMS IN KNIT FABRICS A narrow, closely spaced, zigzag stitch is ideal for seaming knit fabrics. It is particularly desirable for underarm seams where elasticity and give are needed. For neckline and waistline seams, where a stay is needed to prevent undue stretching, this same stitch can be used to apply seam tape. To insure a flat, smooth stayed finish, position tape with edge exactly on seam line. If seam is curved, pre-shape tape to fit by steam pressing, and baste in place. Stitch, allowing the needle to enter seam tape and seam allowance alternately. DECORATIVE STITCHES Various decorative stitches, as shown at right, can be made by using LEFT, CENTER and RIGHT needle positions, and also by regulating the stitch width regulator

22 Needle Position Selector: Left Stitch Width Regualtor: 2mm and 4mm or 21/ mm and 5mm Stitch Length: Satin Stitch Throat Plate: General Purpose Presser Foot: Buttonhole Foot For buttonholes, use a satin stitch as BUTTONHOLES Buttonhole Foot described on page 18. You will need two stitch width settings, one for side stitching and one for the bar tacks. Two practical combinations are shown in sketch at right. Always make a test buttonhole on a sample of your fabric. Be sure' to duplicate the thickness of the garment and include interfacing if appropriate. First, decide how long the opening needs to be. This will depend on the diameter and the thickness of the button. Add at least 1/8 inch (1/16 inch for each bar tack}, and mark buttonhole length on fabric. This bar-tack measurement is approximate; on some buttonholes, you may need to increase it to arrive at pleasing proportions. Preparation: Set needle position selector at LEFT and stitch width regulator for side stitch width (2mm or 2^mm) and bar tack width (4mm or 5mm) as explained in page 14. Marking Line Length of Cutting Space

23 NOTE: Having made the above adjustments, you need not regulate the stitch width regulator when sewing the side stitches. To sew the bar tack, the stitch width regulator must be turned to the previously set bar tack width and held in this position until bar tack is completed. Side Stitching: Position needle in fabric at point A, lower presser foot and stitch to point B. Leave needle in fabric. Raise presser foot and pivot work on needle. Lower foot and take one stitch without changing width setting, bringing work to point C. Leave needle in fabric. \ Bar Tack: Turn stitch width regulator to previously set bar tack width and while holding the stitch width regulator in this position, take approximately 6 stitches to complete tack. Leave needle in fabric at point D. Side Stitching: With needle in fabric at point D, stitch to point E. Leave needle in fabric. Final Bar Tack: Turn stitch width regulator to bar tack width and while holding the regulator in this position, duplicate bar tack previously made. Leave needle in fabric at point F. Fastening Stitch: With needle in fabric, set stitch width regulator for straight stitching and back tack approximately 3 stitches to point G. Remove work, draw threads to wrong side and trim. Cut opening for button with sharp scissors.

24 MONOGRAMS AND MOTIFS Needle Position Selector: Center Stitch Width Regulator: 2mm ~ 5mm Stitch Length: Satin Stitch Throat Plate and Presser Foot: General Purpose Select a design from many transfer patterns available or sketch one to suit your purpose. Always make a sample first to find the right stitch length, thread tension, and pressure. 1. Transfer the design (by tracing, usually) to the right side of fabric. 2. If the fabric is soft or loosely woven, baste a backing of lawn or organdy onto the wrong side. 3. Stitch, following the outline of the design. 4. After stitching, trim the backing close to the stitch ing. SCRIPT LETTERING (FREE-MOTION WORK) Needle Position Selector: Center Stitch Width Regulator: Setting Desired Stitch Length: "0" Throat Plate: General Purpose Presser Foot: None In free-motion stitching, you sew without a presser foot and control fabric movement (and hence stitch length) yourself, by means of an embroidery hoop. Either a straigh or a zigzag stitch setting can be used. If you are embroidering, you can vary the length of stitches simply by moving the hoop faster or slower The faster you move it, the more open the stitches wil be. A slow hoop movement will produce closely pack ed stitches. You can also vary the width of the stitches

25 from a hairline to the full width of whatever stitch width setting you have chosen, simply by moving the hoop, or by regulating the stitch width regulator as you sew. If you move it sideways and stitch in a horizontal line, you will get a hairline; if you move it forward or backward and stitch in a vertical line, you will get full stitch width. Thus you can produce a ribbon-like effect in script lettering. This takes practice but you can achieve some lovely effects that look much like hand embroidery. 1. Always make a sample first to find the right stitch settings and spacing. 2. Trace or mark lettering on right side of fabric. If the fabric is soft or loosely woven, add an underlay of crisp lawn or organdy. 3. Place work in embroidery hoop large enough to encompass the entire design. Be sure fabric is held taut. 4. Position work under needle and lower presser bar to engage tension. 5. Hold needle thread loosely and turn hand wheel toward you to bring bobbin thread up through fabric at start of design. Hold both threads and lower the needle into the fabric. 6. Stitch, following the outline of the lettering. Maintain an even rate of speed so that the stitches are uniformly spaced. 7. After stitching, trim the backing close to the stitchina

26 APPLIQUE Needle Position Selector: Center Stitch Width Regulator: Zigzag Width Desired Throat Plate: General Purpose Presser Foot: General Purpose Applique adds beauty and interest to clothes and household linens. The stitch most commonly used in appliqueing is zigzag stitch, closely spaced to form a satin stitch. The width of this stitch can be varied to accommodate fabrics of different weaves and textures. Procedure 1. Position the design and pin or baste it to the fabric. 2. Set stitch width regulator for straight stitching and outline the entire design with a short stitch. 3- Trim any excess fabric on the outer edges of the stitching. Remove basting. 4. Readjust stitch width regulator for desired stitch width and stitch, following the straight-stitch outline. This step will produce a smooth overedged finish, with no raw edges to be trimmed. 24 -

27 HEMMER FOOT You can turn and stitch a narrow hem in a single operation if you use the hemmer foot. Thus, you can eliminate basting or pinning whenever you are making ruffle edges, lingerie finishes, and the like. PLAIN NARROW HEMS Needle Position Selector: Center Stitch Width Regulator: Straight Stitching Position Throat Plate: Straight Stitch Presser Foot: Hemmer Foot Feed Dog: Straight Stitch HEMMER FOOT Form a double 1/8 inch fold at edge of fabric; crease fold for about 2 inches. Draw bobbin and needle threads under hemmer foot. Place fabric under the foot and stitch through creased fold for several stitches. Hold thread ends in left hand and guide raw edge in front of hemmer evenly into scroll. Sew slowly, still holding thread ends until hem is well started. Feed material evenly into hemmer scroll

28 ZIPPER FOOT This foot is designed to facilitate the placement of stitching close to a raised edge. It is attached to the machine in place of the regular presser foot and may be adjusted to either the right or left side of the needle. APPLICATIONS Zipper Insertion Corded Seams Tubular Cording Slip Cover Welting ZIPPER INSERTION Needle Position Selector: Center Stitch Width Regulator: Straight Stitching Position Throat Plate: General Purpose or Straight Stitch Presser Foot: Zipper Foot Feed Dog: General Purpose or Straight Stitch ZIPPER FOOT When the zipper is to the right of the needle: 1. Loosen the thumb screw B at the back of the foot, and slide the foot to the left of the needle. 2. Check the position of the foot by lowering the needle into the side notch A of the foot, making sure it clears the foot. 3. Lock the foot into position by tightening the thumb screw. When the zipper is to the left of the needle, adjust the foot to the right of the needle in the same way. - 26

29 CORDED SEAMS Needle Position Selector: Center Stitch Width Regulator: Straight Stitching Position Throat Plate: General Purpose or Straight Stitch Presser Foot: Zipper Foot Feed Dog: General Purpose or Straight Stitch The corded seam is a typical treatment for slip covers, children's clothes, blouses, and lingerie. To make a corded seam, make the welting first, then stitch it into the seam. To make the welting 1. Cut bias strips of fabric (width: three times the diameter of the cord plus 1-1/4 inches). 2. Sew strips together on the lengthwise grain to obtain desired length. 3. Fold resulting strip over cord, raw edges even. 4. Adjust zipper foot to the left side of the needle. 5- Lower zipper foot. 6. Stitch close to the cord (but do not crowd stitching against cord), pulling gently on the strip, both in front and in back of the zipper foot. To stitch welting into seam 1. Place the corded welting between two fabrics. 2, Stitch, this time crowding the foot against the cord

30 OTHER PRACTICAL APPLICATIONS Preparing the Interfacing Felling Interfacing to Outer Garment

31 Overedging Trouser Seams Overcasting Trouser Cuffs Inner Waistband of Trouser Inner Sleeve Cuffing Pocket Bar Tack

32 CARING FOR YOUR MACHINE Your SINGER machine will serve you perfectly for many years if you take a few moments of your time to keep it clean. How often you will need to clean and lubricate the machine will depend on how often you will use it. When in regular use, the machine should be cleaned periodically to remove lint and fluff which may have accumulated around the working parts. A machine in continuous use should be oiled frequently, especially when the machine is operated at maximum recommended speed. With a soft cloth, clean: Thread retainer A Take-up lever B and thread guard C Tension discs D Needle bar E and presser bar F Machine arm and bed G (If necessary, dampen the cloth and use mild soap to clean machine surface). With a lint brush, clean: Feed dog H Rotating hook and area under throat plate. Turn hand wheel over toward you until oil hole in rotating hook appears in sight. Apply one or two drops of oil to the oil hole

33 Loosen and remove screws and remove face plate by sliding it downward. Remove screws and lift off arm top cover. Clean and oil the places indicated. Also apply a drop of oil to all other oiling points shown. Keep oil pad under arm top cover saturated with oil. Grease Grease Grease

34 ASSEMBLING THE THREAD UNWINDER Hold the thread unwinder mounting bracket against the arm side cover and check that the collapsible thread guide holder is in its collapsed position. Then fasten the mounting bracket securely to the arm side cover with the two screws furnished with the thread unwinder as shown in the illustration at right. Before you begin to sew, or wind a bobbin, set the collapsible thread guide holder in its upright position as shown at right.

35 TO USE THE SPOOL CAP SPOOL CAP When using a reel type thread spool, fit the spool cap supplied with the machine onto the thread spool. THREAD SPOOL Set height of spool rest so there is approximately 2 mm clearance between top end of spool pin and the tip of the slotted spigot of the spool cap. The spool cap should never be fitted on the spool pin. Forcing it onto the spool pin may result in breaking the slotted spigot of the spool cap. 2mm CLEARANCE SPOOL REST o x -33

36 TO USE THE ANTI-SPILL SLEEVE When using synthetic threads that easily spill off the cop, slip the anti-spill sleeve furnished with the machine over the thread from the bottom of the cop leaving the thread end to hang free at the top of the anti-spill sleeve as shown at right. ANTI-SPILL SLEEVE -34-

37 35- KNEE OPERATING STITCH WIDTH CONTROL A knee operated bell crank complete (A and B) shown in the sketch at right is fastened to the underside of the bed. Bell crank A is used for lifting the presser foot, and bell crank B is used for regulating the stitch width with your knee. To control the width of zigzag stitches with your knee and leave both hands free to handle the fabric, loosen screw D and move lifting arm C so that it is positioned just under the bell crank B; then tighten screw D. The stitch width can now be controlled from zero to maximum width of 9 mm with your knee by pushing the knee plate E to the right. The further you push the knee plate to the right, the wider the stitch width you will obtain. NOTE: The presser foot cannot be raised with the knee lifter when machine is set up for knee operating stitch width control. If there is an occasion you wish to use the knee lifter, merely move lifting arm C away from you and position it just under bell crank A.

38 HOW TO SET KNEE LIFTER WHEN USED ONLY FOR LIFTING PRESSER FOOT Move lifting arm C to the position where bell crank A which is connected to lifting lever can be operated. Then tighten screw D. Make certain that the point end of the lifting arm C does not interfer with the oil pan, and then fix rock shaft stop dog F. Raise presser foot with presser bar lifter and push knee plate E to the right until the presser bar lifter comes down (height of presser foot above throat plate approximately 9 mm). Make certain that the knee plate does not move any further and secure rock shaft stop dog G. -36-

39 PERFORMANCE CHECK LIST If machine fails to start: Are eiectrical plugs properly connected? Is power and light switch on? If thread breaks: Is machine properly threaded? Is needle the correct size for the thread and fabric you are using? Is a catalog needle securely tightened in the needle clamp? Is thread free of slubs and knots? Is needle-thread tension too tight? Are thread guides, tension discs, and bobbin area lint-free? If fabric fails to feed: Is presser foot down? «Is pressure adjusted properly for the weight and texture of your fabric? * Is feed regulating dial properly adjusted? Remember to: Refer to your instruction book. new machine. It was written to explain the most efficient way to operate and use this versatile Keep your machine in good working condition by following the easy at-home-care steps outlined in the instruction book. Remove the belt when machine is not in use. This is to prevent stretching the leather belt.
40 REVISION Before Revision : Slack Thread Regulator After Revision : Thread Guide Pin Page2 PRINCIPAL PARTS OF MODEL 20U MACHINE Thread Guide Pin
41 Page5 THREADING THE NEEDLE 1. Turn hand wheel toward you to raise take-up lever to its highest position. 2. Raise the presser foot. 3. Lead thread from the thread unwinder through all the threading points shown. Thread the needle from front to back. 4. Draw about 3 inches of thread through eye of needle. Insert for 20U31, 33 Form U3990
42 Form U3147 (Rev. 388) Part No (Rev. 2) Printed in Japan
When using an electrical appliance, basic safety precautions should always be followed, including the following:
 Instruction book IMPORTANT SAFETY INSTRUCTIONS This appliance is not intended for use by persons (including children) with reduced physical, sensory or mental capabilities, or lack of experience and knowledge,
4300B. /".y, instructions. Z1GoZAG SEWING MACHINE # 4300B
 4300B,r /".y, k instructions Z1GoZAG SEWING MACHINE # 4300B TABLE OF CONTENTS Adjusting for Good Stitches... 24 Adjusting Pressure of Presser Foot... 10 Adjusting Tensions... 12-13 Blind Stitching... 19
pô1e -/C INSTRUCTION MANUAL FOR SEWING MACHINE WHITE
 pô1e -/C -- INSTRUCTION MANUAL I FOR SEWING MACHINE WHITE Retain these numbers for future reference. Model No. Serial No. The Model No. is located on Rating Plate. The Serial No. is located on Bed Plate.
MAIN PARTS
 MAIN PARTS 7 8 9 10 11 12 13 1 2 3 17 4 5 6 01 02 03 04 05 12 23 34 45 56 13 24 35 46 57 14 25 36 47 58 15 16 26 27 37 38 48 49 59 60 06 07 08 09 10 17 18 28 29 39 40 50 51 61 62 19 30 41 52 63 20 21 31
This sewing machine is designed and manufactured for household use only. Read all instruction before using this sewing machine.
 Instruction book IMPORTANT SAFETY INSTRUCTIONS This sewing machine is not a toy. Do not allow children to play with this machine. The machine is not intended for use by children or mentally infirm persons
2. ACCESSORIES. Zigzag foot Straight foot. machine) Bobbins Denim needle 16 (1 pci. (3 pcs) Ordinary needles 14(2pcs.)
 Bobbins Denim needle 16 (1 pci. (3 pcs) Ordinary needles 14(2pcs.)") 0 0mr -a- 0-I WHITE SEWING MACHINE Record in space provided below the Serial No. and Model No. of this appliance. The Serial No. is located Rear of arm. The Model No. is located Rear of arm. Serial No.
0 0mr -a- 0-I WHITE SEWING MACHINE Record in space provided below the Serial No. and Model No. of this appliance. The Serial No. is located Rear of arm. The Model No. is located Rear of arm. Serial No.
4830 & 4832 INSTRUCTION MANUAL
 INSTRUCTION MANUAL Table of contents Important safety instructions Getting to know your machine Principal parts Accessories Connecting the machine Running the machine Choosing and changing the needle Changing
Janome. Janome 7312 Instruction Manual. Magnolia 7312 Owners Manual/ User Guide
 Janome Magnolia 732 Instruction Manual IMPORTANT SAFETY INSTRUCTIONS This sewing machine is not a toy. Do not allow children to play with this machine. The machine is not intended for use by children or
SAVE THESE INSTRUCTIONS
 INSTRUCTION BOOK IMPORTANT SAFETY INSTRUCTIONS When using an electrical appliance, basic safety precautions should always be followed, including the followings: Read all instructions before using this
SERVICE MANUAL AND PARTSLIST
 SERVICE MANUAL AND PARTSLIST Next 20 CONTENTS WHAT TO DO WHEN... 1~3 SERVICE ACCESS FACE COVER... 4 TOP COVER... 4 BASE COVER... 5 REAR COVER... 6 FRONT COVER... 7 MECHANICAL ADJUSTMENT NEEDLE THREAD TENSION...
SAVE THESE INSTRUCTIONS
 INSTRUCTION MANUAL IMPORTANT SAFETY INSTRUCTIONS This appliance is not intended for use by persons (including children) with reduced physical, sensory or mental capabilities, or lack of experience and
CAUTION- SAVE THESE INSTRUCTIONS This product is for household use, or equivalent.
 Never operate this sewing machine if it has a damaged cord or plug, if it is not working properly, if it has been dropped or damaged, dropped into water. Return this sewing machine to the nearest authorized
A. Preparing the fabric (not shown):
:") INSERTING ZIPPERS - CENTER INSERTION The zipper can be snapped on to the right or to the left side of the needle so that you can sew close to the zipper. When sewing on the right side of the zipper, attach
INSERTING ZIPPERS - CENTER INSERTION The zipper can be snapped on to the right or to the left side of the needle so that you can sew close to the zipper. When sewing on the right side of the zipper, attach
S-85SCH
 4411-4423-4432-4443-4452 5511-5523-5532-5554 44S-85SCH Service Manual 104 73 14-26 2014-02-24 CONTENTS 1. Names of principal parts...2 2. Removing methods of external parts 2-1 Sewing table...3 2-2 Face
WHITE SEWING MACHINE CORPORATION WHITE SEWING MACHINE PRODUCTS LTD. Toronto 16, Ontario, Canada
 V -a a; S a a a. a,.. I.. I S. Co Toronto 16, Ontario, Canada CLEVELAND 11, OHIO WHITE SEWING MACHINE PRODUCTS LTD. WHITE SEWING MACHINE CORPORATION tension adjustments, maintenance, or any of the operations
11210 INSTRUCTION MANUAL
 11210 INSTRUCTION MANUAL Important Safety Instructions When using an electrical appliance, basic safety precautions should always be followed, including the following: Read all instructions before using
SERVICING MANUAL 419S/423S
 SERVICING MANUAL 415 419S/423S TROUBLESHOOTING PROBLEM CAUSE REMEDY REFERENCE 1. SKIPPING 1. NEEDLE IS NOT INSERTED INSERT THE NEEDLE PROPERLY. STITCHES PROPERLY. 2. NEEDLE IS BENT OR WORN. CHANGE THE
INSTRUCTIONS FOR USING THE GREIST ZIGZAG / AUTOMATIC BUTTONHOLE ATTACHMENT Model #;s 6, 7, 8, 9 &10
 INSTRUCTIONS FOR USING THE GREIST ZIGZAG / AUTOMATIC BUTTONHOLE ATTACHMENT Model #;s 6, 7, 8, 9 &10 The possession of a Buttonhole Attachment is one luxury which is also an economy and sewing becomes a
SERVICE MANUAL MODEL: 13512, 14412, 15312
 SERVICE MANUAL MODEL: 13512, 14412, 15312 CONTENTS TROUBLESHOOTING... 1-3 SERVICE ACCESS (1) FACE COVER, BELT COVER... 4 SERVICE ACCESS (2) BASE PLATE... 5 SERVICE ACCESS (3) FRONT COVER... 6 SERVICE ACCESS
STARTED! Get. Let s. Americana Series AMERICAN DENIM Model SA1100 Use This Guide First. Simplicity Sewing Machine Education Helpline:
 Let s Get STARTED! Americana Series AMERICAN DENIM Model SA1100 Use This Guide First To help you get started using your new sewing machine, this booklet shows you, step-by-step, how to thread your machine
SINGER 591D200A 591D240A 591D303A 591D305A 591C308A. rom the library of: Superior Sewing Machine & Supply LLC 591D300A
 SINGER 591D200A 591D240A 591D300A 591D303A 591D305A 591D308A 591C200A 591C240A 591C300A 591C308A CONTENTS Page Introducingtlie NewSINGER* Sewing Machine Model 591 \ Oiling the Machine 2 Oiling the Puller
CONTENTS LOCATE AND IDENTIFY THE PARTS... WIND THE BOBBIN... PREPARE YOUR TOP THREAD... STITCH SELECTOR / STITCH LENGTH/STITCH WIDTH CONTROLS...
 SERVICE MANUAL SEWING MACHINE MODEL 385. 15208400 OCTOBER, 2003 CONTENTS LOCATE AND IDENTIFY THE PARTS... WIND THE BOBBIN... PREPARE YOUR TOP THREAD... STITCH SELECTOR / STITCH LENGTH/STITCH WIDTH CONTROLS...
IMPORTANT SAFETY INSTRUCTIONS
 INSTRUCTION BOOK IMPORTANT SAFETY INSTRUCTIONS When using an electrical appliance, basic safety precautions should always be followed, including the following: This sewing machine is designed and manufactured
Top Innovations, Inc. Innovative Products to Make Your Life Easier. Model SP-402 Owner s Manual
 Top Innovations, Inc. Innovative Products to Make Your Life Easier Model SP-402 Owner s Manual THIS IS NOT A TOY! Adult supervision recommended Item contains sharp functional points and small parts Machine
FEATURES AND PARTS Reverse Button. 1. Thread Take-up Lever. 10. Fly Wheel Clutch 20. Face Plate. 2. Pressure Release (Darning) 11.
 11.") p 19 18 17 15 20 1- Pattern Selector Dial 3. Top Plate Thread Guide 6. Handle 8. Zigzag Width Control Dial 9. Bobbin Winder 2. Pressure Release (Darning) 4. Tension Regulator 5. Top Plate 7. Needle Position
p 19 18 17 15 20 1- Pattern Selector Dial 3. Top Plate Thread Guide 6. Handle 8. Zigzag Width Control Dial 9. Bobbin Winder 2. Pressure Release (Darning) 4. Tension Regulator 5. Top Plate 7. Needle Position
Brother PQ- Series Accessories
 Brother PQ- Series Accessories The PQ-series of high-speed straight stitch machines (1300, 1500 and 1500S) are designed to sew quickly and accurately with a wide variety of fabrics, even combinations of
CONTENTS. Changing Light Bulb 28. Zigzag Width Control NAMES OF PARTS 2. ACCESSORIES 3 3. BEFORE SEWING 4. Detaching Extension Table 4
 E Changing Light Bulb 28 9. APPLIQUE WORK 23 12. TROUBLE CHART 27 Drop Feed Lever 12 Oiling 26 Adjusting Lower Thread 11 Adiusting Threao Tension 17 Cleaning 25 11. MAINTENANCE 25 7. SEWING ON BUTTONS
INTRODUCTION THANK YOU FOR CHOOSING OUR OVERLOCK MACHINE FOR YOUR SAFETY BEFORE YOU USE - 1 -
 INTRODUCTION THANK YOU FOR CHOOSING OUR OVERLOCK MACHINE This overlock machine can stitch dependable seams on all kinds of fabric, both light and heavy, including cotton, wool, rayon, tricot, jersey, and
SERVICE MANUAL PARTS LIST MODEL: NH40
 SERVICE MANUAL & PARTS LIST MODEL: NH40 CONTENTS What to do when... 1-3 SERVICE ACCESS Face Cover... 4 Bed Cover... 5 Free-arm Cover... 6 Front Cover... 7 Rear Cover... 8 MECHANICAL ADJUSTMENT Presser
NAMES OF PARTS. 1 Thread guide for bobbin winding 2 Take-up lever. 3 Upper thread tension dial. 4 Face cover. 5 Thread guide for upper threading
 6 Presser foot thumb screw 9 Spool pins (retractable) 8 Shuttle cover 5 Thread guide for upper threading 7 Presser foot 4 Face cover NAMES OF PARTS.r4r : VjN S* ;WWE7-17 16 15 MODEL 860.-.-.- --. :.---.-
4-H Fabrics & Fashions
 OKLAHOMA COOPERATIVE EXTENSION SERVICE 4-H Fabrics & Fashions Setting Your Stitch Length 1. Stitch, as shown, using six inches to one inch. --------------------------------------------------------------------------------------------------------------------
Janome Decor Excel Janome 5024 Instruction Manual. Instruction Manual INSTRUCTION BOOK Owners Manual/ User Guide
 Janome Decor Excel 02 Janome 02 Instruction Manual Instruction Manual INSTRUCTION BOOK IMPORTANT SAFETY INSTRUCTIONS When using an electrical appliance, basic safety precautions should always be followed,
Intro to the Sewing Machine
 Intro to the Sewing Machine 1. Bobbin Cover Opens to allow you to put the bobbin and bobbin case in the machine. 2. Stitch Plate Where the seam allowance guidelines are found. Each line is 1/8 apart, beginning
INSTRUCTION MANUAL. Attention. COMPUTER SEWING MACHINE HZL-L series
 COMPUTER SEWING MACHINE HZL-L series INSTRUCTION MANUAL EN Attention Please read this instruction manual before using the machine as it contains important operational and safety information. Keep this
SAVE THESE INSTRUCTIONS
 INSTRUCTION BOOK IMPORTANT SAFETY INSTRUCTIONS When using an electrical appliance, basic safety precautions should always be followed, including the followings: Read all instructions before using this
Survey of the machine
 I 7iy ( / the placing of the accessories, please refer to transportea. thread take-up spring Place the machine on the table and remove the the space around the needle. The machine is equipped with a number
SAVE THESE INSTRUCTIONS
 INSTRUCTION BOOK IMPORTANT SAFETY INSTRUCTIONS Your sewing machine is designed and constructed only for HOUSEHOLD use. Read all Instructions before using this appliance. DANGER To reduce the risk of electric
Montgomery Ward 1903
 Montgomery Ward 1903 .. " ~l _, ". ~. MO~L 1903. OPEN ARM Sl-RETCH STITCH SEWING MACHINE GETTING TO KNOW YOUR SEWING MACHINE 1. Bobbin Winder Stop 2. Bobbin Winder Spindle 9 8 7 6 5 4 3 2 3. Stitch Width
Perfect Finish. Model ET-1
 Over 1,000 Stitch Functions Select from over 1,000 Stitch Functions. Fulfill your creative dreams with a large selection of decorative stitches, alphabet stitches, and construction stitches. Large Back-Lit
Darning plate 31. Sewing embroidery 31. Sewing zippers 30. Sewing buttonholes Blind hem 27. Threading the upper thread 18
 r TABLE OF CONTENTS KNOW YOUR SEWING MACHINE Name of parts 45 Accessories 6-7 the to connect the machine to the power supply 8 How to use the foot control 8 Sewing light 8 Thread and needle chart 9 Changing
Janome 204D Instruction Manual. MODEL 204D. 204D Owners Manual/ User Guide
 Janome 0D Instruction Manual Janome 0D serger Janome 0D Instruction Manual MODEL 0D 0D Owners Manual/ User Guide Janome 0D Instruction Manual IMPORTANT SAFETY INSTRUCTIONS Your sewing machine is designed
Symbols used. Move the part in the direction of the arrow. Set the clearance as indicated. Move the part to its highest or lowest position.
 4.1999. This service manual was compiled for use when repairing the XL5300, 5200, 5100, 5030, 5020, 5010,PX300,200,100 Zigzag Stitch Sewing Machines. Use this manual, together with the Parts Catalog, when
TABLE OF CONTENTS ESSENTIAL PARTS UTILITY STITCHES GETTING READY TO SEW DECORATIVE STITCHING CARE OF YOUR MACHINE STITCH PATTERN BASIC SEWING
 Instruction Manual TABLE OF CONTENTS ESSENTIAL PARTS Names of Parts 6 Standard Accessories 7 Dust cover 7 Sewing table 8 Accessory box 8 Free arm Sewing 8 GETTING READY TO SEW Connecting the Power Supply
SINGER* SEWING MACHINE NO. 27 & 28 VIBRATING SHUTTLE, FOR FAMILY USE
 INSTRUCTIONS FOR USING SINGER* SEWING MACHINE NO. 27 & 28 VIBRATING SHUTTLE, FOR FAMILY USE When requiring Needle, Oil, Parts or Repairs, for your Machine Look for the Red "S" There are Singer Shops in
CONTENTS. LOCATE AND IDENTIFYTHE PARTS... WlNDTHE BOBBIN... PREPARE YOUR TOP THREAD... WHAT TO DO WH EN...
 SERVICE MANUAL SEWING MACHINE MODEL 385.11206300 MARCH, 2003 CONTENTS LOCATE AND IDENTIFYTHE PARTS... WlNDTHE BOBBIN... PREPARE YOUR TOP THREAD... WHAT TO DO WH EN... 1 2 3 4-6 SERVICE ACCESS FACE COVER...
Janome Memory Craft 9500 Instruction Manual. MC9500 Owners Manual/ User Guide
 Janome Memory Craft 900 Instruction Manual TABLE OF CONTENTS Janome Memory Craft 900 Instruction Manual KNOW YOUR MACHINE... Name of Parts... Standard Accessories and Storage... Extension Table... GETTING
CONTENTS PRECAUTIONS BEFORE STARTING OPERATION PREPARATION FOR OPERATION CAUTIONS ON USE OPERATION
 CONTENTS PRECAUTIONS BEFORE STARTING OPERATION ------------------------------------- 1 PREPARATION FOR OPERATION 1. Adjustment of needle bar stop position ---------------------------------------------------------
16U288 SINGER' SEWING MACHINE. From the library of: Superior I Sewing Machine & Supply LLC INSTRUCTIONS. Form UIO3 (Rev, 377)., THE SINGER COMPANY
., THE SINGER COMPANY") iiv^- Form UIO3 (Rev, 377)., INSTRUCTIONS FOR USING AND ADJUSTING SINGER' SEWING MACHINE 16U288 THE SINGER COMPANY From the library of: Superior I Sewing Machine & Supply LLC CONTENTS PAGE DESCRIPTION
iiv^- Form UIO3 (Rev, 377)., INSTRUCTIONS FOR USING AND ADJUSTING SINGER' SEWING MACHINE 16U288 THE SINGER COMPANY From the library of: Superior I Sewing Machine & Supply LLC CONTENTS PAGE DESCRIPTION
SEWING MACHINE MODEL 385, 15358
 SERVICE MANUAL SEWING MACHINE MODEL 385, 15358 BER, 2006 CONTENTS LOCATE AND identify THE PARTS... WiND THE BOBBIN... PREPAREYOURTOPTHREAD... WHAT TO DO WHEN... 1 2 3 4-6 SERVICE ACCESS FACE COVER... BELT
Sewing Machine Model SA200 INSTRUCTION MANUAL & REFERENCE GUIDE. Simplicity Sewing Machine Education Helpline:
 Sewing Machine Model SA200 INSTRUCTION MANUAL & REFERENCE GUIDE Simplicity Sewing Machine Education Helpline: 636-651-0030 IMPORTANT SAFETY INSTRUCTIONS When using the sewing machine, basic safety precautions
Article 1: Introduction to the Elna expressive 920
 Article 1: Introduction to the Elna expressive 920 Elna machines are known for their ease of use, and the Elna expressive 920 is no exception. A range of features are available at your fingertips to make
INSTRUCTION MANUAL 2263
 INSTRUCTION MANUAL 2263 TABLE OF CONTENTS Congratulations on the purchase of your new SINGER sewing machine! May we recommend that before you start using your machine, you take time to discover the many
the needle, the user must take sufficient care to avoid injury and observe the sewing area continuously while sewing.
 / - nstruct0fl maflua 7 the needle, the user must take the light bulb is 15 watts. agent. by anyone but an authorized Pfaff D) The drive belt must never be adjusted B) When leaving the machine, chan C)
I N R U C T I 0 N S ZIG- ZAG SEWING MACHINE
 I N R U C T I 0 N S ZIG- ZAG SEWING MACHINE 52880 FRONT VIEW @ @! I - 1. Bobbin Winder 2. Special Stitch Control and Width Control 3. Stitch Length Control 4. Light Switch 5. Feed Dog Control 6. Nomenclature
IMPORTANT SAFETY INSTRUCTIONS
 INSTRUCTION BOOK IMPORTANT SAFETY INSTRUCTIONS This appliance is not intended for use by persons (including children) with reduced physical, sensory or mental capabilities, or lack of experience and knowledge,
SAVE THESE INSTRUCTIONS This product is for household use, or equivalent.
 IMPORTANT SAFETY INSTRUCTIONS When using an electrical appliance, basic safety precautions should always be followed, including the following. Read all instructions before using this sewing machine. CAUTION-
HOW TO USE YOUR LONG SHUTTLE MANUAL SEWING MACHINE. 4çJ MODEL NO.768
 NO.768 MODEL 4çJ Ii SEWING MACHINE LONG SHUTTLE MANUAL HOW TO USE YOUR INDEX Zigzag Formation 18 Zigzag Sewing And Pattern Formation 17 Turning a Corner 14 Placement of Needle 4 Picking Up Bobbin Thread
XL5050us_cover. Operation Manual. English XC Printed in China. XC XL5050 (NA03J061) Bk
 Bk") XL00us_cover Operation Manual English 88-8 XC67-0 Printed in China XC67-0 XL00 (NA0J06) Bk XL000us.book Page Tuesday, November, 00 9: AM IMPORTANT SAFETY INSTRUCTIONS When using this machine, basic safety
XL00us_cover Operation Manual English 88-8 XC67-0 Printed in China XC67-0 XL00 (NA0J06) Bk XL000us.book Page Tuesday, November, 00 9: AM IMPORTANT SAFETY INSTRUCTIONS When using this machine, basic safety
IMPORTANT SAFETY INSTRUCTIONS
 Instruction Book IMPORTANT SAFETY INSTRUCTIONS When using an electrical appliance, basic safety precautions should always be followed, including the following: Read all instructions before using this appliance.
GrandQuilter. Owner s manual
 GrandQuilter Owner s manual This household sewing machine is designed to comply with IEC/EN 60335-2-28 and UL1594 IMPORTANT SAFETY INSTRUCTIONS When using an electrical appliance, basic safety precautions
Practicing Basic Machine Operation Sample #1
 Practicing Basic Machine Operation Sample #1 Listed below are various tasks required in basic sewing machine operation. Demonstrate your ability to perform each task by creating a sample. The samples that
Table of Contents NAMES OF PARTS 7 GETTING READY TO SEW 10 DECORATIVE STITCHING 48 BASIC SEWING 28 PROGRAMMING PATTERNS AND LETTERS 55
 Instruction Manual Table of Contents NAMES OF PARTS 7 Names of Parts 7 Standard Accessories 8 Extension table 8 Sewing Table and Accessory box 9 Free-arm sewing 9 Stitch overview 9 GETTING READY TO SEW
") .JLLJ
.JLLJ The SEWING MACHINE NEEDLE ORGANIZER
 The SEWING MACHINE NEEDLE ORGANIZER Parts of a Sewing Machine Needle Eye: The size and shape of the needle eye influences what kind of thread will work best with it Scarf: An indentation on the back of
The 787 Dreamstitcher Portable Serger
 The 787 Dreamstitcher Portable Serger INSTRUCTION MANUAL TABLE OF CONTENTS 1. KNOWING YOUR MACHINE Identification chart 2 Accessories 3 Setting up your machine 4 Preparation for threading 5-6 Lint tray,
BEL0093 Sewing Machine
 4 BEL0093 Sewing Machine THE SCIENCE BEHIND SEWING BEL0093 Sewing Machine 5 4 8 10 9 21 11 12 1 2 14 19 13 23 7 6 5 21 3 17 18 22 15 6 BEL0093 Sewing Machine 16 22 Auto Low Foot Pedal Auto High THE SCIENCE
N S T R U C T R O N S
 N S T R U C T R O N S I ZIG-ZAG SEWING MACHINE P/N 52882 INDEX Adjusting for Good Stitching... 26 Blind Stitching... 18, 19 Bobbin: Inserting & Threading... 8 Picking up Bobbin Thread... 10 Removing...
Superb Model Over 1,000 Stitch Functions
 Over 1,000 Stitch Functions Select from over 1,000 Stitch Functions. Fulfill your creative dreams with a large selection of decorative stitches, alphabet stitches, and construction stitches. Large Back-Lit
EC Satisfaction from your Sewing Machine
 University of Nebraska - Lincoln DigitalCommons@University of Nebraska - Lincoln Historical Materials from University of Nebraska- Lincoln Extension Extension 1956 EC56-408 Satisfaction from your Sewing
INSTRUCTION MANUAL C240
 INSTRUCTION MANUAL C240 This household sewing machine is designed to comply with IEC/EN 60335-2-28 and UL1594. IMPORTANT SAFETY INSTRUCTIONS When using an electrical appliance, basic safety precautions
CONTENTS LOCATE AND IDENTIFY THE PARTS... WIND THE BOBBIN... PREPARE YOUR TOP THREAD... STITCH SELECTOR / STITCH LENGTH/STITCH WIDTH CONTROLS...
 SERVICE MANUAL SEWING MACHINE MODEL 385. 15218400 OCTOBER, 2003 CONTENTS LOCATE AND IDENTIFY THE PARTS... WIND THE BOBBIN... PREPARE YOUR TOP THREAD... STITCH SELECTOR / STITCH LENGTH/STITCH WIDTH CONTROLS...
STITCH FUNCTION MANUAL
 STITCH FUNCTION MANUAL TABLE OF CONTENTS I. Clothing Construction Functions Button Sewing... 6 Darning... 7 Staystitching... 8 French Seam... 8 Topstitching... 9 Zipper Insertion... 10 Piped (Corded)
SAVE THESE INSTRUCTIONS
 USER S GUIDE E10 This houshold sewing machine is designed to comply with IEC/EN 60335-2-28 and UL1594 IMPORTANT SAFETY INSTRUCTIONS When using an electrical appliance, basic safety precautions should always
INSTRUCTION MANUAL 9970
 INSTRUCTION MANUAL 9970 INSTRUCTION MANUAL This sewing machine is intended for household use. This sewing machine is not intended for use by young children or infirm persons without supervision. IMPORTANT
Quantum L Built-in Stitch Patterns. Large Back-Lit LCD Screen with Brightness Control
 Quantum L-500 Feature 401 Built-in Stitch Patterns Fulfill your creative dreams with a large selection stitches including basic, decorative and stretch stitches for clothing construction, quilting, home
Operation Manual. Sewing Machine. Product Code: 888-X53/X54/X55/X56
 Operation Manual Sewing Machine Product Code: 888-X/X/X/X6 Please visit us at http://solutions.brother.com where you can get product support and answers to frequently asked questions (FAQs). IMPORTANT
SUNDSTITCH INSTRUCTION BOOK SEWING MACHINES REX TRADING CORPORATION MODELS PB. Z78 15th AVENUE, NEWARK, N. J.
 SEWING MACHINES Area Code 201 242-8485 Cable Address REX - NEWARK, N. J. Z78 15th AVENUE, NEWARK, N. J. 07103 REX TRADING CORPORATION 4$4 101-1 101-2 101-3 101-1 PB MODELS BOOK INSTRUCTION SUNDSTITCH RE
PARTS LIST MODEL: HDEJ1800
 First Edition: June 0 PARTS LIST 0 8 4 8 8 4 8 0 KEY PARTS NO. NO. DESCRIPTION 0400 Top cover (unit) 00 Top cover (unit) 0000 Top cover 4 40A04 Flip-top sewing instruction panel 000 Hinge rod (right) 00
MACHINE SEW HOW TO POT HOLDER. Project
 GET TO KNOW YOUR ING BY TRYING OUT THE VARIOUS STITCHES AVAILABLE, THEN TURN YOUR STITCH SAMPLER INTO A USEFUL. CUSTOMIZE YOUR PROJECT BY CHOOSING YOUR OWN FABRIC AND MATCHING OR CONTRASTING THREAD COLOURS.
Instruction Manual Item No.: V~, 60Hz, 15W
 rm Free Ang! Sewi Sewing Machine MODEL: JW12 Montgomery Ward Customer Service 1112 7Th Avenue, Monroe, WI 53566 8:00 am to Midnight, Monday through Friday 1 888 557 3848 Instruction Manual Item No.: 724723
SEWING UNIT MANUAL I R O N I N G
 SEWING UNIT MANUAL S A F E T Y I R O N I N G S E W I N G M A C H I N E P A R T S and F U N C T I O N S H O W T O T H R E A D T H E B O B B I N and U S E T H E A U T O M A T I C N E E D L E T H R E A D
TABLE OF CONTENTS NAME OF MAIN COMPONENTS. 4-5 SETTONG UP YOUR MACHINE 6-8. The position of thread pole 6 Cone holders 6.
 z Cl) c C-) -I 0 z z C I- E ẕ I CD D CD p C) C m 0 m I a) C-) Controlling sewing speed 7 The position of thread pole 6 Cone holders 6 Connecting the foot control 7 Spool caps 6 SETTONG UP YOUR MACHINE
FREE ARM SEWING MACHINE
 INSTRUCTION MANUAL your creative assistant CELEBRITY 550 FREE ARM SEWING MACHINE Safety instructions Like any other electrical device, a sewing machine can cause serious, even life-threatening injuries.to
Important safety instructions
 Important safety instructions IMPORTANT When using an electrical machine, basic safety precautions should always be followed, including the following: Please read the instruction manual carefully before
NAMES OF PARTS. (I Top Thread Guide. 2 Take-up Lever. (7 Snap-on Presser Foot. Upper Thread Tension. Face Cover. Needle Clamp Screw.
 z. 3 w I, 0 E 1 Feed Dog NAMES OF PARTS Face Cover Needle Clamp Screw Automatic Stitch Length Indicator Stitch Length Dial Tacking Button Reverse Button Speed Control Buttons Pattern Selection Buttons
CLOTHING I TEST #350 MULTIPLE-CHOICE IDENTIFY THE LETTER OF THE CHOICE THAT BEST COMPLETES THE STATEMENT OR ANSWERS THE QUESTION.
 CLOTHING I TEST #350 MULTIPLE-CHOICE IDENTIFY THE LETTER OF THE CHOICE THAT BEST COMPLETES THE STATEMENT OR ANSWERS THE QUESTION. 1. A ROTARY CUTTER: A. Can only be used on woven fabrics. B. Should only
ICT TRAINING MATERIAL For SLOW LEARNERS
 ICT TRAINING MATERIAL For SLOW LEARNERS Previous year university questions & answers, for the subject SEWING TECHNIQUES Prepared By J.MEKALA, B.E., MBA, Head, Dept of Fashion Technology Shrimathi Indira
Sewing Machine 911 with Claudia Miller
 Sewing Machine 9 JAMMED MACHINE MACHINE IS NOT STITCHING Threads are too long and get caught in the bobbin holder Machine is dirty Bobbin thread was not drawn up through the machine Threads are stuck when
Another quality product from. Instruction Manual. Model 9105
 Another quality product from Instruction Manual Model 9105 SYMBOL INSTRUCTIONS Raise needle Raise presser foot Lower presser foot When using an electrical appliance, basic safety should always be followed,
Brother Industries, Ltd. Nagoya, Japan
 4. 2001. This service manual has been compiled for explaining repair procedures of the MODEL XL-6562, XL6452, XR- 46. This was produced based on up-to-date product specifications at the time of issue,
Press the Elongation button and eight stitches are made 2 to 3 times longer.
 LCD Screen with Stitch Selection Dial Provides clear and easy viewing of stitch settings including the number and image of the selected stitch, stitch length settings and stitch width settings. Block Alphabets
Instruction Book D1S D2S D3S. Memory Craft 7700 QCP
 Instruction Book DS DS DS APC Autom omatic Plate Co nverter Memory Craft 7700 QCP IMPORTANT SAFETY INSTRUCTIONS This appliance is not intended for use by persons (including children) with reduced physical,
To register your machine warranty and receive Baby Lock product updates and offers, go to If you have questions with
 To register your machine warranty and receive Baby Lock product updates and offers, go to www.babylock.com/profile. If you have questions with registration, visit your Authorized Baby Lock Retailer. CONTENTS
SEQS Built-In Sewing Stitches. 6 Basic, 17 Decorative, 5 Stretch and 2 Buttonholes. 2 Fully Automatic 1-Step Buttonholes
 30 Built-In Sewing Stitches 6 Basic, 17 Decorative, 5 Stretch and 2 Buttonholes 2 Fully Automatic 1-Step Buttonholes A simple 1-step process that provides reliable, precisely balanced buttonholes every
Janome MC10001 Instruction Manual. Janome Memory Craft Instruction Manual. MC10001 Owners Manual/ User Guide
 Janome Memory Craft 000 Instruction Manual Table of Contents GETTING REDY TO SEW... Name of Parts... Standard ccessories and Storage... 4 Detachable Extension Table... 6 Connecting the Power Supply...
Home Sewing Machine Accessories
 Home Sewing Machine Accessories Feb. 2019 Edition Standard Presser Foot This Standard presser foot is used for sewing straight stitches and zigzag stitches. It can be used to sew lightweight to heavyweight
IMPORTANT SAFETY INSTRUCTIONS
 IMPORTANT SAFETY INSTRUCTIONS IMPORTANT When using an electrical machine, basic safety precautions should always be followed, including the following: Please read the instruction manual carefully before
User s Guide. Prelude 350, 370 KEEPING THE WORLD SEWING
 User s Guide Prelude 350, 370 KEEPING THE WORLD SEWING This houshold sewing machine is designed to comply with IEC/EN 60335-2-28 and UL1594 IMPORTANT SAFETY INSTRUCTIONS When using an electrical appliance,
Construction Cards Beginning Level (9-11 Years)
") Beginning Level (9-11 Years) Division of Agricultural Sciences and Natural Resources Oklahoma State University Beginning Level (9-11 Years) No. 801 Seam Finishes Seam finishes make clothes look neat on
Beginning Level (9-11 Years) Division of Agricultural Sciences and Natural Resources Oklahoma State University Beginning Level (9-11 Years) No. 801 Seam Finishes Seam finishes make clothes look neat on
Sample Packet. Directions: Describe the functions of the following basic parts of a sewing machine.
 Sample Packet NAME: Directions: Describe the functions of the following basic parts of a sewing machine. SEWING MACHINE PARTS: Needle stitch plate: Feed dog system: Presser foot: Bobbin case: Spool pin: