Copyright & Disclaimer
|
|
|
- Camron Dennis
- 6 years ago
- Views:
Transcription

1
2 Copyright & Disclaimer Copyright Notice: This e-book is offered for free to the general public. You may distribute it in its original format (PDF), provided that the contents are not changed in any way and you do not claim to be the author. In addition, the information contained in this report may not be used elsewhere without written permission from its authors. Any persons or entities found in violation of infringing the copyright of this report will be prosecuted to the full extent of the law. This e-book is for informational purposes only and its authors do not earn any profit from its distribution. NERF is a registered trademark of Kenner Toys, which is an affiliate of Hasbro, Inc. The authors of this e-book are not affiliated with the aforementioned parties and do not intend to infringe upon any copyright, trademark, or patent. Disclaimer: Individual results may vary. Modding blasters is a hobby of ours, and in no way do we claim to be experts on the subject. We ve written this e-book for other enthusiasts who want to accomplish what we have with our blasters. However, due to legal reasons, we're unable to guarantee any results and the content in this e-book should not be considered professional advice. The use of this information and recommended products should be based on your own due diligence. You agree not to hold the authors and/or distributors of this e-book liable for any success or failure of your endeavors that are directly or indirectly related to the purchase and use of our information, recommended products and services.
3 Table of Contents Introduction...1 Opening the Blaster...2 Air Restrictor and Dead Space Removal...7 Post Removal and Foam Seal Replacement Spring Tensioning and O-ring Seal Brass Barrel Mod... 28
4 Introduction What is a Mod? A modification or mod is anything you do to your blaster that changes its looks, form, or functionality. Doing a custom paint job, adding your own accessories and parts, and working on the internals to increase power are all considered mods. Why Mod? There are a plethora of reasons to mod a blaster: A modded blaster is a great addition to a costume. A blaster that you mod becomes your own work of art. A modded blaster can shoot further and with more intensity compared to FOF (fresh out of factory) blasters. It can give you the upper hand in your next battle. Cosmetic modding, when done right, yields stunning results. A humble foam blaster can become anything from a dystopian steampunk gun to a clean cut weapon right out of science fiction. They can even mimic weapons out of video games and movies. Regardless of the reason, modding is an incredibly fun hobby that creates custom works of art out of average foam blasters. Dangers of Modding If performed incorrectly, modifications can reduce performance or render the blaster inoperable. When performing even basic mods, there is always a risk of losing parts, cracking plastic, or not being able to re-assemble the blaster. Some of the more common blasters' internal pictures can be found online, and it is worthwhile to use these as references. When performing cosmetic mods, care must be taken in order to not lock up any moving parts. Without a few layers of a hard clear coat, paint can gum up areas where plastic slides on plastic. For more complex mods like barrel replacement and fabrication of sealed breech, you must take into consideration the volume of the plunger tube in relation to the barrel length, and spring power must also be increased. So make sure you know what you are getting yourself into before you start a mod. 1 P a g e

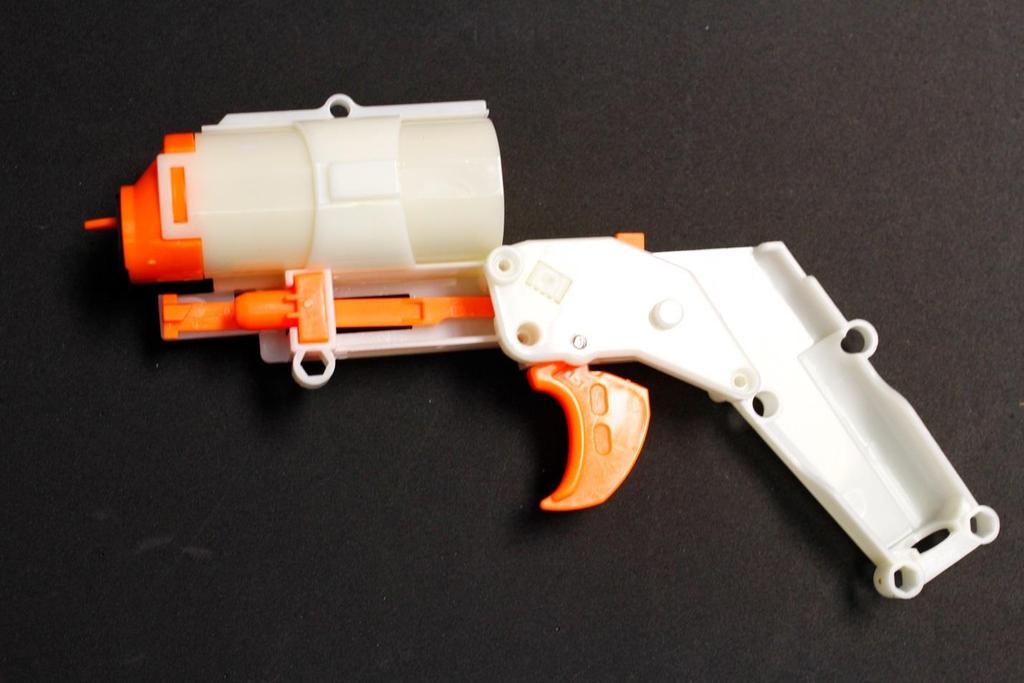
5 Chapter 1: Opening the Blaster It is important to be familiar with your blaster s internal structure in order to carry out any performance related mods. Be sure to remember what size screws go where and make sure no small springs shoot out when the blaster is opened. The blaster should be unloaded with the mainspring relaxed. Try to avoid opening the blaster when it is in the cocked position. Supplies Needed: Small Phillips Head Screwdriver Small Flat Head Screwdriver Step 1: Set your Hammershot on a clear workspace with the screws facing you. 2 P a g e

6 Step 2: Remove all of your screws with the Phillips head screwdriver and set them aside. Be careful not to lose them! Step 3: At this point, the blaster should easily separate into two halves. If the shell resists being split apart, double check to make sure that all the screws have been removed. If the issue continues, use a flat head screwdriver and gently pry around the seam until the blaster separates. Caution: Make sure you do not lose the accessory tooth, which is located on top of the blaster. 3 P a g e


7 4 P a g e

8 Step 4: Remove the hammer and trigger assembly retention plate. It is held in place with 3 screws and you can see the exposed end of the trigger pin on the left side of the plate. Be careful not to dislodge the trigger because re-seating the trigger spring can be tricky. Step 5: Remove the hammer assembly from the blaster and then put the retention plate back into place. This will prevent your trigger from getting dislodged while you are working on the blaster. 5 P a g e


9 You do not need to screw the plate on in order for it to secure the trigger. Just pressing it back into place should be enough. 6 P a g e
10 Chapter 2: Air Restrictor and Dead Space Removal The air restrictor (AR) slows down the flow of air from the plunger to the dart. This device serves to reduce the blaster's power and prevent the plunger from slamming into the plunger tubing at full speed. This drastically reduces the noise generated during firing. The barrel posts prevent you from using shortened or solid darts in your blaster. Removing them allows you to get creative with your darts. For example, loading two short darts in each chamber for a mini shotgun effect at close range! Supplies Needed: Small flat head screwdriver Glue (hot glue works best) Wire cutters, plastic snips, or hobby knife Something to keep the airway open when you fill the dead space with glue, (large straw, marker with grease on it, tightly rolled paper with tape, etc.) Step 1: Remove the barrel and plunger assembly from the blaster and remove the air restrictor housing from the plunger tube by carefully prying at the retention tabs with the flat head screwdriver. The tabs may break but that is ok because we will be gluing the air restrictor housing back into place. 7 P a g e

11 8 P a g e

12 Be careful not to lose this spring! 9 P a g e

13 Step 2: Remove the air valve and spring and cut out the small plastic divider. These can be discarded. At this point it is a good idea to thoroughly clean the inside of the air restrictor housing to remove any residual grease. 10 P a g e

14 Step 3: Block off the airway with something that is both wide enough to keep it open and will not stick too badly to your glue of choice. Thick foam can also be used in place of glue. But for this tutorial, we will be filling the dead space with hot glue. 11 P a g e

15 Step 4: Fill the rest of the orange air restrictor housing with glue or your filler of choice. 12 P a g e


16 Step 5: While the glue is drying, cut away the air restrictor guide posts found inside the plunger body. 13 P a g e

17 Step 6: Clear the airway and put the now filled air restrictor housing back onto the plunger. It is a good idea to seal the seam with glue to prevent air from leaking. 14 P a g e
18 Chapter 3: Post Removal and Foam Seal Replacement The barrel posts prevent you from using shortened or solid darts in your blaster. Removing them allows you to get creative with your darts. For example, loading two short darts in each chamber for a mini shotgun effect at close range! The foam seal that comes standard on Hammershots is much weaker than the seal found on the Strongarm, and we have seen many seals come from the factory without even being glued on all the way. Replacing the seal with craft foam will greatly extend the life of your blaster. Supplies Needed: 2mm EVA craft foam (if you can find foam with an adhesive back, get it) Glue (super glue works best if you don t have adhesive foam) Small flat head screwdriver or hobby knife for scraping off the old seal Wire cutters, plastic snips, hobby knife, or dremel High grit sandpaper Scissors 15 P a g e

19 Step 1: Remove the cylinder from your blaster and cut the small plastic tabs that hold the barrel posts in place. Wire cutters or plastic snips work best for this but a knife or dremel can be used. 16 P a g e

20 Step 2: Smooth out the places where you cut the posts. You want the back of the cylinder face to be as smooth as possible around the barrel holes to prevent wear and tear on the foam seal. If you do not have fine enough sandpaper, a hobby knife can be used to whittle down any sharp areas. 17 P a g e

21 Step 3: Remove your plunger body assembly from your blaster and use a small flat head screwdriver or hobby knife to scrape off the old foam seal. 18 P a g e

22 Step 4: Cut a new seal out of your craft foam. There are two ways to go about this. You can either cut the outside dimension first and paste it onto the plunger mouth, and then cut the air hole. Or you can cut the whole thing to spec before gluing it into place. For this tutorial we will be using adhesive backed foam so I will stick it in place before cutting the air hole. It can be a little larger than the original seal and there will not be any noticeable effect on performance if some of it overlaps into the airway. 19 P a g e

23 Step 5: Stick your new seal onto the plunger body and trim any excess foam with a craft knife. If you want, you can add a thin coat of grease to both the foam seal and the back of the cylinder. But keep in mind that this may lead to dirt and debris buildup. 20 P a g e


24 21 P a g e
25 Chapter 4: Spring Tensioning and O-ring Seal It is possible to get more performance out of your stock spring by adding a spacer that keeps under tension. These spacers can be made out of any rigid material as long as the spring guide can pass through it. Adding Teflon tape to the plunger head increases tension on the o-ring and forces it to form a better seal with the inside of the plunger body. Supplies Needed: A short piece of ½ inch CPVC pipe or other cylindrical material that will fit between the spring and spring stop Roll of Teflon tape Hacksaw or PVC pipe cutter Small flat head screwdriver Step 1: Remove the hammer/plunger assembly from your blaster. 22 P a g e

26 Step 2: Use the small flat head screwdriver to remove the o-ring. 23 P a g e

27 Step 3: Add 3-5 wraps of Teflon tape inside the o-ring groove of the plunger head, and then test fit the plunger in the plunger body. If the fit is too tight, remove some of the Teflon tape. You need to be careful not to use too much tape or there will be too much friction between the o-ring and the plunger body, and performance will be negatively affected. Trim any excess Teflon tape from the plunger head and test fit the o-ring. If there is too much friction between the o-ring and the inside of the plunger body, remove some of the tape. 24 P a g e

28 25 P a g e
")

29 Step 4: Cut a 1/4 inch (more can be used, but make sure it does not interfere with priming) section of CPVC and slide it over the spring guide post. Then slide your spring onto the post. 26 P a g e

30 Step 5: Reinstall the hammer assembly into the plunger body housing, screw down the retention plate, and make sure everything moves smoothly. 27 P a g e
31 Chapter 5: Brass Barrel Mod Adding brass barrels to the Hammershot is a fairly advanced mod that requires some specialized equipment. This mod squeezes the most performance possible out of the Hammershot platform by making more efficient use of the plunger s air volume. Caution: The exposed muzzles of the brass barrels can be sharp! Supplies Needed: 17/32 brass tubing Dremel with metal cutting wheel 17/32 drill bit Drill press and vice (a hand drill can be used, but it is important to make sure you can drill straight down through the cylinder) Sandpaper File Block of scrap wood 28 P a g e


32 Step 1: Use the dremel metal cutting wheel to cut the brass tubing to length. Each piece should not be longer than 70mm in length. The cleaner you make your cuts, the less sanding and filing you will need to do. 29 P a g e

33 Step 2: File and sand the ends of your brass barrels. You want to make sure there are no sharp edges present, as they can make loading dangerous and will make it more difficult to insert the brass barrels into the cylinder. 30 P a g e

34 Step 3: Secure your cylinder in a vice with the muzzles pointing upward, and position it under your drill press. Use the 17/32 drill bit to bore out the cylinder s chambers. Take your time and clear the holes and drill bit of material often. You need to go slow and back the drill bit out often to avoid melting the walls of the cylinder. You may need to remove the rotation mechanism from the back of your cylinder in order to fit it in the vice. 31 P a g e

35 32 P a g e

36 Step 4: Press your brass barrels into the cylinder one at a time using the scrap wood block. It is a good idea to remove the rotating mechanism from the back of the cylinder so you have a nice flat surface to press against. A rubber mallet can be used to during this process, but care must be taken not to crack the cylinder. 33 P a g e


37 Make sure the barrels are flush or close to flush with the very front of the cylinder, or your cylinder will not rotate when installed. The barrels pictured below need to be hammered in further. 34 P a g e


38 Step 5: Reassemble blaster and test fire! 35 P a g e

39 36 P a g e
Copyright & Disclaimer
 Copyright & Disclaimer Copyright Notice: This e-book is offered for free to the general public. You may distribute it in its original format (PDF), provided that the contents are not changed in any way
CALIBURN ASSEMBLY INSTRUCTIONS
 CALIBURN ASSEMBLY INSTRUCTIONS The Caliburn is a Mag-Fed Pump-Action Homemade Nerf Blaster design released as a Public Domain license file set by Captain Slug (http://www.captainslug.com). You are welcome
WESTERN PISTOL.22 CALIBER SINGLE SHOT. Entire pamphlet Copyrighted by JACO Designs 1972
 WESTERN PISTOL.22 CALIBER SINGLE SHOT Entire pamphlet Copyrighted by JACO Designs 1972 This pamphlet contains the plans and instructions necessary to construct the Western pistol. This pistol breaks open
CALIBURN ASSEMBLY INSTRUCTIONS
 CALIBURN ASSEMBLY INSTRUCTIONS The Caliburn is a Mag-Fed Pump-Action Homemade Nerf Blaster design released as a Public Domain license file set by Captain Slug (http://www.captainslug.com). You are welcome
PITTS S2S CONSTRUCTION
 PITTS S2S CONSTRUCTION FUSELAGE CONSTRUCTION 1) Place the right fuselage side over the plan and mark the former positions. Place the left side over the right side and mark the former positions. Glue F1
RIVAL CALIBURN ASSEMBLY
 RIVAL CALIBURN ASSEMBLY 08/02/18 The RIVAL Caliburn is a Mag-Fed Pump-Action Homemade Nerf Blaster design released as a Public Domain license file set by Captain Slug (http://www.captainslug.com). You
SCULL HANDLES AND GRIPS INSTRUCTION BOOKLET
 SCULL HANDLES AND GRIPS INSTRUCTION BOOKLET Contents Section I: Scull Grip Replacement: Fixed Handle or 10 cm Length Adjustment System Refer to this section if you need to replace the grips on your fixed
From "American Woodturner" the Journal of the American Association of Woodturners, April 2015, vol 30, no 2 - CUSTOM - TOOL HANDLES
 From "American Woodturner" the Journal of the American Association of Woodturners, April 2015, vol 30, no 2 - CUSTOM - TOOL HANDLES Carl Ford I have found most commercially available tool handles uncomfortable
CALIBURN ASSEMBLY INSTRUCTIONS
 CALIBURN ASSEMBLY INSTRUCTIONS The Caliburn is a Mag-Fed Pump-Action Homemade Nerf Blaster design released as a Public Domain license file set by Captain Slug (http://www.captainslug.com). You are welcome
Instructions for Lighting an S Scale Caboose
 Instructions for Lighting an S Scale Caboose The S Scale Caboose lighting kit is adaptable for most caboose models of rolling stock including American Flyer (TM) and contains the same components as found
968 Side Cladding Rubber Beading Replacement
 968 Side Cladding Rubber Beading Replacement A common and simple wear-oriented project for the 968 is the replacement of the rubber seals or beading on the lower side body cladding. These seals become
CALIBURN ASSEMBLY INSTRUCTIONS
 CALIBURN ASSEMBLY INSTRUCTIONS The Caliburn is a Mag-Fed Pump-Action Homemade Nerf Blaster design released as a Public Domain license file set by Captain Slug (http://www.captainslug.com). You are welcome
Regulator installation guide Air Arms S4xx/S5xx
 Welcome to Huma-Air. We design and manufacture brand- and model specific precision regulators for PCP air rifles. By using only the highest quality materials such as aircraft grade aluminum, aluminumbronze,
HR175 Sash Replacement Kit Installation Instructions
 HR175 Sash Replacement Kit Installation Instructions IMPORTANT: Please read before you begin. Weather Shield HR175 Sash Replacement Kits Important: Thoroughly read and follow these instructions, failure
PRO 400 M401 MFP M425 CF-280A/X TONER CARTRIDGE REMANUFACTURING INSTRUCTIONS
 HP PRO 400 M401 MFP M425 CF-280A/X TONER CARTRIDGE REMANUFACTURING INSTRUCTIONS HP CF-280A/X TONER CARTRIDGE REMANUFACTURING THE HP LASERJET PRO 400 M401/MFP M425 (CF-280A/X) TONER CARTRIDGE By Mike Josiah
CALIBURN ASSEMBLY INSTRUCTIONS
 CALIBURN ASSEMBLY INSTRUCTIONS The Caliburn is a Mag-Fed Pump-Action Homemade Nerf Blaster design released as a Public Domain license file set by Captain Slug (http://www.captainslug.com). You are welcome
Chin Strap, Sealed Pull Pins and Swing Catch for Fiberglass Helmets. Contents
 Chin Strap Chin Strap, Sealed Pull Pins and Swing Catch for Fiberglass Helmets Contents BTM-1 1.1 Chin Strap BTM-4 1.2.3.1 Preparation BTM-1 1.1.1 Chin Strap Removal BTM-4 1.2.3.2 Disassembly BTM-1 BTM-2
M14 MODULAR CHASSIS SYSTEM (MOD 1) INSTRUCTION MANUAL. West Springfield, MA Phone: (866) FAX: (413)
 INSTRUCTION MANUAL. West Springfield, MA Phone: (866) FAX: (413)") M14 MODULAR CHASSIS SYSTEM (MOD 1) INSTRUCTION MANUAL Troy Industries, Inc. WWW.TROYIND.COM West Springfield, MA 01089 Phone: (866) 788-6412 FAX: (413) 383-0339 Thank You M14/M1A MODULAR CHASSIS SYSTEM
M14 MODULAR CHASSIS SYSTEM (MOD 1) INSTRUCTION MANUAL Troy Industries, Inc. WWW.TROYIND.COM West Springfield, MA 01089 Phone: (866) 788-6412 FAX: (413) 383-0339 Thank You M14/M1A MODULAR CHASSIS SYSTEM
Lots of paints Several brushes from 000 to? Exacto knife. 200 grit sandpaper Bel-Decal Sheets Spray Primer
 Tools Lots of paints Several brushes from 000 to? Exacto knife 200 grit sandpaper Bel-Decal Sheets Spray Primer Brass Rod and a Drill bit that matches Super Glue Sculpy Putty the same size 3/16 suggested
BUILDING A GHOST GLOCK. Prepper Mike
 BUILDING A GHOST GLOCK Prepper Mike WHAT IS A GHOST GLOCK? Ghost guns are guns that don t need to be registered Ghost guns are built by the owner based on not more than 80% complete lowers Ghost guns are
QB78 CO 2 Pellet Rifle
 QB78 CO 2 Pellet Rifle Maintenance Instructions Text and photos by George Fox Lang The Chinese QB78 pellet rifle is one of the nicest and most popular CO 2 rifles ever produced. Here are the long-wanted
Hubble Space Telescope Paper Model Directions Downloads, patterns, and other information at:
 Hubble Space Telescope Paper Model Directions Downloads, patterns, and other information at: www.hubblesite.org/go/model Materials: model pattern printed onto cardstock/coverstock instructions printed
Installing your new Bevella Top. L Shaped Countertop with Joints No Finished Ends (Fits Between Four Walls)
") Installing your new Bevella Top L Shaped Countertop with Joints No Finished Ends (Fits Between Four Walls) Bevella RTI Countertops are engineered and manufactured to the highest quality standards, built
Installing your new Bevella Top L Shaped Countertop with Joints No Finished Ends (Fits Between Four Walls) Bevella RTI Countertops are engineered and manufactured to the highest quality standards, built
 America s leading woodworking authority To download these plans, you will need Adobe Reader installed on your computer. If you want to get a free copy, visit: http://adobe.com/ reader. Having trouble downloading
Vash/Knives Future Revolver Kit. V2.0
 Vash/Knives Future Revolver Kit. V2.0 Thank you for purchasing the Vash/Knives Future Revolver Pistol Kit. This kit contains almost everything you ll need to build up your own replica. This kit is an advanced
T he Double-Hung Replacement System replaces the sash and balance system of an older double-hung window. The
 Double-Hung Replacement System Installation The Pozzi Collection PID001 (12/03) T he Double-Hung Replacement System replaces the sash and balance system of an older double-hung window. The frame of the
Additional Parts List:
 THE TIME MACHINE Additional Parts List: In addition to the cast resin parts enclosed in this kit, there should also be a plastic bag containing the following items needed to complete your time machine
All Terrain Flares 09+ Ford F150
 Page 1/5 Components: 1. Front Flares (2) 2. Front Flare Inner Pieces (2) 3. Rear Flares (2) Tools required: - Utility knife - Electric Drill - 1/4 Drill Bit - #2 Phillips driver - Socket wrench Hardware
'Mutiny' Ozone Reactor Kit
 'Mutiny' Ozone Reactor Kit Skill Level: Beginner Tools Required: Scissors or razor blade Other Materials: Teflon tape Time to Build: Approximately 1 hour not including drying time Version: 2012 spray nozzle
Congratulations on purchasing the Spirit Rails Magnetic Attach that allows easy wand to pack removal and reattachment by just getting close!
 Introduction Congratulations on purchasing the Spirit Rails Magnetic Attach that allows easy wand to pack removal and reattachment by just getting close! The Spirit Rails Magnetic Attach Kit is designed
How to Assemble the Vacuum Formed Plastic 7/8 Scale Lewis Gun
 How to Assemble the Vacuum Formed Plastic 7/8 Scale Lewis Gun 1. Read ALL the instructions before starting assembly. 2. Begin assembly by thoroughly washing the inside and outside surfaces of the vacuum
PROJECT PLANS WOODEN GIFT BOX
 PROJECT PLANS WOODEN GIFT BOX Make the gifts you give even more special by presenting them in this one-of-a-kind gift box. In fact, the box may be valued more than whatever it contains. The box is sized
Max Launch Abort System Prod. No *Kevlar is a registered trademark of Dupont
 Flying Model Parts List Max Launch Abort System Prod. No. 3014 A 11820 - Body Tube 3.5 Diam x 5.5" Long B 11824 - Orange Capsule Base Shoulder Ring C 16032 - Laser-cut Ring motor mount rear D 16033 - Laser-cut
EmagiKit. Privacy Pod Plus. Quiet. Easy. Affordable. INSTRUCTIONS ASSEMBLY
 EmagiKit Privacy Pod Plus Quiet. Easy. Affordable. INSTRUCTIONS ASSEMBLY DIMENSIONS AND COMPONENTS 47 47 Ceiling Unit 2-B 2-L 2-R Glass Door Corner Trim Door Handle 90 Adjustable Height Work Surface 1-B
Installation Instructions for Harrison Design Ejectors BEFORE YOU GET STARTED REMOVE OLD EJECTOR
 Installation Instructions for Harrison Design Ejectors These instructions will show you how to fit and install the Harrison Design Extreme Service Ejector to a properly manufactured 1911 pistol. It is
Razr Adapter Retrofit Project by Craig Hoy, Edmonton, AB, Canada
 Razr Adapter Retrofit Project by Craig Hoy, Edmonton, AB, Canada The following is a description of the process that I have used to modify the console eject box for e38, e39, e46 and x5 s, part number 84-21-6-933-415.
For Barrel Tapers. Installation and Operating Instructions For use with small combination belt & disk sanders. Assembled Taper Tool
 Tim s Taper Tool For Barrel Tapers Installation and Operating Instructions For use with small combination belt & disk sanders Assembled Taper Tool Your taper tool is capable of making barrel tapered shafts.
PAT installation of a Sun Dome over a in-ground
 PAT. 3766573 Installation of Sun Domes for in-ground pool GENERAL INSTRUCTIONS: STEP 1. Read thru the entire instructional materials before beginning any installation. You will find that the installation
Installation Instructions Palladium Wall Panels - Demountable Factory Finished Edges and Field Cut Edges
 Please read all instructions before installing Palladium Wall Panel System. 1. Before installation: a. Acclimate Palladium Panels, reveals, adhesives and wall substrates to room temperature 24 hours before
Practical Scrap Metal Small Arms Vol.10 By Professor Parabellum
 Practical Scrap Metal Small Arms Vol.10 By Professor Parabellum Introduction The 9mm submachine gun design described here is extremely basic and can be put together using very limited tools and materials.
WEBELOS CRAFTSMAN SUGGESTED DEN ACTIVITIES
 SUGGESTED DEN ACTIVITIES Visit furniture factory, lumber mill or lumberyard. Some local home centers offer special weekend classes for Webelos age children. Invite someone to give a demonstration on the
HP M506/MFP M527 CF-287A/X
 HP M506/MFP M527 CF-287A/X TONER CARTRIDGE REMANUFACTURING INSTRUCTIONS HP CF-287A/X TONER CARTRIDGE REMANUFACTURING THE HP LASERJET ENTERPRISE M506/MFP M527 CF-287A/X TONER CARTRIDGE By Mike Josiah and
Refurbishing Your Lincoln Mark VII Dew Wipes
 By Rick One_Way Eckenrode Refurbishing Your Lincoln Mark VII Dew Wipes A common flaw among Lincoln Mark VII s can be found at the top of both doors. The dew wipes (rubber weatherstrip that rests against
Monroe sofa. assembly instructions
 Monroe sofa assembly instructions Smooth & Wrinkle-Free Fabric Covers: In addition to these printed instructions, you may want to watch our beauty tips videos on the customer service page of our website.
MUDGUN Drywall Finishing System
 Watch the demonstration video online at hydetools.com MUDGUN Drywall Finishing System Quick Start Guide Hyde Tools, Inc. / A Hyde Group Company / 800-872-4933 / custrelations@hydetools.com / hydetools.com
Cobra X Q Construction Tips Construction: Bel y pan
 Cobra X Q Construction Tips : The white plastic in this kit is high impact styrene. It can be painted with most types of coatings if light coats are applied this is necessary due to the thickness of the
Team Xecuter Joycon Mod By: XxWiReDxX
 Team Xecuter Joycon Mod By: XxWiReDxX Works With Every Switch SX OS Works with every Nintendo Switch and every firmware version! Play Every Game With SX OS you can play all your favorite games straight
All Terrain Flares 2014 Chevy Silverado
 Page 1/8 Components: 1. Front Flares (2) 2. Rear Flares (2) Tools required: - Utility knife - #2 Phillips driver - Socket wrench - 13 mm Socket - 6 mm Allen Wrench - T-15 Torx bit - Trim Removal Tool -
Fabric Replacement Top and Doors
 Fabric Replacement Top and Doors Installation Instructions For: Wrangler/TJ 1997 and Newer Part Number: 51131 WARNING This product is designed to enhance the appearance of the vehicle and to shield the
SE5a Instrument Board part 2 - rev 1.1
 SE5a Instrument Board part 2 - rev 1.1 Fuel (Petrol) Valve This valve uses two circular name plates, eight brass screws, one black plastic base, copper wire and two black plastic risers. You can pick any
Wanderlust Suitcase Vanity
 Wanderlust Suitcase Vanity If you re like me, you re always up for an adventure. When I saw some examples of DIY reclaimed suitcases, paired with the exciting new Wanderlust embroidery design collection,
TRUE TECHNICAL SERVICE MANUAL - ALL MODELS. DOORS/DRAWERS/LIDS
 DOORS/DRAWERS/LIDS 55 56 NOTES DOORS/DRAWERS/LIDS Swing s 73 74 NOTES INSTALLATION OF A GDM-SWING DOOR Phillips Head Screwdriver (2) - 1/8" Drift Punches (forged) Top Bracket NOTE: It may be necessary
Blakes 7 DSV-1 Liberator
 Blakes 7 DSV-1 Liberator Model kit by Masterpiece Models: www.masterpiecemodels.com Pattern Maker: Alfred Wong Casting: J&S Technologies LLC Parts List Main body 3 Main body nose vanes 4 Main body detail
2014 Lancer Systems all rights reserved
 2014 Lancer Systems all rights reserved PROPRIETARY NOTICE: This contains Lancer Systems confidential, proprietary and/or competition sensitive data. ITAR NOTICE: Warning This document contains technical
Making a 1911 frame from scratch the easy way. 7 parts make up the frame in a 1911 pistol,
 Making a 1911 frame from scratch the easy way. 7 parts make up the frame in a 1911 pistol, The rails and fire control block- needs to be as strong as a standard one piece frame The grip sides (2 off) -
Chapter Ten. Continuation of all inboard details
 Chapter Ten Continuation of all inboard details Inboard stern details There are several details at the stern that need to be completed. The photo above shows all of them finished and painted. Let us break
Jet-ski with motor boat engine
 117.178 Tools required: Vice with bending support Wood glue (water resistant) Scissors Ruler Pencil Round file ø2 ø3 ø4 Drills Jigsaw Sandpaper Super glue Please Note The OPITEC range of projects is not
Building a Spectroscope and Telescope
 Building a Spectroscope and Telescope By Kevin Cobble, Z-Field Observatory, www.z-field.org Send comments and questions to observatory@z-field.org Yield: Spectrometer and telescope Diagrams shown on next
Sailcloth Fabric Replacement Top and Doors with Tinted Side and Rear Curtains Installation Instructions
 Sailcloth Fabric Replacement Top and Doors with Tinted Side and Rear Curtains Installation Instructions TM For: Wrangler / TJ 2003 - Current Part Number: 79129 Inc. This product is only designed for the
Rosalina Accessories Tutorial Version March 2011 Martyn
 Rosalina Accessories Tutorial Version 1.0 - March 2011 Martyn Star Brooch Feel free to experiment with these dimensions, you should make a template you are happy with, the method still works. 1) Creating
HOW TO TUNE A QB SERIES CO2 AIRGUN FOR NOOBS.
 THE UK CHINESE AIRGUN FORUM PRESENTS... HOW TO TUNE A QB SERIES CO2 AIRGUN FOR NOOBS. DISCLAIMER: THE FOLLOWING GUIDE WILL IMPROVE THE PERFORMANCE AND SMOOTHNESS OF THESE AIRGUNS, IT IS ESSENTIAL THAT
Smoker. Written By: Feitan
 Smoker Smoking meat has been around for hundreds of years. Now with this simple smoker one can bring back to life the ancient methods of preserving meats and adding the smoky flavor. Written By: Feitan
Clocking a TD-04 Turbo Compressor Housing. Appendix A : AWIC Silicone and Tubing Fitting
 Clocking a TD-04 Turbo Compressor Housing Appendix A : AWIC Silicone and Tubing Fitting Revision A: 7-13-2015 Tools: Metric Sockets (10, 12, 14, 17mm) 5mm Hex Key Large Internal Snap Ring Pliers 3/8 Socket
Peach, Daisy, Rosalina Crown Tutorial Version August 2010 Martyn
 Peach, Daisy, Rosalina Crown Tutorial Version 1.0 - August 2010 Martyn 1) Creating the template Right, this isn't the most enjoyable part but it is required, get your calculator out we're going to do some
BUILDING A GOAL WALL DO IT YOURSELF! INSTRUCTIONS FOR A GOAL WALL
 INSTRUCTIONS FOR A In just a few steps, we show you how to build your own goal wall and paint it perfectly. COMPILED BY 1 PREPARING Purchase the materials from the enclosed list. The DIY store should be
BODYGUARD 380 BIBLE VERSION 1 11/2011 GeorgiaShooter
 BODYGUARD 380 BIBLE VERSION 1 11/2011 GeorgiaShooter Locate a small punch or make one by grinding down the tip of a small finishing nail and smoothing any sharp edges. A great punch to keep in your portable
AR-15 Lower Receiver Assembly Instructions
 AR-15 Lower Receiver Assembly Instructions Tools There are a few tools that make it easier to put together these kits, but none of them are necessary. Minimum requirements include a hammer and punch to
RFS Class II Rocket Assembly Instructions
 RFS Class II Rocket Assembly Instructions Instructions by: Loc Precision Photos by: Great Lakes Space Port Sheboygan Education Foundation, Inc. Welcome and thank you for joining the Rockets for Schools
INSTALLATION INSTRUCTIONS
 INSTALLATION INSTRUCTIONS Roush Mustang Rear Valances This kit is intended for professional installation. Roush Performance 28400 Plymouth Road Livonia, MI 48150 1-800-59-ROUSH Application: Mustang 1999
INCLUDED IN THIS KIT: SPECIFICATION: NEEDED BUILDING TOOLS: REQUIRED EQUIPMENT:
 Please review this entire manual before beginning assembly. By doing so it will help you better understand each step as you progress in the actual building of your kit, and you will do a better job in
Armless. looseback sofa. assembly instructions
 Armless looseback sofa assembly instructions Smooth & Wrinkle-Free Fabric Covers: In addition to these printed instructions, you may want to watch our beauty tips videos on the customer service page of
Central New York Rocket Team Challenge 2018 Rocket Assembly Instructions
 Central New York Rocket Team Challenge 2018 Rocket Assembly Instructions Note: These instructions vary from those provided by the manufacturer of the rocket kits. There is also considerable varying discussion
The IntoPlay build. This section will show how to fill the components into the case halves, and also the case base, which will look like this:
 The IntoPlay build Ok, I presume you have read the sections about cutting the holes in the case front, speaker holes and spray painting, modding components, preparing the case, etc. So far, the guides
 www.wildmanconstruction.com Changing your toilet is an easy project that should take half a day or less. The most common toilet has a separate tank that mounts on top of the bowl. These instructions apply
Aerospace Speciality Products
 Specifications:! Length: 18.75"/47.6 cm! Diameter: 0.98"/24.9 mm! Weight: 1.5 oz/44 gm! Streamer Recovery! Recommended Engines:!! A8-3; B4-4; B6-4; C6-5! Skill Level: Beginner This is a model rocket kit
XEROX PHASER 3600 TONER CARTRIDGE REMANUFACTURING INSTRUCTIONS
 XEROX PHASER 3600 TONER CARTRIDGE REMANUFACTURING INSTRUCTIONS XEROX PHASER 3600 TONER CARTRIDGE REMANUFACTURING THE XEROX PHASER 3600 TONER CARTRIDGE By Mike Josiah and the Technical Staff at UniNet The
Before beginning refer to page 4 to assure that all parts are included in your kit. Refer to diagrams for help when installing top and hardware.
 INSTALLATION INSTRUCTIONS BRONCO 1980-1994 PART #98501 RAMPAGE P R O D U C T S Thank you for purchasing Rampage Products Top for your Bronco. Please read and follow, precisely, all installation instructions
F-F-Fiddle Assembly Instructions
 F-F-Fiddle Assembly Instructions Bout Bridge Neck Machine Heads/Tuners Truss Rod Strings An open-source FFF 3d-printable electric violin. 1. Assemble materials 5 3 8 1 9,10, 11 7 4 2 6 PARTS 1. Bout part
CO 2 DRAGSTER DESIGN AND CONSTRUCTION Notes for Students
 CO 2 DRAGSTER DESIGN AND CONSTRUCTION Notes for Students EXAMPLES OF DRAGSTER SHAPES AND STYLES 1. Shell Cars the wheels hidden inside the body 2. Rail Cars the wheels outside the body 3. Shell Reveal
GROUND BALANCE & PINPOINT BUTTON MODIFICATION By Sven Stau October 2008
 TESORO CIBOLA GROUND BALANCE & PINPOINT BUTTON MODIFICATION By Sven Stau October 2008 Get some added performance by replacing the internal factory fixed GB with an external user friendly, fully adjustable
For Barrel Tapers. Installation and Operating Instructions for use with table saws and large disk sanders
 Tim s Taper Tool For Barrel Tapers Installation and Operating Instructions for use with table saws and large disk sanders Your taper tool is capable of making barrel tapered shafts. The term barrel is
Real Good Toys 10 Quarry St Barre, VT
 Real Good Toys Special Edition Kit #SE-RR 29 /5 Congratulations on your choice of a Real Good Toys product. Your kit has been precision made with meticulous care by our craftspeople using carefully selected
Tools and Tips: ( 1 )
") Tools and Tips: As you build instructions will show in my many picture manual how to assemble. You can use your own methods as you desire, my results are very good. A smooth, flat work surface is very
Tools and Tips: As you build instructions will show in my many picture manual how to assemble. You can use your own methods as you desire, my results are very good. A smooth, flat work surface is very
Harmony Remote Repair
 Harmony Remote Repair harmonyremoterepair.com How to install your new Harmony One Front Cover/Touch Screen Important! Before you begin working on your Harmony One, you must discharge any static electricity
Sectional armless. assembly instructions
 Sectional armless assembly instructions Smooth & Wrinkle-Free Fabric Covers: In addition to these printed instructions, you may want to watch our beauty tips videos on the customer service page of our
Jeep. Flat Style Fender Flares Set of 4. Included in Hardware Kit: STEP 1 PRIOR TO INSTALLATION. Set Part # Rev-3 1/11/2016
 STEP 1 PRIOR TO INSTALLATION A) Bushwacker only approves installing the fl ares according to these written instructions with the hardware provided. WARNING: Failure to install according to these instructions
Jeep Cherokee Door XJ Set Part # Revision J
 Jeep Cherokee 84-96 4 Door XJ Set Part # 10911 Revision J 6-5-06 Step 1: Prior to Installation: A) Fit: Verify the fit of the flares to vehicle. (Some filing, sanding, or cutting may be necessary to ensure
Repairs. Chapter 10 Repairs 10. 1
 10 Repairs Chapter 10 Repairs 10. 1 Repairs As an installer, you will probably be called upon to repair damage to a resilient floor. Here are some of the most common problems and the recommended repairs
Odd Wobbler Instructions By: Don Geiger
 Odd Wobbler Instructions By: Don Geiger Stock Size Calculations and Reference Table When preparing stock material for turning an Odd Wobbler, you will need two pieces of dry wood that is about one inch
!! " # $ % & '! ( ) * +, -
 * +, -") !! " # $ % & '! ( ) * +, - North Pegasus This carton contains: (1) Instruction package. Response Curves North Creek Cabinet Handbook North Creek Wiring Guide (2) 6 oz. Rolls of Dacron stuffing. (1) Tube
!! " # $ % & '! ( ) * +, - North Pegasus This carton contains: (1) Instruction package. Response Curves North Creek Cabinet Handbook North Creek Wiring Guide (2) 6 oz. Rolls of Dacron stuffing. (1) Tube
(Build Instructions)
") (Build Instructions) Specifications * Wingspan: 58cm * Length: 50cm * Flying Weight: 59 grams * Channels: 3 (Rudder Elevator Throttle) * Suggested Receiver: 4Ch Micro * Motor: 8mm GearDrive * Prop: GWS
(Build Instructions) Specifications * Wingspan: 58cm * Length: 50cm * Flying Weight: 59 grams * Channels: 3 (Rudder Elevator Throttle) * Suggested Receiver: 4Ch Micro * Motor: 8mm GearDrive * Prop: GWS
FOLDING DOOR - FOR FACTORY ASSEMBLED JAMBS WITH APPLIED SILL
 FOLDING DOOR - FOR FACTORY ASSEMBLED JAMBS WITH APPLIED SILL READ SPECIFIC INSTALLATION INSTRUCTIONS COMPLETELY BEFORE STARTING ANY INSTALLATION Failure to install and maintain our product according to
Laney chair. assembly instructions
 Laney chair assembly instructions Smooth & Wrinkle-Free Fabric Covers: In addition to these printed instructions, you may want to watch our beauty tips videos on the customer service page of our website.
Monroe loveseat. assembly instructions
 Monroe loveseat assembly instructions Smooth & Wrinkle-Free Fabric Covers: In addition to these printed instructions, you may want to watch our beauty tips videos on the customer service page of our website.
RHINO II Bottom Drain Installation Instructions
 Crane Enterprises, Inc. DBA: Aquadyne Filtration Systems Hartwell, GA 30643 Ph: (706) 436-9041 Fax: (706) 377-4554 www.aquadyne-filters.com RHINO II Bottom Drain Installation Instructions Manufactured
4-H Model Building. Monroe County. Grades 3-12
 4-H Model Building Monroe County Grades 3-12 PURPOSE Positive development of our young people through the stimulation of their personal interest and natural skills through the assembly, techniques of construction,
THE GREEN CLUB PROJECT
 tennis ball end cap finishing tape THE GREEN CLUB PROJECT duct tape How to make the ultimate recycled juggling club at home. BY JONATHAN POPPELE 16 or 20 oz bottle club body hardwood dowel collar finishing
Brook sectional corner. assembly instructions
 Brook sectional corner assembly instructions Smooth & Wrinkle-Free Fabric Covers: In addition to these printed instructions, you may want to watch our beauty tips videos on the customer service page of
Installation Instructions. Oakmont Folding Doors
 Before You Start For quick and easy installation of your Oakmont folding door, read these instructions thoroughly. A few minutes of prior planning will make the job easier and ensure years of trouble-free