TABLE OF CONTENTS TABLE OF CONTENTS...1 INTRODUCTION...2 TECHNICAL DATA...3 POLISHER INSTALLATION...4 SAFETY AND OPERATIONAL INFORMATION...
|
|
|
- Warren Sims
- 5 years ago
- Views:
Transcription

1 Rev. 8 March 2005
2 SUBJECT TABLE OF CONTENTS PAGE TABLE OF CONTENTS...1 INTRODUCTION...2 TECHNICAL DATA...3 POLISHER INSTALLATION...4 SAFETY AND OPERATIONAL INFORMATION...5 POLISHER OPERATION...6 MICROMOTOR MAINTENANCE...7 STRAIGHT HANDPIECE MAINTENANCE & CLEANING POLISHER MAINTENANCE...10 POLISHER TROUBLESHOOTING OPTIONAL ACCESSORIES FRICTION GRIP CONTRA ANGLE DIAMOND CUTTING DISC MAINTENANCE FREE PROPHY ANGLE WARRANTY INFORMATION...21 RETURN / EVALUATION FORM
3 Introduction Thank you for purchasing an Engler POLI-X Dental Polisher. The design of the Engler Engineering Corporation POLI-X dental polisher combines the latest in integrated circuit technology, to insure a reliable polishing device. Your new POLI-X operates by converting standard line voltage to a variable Direct Current (D.C.) voltage. This voltage is manually adjustable between 2.5 and 27 volts giving you an extended range of operational speed. This allows you to accomplish a wide variety of procedures. With optional attachments available from Engler this POLI-X can also be used for cutting, drilling, grinding, sectioning and finishing. These items are listed towards the end of this manual To insure proper operation and a long trouble-free life, the POLI-X requires regular maintenance. This can be easily accomplished by following the instructions included in this manual. PLEASE READ CAREFULLY We make every effort to verify that all parts for the unit, along with optional accessories shipped from our location, are included in your order. It is imperative that you inspect the package and if you find any pieces missing or damaged, please notify us immediately. Engler Engineering Corporation will not be held liable for any damage incurred while using this unit in any manner for which it was not intended. Thank you for purchasing an Engler POLI-X Dental Polisher. If you have any questions or comments, please contact: Engler Engineering Corporation 1099 East 47 Street Hialeah, Florida FAX
4 TECHNICAL DATA: I. POLISHER: Input Voltage: VAC Input Frequency: 50/60 Hz. 50/60 Hz. Power Control: Variable Voltage Style Output Voltage: 3 30 VDC Output Current 5 Amperes (max) II. III. MICROMOTOR Velocity Range: Style: Brush Design: STRAIGHT HANDPIECE: Maximum Drive Velocity: Style: ,000 RPM Sealed Bearing Fully Replaceable Brushes 30,000 RPM Sealed Bearing Twist Lock Collet VI: VII. PROPHY ANGLE: Recommended Drive Velocity: DIMENSIONS: CHASSIS: 5,000-6,000 RPM Length: 5 1/4 in. (13.3 cm) Width: 5 in. (12.7 cm) Height: 2 1/2 in. (6.35 cm) NET WEIGHT: 2 1/2 Lbs. (1.1 Kg.) SHIPPING WEIGHT: 4.5 Lbs. (2.1 Kg.) Before installing or operating your new POLI-X, please read and follow all of the instructions and suggestions. They have been written to assist you in maintaining your unit properly IMPORTANT: outlet. The POLI-X must be connected to a grounded electrical 3

5 POLISHER INSTALLATION: 1. Plug the Micromotor into the front of the control box. This is done by inserting the male connector at the end of the Micromotor cable, into the female receptacle on the front panel of the unit and rotating the locking collar clockwise. 2. Slide the Straight Handpiece down over the top of the Micromotor, until it snaps into place. 3. Line up the notch of the Prophy Angle with the Aligning Pin on the Straight Handpiece, and then push the shaft of the Prophy Angle into the chuck of the Straight Handpiece. 4. Rotate the Lock Ring counter-clockwise, until it clicks and locks the prophy angle in place. Chuck Bur Lock Ring Straight Handpiece Prophy Angle Aligning Pin 5. Place a disposable rubber polishing cup on the end of the Prophy Angle by snapping it on. The Prophy Angle is now secured and ready for operation. 6. Rotate the selector knob on the front of unit to forward operation. NOTE: When using the polisher the RED LED indicator should be on. NOTE: It is suggested to use a low to mid range speed setting for polishing. 4
6 SAFETY INFORMATION: Note: For your safety Never turn the Bur Lock Ring while the Handpiece is in operation. OPERATIONAL SUGGESTIONS: 1. Never reverse the direction of the Micromotor while it is in operation. Possible damage to the unit may occur. Always let the Micromotor come to a complete stop before reversing directions. 2. Do not drop the Micromotor, Handpiece or Prophy Angle on the floor or other hard surface as the shock may cause malfunction. 3. Do Not lock or run the Micromotor / Straight Handpiece Assembly without a Prophy Angle, Cutting Disk, Contra Angle, or test shaft installed. Doing so could damage the Straight Handpiece and / or Micromotor. 4. When installing the Prophy Angle or other accessory, make sure that the Bur Lock Ring is rotated fully in the unlock position, otherwise the accessory can not be installed and the Straight Handpiece will not operate. 5. Do Not change the selector switch on the front of the control box between Forward and Reverse rapidly. Always allow a second between the two selections. 6. As this is a precision instrument, always return it to Engler Engineering Corporation for repair. Important: When installing any accessory make sure that the marker lines up EXACTLY. If you can not put the accessory into the Straight Handpiece, rotate the two halves as you may have it in the locked position. 5

7 POLISHER OPERATION: 1. Dampen the rubber cup and place a small amount of polishing paste on it. 2. Rotate the POWER control to the minimum setting. 3. Depress the footswitch and the rubber cup will begin to rotate. The speed of rotation may be adjusted to your desired level by readjusting the POWER control. IMPORTANT: The Prophy Angle is only rated to rotational speeds of 5,000 RPM - therefore, in order to prevent premature failure of the angle keep the unit set in the Prophy range whenever the Prophy angle is attached to the Straight Handpiece. 4. High speed settings may throw the polishing paste off of the rubber cup. Always start with a low speed and then adjust to a higher speed as required. 5. Place the end of the angle into the patients mouth and gently apply the rubber cup to the surface of the tooth with a circular motion. Do not allow the rubber cup to remain stationary on one area for an extended period of time. 6

8 MICROMOTOR MAINTENANCE: The Micromotor is capable of rotational speeds up to 35,000 RPM for use in cutting, sectioning and drilling. It contains sealed bearings and does not require any lubrication. The Micromotor has cooling vents located at the back of its body, DO NOT allow water, oil, or any other substance to enter these vents. Failure to keep debris out of the Micromotor will shorten the lifespan of the unit and may cause permanent damage. IMPORTANT: 1. NEVER change the direction of the Micromotor while it is in operation. ALWAYS wait until it has come to a full stop. Cooling vents (Do not oil) Micromotor Shaft Male Connector 7
9 LUBRICATION- STRAIGHT HANDPIECE MAINTENANCE: It is recommended to use the 8 ounce spray lubricant with nozzle as shown in the accessories section (page 20) of this manual to maintain proper cleaning and oiling of your Straight Handpiece. The less recommended method is to use the enclosed lubricant. Place 1 drop of oil in the chuck hole. (See drawings below.) Wipe any excess oil off before placing the Straight Handpiece on the Micromotor. Do not lubricate the Handpiece while it is on the Micromotor. Lubrication of the Straight Handpiece is required at least once a week. Lubrication by spray lubricant: 1. Make sure that the Straight Handpiece is in the unlocked position prior to lubricating. 2. Install the E-Type nozzle by pushing it onto the top of the spray can. To lubricate, insert the E-Type nozzle into the bottom of the Handpiece. Holding the two together tightly, with can in the upright position, push spray button for 2 to 3 seconds. NOTE: If spray time is too short oil may not be propelled into all areas of the Handpiece. 8
10 Cleaning: CLEANING and STERILIZATION OF HANDPIECE. 1. Wipe the Handpiece clean with an alcohol-soaked soft tissue. 2. Never clean the Handpiece with boiling water, chemical solutions, ultrasonic cleaner, or with wire brushes. Sterilization: 1. Autoclaving is recommended for the Engler, Straight Handpiece. 2. Clean the Handpiece as described above. 3. Lubricate the Handpiece as described in the lubrication section of this manual. 4. Place the Handpiece in an autoclaving pouch and seal it in accordance with the instructions on the pouch. 5. Autoclave the Handpiece for no longer than 20 minutes at 121 C (250 F), or 15 min. at 132 C (270 F). Keep the straight Handpiece away from water vapor or mist that may settle and cause premature damage to the bearings. IMPORTANT: If you experience problems during operation, call our repair department. DO NOT attempt to repair the straight Handpiece. Removing any screws will shift the internal springs and may cause permanent damage to the unit and will void your warranty. 9
11 POLISHER MAINTENANCE: PROPHY ANGLE: The Prophy Angle is a precision engineered dental device. All of the gears and shaft assemblies are made of high grade stainless steel, which if cleaned and lubricated correctly will provide long, trouble-free service. Daily Cleaning and Lubrication: 1. Remove Prophy Angle from Straight Handpiece. 2. Remove used rubber cup. 3. Follow the supplied instructions that were included in the package with the Prophy Angle. NOTE: Do not use a Q-Tip or any item with loose fibers. 4. Wipe off all excess oil. 5. Confirm that the gears are meshing properly and turning smoothly by rotating the shaft at the base with your fingers. The shaft should turn easily rotating the head cap. 6. Place a new rubber cup onto the angle. 7. Slide the Prophy Angle down over the Straight Handpiece and lock it in place. IMPORTANT: For a long dependable life, the Prophy Angle should be lubricated daily, if possible after each treatment. Keep hair away from Prophy cup and head cap. SUGGESTION: To keep hair from getting tangled in the angle, we recommend using a gentle adhesive tape around the lips, keeping hair in place away from treatment area. 10
12 POLISHER TROUBLESHOOTING: NO POWER: 1. ON LED indicator does not light up: A. The unit is not plugged in to a power outlet: verify that the unit is plugged in. B. Power Outlet not active: try another outlet. Also check the electrical panel to verify circuit is on. C. Contact Engler Engineering Corporation. 2. ON LED indicator lights up polisher not functioning: A. Micromotor not plugged in: plug micromotor in. B. Short in Micromotor or its cord: Contact Engler Engineering Corporation for instructions. HOT HANDPIECE: 1. Handpiece not lubricated properly: Lubricate as shown on page Bearings in straight handpiece are becoming worn, causing drag. Contact Engler Engineering Corporation. HOT MICROMOTOR: 1. Straight handpiece causing drag, lubricate correctly. 2. Worn brushes in micromotor, Contact Engler Engineering Corporation. 3. Oil inside micromotor, return to Engler Engineering Corporation. 11
13 INTERMITTENT OPERATION: 1. Unit polishes and then stops: A. Damaged micromotor cord: contact Engler Engineering Corporation. B. Possible malfunction in control box. Contact Engler Engineering. MISCELLANEOUS: 1. If the micromotor speed does not vary (runs high speed only): return the complete POLI-X to Engler Engineering Corporation. 2. If the prophy cup flies off the prophy angle: micromotor is rotating in the wrong direction, change direction by rotating the selector on the front of the unit to the opposite direction. 3. Straight handpiece rotates on the micromotor: A. Prophy angle or Contra angle is binding. Remove angle, clean and oil. Try again. If rotation continues, call Engler Engineering for technical assistance. B. Straight handpiece not properly locked. 12
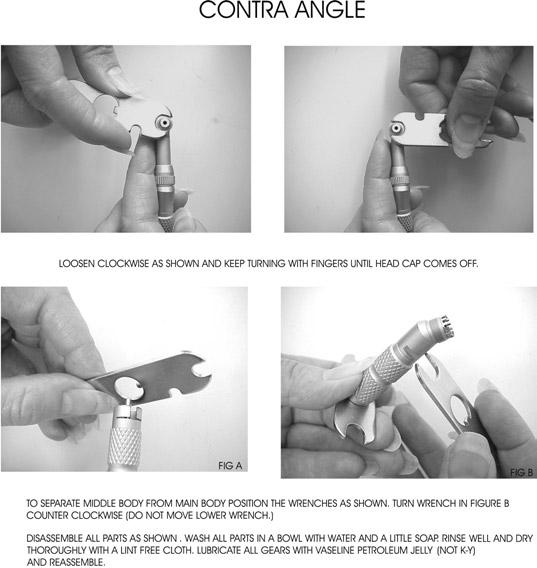
14 POLI-X Dental Accessories A number of optional handpieces and attachments are available for the POLIi-X unit. 1:1 handpieces, reduction handpieces, friction grip or latch type contra angles, prophy angle, 2.35 mm shaft diamond cutting disc, 1.60 mm shaft diamond and carbide bur kits, prophy paste and snap-on rubber cups. AUTOCLAVABLE: All handpieces, metal accessory angles, metal discs and burs are autoclavable. ** Please note Micromotor is D.C.** Optional Accessory MAINTENANCE FOR THE FRICTION GRIP CONTRA ANGLE P-A3 F.G. Contra angle for handpiece Part A 1. Hold the contra angle in one hand and the special wrench in the other. 2. Position the U cutout on the wrench, which corresponds to the correct head cap size, over the head cap. Note the wrench only fits on to the flats of the head cap. 3. Rotate wrench in a clockwise direction until head cap is loose. 4. Unscrew the head cap with your fingers, and put aside to be cleaned with alcohol. 5. Pull the collet assembly from the contra angle s head. 13
15 6. Clean the collet assembly with alcohol and lubricate with Vaseline or oil. 7. Put the collet assembly back into the head making sure the long part of the collets assembly is first into the head, and that the crown on the collect assembly mates with the crown in the head. 8. Replace head cap, turning counterclockwise secure with finger tight pressure: note do not use the wrench to tighten the cap. Part B 1. Locate the nut approximately one inch from the head located on the elbow. 2. Unscrew counterclockwise, and separate the head from the main body. 3. Remove the shaft that is located in either the main body or the head. 4. Clean the shaft with alcohol, then lubricate with a light film of oil making sure that a drop of oil is placed in the hole that is in the middle of the shaft. Apply a dab of vaseline on both ends (crowns) for lubrication. 5. Replace the shaft into the main body (short end first). 6. Fit the head onto the long end of the shaft, making sure that the teeth on the head locates with the teeth of the main body at the correct angle for the desired operation. 7. Secure the nut using only finger pressure. 14
16 15

17 16

18 DIAMOND DISC OPERATING INSTRUCTIONS: The diamond disc is an extremely powerful and versatile tool which may be used for dental and other surgical procedures. P-129 Diamond cutting disc 18 MM dia. P-130 Diamond cutting disc 22 MM dia. Both disc s have a 2.35 mm post diameter WARNING!!! Keep the cutting disc away from any surface you DO NOT wish to cut. The disc operates at a very high speed and it is extremely sharp. The disc will cut through Skin, Bone, and Tooth surfaces with no resistance. Keep fingers away from disc at all times. NOTE: To prevent thermal damage to the surface being cut, it is highly recommended that you irrigate the area being cut with water during the procedure. Always wear protective eye or face protection when using the cutting disc. 1. Place the cutting disc into the straight handpiece. This can be done by performing the following: A. Hold the straight handpiece in one hand, and rotate the movable collar so that the dot on the collar lines up with the marker on the straight handpiece. B. If there is another tool in the straight handpiece, remove it at this time. C. Fully insert the shaft of the disc into the chuck of the straight handpiece. D. Rotate the movable collar so that the dot on the collar lines up with the dot on the straight handpiece. 17

19 2. Place the selector switch on the front of unit to micromotor forward operation. Important: Do Not run the Micromotor/Straight Handpiece Assembly without a Prophy Angle, Cutting Disk, Contra Angle or other accessory installed. Doing so could damage the Straight Handpiece and/or Micromotor. 3. Adjust POWER control to a medium to high setting. 4. To activate, depress footswitch. Optional Accessories CARE FOR YOUR MAINTENANCE-FREE ANGLE P-MF P-106 P-MF Maintenance free prophy angle P-106 screw on rubber cups 144/pkt STERILIZATION PROCEDURES: After each prophy... A. Remove rubber cup. B. Rinse abrasive paste from head area with water. C. Thoroughly clean the outside of angle with disinfectant. D. Autoclave angle - not more than 275 F (135 C) E. After sterilization cycle is complete, install a new disposable rubber cup and attach angle to handpiece. You are now ready for your next prophy. 18
20 CAUTIONS AND WARNINGS: A. Do not attempt to disassemble. B. DO NOT SUBMERGE IN LIQUIDS, INCLUDING ULTRASONIC SOLUTIONS. C. Do not heat over 275 F (135 C). D. Use only Engler Care Free Prophy Rubber Cups. Other brands will not properly seal the angle, causing premature wear and voiding the warranty. E. Use 1 year and dispose of properly. YOUR CARE-FREE ANGLE IS WARRANTED AGAINST DEFECTS IN MATERIAL AND WORKMANSHIP FOR 6 MONTHS. A COPY OF OUR INVOICE OR PICKING TICKET WILL BE REQUIRED AS PROOF OF PURCHASE. WARRANTY IS VOID IF: A. Engler Care-Free rubber cups are not used exclusively. B. Sterilization procedure is not followed properly. C. The angle has been submerged in any liquid. D. The angle has been damaged or abused. E. Damaged due to use at high speed. If you have any questions or concerns, please call us. ENGLER ENGINEERING CORP

 P-105 Snap on rubber cups 144/pkt P-110 polishing paste (200 cups) 8.8 Oz.")
21 Optional Dental Accessories Optional Oiling Accessory Spray Lubricant with E-Type Nozzle for all Engler Polishing Straight Handpieces 8.8 Oz / 355 ML P-131 Carbide Burs - Kit of 6 P-132 Diamond Burs - Kit of 7 P112 Polishing paste (8 oz. jar) P-105 Snap on rubber cups 144/pkt P-110 polishing paste (200 cups) 8.8 Oz. / 355 ML # P-02 To Order call: At or If you have any questions or concerns, please call us. ENGLER ENGINEERING CORP
22 WARRANTY INFORMATION It is imperative that when calling Engler Engineering regarding the operation of your unit, that you have the serial number available for quick reference. The POLI-X polisher with attachments, is warranted to be free from material and manufacturing defects to the original consumer / purchaser for a period as specified below. The POLI-X control box is warranted for a period of six (6) years from date of purchase. The micromotor is warranted for a period of one (1) year from date of purchase. The polishing straight handpiece is warranted for a period of one year from date of purchase. Prophy and Contra angles, burs and cutting discs are warranted for a period of thirty (30) days from date of purchase. All warranties are void if the items have been damaged due to negligence, improper use, failure to lubricate, removed parts, or opening the control unit. PLEASE NOTE: Whenever returning any products for evaluation and / or repair, we strongly suggest you send in the complete unit with all attachments so that a correct evaluation can be made. You can mail all comments, suggestions and questions to us at the following address and number: Engler Engineering Corp East 47 Street Hialeah, FL If you wish to fax to us, please use For your convenience, the following names are listed for your correspondence: President VP Sales & Marketing Operations Manager Customer Service Cust. Service/Repair Eva Engler Steven Menaged Joel Katz Raya Engler Harvey Meinstein Rev. 8 March
23 RETURN FOR EVALUATION / REPAIR FORM PLEASE PHOTOCOPY AND INCLUDE A COMPLETED COPY WHENEVER SENDING UNITS IN TO US FOR EVALUATION AND / OR REPAIR. CLINIC PHONE NUMBER: FAX # CLINIC NAME: Contact person: Shipping Address: City: State: Zip: Item being sent: Please describe what is happening or why you are sending in this unit: When returning items to us, we would prefer you send the complete unit so that a proper evaluation can be made. It is suggested that you ship all returns to us by Federal Express, UPS or DHL. If using US Mail, it is suggested that you track and insure the package. Address all returns as follows: ENGLER ENGINEERING CORP. REPAIR DEPARTMENT 1099 EAST 47 STREET HIALEAH, FL
High Speed Air Turbine Handpiece
 OPERATION MANUAL High Speed Air Turbine Handpiece Please read this Operation Manual carefully before use and file for future reference. Handpiece should not be used with friction grip burs exceeding 18.5
HOLE CUTTER SHARPENER ASSEMBLY & SERVICE MANUAL
 HOLE CUTTER SHARPENER ASSEMBLY & SERVICE MANUAL WARNING You must thoroughly read and understand this manual before operating the equipment, paying particular attention to the Warning & Safety instructions.
Surgical Handpiece. Ti-Max Ti-Max Ti-Max Ti-Max X-SG20L X-SG25L X-SG93L X-SG93. S-Max SG M OM-C0425E
 Surgical Handpiece Ti-Max Ti-Max Ti-Max Ti-Max X-SG20L X-SG25L X-SG93L X-SG93 S-Max SG20 09.03.01 M OM-C0425E 001 for X-SG20L,SG20 This handpiece is used only for the Surgical Unit with Torque Calibration
SAVE THIS FOR FUTURE REFERENCE THIS PRODUCT IS FOR PROFESSIONAL LABORATORY USE ONLY USER'S MANUAL
 DENTAL, INC. TECHNICAL BULLETIN Q827-022510 5860 FLYNN CREEK ROAD READ ALL INSTRUCTIONS P.O. BOX 106 BEFORE PROCEEDING COMPTCHE, CALIFORNIA, U.S.A. 95427 SAVE THIS FOR FUTURE REFERENCE www.wellsdental.com
RING CUTTING SYSTEM OPERATION MANUAL. The lighter your touch, the faster GEM cuts
 RING CUTTING SYSTEM OPERATION MANUAL The lighter your touch, the faster GEM cuts ❶ SELECT THE CORRECT GEM CUTTING DISC ❶ REVIEW THE GEM QUICK REFERENCE CHART (BELOW). ❷ ASK THE PATIENT if they know ring
INSTRUCTION MANUAL. 200 Main Street Elmwood WI Phone: Toll Free: Fax:
 HIGH SPEED VETERINARY DENTAL UNIT INSTRUCTION MANUAL 200 Main Street Elmwood WI 54740 Phone: 715.639.2081 Toll Free: 1.800.523.8185 Fax: 715.639.9205 Table of Contents Warnings... 3 Unit Diagrams... 4-5
Instruction manual SUN-PM100L. SUN-PM100L Polishing Machine English
 Instruction manual SUN-PM100L SUN-PM100L Polishing Machine English Table: SUN-UM-TL-PM001 Version: A/0 Fiber Optic Solutions Provider Ⅰ Safety Precautions To ensure safe operation and maximize product
Table-Top & Arm Units UDS Technical Support: (954)
") Ultima 250 Owner s Manual Table-Top & Arm Units UDS Technical Support: (954) 772-9779 Congratulations on the purchase of your new Ultima 250 air dental delivery unit. Our goal at Ultima Dental Systems
Ultima 250 Owner s Manual Table-Top & Arm Units UDS Technical Support: (954) 772-9779 Congratulations on the purchase of your new Ultima 250 air dental delivery unit. Our goal at Ultima Dental Systems
SAVE THIS FOR FUTURE REFERENCE THIS PRODUCT IS FOR PROFESSIONAL LABORATORY USE ONLY USER'S MANUAL
 DENTAL, INC. TECHNICAL BULLETIN G801-022510 5860 FLYNN CREEK ROAD READ ALL INSTRUCTIONS P.O. BOX 106 BEFORE PROCEEDING COMPTCHE, CALIFORNIA, U.S.A. 95427-0106 SAVE THIS FOR FUTURE REFERENCE www.wellsdental.com
User s Manual. A highly versatile chuck featuring easy to attach and release jaws for midi- and full-sized woodworking lathes
 User s Manual Barracuda 5 Quick-Change Jaw System Chuck A highly versatile chuck featuring easy to attach and release jaws for midi- and full-sized woodworking lathes #CSCBARR5 IMPORTANT: Read this manual
OPERATING INSTRUCTIONS
 OPERATING INSTRUCTIONS MODEL TSM-6000 FACING/SQUARING MACHINE REV 8/2011 USA Otto Arc Systems, Inc. (Corporate/Sales/Mfg. Division) 3921 Sandstone Drive El Dorado Hills, California 95762 Phone: (916) 939-3400
Tube Facing Tool.
 www.swagelok.com Tube Facing Tool This manual contains important information for the safe and effective operation of the Swagelok TF72 series tube facing tool. Users should read and understand its contents
Owner s Manual ODYSSEY BENCH MODEL. O4100B shown REV E. Southern Avenue, Phoenix, AZ USA Workhorseproducts.
 Owner s Manual ODYSSEY BENCH MODEL O4100B shown 67-1375 REV 218 3730 E. Southern Avenue, Phoenix, AZ 85040 USA 800-778-8779 Workhorseproducts.com 1 Table of Contents I. Introduction & Safety Information.
 GENERAL OPERATIONAL PRECAUTIONS WARNING! When using electric tools, basic safety precautions should always be followed to reduce the risk of fire, electric shock and personal injury, including the following.
END MILL RE-SHARPENER EMG-413
 END MILL RE-SHARPENER EMG-413 OPERATING INSTRUCTIONS -TABLE OF CONTENTS- A.SAFETY INSTRUCTIONS -------- 1 B.NAMES OF COMPONENTS ----- 2 C.OPERATIONS ------------------------ 3 D.REPLACING THE WHEEL --------
Specifications. Important Safety Information
 Specifications Tire Rim Capacity 4 to 12 Rim Height 16 (2) Bead Breaker Handles 21 Long Includes Aluminum Centering Cone (2) Nylon Spacers Important Safety Information 1. Do not exceed max. tire capacity.
INSTALLATION & OPERATING INSTRUCTIONS. REDCO LETTUCE KING I and LETTUCE KING IV
 INSTALLATION & OPERATING INSTRUCTIONS for REDCO LETTUCE KING I and LETTUCE KING IV Lettuce King I Shown with optional Drum Ring Lettuce King IV TO BE SERVICED ONLY BY AUTHORIZED PERSONS P/N: 2802381 REV:
SFP-550. Operating Manual MATSUHIDAI, MATSUDO-CITY, CHIBA JAPAN TEL: FAX:
 SFP-550 Operating Manual 296-1 MATSUHIDAI, MATSUDO-CITY, CHIBA 270-2214 JAPAN TEL: +81-47-388-6111 FAX: +81-47-388-4477 Safety Precautions To ensure safe operation and maximize product service life, observe
OPERATION AND MAINTENANCE FOR MODEL MRV050A REVERSIBLE
 OPERATION AND MAINTENANCE FOR MODEL MRV050A REVERSIBLE MANUAL AIR MOTOR 04666770 Edition 1 April, 1999 IMPORTANT SAFETY INFORMATION ENCLOSED. READ THIS MANUAL BEFORE OPERATING TOOL. FAILURE TO OBSERVE
H8508 Impact Wrench SERVICE MANUAL. Model (Serial Code FWN) Model (Serial Code FWP)
 Model (Serial Code FWP)") SERVICE MANUAL H8508 Impact Wrench Model 48755 (Serial Code FWN) Model 48760 (Serial Code FWP) Read and understand all of the instructions and safety information in this manual before operating or servicing
SERVICE MANUAL H8508 Impact Wrench Model 48755 (Serial Code FWN) Model 48760 (Serial Code FWP) Read and understand all of the instructions and safety information in this manual before operating or servicing
ARROW SAW PRECISE CUT 8000 RPM WITH DUST COLLECTING ATTACHMENT INSTRUCTION BOOK MODEL NO
 ATTENTION If any components of this unit are broken or the unit does not operate properly, please contact Cabela s Customer Service. Retail Store Purchases: 1-800-905-2731 (U.S. & Canada) Catalog and Internet
SFP-550. Operating Manual MATSUHIDAI, MATSUDO-CITY, CHIBA JAPAN TEL: FAX:
 SFP-550 Operating Manual 296-1 MATSUHIDAI, MATSUDO-CITY, CHIBA 270-2214 JAPAN TEL: +81-47-388-6111 FAX: +81-47-388-4477 Safety Precautions To ensure safe operation and maximize product service life, observe
PORTROD WALL MOUNTED HEIGHT ROD
 PORTROD WALL MOUNTED HEIGHT ROD USER INSTRUCTIONS P/N UMPORTROD Rev 1-052112 1 PORTROD Thank you for your purchase of this Health o meter Professional product. Please read this manual carefully, and keep
SALES CUSTOMER SERVICE TECHNICAL ASSISTANCE CALL TOLL-FREE:
 DENTAL, INC. TECHNICAL BULLETIN U802-022510 5860 FLYNN CREEK ROAD READ ALL INSTRUCTIONS P.O. BOX 106 BEFORE PROCEEDING COMPTCHE, CALIFORNIA, U.S.A. 95427 SAVE THIS FOR FUTURE REFERENCE THIS PRODUCT IS
Operator s Manual. Onion King 500N 501N 502N 503N ENGLISH
 Onion King 500N 501N 502N 503N Thank you for purchasing this Vollrath Food Processing Equipment. Before operating the equipment, read and familiarize yourself with the following operating and safety instructions.
SCALE AIRE MINI INSTRUCTION MANUAL. Engler High Speed Dental Air Unit
 SCALE AIRE MINI INSTRUCTION MANUAL Engler High Speed Dental Air Unit Rev. C 04/29/2015 COMPANY PROFILE Engler Engineering Corporation has been in business since 1964 and occupies an 8000 square foot facility
Midwest RDH Handpiece Repair Procedure
 Midwest RDH Handpiece Repair Procedure The Midwest RDH handpiece is fairly common and is used by hygienists to clean teeth. The most common problems for this handpiece include a bad prophy head or a dirty
RING CUTTING SYSTEM OPERATOR S MANUAL
 . RING CUTTING SYSTEM OPERATOR S MANUAL INTRODUCTION GEM is not a modified power tool; rather, it s a device that has been designed specifically to cut rings quickly and safely. The abrasive quality of
K&M Precision Shooting Products Benchtop Case Preparation Machine User Guide
 K&M Precision Shooting Products Benchtop Case Preparation Machine User Guide K&M Precision Shooting Products LLC 12764 Greenly Street Suite 10 Holland, MI 49424 www.kmshooting.com 616-399-7894 February
RING CUTTING SYSTEM OPERATION MANUAL
 RING CUTTING SYSTEM OPERATION MANUAL Before using it is imperative that all individuals working with the system read this manual. Users are responsible for learning the proper techniques in the use of
COMPLEX GRINDER OF MILL& DRILL
 COMPLEX GRINDER OF MILL& DRILL MODEL: MR-F6 OPERATING INSTRUCTION PLEASE REMEMBER 1. When using electric tools, machines or equipment, basic safety precautions should always be followed to reduce the risk
STRINGING MACHINE OWNER'S MANUAL. Copyright 1998 GAMMA Sports - All Rights Reserved
 6002 STRINGING MACHINE OWNER'S MANUAL Issue 3 - June 20, 1998 Copyright 1998 GAMMA Sports - All Rights Reserved 6002 OWNER'S MANUAL TABLE OF CONTENTS PAGE 1... WARRANTY PAGE 2... FEATURES PAGE 3... ASSEMBLY
INSTRUCTION MANUAL. 200 Main Street Elmwood WI Phone: Toll Free: Fax:
 FIBER-OPTIC HIGH SPEED VETERINARY DENTAL CART INSTRUCTION MANUAL 200 Main Street Elmwood WI 54740 Phone: 715.639.2081 Toll Free: 1.800.523.8185 Fax: 715.639.9205 Table of Contents Warnings... 3 Unit Diagram...
Model SQM-2AC Squaring Module Rev TABLE OF CONTENTS
 92-0714 Rev. 970428 Model SQM-2AC Squaring Module TABLE OF CONTENTS CUSTOMER MESSAGE Inside Front Cover SAFETY PRECAUTIONS 3 GENERAL DESCRIPTION 6 SPECIFICATIONS 7 MAINTENANCE 8 OPERATION 9 CUTTING SPEEDS
GENERAL OPERATIONAL PRECAUTIONS
 GENERAL OPERATIONAL PRECAUTIONS WARNING! When using electric tools, basic safety precautions should always be followed to reduce the risk of fire, electric shock and personal injury, including the following.
Copyright 2007 ES Manufacturing, Inc th Street North St. Petersburg, FL 33713
 e-mail sales@esmfg.com US/Canada 800-55ES-MFG Documentation & Warranty Packet MB110 ( 600 rpm s) Thank you for purchasing the MB110 If properly operated and maintained, this Heavy Duty Fiber Cutter will
INSTRUCTION SHEET STRUT DRIVER RETROFIT KIT PN: 22-79SDRF
 INSTRUCTION SHEET STRUT DRIVER RETROFIT KIT PN: 22-79SDRF COMPONENTS: - Note: Each kit comes with one Strut Driver Gear Case Assembly, one Strut Driver Tube End Adapter Assembly, and a One-Time-Use Threadlocker
INSTALLATION OF WELLS SUPER QUICK CHUCK LEFT HAND ON BALDOR LATHE
 DENTAL, INC. TECHNICAL BULLETIN Q832-022510 5860 FLYNN CREEK ROAD READ ALL INSTRUCTIONS P.O. BOX 106 BEFORE PROCEEDING COMPTCHE, CALIFORNIA, U.S.A. 95427 SAVE THIS FOR FUTURE REFERENCE THIS PRODUCT IS
JARVIS. Model BR-3 Blade Reconditioner ... EQUIPMENT TABLE OF
 - Model BR-3 Blade Reconditioner EQUIPMENT SELECTION.......... Ordering No. TABLE OF CONTENTS............................ Page Model BR-3 (100 mm Blade) 115V/60Hz............ 4011003 220V/50Hz............
Angle Grinder MODEL 9553B MODEL 9555B
 ENGLISH Angle Grinder MODEL 9553B MODEL 9555B 006649 DOUBLE INSULATION I N S T R U C T I O N M A N U A L WARNING: For your personal safety, READ and UNDERSTAND before using. SAVE THESE INSTRUCTIONS FOR
Fast End Mill. Drill Re-Sharpening Machine
 http://paofong.com.tw Fast End Mill. Drill Re-Sharpening Machine FAST END MILL RE-SHARPENING MACHINE EASY ACCURRACY FAST 1 4 flutes 3 flutes 2 flutes 3 Flutes Patent : M321829 Unit: cm Model PF-313 PF-1225
Model 204B-EM Elbow Mandrels Rev TABLE OF CONTENTS
 92-0697 Rev. 970131 Model 204B-EM Elbow Mandrels TABLE OF CONTENTS CUSTOMER MESSAGE Inside Front Cover SAFETY PRECAUTIONS 3 GENERAL DESCRIPTION 6 MAINTENANCE 7 OPERATION 8 TROUBLE SHOOTING 11 ACCESSORIES
EllisSaw.com. EllisSaw.com P.O. Box Verona, WI
 P.O. Box 9019 Verona, WI 9-019 GENERAL OPERATING & SAFETY INSTRUCTIONS * READ INSTRUCTIONS BEFORE USE * CAUTION: Disconnect power supply cord from power source when doing repair work or changing belt.
Instruction Manual for Recipro Handpiece Model: Z-6X #
 Instruction Manual for Recipro Handpiece Model: Z-6X #510-2160 Introduction Gesswein Power Hand 2X Recipro handpieces are manufactured to the highest standards available to provide many years of trouble-free
MAXIMIST ULTRA PREMIER HVLP SPRAY TANNING SYSTEM
 MAXIMIST ULTRA PREMIER HVLP SPRAY TANNING SYSTEM DO NOT USE EQUIPMENT BEFORE READING THIS MANUAL This manual contains important warnings and instructions. Please read these instructions carefully and keep
Fisher 667 Diaphragm Actuator Sizes 30/30i 76/76i and 87
 Instruction Manual 667 Actuator (Size 30/30i - 76/76i and 87) Fisher 667 Diaphragm Actuator Sizes 30/30i 76/76i and 87 Contents Introduction... 1 Scope of Manual... 1 Description... 2 Specifications...
MAXIMIST ULTRA PRO HVLP SPRAY TANNING SYSTEM
 MAXIMIST ULTRA PRO HVLP SPRAY TANNING SYSTEM DO NOT USE EQUIPMENT BEFORE READING THIS MANUAL This manual contains important warnings and instructions. Please read these instructions carefully and keep
MaxiMist SprayMate Pro HVLP TANNING SYSTEM
 MaxiMist SprayMate Pro HVLP TANNING SYSTEM DO NOT USE EQUIPMENT BEFORE READING THIS MANUAL This manual contains important warnings and instructions. Please read these instructions carefully and keep for
User Manual. LED Dental Scaler, Drill and Polishing unit Eicksonic Plus
 User Manual LED Dental Scaler, Drill and Polishing unit Eicksonic Plus 176880 Table of Contents Page 1. Scope... 3 2. Device overview and connections... 3 3. Operating the unit... 5 3.1 Start up scaler...
Due to possible damage in shipping, the vertical stop assembly has been removed from this machine.
 Due to possible damage in shipping, the vertical stop assembly has been removed from this machine. To assemble, insert the threaded rod through the shroud opening in the top of the machine. Start the four
Operator s Manual TOMATO PRO TM ECONO PRO TM TOMATO KING TM ENGLISH
 TOMATO PRO TM ECONO PRO TM TOMATO KING TM Thank you for purchasing this Vollrath Food Processing Equipment. Before operating the equipment, read and familiarize yourself with the following operating and
southpaw enterprises, inc.
 southpaw enterprises, inc. Instruction Sheet C-STAND 7100 Store these instructions in a safe place or with the enclosed maintenance checklist Take time to familiarize yourself with the use and maintenance
400 SERIES GRINDER PUMPS 41502, 42202,43302, AND MODELS
 Section: MOYNO 500 PUMPS Page: 1 of 6 Date: March 1, 1998 SERVICE MANUAL MOYNO 500 PUMPS 400 SERIES GRINDER PUMPS 41502, 42202,43302, AND 44402 MODELS DESIGN FEATURES Housing: Cast iron Pump Rotor: Chrome
Application Tooling Specification Sheet
 HAND CRIMP TOOL Application Tooling Specification Sheet TYPE 4D Order No. 63825-8200 FEATURES A full cycle ratcheting hand tool ensures complete crimps Ergonomic soft grip handles for comfortable crimping
GroundControl. Follow instructions contained in this manual. Incorrect installation could result in serious injury or damage to property.
 GroundControl TM use supplied hardware Use only hardware supplied in your GroundControl kit or supplied by an authorized YAKIMA dealer. Use of unauthorized parts in the GroundControl system could result
REPAIR INSTRUCTIONS. Cat. No Cat. No MILWAUKEE ELECTRIC TOOL CORPORATION. SDS Max Demolition Hammer. SDS Max Rotary Hammer
 Cat. No. 9-0 SDS Max Demolition Hammer Cat. No. -0 SDS Max Rotary Hammer MILWAUKEE ELECTRIC TOOL CORPORATION W. LISBON ROAD BROOKFIELD, WISCONSIN 00-0 8-9-0 d 000 8-9-0 d Special Tools Require Forcing
Transcend Overbed Table - Assembly, Maintenance and Parts Manual
 Transcend Overbed Table - Assembly, Maintenance and Parts Manual Your table may vary from this illustration 45 Goodrich Drive, Kitchener, Ontario, Canada N2C 0B8 tel 1.877.395.2623 fax 1.877.395.6270 www.stancehealthcare.com
KaVo POWERtorque LUX 646B PB (Pushbutton) Repair Procedure
 Repair Procedure") KaVo POWERtorque LUX 646B PB (Pushbutton) Repair Procedure Tools needed to properly repair this handpiece: 1. Kavo Coupler 2. Kavo 647B/649B Back Cap Removal Tool (10129) 3. Auto-Chuck Protector Punch
KaVo POWERtorque LUX 646B PB (Pushbutton) Repair Procedure Tools needed to properly repair this handpiece: 1. Kavo Coupler 2. Kavo 647B/649B Back Cap Removal Tool (10129) 3. Auto-Chuck Protector Punch
CAUTION! This manual contains important information for the correct installation, operation and maintenance of the equipment described herein.
 CAUTION! This manual contains important information for the correct installation, operation and maintenance of the equipment described herein. All persons involved in such installation, operation, and
Trautman Carvers. Product Manual
 Trautman Carvers Product Manual Contents Product Specifications.... 4 Operating Precautions.... 6 Floor Carver Use.... 7 Floor Carver Diagram.... 10 Trautman Motor Lift Assist.... 11 Use of the Lift Assist....
E.C. HOPKINS LTD PGO4 PEANUT GRINDER OPERATORS MANUAL AND PARTS LIST
 E.C. HOPKINS LTD PGO4 PEANUT GRINDER OPERATORS MANUAL AND PARTS LIST E.C. HOPKINS LTD UNIT 1, 82 KETTLES WOOD DRIVE, WOODGATE BUSINESS PARK, WOODGATE VALLEY, BIRMINGHAM B32 3DB TEL NO. +44 (0)121 506 6095
INSTRUCTION BOOKLET AND WARRANTY INFORMATION 6 BENCH GRINDER
 INSTRUCTION BOOKLET AND WARRANTY INFORMATION 6 BENCH GRINDER Part No.: SW1250 PLEASE READ CARE AND SAFETY INSTRUCTIONS BEFORE USE SPECIFICATIONS Part No.: SW1250 Input Voltage: 240V Frequency: 50Hz Rated
User and Installation Manual. For Tandem Arm and Slim Line Models. Tandem Arm. Slim Line
 Tandem Arm User and Installation Manual For Tandem Arm and Slim Line Models Tandem Arm Slim Line Table of Contents Warnings... 4 Box Contents... 5 Hardware Kits... 6 Parts... 7 Tandem Arm Installation...
Top spin Nr /
 Top spin Nr. 1840 0000 / 1840 1000 Bedienungsanleitung 21-6680 28052014 / A Made in Germany Ideas for dental technology Top spin Nr. 1840 0000 / 1840 1000 Contents 1. Introduction...2 1.1 Symbols...2 2.
INSTRUCTION MANUAL HAPPY-MIST TANNING SYSTEM. (Not Suitable for Continuous Use)
") INSTRUCTION MANUAL HAPPY-MIST TANNING SYSTEM (Not Suitable for Continuous Use) DO NOT USE EQUIPMENT BEFORE READING THIS MANUAL This manual contains important warnings and instructions. Please read these
INSTRUCTION MANUAL HAPPY-MIST TANNING SYSTEM (Not Suitable for Continuous Use) DO NOT USE EQUIPMENT BEFORE READING THIS MANUAL This manual contains important warnings and instructions. Please read these
COJSAWBX Electric Jig Saw Assembly & Operating Instructions
 COJSAWBX Electric Jig Saw Assembly & Operating Instructions READ ALL INSTRUCTIONS AND WARNINGS BEFORE USING THIS PRODUCT. This manual provides important information on proper operation and maintenance.
Rev B C-RING TOOL VA0375 ½ in. OPERATING MANUAL
 Rev B 4-30-0 C-RING TOOL VA0375 ½ in. OPERATING MANUAL Operational Instructions for Vertex C-Ring Tool VA0375 Vertex Fasteners is committed to providing our customers with world-class customer service
MAXIMIST HVLP TANNING SYSTEM
 L0941 12 10:Layout 1 16/12/10 09:03 Page 1 MAXIMIST HVLP TANNING SYSTEM DO NOT USE EQUIPMENT BEFORE READING THIS MANUAL This manual contains important warnings and instructions. Please read these instructions
Order Number
 Order Number 200218-5500 FEATURES Application Tooling Specification TYPE 4D A full-cycle ratcheting hand tool ensures complete crimps Ergonomic soft grip handles for comfortable crimping A precision user-friendly
Band-Master ATS Nano Pneumatic Banding Tool Operating Instructions
 Band-Master ATS 601-118 Nano Pneumatic Banding Tool CONTENTS 601-118 Overview... 3 Safety.... 5 Initial Tool Set-up... 5 Regulator assembly mounting... 5 Attach tool head to regulator.... 6 Operating instructions...
ENGLISH (Original instructions) INSTRUCTION MANUAL. Drill DS4012 DOUBLE INSULATION. IMPORTANT: Read Before Using.
 INSTRUCTION MANUAL. Drill DS4012 DOUBLE INSULATION. IMPORTANT: Read Before Using.") ENGLISH (Original instructions) INSTRUCTION MANUAL Drill DS402 05402 DOUBLE INSULATION IMPORTANT: Read Before Using. ENGLISH (Original instructions) SPECIFICATIONS Model DS402 Capacities Steel 3 mm Wood
ENGLISH (Original instructions) INSTRUCTION MANUAL Drill DS402 05402 DOUBLE INSULATION IMPORTANT: Read Before Using. ENGLISH (Original instructions) SPECIFICATIONS Model DS402 Capacities Steel 3 mm Wood
OWNER'S MANUAL Issue 2 - December 14, 2000
 OWNER'S MANUAL AL Issue 2 - December 14, 2000 Copyright 2000 GAMMA Sports - All Rights Reserved Provided by www.gssalliance.com OWNER'S MANUAL TABLE OF CONTENTS PAGE 1... WARRANTY PAGE 2...FEATURES PAGE
INSTRUCTION MANUAL T100 MINI-MIST DELUXE TANNING SYSTEM. (Not Suitable for Continuous Use)
") INSTRUCTION MANUAL T100 MINI-MIST DELUXE TANNING SYSTEM (Not Suitable for Continuous Use) DO NOT USE EQUIPMENT BEFORE READING THIS MANUAL This manual contains important warnings and instructions. Please
INSTRUCTION MANUAL T100 MINI-MIST DELUXE TANNING SYSTEM (Not Suitable for Continuous Use) DO NOT USE EQUIPMENT BEFORE READING THIS MANUAL This manual contains important warnings and instructions. Please
1. TOOLS + MATERIALS REQUIRED
 R INSTALLATION INSTRUCTIONS PRODUCT: BALDUR + ODEN CONFIGURATION: BI-PARTING DOOR MOUNT: TOP MOUNT Product is covered by U.S. patents. For more information visit www.krownlab.com. TOOLS + MATERIALS REQUIRED
Print Head Installation Guide
 Print Head Installation Guide MCS Raptor 6 (MCS Eagle AMS Software) is copyright of MCS Incorporated. 2015 MCS Incorporated. 1 Contents Tools... 4 Warnings... 4 Introduction... 4 Section One - Pillar Installation...
Dairy Cap Chuck. Service & Installation Instructions. An Altra Industrial Motion Company P-2021-WE
 Dairy Cap Chuck P-2021-WE Service & Installation Instructions An Altra Industrial Motion Company Setting Application Torque 1. Determine initial clutch setting from torque chart below. Recommended Maintenance
VARIABLE SPEED WOOD LATHE. Model DB900 INSTRUCTION MANUAL
 VARIABLE SPEED WOOD LATHE Model DB900 INSTRUCTION MANUAL 1007 TABLE OF CONTENTS SECTION...PAGE Technical data.. 1 General safety rules....1-3 Specific safety rules for wood lathe.....3 Electrical information.4
Tapping Screw (W/Flange) 46 Cord Armor 47 Tube (D) 48 Cord. 45 Cord Clip. Tapping Screw (W/Flange) 10 Gear Cover Ass'y. 12 Socket (B) Ass'y
 46 Cord Armor 47 Tube (D) 48 Cord. 45 Cord Clip. Tapping Screw (W/Flange) 10 Gear Cover Ass'y. 12 Socket (B) Ass'y") W8VB The exploded assembly drawing should be used only for authoized service center. W8VB Item No. Part time 1 Magnetic Hex. Socket 2 Sub Stopper 3 O-Ring (S-16) 4 Locator (A) 5 Lock Sleeve (A) 6 O-Ring
W8VB The exploded assembly drawing should be used only for authoized service center. W8VB Item No. Part time 1 Magnetic Hex. Socket 2 Sub Stopper 3 O-Ring (S-16) 4 Locator (A) 5 Lock Sleeve (A) 6 O-Ring
ApexDesk Assembly Guide
 ELECTRIC HEIGHT-ADJUSTED SIT TO STAND DESK ApexDesk Assembly Guide REV-1507C Table of Contents CAUTION, USE & LIABILITY... 3 PARTS & HARDWARE LIST... 4 PARTS / COMPONENT DIAGRAMS... 5 ASSEMBLY INSTRUCTIONS...
HDL(M)6 Nut/Screw Assembly
6 Nut/Screw Assembly") HDL(M)6 Nut/Screw Assembly Remove, repair, and reassemble the nut and screw assembly in your HDL series double lock vise. In these instructions when we refer to the front of the vise or nut/screw assembly,
HDL(M)6 Nut/Screw Assembly Remove, repair, and reassemble the nut and screw assembly in your HDL series double lock vise. In these instructions when we refer to the front of the vise or nut/screw assembly,
Application Tooling Specification Sheet
 HAND CRIMP TOOL Application Tooling Specification Sheet TYPE 4D Order No. 63819-0900 FEATURES A full cycle ratcheting hand tool ensures complete crimps Ergonomic soft grip handles for comfortable crimping
Power Threader BT-5020 Owner s Manual
 Power Threader BT-5020 Owner s Manual WARNING! Read this owner s manual before assembling and operating the unit. The moving parts of this unit may cause body injury if it is not proper operated. Always
Application Tooling Specification Sheet
 HAND CRIMP TOOL Application Tooling Specification Sheet TYPE 4D Order No. 63825-8100 FEATURES A full cycle ratcheting hand tool ensures complete crimps Ergonomic soft grip handles for comfortable crimping
TB & SB Series Drill Presses
 TB & SB Series Drill Presses OWNERS MANUAL BENCH AND FLOOR DRILL PRESS TB-16 Series & SB-16-25-32-Series FOR YOUR OWN SAFETY AND OPTIMUM OPERATION READ INSTRUCTION MANUAL BEFORE OPERATING DRILL PRESS RETAIN
3-1/4 HP VARIABLE SPEED PLUNGE ROUTER
 IMPORTANT INFORMATION 2-YEAR LIMITED WARRANTY FOR THIS PLUNGE ROUTER KING CANADA TOOLS OFFERS A 2-YEAR LIMITED WARANTY FOR NON-COMMERCIAL USE. 3-1/4 HP VARIABLE SPEED PLUNGE ROUTER PROOF OF PURCHASE Please
30DC Speed Lathe Manual
 30DC Speed Lathe Manual The Crozier Model 30DC Speed Lathe is our most popular model. It has many standard features not found on any other machine in its class or price range. Standard Features 3/4 HP
MODELS 49 RA 49 RAZ 49 RAC
 General Safety and Maintenance Manual MODEL grinder featuring a rear exhaust. Model Number Exhaust Direction REAR Throttle Type (L) Lever or (K) Safety Lever Speed 12000 to 14000 R.P.M (13500rpm is standard)
Hardinge FlexC Dead-Length Collet System Style DL 42mm. Installation Instructions and Parts Lists
 Hardinge FlexC Dead-Length Collet System Style DL 42mm Installation Instructions and Parts Lists 1 General Safety Information Before installing the Hardinge FlexC Collet System on your machine tool, thoroughly
Application Tooling Specification Sheet
 HAND CRIMP TOOL Application Tooling Specification Sheet TYPE 4D Order No. 63819-1000 FEATURES A full cycle ratcheting hand tool ensures complete crimps Ergonomic soft grip handles for comfortable crimping
Sink BULL INSTRUCTION MANUAL. with Rapid Z -CUT & Rapid Z -DRUM
 Sink BULL with Rapid Z -CUT & Rapid Z -DRUM INSTRUCTION MANUAL Please read this instruction manual thoroughly to ensure safety and the correct use of this tool. Keep this manual in a place where operators
Table of Contents. B. Base Tool Changer...2 MC-16 Manual Tool Changer...2
 Table of Contents B. Base Tool Changer...2 MC-16 Manual Tool Changer...2 1. Product Overview... 2 1.1 Master Plate Assembly... 2 1.1.1 Optional Ratchet Knob... 2 1.2 Tool Plate... 3 1.3 Optional Modules...
Installation Guide Installation Kit for Mounting Philips MP20/30/40/50 on Datex-Ohmeda Aisys Anesthesia Machine
 Installation Guide Installation Kit for Mounting Philips MP20/30/40/50 on Datex-Ohmeda Aisys Anesthesia Machine The purpose of this guide is to: 1. Describe mounting of Counterweight (page 2). 2. Describe
Kendall Crib (W5921)- Assembly and Operation Manual
- Assembly and Operation Manual") Kendall Crib (W5921)- Assembly and Operation Manual Congratulations on purchasing this product. This crib will provide many years of service if you adhere to the following guidelines for assembly, maintenance,
Kendall Crib (W5921)- Assembly and Operation Manual Congratulations on purchasing this product. This crib will provide many years of service if you adhere to the following guidelines for assembly, maintenance,
INSTRUCTION MANUAL DO NOT USE SPRAY GUN BEFORE READING THIS MANUAL
 INSTRUCTION MANUAL DO NOT USE SPRAY GUN BEFORE READING THIS MANUAL This manual contains important warnings and instructions. Please read these instructions carefully and keep for your reference. 2013 Apollo
H6400, H6400C1 & VSD6400 REVERSIBLE DRILLS
 SERVICE MANUAL H6400, H6400C1 & VSD6400 REVERSIBLE DRILLS Read and understand all of the instructions and safety information in this manual before operating or servicing this tool. 999 1801.3 REV 4 2001
INSTALLATION OF WELLS SUPER QUICK CHUCK LEFT HAND ON RED WING LATHE
 DENTAL, INC. TECHNICAL BULLETIN Q824-022510 5860 FLYNN CREEK ROAD READ ALL INSTRUCTIONS P.O. BOX 106 BEFORE PROCEEDING COMPTCHE, CALIFORNIA, U.S.A. 95427 SAVE THIS FOR FUTURE REFERENCE www.wellsdental.com
Application Tooling Specification Sheet
 HAND CRIMP TOOL Application Tooling Specification Sheet TYPE 4D Order No. 63819-0900 FEATURES A full cycle ratcheting hand tool ensures complete crimps Ergonomic soft grip handles for comfortable crimping
Item# " VARIABLE SPEED BENCH GRINDER USER'S MANUAL
 Power Tools Item# 33309 3" VARIABLE SPEED BENCH GRINDER USER'S MANUAL Read carefully and understand RULES FOR SAFE OPERATION and instructions before operating. Failure to follow the safety rules and other
Cartridge Machine USER MANUAL
 Cartridge Machine USER MANUAL 2018 USER MANUAL MACHINE OVERVIEW PACKAGE CONTENTS User Manual, Spektra Edge Body Hex Drive MotorBolt Oil Lubricant 0.05 Hex Screwdriver Spare 4-40 3/16 Stroke Set Screw Spare
Application Tooling Specification Sheet
 Hand Crimp Tool Application Tooling Specification Sheet TYPE 4D Order No. 63819-0800 FEATURES A full cycle ratcheting hand tool ensures complete crimps Ergonomic soft grip handles for comfortable crimping