IF THIS SHEET IS NOT FILLED OUT, SIGNED AND RETURNED, PRODUCTION WILL BE POSTPONED UNTIL THIS DOCUMENT IS COMPLETED AND RETURNED.
|
|
|
- Penelope Day
- 5 years ago
- Views:
Transcription

1 X 2/18/2015 JDF Trash Chute & Trash Compactor
2 P.O. Box West Quincy St. Lakeland, FL 33802/33815 Phone: Fax: Valiant Products, Inc. Trash/Linen Chutes Tenant Storage Lockers Recycle Systems Submittal Coordination Information Response Required Date: February 13, 2015 Valiant Job.: 11578A To: Landsouth Construction Attn: Justin Marchant; Jason Fansler Project: Uptown At Delray Location: Delray Beach, Florida This letter is to work with the submittal drawing to verify that the information in the submittal is correct. Valiant requires that this be filled out and returned along with the submittals. If necessary, mark up the submittal to reflect the proper information. What is the projected ship/install date? Is the discharge shown the proper type? Are the floor heights correct? Is the right type of vent shown? If not, please indicate flat, pitched or curb. If the vent is to be curb, please specify curb dimensions and height. If the vent is to be pitched, please indicate pitch. If truss roof, are trusses spaced to allow chute to penetrate through? Is the chute in a chase? If it is, please indicate chase dimensions. Is the number of chutes indicated correct? Is the material indicated correct? Are the intake sizes and hinge direction correct? Are the numbers of intakes correct? Are accessories required? If they are required, are they listed? If offsets or reductions are required, are the dimensions and the angle indicated? Is approval for the offset or reduction been received from the fire marshal? IF THIS SHEET IS NOT FILLED OUT, SIGNED AND RETURNED, PRODUCTION WILL BE POSTPONED UNTIL THIS DOCUMENT IS COMPLETED AND RETURNED. AFTER ALL REQESTED PAPER WORK IS SIGNED & RECEIVED BACK LEAD TIME IS 4 TO 6 WEEKS. Please feel free to contact Design Engineering, if you have any questions. David Smith Design Engineering Signature of Project Manager or Superintendent
3 P.O. Box West Quincy St. Lakeland, FL 33802/33815 Phone: Fax: Valiant Products, Inc. Trash/Linen Chutes Tenant Storage Lockers Recycle Systems Letter of Transmittal Date: February 13, 2015 Valiant Job.: 11578A To: Landsouth Construction 1680 The Greens Way, Suite 100 Jacksonville Beach, Florida Phone: Attention: Justin Marchant; Jason Fansler Project: Uptown At Delray Location: Delray Beach, Florida For Approval For File and Field Use Please find enclosed 1 copy (copies) of trash chute drawings. We will require the following information before we may proceed: One (1) set of approved shop drawings. Desired Delivery Date Shipping address or directions if we are to install. Jobsite Superintendent Jobsite Phone Number Jobsite Fax Number Field Measurements For Information Only Review, Sign and Seal ** NOTE: Drawings must be received approved sixty (60) days prior to needing product on jobsite. Cut off date is the 15 th of every month. Please feel free to call if you have any questions. David Smith Design Engineering
4
5
6
7
8
9


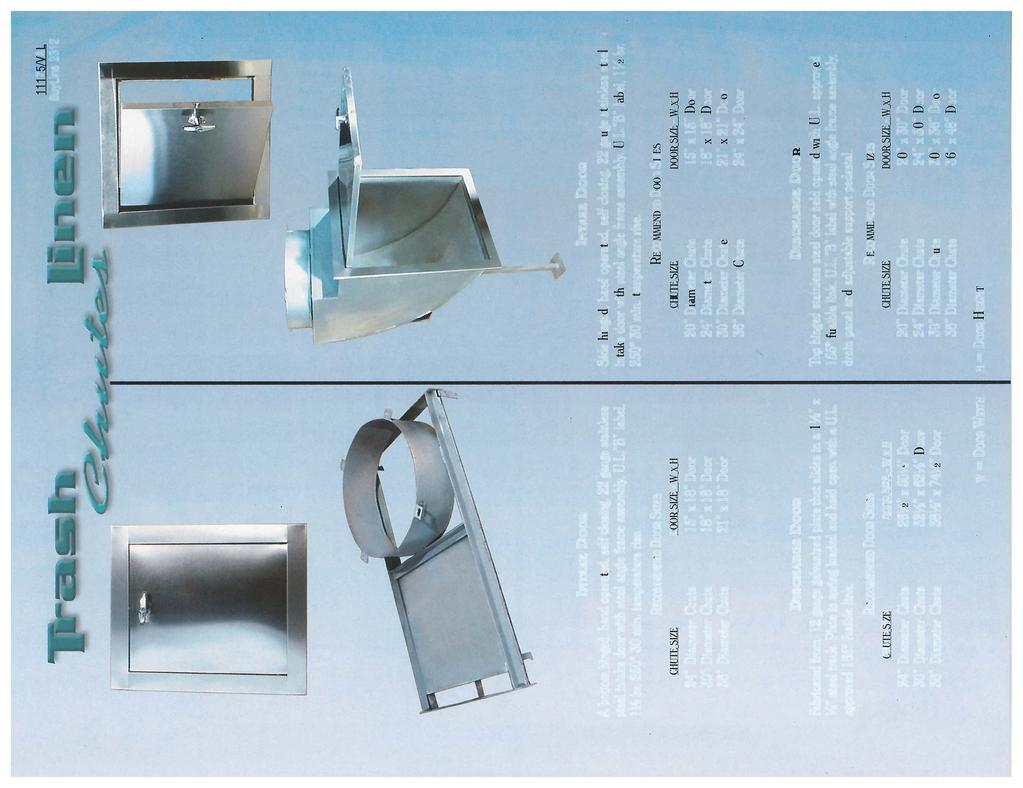
10 Trash/Linen Chutes Tenant Storage Lockers Recycle Systems P.O. Box West Quincy St. Lakeland, FL 33802/33815 Phone: Fax: Installation of a Valiant chute requires very few tools; hammer, screwdriver, drill, wrench and level. Materials are prefabricated to dimensions shown on shop drawings, therefore, no field cutting or fitting is required. The joints are slip joints to permit slight field height variations. Intake doors, frames and hardware are prefabricated and installed on each intake section throat, fully assembled. Doors and pneumatic closure tension are adjusted. The protective covering on the doors should be removed only after completion of plastering and painting. Install Instructions 1. Distribute chute sections, typically one intake and one b section per floor, noting that the top intake section will have a flushing head and a sprinkler head. 2. On the first floor above the discharge room, place a floor support angle over floor opening with cross members parallel to the intake door.
11 3. Set the first intake section, this section has 4 a-clips with slots welded to the bottom of it, into the floor opening and seat the support clips over the floor support. 4. After first intake section has been set, slip the beaded end of the plain chute section ( b section) into the intake section making sure it is sealed all around. Some floor heights may require multiple b sections. Check with level to plumb chute as installation proceeds. Sprinkler Head 165 Automatic Brass, ½ IPS Flushing Head ½ IPS, located above top intake door.
12 5. Repeat steps #2, #3 and #4 on the remaining floors. te the floors requiring intakes with sprinkler heads. Per NFPA, this means the top floor and at alternate floor levels with a mandatory one at the first intake floor. 6. After installation of the top intake section and final b sections, the final beaded section or sb section of chute is installed to protrude above the roof. 7. Place vent assembly over the sb section protruding through the roof, until the vent is seated onto the roof. Secure the vent body to the sb section using ¾ long tek-screws. Attach flashing to the roof, the roofer may then finish over the flashing assembly. 8. After all floors of chute have been installed, starting at the first intake floor, plumb and level intake doors. Make sure that the face of the doors will be flush to the proposed wall. Fasten the floor support frames to the floor slab. The frames are to be anchored per local building codes.
13 9. Complete installation in the discharge room. Slip the discharge sleeve, this sleeve has 4 angle clips on each end, over the section of chute projecting through the first floor slab. Match the clips and secure with (4) 2 ½ long bolts and nuts. Secure the discharge in the same manner to the sleeve. If the discharge is a horizontal rolling type, slide the door back and connect the fusible link to the angle clip on the bottom of the door. If the discharge is hopper style, attach the top hinged door to the throat of the hopper. Attach the door support arm to the flange of the door using the bolts and nuts supplied. Open the door and connect the fusible link to the eye ring located on the door. OR
14 Standard Floor Elevation
15


16


17


18


19

20 P.O. Box West Quincy St. Lakeland, FL 33802/33815 Phone: Fax: Valiant Products, Inc. Trash/Linen Chutes Tenant Storage Lockers Recycle Systems Letter of Transmittal Date: February 13, 2015 Valiant Job.: To: Landsouth Construction 1680 The Greens Way, Suite 100 Jacksonville Beach, Florida Phone: Attention: Justin Marchant; Jason Fansler Project: Uptown At Delray Location: Delray Beach, Florida For Approval For File and Field Use Please find enclosed 1 copy (copies) of compactor drawings. We will require the following information before we may proceed: One (1) set of approved shop drawings. Desired Delivery Date Shipping address or directions if we are to install. Jobsite Superintendent Jobsite Phone Number Jobsite Fax Number Field Measurements For Information Only Review, Sign and Seal ** NOTE: Drawings must be received approved sixty (60) days prior to needing product on jobsite. Cut off date is the 15 th of every month. Please feel free to call if you have any questions. David Smith Design Engineering
21
22
C. Samples for Initial Selection: Manufacturer's color charts showing the full range of colors available.
 SECTION 105113 - METAL LOCKERS PART 1 - GENERAL 1.1 RELATED DOCUMENTS A. Drawings and general provisions of the Contract, including General and Supplementary Conditions and Division 01 Specification Sections,
Installation Instructions - Model V4JSD 1
 Installation Instructions - Model V4JSD 1 Support Assemblies: Parts list: (Note see enclosed cut sheet for quantities and dimensional information) A vertical structural member (1 ½ x 1 ½ modular frame)
SECTION GARBAGE CHUTE. Wilkinson Chutes Canada Toronto, Ontario, CANADA
 Version 00 WILKINSON HUTES ANADA PAGE OF This section is based on a system produced by: Part GENERAL RELATED DOUMENTS - GARAGE HUTE Wilkinson hutes anada Toronto, Ontario, ANADA -- A The general provisions
Spring Loaded All Season Roll-Up Doors
 Spring Loaded All Season Roll-Up Doors STAND-OFF MOUNTING METHOD INSTALLATION INSTRUCTIONS READ THIS FIRST Carefully examine the crate(s) for damage before opening. If the carton is damaged, immediately
Spring Loaded SCREEN-PRO. All Season Roll-Up Doors IN-JAMB MOUNTING METHOD INSTALLATION INSTRUCTIONS READ THIS FIRST
 Spring Loaded SCREEN-PRO All Season Roll-Up Doors IN-JAMB MOUNTING METHOD INSTALLATION INSTRUCTIONS READ THIS FIRST Carefully examine the crate(s) for damage before opening. If the carton is damaged, immediately
Locker Pedestal Installation Instructions
 Locker Pedestal Installation Instructions LK-PED-INST-0314r1 Parts List Single Pedestal Back to Back Pedestal Horizontal Support Tube TS-169 Post Flange TS-190 Post Cap Fasteners Provided: #8 x ¾ round
COPPER / FIBER MANAGER RACK INSTALLATION INSTRUCTIONS PX Standard Release A March 2008
 COPPER / FIBER MANAGER RACK INSTALLATION INSTRUCTIONS PX101425 Standard Release A March 2008 A UPON RECEIPT OF YOUR Copper / Fiber Manager Rack Great care has been taken to insure that your Copper / Fiber
Clopay Models 835/837 Sliding Door System Installation Guide
 Clopay Models 835/837 Sliding Door System Installation Guide The aim of this instruction is to guide you through the process of construction and fitting of Sliding Doors. Due to the number of sizes available
Dublin Stalls Installation Instructions
 Dublin Stalls Installation Instructions RAMM Horse Fencing and Stalls 13150 Airport Hwy. Swanton, OH 43558-9615 1-800-434-8456 Rev. 9/13/17 Part Identification Round Track Bracket (4) (Not Painted) Round
96 (Standard Length)
") Setbacks 96 (Standard Length) Bike Files may be lined up end to end to fill the available space. A 36 aisle should be left between the ends of bikes in racks facing one another. 36 aisle 50 Installation
Setbacks 96 (Standard Length) Bike Files may be lined up end to end to fill the available space. A 36 aisle should be left between the ends of bikes in racks facing one another. 36 aisle 50 Installation
Fold-A-Way Patio Door ASSEMBLY & INSTALLATION GUIDE
 Fold-A-Way Patio Door ASSEMBLY & INSTALLATION GUIDE This instruction guide provides the minimum recommended procedures to correctly prepare the rough opening, install a fold-a-way patio door unit and apply
Sutton Screened in Awning / Porch
 Sutton Screened in Awning / Porch Sections: Project Overview Roof Work Cedar Framing Canopy Frame Screen Frames Misc. Sheet 1 - - - Index Sheet 2 - - - Project Summary Sheet 3 - - - Roof Work overview
INSTALLATION INSTRUCTIONS FOR FRONT CASTING DECK RAIL Ranger
 INSTALLATION INSTRUCTIONS FOR FRONT CASTING DECK RAIL Ranger TOOLS REQUIRED FOR INSTALLATION: Drill motor, (1) 5/16 inch drill bit, (1) 13/64 drill bit, (1) 3/16 inch hex wrench (1) 3/32 inch hex wrench.
Installation Instructions
 AMPCO Stainless Steel and Baked Enamel Toilet Partitions AMPCO Florida 11400 NW 36 th Avenue Miami, FL 33167 T. 305.821.5700 florida@ampco.com AMPCO Texas 201 Railroad Avenue Sanger, TX 76266 T. 940.458.7401
INSTALLATION INSTRUCTIONS FOR PLASCORE F5075 FRAME WALL
 INSTALLATION INSTRUCTIONS FOR PLASCORE F5075 FRAME WALL The following information is provided by Plascore, Inc., as a general guideline for the installation of the F5075 Frame Wall System. This information
THANK YOU FOR PURCHASING FROM HERITAGE PATIOS
 Installation Guide THANK YOU FOR PURCHASING FROM HERITAGE PATIOS Your purchase is engineered by nearly a half century of commercial and residential product design proudly manufactured in the USA from responsibly
Boxed Shed. QUAKER or A-FRAME SIZES: 6 x 8 6 x 10 T1-11Siding
 Boxed Shed QUAKER or A-FRAME SIZES: 6 x 8 6 x 10 T1-11Siding Required Equipment; * Power Drill with square head bit * Hammer, Square, Gloves & an Allen wrench * Step Ladder Screws Supplied; * 2 for roof
Installation Guidelines
 Page 1 Tools You ll Need 4 ft. Carpenter s level Chalk line (to mark U channel locations) Cordless drill/nut driver Caulking gun Chop saw with a metal cutting blade on it (required to make accurate and
Steel Roll Forming Plant. horse stalls. midwestmanufacturing.com. Front wall. Fax Effective 1 Oct 2014
 s LET MIDWEST HELP you Custom build your own STABLE system with these wall sections. partition section partition section partition section door Front wall wall section door Front wall 46 Fax 715-876-5564
Oxford Stalls Installation Instructions
 Oxford Stalls Installation Instructions RAMM Horse Fencing and Stalls 13150 Airport Hwy. Swanton, OH 43558-9615 1-800-434-8456 Rev. 8/15/17 Before You Start Typical stall sizes are 10 x 10, 12 x 12 or
WPS crew Doors Installation instructions
 WPS-132-133 crew Doors Installation instructions ORDER OF INSTALLATION FOR A COMPLETE ENCLOSURE OF A CREW WPS (Weather Protection System) IS AS FOLLOWS: 1. Heater 2. Rear Thresholds - Right Hand & Left
Introduction. Depending on your kennel project, you may have some or all of the following hardware: Part # Description Part # Description 1468
 Introduction Thank you very much for your investment in Mason kennels. We take great pride in providing our customers with the highest quality animal enclosures combined with an enjoyable ordering experience.
Series 7600 Installation Instructions Aluminum Multi-Slide Door (Pocketing)
") Series 7600 Installation Instructions Aluminum Multi-Slide Door (Pocketing) Things to Know Before You Start Things to Know Before You Start Removal of Old Fenestration Products Ensure any old fenestration
Series 7600 Installation Instructions Aluminum Multi-Slide Door (Pocketing) Things to Know Before You Start Things to Know Before You Start Removal of Old Fenestration Products Ensure any old fenestration
MOTORIZED STANDARD SHADE WITH CABLES Installation Instructions
 Tools Needed Drill Measuring Tape Pencil 2 Level Plumb Line ¼ Masonry Drill Bit Hammer Linesmans Pliers Cable Cutters Phillips & Flat-Head Screw Driver 11/32 Socket or Open End Wrench 5/32 Allen Wrench
In-Tube Motorized SCREEN-PRO. All Season Roll-Up Doors IN-JAMB MOUNTING METHOD INSTALLATION INSTRUCTIONS READ THIS FIRST
 In-Tube Motorized SCREEN-PRO All Season Roll-Up Doors IN-JAMB MOUNTING METHOD INSTALLATION INSTRUCTIONS READ THIS FIRST Carefully examine the crate(s) for damage before opening. If the carton is damaged,
BIKE FILE (301)
") B IK E F I L E High Efficiency The Bike File is our most space efficient u-lock compatible product. Sturdy sliding hangers allow nine bikes to be securely stored in an eight-foot section while allowing
B IK E F I L E High Efficiency The Bike File is our most space efficient u-lock compatible product. Sturdy sliding hangers allow nine bikes to be securely stored in an eight-foot section while allowing
RAMPAGE P R O D U C T S. INSTALLATION INSTRUCTIONS BRONCO ZIPPER FASTRACK TOP PART #984xx BRONCO TOOLS REQUIRED
 RAMPAGE P R O D U C T S 84 (+/- 1/4 ) INSTALLATION INSTRUCTIONS BRONCO ZIPPER FASTRACK TOP PART #984xx BRONCO 1966-1977 TOOLS REQUIRED 3/8 WRENCH 7/16 WRENCH ½ WRENCH #2 PHILLIPS SCREWDRIVER 1/8 DRILL
SILVERBACK INSTALLATION MANUAL
 SILVERBACK INSTALLATION MANUAL R-SERIES SOLAR RACKS T OLL FREE 866-766-3727 WWW.ROOFSCREEN.COM Introduction... 2 The Silverback Solar Racking System... 2 This manual... 2 Application... 2 System Overview...
Chapter 12 - Windows and Doors
 Chapter 12 - Windows and Doors Contents Chapter 12 - Windows and Doors... 12-1 Timing & Prerequisites... 12-2 Verifying Windows and Doors Orders... 12-3 Windows... 12-4 Prepare the Window Openings... 12-4
Heavy Wall Applied Stop Tube Frame and Door Installation
 INSTALLATION INSTRUCTIONS Heavy Wall Applied Stop Tube Frame and Door Installation Read all instructions before beginning installation. These instructions are provided to help prevent installation problems
INSTALLATION MANUAL. All Recessed Wall-Mount Modules Front-Loading, Rear-Loading, Parcel-Only, Collection Box, Trash/Recycling Bin
 INSTALLATION MANUAL All Recessed Wall-Mount Modules Front-Loading, Rear-Loading, Parcel-Only, Collection Box, Trash/Recycling Bin TABLE OF CONTENTS GENERAL INFORMATION AND ADVISORIES 3 USPS INSTALLATION
GLOSSARY OF TERMS SECTION 8
 GLOSSARY OF TERMS SECTION 8 Anchor Bolt Angle Base Plate Bay Blocking CCB Centerline Chord Cladding Clip Closure Strip An A-307 steel bolt embedded in the concrete footing to anchor the base plate of the
EUROLINE CLASSIC SOLID SURFACE Installation Instructions
 EUROLINE ASSIC SOLID SURFACE Installation Instructions 12/01/15 EUROLINE ASSIC SOLID SURFACE Installation Instructions Before you begin, please note the following considerations: Safety First! Please use
Installation Instructions Evolve Cabinets
 Installation Instructions Evolve Cabinets Follow these installation instructions for Evolve upper, base, tall, and scope cabinets with AireCore or wood composite construction. Tools needed: Flat head screwdriver
Preference Collection 5531 Accessory Console I NSTALLATION GUIDE
 Preference Collection 5531 Accessory Console I NSTALLATION GUIDE WARNING Failure to install the 5531 as described in this installation guide may cause the unit to collapse, resulting in serious injury
Track Rack. * Track Racks are not lockable
 The Track Rack s unique staggered, sliding hook design creates the greatest parking efficiency while still providing easy access to any particular bike. When adding or removing a bike to the rack, simply
External Motor Driven SCREEN-PRO. All Season Roll-Up Doors WALL MOUNTING METHOD INSTALLATION INSTRUCTIONS READ THIS FIRST
 External Motor Driven SCREEN-PRO All Season Roll-Up Doors WALL MOUNTING METHOD INSTALLATION INSTRUCTIONS READ THIS FIRST Carefully examine the crate(s) for damage before opening. If the carton is damaged,
PH03 Comfort XL Front Assembly Replacement Instructions
 PH03 Comfort XL Front Assembly Replacement Instructions POLYJOHN USA PolyJohn Enterprises Corp 2500 Gaspar Ave. Whiting, IN 46394 Phone: 800-292-1305 Fax: 219-659-0625 www.polyjohn.com info@polyjohn.com
PLAYLAND 72 SPIRAL SLIDE 3.5 Posts, 3.5 Posts / 48 Grid and 5 Posts
 PLAYLAND 72 SPIRAL SLIDE 3.5 Posts, 3.5 Posts / 48 Grid and 5 Posts USER GROUP: 2-12 RECOMMENDED CREW: 2 people TOOLS REQUIRED: T-30 TORX tool (supplied by manufacturer) T-45 TORX tool (supplied by manufacturer)
EmagiKit. Privacy Pod Plus. Quiet. Easy. Affordable. INSTRUCTIONS ASSEMBLY
 EmagiKit Privacy Pod Plus Quiet. Easy. Affordable. INSTRUCTIONS ASSEMBLY DIMENSIONS AND COMPONENTS 47 47 Ceiling Unit 2-B 2-L 2-R Glass Door Corner Trim Door Handle 90 Adjustable Height Work Surface 1-B
Salter Industries Spiral Stair
 Salter Industries Spiral Stair The Leader in Spiral Staircases Continuous Sleeve Stair Installation Instructions TOOLS NEEDED: 1. Electric drill with hex chuck and Phillips bit 2. Drill bits 1/8", 1/4",
TOLL FREE:(888) FAX:(941) ASSEMBLY of ProTEC CONCRETE STRUCTURAL INSULATED PANEL
 FAX:(941) ASSEMBLY of ProTEC CONCRETE STRUCTURAL INSULATED PANEL") ASSEMBLY of ProTEC CONCRETE STRUCTURAL INSULATED PANEL The ProTEC panels are manufactured with grooves on all four sides to accept the steel components. This grooving applies to the regular panel whose
ASSEMBLY of ProTEC CONCRETE STRUCTURAL INSULATED PANEL The ProTEC panels are manufactured with grooves on all four sides to accept the steel components. This grooving applies to the regular panel whose
DOCK WEDGE - STANDARD
 DOCK WEDGE - STANDARD INSTALLATION INSTRUCTIONS WOOD HEADER READ ALL INSTRUCTIONS BEFORE INSTALLING SEAL. SUPER SEAL MFG. LTD. WILL NOT BE HELD RESPONSIBLE FOR IMPROPER INSTALLATION OF ANCHORING DEVICES,
HEAVY DUTY 11 STEEL CABINET
 HEAVY DUTY STEEL CABINET ASSEMBLY INSTRUCTIONS ONE DRAWER BASE CABINET 05-206 Parts List Part No Description Qty Image ONE DRAWER BASE CABINET Part No Description Qty Image SB- Cabinet Body EH-0 Euro Hinge
SunTrackerTwo Preparation
 TOLL FREE:(888)29-2705 FAX:(941)77-9460 info@eco-smart.com SunTrackerTwo Preparation Cutting Holes and Preparing Curbs T.G.I Or Truss CIRALIGHT INSTALLATION MANUAL Page 1 Cutting Holes and Preparing Curbs
Stainless Steel 95C34 Series
 Stainless Steel 95C34 Series Toilet Partition Installation Manual PHONE: FAX: 866-317-2786 ATTENTION DO NOT MIX FASTENER PACKS EACH FASTENER PACK HAS THE NECESSARY BOLTS, BARRELS AND SCREWS TO INSTALL
ALL SEASON PATIO COVER
 ALL SEASON PATIO COVER 61 Where the All Season Patio Cover is to be attached to the home, create a level line showing where the top of the mounting rail is to be located. Install each section with the
Qwik-Fence Installation Instructions
 Qwik-Fence Installation Instructions 1 Tools Required The following installation instructions should be used as a guide for installing Folding Guard Qwik-Fence Partitions. Good common sense and appropriate
Installation Instructions for 30, 40, and 50 Series Plastic Laminate Toilet Partitions.
 GENERAL PARTITIONS Mfg. Corp. 170 Peninsula Drive, Erie PA 16505-443 P.O. Box 8370, Erie, PA 16505-0370 Phone (814) 833-1154 FAX (814) 838-3473 Installation Instructions for 30, 40, and 50 Series Plastic
TOOLS REQUIRED FOR ASSEMBLY. Rubber Mallet or Plastic Tip Hammer PARTS REQUIRED FOR ASSEMBLY OF SINGLE ENTRY STARTER.
 TOOLS REQUIRED FOR ASSEMBLY Rubber Mallet or Plastic Tip Hammer Top Cover Support PARTS REQUIRED FOR ASSEMBLY OF SINGLE ENTRY STARTER Back Stop Divider Closed 'L' Upright Slotted Reinforcement Support
8' x 22' Cash Hut INSTALLATION INSTRUCTIONS
 PARTS IST J I G A A J I C F D E B B K H A A K H G A Posts w/ Feet (4pcs) J eft End Panels (Front & Back) [4'3"x7'8"] (2pcs) B 22' Peak Trusses (2pcs) K Right End Panels (Front & Back) C 8' Centre Truss
GROWING BETTER THROUGH DESIGN. 6ft Lean-To LEAN-TO. Assembly Instructions 04/02
 GROWING BETTER THROUGH DESIGN 6ft Lean-To LEAN-TO Assembly Instructions 04/02 6ft Lean-To Greenhouse Base Plan Introduction/Tools/Contents / / Contents This is a copy of our Lean-To greenhouse base plan.
Series 7650 Installation Instructions Sliding Glass Door
 Series 7650 Installation Instructions Sliding Glass Door Things to Know Before You Start Things to Know Before You Start Removal of Old Fenestration Products Ensure any old fenestration products are removed
#916 CLASSIC 16 GUN CABINET ASSEMBLY INSTRUCTIONS
 Thank you for purchasing this quality product. A list of PARTS and INSTRUCTIONS is included to assist you. Unpack and identify all parts included on the Parts List and Hardware List. If parts are missing,
D. Drill Bolt Holes Through Topper Shell and Bed Rails
 A. Check Mounting Kit Check to make sure that all of the following items are included in the mounting kit. Call 515-272-4372 if you need to obtain a part from BrandFX. Double-stick tape (1 roll) White
Installation Guidelines
 Page 1 Tools You ll Need 4 ft. Carpenter s level Chalk line (to mark U channel locations) Cordless drill/nut driver Caulking gun Chop saw with a metal cutting blade on it (required to make accurate and
Best Barns USA. Regency Deluxe. 8' x 12' Assembly Book. revised February 15, 2017
 Best Barns USA Assembly Book revised February 15, 2017 Regency Deluxe 8' x 12' Manufactured by Reynolds Building Systems, Inc. 205 Arlington Drive, Greenville, PA 16125 This manual is copyrighted. Under
P a r k c o n s o l e s i n k a s s e m b l y i n s t r u c t i o n s
 P a r k c o n s o l e s i n k a s s e m b l y i n s t r u c t i o n s Before You Begin: Professional installation by two-person crew is required for this fixture. Install water supply and drain piping
WADE 2-1. Universal Carrier. Exclusive Features of 400 Series Universal Carrier for Lavatories, Urinals, Drinking Fountains.
 Universal Carrier Exclusive Features of 400 Series Universal Carrier for Lavatories, Urinals, Drinking Fountains. The 400 series carrier accommodates most urinal, water-cooler or hanger plate lavatory
Installation Instructions
 Contents Page General Information and Installer Tips.......... 2 Panels & Posts............................. 3 Enclosure Description..................... 4 Hinge Door Hardware................... 4-5 Step-by-Step
Top Closure Kit Accessory for Music Library System
 Assembly Instructions Top Closure Kit Accessory for Music Library System Contents Required Tools.....................................2 Installation Requirements............................2 Fasteners -
1/4 FRAMELESS DOOR WITH INLINE PANEL 1413A-1713A-1813A
 1/4 FRAMELESS DOOR WITH INLINE PANEL 1413A-1713A-1813A F AB GLASS AND MIRROR www.fabglassandmirror.com Call: +1 888-474-2221 Fax: (614)-334-4919 Office Timing: 8:30-18:00 EST info@fabglassandmirror.com
Best Barns USA. the Brookhaven 10' x 16' Assembly Book. revised March 23, 2016
 Best Barns USA Assembly Book revised March 23, 2016 the Brookhaven 10' x 16' Manufactured by Reynolds Building Systems, Inc. 205 Arlington Drive Greenville, PA 16125 724-646-3775 This manual is copyrighted.
PUSH-PULL-PROPS. and accessories ROBUSTA-GAUKEL GMBH MOUNTING TECHNOLOGY &CO.KG
 PUSH-PULL-PROPS and accessories MOUNTING TECHNOLOGY ROBUSTA-GAUKEL GMBH &CO.KG MOUNTING TECHNOLOGY PUSH-PULL-PROPS AND ACCESSORIES INDEX General information...................... 3 Push-pull-prop Type
FLUOROPOLYMER COATED DUCT FOR CAUSTIC ENVIRONMENTS
 DIVISION 23 FLUOROPOLYMER COATED DUCT FOR CAUSTIC ENVIRONMENTS Part I General 1.1 Related Documents A. All terms and general provisions of contract, General and Supplementary Conditions, and Specification
Melamine Plastic Laminate. Toilet Partition Installation Manual
 Melamine Plastic Laminate Toilet Partition Installation Manual PHONE: FAX: 1-866-317-2786 ATTENTION DO NOT MIX FASTENER PACKS EACH FASTENER PACK HAS THE NECESSARY BOLTS, BARRELS AND SCREWS TO INSTALL THE
SIMPLER BETTER FASTER
 SIMPLER BETTER FASTER 1. FITTING RING BEAMS DETAILS Always work anti-clockwise viewed from outside the roof. Each bar should be sequentially numbered, i.e. 1, 2, 3. Select the ring beam, position the left
K.D. LOCKER ASSEMBLY INSTRUCTIONS
 K.D. Locker Assembly Instructions PN 0860 K.D. LOCKER Updated /05 ASSEMBLY INSTRUCTIONS These Instructions Cover 3 Types of Lockers: VANGUARD, GUARDIAN AND INVINCIBLE II Contents General Instructions 1
EUROLINE CLASSIC PHENOLIC / EVERGREEN. Installation Instructions. Installation Instructions.
 EUROLINE ASSIC PHENOLIC / EVERGREEN EUROLINE ASSIC PHENOLIC / EVERGREEN Before you begin, please note the following considerations: Safety First! Please use proper safety gear when performing any installation.
Preference Collection and Treatment Console INSTALLATION GUIDE
 Preference Collection 5580.69 and 5580.96 Treatment Console INSTALLATION GUIDE WARNING Failure to install the 5580 as described in this installation guide may cause the unit to collapse, resulting in serious
Before Assembling the Storage Wall
 Chapter 1 Assembling the Lista Storage Wall Lista provides two types of standard Storage Walls: B251 and B255. The design, construction, assembly, and quality are identical for both types, however, B251
FOR PROFESSIONAL GARAGE DOOR INSTALLERS
 Composite Garage Doors Installation Instructions FOR PROFESSIONAL GARAGE DOOR INSTALLERS Tools required Screwdriver Claw Hammer Locking Pliers Power Drill Level with a 3/32" Drill Bit Utility Knife 9/16",
B. Shop Drawings: Include elevations, door edge details, frame profiles, metal thicknesses, preparations for hardware, and other details.
 SECTION 081113 - HOLLOW METAL DOORS AND FRAMES PART 1 - GENERAL 1.1 SUMMARY A. Section Includes: 1. Standard hollow metal doors and frames. 1.2 SUBMITTALS A. Product Data: For each type of product indicated.
Shay Cab - Floor & Roof
 Shay Cab - Floor & Roof Nelson Riedel Nelson@NelsonsLocomotive.com Initial: 1/20/04 Last Revised: 06/06/2004 Cab Floor: A cab floor was made at the same time as the tender floor. I was unhappy with some
WINDLOAD POST WayneMark 8000, 8100 INSTALLATION INSTRUCTIONS
 WINDLOAD POST WayneMark 8000, 8100 INSTALLATION INSTRUCTIONS Wayne Dalton, a division of Overhead Door Corporation P.O. Box 67, Mt. Hope, OH 44660 www.wayne-dalton.com See garage door owner s manual for
ELEGANCE SHOWER DOOR/ENCLOSURE INSTALLATION INSTRUCTIONS. Style A Style B Style C Style D
 ELEGANCE SHOWER DOOR/ENCLOSURE INSTALLATION INSTRUCTIONS IMPORTANT DreamLine reserves the right to alter, modify or redesign products at any time without prior notice. For the latest up-to-date technical
Chapter 12 - Windows and Doors
 Chapter 12 - Windows and Doors Contents Chapter 12 - Windows and Doors... 12-1 Timing & Prerequisites... 12-2 Verifying Windows and Doors Order... 12-3 Windows... 12-4 Prepare the Window Openings... 12-4
SERIES: CONFIGURATION: MOUNTING PACKAGE: 1200 Door-Door Frameless, sliding door
 SERIES: CONFIGURATION: MOUNTING PACKAGE: 1200 Door-Door Frameless, sliding door RDQCI5022 Rev.0 Page 1 Certified 06/01/2016 Tools: To install your New Shower Enclosure, you may need the following: Pencil
TrendWall Floor-To-Ceiling Panels Installation Instruction
 TrendWall Floor-To-Ceiling Panels Installation Instruction TrendWall Components Covered by this Instruction: Crown (and accessories) Floor Plate Solid Panel Filler Panel Wall Channel Door Section Pilaster
Installation And Care Instructions. Vertical Honeycomb Shades
 Installation And Care Instructions Vertical Honeycomb Shades Rev 5/2013 Table Of Contents Getting Started... 3 Parts Overview... 4 Materials Required... 5 Tools Required... 6 Outside Mount Installation...
Assembly Instructions
 Unite Panel System Hinge Door July 2016 #12 x / slotted hex washer head bolt Figure 1 threshold bracket frame Detail F threshold bracket threshold bracket (installed) #12 x / slotted hex washer head bolt
Arriva. Concealed frame doorsets. Installation instructions
 Arriva Concealed frame doorsets 1 2 Installation instructions 3 Thank you for choosing Arriva To ensure the installation process is simple and efficient we recommended you read this guide in full before
Installation Instructions
 AMPCO Solid Plastic Toilet Partitions AMPCO Florida 11400 NW 36 th Avenue Miami, FL 33167 T. 305.821.5700 florida@ampco.com AMPCO Texas 201 Railroad Avenue Sanger, TX 76266 T. 940.458.7401 texas@ampco.com
Extra Wide Designer Lockers Series Installation Instructions
 Extra Wide Designer Lockers 20000 Series Thank you for selecting the 20000 Series Extra Wide Designer Lockers. We are confident that the quality and construction of the lockers will prove to be a good
B. Shop Drawings: Include elevations, door edge details, frame profiles, metal thicknesses, preparations for hardware, and other details.
 SECTION 081113 - HOLLOW METAL DOORS AND FRAMES PART 1 - GENERAL 1.1 SUMMARY A. Section Includes: 1. Standard hollow metal doors and frames. 1.2 SUBMITTALS A. Product Data: For each type of product indicated.
INSTALLATION INSTRUCTIONS
 PARTS LIST ITEM PART DESCRIPTION QTY 73-A 503F 9MM 50G 5A 50E 505S 50H Connector Bracket Door Stops Support Bar Panel Glass Bracket Wall Mount Bracket Rollers Center Guide Recessed Finger Pull Fixed Panel
6X3 Oscar Shed Assembly Manual
 6X3 Oscar Shed Assembly Manual Revision #7 Jan 1st, 2017 Thank you for purchasing our 6x3 Oscar Storage Shed. Please take the time to identify all the parts prior to assembly. Please use Safety Eyewear
Rheem Room Sealed Kit - Installation Instructions. Installation must be carried out by a licenced plumber
 Rheem 631275 Room Sealed Kit - Installation Instructions Installation must be carried out by a licenced plumber General The Rheem Room Sealed Balanced Flue Kit is designed to connect to a 631275 heavy
INSTALLATION AND CARE INSTRUCTIONS
 INSTALLATION AND CARE INSTRUCTIONS Vertical Applications Honeycomb Shades CONTENTS Introduction...2 Before You Begin...3 Vertical Application Parts Overview...4 Materials Required...5 Tools Required...6
INSTALLATION INSTRUCTIONS
 INSTALLATION INSTRUCTIONS Special-Lite Restroom Partitions IMPORTANT - BEFORE YOU START... 1. Read through these installation instructions first to understand the order of work. 2. Check all components
Installation Instructions for Bifold Doors (JII103)
") Thank you for selecting JELD-WEN products. Attached are JELD-WEN s recommended installation instructions for premium composite, hollow and solid core molded Bifold Doors. Bifolds are designed for fast
Thank you for selecting JELD-WEN products. Attached are JELD-WEN s recommended installation instructions for premium composite, hollow and solid core molded Bifold Doors. Bifolds are designed for fast
10 x 10 Flat Top Pergola
 0 x 0 Flat Top Pergola A S S E M B L Y G U I D E Models: Venetian, Tuscany, Luxor, Acadia O P T I O N A L A C C E S S O R I E S Arch Kit System ( Arches) Privacy Fence Panel System ( Panels & Middle Post)
6 1/2 x 6 1/2 Flat Top Pergola
 6 / x 6 / Flat Top Pergola A S S E M B L Y G U I D E Models: Portland, Liberty O P T I O N A L A C C E S S O R Y Bolt Down Bracket Kit V.-0506 Ta b l e o f Co n t e n t s PAGE The Introduction & Overview......................................................
Assembly Instructions
 Selling Station Assembly Instructions View from above without top A B C D Rounded finished corners on A & D Square unfinished 3-sides on B & C Selling Station Components (2) 2' x 6' Side s Have a channel
Horizontal Cable Systems
 ALUMINUM RAILING INSTALLATION INSTRUCTIONS v2012 orizontal Cable Systems 1) Check Contents Of Packages: Verify that all parts have arrived and that they match the packing list. 1A) Coastal applications:
6 1/2 x 6 1/2 Wood Grain Flat Top Pergola
 / x / Wood Grain Flat Top Pergola A S S E M B LY G U I D E Models: Lakewood OPTIONAL ACCESSORY Bolt Down Bracket Kit V.- Ta b l e o f Co n t e n t s The PAGE Introduction & Overview.......................................................
INSTALLATION INSTRUCTIONS FOR CECO DOOR FLOOD RESISTANT DOOR AND FRAME ASSEMBLIES
 INSTLLTION INSTRUCTIONS FOR CECO DOOR FLOOD RESISTNT DOOR ND FRME SSEMBLIES GENERL The installation of flood resistant door and frame assemblies differs significantly from that of standard door and frame
TOOLS REQUIRED Metal Wood Wood and Metal Screws. #16 Drill #12-24 Tap. 1/8 Drill
 DEVICES COVERED IN THIS DOCUMENT: 4700S Surface Vertical Rod Device 4700SF Fire Exit Surface Vertical Rod Device TOOLS REQUIRED Metal Wood Wood and Metal Screws Sex Bolts #7 Drill ¼ -20 Tap #16 Drill #12-24
 www.wildmanconstruction.com Changing your toilet is an easy project that should take half a day or less. The most common toilet has a separate tank that mounts on top of the bowl. These instructions apply
Kocked Down with Ends Assembled
 Installation Instructions for Quarter Round (QR) Kocked Down with Ends Assembled Note: Prior to starting Installation, check unit/parts for damage. Please read entire Installation Instructions & review