Building Instructions ARTEMIS Sailing Canoe Day Six Version 1.0 Brian Pearson & Dr. Axel Schmid Day Six. Align and Glue Planks
|
|
|
- Bruno Collins
- 5 years ago
- Views:
Transcription


1 Version 1.0 Brian Pearson & Dr. Axel Schmid 2016 Align and Glue Planks Steps: Align boat, check dimensions Join planks provisionally Pull wires Glue the outside planks Tools and Materials: Epoxy putty powder, mixing cups and wooden spatula Spatula, painter's tape Two sawhorses Two battens Universal pliers and string cutter Today, the boat will be inverted and fixed on two sawhorses. Then, the seams are glued in two steps with epoxy. The epoxy has to cure between the two steps. That's a long lunch break. Unfortunately, the upper part of the bow is warped slightly to starboard: Control of important dimensions As long as the boat is still on a flat surface, recheck all important dimensions again. It is so easy to glue together a boat which has moved slightly and is no longer sitting square and true, and then get angry every time you look at it. To prevent this from happening we must recheck: - Are the bow and stern standing exactly upright? With a right-angle check whether the bow and stern are exactly upright. The rear looks really good: If you open the bow top wires and rasp the port side one or two mm finer Page 37


2 - Are all moulds perpendicular? This is controlled with the plumb line - or a big nut on a thread...., then the bow comes out exactly straight! Align boat on the sawhorses The boat is turned over. The frames A and E are clamped on the sawhorses. - Now is the last chance to check that the boat is not twisted. For this purpose two battens are clamped at the frames in a way that they touch the gunwale, so that they stick out the left and right under the boat. Peer over the centre of the boat. The two battens must be parallel: - -Are the distances between the moulds on the right and left the same? This can be easily checked with a ruler: Page 38


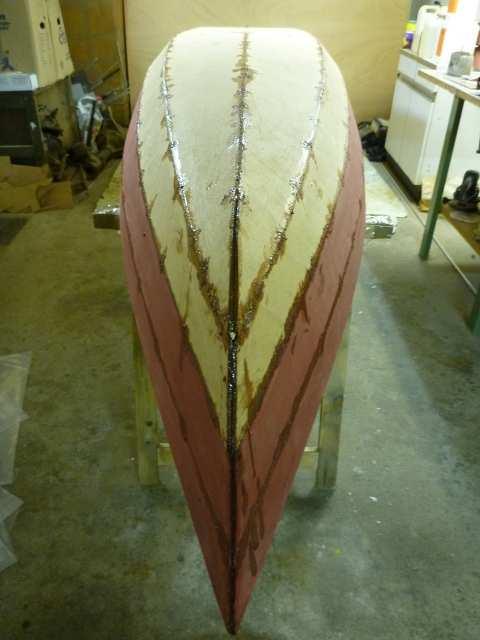
3 (The picture shows this step at a later date). -Are all planks really positioned exactly edge to edge? Are the plank seams straight and not wavy? If not, maybe tighten a few wires or add a few extra wires. Hull Seam Glueing first, we glue the plank seams only between the wires. And there you go: Mask the plank seams with painter s tape. To work as a glue, the epoxy needs to be thickened to a mayonnaise-like consistency. It must be so fluid that one can easily squeeze it in the plank seams. By cutting a few wires at the bow and stern, you can fill the seam with slightly thickened epoxy placed on the adhesive edge. Then firmly wire back up again. When assembling with wire again, check whether the bow and skeg still stand straight. To do this, aim with the eye directly along the Bow edge and skeg edge. Work then the epoxy putty well into the plank seams. The wired sections remain free of epoxy glue at the moment.. A narrow spatula is well suited to this work: comes from being coated with fibreglass cloth and epoxy. The filler is intended to bridge the seams. It is good if you work in the rather thin liquid filler with the spatula into the seam, but the filler must not come out on the inside of the plank. It really pays to carefully remove excess epoxy with a narrow metal spatula. Removal now is much easier than sanding away later! Pull Wires When the epoxy putty has hardened, all the wires are removed. To do this, cut them on the inside with the string cutter and then pull them gently with the slip joint pliers from the outside. Oops! When pulling out the wires, the bonding has separated at the bow! The bonds are to be so durable that the hull does not fly apart during subsequent sanding. They do not need to be very strong. With this building methodology, the wooden planks provide the form; the strength Nothing serious. I sand the seams again slightly, brush them with epoxy, apply some putty on the edges and put three wires and a spring clamp on. Page 39


4 Glue Planks When all the wires are pulled, I mix some epoxy with filler and fill the positions under the wires and all wire holes with putty. Then I pull off the painter s tape. (This must be removed now, before the epoxy putty hardens fully) The skeg gets a fillet of putty on both sides. For that, the epoxy is mixed a little thicker. Creating the fillet is easiest if a wooden spatula is used. The 3 mm cord is dipped in epoxy, so that it becomes saturated. Then apply epoxy to the front edge and attach the cord with small staple nails until the epoxy has cured. The excess epoxy putty right and left of the fillet is removed using a small metal spatula. On the finished boat, it will look like this: Finish the bow and stern The bow now gets added protection from glass fibre cord. Page 40


5 If you do not find this beautiful, you can create an edge with filler instead - like at the stern. Here's how: First, apply thick mixed up epoxy putty After drying, a smooth edge has formed that needs little sanding work: This is what the hull looks like now: Totally uneven seams, and rough edges. Don t worry, all of that will change tomorrow...., then tape down with construction film. Page 41
6 Page 42
Building instructions ARTEMIS Sailing Canoe Day Five Version 1.0 Brian Pearson & Dr. Axel Schmid Day Five. Assembly of Planks and Frames
 Building instructions ARTEMIS Sailing Canoe Version 1.0 Brian Pearson & Dr. Axel Schmid 2016 Assembly of Planks and Frames Steps: Assembling hull plansk with wire Install frames Align and check keel rocker
1Use the metal file to smooth
 Yamato: Step-by-step 85 Parts of the bridge and the hull a b c d e f a Part of the bridge b Part of the bridge c Part of the bridge d Radar x 2 e Part of the bridge x 2 f Wire Recommended tools and materials
Above are the offsets for the plywood panels.
 DinkyDink Plans Bottom Panel Half Station X Y X2 Y2 1 1/4 3/4 0 11 5/16 2 4 9/16 4 12 9/16 3 11 11/16 1/4 11 7/16 14 1/2 4 18 5/8 1/16 18 5/8 15 11/16 5 25 3/4 0 25 3/4 16 5/16 6 32 13/16 0 32 13/16 16
3Insert the second rod no. 4
 Yamato: Step-by-step 37 The stern block and searchlight control towers a b c d e f Recommended tools and materials Wood glue Sandpaper (no. 800 grain) Metal file Putty Craft knife For metal: Super Glue
Building Instructions ARTEMIS Sailing Canoe Workshop and Tools Version 1.0 Brian Pearson / Dr. Axel Schmid Two Sawhorses. Workshop and Tools
 Building Instructions ARTEMIS Sailing Canoe Two Sawhorses Workshop Yes, you can build the ARTEMIS sailing canoe in the garage, with good lighting, and assuming a power supply. To have room to work it needs
How to build a Javelin Skiff
 How to build a Javelin Skiff This is not your grandfather s plywood boat! The Javelin involves a high-tech type construction, called composite. The hull can be constructed with foam or plywood; these materials
5If the protruding part is. 6Place 1 as is shown in the. 7Place what was assembled
 Yamato: Step-by-step 49 The base of the bridge and strakes a c b d a Base of the bridge b Base of the bridge c Base of the bridge d Strakes x 10 THE BASE OF THE BRIDGE 1Smooth 1 to 3, first using the metal
Redwood strips are tacked to the templates, and edge-glued. Drive brads through into the templates before putting on fiberglass doth.
 1 Make the building form and attach templates to the crosspieces. Nail a strip down the center to hold the stems and templates in position. prototype canoe took about three weekends to build. She's broad
1Smooth pieces 4, 5 and 6, using
 Yamato: Step-by-step 109 Machine-guns, anti-aircraft guns and decking h e f a b c g d e f a Anti-aircraft gun base x 2 b Anti-aircraft gun (bottom) x 2 c Anti-aircraft gun (top) x 2 d Machine-gun base
CAUTIONS / INSTRUCTIONS
 CAUTIONS / INSTRUCTIONS EPOXY Epoxy is used for many purposes in the building of your boat. It is used to join wood, bond fiberglass, fill gaps, and seal the wood. We supply epoxy from Raka Boat Building
joining materials - wood
 UNIT D E S I G N A N D M A N U F A C T U R E : C O U R S E M A T E R I A L Wood joints joining materials - wood The majority of joints used in woodcraft have been designed specifically to attain the maximum
4Wrap piece 7 around a rod. 5Remove piece 7 from the. 6Close up the join in both
 Yamato: Step-by-step 193 Parts of the command bridge and sides a b c d g e a Bow fairlead b Anchor x 2 c Machine-gun firing control mechanism x 2 d Base of machine-gun fire control mechanism x 2 e Launch
3Position the hull of the ship as
 Yamato: Step-by-step 25 The hull and stern deck c b d a b d c e e f a Rear frame b Stern deck x 2 c Stern deck x 2 d Side wall x 2 Wood glue Sandpaper (no. 400 grain) Craft knife Pliers d Side wall x 2
1Take the keel (3) and
 and") 1 The hull and the bridge 1Take the keel (3) and apply PVA wood glue in the second slot from the left: a toothpick may make it easier. Take care: the left end is the one that has a projection. THE HULL
1 The hull and the bridge 1Take the keel (3) and apply PVA wood glue in the second slot from the left: a toothpick may make it easier. Take care: the left end is the one that has a projection. THE HULL
Deck Repair Grady White Runabout
 Deck Repair Grady White Runabout An older Grady White runabout with pedestal mounted captains chairs had suffered a structural failure at one of the pedestal bases. The deck in this area was cored. Inadequate
Bluenose II Part 2. Planking the Hull
 Planking the Hull Planking is time consuming and requires care, but it can be very satisfying to watch your creation take shape. It is also the point at which many would-be ship modelers throw up their
Please read and understand all instructions before building!
 D-Region Tomahawk The D-Region Tomahawk kit contains all the parts necessary* to build a flying high power rocket: (1) Pre-slotted main airframe (1) Payload airframe (1) Airframe coupler tube (1) Coupler
Max Launch Abort System Prod. No *Kevlar is a registered trademark of Dupont
 Flying Model Parts List Max Launch Abort System Prod. No. 3014 A 11820 - Body Tube 3.5 Diam x 5.5" Long B 11824 - Orange Capsule Base Shoulder Ring C 16032 - Laser-cut Ring motor mount rear D 16033 - Laser-cut
Building a Scarab 350 Trimaran
 This boat was designed to be built using flat panels. In either foam laminated panels or plywood. 1. The build time is less. Panels are lofted, cut out and joined on the frame. 2. Frame can be simpler.
BUILD THE. Soleil Royal. Pack 1. The flagship of King Louis XIV.
 BUILD THE Soleil Royal The flagship of King Louis XIV www.model-space.com Pack 1 Stage 1 Assembly Guide Hull frame, false keel and first deck half A 4 2 5 1 6 7 1A Smooth the surfaces of all the pieces
REVISION LIST CHAPTER 25: AFT WINDOWS. The following list of revisions will allow you to update the Legacy construction manual chapter listed above.
 REVISION LIST CHAPTER 25: The following list of revisions will allow you to update the Legacy construction manual chapter listed above. Under the Action column, R&R directs you to remove and replace the
Please read and understand all instructions before building!
 The X-Calibur kit contains all the parts necessary* to build a flying high power rocket: (1) Pre-slotted main airframe (1) Payload airframe (1) Airframe coupler tube (1) Coupler bulkplate (1) Coupler hardware
Building Instructions Diva cabin boat
 Building Instructions Diva cabin boat Order no. 3093/00 aero-naut Modellbau Stuttgarterstr. 18-22 D-72766 Reutlingen / Germany http://www.aero-naut.com 1 For pictured building instructions please see the
The following pages replace pages 7 thru 14 in the current printing of BUILDING THE PT ELEVEN. (As of December 2012.)This is a modified method for
This is a modified method for") The following pages replace pages 7 thru 14 in the current printing of BUILDING THE PT ELEVEN. (As of December 2012.)This is a modified method for gluing puzzle joints that we believe is simpler than the
The following pages replace pages 7 thru 14 in the current printing of BUILDING THE PT ELEVEN. (As of December 2012.)This is a modified method for gluing puzzle joints that we believe is simpler than the
Grade 11 Woods Lift Lid Coffee Table. Based on Under the big Top from Popular Mechanics Website
 Grade 11 Woods Lift Lid Coffee Table Based on Under the big Top from Popular Mechanics Website TABLE TOP 1. Select enough lumber to construct a top that is between 22 ½ and 24 wide after jointing. Ensure
Hatch Installation For Pygmy Solo and Double Kayaks
 Introduction/Overview Hatch Installation For Pygmy Solo and Double Kayaks The hatch kit consists of several wooden lips, strapping and hardware. The hatch is constructed by cutting a hole in your deck,
RFS Class II Rocket Assembly Instructions
 RFS Class II Rocket Assembly Instructions Instructions by: Loc Precision Photos by: Great Lakes Space Port Sheboygan Education Foundation, Inc. Welcome and thank you for joining the Rockets for Schools
Photo Essay How to Build an. Alaskan. Grand Banks Dory. Plans for this boat may be found at:
 Photo Essay How to Build an Alaskan Grand Banks Dory Plans for this boat may be found at: http://www.spirainternational.com/ How to Build an Alaskan Grand Banks Dory The Alaskan is an easy to build Spira
Building small wooden boats in Myanmar
 39 12 ft & 18 ft Prepare bottom Before fitting the keel, there are several steps to complete: 1) Cut frame ends and transom to length (level with bottom). 2) Bevel bottom edge of lower side planks; this
Pre-Paint>Wings>Fit ailerons. Objectives of this task: Materials and equipment required: Size the ailerons and pre-mould strips
 Pre-Paint>Wings>Fit ailerons Objectives of this task: In this task the ailerons and the pre-mould strips will be sized and trimmed, then flocked onto the wings and glassed in place, and the next day the
Please read and understand all instructions before building!
 Patriot M i s s i l e The 1/6-Scale Patriot kit contains all the parts necessary* to build a flying high power rocket: (1) Pre-slotted main airframe (1) Nose cone (4) Fins (1) Piston ejection kit: (1)
How to make a template to mount your plaque to a surface
 How to make a template to mount your plaque to a surface A piece of heavy paper 3 4 wider than your plaque on all four sides (paper grocery bag works great too) Small amount of paint (latex dries the fastest)
SAN FELIPE: Step by Step Pack 2
 Pack 2 Your parts Stern reinforcement Bulkheads The poop deck Bulkhead planks Planks Tools and equipment Knife Pencil Wood glue Sandpaper File a Using leftover 5 x 5-mm wooden strips, measure and cut beams
Tips & Tricks using Part 2
 Tips & Tricks using Part 2 Using the cobblestone mold #210...1 Making a dungeon diorama...2 Making torches...3 Making a textured door...4 Making a portcullis...5 Adding moss...6 Tips & Tricks using Bruce
#70 grit sand Putty knives, sized as needed #1 fine gray sand Corner tools Milestone acrylic liquid
 Countertops Supplies Tools White and/or gray Milestone cement 12 inch steel trowel #70 grit sand Putty knives, sized as needed #1 fine gray sand Corner tools Milestone acrylic liquid Hock Universal tints
Noville School Diorama Part 4 Making the Floors and Plastering the Walls and Ceilings
 Noville School Diorama Part 4 Making the Floors and Plastering the Walls and Ceilings Moulds and Materials Making the Floors Plastering the Ceiling Plastering the Walls Installing the Ceiling and Floor
Please read and understand all instructions before building!
 AGM-256 Pit Bull This kit contains all the parts necessary* to build a flying high power rocket: 1) Pre-slotted main airframe 1) Pre-slotted boat tail 1) Nose cone 4) Main fins 4) Canard fins 1) Piston
San Felipe: Step by Step Pack 3
 Pack 3 Your parts Bulwarks Gun port covers x 2 Tools and equipment Wood glue Sandpaper Brushes Wood stain Hammer Pin pusher/nails Razor saw a Remove the longer bulwark and test-fit it in place at the bow
Kitchen Step Stool. Premium Plan. In this plan you ll find: America s leading woodworking authority
 America s leading woodworking authority Premium Plan In this plan you ll find: Step-by-step construction instruction. A complete bill of materials. Construction drawings and related photos. Tips to help
Installing your SHOE KEEL
 Installing your SHOE KEEL The shoe keel is there solely to protect the bottom of the hull. On a windy day, it will offer some resistance to a side or quartering wind and will help to avoid being blown
How To Make A. Large Diameter Brayer
 How To Make A Large Diameter Brayer Charles G. Morgan Mossworks Studio 77 Moss Street Victoria, B.C. V8V 4M2 CANADA 2008 www.mossworks.com charlesgmorgan@yahoo.com I got the basic design for this homemade
Illustrated Guide to Building a Spira International Ply on Frame Boat
 Illustrated Guide to Building a Spira International Ply on Frame Boat Spira International, Inc. Huntington Beach, California Copyright, 2008 All Rights Expressly Reserved Building a Spira International
Continue gluing the remaining top parts ensuring the angled piece is glued well. Set aside and let dry. See photo below
 Radiator rev 1.1 The SE5a s radiator is one of the most recognized radiators in WW1. It is one of the components that defines the SE5a. The original SE5a has seen multiple radiator designs used during
LUNAR EXPRESS. Little
 Little LUNAR EXPRESS The Little Lunar Express kit contains all the parts necessary* to build a flying high power rocket: 1) Pre-slotted boattail 1) Airframe 5.5" long 1) Nose cone 2) Main fins 2) Stabilizer
Installation Instructions
 Please read all instructions before installing products. STORAGE: Keep crates in the upright position. When unpacking, store panels flat in a clean dry place. BEFORE INSTALLATION: Check for damage that
Central New York Rocket Team Challenge 2018 Rocket Assembly Instructions
 Central New York Rocket Team Challenge 2018 Rocket Assembly Instructions Note: These instructions vary from those provided by the manufacturer of the rocket kits. There is also considerable varying discussion
Cabinet is 90% assembled, all you need to do is to attach the legs, lay the glass top on the cabinet, connect the faucet, drains & ptrap.
 Things you might need for the installation: vessel sink, plumber's putty(home depot), liquid nails(home depot), Bucket silicone caulk(home depot), Putty knife Plumber's putty Pipe wrench Channel-lock pliers
Contents. Introduction. List of Materials. Glue, Resin and Fixings. Tools. Construction Sequence. Study Plans Sheet 3. Andrew Walters April 2012
 Mia Study Plans Contents C Andrew Walters April 2012 2 Introduction. 4 List of Materials. 5 Glue, Resin and Fixings. 6 Tools. 7 Construction Sequence. 10 Study Plans Sheet 1. 11 Study Plans Sheet 2. 12
Making a Cement Upper Molding Surface for Compression Molding of Shape&Roll Prosthetic Foot Cores
 Making a Cement Upper Molding Surface for Compression Molding of Shape&Roll Prosthetic Foot Cores Andrew Hansen, PhD Steven Steer, MS Kerice Tucker Elizabeth Klodd Craig Heckathorne, MS Northwestern University
Router Table. Construction
 Router Table A router table is an invaluable tool. The problem, however, is that ready-built router tables are usually relatively expensive and too narrow for many projects. This router table provides
Building a Scarab 18/650 folding trimaran
 Building a Scarab 18/650 folding trimaran The plans for these two boats will be sent by email and contain everything needed to build these boats, including rig and trailer drawings and a list of all materials
This article was written by Phill Brander (AUS), who has built many timber catamarans including a Paper Tiger.
, who has built many timber catamarans including a Paper Tiger.") Building a Paper Tiger Catamaran Scarfing Plywood Paper Tiger Catamaran GUIDES Warnings/Cautions As always, using any power tools, cutting implements or adhesives carries certain risks. Make sure you understand
Building a Paper Tiger Catamaran Scarfing Plywood Paper Tiger Catamaran GUIDES Warnings/Cautions As always, using any power tools, cutting implements or adhesives carries certain risks. Make sure you understand
Bateau.com PH18 CNC kit notes 1/5
 Bateau.com PH18 CNC kit notes 1/5 These building notes must be used in conjunction with the standard building notes included in the plans package for this boat. The PH18 kit is assembled as described in
Contents. Study Plans. 2 Introduction. 4 List of Materials. 5 Glue, Resin and Fixings. 6 Tools. 7 Construction Sequence
 Volare Study Plans Contents 2 Introduction 4 List of Materials 5 Glue, Resin and Fixings 6 Tools 7 Construction Sequence Study Plans The study plans consist of an abridged version of the first 7 pages
How to repair a wall or ceiling FREE
 How to repair a wall or ceiling FREE How to repair a wall or ceiling This guide shows how to repair walls and ceilings throughout the guide we only refer to walls but the same principles apply to ceiling
Building small wooden boats in Myanmar
 19 12 ft & 18 ft Fit remaining floors The remaining floors can now be cut to size by taking measurements at the boat. The timber required is given in step 1. See step 10, 11 and 20 for installation procedures.
Tools and Tips: ( 1 )
") Tools and Tips: As you build instructions will show in my many picture manual how to assemble. You can use your own methods as you desire, my results are very good. A smooth, flat work surface is very
Tools and Tips: As you build instructions will show in my many picture manual how to assemble. You can use your own methods as you desire, my results are very good. A smooth, flat work surface is very
PROJECT BEGINNER/INTERMEDIATE METAL/RESIN
 PROJECT BEGINNER/INTERMEDIATE METAL/RESIN FCT-CR-091816_05 A photograph taken by the Hubble Space Telescope inspired the design of this 13 4 x 1½-in. (44 x 38 mm) pendant. 2009 Kalmbach Publishing Co.
Engineering Directive
 Thing-a-ma-Jig Finishing To Finish a model means to apply paint and other decorations to complete the look of your model. Meaning to apply a finish. That is what we will discuss in this section. Applying
E S TORMINATOR TORMINATOR. Skill Level 4. EggStorminator Parts List. Skill Level 4 - Slightly Challenging
 Kit #050 Skill Level 4 Made In USA E S TORMINATOR GG TORMINATOR Skill Level 4 - Slightly Challenging The EggStorminator model rocket was designed around the rules of the National Association of Rocketry
12. Wings, Flaps, Ailerons and Struts
 12. Wings, Flaps, Ailerons and Struts Fit Aileron Hinges Reference: Drawing 20270K2 Photo 12.1 Parts Required: 2007092 Aileron LS 200809N Aileron RS 2001394 Hinge 3/16 A1 (4) 2001694 Hinge Pin (4) PH0059N
PITTS S2S CONSTRUCTION
 PITTS S2S CONSTRUCTION FUSELAGE CONSTRUCTION 1) Place the right fuselage side over the plan and mark the former positions. Place the left side over the right side and mark the former positions. Glue F1
1 ¼-inch Pocket Screws Brad Nailer or Hammer 1 ¼-inch Brad Nails Clamps
 MATERIALS: TOOLS: (4) 2 x 6 x 8 Ft. Boards Tape Measure (2) 2 x 4 x 8 Ft. Boards Carpenter s Square (7) 1 x 4 x 8 Ft. Boards Pencil (2) 1 x 3 x 8 Ft. Boards Drill (1) Half Sheet of ¾-inch Thick Plywood
Cold curing adhesive K-X280
 Instructions for use English Cold curing adhesive K-X280 A4048-1.0 en English 1 Safety instructions... 3 2 General information... 3 2.1 Scope of delivery for K-X280... 3 2.2 Accessories required for installation...
Repairs. Chapter 10 Repairs 10. 1
 10 Repairs Chapter 10 Repairs 10. 1 Repairs As an installer, you will probably be called upon to repair damage to a resilient floor. Here are some of the most common problems and the recommended repairs
HOGNOSE PSALTERY KIT Assembly Instructions
 HOGNOSE PSALTERY KIT Assembly Instructions WOOD PARTS 1 Plywood Top (Soundhold Pre-Cut) 1 Plywood Bottom 2 Pin Blocks 1 Short Side 1 Long Side 1 Bridge 1 Scrap of Plywood HARDWARE 1 L-Handle Tuning Wrench
Part 2 Lining off and planking
 Part 2 Lining off and planking Lining off the hull for planking Those of you who have built one of my projects in the past probably know how I have always stressed the importance of lining of your hull.
A Skin-on-Frame Pram. Designed by Dana Munkelt. Drawings by Andrew Walters. Duckworks Boatbuilder's Supply duckworksbbs.com
 A Skin-on-Frame Pram Designed by Dana Munkelt Drawings by Andrew Walters Duckworks Boatbuilder's Supply duckworksbbs.com "" is a small skin-on-frame (SOF) pram design with a twist; a solid plywood floor.
A Day House. A View of One Way to Finish the Exterior of The Day House. Read these instructions all the way through before beginning this project.
 A Day House A View of One Way to Finish the Exterior of The Day House Read these instructions all the way through before beginning this project. General Comments For the purposes of this project, the standard
Miniature Steam Models Wattle Steam Powered Launch
 Miniature Steam Pty Ltd Bringing the Highest Standards to Model Engineering Assembly Instructions Miniature Steam Models Wattle Steam Powered Launch Manufacturer: Miniature Steam Pty Ltd PO Box 16 Montrose
My Dreamhouse Add - A - Room
 Instructions for Kit #AG185 Real Good Toys 10/15 My Dreamhouse Add - A - Room This kit will add an additional level to your 'My Dreamhouse' dollhouse. The ideal time to include this Add A Room in your
ADVANCED ROCKETRY. Page 01. What you will need to build the Quest MEAN GREEN. Parts and exploded view of the Quest MEAN GREEN. Prod No.
 ADANCED Prod No. 5013 * What you will need to build the Quest MEAN GREEN Hobby Knife * Pencil Straight Edge Aliphatic Resin Wood Sanding Sealer & Brush Spray Paint Parts and exploded view of the Quest
Cardboard Model Buildings
 Cardboard Model Buildings Get more model kits from http://www.modelbuildings.org PRINTING & ASSEMBLY TIPS: These OO designs can easily be resized by reducing the print percentage as follows: OO scale is
The Serpent Website s Squarpent
 Construction Guide The Serpent Website s Squarpent Neither The Serpent Website or the author make any guarantees that the following instructions are free of errors, or that a resulting instrument (the
Building an Unfeathered Paddle with a Wood Shaft and Carbon Fiber Blades
 Building an Unfeathered Paddle with a Wood Shaft and Carbon Fiber Blades by Duane Strosaker Choosing the Wood Two 3/4" pieces of Sitka spruce laminated with epoxy for an unfeathered one-piece paddle. For
Installation Instructions
 Aspex Digitally Printed Wall Art PL PREMIUM HEAVY DUTY ADHESIVE ASPEX WALL ART DOUBLE SIDED FOAM TAPE Installation of Aspex Digitally Printed Wall Art with Foam Tape and PL Premium Adhesive. Maximum size
10. Wing prep and subassembly
 Date Section Objective: Construct and fabricate the sub-assemblies of the wing panel. Required Parts: Wing left 11gal PN104-300, Wing right 1gal PN104-400, Wing left 15 gal option PN104-322, Wing right
Car Construction E-Book
 Physics Lecture 15 - Building the Simple But Fast (SBF) Car - Part 2 Introduction - This lecture continues on where Lecture 14 left off- Explain to your Cub partner how Archimedes in about 100 AD first
This Manual Covers The Construction Of A Hood Scoop Plug From The Drawing Board. Through Construction. To Final Fitting.
 1 This Manual Covers The Construction Of A Hood Scoop Plug From The Drawing Board. Through Construction To Final Fitting. 2 TABLE OF CONTENTS: INTRODUCTION: 3 MAKING A PLUG FOR A CUSTOMIZED PRODUCT. 4
Build the. Steam Locomotive. Pack 06
 Build the Steam Locomotive Pack 06 Build the Steam Locomotive Contents Step by step Stage 38: The boiler band Stage 39: Sand spreader pipe main cocks Stage 40: Building up the dome Stage 41: The sand spreader
Treviso POCKET BILLIARD TABLE INSTALLATION MANUAL. SERVICE DEPARTMENT P.O. BOX 68 BRISTOL, WI 53104
 Treviso TM POCKET BILLIARD TABLE INSTALLATION MANUAL www.brunswickbilliards.com SERVICE DEPARTMENT P.O. BOX 68 BRISTOL, WI 53104 51-905881-000 NOVEMBER 2008 NOTE: Please use the instructions in this manual
Canopy Gluing Procedure for the RV-8/8A. Eric Wolf RV-8A (Finish Kit at time of writing) (262) February 3, 2006
 (262) February 3, 2006") Canopy Gluing Procedure for the RV-8/8A Eric Wolf RV-8A (Finish Kit at time of writing) wolfe@msoe.edu (262)-989-9653 February 3, 2006 Introduction I decided to glue on the canopy because I have heard
Canopy Gluing Procedure for the RV-8/8A Eric Wolf RV-8A (Finish Kit at time of writing) wolfe@msoe.edu (262)-989-9653 February 3, 2006 Introduction I decided to glue on the canopy because I have heard
Step by Step Wing Bagging
 Step by Step Wing Bagging By Evan Shaw 073 589 9339 evanevshaw@gmail.com Preparing the Leading Edge 1. Cut cores. (Cutting of wing cores is covered in another article elsewhere) 2. Sand the LE to a nice
San Felipe: Step by Step Pack 6
 Pack 6 Your parts Framing Tools and equipment Glue Knife Sandpaper Superglue Tweezers Clear varnish a Retrieve the grating that you assembled on Page 100. Cut two pieces of 2 x 3 mm wooden strip to fit
Chapter Six. Getting started inboard. Installing the false deck
 A close look at the thinning down of the bulkhead extensions. They are just 1/16 thick after fairing them. Chapter Six Getting started inboard This next step is one of the last remaining messy tasks to
1. VERIFY ALL COMPONENTS
 R INSTALLATION INSTRUCTIONS RAGNAR+ODEN FACE MOUNT, BYPASSING. VERIFY ALL COMPONENTS BASE KIT Track stand-offs Front trolley kit * Rear trolley kit * Allen keys Track fastener kit - wood - Bottom guide
Assembly Instructions
 Assembly Instructions Parts Included: 1 Nose Cone 1 Body Tube 3 1/8 Balsa Fins 1 Thrust Ring 1 Motor Tube 1 Motor Hook 1 Motor Sleeve 2 Centering Rings 1 Launch Lug 1 Kevlar Shock Cord (yellow) 1 Elastic
Golden angels in an elegant design
 Golden angels in an elegant design The magic of advent these modern-looking, golden-gowned angels are simply perfect for giving your home a festive Christmas feel. Made using the clay-like FIMOair basic
ALAN CARTER STUDIO 5332 RIVERVIEW DR., LISLE, IL
 ALAN CARTER STUDIO 5332 RIVERVIEW DR., LISLE, IL 60532 630-971-0690 apcarter@sbcglobal.net www.alancarterstudio.com SPLITTING THE DIFFERENCE This is for all you slackers out there. Sometimes half measures
Aerospace Speciality Products
 Specifications:! Length: 18.75"/47.6 cm! Diameter: 0.98"/24.9 mm! Weight: 1.5 oz/44 gm! Streamer Recovery! Recommended Engines:!! A8-3; B4-4; B6-4; C6-5! Skill Level: Beginner This is a model rocket kit
Fortress Fe Posts must always be secured to the deck framing. Fortress Fe Posts should never be attached to only the deck boards.
 Installation Instructions for Fortress Horizontal Cable Panel System with UB-05 Brackets and Fe Posts It is the responsibility of the installer to meet all code and safety requirements, and to obtain all
Installation Guide. Pionite Decorative Surfaces One Pionite Road, Auburn, Maine PIONITE ( )
") Installation Guide A Subsidiary of Panolam Surface Systems SMPBRO00-012 6/14 Pionite decorative laminates are designed for finished interior surfaces which require high impact, wear and stain resistance
Installation Guide A Subsidiary of Panolam Surface Systems SMPBRO00-012 6/14 Pionite decorative laminates are designed for finished interior surfaces which require high impact, wear and stain resistance
Thank you for purchasing E.L. Moore Window & Door.
 Thank you for purchasing E.L. Moore Window & Door. Instructions Version 4.28.15 I ve named this kit after one of the greatest modelers I ve ever known, the late Elliot Moore Jr. Rest in peace my friend.
Swift assembly guide
 Swift assembly guide Download the assembly guide at www.scihighmodels.com/swift.pdf Sample kit shown with aluminium bells (available with the Deluxe kit) Shown here without main tanks Version 10/12/2010
Filling the cracks. Grinding and sanding. velomobiel.nl
 Filling the cracks We have published a manual on how to repair the laminate before, now it's time to smoothen the outside of the repair. This nose damage (picture ) has been repaired from the inside. The
Photo Essay Building a. Key Largo. Carolina Dory. Plans for this boat may be found at:
 Photo Essay Building a Key Largo Carolina Dory Plans for this boat may be found at: http://spirainternational.com/ Photo Essay Building a Key Largo Carolina Dory The Carolina Dory is a specialized type
Fitting Fiberglass arches to MK 1 Escort
 Fitting Fiberglass arches to MK 1 Escort This is a fairly big job and not for the faint hearted. I got a mate who has done some glass work before, to help me. The method of fixture is varied. You could
Woodline USA Woodline Spacer Fence System
 Woodline USA Woodline Spacer Fence System MADE IN THE USA Includes: (1) ¼ Spacer Fence (1) 3/8 Spacer Fence (1) ½ Spacer Fence (1) Hardware Package (1) 3 Piece Brass bar set (2) Setup Blocks Visit Us Online
Block Lesson #11. Lesson Supplies UPDATED. Preparing the binding strips. Skill Builder BOM BLOCK LESSON #11 NOVEMBER 20, 2013
 UPDATED 1 BLOCK LESSON #11 NOVEMBER 20, 2013 Block Lesson #11 Skill Builder BOM In this lesson you will learn how to join your finished quilted and trimmed quilt blocks together with binding joints to
Pivot-Door Downdraft Cabinet Plans
 Pivot-Door Downdraft Cabinet Plans Finished Cabinet Closed Open Exploded View Introduction This simple downdraft-style dust collection cabinet is a great way to keep your shop cleaner and keep your router