Fabricated PCB chassis for the W8DIZ 1 Watter Transceiver
|
|
|
- Reynold Byrd
- 6 years ago
- Views:
Transcription

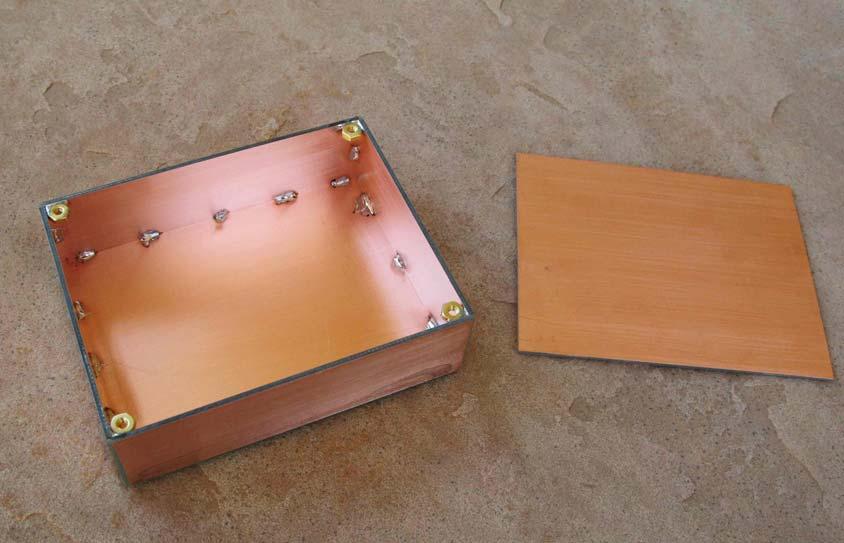
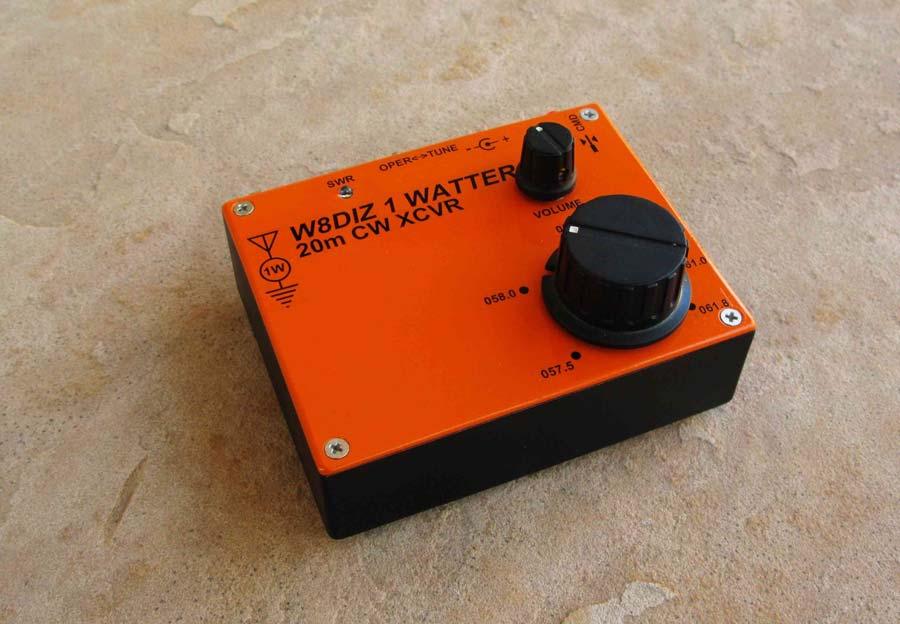
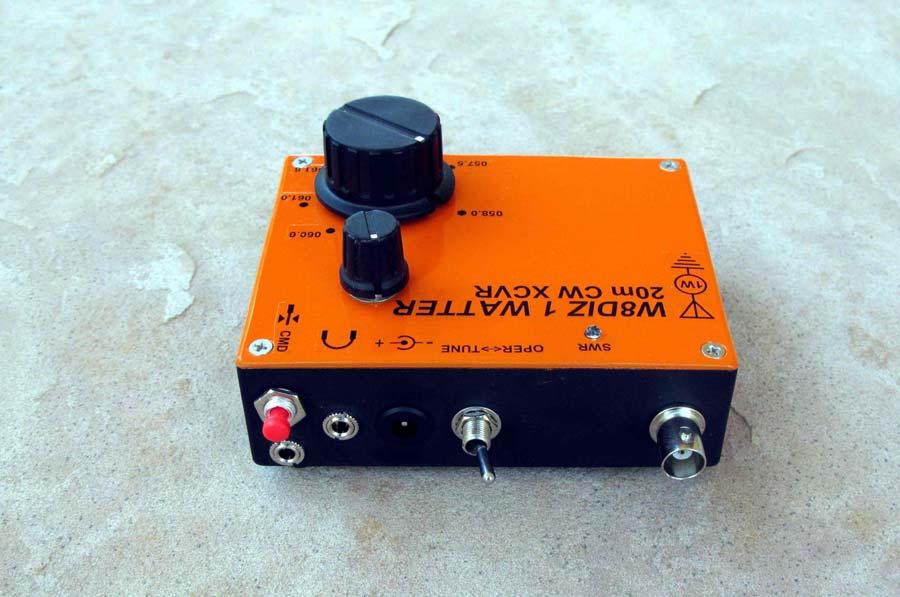
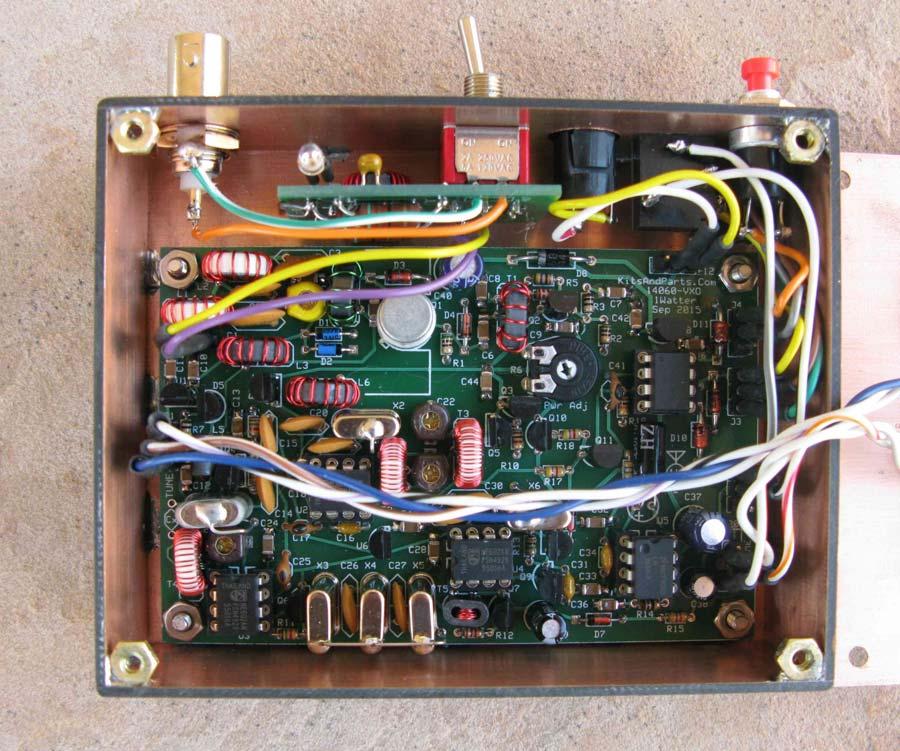
1 Fabricated PCB chassis for the W8DIZ 1 Watter Transceiver A practical chassis can be constructed for the W8DIZ 1 Watter fabricated from printed circuit board material using the commonest tools found in most garages. The construction details of preparing and fabricating any pcb case can be found on my website at The additional details particular to this chassis will be addressed here. The chassis can be built in two versions. On the left is the transceiver with all the necessary I/O connectors, and the right has all the I/O, plus the additional capacity to install the Dan Tayloe (N7VE) SWR indicator available from Both cases are the same size, with only the hole locations modified to accept the additional swr assembly. I have detailed the additional connectors and chassis components not included in the transceiver kit. Should you choose to use other components, you may have to modify the described holes or locations to accommodate your particular components. You can build the case and then decide which option you want when you drill the rear panel holes X 1/4L FH SS screw X 1/2L FH SS screw SS nut brass nut 1 10K ohm Lin. taper potentiometer, Mouser # 31CN401-F 2 1/8 audio jack, Mouser # E 1 Small knob, Mouser # GRX 1 Medium knob, Mouser # GRX 1 DC power jack, 2.1mm, Mouser # EX 4 self adhesive rubber foot Again, using as a guide finish the copper clad pcb material to the following sizes: " X 3.438" " X 1.125" " X 1.125" 1 of 11
2 Fabricate the bottom of the chassis. Note the corner orientation when soldering the pieces together. Four brass nuts in the top corners will be used to secure the top cover. Be sure to rough up the flats on the brass nuts so they will solder easily. Solder the four nuts flush, or just below the top surface. You can use a longer 4-40 screw threaded into the nut to check that it is square to the top surface of the chassis. 2 of 11
3 Before you drill the case you must decide which option you which to use, either the SWR option or the plain. Below are the two connector layouts. Below are the hole patterns for the two different options. You can either cutout and transfer the hole locations using these templates, or use the dimensioned drawings at the end of the document. If you use the templates, scale your printing to match the 4.0 dimension shown to get the correct spacing. 3 of 11
4 4 of 11
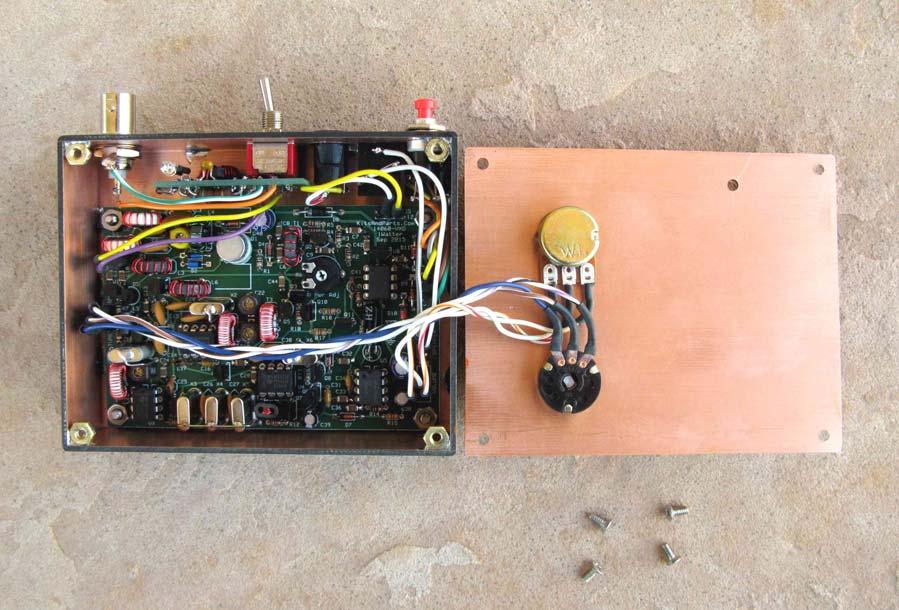
5 Below, I am showing two options for mounting the transceiver pcb. One option is soldering brass nuts to the bottom of the case on the inside and using the nuts themselves as spacers for the bottom of the pcb, and securing the transceiver board with four short 4-40 screws. The other option is using 1/2 long flathead screws from the outside, secured with a nut to the inside of the case, then the transceiver pcb, then a nut on top. Your choice. Either drill and countersink (Ø.125, csk Ø.220 x 82º) the holes, or use these locations to solder the brass nuts. I found the screw and two nuts the easiest. Reference drawings: 5 of 11
6 6 of 11
7 7 of 11
8 8 of 11
9 9 of 11
10 Decals Print out the above onto laser decal paper. I use Papilio Item# PAS48511G. Practice on plain paper to achieve the correct printer scaling. Thoroughly clean the surface of the panel to remove any oils or contamination. The decals are applied the same as model decals. Cut around each group of text you wish to apply. It doesn t have to be perfect as the background film is transparent. Apply the decals before you mount anything to the chassis Trim around the decal. After trimming, place the decal in a bowl of lukewarm water, with a small drop of dish soap to reduce the surface tension, for seconds. Using tweezers, handle carefully to avoid tearing. Start to slide the decal off to the side of the backing paper, and place the unsupported edge of the decal close to the final location. Hold the edge of the decal against the panel, with your finger, and slide the paper out from under the decal. You can slide the decal around to the right position, as it will float slightly on the film of water. Use a knife point or something sharp to do this. When in position, hold the edge of the decal with your finger and gently squeegee excess water out from under the decal with a tissue or paper towel. Work from the center, to both sides. Remove any bubbles by blotting or wiping gently to the sides. Do this for each decal, and take your time. Allow to set overnight, or speed drying by placing near a fan for a few of hours. When dry, spray two light coats of matte finish, Krylon, clear to seal and protect the decals, and allow the spray to dry in between coats. 10 of 11

11 Here s a cheat sheet you can print for the keyer commands, and attach to the bottom with two sided tape. 11 of 11 1_watter_ pdf
Three possible chassis for the KD1JV Para80set Transceiver
 Three possible chassis for the KD1JV Para80set Transceiver Shown above are two of the three possible variations of homemade chassis for the KD1JV Para80set Transceiver. The one on the left is a complete
Hendricks RockHunter CW Transceiver w/switched crystal board assembly instructions
 Hendricks RockHunter CW Transceiver w/switched crystal board assembly instructions First off, check to see if the parts match the parts list 1 band specific additional crystal 1 3 pin SIP socket 1 DP3T
Pacific Antenna SLT+ Switched Long wire Tuner
 Pacific Antenna SLT+ Switched Long wire Tuner The SLT+ is designed to match the high impedance load of an end feed, half wave antenna wire to a 50 ohm transmitter using manually switched inductors and
The Deluxe Tenna Dipper Design by: KD1JV Distributed by: Hendricks QRP kits,
 The Deluxe Tenna Dipper Design by: KD1JV Distributed by: Hendricks QRP kits, www.qrpkits.com The Tenna Dipper provides a simple means of determining the 50 ohm resonate frequency of an HF antenna or ATU
Building the Toothpick Audio CW Filter
 Building the Toothpick Audio CW Filter Introduction The toothpick is a simple variable bandpass audio filter designed to compliment the Splinter QRPp Trans-Receiver. The filter also contains an audio amplifier
WARNING! ETCHED PARTS CONTAINED IN THIS KIT HAVE SHARP POINTS, EDGES AND CORNERS.
 MPD18 chassis build instructions K A (see below for details) J I G H L C D F E B M Parts list: Ident Quantity A Etched Nickel/Silver fret 1 B Wheel sets 2 C Worms 2 D Worm gears 2 E Shaft adapters 2 F
Clay Modeling Film. Features of Clay Modeling Film. Use Clay Modeling Film
 Clay Modeling Film The series of Clay Modeling Film, originally developed by TOOLS INTERNATIONAL Corp, is mainly used for interior/exterior shape confirmation, checking highlights and qualification studies
QRPGuys Iambic Mini Paddle
 QRPGuys Iambic Mini Paddle First, familiarize yourself with the parts and check for all the components. If a part is missing, please contact us and we will send one. You must use qrpguys.parts@gmail.com
QRPGuys Iambic Mini Paddle w/base
 QRPGuys Iambic Mini Paddle w/base First, familiarize yourself with the parts and check for all the components. If a part is missing, please contact us and we will send one. You must use qrpguys.parts@gmail.com
Vi - BOX GUTTER COMPONENT REFERENCE
 Page 114 Vi - BOX GUTTER COMPONENT REFERENCE Item No Item Description Pack Comments BG1 Box Gutter D BG2 Box Gutter Braces A BG4 Box Gutter Sealing Tape A BG7 Box Gutter Internal Cladding D BG8 135 Box
FEEDCHAIN AND FEEDBELT REPLACEMENT GUIDE
 FEEDCHAIN AND FEEDBELT REPLACEMENT GUIDE NARROW BELT MODELS (500mm WIDE) You will need : 5 metres of belting (6m on BT5 Model) 60 to 66 stainless steel Tec Screws 60 TO 66 mudguard washers for belt join
Building the Sawdust Regenerative Receiver
 Building the Sawdust Regenerative Receiver Introduction The Sawdust is a super regenerative receiver using the basic Armstrong design architecture. The receiver uses one toroidal transformer to provide
Installation Instructions for DIY or Completed Light Channel.6 Millwork
 2017 Edge Lighting. All Rights Reserved. 1718 W. Fullerton Ave Chicago, IL 60614 Tel: 77-770-1195 Fax: 77-95-561 www.edgelighting.com info@edgelighting.com LCMW.6- - - 904-LCMW.6_02 Installation Instructions
Instruction for applying the Logo Decals
 Instruction for applying the Logo Decals Supplied: *One set of N/C cut vinyl decals (one right and One left) (Note: packaged with the contoured wing tip plans) Items required to apply the decals (not supplied):
Building the Sawdust Regenerative Receiver
 Building the Sawdust Regenerative Receiver Introduction The Sawdust is a super regenerative receiver using the basic Armstrong design architecture. The receiver uses one toroidal transformer to provide
Percy Pumpkin Head Light A KraftyBlok project.
 Percy Pumpkin Head Light A KraftyBlok project. DESIGNED BY: Jeanne Baruth for Diamond Tech SKILL LEVEL: (Adult 1-5: 1 being the easiest, 5 being most difficult) 3 TIME TO COMPLETE: 2 hours not including
Pre-Paint>Fuselage>Empennage>Fit elevator. Objectives of this task: Materials required: Prepare the horizontal stabiliser and the elevator
 Pre-Paint>Fuselage>Empennage>Fit elevator Objectives of this task: To fit the elevator to the horizontal stabiliser, to fit the trim tabs to the elevator and the end caps to the elevator and the horizontal
Level Railing. Installation Guide. v2.5 W W W. S O L U T I O N S A L U M I N U M. C O M
 Level Railing Installation Guide Top Rail Bottom Rail Aluminum Baluster 2x Bottom Bracket 1x Rail Support #909915 Kit Includes: 1 - Top Rail (with Baluster Connectors installed) 1 - Bottom Rail (with Baluster
Modular Locomotive System Instruction Manual for HBK22 Fowler Body Kit
 Modular Locomotive System Instruction Manual for HBK22 Fowler Body Kit Roundhouse Engineering Co. Ltd. Units 6-10 Churchill Business Park. Churchill Road, Wheatley. Doncaster. DN1 2TF. England. Tel. 01302
ECLIPSE: TV COVER INSTALLATION GUIDE
 ECLIPSE: TV COVER INSTALLATION GUIDE 1 Congratulations on purchasing your Eclipse Vanishing TV Mirror! Installing your TV into the Eclipse Mirror is a very simple process following these instructions.
Page 1. Trophy Oar Blade Finishing and Care Manual
 Page 1 Trophy Oar Blade Finishing and Care Manual Page 2 I. Finishing with Paint Materials Needed for Painting: Krylon Fusion Spray Paint (or other plastics Instructions for Painting: spray paint) Primer
Max Launch Abort System Prod. No *Kevlar is a registered trademark of Dupont
 Flying Model Parts List Max Launch Abort System Prod. No. 3014 A 11820 - Body Tube 3.5 Diam x 5.5" Long B 11824 - Orange Capsule Base Shoulder Ring C 16032 - Laser-cut Ring motor mount rear D 16033 - Laser-cut
Kam Aero 43% Extra 300.
 Stab Sheeting Kam Aero 43% Extra 300. Stabs / Elevator: Make your skins using the same method as you did for the fuselage foam parts. The stabs require 8 sheets (4 per stab) of 4 x 48 A grain sheeting.
PS 5077 cu. ft. Boxcar with EOC device. 1:29 scale resin craftsman kit. by Burl Rice
 PS 5077 cu. ft. Boxcar with EOC device 1:29 scale resin craftsman kit by Burl Rice www.burlrice.com Bill of materials (not included): Thick/medium viscosity CA PL adhesive, or Gorilla Glue Heavy Duty Construction
Treviso POCKET BILLIARD TABLE INSTALLATION MANUAL. SERVICE DEPARTMENT P.O. BOX 68 BRISTOL, WI 53104
 Treviso TM POCKET BILLIARD TABLE INSTALLATION MANUAL www.brunswickbilliards.com SERVICE DEPARTMENT P.O. BOX 68 BRISTOL, WI 53104 51-905881-000 NOVEMBER 2008 NOTE: Please use the instructions in this manual
Tech Sheet. T4 Interior conversion kit how to - fitting instructions. 1. Rear seat belts. 2.
 Page 1 of 8 T4 Interior conversion kit how to - fitting instructions Thank you for purchasing our T4 interior conversion kit. This kit will enable you to convert any SWB left hand loading door T4 into
4SQRP Enclosure Kit. By Craig Johnson, AAØZZ
 4SQRP Enclosure Kit By Craig Johnson, AAØZZ TABLE OF CONTENTS 1 Introduction... 1 2 Building the Enclosure... 1 Appendix A Enclosure Parts List... 10 1 Introduction This is the instruction manual for the
The Virgo/Libra Steam Engine
 The Virgo/Libra Steam Engine Congratulations on becoming the owner of a Virgo or Libra Steam Engine. With careful use and maintenance it will give many years of satisfying performance. Contents 1) Notes
1/4 Rubber Spacer, 26 pcs. M5-.8 Machine Screw, 26 pcs 13. Female Wire Connector, 4 pcs
 97-06 Jeep Wrangler TJ Set Part #10920-07 Rev-3 12-15-08 A) B) C) D) E) F) G) STEP 1 - PRIOR TO INSTALLATION Bushwacker only approves installing the fl ares according to these written instructions with
2x Bottom Bracket. 1x Rail Support STEP 1 STEP 2
 Level Railing Top Rail Bottom Rail Aluminum Baluster 2x Bottom Bracket 1x Rail Support Kit Includes: 1 - Top Rail (with Baluster Connectors installed) 1 - Bottom Rail (with Baluster Connectors installed)
Installation Instructions Parasol Cellular Shades
 Installation Instructions Parasol Cellular Shades SlideArch CONTENTS Getting Started: Product View...1 Tools and Fasteners Needed...2 Installation: Installation Overview... Mount the Installation s Inside
Pre-Paint>Wings>Fit ailerons. Objectives of this task: Materials and equipment required: Size the ailerons and pre-mould strips
 Pre-Paint>Wings>Fit ailerons Objectives of this task: In this task the ailerons and the pre-mould strips will be sized and trimmed, then flocked onto the wings and glassed in place, and the next day the
Installation Instructions for DIY or Completed 45 Degree Light Channel
 201 Edge Lighting. All Rights Reserved. Installation Instructions for DIY or Completed Degree Light Channel IMPORTANT INFORMATION - This instruction shows a typical installation. 11 W. Fullerton Ave Chicago,
QRPGuys Michigan Mighty Might Plus 40M Transmitter
 QRPGuys Michigan Mighty Might Plus 40M Transmitter First, familiarize yourself with the parts and check for all the components. If a part is missing, please contact us and we will send one. You must use
UNIT No FRAMELESS PIVOT SHOWER DOOR
 INSTALLATION INSTRUCTIONS UNIT No. 3600 FRAMELESS PIVOT SHOWER DOOR NEED INSTALLATION HELP? Call 1-800-45-BASCO (452-2726) Monday - Friday 8:00 A.M. - 4:30 P.M. Eastern Time QCI0020 Rev. 3 Page 1 of 8
Dayton Audio 15" Dual Passive Radiator Subwoofer Kit
 Dayton Audio 15" Dual Passive Radiator Subwoofer Kit Thank you for purchasing the Passive Dayton Audio Reference 15" With Dual Passive Radiator Subwoofer Kit. This subwoofer kit was precision cut using
Instructions for Lighting an S Scale Caboose
 Instructions for Lighting an S Scale Caboose The S Scale Caboose lighting kit is adaptable for most caboose models of rolling stock including American Flyer (TM) and contains the same components as found
Starving Student II. Starving Student II. SS2 guide. Written By: 6L guides.diyaudio.com/ Page 1 of 24
 SS2 guide Written By: 6L6 2019 guides.diyaudio.com/ Page 1 of 24 INTRODUCTION This is a build guide for the hybrid headphone/pre-amplifier. You can buy a kit at the SSII product listing on the diyaudio
TELESCOPIC GATE MANUFACTURING AND INSTALLATION MANUAL.
 TELESCOPIC GATE MANUFACTURING AND INSTALLATION MANUAL. Telescopic gates have been manufactured for many years essentially in the same way they are largely today. In recent years hardware suppliers have
Under Seat Storage Drawer Installation Instructions
 Under Seat Storage Drawer Installation Instructions Parts List: 1) Drawer Assembly 8) Self Tapping Screws 1) Instructions 1) Template Tools Needed: Drill and/or Bit Driver Tape Measure Jigsaw or metal
Dayton Audio 10" Dual Passive 500 Watt Subwoofer Kit
 Dayton Audio 10" Dual Passive 500 Watt Subwoofer Kit Thank you for purchasing the Dayton Audio 10" with Dual Passive Radiator 500 Watt Subwoofer Kit with Built-In DSP. This subwoofer kit was precision
How To Tame A Wild Mouse
 How To Tame A Wild Mouse By Steve Daniels, President, Small Bear Electronics LLC What's A Wild Mouse? This Wild Mouse is an active tone boost--an amplifier that is tuned with a filter so that it boosts
Taco Bell Restaurant kit in HO scale
 Taco Bell Restaurant kit in HO scale Parking lot base and cars not included This kit includes all building parts milled in white styrene plastic, clear window glazing, Plastruct tile roofing, and logo
Glaser Ceramics Fired-On Images Transfer Paper MS (Multi-Surface) Instructions for Glazed Clay Bisque, Factory Glazed Ware and Fusible Glass
 Instructions for Glazed Clay Bisque, Factory Glazed Ware and Fusible Glass") Glaser Ceramics Fired-On Images Transfer Paper MS (Multi-Surface) Instructions for Glazed Clay Bisque, Factory Glazed Ware and Fusible Glass STEP 1 - Acquiring Images:. Photographs, drawings, invitations
Glaser Ceramics Fired-On Images Transfer Paper MS (Multi-Surface) Instructions for Glazed Clay Bisque, Factory Glazed Ware and Fusible Glass STEP 1 - Acquiring Images:. Photographs, drawings, invitations
ARP AVATAR PATCH PANEL INSTALLATION MANUAL
 ARP AVATAR PATCH PANEL INSTALLATION MANUAL Introduction Thank you for purchasing an Avatar Patch Panel Kit! These instructions are intended to guide you through installing and using this kit. Before we
The ability to make basic voltage and resistance measurements using a digital multimeter
 Congratulations on your purchase of a new OneShot chassis! The PC01 OneShot combines a rugged enclosure, power supply, and discrete instrument DI in a compact 1/4U package. A few minutes of assembly are
Fender Protectors. To ensure a successful installation, please read all of these instructions prior to starting.
 Fender Protectors To ensure a successful installation, please read all of these instructions prior to starting. General Instructions All Tough Stuff Protective Products use a waterproof contact adhesive.
THE PODIUM MUSIC STAND
 THE PODIUM MUSIC STAND 1 Set Assembly Instructions Wooden Parts: a. 1 Column b. 2 Long Slide Pieces c. 2 Slide Spacers (1 long & 1 short) d. 4 Feet e. 2 Fork Pieces f. 1 Fork Spacer g. 2 Long Desk Frame
Standard Kit #1 (3-way switch)
") Standard Kit #1 (3-way switch) Please Read All Instructions Before Beginning. Tools you will need: Soldering Iron (35 watt preferably) Solder Wet Sponge Wire Clippers 3/8 Drill Bit 1/4 Drill Bit Variable
Standard Kit #1 (3-way switch) Please Read All Instructions Before Beginning. Tools you will need: Soldering Iron (35 watt preferably) Solder Wet Sponge Wire Clippers 3/8 Drill Bit 1/4 Drill Bit Variable
SURFACE CASTING METHOD: For Molds & Core Boxes. Presented by: Hapco Inc.
 SURFACE CASTING METHOD: For Molds & Core Boxes Presented by: Hapco Inc. RAPIDFIL Detailed Specifications STEP 1 SPACER LAYER Apply a layer of ¼ foam to create a uniform ¼ thickness around the pattern.
LOCKN LOAD FIRST TIME INSTALLATION
 LOCKN LOAD TM TRACK MOUNTING KIT NISSAN NAVARA D40 2004-2015 2 BAR TRACK HEAVY DUTY ROOF RACK SYSTEM MAX VEHICLE ROOF LOAD RATING: 100KG TOTAL LOAD EQUALS WEIGHT OF ROOF RACKS + ACCESSORIES + CARGO FIRST
Arizona ScQRPion QRP Club. Ft Tuthill w DC CW Transceiver for 80m Part 1 of 2. by Dan Tayloe, N7VE. Ft Tuthill Page 1 of 31
 Arizona ScQRPion QRP Club Ft Tuthill 80 2.5w DC CW Transceiver for 80m Part 1 of 2 by Dan Tayloe, N7VE Page 1 of 31 Table of Contents Specifications... 4 Specifications... 4 Receiver... 4 Transmitter...
ADULT. Adirondack / Muskoka Chair Plans
 ADULT Adirondack / Muskoka Chair Plans Materials List 3/4" x 9 1/2" (1.9cm x 24.1cm) redwood, cedar or pine boards. Six, 8' (2.44m) boards should make one chair depending on knots and layout. You can also
Pancake Holster: Assembly Instructions
 Pancake Holster: Assembly Instructions THIS TUTORIAL DESCRIBES HOW TO BUILD A PANCAKE STYLE HOLSTER AND IS INTENDED FOR USE BY INTERMEDIATE TO ADVANCED LEATHER WORKERS. FOR PERSONAL/HOBBYIST OR PROFESSIONAL
N7VE LED SWR Bridge Hendricks QRP Kits
 N7VE LED SWR Bridge Hendricks QRP Kits A simple, rugged and lightweight SWR bridge by Dan Tayloe, N7VE Page 1 of 10 Table of Contents Kit Parts... 3 Building the LED SWR bridge... 3 RF step up transformer...
Billy Body Kit HBK5 CHECKLIST. Modular Locomotive System Instruction Manual for HBK5 Billy Body Kit. Checked
 Billy Body Kit HBK5 CHECKLIST 1 Cab body panel (folded). 1 Cab floor. 1 Cab front panel. 1 Roof. 1 Body tank support. 2 Boiler bands with M2 Long Steel Screws & Nuts fitted. 1 Brass dome. 1 Cast brass
Avenger Holster: Assembly Instructions
 Avenger Holster: Assembly Instructions THIS TUTORIAL DESCRIBES HOW TO BUILD AN AVENGER STYLE HOLSTER AND IS INTENDED FOR USE BY INTERMEDIATE TO ADVANCED LEATHER WORKERS. FOR PERSONAL/HOBBYIST OR PROFESSIONAL
The Useless Machine. DIY Soldering Edition. Instruction Guide v0004
 The Useless Machine DIY Soldering Edition Instruction Guide v0004 TM For the best outcome, follow each step in order. We recommend reading this guide entirely before you get started. Tools required: Soldering
Resin Tree Drop Earrings We look forward to bringing you exclusive innovations and distinctive products this year and beyond.
 Resin Tree Drop Earrings We look forward to bringing you exclusive innovations and distinctive products this year and beyond. www.nunndesign.com www.nunndesign.com 1 SUPPLIES NEEDED: PE9217-2 Pewter Drop
Swift assembly guide
 Swift assembly guide Download the assembly guide at www.scihighmodels.com/swift.pdf Sample kit shown with aluminium bells (available with the Deluxe kit) Shown here without main tanks Version 10/12/2010
WRIGHT FLYER 1 INSTRUCTIONS FOR THE D10LC KIT
 WRIGHT FLYER 1 INSTRUCTIONS FOR THE D10LC KIT Manufactured in the USA by Easy Built Models PO Box 681744, Prattville, AL 36068-1744 Visit us at www.easybuiltmodels.com Easy Built Models GLUE METHODS Always
Mirrorcraft Project Especially for Dogs
 Mirrorcraft Project Especially for Dogs DIY Customized Pet Mirror Make a mirror photo frame to Display your Pets Photo Irene Jacobs April 2007 Mirrorcraft is a fun craft to easily create you own customized
The Switched Longwire Tuner SLT
 The Switched Longwire Tuner SLT Thank you for purchasing the SLT kit from Hendricks QRP Kits. This kit is a very high quality kit that you will find easy to build, yet when you finish, you will have a
Installation Instructions
 READ BEFORE INSTALLING UNIT For Through-the-Wall Air Conditioners To avoid risk of personal injury, property damage, or product damage due to the weight of this device and sharp edges that may be exposed:
INSTALLATION GUIDE SLIMLINE ROOF LANTERN 4 PANE CONFIGURATION
 INSTALLATION GUIDE SLIMLINE ROOF LANTERN 4 PANE CONFIGURATION SLIMLINE STEP-BY-STEP INSTALLATION GUIDE Thank you for choosing Roof Maker, we hope you are delighted with your new rooflight. Our roof lanterns
Mail Truck Bank Plan. Rockler Mail Truck Bank Plan
 Mail Truck Bank Plan Build this nostalgic Mail Truck Bank and capture the imagination of a child! This easy-to-build plan uses our Solid Brass Mailbox Door (#55358) to commemorate the stalwart little truck
INSTALLATION INSTRUCTIONS DANUBE ACRYLIC NEO ANGLE
 INSTALLATION INSTRUCTIONS DANUBE ACRYLIC NEO ANGLE March 2013 DOOR 2 Page 1 of 5 INSTALLATION INSTRUCTIONS NEO ANGLE 6MM FRAMELESS AND 4MM FRAMED SHOWER DOOR DANUBE, DELTA, SIGNATURE, OCEANIA, CASCADE
Spiderbeam Balun Construction Guide
 BALUN CONSTRUCTION GUIDE Ver. 1.0 1 The components of the Balun Kit are in a plastic bag. Most of the components are inside the plastic case of the balun. The aluminum U-profile and the RG-142 Teflon Coax
Rugged Ridge Body Armor Guard Kit, 5 Pieces, Black (07-Current JK 4-door)
") Rugged Ridge Body Armor Guard Kit, 5 Pieces, Black (07-Current JK 4-door) Installation Time: 60 Minutes Tools Required: Notes: Phillips head screwdriver 3/8 socket or Flat head screwdriver 1/2 socket 7
Rugged Ridge Body Armor Guard Kit, 5 Pieces, Black (07-Current JK 4-door) Installation Time: 60 Minutes Tools Required: Notes: Phillips head screwdriver 3/8 socket or Flat head screwdriver 1/2 socket 7
Central New York Rocket Team Challenge 2018 Rocket Assembly Instructions
 Central New York Rocket Team Challenge 2018 Rocket Assembly Instructions Note: These instructions vary from those provided by the manufacturer of the rocket kits. There is also considerable varying discussion
Isuzu D-Max Part Numbers Black Polished
 SB007 Sports Bar Fitting Instructions Isuzu D-Max 0 Part Numbers - 55000 - Black - 5000 - Polished Installation Time: 0 min (Approximately) PLEASE KEEP INSTRUCTIONS IN GLOVE BOX FOR FURTHER USE RECOMMENDED
HOMECREST STYLE SLING 3J300 Installation Instructions
 1 HOMECREST STYLE SLING 3J300 Installation Instructions Before beginning, take careful note of how the chaise is assembled, particularly the adjustment hardware. An additional set of hands to help during
Tutorial Building the Mono Amp Case
 Kitronik Ltd Building the Mono Amp Case Tools you will need: Wire cutters/strippers A soldering iron A small cross headed screwdriver A pair of pliers A ruler Included with your case you should find: 16
QWALL 5.2 (2 Back Panels)
") QWALL 5. ( Back Panels) SHOWER ACRYLIC WALL INSTALLATION INSTRUCTIONS IMPORTANT DreamLine TM reserves the right to alter, modify or redesign products at any time without prior notice. For the latest up-to-date
QWALL 5. ( Back Panels) SHOWER ACRYLIC WALL INSTALLATION INSTRUCTIONS IMPORTANT DreamLine TM reserves the right to alter, modify or redesign products at any time without prior notice. For the latest up-to-date
ELECRAFT KXPD1 PLUG-IN KEYER PADDLE
 Introduction ELECRAFT KXPD1 PLUG-IN KEYER PADDLE Assembly and Operating Instructions Revision B, July 27, 2011. Copyright 2011, Elecraft; All Rights Reserved The KXPD1 is a unique plug-in keyer paddle
Guitarpedalkits.com Overdrive Pedal Build Instructions
 Page 1 Guitarpedalkits.com Overdrive Pedal Build Instructions Follow the instructions in this guide to build your very own DIY overdrive pedal from GuitarPedalKits.com. If you re a first time builder,
Traditional Undermount: S Method (Undermount):
:") TOOLS REQUIRED 15.1 TOOLS REQUIRED The installation of Corian shape product must be a precise and exacting process to ensure that a good fit is always created. Using the correct tools is essential. In
TOOLS REQUIRED 15.1 TOOLS REQUIRED The installation of Corian shape product must be a precise and exacting process to ensure that a good fit is always created. Using the correct tools is essential. In
Installation Instructions. Walk-in Shower Screen. with 180 Return Panel
 Installation Instructions Walk-in Shower Screen O with 180 Return Panel Installation Instructions Important Information Please read these instructions carefully before starting installation and keep for
FENDER FLARE INSTALLATION
 TG-FF8T4178: Fit 2014-UP Toyota Tundra PRIOR TO INSTALLATION IMPORTANT Tyger only approves the installation according to our instructions with the hardware provided. WARNING Failure to complete the installation
Two Panel Frameless Bypass Door
 INSTALLATION INSTRUCTIONS Two Frameless Bypass Door Series 00 Please Record Model Number From Carton Label Here Please read these instructions carefully to familiarize yourself with the required tools,
3Insert the second rod no. 4
 Yamato: Step-by-step 37 The stern block and searchlight control towers a b c d e f Recommended tools and materials Wood glue Sandpaper (no. 800 grain) Metal file Putty Craft knife For metal: Super Glue
2.0 INSTALLATION PROCEDURE. 2.1 Open the Speaker Post. 2.2 Install the Speaker and Microphone Grills. Figure 2. SPP2 rear view
 Figure 2. SPP2 rear view 2.0 INSTALLATION PROCEDURE Figure 3. SPP2 rear view with rear panel removed For ease of assembly, locate a clean area where the speaker post can be laid down to be worked on without
504P Operator s Booklet
 504P Operator s Booklet Visit our Web site at http://www.rhinovending.com/ Copyright 2011 by Rhino Vending. All rights reserved. No portion of this manual or any artwork contained herein may be reproduced
Directive Systems & Engineering 2702 Rodgers Terrace Haymarket, VA
 Directive Systems & Engineering 2702 Rodgers Terrace Haymarket, VA 20169-1628 www.directivesystems.com 703-754-3876 25 Element 7.4 wl. K1FO Designed Yagi, Model DSEFO432-25 ELECTRICAL SPECIFICATIONS Frequency
Jeep Cherokee Door XJ Set Part # Revision J
 Jeep Cherokee 84-96 4 Door XJ Set Part # 10911 Revision J 6-5-06 Step 1: Prior to Installation: A) Fit: Verify the fit of the flares to vehicle. (Some filing, sanding, or cutting may be necessary to ensure
Building Instructions Diva cabin boat
 Building Instructions Diva cabin boat Order no. 3093/00 aero-naut Modellbau Stuttgarterstr. 18-22 D-72766 Reutlingen / Germany http://www.aero-naut.com 1 For pictured building instructions please see the
LP-200 Dummy Load / Wattmeter
 LP-200 Dummy Load / Wattmeter Enclosure Retrofit Assembly Instructions March 2009 TelePost Incorporated LP-200 is a trademark of TelePost Inc. Material in this document copyrighted 2009 TelePost Inc. 1
Installation for Full Size Polaris Ranger Crew Doors
 Installation for Full Size Polaris Ranger Crew Doors Order of Installation: Heater Doors Wiper on to Windshield Windshield Top & Back Panel Note: Most of the steps in these instructions need to be repeated
Elektor Construction Guide TAPIR
 Elektor Construction Guide TAPIR The TAPIR is a three-dimensional assembly. To ensure good access to all soldering points, we recommend assembling the kit exactly according to the described sequence. 1
Installation Instructions and Details
 Installation Instructions and Details Contents Page General Notes 2 Typical System Perspective 3 Panel, Hardware & Trim Details 4-6 Hardware & Trim Fabrication Details 7-9 Installation Procedures 10-12
The Useless Machine. Parts Only - Build Guide v0001
 TM The Useless Machine Parts Only - Build Guide v0001 For the best outcome, follow each step in order. We recommend reading this guide entirely before you get started. Tools required: One phillips screwdriver,
PLEASE READ INSTRUCTIONS THOROUGHLY BEFORE PROCEEDING
 Part No. 8870 -or Part No. 9100-9110 Front Fender Flares Flat Panel Design 07-09 Jeep JK, 2/4 Dr. PLEASE READ INSTRUCTIONS THOROUGHLY BEFORE PROCEEDING We have provided complete instructions and specific
Craftman One Car Garage Assembly Instruction by Laser Dollhouse Designs
 Craftman One Car Garage Assembly Instruction by Laser Dollhouse Designs NOTE 1: Please do a dry assembly using only tape to hold house together. This will get you familiar with parts, location, and fit.
Hardee s Restaurant kit in HO scale
 Hardee s Restaurant kit in HO scale Parking lot base and cars not included This kit includes all building parts milled in white styrene plastic and laser cut white acrylic, clear acrylic window glazing,
Hudson Dresser [1] Hudson Dresser Published on Ana White ( Submitted by dan-k [2] on Fri, :43 [1]
![Hudson Dresser [1] Hudson Dresser Published on Ana White ( Submitted by dan-k [2] on Fri, :43 [1]](/thumbs/90/102626096.jpg "Hudson Dresser [1] Hudson Dresser Published on Ana White ( Submitted by dan-k [2] on Fri, :43 [1]") [1] Submitted by dan-k [2] on Fri, 2011-03-11 11:43 [1] If you plan on staining this piece, it is recommended that you stain all of the drawer face materials before assembly for a more professional look.
[1] Submitted by dan-k [2] on Fri, 2011-03-11 11:43 [1] If you plan on staining this piece, it is recommended that you stain all of the drawer face materials before assembly for a more professional look.
Giraud Tool Company, Inc.
 Motor Upgrade for Gracey Trimmer This package is intended to allow the user to upgrade their Gracey trimmer with a higher rpm motor and convenience features not found in the production offering. This upgrade
Operator s Manual. Onion King 500N 501N 502N 503N ENGLISH
 Onion King 500N 501N 502N 503N Thank you for purchasing this Vollrath Food Processing Equipment. Before operating the equipment, read and familiarize yourself with the following operating and safety instructions.
Scratch Build a Water Tower
 Here s some Prototype details Photos Courtesy of Rodney Doster Water Spout and Discharge Pipe Tank Bands Here s some more Prototype details Photos Courtesy of Rodney Doster Weather Vane as a Finial Using
All Terrain Flares 2014 Chevy Silverado
 Page 1/8 Components: 1. Front Flares (2) 2. Rear Flares (2) Tools required: - Utility knife - #2 Phillips driver - Socket wrench - 13 mm Socket - 6 mm Allen Wrench - T-15 Torx bit - Trim Removal Tool -
Creative Line Quilting by Amanda Greene / #82013 / 45 Designs
 Note: Some designs in this collection may have been created using unique special stitches and/or techniques. To preserve design integrity when rescaling or rotating designs in your software, always rescale