Fender Protectors. To ensure a successful installation, please read all of these instructions prior to starting.
|
|
|
- Clara Walton
- 5 years ago
- Views:
Transcription

1 Fender Protectors To ensure a successful installation, please read all of these instructions prior to starting. General Instructions All Tough Stuff Protective Products use a waterproof contact adhesive. q The surface temperature of your vehicle and your Tough Stuff Protectors must be above 60 Degrees F (16 C) for a successful installation. q The air temperature should also be above 60 Degrees F (16 C) before you begin. q Do not install your protectors in direct sunlight. Allow your vehicle to cool in the shade to ensure a trouble free installation. q Unroll the Protectors and lay on a clean flat surface. (You may lay them out in the sun for a minute or two to assist in getting them to lay flat.) q Proper surface preparation is vitally important for proper adhesion. Your vehicle body must be cleaned thoroughly to remove all dirt, wax, oil and on/off road film. Please follow the detailed directions on how to clean the surface using 70% 1
 q DO NOT remove the Adhesive Backing Paper from the Protectors until instructed to do so.")
2 Isopropyl Alcohol. (Check your bathroom medicine cabinet or you can get this at any grocery store or pharmacy for under $1.00 per bottle.) q DO NOT remove the Adhesive Backing Paper from the Protectors until instructed to do so. Tools Required 70% Isopropyl Alcohol Single Edge Razor Blade Paper Towels Masking Tape Basic Hand Tools Sharp Scissors 2


3 Detailed Instructions: Step 1 - Remove Hood Latch Components (Not required for CJ s) Open your hood fully. It may help you during the installation to rest the hood against the windshield frame. Lay a towel or blanket on your windshield frame to protect your paint. Remove your Hood Latches by unscrewing the 15mm (TJ) retaining nut underneath the fender. 3
 are old and weather cracked, you may damage them by removal (Either")
 The Rubber Hood Bumpers are held in place by two small nipples that extend through holes on the top of the fender.")
4 Remove your Rubber Hood Bumpers. PLEASE NOTE: If your rubber hood bumpers (on the fender top of Wranglers) are old and weather cracked, you may damage them by removal (Either acquire a new set from your Jeep dealer, or trim the Fender Protectors around them.) The Rubber Hood Bumpers are held in place by two small nipples that extend through holes on the top of the fender. The bumpers can be removed by carefully pulling to one side, then wetting underneath (to lubricate) with water, window cleaner or alcohol. Continue to work side to side until the bumpers are removed. 4

5 Here is the Hood Latch and Rubber Bumper you should have removed from each fender. 5

6 Step 2 Cleaning / Surface Preparation *** Proper surface preparation is vital for proper adhesion. *** WARNING: Do Not Remove the Adhesive Backing Paper from the Fender Protectors Yet! Place the Fender Protectors on top of your fenders where you would like to install them. Take note of the area that the Fender Protector covers, plus another ½-inch around the outside edge of the Fender Protectors. Remove the Fender Protectors and thoroughly clean each area three (3) times. Use a generous amount of rubbing alcohol and clean paper towels each time (rub hard). Allow the alcohol to air dry on the top of the fenders. Clean each fender top one more time (fourth time). This time dry the alcohol off with a clean dry paper towel. If you see any dirt/wax film streaks while doing this repeat the cleaning process until spotless. This is important. Please get carried away with your cleaning effort. 6

7 Step 3 Installation *** The tops of your fenders are clean, right? *** WARNING: Do Not Remove the Adhesive Backing Paper from the Fender Protectors Yet! Carefully locate the Fender Protectors on your fenders and check for the proper fit. (Normally 1/8-inch to ¼-inch gap will be around all outside edges.) If you find any areas need trimming, trim with a sharp scissors to fit to your liking. Securely tape the Fender Protectors in the proper location using masking tape. Make sure there are no voids under the Protectors. Double-check the location of your Protectors. Close your vehicle hood to make sure you are satisfied with this location. 7

 Carefully peel the adhesive backing paper off the untaped area of")
8 Carefully remove the masking tape ONLY on the rear half of the Protector. Leave the front half securely taped in place. (This will keep the Protector properly located where you want it.) Carefully peel the adhesive backing paper off the untaped area of the Protector; 8


9 Then tear the paper off the rear half and discard. Lightly lay the rear half of the fender protector onto the fender. DO NOT rub down hard until after the installation is complete, but DO make sure there are no voids under the Protector. If the location is off, you can pull it up and relocate the Protector before final rub down. Remove the masking tape and carefully peel the adhesive backing paper off the front half of the protector. 9


10 Continue to lay the front half of the Protector down onto the fender. DO NOT rub down yet. If the location is off you can lift the protector and re-align it. When you are satisfied with the alignment and installation, use a clean dry paper towel or the Protector Backing Paper and thoroughly rub down the enter Protector to finish adhesion. Rub from the center of the Protector out toward the edges. This will help eliminate air pockets. If you have an air bubble you cannot work to an outside edge cut a small slit in the center of the bubble and press the air out. 10
11 11

 holes in the top of")
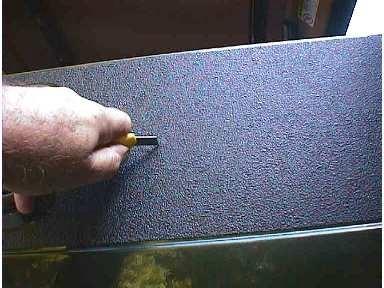
12 Step 4 Reinstall Removed Hood Latch and Bumper (Not required for CJ s) Locate the mounting holes for the rubber bumper and hood latch under the Fender Protector with your finger. Press down to make small indentations in the Protector over the holes. Press a Philips Head screwdriver into each indentation to open up the five (5) holes in the top of the fender needed to mount the latch and bumper. 12


13 Enlarge these holes by rotating the screwdriver to their proper size. Hold the rubber bumper in place and cut around it as shown with the razor blade, being careful not to scratch the paint. Relieve the sharp corners on the Protector slightly. The rubber bumper must rest directly on the fender, not the Protector. To install the Rubber Bumper first lubricate the two nipples with water or a window cleaning solution. Then insert a small screwdriver into the holes on the top of the rubber bumper and press it into place through the Protector and into the fender. Reinstall the Hood Latches using the 15 mm nut from the underside of the fender. 13
14 NOTE: The "Clear Frost" colored Protectors will take a week or so (faster in warm temperatures) before the clear color will even out, the adhesive is very thick and viscous and it takes time for the adhesive to fully "wet out". Please do not be alarmed if, directly after application, the Protector looks spotty, you are only seeing the adhesive through the clear material. MAINTENANCE and REMOVAL There is no real maintenance required for your Tough Stuff Fender Protectors. Simply clean them with a soft brush or sponge and soapy water. DO NOT direct a pressure washer spray at an angle around the edges of the Protectors for 14 days after installation. If a Protector ever needs to be removed, use a hair drier to heat one corner. You will be able to pull the Protector off, however this will destroy it. Use rubbing alcohol to soften and remove any residual adhesive. Thank you for purchasing our product. We are certain you will receive many years of value from your purchase. We also manufacture many other body protection products and accessory items for your vehicle. Our complete product line can be seen at 14
IMPORTANT: WILL NOT FIT COUNTRYMAN MODELS
 Part #1410-0102-07 2 3 1 IMPORTANT: WILL NOT FIT COUNTRYMAN MODELS Apply masking tape around the bottom grille opening and across the bottom of the upper facto ry grille.. Open the hood and remove the
Surf-N-Skim and Surf Pad System Installation Instructions
 Surf-N-Skim and Surf Pad System Installation Instructions Tools & Materials: Warm, clean, dry and well lit working environment; flexible straight edge or chalk line; single edge razor; plastic squeegees;
INSTALLATION INSTRUCTIONS
 INSTALLATION INSTRUCTIONS Accessory Application Publications No. BII 30914 UNDER SPOILER 2006 TL Issue Date SEP 2005 PARTS LIST Front under spoiler Template B Left bracket (Marked L) Left cover (Marked
DASH KIT INSTALLATION
 ÿÿÿÿÿ ÿÿÿÿÿÿÿÿÿÿÿÿ ÿÿÿ ÿÿÿÿÿ ÿÿ ÿÿÿ ÿÿÿÿÿÿÿÿÿÿÿÿÿÿ ÿÿÿÿÿÿÿÿÿÿ ÿÿÿÿ ÿÿÿÿ ÿÿ ÿÿÿÿÿ ÿÿÿÿÿÿÿÿ PROUDLY MADE IN THE USA DASH KIT INSTALLATION These instructions are aimed at the do-it-yourself installer. Read
INSTALLATION INSTRUCTIONS
 INSTALLATION INSTRUCTIONS Accessory WELL P/N 08P21-STX-200A Application 2011 MDX Publications No. BII 43668 Issue Date AUG 2010 PARTS LIST Left front fender trim Bracket A-L Left front bumper trim Bracket
Bushwacker Jeep Flat Style Fender Flares Rear Pair (JK Wrangler 2dr)
") Bushwacker Jeep Flat Style Fender Flares Rear Pair (JK Wrangler 2dr) Note: These instructions involve cutting parts of your vehicle. Please read all instructions prior to starting. Installation Time: 3-4
Bushwacker Jeep Flat Style Fender Flares Rear Pair (JK Wrangler 2dr) Note: These instructions involve cutting parts of your vehicle. Please read all instructions prior to starting. Installation Time: 3-4
FRAMED SLIDING DOOR FOR TUB OR SHOWER ENCLOSURE 6150A-7150A
 FRAMED SLIDING DOOR FOR TUB OR SHOWER ENCLOSURE 6150A-7150A F AB GLASS AND MIRROR www.fabglassandmirror.com Call: +1 888-474-2221 Fax: (614)-334-4919 Office Timing: 8:30-18:00 EST info@fabglassandmirror.com
Rugged Ridge Body Armor Guard Kit, 5 Pieces, Black (07-Current JK 4-door)
") Rugged Ridge Body Armor Guard Kit, 5 Pieces, Black (07-Current JK 4-door) Installation Time: 60 Minutes Tools Required: Notes: Phillips head screwdriver 3/8 socket or Flat head screwdriver 1/2 socket 7
Rugged Ridge Body Armor Guard Kit, 5 Pieces, Black (07-Current JK 4-door) Installation Time: 60 Minutes Tools Required: Notes: Phillips head screwdriver 3/8 socket or Flat head screwdriver 1/2 socket 7
FRAMED SLIDING DOOR FOR TUB OR SHOWER ENCLOSURE INSTALLATION INSTRUCTIONS
 FRAMED SLIDING DOOR FOR OR SHOWER ENCLOSURE INSTALLATION INSTRUCTIONS QCI5023 REV. 0 Page 1 Certified 06/22/2016 INSTALLATION NOTES: Unpack your unit carefully and inspect for freight damage. Lay out and
INSTALLATION INSTRUCTIONS
 INSTALLATION INSTRUCTIONS Accessory Application Publications No. AII 33173 UNDER 2007 ODYSSEY Issue Date JULY 2006 PART LIST Front under spoiler 5 Stepped bolts TOOLS AND SUPPLIES REQUIRED Phillips screwdriver
Jeep Wrangler JK Door Rear Pair Part # Revision E
 Jeep Wrangler JK 2007 4-Door Rear Pair Part # 10044 Revision E 03-25-09 Step 1: Prior to Installation: A) Bushwacker only approves installing the flares according to these written instructions with the
GENUINE PARTS INSTALLATION INSTRUCTIONS
 GENUINE PARTS INSTALLATION INSTRUCTIONS 1. 2. 3. 4. DESCRIPTION: APPLICATION: PART NUMBER: KIT CONTENTS: Kit G Coupe 999J2 JxxxxB4 (xxxx Designates model year and color) Item Qty. Description Part Number
Application guidance for Printed Vinyl decals
 Paint Masks - Dry Rub Decals - Waterslides - Printed media Telephone: Website: email: +44(0)7872 181119 (mobile) http://www.flightlinegraphics.com sales@flightlinegraphics.com Application guidance for
GRIP Mustang GT/V6 Body Kit
 GRIP Mustang GT/V6 Body Kit GRIP highly recommends that our kits be installed by professionals with experience installing automotive aftermarket parts and accessories. However, we do recognize that many
Vinyl Installation Guide and Tips
 Vinyl Installation Guide and Tips Tools Needed: Squeegee; Grease Pencil (white or blue only!); 2" & 1/4" Masking Tape Prepare your surface and vinyl as outlined on back cover prior to employing this technique
Clay Modeling Film. Features of Clay Modeling Film. Use Clay Modeling Film
 Clay Modeling Film The series of Clay Modeling Film, originally developed by TOOLS INTERNATIONAL Corp, is mainly used for interior/exterior shape confirmation, checking highlights and qualification studies
GENUINE PARTS INSTALLATION INSTRUCTIONS
 GENUINE PARTS INSTALLATION INSTRUCTIONS DESCRIPTION: APPLICATION: PART NUMBER: REAR SPOILER KIT - CARBON FIBER INFINITI Q60 T99J1 5CH0B KIT CONTENTS: Item Qty. Part Description A 1 Spoiler Assembly B 4
INSTALLATION INSTRUCTIONS FRAMELESS CONTINUOUS HINGE SHOWER ENCLOSURE QCI5233
 INSTALLATION INSTRUCTIONS FRAMELESS CONTINUOUS HINGE SHOWER ENCLOSURE QCI5233 QCI5233 Rev 0 Page 1 Certified 06/20/2016 INSTALLATION NOTES: Unpack your unit carefully and inspect for freight damage. Lay
INSTALLATION INSTRUCTIONS
 INSTALLATION INSTRUCTIONS BRONCO FAST TRAC TOP PART #331-210 BRONCO 1966-1977 Thank you for purchasing Specialty s Convertible Top for your Bronco. It has been designed for great fit and long wear. Please
SCION FR-S REAR SPOILER Preparation
 Preparation Part Number: PT938-18130-XX Kit Contents Item # Quantity Reqd. Description 1 1 Spoiler 2 2 Strut 3 1 Hardware Bag Hardware Bag Contents Item # Quantity Reqd. Description 1 2 M6 x 1 Nut with
Simply lift up on the flexible cover to remove it from the radiator support panel and factory grille, exposing the upper mounting hardware.
 2 Simply lift up on the flexible cover to remove it from the radiator support panel and factory grille, exposing the upper mounting hardware. Apply masking tape to the top of the bumper cover underneath
2011 KIA Optima SX / EX Turbo Mesh Grille
 IMPORTANT: PLEASE KEEP THIS INSTRUCTION MANUAL FOR FUTURE REFERENCE! TOOLS REQUIRED 2011 KIA Optima SX / EX Turbo Mesh Grille Upper and Lower Overlay Part #: Complete 1310-0102-11SX / Black Ice Part #1310-B102-11SX
CJ-7 YJ FRONT KITS: Preparation. BEDRUG, INC. n 635 Old Hickory Blvd, Old Hickory, TN n n bedrug.com
 CJ-7 YJ FRONT KITS: BRCYJ76F Jeep Wrangler CJ-7/YJ BedRug Interior Installation Instructions Congratulations on choosing the finest interior flooring kit available for your Jeep. The BedRug material is
BMW X5 OEM RUNNING BOARD PART#SBBW
 INSTALLATION INSTRUCTIONS 2014-2016 BMW X5 OEM RUNNING BOARD PART#SBBW-146-74 QTY HARDWARE 1 Driver Side OEM Running Board 1 Passenger Side OEM Running Board 8 Rivet Pin 1 Page Step 1: Verify all parts
INSTALLATION INSTRUCTIONS Scout II - Fast Trac PART #
 INSTALLATION INSTRUCTIONS Scout II - Fast Trac PART #442-210 Thank you for purchasing Specialty s Convertible Top for your Scout vehicle. It has been designed for great fit and long wear. Please read and
Part # 4463 & Ford Mustang C-Series Upper & Lower Grilles
 Rev. 3/18 Page 1 Part # 4463 & 4464 2018 Ford Mustang C-Series Upper & Lower Grilles Notice: Install new, parts according to these instructions! Altered Parts are Non-Refundable! Part #4464 Notice: Part
Bath Accessory Installation
 Bath Accessory Installation Step 1 - Clean surface using a clean dry cloth or use rubbing alcohol to remove any residue (wax, grease, solvents). Allow to dry one hour. Caution! DO NOT use any household
Jeep Wrangler JK & 4-Door Front Pair Part # Revision H
 Jeep Wrangler JK 2007 2 & 4-Door Front Pair Part # 10045 Revision H 03-25-09 Step 1: Prior to Installation: A) Bushwacker only approves installing the flares according to these written instructions with
INSTALLATION INSTRUCTIONS CJ-5 M38A PART # With Doors
 INSTALLATION INSTRUCTIONS CJ-5 M38A1 1955-1975 PART #109-011 With Doors Thank you for purchasing Specialty s Convertible Top for your Jeep vehicle. It has been designed for great fit and long wear. Please
INSTALLATION INSTRUCTIONS JEEP SCRAMBLER FAST TRAC TOP PART #108-21X
 INSTALLATION INSTRUCTIONS JEEP SCRAMBLER FAST TRAC TOP PART #108-21X Thank you for purchasing Specialty s Convertible Top for your Jeep vehicle. It has been designed for great fit and long wear. Please
Bushwacker Jeep Flat Style Fender Flares Front Pair
 Bushwacker Jeep Flat Style Fender Flares Front Pair Note: These instructions involve cutting parts of your vehicle. Please read all instructions prior to starting. Installation Time: 3-4 Hours Tools Required:
GENUINE FRONT UNDER GARNISH
 GENUINE FRONT UNDER GARNISH INSTALLATION AND USER S INSTRUCTIONS Thank you for purchasing a Genuine Mazda Accessory. Before removal and installation, please thoroughly read these instructions. For your
PART NUMBER: T-R20 PACKAGE CONTENTS: GENUINE ACCESSORIES INSTALLATION INSTRUCTIONS Scuff Plate TOOLS REQUIRED: APPLICABLE MODELS: 2013 MAZDA CX-
 PART NUMBER: 0000-8T-R20 PACKAGE CONTENTS: GENUINE ACCESSORIES INSTALLATION INSTRUCTIONS TOOLS REQUIRED: APPLICABLE MODELS: 2013 MAZDA CX-5 FRONT SCUFF PLATE (Qty 2) 50% ISOPROPYL ALCOHOL/RESIDUE FREE
ASX / OUTLANDER SPORT MZ538307EX SIDE MOULDING INSTALLATION AND HANDLING INSTRUCTIONS
 ASX / OUTLANDER SPORT MZ538307EX SIDE MOULDING INSTALLATION AND HANDLING INSTRUCTIONS Side moulding Thank you for purchasing the Mitsubishi Genuine Accessory. To install and use the product correctly with
Installing 3M DI-NOC Architectural Finishes on Doors
 Installation Guide Revision C, September 2017 Introduction The purpose of this installation guide is to establish a 3M-recommended procedure for installing 3M DI-NOC Architectural Finishes (the Product
Application of 3M Pressure Sensitive Films to 3M Panagraphics Substrates
 Instruction Bulletin 5.30 Release B, Effective October 2006 See bulletin change summary on last page Application of 3M Pressure Sensitive Films to 3M Panagraphics Substrates Preparation Points to Consider
INSTALLATION INSTRUCTIONS Super Scout PART #
 INSTALLATION INSTRUCTIONS Super Scout 71-80 PART #443-010 Thank you for purchasing Specialty s Convertible Top for your Scout vehicle. It has been designed for great fit and long wear. Please read and
The Virgo/Libra Steam Engine
 The Virgo/Libra Steam Engine Congratulations on becoming the owner of a Virgo or Libra Steam Engine. With careful use and maintenance it will give many years of satisfying performance. Contents 1) Notes
INSTALLATION INSTRUCTIONS
 INSTALLATION INSTRUCTIONS Roush Mustang Rear Valances This kit is intended for professional installation. Roush Performance 28400 Plymouth Road Livonia, MI 48150 1-800-59-ROUSH Application: Mustang 1999
Polaris General Doors #06016 Installation & Operations Manual Fits Polaris General
 Polaris General Doors #06016 Installation & Operations Manual Fits Polaris General Before You Start: Please familiarize yourself with all the steps before beginning assembly. Compatibility Info: This Door
PLEASE READ INSTRUCTIONS THOROUGHLY BEFORE PROCEEDING
 Part No. 8870 -or Part No. 9100-9110 Front Fender Flares Flat Panel Design 07-09 Jeep JK, 2/4 Dr. PLEASE READ INSTRUCTIONS THOROUGHLY BEFORE PROCEEDING We have provided complete instructions and specific
Included in Hardware Kit: Pocket Style Extended Coverage Fender Flares Rear Pair. Jeep
 Jeep Pocket Style Extended Coverage Fender Flares Rear Pair STEP 1 PRIOR TO INSTALLATION A) Bushwacker only approves installing the fl ares according to these written instructions with the hardware provided.
Mission One Remove exhaust-you need room to work. Mission Two-Install nose
 RXL Hood Assembly 4/24/15 Warning It is just too easy to scratch the nose and/or hood when installing or removing the hood. The little ring on the Dzus ¼ turn latch is meant as a finger hold as your other
GENUINE PARTS INSTALLATION INSTRUCTIONS
 GENUINE PARTS INSTALLATION INSTRUCTIONS DESCRIPTION: APPLICATION: PART NUMBER: KIT CONTENTS: Tow Hitch Finisher Pathfinder (2013) 999T5 RZ030 Installation of this accessory requires installation of additional
Installation Instructions for DIY or Completed Light Channel.6 Millwork
 2017 Edge Lighting. All Rights Reserved. 1718 W. Fullerton Ave Chicago, IL 60614 Tel: 77-770-1195 Fax: 77-95-561 www.edgelighting.com info@edgelighting.com LCMW.6- - - 904-LCMW.6_02 Installation Instructions
PanelKeeper GL1500 Kit
 Rudy's ** Removable side panel cover retainer system ** PanelKeeper GL1500 Kit Installs in about 10 minutes per side - No tools required! Both sides included Prevents loss of detachable panels Stop losing
Included in Hardware Kit: 1. Jeep. Pocket Style Factory Coverage Fender Flares Rear Pair STEP 1 PRIOR TO INSTALLATION
 STEP 1 PRIOR TO INSTALLATION A) Bushwacker only approves installing the fl ares according to these written instructions with the hardware provided. WARNING: Failure to install according to these instructions
Unit No. 6150, 7150 Deluxe Framed Sliding Tub/Shower Enclosure
 INSTALLATION INSTRUCTIONS Unit No. 6150, 7150 Deluxe Framed Sliding Tub/Shower Enclosure QCI0023 Rev. 1 Page 1 of 8 Certified 8/20/10 MAINTENANCE: Two primary materials are used to manufacture your new
Rubber Grommet, 36 pcs. 3/4 Screw, 10 pcs. Nut, 10 pcs
 Jeep Cherokee ZJ Set Part #10916-07 Rev-2 03-11-10 THESE INSTRUCTIONS INVOLVE CUTTING THE FENDERS OF THE VEHICLE. IT IS IMPORTANT TO READ ALL INSTRUCTIONS PRIOR TO THE CUTTING AND INSTALLATION OF THESE
GRIP Scion tc Body Kit
 GRIP Scion tc Body Kit GRIP highly recommends that our kits be installed by professionals with experience installing automotive aftermarket parts and accessories. However, we do recognize that many customers
REVISION LIST CHAPTER 25: AFT WINDOWS. The following list of revisions will allow you to update the Legacy construction manual chapter listed above.
 REVISION LIST CHAPTER 25: The following list of revisions will allow you to update the Legacy construction manual chapter listed above. Under the Action column, R&R directs you to remove and replace the
INSTALLATION INSTRUCTIONS
 INSTALLATION INSTRUCTIONS BUILDERS CHOICE FRAMED Shower Height Swing Door Model: L533 Rev. 09.03.13 MAINTENANCE: Two primary materials are used to manufacture your new Aquatic enclosure; tempered glass
Included in Hardware Kit 4. Jeep Wrangler JK 4-Door Rear Flares. Set Part # Rev STEP 1 PRIOR TO INSTALLATION
 A) B) C) D) E) STEP 1 PRIOR TO INSTALLATION Bushwacker only approves installing the fl ares according to these written instructions with the hardware provided. WARNING: Failure to install according to
Product must be installed as shown using the screws and brackets provided. Use of incorrect hardware could result in damage to the product.
 General Notes These installation instructions are intended to be comprehensive for a typical Keyeira/Presto configuration. Your configuration may differ. If you have questions contact Geiger Customer Service
INSTALLATION INSTRUCTIONS FRAMELESS CONTINUOUS HINGE SHOWER ENCLOSURE QCI5232
 INSTALLATION INSTRUCTIONS FRAMELESS CONTINUOUS HINGE SHOWER ENCLOSURE QCI5232 QCI5232 Rev 0 Page 1 Certified 06/20/2016 INSTALLATION NOTES: Unpack your unit carefully and inspect for freight damage. Lay
Volvo 1800 Smiths Gauge Face Overlay Installation By Dave Barton
 Volvo 1800 Smiths Gauge Face Overlay Installation By Dave Barton These face overlays are the product of a lot of research. They are printed with a special printer using waterproof and UV resistant ink
1/4 FRAMELESS CONTINUOUS HINGE SHOWER ENCLOSURE
 1/4 FRAMELESS CONTINUOUS HINGE SHOWER ENCLOSURE QCI5028 Rev 1 Page 1 Certified 09/19/2018 INSTALLATION NOTES: Unpack your unit carefully and inspect for freight damage. Lay out and identify all parts using
LANCER LOWER GRILLE GARNISH KIT MZ INSTALLATION AND HANDLING INSTRUCTIONS
 LNCER LOWER GRILLE GRNISH KIT MZ940000 INSTLLTION ND HNDLING INSTRUCTIONS Thank you for purchasing the Mitsubishi Genuine ccessory. To install and use the product correctly with proper knowledge of it,
Bolt-On/Rugged Fender Flares Toyota Tundra (14-ON) Important: Please read instructions entirely before installing this product.
 Important: Please read instructions entirely before installing this product.") Important: Please read instructions entirely before installing this product. Hardware Included QTY Hardware Included QTY Bolt Kit Included QTY Extrusion 28.0 ft Short Screw 18 Nuts 42 Alcohol Wipe 4 Long
Important: Please read instructions entirely before installing this product. Hardware Included QTY Hardware Included QTY Bolt Kit Included QTY Extrusion 28.0 ft Short Screw 18 Nuts 42 Alcohol Wipe 4 Long
UNIT No FRAMELESS PIVOT SHOWER DOOR
 INSTALLATION INSTRUCTIONS UNIT No. 3600 FRAMELESS PIVOT SHOWER DOOR NEED INSTALLATION HELP? Call 1-800-45-BASCO (452-2726) Monday - Friday 8:00 A.M. - 4:30 P.M. Eastern Time QCI0020 Rev. 3 Page 1 of 8
Ford F150 Front Bumper
 2009-2011 Ford F150 Front Bumper Warning! Read the instructions completely before beginning the installation. Before tightening bolts, drilling or cutting where required, check to make sure that there
1/4 Rubber Spacer, 26 pcs. M5-.8 Machine Screw, 26 pcs 13. Female Wire Connector, 4 pcs
 97-06 Jeep Wrangler TJ Set Part #10920-07 Rev-3 12-15-08 A) B) C) D) E) F) G) STEP 1 - PRIOR TO INSTALLATION Bushwacker only approves installing the fl ares according to these written instructions with
INSTALLATION INSTRUCTIONS GRILLE GUARD 09-ON DODGE RAM PART #
 INSTALLATION INSTRUCTIONS GRILLE GUARD 09-ON DODGE RAM PART # PARTS LIST: Qty Description Qty Description 1 Grille Guard 8 12-1.75mm x 35mm Hex Bolts 2 Brackets (for trucks without 22 12mm x 30.1mm OD
IMPORTANT: PLEASE RETAIN THIS INSTRUCTION MANUAL FOR FUTURE REFERENCE
 IMPORTANT: PLEASE RETAIN THIS INSTRUCTION MANUAL FOR FUTURE REFERENCE 005-07 Cadillac STS Classic 3D Z, Classic Dual Weave, Classic Mesh & Classic Black Mesh Grilles B 7 HR 3 STS Classic 3D Z Grille Part
1/4 FRAMELESS CONTINUOUS HINGE SHOWER ENCLOSURE 1400A-1700A-1800A
 1/4 FRAMELESS CONTINUOUS HINGE SHOWER ENCLOSURE 1400A-1700A-1800A F AB GLASS AND MIRROR www.fabglassandmirror.com Call: +1 888-474-2221 Fax: (614)-334-4919 Office Timing: 8:30-18:00 EST info@fabglassandmirror.com
Included in Hardware Kit: Jeep. Pocket Style Extended Coverage Fender Flares Rear Pair
 A) B) C) D) E) F) G) H) STEP 1 PRIOR TO INSTALLATION Bushwacker only approves installing the fl ares according to these written instructions with the hardware provided. WARNING: Failure to install according
3M Wrap Film Series 1080 Preparation of Substrates, Application, Maintenance and Removal
 Instruction Bulletin 1080 3M Europe, Effective August 2015 3M Wrap Film Series 1080 Preparation of Substrates, Application, Maintenance and Removal Instruction Bulletin Recommended Types of Graphics and
QWALL 5.2 (2 Back Panels)
") QWALL 5. ( Back Panels) SHOWER ACRYLIC WALL INSTALLATION INSTRUCTIONS IMPORTANT DreamLine TM reserves the right to alter, modify or redesign products at any time without prior notice. For the latest up-to-date
QWALL 5. ( Back Panels) SHOWER ACRYLIC WALL INSTALLATION INSTRUCTIONS IMPORTANT DreamLine TM reserves the right to alter, modify or redesign products at any time without prior notice. For the latest up-to-date
Instructions to Convert a 4-foot Florescent Fixture to LEDs Using 60W Power Supply Using 2 or 3 strips 30Dec15
 Instructions to Convert a 4-foot Florescent Fixture to LEDs Using 60W Power Supply Using 2 or 3 strips 30Dec15 Thank you for purchasing the Shoplight Solutions 4-ft conversion kit. This is a companion
Cervini's Quarter Window Scoops (2005+) - Installation Instructions
 - Installation Instructions") Cervini's Quarter Window Scoops (2005+) - Installation Instructions The below installation instructions work for the following products: Cervini's Quarter Window Scoops (2005+) Please read through the
Cervini's Quarter Window Scoops (2005+) - Installation Instructions The below installation instructions work for the following products: Cervini's Quarter Window Scoops (2005+) Please read through the
INSTALLATION INSTRUCTIONS. UNIT No. 160/760 THIN-LINE SHOWER ENCLOSURE
 INSTALLATION INSTRUCTIONS UNIT No. 160/760 THIN-LINE SHOWER ENCLOSURE QCI0011 Rev. 0 Page 1of 10 Certified 10/18/2006 MAINTENANCE: Two primary materials are used to manufacture your new Basco enclosure;
TOYOTA RAV DOOR SILL PROTECTOR Preparation
 Preparation Part Number: PU060-42141-P1 Kit Contents 1 2 Door Sill (w/logo) 2 2 Rear Door Sill (w/graphic) Hardware Bag Contents Additional Items Required For Installation 1 2 3 Conflicts Note: Recommended
Insta-DE Series Soft- padded Dry- erase Whiteboard Projection Screen
 Insta-DE Series Soft- padded Dry- erase Whiteboard Projection Screen User s Guide Product Features Ø Award winning and GREENGUARD certified VersaWhite material. Ø 1.1 gain with 180 degree wide viewing
All Terrain Flares 2014 Chevy Silverado
 Page 1/8 Components: 1. Front Flares (2) 2. Rear Flares (2) Tools required: - Utility knife - #2 Phillips driver - Socket wrench - 13 mm Socket - 6 mm Allen Wrench - T-15 Torx bit - Trim Removal Tool -
Conflicts. TOYOTA Highlander 2015 Fender Flares Part Number: Accessory Code: BF7000. Safety Tools Safety Glasses
 Highlander 2015 Fender Flares Part Number: 00016-48016 Accessory Code: BF7000 Conflicts Note: Factory Splash Guards Kit Contents Item # Quantity Reqd. Description 1 1 Left Front Fender Flare 2 1 Right
All Terrain Flares 09+ Ford F150
 Page 1/5 Components: 1. Front Flares (2) 2. Front Flare Inner Pieces (2) 3. Rear Flares (2) Tools required: - Utility knife - Electric Drill - 1/4 Drill Bit - #2 Phillips driver - Socket wrench Hardware
Jeep. Flat Style Fender Flares Rear Pair. Included in Hardware Kit:
 Jeep Flat Style Fender Flares Rear Pair STEP 1 PRIOR TO INSTALLATION A) Bushwacker only approves installing the fl ares according to these written instructions with the hardware provided. WARNING: Failure
QWALL 4 ACRYLIC SHOWER WALL INSTALLATION INSTRUCTIONS
 QWALL 4 ACRYLIC SHOWER WALL INSTALLATION INSTRUCTIONS IMPORTANT DreamLine TM reserves the right to alter, modify or redesign products at any time without prior notice. For the latest up-to-date technical
INSTALLATION INSTRUCTIONS
 INSTALLATION INSTRUCTIONS BUILDERS CHOICE FRAMED Bypass Door Model: L0516 (Tub Height), L0517 (Shower Height) Rev. 09.20.13 INSTALLATION NOTES: Unpack your unit carefully and inspect for freight damage.
Slide the stock rubber tank mount caps onto the ends of the CS-1 tank mount:
 RYCA CS-1 BODY PARTS INSTALLATION GUIDE [The CS-1 installation guides should be used as supplements to the videos found on our Youtube Channel. There is no strict order to the build process, but it is
Half Door Installation Instructions
 Half Door Installation Instructions For: CJ5 (1955-1975), CJ6 (All), M38-A1 (1955-1971) Part Number: 53025 WARNING This product is designed primarily to enhance the appearance of the vehicle and to shield
2018+ Mustang Corner Pockets Installation Instructions P/N: (R B972)
") 2018+ Mustang Corner Pockets Installation Instructions D 02 RA -1 F 9- T 18 P/N: 422083 (R1318-16B972) 39555 Schoolcraft Rd, Plymouth MI, 48170 800.59.ROUSH 2018+ Mustang Corner Pockets Installation Instructions
2018+ Mustang Corner Pockets Installation Instructions D 02 RA -1 F 9- T 18 P/N: 422083 (R1318-16B972) 39555 Schoolcraft Rd, Plymouth MI, 48170 800.59.ROUSH 2018+ Mustang Corner Pockets Installation Instructions
675 Quick N Stall Neo Angle Framed Hinge Shower Enclosure
 INSTALLATION INSTRUCTIONS 675 Quick N Stall Neo Angle Framed Hinge Shower Enclosure Call Technical Dept @ 1-800-452-2726 QCI1003 Page 1 of 9 Certified 10/01/09 INSTALLATION NOTES: Unpack your unit carefully
INSTALLATION INSTRUCTIONS
 SG57f GENUINE PARTS INSTALLATION INSTRUCTIONS. DESCRIPTION: Sunroof Wind Deflector. APPLICATION: Pathfinder; Frontier with no roof rails 3. PART NUMBER: 999D4-XR00 4. KIT CONTENTS: Item No. ) ) 3) 4) 5)
FV44 & FV33 GRACE KIT INSTALLATION INSTRUCTIONS
 LIST OF INCLUDED PARTS QTY DESCRIPTION 1 GRACE KIT (NOT SHOWN) BAG ASSEMBLY, HANGING OVERLAY 4 S 4 LOCK WASHERS 4 8-32 SCREWS, SLOT HEAD BAG ASSEMBLY, CONNECTING OVERLAYS 4 10-32 X 1/2" SCREWS TOOLS REQUIRED
Included in Hardware Kit. Jeep Cut-Out Fender Flare Set of 4 Set Part # Rev STEP 1 PRIOR TO INSTALLATION
 Jeep Cut-Out Fender Flare Set of 4 Set Part #10926-07 Rev-01 09-11-12 STEP 1 PRIOR TO INSTALLATION A) Bushwacker only approves installing the flares according to these written instructions with the hardware
INSTALLATION INSTRUCTIONS
 INSTALLATION INSTRUCTIONS Trans4mer Grille Guard/Winch Mount For Chevrolet Silverado 1500HD & 2500 Kit 68162 This WARN Trans4mer system can be customized to give your Chevy Silverado a wide variety of
Installation Instructions for DIY or Completed 45 Degree Light Channel
 201 Edge Lighting. All Rights Reserved. Installation Instructions for DIY or Completed Degree Light Channel IMPORTANT INFORMATION - This instruction shows a typical installation. 11 W. Fullerton Ave Chicago,
Frameless Fixed Panel Slider
 INSTALLATION INSTRUCTIONS Frameless Fixed Panel Slider QCI-5279 SINGLE ROLLER WITH ANTI-JUMP DOUBLE ROLLERS QCI5279 Rev Page Certified 08/09/6 Tools: To install your New Shower Enclosure, you may need
Volvo 1800 Smiths Gauge Face Overlay Installation By Dave Barton
 Volvo 1800 Smiths Gauge Face Overlay Installation By Dave Barton These face overlays are the product of a lot of research. They are printed with a special printer using waterproof and UV resistant ink
Included in Hardware Kit: Jeep Pocket Style Fender Flare Set of 4. Set Part # Rev-0 3/15/2013 TOOLS FOR EASY INSTALLATION:
 STEP 1 PRIOR TO INSTALLATION A) Bushwacker only approves installing the fl ares according to these written instructions with the hardware provided. WARNING: Failure to install according to these instructions
VANITY CABINET + MIRROR VANITY SET: LV1-30 INSTALLATION INSTRUCTIONS. Version 1.1
 INSTALLATION INSTRUCTIONS Version 1.1 READ ALL INSTRUCTIONS BEFORE UNPACKING THE PRODUCT 2 PEOPLE ARE REQUIRED TO LIFT AND DURING ENTIRE INSTALLATION OF THIS PRODUCT INSTALLATION OF LESSCARE PRODUCTS BY
Instructions to Convert a 4-foot Florescent Fixture to LEDs Using 100W Power Supply Using 1-4 strips 30Dec15
 Instructions to Convert a 4-foot Florescent Fixture to LEDs Using 100W Power Supply Using 1-4 strips 30Dec15 Thank you for purchasing the Shoplight Solutions 100W conversion kit. This is a companion document
Contemporary 3 Panel Classic 5 Panel French Panel
 Contemporary 3 Panel Classic 5 Panel French Panel (X) Operating / Lock Panel Left (O) Fixed Panel Right Note : Glazing Beads For All Panel Face To The Exterior 2 Panel XO Left Is Shown Above Opposite =
RAMPAGE P R O D U C T S. BRONCO ZIPPER FASTRACK TOP PART #984xx BRONCO TOOLS REQUIRED
 RAMPAGE P R O D U C T S 84 (+/- 1/4 ) BRONCO ZIPPER FASTRACK TOP PART #984xx BRONCO 1966-1977 TOOLS REQUIRED 3/8 WRENCH 7/16 WRENCH ½ WRENCH #2 PHILLIPS SCREWDRIVER 1/8 DRILL BIT 9/64 DRILL BIT 5/32 DRILL
Flat Style Fender Flares Rear Pair. Jeep. Included in Hardware Kit:
 Jeep Flat Style Fender Flares Rear Pair STEP 1 PRIOR TO INSTALLATION A) Bushwacker only approves installing the fl ares according to these written instructions with the hardware provided. WARNING: Failure
Installation Instructions for Zip Suspension Downlight with Remote Power and 4" Square or Round Canopy
 Doc # 90-ZS-SQ_0 W. Fullerton Chicago, IL 0 Ph:.0.9 Fax:.9. www.pureedgelighting.com info@pureedgelighting.com 0 PureEdge Lighting. All Rights Reserved. Installation Instructions for Zip Suspension Downlight
FRAMED PANEL / DOOR / PANEL CONTINUOUS HINGE SHOWER ENCLOSURE INSTALLATION INSTRUCTIONS
 FRAMED / DOOR / CONTINUOUS HINGE SHOWER ENCLOSURE INSTALLATION INSTRUCTIONS QCI5229 Rev 0 6 INSTALLATION NOTES: Unpack your unit carefully and inspect for freight damage. Lay out and identify all parts
Stop! Read This Important Information.
 Stop! Read This Important Information. Stop, Do Not Proceed, Read This This door replacement kit is designed for the replacement of doors on a Supertop ONLY! This door will not work on any other style
Instructions to Convert a 4-foot Florescent Fixture to LEDs Using a SS 25W Power Supply and a 4 LED strip 30Dec15
 Instructions to Convert a 4-foot Florescent Fixture to LEDs Using a SS 25W Power Supply and a 4 LED strip 30Dec15 Thank you for purchasing the Shoplight Solutions 4-ft conversion kit. This is a companion