ALU MAT. Industriezone " De Zaat" Frank Van Dyckelaan Temse. Belgium. Tel:0032(0) Fax:0032(0) BTW:BE
|
|
|
- Derek Wilkins
- 5 years ago
- Views:
Transcription
37 11 11 07 BTW:BE 0429 999 317 mailto:info@debomat.be www.debomat.be 1")
1 ALU MAT Industriezone " De Zaat" Frank Van Dyckelaan Temse Belgium Tel:0032(0) Fax:0032(0) BTW:BE

 is 2m.")


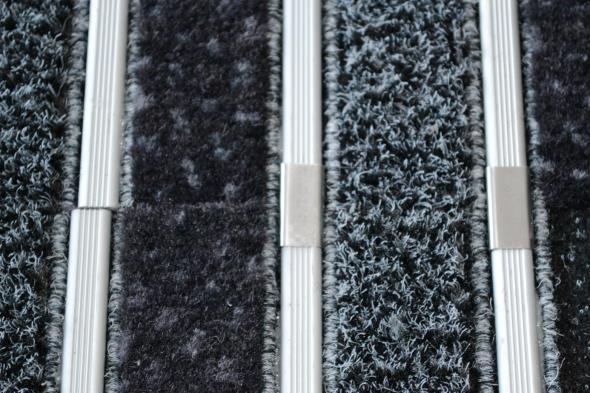
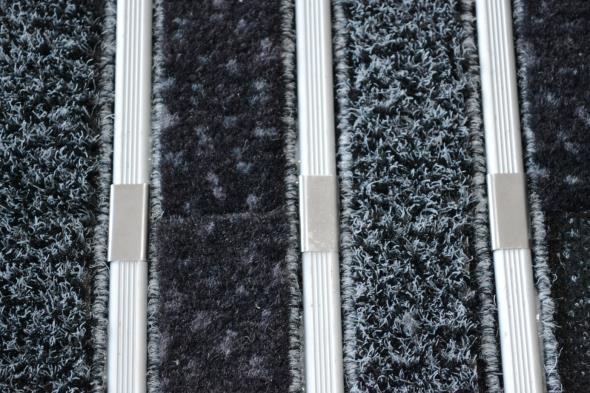
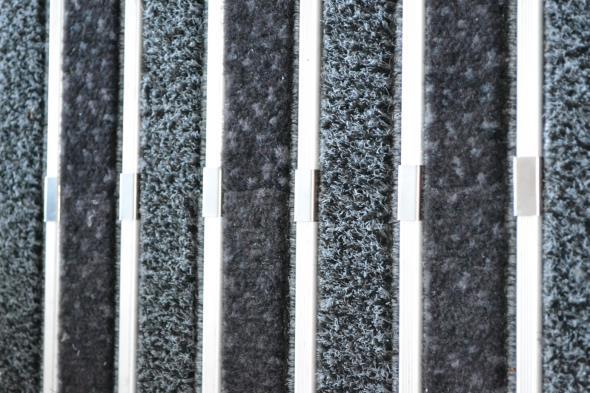
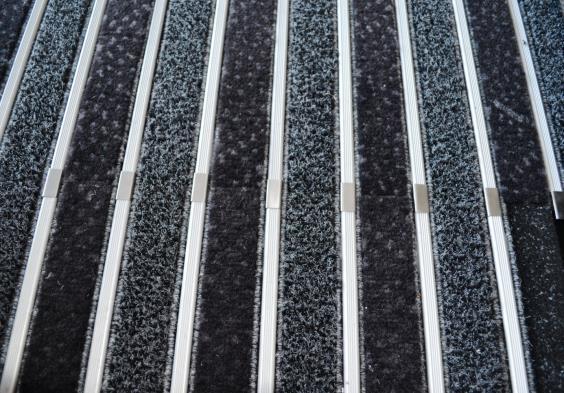
2 Alumat 1) What are the dimensions? Alumat is in roll form and the stripe direction is in the same direction as the width of the roll so completely opposite to the textile products like Super Scraper, Trio Brush or Trio Scraper. The length is 10m and the height of the roll (width) is 2m. These dimensions can vary ±0.5 %. The weight per m² is 4 kg (± 80 kg per roll). Every roll has a pole direction which is marked by arrows on the reverse side of the roll. The thickness is +/- 11 mm. 2) What is it made of? Alumat is made from a Polypropylene needle punch with a latex backing. Strips of Aluminium bars are inserted in the Polypropylene base 3) Available colours? (in order of most popular) Antracite Grey Beige Brown 2
 How does it work compared with other walk off mats? As you can see on the picture below, the mat has 2 different zones in one. The first zone is the scraping zone.")
 When does it not work as well as it should?")

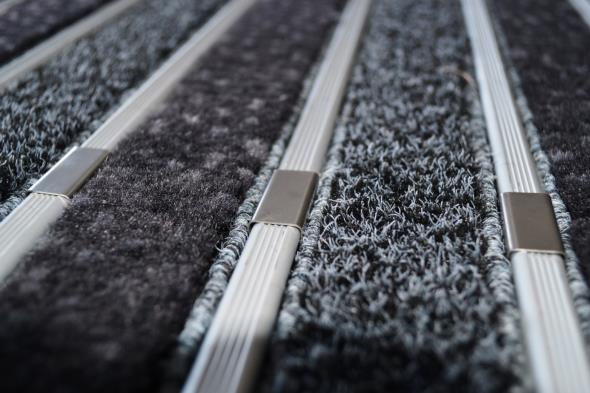
3 4) Can it be branded? Yes, it can be branded with logos. A logo is produced separately and then inserted into the existing matting. The way the logo is produced can be cut out or printing. 5) How does it work compared with other walk off mats? As you can see on the picture below, the mat has 2 different zones in one. The first zone is the scraping zone. This insert will scrape the soles of the shoes. The second zone is the optical zone with the aluminium bar which has an edged scraper profile on top. Zone 2 Zone 1 6) When does it not work as well as it should? Tests conducted by a certified testing lab have shown that a total of 7m is required before feet are completely dry and clean by walking over the mat. This can be achieved with a combination of outdoor matting and indoor matting as realistically, not all buildings have the available space for one mat of this size. Consequently it is important that architects are aware of this fact when designing an area for an entrance mat. 7) The truth about dirt It can cost more than 500 to remove 500g of dirt, after it has been tracked into a building. Up to 12kg of dirt can be tracked into a building by just 1000 people coming through an entrance each day over a 20 day work period. Without adequate matting, 42% of a floor s finish can be removed within the first 1.5m of an entrance after only 1,500 people have walked in. 3

4 8) Recommended installation procedures Placement on top of existing floor (loose lay) If Alumat is installed on top of an existing floor, it is recommend that the mat include a PVC edge profile to avoid a tripping hazard. It is also recommend that mats measuring under 4m² (2m x 2m), not be loose lay as there is insufficient weight to exert pressure on the surface, resulting in the non-slip backing being ineffective. Placement in a mat well If Alumat is placed in a mat well, it can be loose lay or bonded to the surface. Bonding is recommended to support rolling traffic over the mat. For gluing, Bison Textile Adhesive is recommended but any wall to wall carpet adhesive would be suitable. The mat well should be level, free of dirt and impurities and be a minimum depth of 10 mm (measured from the level of the existing floor). If the mat well is any deeper, a non-elastic underlay must be inserted to reduce the depth to the suitable height of 10 to 11 mm. Doors must be checked for sufficient play in height otherwise movement of the door will cause damage to the mat. Cut to size If the mat well is complete, the mat can be cut to size in advance. However, experience tells us that mat wells are all too often not perfect rectangles so cutting the mat in advance does result in an imperfect fit. The mat can be cut to size with a Stanley knife in the textile direction. The other direction should be cut by an angle grinder. Each aluminium bar has to be grinded separately over the whole length from the top down. Then in one solid move the angle grinder will cut the carpet passing the aluminium bars which are already cut. Site and Preparation prior to Mat installation In order for a mat to be installed according to spec and to perform well beyond its intended life cycle, and to avoid bending of the aluminium bars it is imperative to take note of the following when preparing the site for installation : 1. The screed needs to be even and level with a uniform depth across the full area of the recess within 1mm. Tile Mat Tile Mat Tile Mat 4
5 2. The depth of the recess should be within a tolerance of 1mm of the thickness of the mat to be installed. Tile Mat Tile Mat Tile Mat 3. All debris needs to be removed from the screed prior to installation. Debris include tile cement and grout left behind by contractors, temporary fasteners used to anchor frames or other structures and any other object or material that would render the screed surface uneven or irregular. Tile Mat Tile Mat 4. Where the screed meets the mat-well / recess surrounding frame, the screed should be square to the perpendicular edge of the frame. Generally screeds tend to form a meniscus at the frame and thus the screed closest the frame is not within the 1mm spec. Tile Mat Tile Mat 5. Mats cannot be installed in active entrances as the recess needs to remain clean in order for adhesives to bond properly. The unnecessary disturbance of the process of the mat installation could hinder the outcome of the quality of the installed mat. There are some steps that are very time frame specific such as the application of adhesives and the subsequent bonding of the mat to the screed. Any disruptions during these critical stages could be disastrous. Other stages are very sensitive to movement of the mat such as when marking and trimming a mat to fit a recess. 5
6 6. Did you know that recesses are generally not square or straight and even a deviation of 2mm could cause an unsightly gap between the mat and the recess frame. On a mat that is 10 meters long this amounts to a tolerance of only 0.02%. 7. Mats cannot be installed over wet or uncured screeds due to the presence of excessive moisture that would render the bonding agents ineffective. Great screeds make great mats How to install in a recess Necessary tools: 1 straight edge that does not bend and maximum 10 mm thickness, Stanley knife, paper tape, wooden cutting board for protecting the floor against cutting marks and a pencil. Make sure you have your health and safety file and that the area where you will be working is cordoned off and in rule with the safety specifications. Here above you will see a recess of 100 cm X 200 cm portrait orientation. The walking direction will be in the length of the 100 cm. Step 1: You cut the mat 110 cm X 205 cm from the roll to cut it afterwards to size. Step 2: You put a paper tape on top of the existing floor in all 4 corners vertically and horizontally (red blocks on the drawing is the tape) Step 3: You take a straight edge and put it in the length of every profile of the recess. Then you mark this line on top of the tape. You have now an extension of the recess lines. Step 4: You take the mat and you put it over the recess and then you can see the extended lines on top of the tape outside the mat. First you look for the best solution so that the lines of the carpet are exactly divided top and bottom inside the recess lines. 6
7 Step 5: Put a piece of paper tape on top of the mat at position 1 at the drawing making sure that the line on top of the floor can be projected on this tape. Take the straight edge and align it with both markings on the floor end then mark the tape on top of the carpet with a pencil. Step 6:Then you move the mat a little bit away from the recess so you have a solid floor where you can put the cutting board on. Then you put the mat on top of the cutting board and align the straight edge with the lines on top of the tape on top of the mat and you cut. TIP: Sit with your knees on top of the straight edge so that it cannot move under any circumstance. Also cut the mat in several movements. Do not try to cut through the mat in one time. Step 7: Repeat step 5 and 6 but at position 2. The only difference here is that instead of aligning the straight edge with the lines on top of the mat, you move 5 mm away from the lines towards the inside of the mat. This will give your 5 mm space between the mat and the inside of the recess because the mat can expand and also then something could be put in between the recess and the mat to get it out for extensive cleaning only. Also only possible if the mat is not glued in. Step 8: repeat step 5 and 6 for position 3 Step 9: repeat step 7 for position 4 Installing Aluminium products like Alumat, trio scraper aluminium and alu brush. Here the procedure is completely the same as above with the only difference that you cannot cut in the aluminium profile in the length of the profile. This is not a problem if you do the aligning correctly like explained in step 4. Cutting through the aluminium orthogonal to the length, is not a problem. Here we use an angle grinder with a thin blade of 1.2 mm and 115 or 125 mm diameter. The cutting process through aluminium is available on video and can be send to you to see. Always cut top to bottom and allow the blade to cut avoiding too long contact with the aluminium. If there is too long contact with the blade grinding the aluminium the results will be that the aluminium turns brown on colour and the glue could release from the profile due to the heat. Gluing the mat inside the recess. For gluing the mat inside a recess the screed needs to be well prepared like explained in the product specs. Also it needs to be free of dust and therefore I recommend vacuum cleaning. Using a brush will not be enough. The following safety measures have to be taken: Wear protective gloves and were the right protection not to inhale the fumes of the glue. Also make sure no work is being performed where the glue could ignite due to sparks or open fires. Therefore works like welding, grinding or smoking are not allowed near the installation site. The glue used is a super contact glue ( Adtech S 11 ) and 1 litre can cover +/- 3 m² (0.5 litre on the recess and 0.5 litre on the mat). The tools you need for gluing are an empty 5 litre container where the side is cut open to contain the glue and a left over piece of carpet which will act like a brush to apply the glue. Also a rubber hammer or a heavy roller to apply pressure after the gluing on top of the mat. First you glue the recess allowing it to dry for about 20 minutes in a temperature of at least 20 degrees. If the temperature is lower the drying time will be longer. Then the glue has to be applied to the bottom of the mat. Also there the drying time has to be respected of +/- 20 minutes. Put the mat in such a position that it can be for installing easily tipped over into the recess because one applied pressure between the recess and the 7
8 mat, moving the mat is impossible. Once in position you can hammer the mat onto the floor or use the heavy roller. This procedure is only applicable for smaller mats. For bigger mats following procedure should be followed: Put the mat into the recess into its perfect position. On one side an installer will have to sit on top of the mat. Then the mat is flipped over towards the installer sitting on the mat and he will hold back the mat. Another installer will then glue the recess and mat for +/- 20 to 50 cm and after the drying time the mat will be released and hammered down. Once there is good contact the mat can be flipped over to the already attached side and then the rest of the mat and recess can be glued. After the drying time the mat can be flipped back and everything will be then hammered into position. 9) Applying a PVC edge to the Alumat The PVC edging is applied by gluing it into the underside of the mat. As extra reinforcement, it is recommended that the PVC edging is also stapled (using a staple gun) to the mat. For further guidance on the most effective brand of staple gun, please contact Debomat directly. 10) What about guarantees, warranties? Debomat N.V. provides a 2 year warranty on the quality of all our entrance matting. Debomat N.V. guarantees that all entrance matting will be free from any defects in material and workmanship at the time of sale, to original purchaser, under normal usage. Should any product, within the warranty period, prove to be defective in material and/or workmanship under normal usage, Debomat will replace the product at no additional charge (except as otherwise stated herein) provided that the product has not been subject to abuse, misuse, misapplication, neglect, accident, disaster, alteration or modification. Normal wear and tear is not covered under the warranty. NOTE: THE ABOVE WARRANTY IS THE ONLY WARRANTY PROVIDED BY DEBOMAT N.V. AND MAKES NO OTHER WARRANTY OF ANY KIND, EXPRESS OR IMPLIED, INCLUDING, BUT NOT LIMITED TO, ANY IMPLIED WARRANTY OF MERCHANTABILITY OR FITNESS FOR A PARTICULAR PURPOSE OR ANY OTHER WARRANTY OF ANY KIND. UNDER NO CIRCUMSTANCES WILL DEBOMAT BE HELD LIABLE TO THE CUSTOMER FOR DAMAGES FOR LOST PROFITS, LOSS OF GOODWILL, OR OTHER INDIRECT, SPECIAL, INCIDENTAL, EXEMPLARY, PUNITIVE OR CONSEQUENTIAL DAMAGES ARISING OUT OF THE USE OF, OR INABIITY TO USE, SUCH PRODUCT PURCHASED, EVEN IF DEBOMAT HAS BEEN ADVISED, OR SHOULD HAVE KNOWN, OF THE POSSIBILITY OF SUCH DAMAGES, OR FOR ANY CLAIM BY ANY THIRD PARTY. Use and Care of Debomat entrance matting Mat should be vacuumed weekly and in high traffic areas more frequently. Should a claim be lodged and dirt makes up more than 10% of the weight per m², the warranty is null and void. A maximum of a 1,000 people per day over a 2 year period is guaranteed The warranty is effective if the mat no longer performs a cleaning function, within 2 years of purchase date. 8


: 6.")

9 11) What about CE declaration? DECLARATION OF PERFORMANCE No. DOP-CPR Unique identification code of the product-type or product family: Alu Mat cm x 10 m 2. Type, batch or serial number or any other element allowing identification of the construction product: Entrance Matting 3. Intended uses of the construction product, in accordance with the applicable harmonised technical specification, as foreseen by the manufacturer: Use as entrance floor covering(s) within a building according to the manufacturer's specifications and installation practices in accordance with EN Name, registered trade name or registered trade mark and contact address of the manufacturer: Alumat Frank Van Dyckelaan 12, 9140 Temse, Belgium 5. Where applicable, name and contact address of the authorised representative (distributor, importer): 6. System of assessment and verification of constancy of performance of the construction product: AVCP system 4 7. In case of the declaration of performance concerning a construction product covered by a harmonised standard: system 4 Not applicable 8. In case of the declaration of performance concerning a construction product for which a European Technical Assessment has been issued: not applicable 9. Declared performance: Essential characteristic Performance Harmonised technical specification EN 14041:2004 Reaction to fire AC:2006 EN Essential characteristic Electrical behaviour (dissipative) Performance Not applicable Harmonised technical specification EN 14041:2004 AC:2006 Content of pentachlorophenol EN EN 1081 or ISO Electrical behaviour (conductive) Not applicable Formaldehyde emissions EN 1081 or ISO Thermal conductivity Not applicable ENV or EN EN or EN Slip resistance EN Water-tightness EN Not applicable Electrical behaviour (antistatic) Not applicable EN 1815 or ISO The performance of the product identified in points 1 and 2 is in conformity with the declared performance in point 9. This declaration of performance is issued under the sole responsibility of the manufacturer identified in point 4. Signed for and on behalf of the manufacturer by: De Bondt Tom, CEO Temse, 01/09/2013 9
10 12) What about cleaning procedures? The care and maintenance of Alumat is essential to maintain the durability and appearance of the mat. Soiling and general wear has a negative impact on the appearance of the entrance mat and should be prevented by instituting an effective cleaning program. A regular cleaning program prevents premature replacement of the entrance mat. Installation of an exterior mat such as Super Scraper will reduce the soiling of the Alumat. Avoid excessive use of cleaning products. If they are used then ensure they are washed out of the mat thoroughly as any residue can attract dirt. Vacuuming Regular vacuuming with a sufficiently powerful vacuum cleaner and brush is essential to maintain the condition of the mat. Heavy traffic areas should be vacuumed more intensively than lighter traffic areas. Stain removal Stains should be removed immediately (before it dries) with a neutral stain remover. Chewing gum can be removed with ice by turning the gum to a solid and then removing it with a knife or scraper. 13) What about tests and certificates? Certificates are available on request: Fire classification to European standards, Anti-slip certificate, Reach compliant certificate which includes the VOC, wheelchair compliant, etc. We work with Centexbel in Ghent (associated with the Textile University of Ghent) which is fully licensed to carry out testing and produce certificates, so please do not hesitate to contact us. 14) What can go wrong? Over the years Debomat has worked with a number of distributors and customers and has valued experience of installations and the various obstacles and issues that arise. Below please find some typical examples and their relevant solutions: When I put 2 pieces together in the same installation, the colour is different between the 2 pieces. The reason for this is that one of the pieces has been turned around 180 degrees. It is important that the arrows on the backing are matched for both pieces in the same direction, which will ensure a colour match. The mat does not want to lie flat. In a mat well: the reason for this could be that the mat was cut exactly to size and a few hours later it has expanded. Solution: cut 5mm off the length of mat. This should be done prior to installation so that a re-visit to the customer is not required. Loose lay: In colder conditions the mat will try to revert to its original form, namely rolled up. The solution for this is to break the mat. This means that you counter roll the mat in the opposite direction for the required result. The mat will should settle into a flat position within 24 hours if the temperature conditions are above 20 degrees Celsius. I have a piece that is damaged on the mat, what now? It is possible to cut the damaged piece out and to replace it with a new piece but, depending on the age of the mat, there could be a colour variation between the old and new material. This is only possible if 10


11 the textile is damaged. Of course the new piece has to be glued down in the recess or bonded together with a new piece of textile backing. If the aluminium is damaged, you can try to bend the aluminium bar back to its original position but the success will depend on the amount of damage that has been done. I have an install where the dimension of the recess is exceeding the 2 meters left to right, what should I watch out for? 3.7m 4m For purposes of explaining, we will use the size of 3.7m x 4.0m with the aluminum profiles running along the direction of the 3.7m. Under normal circumstances, you would cut a piece of 2m x 4m straight from the roll and another piece of 1.7m x 4m to make the size 3.7m x 4m. However, aesthetically, the mat would not look balanced as the one side would be larger than the other and the ribs may not necessarily line up. The following steps would therefore need to be followed: 1. Cut off two strips of 2m lengths of the aluminum insert with grey carpet profile, and glue these pieces one after the other with a contact adhesive into the center of the existing mat well. 2. Cut a 4m piece from the Alumat roll and place this piece of 2m x 4m to the right of the glued in aluminum strip running down the center of the recess. This piece will extend over the recess on the right side by approximately 15cm. 11

12 3. With an angle grinder (using a 1mm thick blade), cut the right hand side of this piece so that it fits into the recess. Repeat steps 2 and 3 to complete the mat on the left hand side of the aluminum strip. 4. Finished Look 12


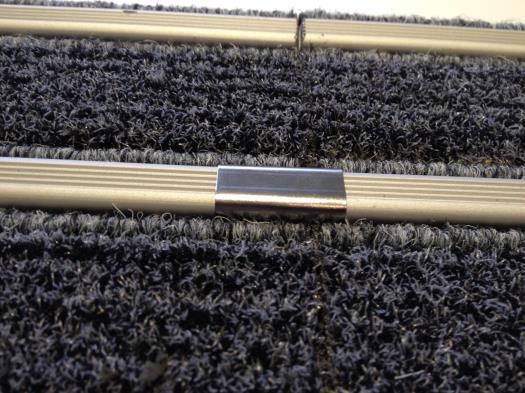
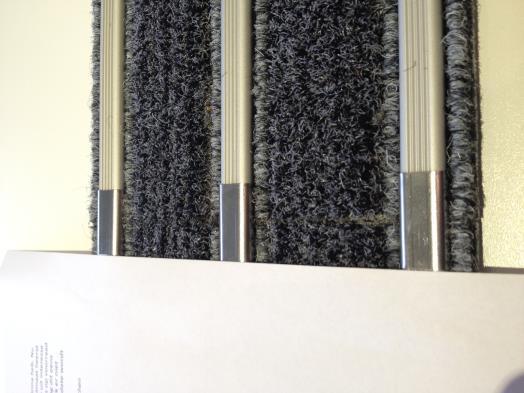
13 Second solution to connect 2 widhts to eachother: The alu clip. Because several Distributors made a remark that if you put 2 rolls of alubrush next to eachother, that the aluminium profiles do not align. To solve this, several Distributors used a profile in between to separate the 2 pieces. Now with this clip, it should be no problem anymore. 13
14 14

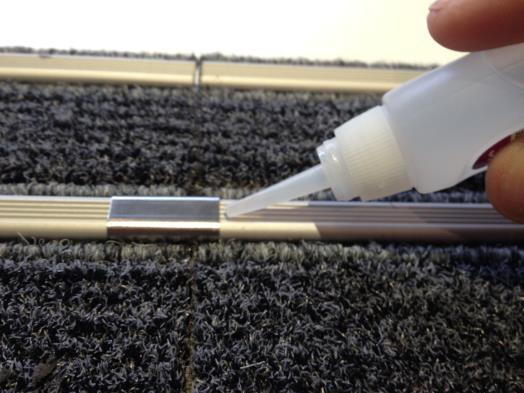
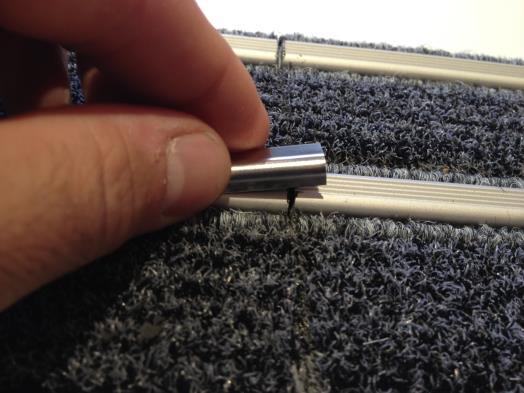
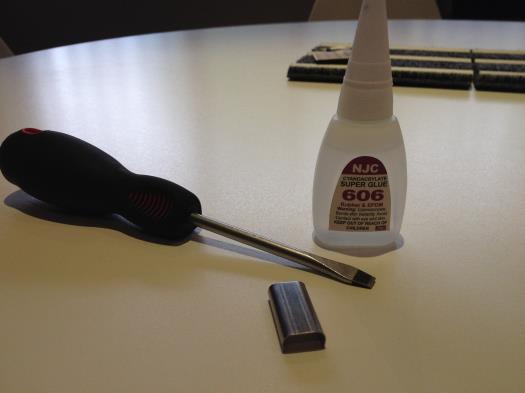
15 Positioning the clips with cyanoacrylate glue. 15


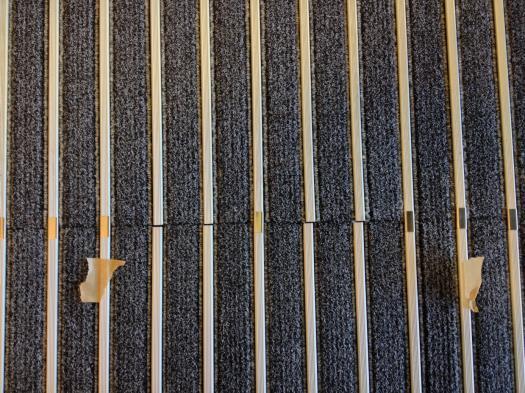
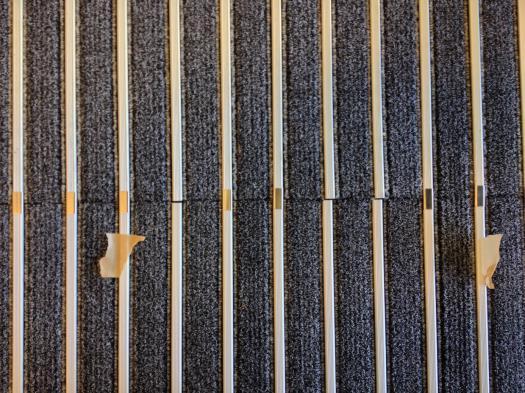

16 The right order of applying the clips: 16

17 Important remark: The Alumat has to be always installed upon a solid underlay flooring. In a high traffic area it is recommended that the Alumat is glued down onto the floor inside the recess. In case the recess depth is bigger than the thickness of the mat, it is recommended to use a solid underlay floor like wood or firm plastic sheets to fill out the height difference. Also filling out the recess with a concrete/cement fast drying mixture is a possibility. If the under floor exists out of a compressible material, the possibility is there that if a very heavy weight is pressing on the aluminum profiles, these could bend. See picture. When I have cut the aluminium bars the edges appear to be brown. Where does this come from? When cutting through the aluminium bars it is important not to grind too long at the same place because the aluminium heats up to quickly and this will result into burned annodisation of the aluminium bars. This burn will result into a brown spot at the place where has been grinded. While cutting allow by lifting the blade regularly to cool the aluminium. After cutting the aluminium the edges seem to be very sharp. This will only be the case if you cut the mat from the bottom down and not from the top down. Also always use the recommended thin blade of +/- 1 mm. Not the standard cutting tool of 3 mm thick. 17
Alu brush. 1) What are the dimensions?
 What are the dimensions?") ALU BRUSH 1 Alu brush 1) What are the dimensions? Alu Brush is in roll form and the stripe direction is in the same direction as the width of the roll so completely opposite to the textile products like
ALU BRUSH 1 Alu brush 1) What are the dimensions? Alu Brush is in roll form and the stripe direction is in the same direction as the width of the roll so completely opposite to the textile products like
Handrail H Series. Product Installation. Instructions. Installation Instructions For. Wall Mounted and Freestanding Round Handrails
 Product Installation Installation Instructions For Instructions Handrail H Series Installation Instructions for Wall Mounted and Freestanding Round Handrails Step Nosing F Series Concrete and Timber Step
Install your floor between 18 and 30 C.
 GOLDEN RULES 8-0 C Install your floor between 8 and 0 C. Quick-Step Livyn must be acclimatized in the room of installation between 8-0 C for a period of at least 8 hours before installation. This floor
INSTALLATION INSTRUCTIONS FOR QUICK-STEP LAMINATE.
 . PREPARATION. INSTALLATION. FINISHING. MAINTENANCE INSTALLATION INSTRUCTIONS FOR QUICK-STEP LAMINATE. IN ORDER TO OBTAIN A GOOD RESULT, WE ADVISE TO FOLLOW ALL GIVEN INSTRUCTIONS CAREFULLY. - 0-% RH 8h
INSTALLATION INSTRUCTIONS FOR ELKALAMINATE. IN ORDER TO OBTAIN A GOOD RESULT, WE ADVISE TO FOLLOW ALL GIVEN INSTRUCTIONS CAREFULLY.
 INSTALLATION INSTRUCTIONS FOR ELKALAMINATE. IN ORDER TO OBTAIN A GOOD RESULT, WE ADVISE TO FOLLOW ALL GIVEN INSTRUCTIONS CAREFULLY. PREPARATION Let the planks acclimatize for 48 hours in the unopened packaging
Laying and maintenance of cement tiles
 Laying and maintenance of cement tiles David&Goliath cement tiles are manufactured under licence in the Far East, according to our standards and specifications concerning colour and dimensional stability;
For best results, it is essential that you follow the installation instructions exactly.
 For best results, it is essential that you follow the installation instructions exactly. PREPRTION Let the planks acclimatize for 48 hours in the unopened packaging at the normal room temperature, in the
INSTALLATION INSTRUCTIONS
 VESDURA VINYL PLANKS 3MM PVC GLUE DOWN - OAK COLLECTION Safety First CAUTION Asbestos Warning in existing floor. Do not sand, dry scrape, bead blast or mechanically pulverize existing resilient flooring.
Repairs. Chapter 10 Repairs 10. 1
 10 Repairs Chapter 10 Repairs 10. 1 Repairs As an installer, you will probably be called upon to repair damage to a resilient floor. Here are some of the most common problems and the recommended repairs
3M Impact Protection Profile Installation System Instructions
 3M Impact Protection Profile Installation System Instructions IMPORTANT: READ INSTRUCTIONS FOR USE BEFORE OPERATING Intended Use: The 3M Impact Protection Profile Installation System is for installing
INSTALLATION INSTRUCTIONS FOR QUICK-STEP LAMINATE WITH HYDROSEAL TECHNOLOGY.
 . PREPARATION. INSTALLATION. FINISHING. MAINTENANCE INSTALLATION INSTRUCTIONS FOR QUICK-STEP LAMINATE WITH HYDROSEAL TECHNOLOGY. IN ORDER TO OBTAIN A GOOD RESULT, WE ADVISE TO FOLLOW ALL GIVEN INSTRUCTIONS
Roll Out Vinyl Installation Guide
 Sub-floor Requirements The contractor performing the installation of the performance vinyl flooring must ensure the proper quality of the sub-floor. The sub-floor must be clean, smooth, permanently dry,
Loose Lay Luxury Vinyl Plank
 Loose Lay Luxury Vinyl Plank FLEX COLLECTION Installation & maintenance * PLEASE READ CAREFULLY * Installation, maintenance & warranty guideline for loose lay luxury vinyl products. Adherence to This guideline
FLEXITEEK INSTALLATION INSTRUCTIONS
 an Advanced Plastic Fabrications Company 99 marcus Blvd., 631.244.3620 631.231.4466fax FLEXITEEK INSTALLATION INSTRUCTIONS Before you begin, take your new Flexiteek deck out of the shipping package and
Wallgard 1,3 product
 INSTALLATION INSTRUCTIONS Wallgard 1,3 product October 2015 GENERAL Application can be done to smooth, dry, clean, sound walls of concrete, plaster, hardboard, plywood and fibreboard. Board material must
Installation instructions
 1/5 Installation instructions Dear customer, We thank you for purchasing our Par-ky floor. Before starting the installation, it is essential to read these instructions carefully. INSTALLATION MATERIALS
3M Scotchkote System Application Guide. High Performance Corrosion Resistant System for Plastisol Coated Metal Cladding
 High Performance Corrosion Resistant System for Plastisol Coated Metal Cladding - Issue 1 Surface Preparation & Cleaning Application of Patch Primer to Corroded Areas Application of Primer to Patch Primed
Installation Operation Care. Duette Honeycomb Shades EasyRise Lifting System
 Installation Operation Care Duette Honeycomb Shades EasyRise Lifting System CONTENTS Getting Started: Product View... 1 Tools and Fasteners Needed... 2 Installation: Installation Overview... 3 Mount the
RECOMMENDED METHOD OF INSTALLATION
 Installation Guide RECOMMENDED METHOD OF INSTALLATION: These notes have been prepared as a guide only, the information is supplied in good faith but without guarantee as site conditions vary and are beyond
Installation Instructions
 www.marlite.com Effective Date 03/01/2018 ARTIZAN FRP, SYMMETRIX FRP, ENVUE FRP, STANDARD FRP Installation Instructions Statements expressed in this technical bulletin are recommendations for the application
WELDING. Section nine 9.1 CORRECT TOOLS
 Section nine 9.1 CORRECT TOOLS WELDING Polyflor strongly recommends vinyl sheet and 608mm vinyl tile floorings are welded, this includes the internal and external joints when the vinyl sheet is site cove
694 SERIES NEO-ANGLE PIVOT SHOWER ENCLOSURE
 BATH ENCLOSURES An Alcoa Company Tel: 800-643-1514 Fax: 870-234-3181 www.alumaxbath.com 694 SERIES NEO-ANGLE PIVOT SHOWER ENCLOSURE INSTALLATION INSTRUCTIONS Copyright Alumax Bath Enclosures 1996. All
Safety, Comfort & Style
 3M Building and Commercial Services Division 3M Matting Solutions Safety, Comfort & Style Anywhere You Go A Cleaner, Safer Building Starts at Your Front Door Contents 3M Nomad Matting... 6 Specific Mats
Install Instructions for Torrance Jurastone #4004 Mantel
 Install Instructions for Torrance Jurastone #4004 Mantel Please read this manual before installing the suite. This manual should remain with the homeowner. 20/05/11 Fires of Tradition assumes no responsibility
INSTALLATION GUIDE DUOFUSE SLAT WALL SYSTEM
 06/2013 ENG 1 INSTALLATION GUIDE DUOFUSE SLAT WALL SYSTEM The Duofuse wood composite slat wall system is much more durable than wooden fences, and correct installation is necessary to enjoy the fences
Installation Operation Care
 Installation Operation Care Designer Roller and Designer Screen Shades Standard and Cassette Cordless Lifting System CONTENTS Getting Started: Product Views... 1 Tools and Fasteners Needed... 3 Installation
Outdoor Deck Turf Tile. Installation Instructions
 Outdoor Deck Turf Tile Installation Instructions 1 Outdoor Deck Turf Tile Installation Instructions 1 Tool Checklist: Power Tools 7 1/2 Skill saw (13 amp or more) Jigsaw (13 amp or more) Standard Drill
INSTALLATION INSTRUCTIONS FOR QUICK-STEP LAMINATE WITH HYDROSEAL TECHNOLOGY.
 . PREPARATION. INSTALLATION. FINISHING. MAINTENANCE INSTALLATION INSTRUCTIONS FOR QUICK-STEP LAMINATE WITH HYDROSEAL TECHNOLOGY. IN ORDER TO OBTAIN A GOOD RESULT, WE ADVISE TO FOLLOW ALL GIVEN INSTRUCTIONS
AquaGuard - Water Resistant Flooring Installation guidelines
 AquaGuard - Water Resistant Flooring Installation guidelines Before You Start: Please read all the instructions before you begin the installation. Improper installation will void the warranty. Important
General Installation Instructions. Laminate Drop & Lock installation - 2G
 General Installation Instructions Laminate Drop & Lock installation - 2G A. INTRODUCTION Laminates and other wooden material acts after the surrounding climate, the main factor is the relative humidity
Installation Operation Care
 Installation Operation Care Designer Banded Shades Cassette with Custom Clutch and UltraGlide CONTENTS Getting Started Product View Custom Clutch... 1 Product View UltraGlide... 2 Tools and Fasteners Needed...
INSTALLING YOUR UNICLIC FLOOR - Small planks / 3 sizes
 INSTALLING YOUR UNICLIC FLOOR - Small planks / 3 sizes 1) General The panels must be rotated on both short and long edges to fit into one another. This can be performed by inserting either the tongue into
SlipGrip Data Sheet & Installation Guide
 SlipGrip Data Sheet & Installation Guide Stair Treads Landing Covers Flat Sheets 9/2015 SlipGrip Technical Data Description SlipGrip products are high performance safety stair treads, landing covers and
Elara NanoEdge Fixed Frame Screen User Guide
 Elara NanoEdge Fixed Frame Screen User Guide INTRODUCTION INTRODUCTION WARNING This product may contain sharp edges, please handle with care. Protective gloves are recommended. A minimum of two people
Recommendation for fitting the floor coverings: Alfa / Beta
 1/6 The article, like other flat weave carpets, is not fitted in the same way as conventional loop pile and velours carpets. For this reason please observe all the details specified in these fitting recommendations.
Installation Operation Care
 Installation Operation Care Applause Honeycomb Shades LiteRise Operating System Contents GETTING STARTED Product View...1 Tools and Fasteners Needed...2 INSTALLATION Installation Overview...3 Mount the
MATERIALS FORMAT CODE NOTES
 FLOORS IN BUILDINGS [421] LAYING FLOOR COVERINGS WITH ELECTRICAL PROPERTIES, Before laying the flooring, it is a good idea to inspect it and to identify any problems with the appearance. If there are visible
Technical Data February, 2016
 Technical Data February, 2016 Product Description 3M DP-600 is a non-sag, grey, rapid setting, two-component polyurethane. It is packaged as 1:1 ratio liquids in a duo-pak cartridge. With the squeeze of
1INSTALLATION GUIDE: ENGINEERED WOOD FLOORING
 1INSTALLATION GUIDE: ENGINEERED WOOD FLOORING INSTALLATION GUIDELINES FOR ENGINEERED WOOD FLOORING These guidelines are designed to complement the current South African Flooring Standards. Engineered wood
INSTALLATION INSTRUCTIONS CJ-5 M38A PART # With Doors
 INSTALLATION INSTRUCTIONS CJ-5 M38A1 1955-1975 PART #109-011 With Doors Thank you for purchasing Specialty s Convertible Top for your Jeep vehicle. It has been designed for great fit and long wear. Please
METHOD STATEMENT. Sika FloorJoint S
 METHOD STATEMENT Table of Contents 1 SCOPE 3 2 PRODUCT 3 2.1 3 3 SUBSTRATE REQUIREMENTS 3 4 Preparation of the Substrate 3 4.1 Mapping of the joint panels on the floor for the saw cuts 3 4.2 Execution
Galaxy SPC RIGID-CORE UNICLIC HYBRID PLANK. Installation Guidelines
 Galaxy SPC RIGID-CORE UNICLIC HYBRID PLANK Installation Guidelines ** Read all instructions carefully before installing. Incorrect installation will invalidate and void warranty. ** The planks you are
INSTALLATION GUIDE. Preparation. Subfloor Preparation. Installation of Vapour Barrier Paper (asphalt-free) Model repair and maintenance kit
 Model repair and maintenance kit") INSTALLATION GUIDE pg and model solid ing The investment that ing represents in the home is an important one and customers want their ing to last. In light of this fact, the importance of product quality
INSTALLATION GUIDE pg and model solid ing The investment that ing represents in the home is an important one and customers want their ing to last. In light of this fact, the importance of product quality
340 & 350 SERIES DELUXE FRAMELESS BYPASS
 BATH ENCLOSURES An Alcoa Company Tel: 800-643-1514 Fax: 870-234-3181 www.alumaxbath.com INSTALLATION INSTRUCTIONS 340 & 350 SERIES DELUXE FRAMELESS BYPASS BATH ENCLOSURES Copyright Alumax Bath Enclosures
Installation Operation Care
 Installation Operation Care Applause Honeycomb Shades LiteRise Operating System with TrimKit Contents GETTING STARTED Product View... 1 Tools and Fasteners Needed... 2 INSTALLATION Installation Overview...
Frameless Fixed Panel Slider
 INSTALLATION INSTRUCTIONS Frameless Fixed Panel Slider QCI-5279 SINGLE ROLLER WITH ANTI-JUMP DOUBLE ROLLERS QCI5279 Rev Page Certified 08/09/6 Tools: To install your New Shower Enclosure, you may need
Installation Guide. Aspect Stone Peel & Stick Tile. proper surface preparation is essential for a successful project. Installations Methods
 Aspect Stone Peel & Stick Tile Installation Guide E proper surface preparation is essential for a successful project Failure to follow recommended surface preparation instructions may void the warranty.
INSTALLATION INSTRUCTIONS FRAMELESS CONTINUOUS HINGE SHOWER ENCLOSURE QCI5232
 INSTALLATION INSTRUCTIONS FRAMELESS CONTINUOUS HINGE SHOWER ENCLOSURE QCI5232 QCI5232 Rev 0 Page 1 Certified 06/20/2016 INSTALLATION NOTES: Unpack your unit carefully and inspect for freight damage. Lay
INSTALLATION GUIDE. Preparation The environment
 INSTALLATION GUIDE PG-MODEL HARDWOOD FLOORING The investment that ing represents in the home is an important one and customers want their ing to last. In light of this fact, the importance of product quality
Page 1 of 18. SunRail System Installation Instructions
 Page 1 of 18 SunRail System Installation Instructions Page 2 of 18 SunRail Stainless Steel Railing Installation Guide Table of Contents Before You Begin 3 Installing Surface Mount Bases for a Two Rail
WETFLOR INSTALLATION GUIDE
 WETFLOR INSTALLATION GUIDE Pre-installation Prior to installation, Multipanel recommend that you visit our video section on www.multipanel.co.uk, where you will find a complete WetFlor animation. A sharp
Frameless Fixed Panel Slider QCI5279
 Frameless Fixed Panel Slider QCI5279 F AB GLASS AND MIRROR www.fabglassandmirror.com Call: +1 888-474-2221 Fax: (614)-334-4919 Office Timing: 8:30-18:00 EST info@fabglassandmirror.com Frameless Fixed Panel
Curium 19H Installation Instructions & Parts List
 Curium 19H Installation Instructions & Parts List Illustration Curium 19H Right Hand Page 1 of 15 01/07/2016 Revision 2.1 IMPORTANT This shower screen / enclosure must be installed by suitably qualified
The use of retaining pins is not required when using Armaflex 520 Adhesive.
 INSTALLATION INSTRUCTIONS AP Armaflex & AP Armaflex FS Black Duct Liner (non-self adhesive) 2/18/11 Installation Instructions for Rectangular Duct Using Armaflex 520 Adhesive Temperature The temperature
INSTALLATION GUIDE Twinback
 INSTALLATION GUIDE Twinback Fundamentals Subfloor preparation 1. Always check before fitting the carpet supplied does correspond to the requested specifications (colour, width...) 2. Provide for a detailed
SERIES M MIXER MASTS
 SERIES M MIXER MASTS T AB L E O F C O N T E N T S V e n d o r D a t a Material Data Sheet 4-in. Mixer Mast Specification 3-in. Mixer Mast Specification 2 - in. M i x e r M a s t S p e c i f i c a t i o
340 & 350 SERIES BATH ENCLOSURES
 INSTALLATION INSTRUCTIONS 340 & 350 SERIES BATH ENCLOSURES 800-643-1514 www.alumaxbath.com Copyright Alumax Bath Enclosures 2010. All rights reserved. LIMITED WARRANTY AND REMEDY ALUMAX BATH ENCLOSURES
INSTALLATION SUGGESTIONS LEVEL APPLICATION LIMITED WARRANTY
 INSTALLATION SUGGESTIONS LEVEL APPLICATION LIMITED WARRANTY L.J. Smith, Inc. issues the following Limited Warranty: The product(s) furnished hereunder are warranted to be free from defects in material
Dubnium 11 Installation Instructions & Parts List
 Dubnium 11 Installation Instructions & Parts List Illustration Dubnium, H1 Handle Right Hand: Open Out Page 1 of 25 IMPORTANT This shower screen / enclosure must be installed by suitably qualified individuals.
Maintenance and other important non-personal injury and non-material damage instructions or statements that should be observed.
 VIGO INDUSTRIES INSTALLATION GUIDE FOR SHOWER ENCLOSURE ()! SAFETY PRECAUTIONS This Installation Guide uses the following symbols to indicate important information. Always observe the instructions indicated
Gallium 03 Installation Instructions & Parts List
 Gallium 03 Installation Instructions & Parts List Illustration Gallium 03, H1 Handle Left Hand: Open Out 04/05/2016 Revision 1.1 Page 1 of 19 IMPORTANT This shower screen / enclosure must be installed
INSTALLATION INSTRUCTIONS
 INSTALLATION INSTRUCTIONS BRONCO FAST TRAC TOP PART #331-210 BRONCO 1966-1977 Thank you for purchasing Specialty s Convertible Top for your Bronco. It has been designed for great fit and long wear. Please
GreatDeck Outdoor Hardwood, Plastic, Red Cedar, and Wood Deck Tile. Installation Instructions
 GreatDeck Outdoor Hardwood, Plastic, Red Cedar, and Wood Deck Tile Installation Instructions 1 GreatDeck Outdoor Tile Installation Instructions 1 Tool Checklist: Power Tools 7 1/2 Skillsaw (13 amp or more)
INSTALLATION INSTRUCTIONS
 INSTALLATION INSTRUCTIONS 1/5 Dear customer, We thank you for purchasing our Par-ky floor. Before starting the installation, it is essential to read these instructions carefully. If these instructions
Frameless Inline Door With Return QCI5263
 INSTALLATION INSTRUCTIONS Frameless Inline Door With Return QCI5263 WALL MOUNT HINGES FRAMELESS DOOR / PANEL / RETURN PANEL QCI5263 REV. 0 Page 1 Certified 06/17/2016 Parts List with wall mount hinges
INSTALLATION GUIDE. Preparation
 INSTALLATION GUIDE The investment that flooring represents in the home is an important one and customers want their flooring to last. In light of this fact, the importance of product quality and the quality
Basic Spring Motor Roller Shades
 Basic Spring Motor Roller Shades ATTENTION!!! READ CAREFULLY! This shade has a reliable long-lasting Spring Motor. The Spring Motor must have proper tension in order to function as intended. Handling in
INSTALLATION INSTRUCTIONS FRAMELESS CONTINUOUS HINGE SHOWER ENCLOSURE QCI5233
 INSTALLATION INSTRUCTIONS FRAMELESS CONTINUOUS HINGE SHOWER ENCLOSURE QCI5233 QCI5233 Rev 0 Page 1 Certified 06/20/2016 INSTALLATION NOTES: Unpack your unit carefully and inspect for freight damage. Lay
QWALL 5.2 (2 Back Panels)
") QWALL 5. ( Back Panels) SHOWER ACRYLIC WALL INSTALLATION INSTRUCTIONS IMPORTANT DreamLine TM reserves the right to alter, modify or redesign products at any time without prior notice. For the latest up-to-date
QWALL 5. ( Back Panels) SHOWER ACRYLIC WALL INSTALLATION INSTRUCTIONS IMPORTANT DreamLine TM reserves the right to alter, modify or redesign products at any time without prior notice. For the latest up-to-date
LED Thin Frame Fixed Frame Screen User Guide
 LED Thin Frame Fixed Frame Screen User Guide INTRODUCTION INTRODUCTION WARNING - Sharp Edges This product may contain sharp edges, please handle with care. Protective gloves are recommended. WARNING -
Unit No. 6150, 7150 Deluxe Framed Sliding Tub/Shower Enclosure
 INSTALLATION INSTRUCTIONS Unit No. 6150, 7150 Deluxe Framed Sliding Tub/Shower Enclosure QCI0023 Rev. 1 Page 1 of 8 Certified 8/20/10 MAINTENANCE: Two primary materials are used to manufacture your new
675 Quick N Stall Neo Angle Framed Hinge Shower Enclosure
 INSTALLATION INSTRUCTIONS 675 Quick N Stall Neo Angle Framed Hinge Shower Enclosure Call Technical Dept @ 1-800-452-2726 QCI1003 Page 1 of 9 Certified 10/01/09 INSTALLATION NOTES: Unpack your unit carefully
INSTRUCTIONS *= RECOMMENDED += ACCEPTABLE N/A= NOT AN APPROVER INSTALLATION METHOD
 Topic BASE PREPARATION Base Preparation Recommended Installation Methods pg.1 Tools/Materials Required pg.4 Site Work pg.1 Base Options pg.1-2 INTERIOR 4-5 Interior Installation General Information pg.2
Installation Operation Care. Sonnette Cellular Roller Shades. LiteRise Operating System
 Installation Operation Care Sonnette Cellular Roller Shades LiteRise Operating System CONTENTS GETTING STARTED: Product View...1 Tools and Fasteners Needed...2 INSTALLATION: Installation Overview...3 Mount
Installation Guide Acoustic Wall Panel
 Installation Guide Acoustic Wall Panel Contents Preface 2 Adhesive Method 3 Fast Mount Method 4 Adhesive Method 5 Direct Fix Method 6 Magnet Method 7 Preface Wall Preparation Before beginning the installation
Radon 07 Installation Instructions & Parts List
 Radon 07 Installation Instructions & Parts List Illustration Radon 07, H1 Handle Right Hand: Open Out 14/06/2016 Revision 1.1 Page 1 of 21 IMPORTANT This shower screen / enclosure must be installed by
FRAMED PANEL / DOOR / PANEL CONTINUOUS HINGE SHOWER ENCLOSURE INSTALLATION INSTRUCTIONS
 FRAMED / DOOR / CONTINUOUS HINGE SHOWER ENCLOSURE INSTALLATION INSTRUCTIONS QCI5229 Rev 0 6 INSTALLATION NOTES: Unpack your unit carefully and inspect for freight damage. Lay out and identify all parts
3M Scotchkote System Application Guide. High Performance Coating System for Degraded Plastisol Cladding Surfaces.
 High Performance Coating System for Degraded Plastisol Cladding Surfaces. - Issue 2 Surface Preparation & Cleaning Primer Stage Finish Coat(s) As required 3M Scotchkote Epoxy Primer MC 135 @ 50µ Theoretical
Install Instructions for Corvallis Jurastone #4008 Mantel
 Install Instructions for Corvallis Jurastone #4008 Mantel Please read this manual before installing the suite. This manual should remain with the homeowner. Updated 12/03/12 NOTE the installation requirements
SIMPLEX ELITE MAT CUTTER
 INSTRUCTION MANUAL MODEL 750-1 / 760-1 SIMPLEX ELITE MAT CUTTER INSTRUCTIONS AND OPERATION MANUAL 40 in (101 cm) mat cutting system with bevel & straight cutters, production stops, 27 in (68 cm) squaring
WoodTrac Direct Mount Ceiling System
 WoodTrac Direct Mount Ceiling System Assembly Instructions All product is Class C rated and some product is available Class A rated. Check the ordering information to obtain the class rating for your product.
1300-lb Furniture and Crate Movers
 1300-lb Furniture and Crate Movers Owner s Manual WARNING: Read carefully and understand all ASSEMBLY AND OPERATION INSTRUCTIONS before operating. Failure to follow the safety rules and other basic safety
HOW TO TILE A SPLASHBACK
 HOW TO TILE A SPLASHBACK Don t just DO IT YOURSELF DO IT WITH BEAUMONTS! PREPARE & CLEAN A KITCHEN FOR TILING Any tiling job will only be as good as the surface it s laid on. It s important to ensure that,
Curium 19.4H Installation Instructions & Parts List
 Curium 19.4H Installation Instructions & Parts List Illustration Curium 19.4H Right Hand Page 1 of 21 30/06/2016 Revision 1.0 IMPORTANT This shower screen / enclosure must be installed by suitably qualified
Installation instructions for: Visi-Guard and EZ-Guard Pool Fence Kits
 Installation instructions for: Visi-Guard and EZ-Guard Pool Fence Kits Planning: Layout Your Pool Fence Planning is the first step of any successful project. Decide where you would like your fence to surround;
FRAMED SLIDING DOOR FOR TUB OR SHOWER ENCLOSURE 6150A-7150A
 FRAMED SLIDING DOOR FOR TUB OR SHOWER ENCLOSURE 6150A-7150A F AB GLASS AND MIRROR www.fabglassandmirror.com Call: +1 888-474-2221 Fax: (614)-334-4919 Office Timing: 8:30-18:00 EST info@fabglassandmirror.com
FIXED PANEL SLIDER QCI5241
 INSTALLATION INSTRUCTIONS FIXED PANEL SLIDER QCI5241 FRAMELESS PANEL / DOOR / PANEL FRAMELESS DOOR / PANEL QCI5241 REV. 0 Page 1 Certified 06/16/2016 Parts List *Quantities may vary QCI5241 REV. 0 Page
PRIME SHOWER ENCLOSURE INSTALLATION INSTRUCTIONS
 PRIME SHOWER ENCLOSURE INSTALLATION INSTRUCTIONS IMPORTANT DreamLine reserves the right to alter, modify or redesign products at any time without prior notice. For the latest up-to-date technical drawings,
General Installation Instructions
 General Installation Instructions Good web sites to check out that may assist you are: For gluing engineered boards over timber chipboard/particle board/ yellow tongue: https://www.youtube.com/watch?v=bpyfr373tl8
FRAMED SLIDING DOOR FOR TUB OR SHOWER ENCLOSURE INSTALLATION INSTRUCTIONS
 FRAMED SLIDING DOOR FOR OR SHOWER ENCLOSURE INSTALLATION INSTRUCTIONS QCI5023 REV. 0 Page 1 Certified 06/22/2016 INSTALLATION NOTES: Unpack your unit carefully and inspect for freight damage. Lay out and
60 DIRECT-TO-STUD SHOWER WALL SET
 60 DIRECT-TO-STUD SHOWER WALL SET 60 X 30 MODEL # DKW6008-XX 60 X 32 MODEL # DKW6028-XX 60 X 36 MODEL # DKW6068-XX Unit consists of Model DB608-XX Backwall, and requires one of the following Side Panel
1Use the metal file to smooth
 Yamato: Step-by-step 85 Parts of the bridge and the hull a b c d e f a Part of the bridge b Part of the bridge c Part of the bridge d Radar x 2 e Part of the bridge x 2 f Wire Recommended tools and materials
Sabre Series 2 Inspired Design Precision Engineering
 Sabre Series 2 Inspired Design Precision Engineering USER INSTRUCTIONS Thank you for choosing the Keencut Sabre Series 2. Every effort has been made to bring you a precision engineered product with the
PATRIOT DOCKS ASSEMBLY INSTRUCTIONS
 6/1/2008 PATRIOT DOCKS ASSEMBLY INSTRUCTIONS Congratulations on your new Patriot Dock purchase. This manual contains instructions to assemble basic dock configurations for use at typical shoreline application.
Installation Operation Care
 Installation Operation Care Duette and Applause Honeycomb Shades SkyLift Lifting System with Manual Operation CONTENTS Getting Started: Product View... 1 Tools Needed... 2 Assembly: Arrange the Shade Components
POWER VLIES STRETCH 160
 Product Information Manufacturer: Architects Paper A brand of A.S. Création Tapeten AG Südstr. 47 51645 Gummersbach www.architects-paper.com Product Name POWER VLIES STRETCH 160 Quick Start Guide - The
Pocket Door Installation Instructions
 Installation Instructions Before getting started: Read instructions thoroughly. Be sure that you have the necessary tools and materials before starting the installation. Consult your local building code
Installation Operation Care
 Installation Operation Care Vignette Modern Roman Shades Arches and Angles CONTENTS Getting Started: Mounting Types And Window Terminology... 1 Installation Components Needed... 1 Tools And Fasteners Needed...
INSTALLATION INSTRUCTIONS Scout II - Fast Trac PART #
 INSTALLATION INSTRUCTIONS Scout II - Fast Trac PART #442-210 Thank you for purchasing Specialty s Convertible Top for your Scout vehicle. It has been designed for great fit and long wear. Please read and
Access Hatch. Installation Instructions and Operators Manual. PS DOORS Contact Information. Model AH-710 Standard High Neck Radius Cut
 Access Hatch Installation Instructions and Operators Manual Standard Low Profile Frame Model AH-710 Standard High Neck Radius Cut High Neck Frame for special applications. Table of Contents Warranty Information...2