INSTALLATION INSTRUCTIONS
|
|
|
- Felix Gallagher
- 6 years ago
- Views:
Transcription
1 INSTALLATION INSTRUCTIONS BRONCO FAST TRAC TOP PART # BRONCO Thank you for purchasing Specialty s Convertible Top for your Bronco. It has been designed for great fit and long wear. Please read and follow, precisely, all installation instructions provided when installing top. Failure to do so may result in a poor fitting top and could place occupants in a potentially hazardous situation. TOOLS REQUIRED: 3/8 WRENCH 7/16 WRENCH 1/2 WRENCH #2 PHILLIPS SCREWDRIVER 1/8 DRILL BIT 9/64 DRILL BIT 5/32 DRILL BIT 3/8 DRILL BIT ELECTRIC DRILL 8 TAPE MEASURE ALCOHOL Windshield Adjustment. If your windshield frame is improperly adjusted, the top will not fit or function properly. Measure from the inside edge of windshield frame to the inside edge of tailgate as shown in figure 1. For a proper fit this measurement should be 83 3/4 to 84. If it measures slightly more than 84 the tension from the top may pull it into position. If it measures less than 83 3/4 you will need to loosen the hand bolts on both sides of windshield frame and place shims under windshield frame and retighten bolts. Figure 1 INSTALLATION TIPS Before you begin installing this top, here are a few tips to make installation easier. This top should be installed where the temperature is above 72 degrees Fahrenheit. Below this temperature, the top may contract making it difficult to install. It is normal for a top to contract and wrinkle when stored in the shipping carton. The top will relax and wrinkles will disappear within a few days of installation as fabric adjusts to shape of mounting hardware. INSTALLATION PROCEDURES: On page of this instruction manual there is an assembly drawing. Please refer to it for identification of parts and assembly assistance. Also refer to page to assure that are parts are include in your kit. Pg
2 Step 2. Body aluminum. Mount body aluminum (Item 1) to the top edge of the body with notch to inside of vehicle. Locate body aluminum 11/8" from the inside edge of body and 2 1/8" from the drop in door opening. Body aluminum should be parallel to vehicle body front to rear. Place 5/16-18 hex bolts (Item 2) through 5/16" flat washer (Item 3) original hard top mounting holes. Secure with 5/16" flat washers and 5/16-18 hex nuts (Item 4). Drill 5/32" hole in top of body using rear hole in body aluminum as a template. Install #14 x 1/2" sheet metal screw (Item 6) to secure rear of body aluminum to vehicle. See figure 2. Figure 2 Step 4. Bows. Secure bow release bracket (Item 7) to bow mount by placing 1/4-20 x 1 3/4" hex head bolt (Item 8) through 1/4" flat washer (Item 9), then through one side of bow mount, the bow release bracket, the other side of bow mount and another 1/4" flat washer. Secure with 1/4-20 lock nut (Item 10). These items must pivot so do not over tighten. Repeat for other side. Place rear bow sleeves (Item 11) over rear bows (Item 12). Slide rear bow halves together. Mount rear bow into center set of holes in bow release bracket by placing 1/4-20 x 11/2" hex head bolt (Item 13) through one side of release bracket, rear bow and then through the other side of release bracket. Secure with 1/4-20 lock nut (Item 10). Again these items must pivot so do not over tighten. Repeat for other side. Slide front bow sleeves (Item 14) over front bow halves (Item 15). Place front bow into front slot in bow mount so that the large holes in bow are facing towards the front of vehicle. Secure front bow to bow mount with 1/4-20 x 1 3/4" hex head bolt through 1/4" flat washer one side of bow mount, front bow, the other side of bow mount, and another 1/4" flat washer. Secure with 1/4-20 lock nut. Again these items must pivot so do not over tighten ten. Repeat for other side. See figure 3. Figure 3 Step 3. Bow Mount. Fit bow mount (Item 5) into the forward corner of notch in body aluminum. Using bow mount as a template, mark and drill two 5/32" holes, one at the front inside of bracket and one at the rear inside of bracket. Secure with #14 x 1/2" hex head sheet metal screws (Item 6). Repeat for the other side. See figure 2. Pg
3 Step 5. Riser. Position riser (Item 16), on top of windshield frame, centering it from side to side. Place 5/16-18 x 3/4" hex bolts (Item 2) through 5/16" flat washer (Item 3), the riser windshield frame and 5/16" star washer (Item 17). Secure with 5/16-18 hex nut (Item 4). On both ends of the riser you will need to mount horizontal rod brackets (Item 18). There is one left and one right The large hole in the bracket should face the rear of and to the outside of the vehicle as shown in figure 4. These brackets sit on top of riser and are attached with the same bolts that secure the riser to the windshield frame. See figure 4. Step 7. Footman Loop. A footman loop (Item 27) will need to be installed at rear corner of body. Place footman loop at an angle on rear corner of body. Using footman loop as a template, mark and drill 1/8" holes. Secure footman loop to body with #8 x 1/2" sheet metal screws (Item 28). Clean tailgate with alcohol and water solution where hook on bottom of rear curtain and tailgate meet. Attach self adhesive loop (Item 26) at this point. See illustration G on page 5. Step 6. Windshield Wiper Motor Bracket On certain models a windshield wiper motor bracket (Item 19) will need to be installed to lower the windshield wiper motor and keep it from protruding into the top. Remove wiper arm from motor. Remove motor from original bracket and bracket from windshield frame. Install windshield wiper motor bracket provided in the kit into original holes. Turn motor over and install into wiper motor bracket using original fasteners. Reattach wiper arm making sure that wipers are in the correct position. See figure 4. Step 8. Tailgate Clip. Measure 3 1/4" from edge of tailgate and mark for location of tailgate clip (Item 29). Using tailgate clip as a template mark and drill 1/8" holes making sure that there is a 3/16" gap between top of tailgate and bottom of tailgate clip. Secure tailgate clip to tailgate with #10 x 1/2" sheet metal screws (Item 30). See illustration H on page 5. Figure 4 Pg
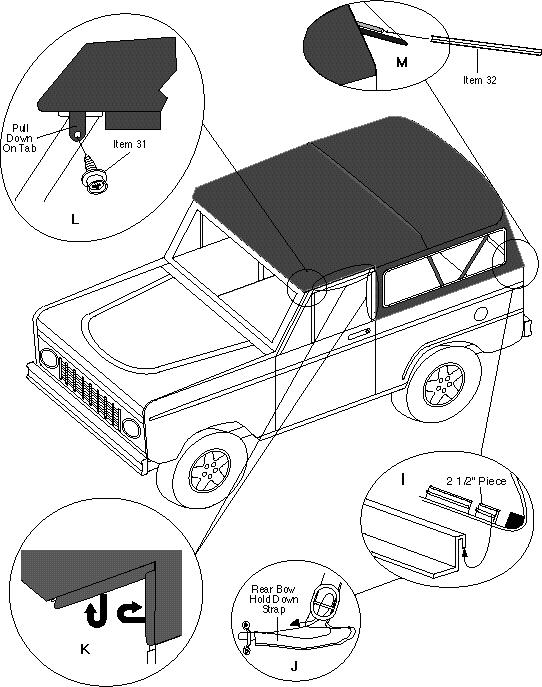
4 FABRIC INSTALLATlON Step 1. Horizontal And Vertical Rods. Position front of horizontal rods (Item 20) into horizontal rod brackets mounted on windshield riser See figure A. Pull front bow forward and place rear of horizontal rod into hole in bow. See figure B. It is recommended that you hold the vertical rod in position, to assure proper alignment, prior to drilling holes. This should be done with the door closed. You will need to remove a phillips screw from the weather stripping on door opening and either cut the large portion away or leave it intact, but to one side, for reinstallation of hard top. Drill 3/8" holes as noted on page 2, figure 2. Remove wing nut (Item 22), 5/16" flat washer (Item 23) and 5/16" x 3/4" carriage bolt (Item 24) from horizontal rod. Position end of vertical rod (Item 21) into hole drilled in top edge of door opening. Place 5/16" x 3/4" carriage bolt through square hole in horizontal rod and slotted hole in vertical rod. Place 5/16" flat washer on next and secure with 5/16" wing nut. See figure C. Step 2. Channel Installation. Place top on hood of vehicle, vinyl side down. Slide sewn in rope into channel (Item 25). See figure D. Slip channel into windshield riser Flip top up and over front bow. Snap rear bow flap to rear bow. See figure E. Step 5. Windshield Snap Studs. Pull down on tab at front side of top. Mark and drill for best position of snap stud. Mark and drill 9/64" hole. Install 3/8" sheet metal screw stud (Item 31). Repeat for other side. See illustration L on page 6. Rolling Up Side Panels. It is possible to roll up your side curtains to provide more ventilation in your vehicle. Prior to rolling side or rear curtains you must first make sure that windows are clean. If not properly cleaned dirt will scratch them reducing top fife. To clean windows, wash them with a mild non-detergent soap and water. You may want to place a soft cloth between retaining straps and windows to prevent marring of window glass. To roll up side panels, unzip rear curtain zippers, unlock rear bow, unfasten side panels, unfasten hook and loop from vertical rod and roll up side panels. Secure with retaining straps on top. Lock rear bow, buckle and tighten hold down straps. To roll up rear curtain, remove tailgate retainer and follow the same procedure. You will not have to unfasten hook and loop from vertical rod to roll up the rear curtain. You may roll up both side and rear curtains if you wish. See figure N. Step 3. Top Installation. Pull to the rear and down on rear bottom corners of side panels until 2 1/2" pieces of plastic are fully engaged on rear of belt rail. See illustration I on page 6. Install long plastic pieces, working from rear to front, until all are fully engaged. Lock bows into position as shown in illustration F on page 5. Insert tailgate retainer (Item 32) in fabric loop in bottom of rear curtain. See illustration M on page 6. Slip between tailgate clips and the tailgate. Thread hold down straps through footman loops, buckle and tighten only enough to hold rear bow in place. If over tightened, it could cause the fabric to tear. Close zippers on both sides of rear curtain. Fasten hook on side panels to loop on rear curtain. See illustration J on Page 6. Figure N Step 4. Horizontal And Vertical Rod Flaps. Wrap vertical rod flap around vertical rod and press hook and loop together at side curtain. Wrap horizontal rod flap around horizontal rod and press hook and loop together See illustration K on page 6. Pg
5 Pg
6 Pg
7 Pg

8 FOLDING INSTRUCTlONS Step 1. Unlock rear bow, unfasten all sewn in plastic and unwrap horizontal and vertical rod flaps. Lift side curtains up and fold them on top of bows. Step 2. Lift rear curtain up and fold it on top of bows. Step 3. Remove horizontal and vertical rods. Step 4. Slip channel out of windshield riser. Fold front of top to the rear over bows. Step 5. As you pull the front of top and bows to the rear of vehicle, let the top sag in between bows. Step 6. Continue to lay bows down and let them come to rest on top of tailgate. A convertible boot is available from your local dealer to enclose your top, preventing top from becoming dirty while in the down position. 5 6 Pg
9 CARE INSTRUCTIONS Convertible tops and accessories require special care if you want to get the maximum usage and enjoyment from them. The following recommendations, if followed carefully, can extend the life of your top or accessory. 1. Hand wash using a mild non-detergent soap such as Ivory. Use a nonabrasive cloth or sponge. Rinse thoroughly. 2. DO NOT wash in direct sunlight and avoid automatic car washes. 3. When your top is clean, we recommend using 303 Protectant on both the vinyl top and windows. This product contains a sunscreen that helps protect from the sun s damaging rays. Stay away from products containing alcohol as it will cause the fabric and windows to lose their elasticity, thus reducing the life of your top or accessory. If you are unable to locate 303 Protectant, please call for a distributor near you. 4. Direct sunlight and heat are the biggest enemies of the windows. Park in the shade whenever possible. If you must park in the sunlight, rotate the direction that you park every few days so all windows get even exposure. 5. Our tops are designed so that you may roll up and/or store the rear curtain and side curtains. To prevent scratching of the windows, be sure that windows are completely clean and free of dust particles. Even a little dirt will badly scratch the windows. You may want to use a soft cloth when rolling up or storing your windows. Heat may build up on rolled up windows, so be sure to unroll them frequently. If you roll up the windows at the beginning of summer and leave them, they may be ruined by fall. 6. DO NOT open or roll up windows at temperatures below 45 degrees F. This could cause them to crack or break. 7. NEVER use ice scrapers or snow brushes on vinyl windows. WARRANTY INFORMATION: Specialty Top Co. manufacturing warrants to the original purchaser of any product it manufactures, that the product will be free of defects in material or workmanship for a period of 90 days from date of purchase. Such obligations under this warranty shall be limited to the repair or replacement, at Specialty s discretion, of any assembly or parts which upon examination by Specialty Top Co. proves to be defective. All defective items must be returned with proof of purchase to Specialty Top Co. Manufacturing, 200 East 64th Avenue, Denver, Colorado 80221, freight prepaid. This warranty does not cover damage resulting from abuse, misuse, alteration, accident or damage in transit. Specialty s obligations under this warranty are limited to the aforementioned repair or replacement of warranty defects for which the return authorization has been received during the warranty period, and SPECIALTY TOP CO. SHALL NOT BE LIABLE FOR ANY INCIDENTAL OR CONSEQUENTIAL DAMAGES ARISING FROM BREECH OF THIS OR ANY IMPLIED WARRANTY. Some states do not allow the exclusion or limitation of incidental or consequential damages, so the above limitation or exclusion may not apply to you. This warranty gives you specific legal rights, and you may also have other rights which may vary from state to state. If you need assistance or further information, you may contact Specialty Top Co. at between the hours of 8:00 AM and 5:00 PM, Monday through Friday, Mountain Standard Time. Pg
INSTALLATION INSTRUCTIONS Scout II - Fast Trac PART #
 INSTALLATION INSTRUCTIONS Scout II - Fast Trac PART #442-210 Thank you for purchasing Specialty s Convertible Top for your Scout vehicle. It has been designed for great fit and long wear. Please read and
INSTALLATION INSTRUCTIONS Super Scout PART #
 INSTALLATION INSTRUCTIONS Super Scout 71-80 PART #443-010 Thank you for purchasing Specialty s Convertible Top for your Scout vehicle. It has been designed for great fit and long wear. Please read and
INSTALLATION INSTRUCTIONS CJ-5 M38A PART # With Doors
 INSTALLATION INSTRUCTIONS CJ-5 M38A1 1955-1975 PART #109-011 With Doors Thank you for purchasing Specialty s Convertible Top for your Jeep vehicle. It has been designed for great fit and long wear. Please
INSTALLATION INSTRUCTIONS JEEP SCRAMBLER FAST TRAC TOP PART #108-21X
 INSTALLATION INSTRUCTIONS JEEP SCRAMBLER FAST TRAC TOP PART #108-21X Thank you for purchasing Specialty s Convertible Top for your Jeep vehicle. It has been designed for great fit and long wear. Please
RAMPAGE P R O D U C T S. BRONCO ZIPPER FASTRACK TOP PART #984xx BRONCO TOOLS REQUIRED
 RAMPAGE P R O D U C T S 84 (+/- 1/4 ) BRONCO ZIPPER FASTRACK TOP PART #984xx BRONCO 1966-1977 TOOLS REQUIRED 3/8 WRENCH 7/16 WRENCH ½ WRENCH #2 PHILLIPS SCREWDRIVER 1/8 DRILL BIT 9/64 DRILL BIT 5/32 DRILL
RAMPAGE P R O D U C T S. INSTALLATION INSTRUCTIONS BRONCO ZIPPER FASTRACK TOP PART #984xx BRONCO TOOLS REQUIRED
 RAMPAGE P R O D U C T S 84 (+/- 1/4 ) INSTALLATION INSTRUCTIONS BRONCO ZIPPER FASTRACK TOP PART #984xx BRONCO 1966-1977 TOOLS REQUIRED 3/8 WRENCH 7/16 WRENCH ½ WRENCH #2 PHILLIPS SCREWDRIVER 1/8 DRILL
SPECIALTY TOP CO. STC
 STC SPECIALTY TOP CO. INSTALLATION INSTRUCTIONS BRONCO 1980-1991 PART #334-31X Thank you for purchasing Specialty's Convertible Top for your Bronco. It has been designed for great fit and long wear. Please
Before beginning refer to page 4 to assure that all parts are included in your kit. Refer to diagrams for help when installing top and hardware.
 INSTALLATION INSTRUCTIONS BRONCO 1980-1994 PART #98501 RAMPAGE P R O D U C T S Thank you for purchasing Rampage Products Top for your Bronco. Please read and follow, precisely, all installation instructions
Stop! Read This Important Information.
 Stop! Read This Important Information. Stop, Do Not Proceed, Read This This door replacement kit is designed for the replacement of doors on a Supertop ONLY! This door will not work on any other style
Installation Instructions Supertop with Tinted Windows
 Installation Instructions Supertop with Tinted Windows Vehicle Application: Ford Bronco 1966 1977 Part Number: 51533 www.bestop.com - We re here to help! Visit our web site and click on Ask a Question.
Installation Instructions and Owner's Manual. Model: CJ3A, and M38, Part Number 51403
 by Installation Instructions and Owner's Manual Model: CJ3A, 1949-1953 and M38, 1950-1951 Part Number 51403 Congratulations on your purchasing decision. Bestop designed this Convertible Top to give you
Half Door Installation Instructions
 Half Door Installation Instructions For: CJ5 (1955-1975), CJ6 (All), M38-A1 (1955-1971) Part Number: 53025 Congratulations on your purchasing decision. Bestop designed these Doors to give you years of
Fabric Replacement Top and Doors
 Fabric Replacement Top and Doors Installation Instructions For: Wrangler/TJ 1997 and Newer Part Number: 51131 WARNING This product is designed to enhance the appearance of the vehicle and to shield the
Sailcloth Fabric Replacement Top and Doors with Tinted Side and Rear Curtains Installation Instructions
 Sailcloth Fabric Replacement Top and Doors with Tinted Side and Rear Curtains Installation Instructions TM For: Wrangler / TJ 2003 - Current Part Number: 79129 Inc. This product is only designed for the
Sailcloth Fabric Replacement Top and Doors Installation Instructions
 Sailcloth Fabric Replacement Top and Doors Installation Instructions For: Wrangler/TJ 1997-2002 Part Number: 79121 This product is only designed for the vehicles listed above. DO NOT INSTALL THIS PRODUCT
Installation Instructions Supertop Kit includes 2-Piece Soft Doors
 Installation Instructions Supertop Kit includes 2-Piece Soft Doors Vehicle Application Jeep CJ5 1955 1975 Part Number: 51595 Jeep M-38A1 1951 1962 Part Number: 51595 www.bestop.com - We re here to help!
Installation Instructions Tigertop
 Installation Instructions Tigertop Vehicle Application Jeep CJ2A 1946 1948 Part Number: 51402 Jeep MB 1941 1945 Part Number: 51402 www.bestop.com - We re here to help! Visit our web site and click on Ask
International Scout II
 International Scout II Tools needed: 9/64 drill bit 1/8 drill bit #2 Philips bit for drill Tape measure Pencil Drill #3 Philips Screwdriver #2 Philips Screwdriver Utility knife Contents: 2 bedrails (2
Installation Instructions Tigertop
 Installation Instructions Tigertop Vehicle Application Jeep CJ5 1976 1983 Part Number: 51407 www.bestop.com - We re here to help! Visit our web site and click on Ask a Question. Click here for more Jeep
Installation Instructions Trektop NX
 Installation Instructions Trektop NX Vehicle Application: Jeep Wrangler Unlimited TJD 2004 2006 Part Number: 56821 www.bestop.com - We re here to help! Visit our web site and click on Ask a Question. Click
Replay Top w/ Tinted Side and Rear Windows and Upper Door Skins Installation Instructions For: Jeep Wrangler (TJ) Part Number: 51197
 Part Number: 51197") Replay Top w/ Tinted Side and Rear Windows and Upper Door Skins Installation Instructions For: Jeep Wrangler (TJ) 1997 2002 Part Number: 51197 Table of Contents FABRIC REPLACEMENT TOP PARTS LIST... PAGE
Replay Top w/ Tinted Side and Rear Windows and Upper Door Skins Installation Instructions For: Jeep Wrangler (TJ) 1997 2002 Part Number: 51197 Table of Contents FABRIC REPLACEMENT TOP PARTS LIST... PAGE
Installation Instructions Sailcloth Replace-a-top
 Installation Instructions Sailcloth Replace-a-top Upper Door Skins Not Included Vehicle Application Jeep Wrangler TJ 2003-2006 Tinted Glass Windows Part Number: 79141 www.bestop.com - We re here to help!
Installation Instructions Yamaha Rhino Soft Cab Enclosure
 Installation Instructions Yamaha Rhino Soft Cab Enclosure Vehicle Application Yamaha Rhino 2008 Current Part Number: 20301 www.bestoputv.com - We re here to help! Visit our web site and click on Ask a
Installation Instructions Fabric Replacement Top Upper Door Skins Not Included
 Installation Instructions Fabric Replacement Top Upper Door Skins Not Included Vehicle Application Jeep Wrangler TJ 1997 and 2002 Clear Glass Windows Part Number: 51127 Jeep Wrangler TJ 1997 and 2002 Tinted
Installation Instructions Factory Style Bow Kit
 INSTALLATION TIME Installation Instructions Factory Style Bow Kit SKILL LEVEL Vehicle Application: Jeep Wrangler JK 2 Door 2007 Current Part Number: 55000 Compatible with original equipment soft tops,
Replay Top with Tinted Side and Rear Windows Installation Instructions For: Jeep Wrangler (TJ) Part Number: 51141
 Part Number: 51141") Replay Top with Tinted Side and Rear Windows Installation Instructions For: Jeep Wrangler (TJ) 2003 2006 Part Number: 51141 Table of Contents FABRIC REPLACEMENT TOP PARTS LIST... PAGE 2 FABRIC REPLACEMENT
Replay Top with Tinted Side and Rear Windows Installation Instructions For: Jeep Wrangler (TJ) 2003 2006 Part Number: 51141 Table of Contents FABRIC REPLACEMENT TOP PARTS LIST... PAGE 2 FABRIC REPLACEMENT
Installation Instructions Supertop with Tinted Side and Rear Windows
 Installation Instructions Supertop with Tinted Side and Rear Windows Vehicle Application Jeep Wrangler (JK) 2007 Current Part Number: 54716 www.bestop.com - We re here to help! Visit our web site and click
Half Door Installation Instructions
 Half Door Installation Instructions For: CJ5 (1955-1975), CJ6 (All), M38-A1 (1955-1971) Part Number: 53025 WARNING This product is designed primarily to enhance the appearance of the vehicle and to shield
Half Door Installation Instructions
 Half Door Installation Instructions For: CJ7, CJ8/Scrambler and Wrangler/YJ Part Number: 53028 Note: Wrangler/YJ Use of this product may not allow use of factory side mirrors. Note: Wrangler/YJ Use of
Installing A Carver Bimini Top
 Installing A Carver Bimini Top How To Prolong The Life Of Your Bimini Top Carver Bimini Tops are a classy way to protect yourself and your boat from the elements. They also add style and color to your
Installation Instructions Windjammer
 Installation Instructions Windjammer Vehicle Application Jeep Wrangler 2003 2006 Part Number: 80032 www.bestop.com - We re here to help! Visit our web site and click on Ask a Question. Click here for more
Basic Spring Motor Roller Shades
 Basic Spring Motor Roller Shades ATTENTION!!! READ CAREFULLY! This shade has a reliable long-lasting Spring Motor. The Spring Motor must have proper tension in order to function as intended. Handling in
Installation Instructions Replacement Top (Part # ) Unlimited (4 Door) Replacement Top (Part # ) JK (2 Door)
 Unlimited (4 Door) Replacement Top (Part # ) JK (2 Door)") NOTE: Read entire instructions thoroughly before installing this product. It is recommended to install this Top when temperatures are above 70 degrees. The top can contract and stretch an inch or more.
NOTE: Read entire instructions thoroughly before installing this product. It is recommended to install this Top when temperatures are above 70 degrees. The top can contract and stretch an inch or more.
Installation Instructions Hinged Roof Rack
 Installation Instructions Hinged Roof Rack Application: Jeep Wrangler Unlimited 2004 - Current Part Number: 41435-01 www.bestop.com - We re here to help! Visit our web site and click on Ask a Question
Installation Instructions Tailgate Rack Bracket
 Installation Instructions Tailgate Rack Application: Jeep Wrangler 1986 Current Part Number: 41411 www.bestop.com - We re here to help! Visit our web site and click on Ask a Question. Click here for more
Installation Instructions Hard Top Part # , Wrangler 2 & 4 Door
 Please read instructions entirely before installing this product. This accessory is designed and manufactured primarily to augment the vehicles appearance and to protect the occupants from normal weather
Installing A Carver Bimini Top
 Installing A Carver Bimini Top How To Prolong The Life Of Your Bimini Top Avoid letting water or snow stand on the top. Always travel with top in the stored position. Allow Bimini Top to dry thoroughly
Installation Operation Care
 Installation Operation Care Designer Roller and Designer Screen Shades Standard and Cassette Cordless Lifting System CONTENTS Getting Started: Product Views... 1 Tools and Fasteners Needed... 3 Installation
Please Do Not Return This Product To The Store!
 MODEL NOS. T8512 TOURNAMENT SERIES 3 TABLE TENNIS TABLE OWNER'S MANUAL 1. Read this manual carefully before starting assembly. Read each step completely before beginning each step. 2. Some smaller parts
2-Door EXO-Top Roof Rack System
 Page 1/29 Part 13516.01 2-Door EXO-Top Roof Rack System! WARNING The EXO-Top Roof Rack System is rated to a dynamic 300 lb, evenly distributed load. Further loading could result in serious injury or death.
Installation Operation Care. Duette Honeycomb Shades EasyRise Lifting System
 Installation Operation Care Duette Honeycomb Shades EasyRise Lifting System CONTENTS Getting Started: Product View... 1 Tools and Fasteners Needed... 2 Installation: Installation Overview... 3 Mount the
Installation Instructions HOSS Hardtop Organized Storage System
 Installation Instructions HOSS Hardtop Organized Storage System Application: Hard Top and Doors Storage System Part Number: 42801 www.bestop.com - We re here to help! Visit our web site and click on Ask
Models 2230 and 2240
 Models 2230 and 2240 Overview... 2 Tools Needed... 2 Hardware...3 Assembly... 4-13 Installation... 14 Drawer Removal... 15 Operation... 15 Maintenance... 15 Accessories... 16 Limited Warranty... 16 Perform
Installation Instructions:
 NOTE: Carefully read entire instructions thoroughly before attempting to install this part. (SB76904) Parts Included Qty 94-241CA001 Front Upright: Drvr 1 94-241CA002 Front Upright: Pass 1 94-241CA003
Installation Operation Care
 Installation Operation Care Applause Honeycomb Shades LiteRise Operating System with TrimKit Contents GETTING STARTED Product View... 1 Tools and Fasteners Needed... 2 INSTALLATION Installation Overview...
Installation Operation Care. Sonnette Cellular Roller Shades. LiteRise Operating System
 Installation Operation Care Sonnette Cellular Roller Shades LiteRise Operating System CONTENTS GETTING STARTED: Product View...1 Tools and Fasteners Needed...2 INSTALLATION: Installation Overview...3 Mount
Installation Instructions Lower Cargo Rack Bracket
 Installation Instructions Lower Cargo Rack Application: Jeep Wrangler 2003 Current Part Number: 41437 US Patent 6799706 www.bestop.com - We re here to help! Visit our web site and click on Ask a Question.
OWNER'S MANUAL. Please Do Not Return This Product To The Store!
 MODEL NO. T8190SA TABLE TENNIS TABLE OWNER'S MANUAL 1. Read this manual carefully before starting assembly. Read each step completely before beginning each step.. Some smaller parts may be shipped inside
Installation Instructions TrekStep Side Mount
 Installation Instructions TrekStep Side Mount Vehicle Application Ford F150 Regular Cab and Super Cab 2009 Current Part Number: 75402-15 Fits both Driver s and Passenger Side www.bestop.com - We re here
Installation Operation Care
 Installation Operation Care Applause Honeycomb Shades LiteRise Operating System Contents GETTING STARTED Product View...1 Tools and Fasteners Needed...2 INSTALLATION Installation Overview...3 Mount the
Models 2030 and 2040
 Models 2030 and 2040 Overview... 2 Tools Needed... 2 Hardware... 2 Assembly... 3-8 Installation... 9 Operation... 9 Maintenance... 10 Accessories... 10 Limited Warranty... 10 Document # 101290 0607 Printed
Spa & Hot Tub Necessities. Cover Removal System Installation & Use Manual
 Spa & Hot Tub Necessities Cover Removal System Installation & Use Manual SET-UP AND ASSEMBLY BEFORE BEGINNING ASSEMBLY, CAREFULLY READ THE FOLLOWING INFORMATION AND INSTRUCTIONS: Place all parts in a cleared
Installation Operation Care
 Installation Operation Care Provenance Woven Wood Shades Standard Cordlock CONTENTS Getting Started: Product View...1 Tools and Fasteners Needed...2 Installation: Installation Overview...3 Mount the Standard
Installation Instructions PREMIUM Replacement Top (Part # )
") 0 7-0 9 U n l i m i t e d ( 4 D o o r ) NOTE: Read entire instructions thoroughly before installing this product. It is recommended to install this Top when temperatures are above 70 degrees. The top can
0 7-0 9 U n l i m i t e d ( 4 D o o r ) NOTE: Read entire instructions thoroughly before installing this product. It is recommended to install this Top when temperatures are above 70 degrees. The top can
INSTALLATION INSTRUCTIONS TOOLS YOU WILL NEED GETTING STARTED
 INSTALLATION INSTRUCTIONS HONEYCOMB SHADES TOP-DOWN, MOVABLE ARCH Thank you for your purchase. This shade has been custom built for you from the highest quality materials. To avoid errors and save valuable
Installation Instructions TrekStep Side Mount
 Installation Instructions TrekStep Side Mount Vehicle Application Chevrolet Silverado / GMC Sierra All Bed Sizes 1999 Current Part Number: 75400-15 www.bestop.com - We re here to help! Visit our web site
Horizontal Shadings. Installation & Operating Instructions
 Horizontal Shadings Installation & Operating Instructions TABLE OF CONTENTS Getting Started: Mounting Types...3 Installation Components...3 Tools and Fasteners Needed...4 Product View...5 Installation:
Installing A Carver Bimini Top
 Installing A Carver Bimini Top How To Prolong The Life Of Your Bimini Top Avoid letting water or snow stand on the top. Always travel with top in the stored position. Allow Bimini Top to dry thoroughly
Installation Operation Care
 Installation Operation Care Designer Banded Shades Cassette with Custom Clutch and UltraGlide CONTENTS Getting Started Product View Custom Clutch... 1 Product View UltraGlide... 2 Tools and Fasteners Needed...
Owner s Manual LSP38 38 Lawn Sweeper
 Owner s Manual LSP38 38 Lawn Sweeper Manual Contents Safety Instructions Assembly Operation Maintenance Parts Warranty 2 4-13 2 11 14-15 16 Your Lawn Sweeper Congratulations on your purchase of a new Precision
Installation Instructions
 Installation Instructions HighRock 4x4 TM SlideAway TM Rear Bumper Vehicle Application: 1997-2006 Jeep Wrangler and Wrangler Unlimited HighRock 4x4 TM SlideAway TM Part Number: 42904 www.bestop.com - We
Convertable Binimi Top Assembly and Instruction Guide
 Convertable Binimi Top Assembly and Instruction Guide Taylor Made Convertible Bimini Top Assembly and Instruction Guide: This Kit contains the following components: If you are missing any of the listed
Models 2130 and 2140
 Models 2130 and 2140 Overview... 2 Tools Needed... 2 Hardware... 2 Assembly... 3-10 Installation...11 Operation... 11 Maintenance... 12 Accessories...12 Limited Warranty... 12 Printed in USA 2007 Perform
Models 2130 and 2140
 Models 2130 and 2140 Overview... 2 Tools Needed... 2 Hardware... 2 Assembly... 3-10 Installation...11 Operation... 11 Maintenance... 12 Accessories...12 Limited Warranty... 12 Perform the following sequence
C L A S S I C. Deluxe. Snow Thrower Cab. Assembly and Care Instructions
 C L A S S I C Deluxe Snow Thrower Cab Assembly and Care Instructions Deluxe Snow Thrower Cab Assembly and Care Instructions Before you begin please unpack the carton and check that you have all your parts.
Installation and Assembly: Articulating Swivel Arm for 37" - 60" Flat Panel Displays
 Installation and Assembly: Articulating Swivel Arm for 37" - 60" Flat Panel Displays Models: PLA60, PLA60-S, PLAV60, PLAV60-S Max UL Load Capacity: 175 lb (79 kg) 2300 White Oak Circle Aurora, Il 60502
Assembly Instructions and Parts Manual JPSF-1 Fence and JPSR Rail Set #
 Assembly Instructions and Parts Manual JPSF-1 Fence and JPSR Rail Set #1002493 JET 427 New Sanford Road LaVergne, Tennessee 37086 Part No. M-708482 Ph.: 800-274-6848 Revision C3 02/2014 www.jettools.com
Installation Operation Care
 Installation Operation Care Provenance Woven Wood Shades Standard Cordlock CONTENTS Getting Started: Product View...1 Tools and Fasteners Needed...2 Installation: Installation Overview...3 Mount the Standard
4-Door EXO-Top Roof Rack System
 Page 1/31 4-Door EXO-Top Roof Rack System 13516.02! WARNING The EXO-Top Roof Rack System is rated to a dynamic 300 lb, evenly distributed load. Further loading could result in serious injury or death.
Balishutters. INSTALLATION guide FOR L-FRAME MOUNT INSTALL OPTIONS B OR C
 Balishutters INSTALLATION guide FOR L-FRAME MOUNT INSTALL OPTIONS B OR C Tools needed for installation Drill Phillips bit 1/8" drill bit 4. Hammer (preferably hard plastic) 5. Level 6. Phillips-head screwdriver
Hollywood Swing Away 2 and 4 Bike Racks Assembly and Installation Guide
 Hollywood Swing Away 2 and 4 Bike Racks Assembly and Installation Guide Tools Required: two adjustable wrenches, pliers, ¾ socket wrench recommended Note: please do assembly near your vehicle as you Can
INSTALLATION INSTRUCTIONS ROLLER SHADES
 INSTALLATION INSTRUCTIONS ROLLER SHADES Tools Required: Tape measure, pencil, drill, drill bits, screw driver, step stool or ladder. Note: use a 5/64 drill bit to pre-drill the screw holes (for attachment
Assembly Instructions and Parts Manual JPSF-1 Fence and JPSR Rail Set
 Assembly Instructions and Parts Manual JPSF-1 Fence and JPSR Rail Set WALTER MEIER (Manufacturing) Inc. 427 New Sanford Road LaVergne, Tennessee 37086 Part No. M-708482 Ph.: 800-274-6848 Revision C2 02/2013
Installation Operation Care. Solera Soft Shades EasyRise, UltraGlide, and LiteRise Lifting System
 Installation Operation Care Solera Soft Shades EasyRise, UltraGlide, and LiteRise Lifting System CONTENTS GETTING STARTED Product Views...1 Tools and Fasteners Needed...3 INSTALLATION Installation Overview...4
Installation Operation Care
 Installation Operation Care Duette and Applause Honeycomb Shades SkyLift Lifting System with Manual Operation CONTENTS Getting Started: Product View... 1 Tools Needed... 2 Assembly: Arrange the Shade Components
00108/00110 INSTRUCTION MANUAL
 00108/00110 INSTRUCTION MANUAL Removable and Adjustable Mudflap System IMPORTANT! Please Read this Instruction Booklet prior to assembly of your Rock Tamer Kit. IMPORTANT! Exhaust Systems Note: Any modifications
UPPER DOOR KIT P/N
 UPPER DOOR KIT P/N 2879946 Application RZR XP4 1000 Before you begin, read these instructions twice and check to be sure all parts and tools are accounted for. Please retain these installation instructions
Sunset Swings By Health in Motion, LLC
 Sunset Swings By Health in Motion, LLC Model 421 Lounge Swing Assembly and Operation Manual Record Serial Number Here www.sunsetswings.com by Health In Motion, LLC. 11/6/2009 421 Owners Assembly and Operation
CABANA / PAVILION ASSEMBLY ALUMINUM FRAME MODELS
 Assembled cabanas are large & heavy. Assemble at place of use. CABANA / PAVILION ASSEMBLY ALUMINUM FRAME MODELS Step 1 CAUTION: To avoid damage to the finish of your Cabana frame, prepare a smooth, non-scratch
Installation Operation Care
 Installation Operation Care Vignette Modern Roman Shades Arches and Angles CONTENTS Getting Started: Mounting Types And Window Terminology... 1 Installation Components Needed... 1 Tools And Fasteners Needed...
M ACS Instructions
 APPLICABLE MODELS: Nissan Frontier 2005 and up short bed with Utili-Trak mounting rails PACKAGE CONTENTS 00-0060-M-01-1205 ACS Instructions Leitner Designs 25675 Taladro Circle Unit E Mission Viejo, CA
Midmark Stainless Steel Cages Setup Manual
 Midmark Stainless Steel Cages Setup Manual Table of Contents Pre-Installation......................... 2 Parts Identification..................... 2-3 Base Construction....................... 3 Assembly............................
Please Do Not Return This Product To The Store!
 MODEL NOS. T81 TABLE TENNIS TABLE OWNER'S MANUAL 1. Read this manual carefully before starting assembly. Read each step completely before beginning each step.. Some smaller parts may be shipped inside
N. 15th Street, Middlesboro, KY FLIP TARP DUMP BODY INSTALLATION INSTRUCTIONS
 1-800-248-7717 1002 N. 15th Street, Middlesboro, KY 40965 FLIP TARP DUMP BODY INSTALLATION INSTRUCTIONS Congratulations on your purchase of a Mountain Flip Tarp Dump Body tarping system. With tarping systems
Installation Instructions Hard Top Part # ,517701
 Please read instructions entirely before installing this product. This accessory is designed and manufactured primarily to augment the vehicles appearance and to protect the occupants from normal weather
738 SERIES PIVOT SHOWER DOOR
 INSTALLATION INSTRUCTIONS 738 SERIES PIVOT SHOWER DOOR Copyright Alumax Bath Enclosures 1997. All rights reserved. Page 1 of 8 LIMITED WARRANTY AND REMEDY Alumax Bath Enclosures warrants to its dealers,
Installation Operation Care
 Installation Operation Care Duette and Applause Honeycomb Shades Cordless Sidelight Shades CONTENTS Getting Started: Product View...1 Tools and Fasteners Needed...2 Installation: Installation Overview...
Please Do Not Return This Product To The Store!
 MODEL NO. T8176 QUICK SERVE 3000 TABLE TENNIS TABLE OWNER'S MANUAL 1. Read this manual carefully before starting assembly. Read each step completely before beginning each step. 2. Some smaller parts may
Installation Instructions For Custom Roman Shades
 Roman Shade Installation Guide Installation Instructions For Custom Roman Shades Step 1. Check Package Contents Missing part? Call 800-264-1190 Mounting hardware kit includes the following: Part Quantity
Sea Doo Spark Engine Access Kit
 Sea Doo Spark Engine Access Kit PART# - RS4-130-EAK APPLICATION(S): Sea Doo Spark. 2up & 3up Models. We strongly recommend the use of a service manual to familiarize yourself with the various components
COMPETITOR CB-610 STANDARD BENCH
 NOTE: Please read all instructions carefully before using this product Table of Contents Safety Notice COMPETITOR CB-610 STANDARD BENCH Hardware Identifier Assembly Instruction Exploded Diagram Parts List
Installation Operation Care
 Installation Operation Care Duette Honeycomb Shades UltraGlide Lifting System CONTENTS Getting Started: Product View... 1 Tools and Fasteners Needed... 2 Installation: Installation Overview... 3 Mount
YJ Bow Assembly. Installation Instructions INSTALLATION TIME SKILL LEVEL TOOLS. Vehicle Application: Jeep Wrangler YJ Part Number: 55004
 Installation Instructions YJ Bow Assembly Vehicle Application: Jeep Wrangler YJ 1988 1995 Part Number: 55004 INSTALLATION TIME SKILL LEVEL 2 Hours 2 - Moderately Easy TOOLS 1/8" Bit 10' #2 #50, #45, #50
MM Strut Tower Brace, GT (MMSTB-5.1)
") 3430 Sacramento Dr., Unit D San Luis Obispo, CA 93401 Telephone: 805/544-8748 Fax: 805/544-8645 www.maximummotorsports.com MM Strut Tower Brace, 1996-97 GT (MMSTB-5.1) MMSTB-5.1 is for 1996-97 GT s with
3430 Sacramento Dr., Unit D San Luis Obispo, CA 93401 Telephone: 805/544-8748 Fax: 805/544-8645 www.maximummotorsports.com MM Strut Tower Brace, 1996-97 GT (MMSTB-5.1) MMSTB-5.1 is for 1996-97 GT s with
Be sure any accessory used will fit with the soft upper doors before installing. Not all accessories will be compatible.
 Company Name: Spike Power Sports Vehicle Name: Polaris General 2P Product Description: Soft Upper Doors Part Number: 58-1600 Revision: R01 09/19/2018 Contents: 655 Elm Ridge Ave, Canal Fulton OH, 44614
Installation Operation Care
 Installation Operation Care Duette Honeycomb Shades EasyView Arch CONTENTS Getting Started: Product View...1 Tools and Fasteners Needed...2 Installation: Installation Overview... Mount the Installation
UPPER DOOR KIT P/N APPLICATION BEFORE YOU BEGIN ITEMS MARKED (*) ARE INCLUDED IN HARDWARE KIT PN P/N Rev 01 07/14 Page 1 of 6
 ARE INCLUDED IN HARDWARE KIT PN P/N Rev 01 07/14 Page 1 of 6") UPPER DOOR KIT P/N 2880609 APPLICATION RZR 900 BEFORE YOU BEGIN Read these instructions thoroughly and make sure all parts and tools are accounted for. Please retain these installation instructions for
UPPER DOOR KIT P/N 2880609 APPLICATION RZR 900 BEFORE YOU BEGIN Read these instructions thoroughly and make sure all parts and tools are accounted for. Please retain these installation instructions for
Installation for Full Size Polaris Ranger Crew Doors
 Installation for Full Size Polaris Ranger Crew Doors Order of Installation: Heater Doors Wiper on to Windshield Windshield Top & Back Panel Note: Most of the steps in these instructions need to be repeated
WORK BENCH. Owner s Manual. Visit us on the web at QUESTION Model No. MT4006
 Owner s Manual Model No. MT4006 WORK BENCH QUESTION... 1 847 780 6120 Visit us on the web at www.southerntechllc.com You will need this manual for safety instructions, operating procedures, and warranty.
Installation Operation Care
 Installation Operation Care Provenance Woven Wood Shades Standard Cordlock CONTENTS Getting Started: Product View... 1 Tools and Fasteners Needed... 2 Installation: Installation Overview... 3 Mount the