Dry Toilet, Version 2.0 June 17, 2015
|
|
|
- Mercy Goodman
- 5 years ago
- Views:
Transcription


1 Dry Toilet, Version 2.0 June 17, 2015 Concrete Base When forming the concrete base, make sure it is same or slightly larger dimensions than the wooden base described below. The urine drain pipe is accommodated as shown, and J-bolts are put in place before concrete is poured. Base Frame Holes are drilled to pass J-bolts through. 1

 is shown at a specified height from bottom of side piece.")

.")
2 Base Floor Side Elements Sides are best constructed on a table as a unit (photo at right) then assembled in position. Note that two identical sides are being constructed in photo, one on top of the other. The lower cross piece (2x4) is shown at a specified height from bottom of side piece. The top of this cross piece is to correspond to the top of the bottom of the back piece described below. In turn, the tops of these three pieces (bottom of back, two lower cross pieces of sides) form three sides of the frame for the bench (described later). To be sure these are lined up evenly at the same height, it may be best to leave the lower cross piece on each side only temporarily attached until the frame is fully assembled on the base. 2

3 Back Elements Like the sides, the back panel is best constructed on a bench, then assembled on the base with the sides. The back panel is shorter than sides, mounted flush with top of sides, leaving space below for rear hatch door. 3

, forming an L-shape that will stand alone on base.")
 horizontal cross pieces")

4 Assembly of Sides and Back Once constructed, the two sides plus back panel are attached and put in place on the base. One method is to attach one side to back panel (equipped with temporary leg), forming an L-shape that will stand alone on base. Then other side can be added and the whole assembly attached to base. Be sure the tops of the first (2x4) horizontal cross pieces of the sides are aligned at the same height as the top of the bottom of the back (these form three sides of the base of bench, described later). 4
 Front Elements The front elements can be added in place or, more easily, built as a unit on the bench.")
.")
5 Roof Elements Two cross-pieces are added to support corrugated roofing material. (Cross piece for front comes with the Front Elements, below.) Front Elements The front elements can be added in place or, more easily, built as a unit on the bench. Insets shown above depict methods of attaching various members that will give a strong support to door frame, maintain a flat profile at approximately 13 bevel for roofing, and give a 6 rise for the user floor (described later). The members defining the door frame must be ripped to be as straight as possible on door sides (verticals could be as narrow as 3 but no less). 5

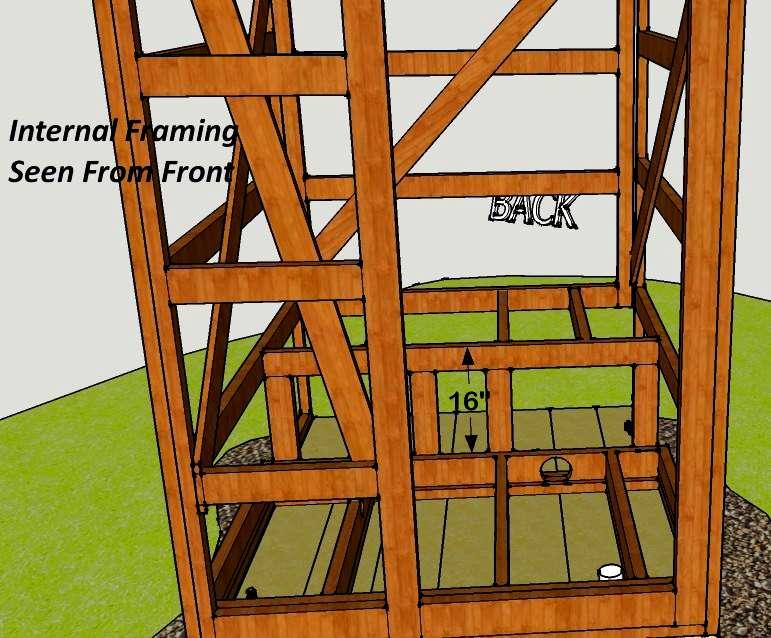

6 Interior Framing 6
 on top of a 2x2 (1.5x1.5 ) Holes are cut in user floor framing to accommodate plumbing (below).")


7 Note that framing of user floor achieves a height of 6 by placing a custom-cut 2x4 (cut to 2x4.5 ) on top of a 2x2 (1.5x1.5 ) Holes are cut in user floor framing to accommodate plumbing (below). Plumbing PVC pipes are shown roughed in before user floor planks or bench planks are added. PVC fittings are shown as approximations; actual fittings will depend on actual position where vertical urine drain pipe enters. End points have rubber reducing couplings to accept flexible hose coming from toilet seat and urinal. The exact positions of these end points are determined once toilet seat and urinal are in place. 7
. Should be cut to overhang in front several inches, in back 3-4 inches, sides 2. 24 in.")

. The edge of blue base of the toilet seat should be 9½\" 10\" from right-hand edge of bench top (11½\" 12\" measured from the edge of the hole itself).")
8 Roof, Bench and User Floor, Location of Toilet Seat & Urinal The roof material is translucent, corrugated plastic panels (usually sold in 26 widths, meant to overlap at least 2 ) mounted on closure strips (wooden strips about 2 wide and 2 feet long with ridges or waves that fit the corrugation). Should be cut to overhang in front several inches, in back 3-4 inches, sides in. Horizontal Wood Closure Strips (5-Pack) Toilet Seat Sketch above shows the urine-diverting toilet seat; inset shows how seat is supported by 2x4 bench cross-pieces. Photo at left indicates positioning. Position of toilet hole is important to enable easy use (a template for inscribing the hole for the toilet seat is printed on the side of the toilet shipping box; it is an oval shape 9¾" wide and 12¾" long). The edge of blue base of the toilet seat should be 9½" 10" from right-hand edge of bench top (11½" 12" measured from the edge of the hole itself). The edge of the blue base should be 1 in. from front of bench (3" measured from the edge of the hole). Accordingly, the cross members of the frame underneath must be placed not to interfere with toilet yet to support it as closely as possible. 8


.")
9 The urine-diversion toilet seat extends approximately 9 down from seat level. The plumbing (connected to an external tank) is one reason the rear compartment must have plenty of room. Urinal The urinal is mounted on the left wall, its bottom a minimum of approximately 17 above the user floor (putting the lip at about 20 which is the same as in portapotties). Walls, Doors, Vent Pipe [Materials List coming next] 9
PATIO INSTALLATION MANUAL
 PATIO INSTALLATION MANUAL A few minutes spent reviewing the following instructions will help insure quick and proper assembly. The Patio Sauna Kit will arrive on a stretchwrapped pallet including pre-built
6x6 Maximizer Storage Shed Assembly Manual Version #9 Feb 26th, 2015
 6x6 Maximizer Storage Shed Assembly Manual Version #9 Feb 26th, 2015 Thank you for purchasing a 6x6 Maximizer Storage Shed. Please take the time to identify all the parts prior to assembly. Please Note-
Sliding Door Kit
 YOU MUST READ THIS DOCUMENT BEFORE YOU BEGIN TO ASSEMBLE THE DOOR KIT. Thank you for purchasing this GrowSpan door kit. When properly assembled and maintained, this product will provide years of reliable
Installation Manual For ToddPod Outdoor Shower Enclosures
 Installation Manual For ToddPod Outdoor Shower Enclosures Contact us at 888-545-9763 or email us at office@toddpod.com with any questions during the installation process. Our service team is available
Potting Store Assembly Instructions
 Before assembly We recommend that time is taken to read the instructions before starting assembly, then follow the easy step by step guide. The instruction sheet is only a guide to the assembly. Certain
STACKING MULTI-SLIDE DOOR SYSTEM INSTALLATION INSTRUCTIONS
 STACKING MULTI-SLIDE DOOR SYSTEM INSTALLATION INSTRUCTIONS 1290363 Revision 1 12/16 Page 1 Weather Shield Mfg., Inc. NOTICE CAUTION! Failure to install and maintain our product according to these instructions
Installation Instructions for. Before You Begin TOOLS REQUIRED
 Composite Railing System STEP-BY-STEP Installation Instructions for Spectrum Composite Railing Virtually maintenance free 20-year warranty EverNew Spectrum Railing system is designed to work with a number
8x4 SpaceSaver Garden Shed - Double Door - Bevel Model Assembly Manual Revision #18 January 3rd, 2018
 8x4 SpaceSaver Garden Shed - Double Door - Bevel Model Assembly Manual Revision #18 January 3rd, 2018 Thank you for purchasing an 8x4 SpaceSaver Garden Shed. Please take the time to identify all the parts
Before Assembling the Storage Wall
 Chapter 1 Assembling the Lista Storage Wall Lista provides two types of standard Storage Walls: B251 and B255. The design, construction, assembly, and quality are identical for both types, however, B251
K2 Assembly Instructions - Page 1.
 K Assembly Instructions - Page. Recommended Tools: Electric/Cordless Drill # Phillips Bit with Extension #0 Drill Bit /4 Drill Bit Pop Rivet Gun / Wrench / Socket Wrench Locking Pliers Rubber Mallet Measuring
COMPLIMENTARY WOODWORKING PLAN
 COMPLIMENTARY WOODWORKING PLAN ORIENTAL GARDEN ARBOR PLAN This downloadable plan is copyrighted. Please do not share or redistribute this plan in any way. It has been paid for on your behalf by JET Tools,
π H-4408 ALUMINUM BLEACHERS 5-ROW x 15' PARTS uline.com TOOLS NEEDED
 π H-4408 1-800-295-5510 uline.com ALUMINUM BLEACHERS 5-ROW x 15' TOOLS NEEDED Square Tape Measure Rivet Gun 3/16" Drill Bit 1/2" Wrench Socket Wrench 1/2" Deep Well Socket #2 Phillips Bit Rubber Mallet
Corner Potting Store Assembly Instructions
 Corner Potting Store Assembly Instructions English SS225E Before assembly We recommend that time is taken to read the instructions before starting assembly, then follow the easy step by step guide. The
Chapter 17 - Porch Trim
 Chapter 17 - Porch Trim Contents Chapter 17 - Porch Trim... 17-1 Timing & Prerequisites... 17-2 Trim on Porch Beams (Volunteer)... 17-4 Smart Trim on the Bottom of the Beam... 17-4 Smart Trim on the Inside
6X3 Patio Garden Shed Assembly Manual
 Thank you for purchasing a 6x3 Patio Garden Shed. Please take the time to identify all the parts prior to assembly. Revision #4 July 6th, 2016 6X3 Patio Garden Shed Assembly Manual Please use Safety Eyewear
Metro Series Sauna. installation instructions
 Metro Series Sauna installation instructions Please immediately check for any hidden damage that may have occurred in shipping. If any damage is found you must notify the delivering carrier within seven
Figure 1. RAILING INSTALLATION The following instructions describe the installation of three types of railing sections: Line, Stair, and Angled
 Veranda Railing System Veranda railing systems are designed to work with a number of different decking materials and surfaces. Before initiating any project, obtain a copy of your local building codes
Intex Engineered Pergola System Installation Instructions. NOTE: See Appendix for Foundation Requirements
 Intex Engineered Pergola System Installation Instructions NOTE: See Appendix for Foundation Requirements Pergola Installation, Freestanding (If pergola will be attached-to-structure, skip to page 3) 1.
Pacifica / DLG-52(E) Shower Cabin Installation and User s Guide
 Shower Cabin Installation and User s Guide") Pacifica / DLG-52(E) Shower Cabin Installation and User s Guide I. Mounting Preparation 1. After opening the case, read this introduction carefully, check all the packed parts, examine the shower cabinet
Pacifica / DLG-52(E) Shower Cabin Installation and User s Guide I. Mounting Preparation 1. After opening the case, read this introduction carefully, check all the packed parts, examine the shower cabinet
Assembly Instructions
 Selling Station Assembly Instructions View from above without top A B C D Rounded finished corners on A & D Square unfinished 3-sides on B & C Selling Station Components (2) 2' x 6' Side s Have a channel
8x4 SpaceSaver Garden Shed Bevel Model Assembly Manual Revision #18 March 9th, 2017
 8x4 SpaceSaver Garden Shed Bevel Model Assembly Manual Revision #18 March 9th, 2017 Thank you for purchasing an 8x4 SpaceSaver Garden Shed. Please take the time to identify all the parts prior to assembly.
8x12 SpaceMaker Garden Shed Assembly Manual
 8x12 SpaceMaker Garden Shed Assembly Manual Version #6 Revised June / 2007 Thank you for purchasing a 8x12 SpaceMaker Garden Shed. Please take the time to identify all the parts prior to assembly. Safety
Grand Garden Chalet 6X3 Assembly Manual
 Revision #8 November 1, 2009 Grand Garden Chalet 6X3 Assembly Manual Thank you for purchasing a Grand Garden Chalet. Please take the time to identify all the parts prior to assembly. Please use Safety
Chapter 23. Garage Construction
 Chapter 23. Garage Construction 23.1 ESTABLISHING CHALK LINES 23.2 MEASURING AND CUTTING WALL PLATES 23.3 MARKING WINDOW & DOOR LOCATIONS ON EXTERIOR WALL PLATES 23.4 MARKING STUDS ON EXTERIOR WALL PLATES
Insolroll Clutch Operated Shades Installation Instructions Installation Instructions
 All clutch operated shades are shipped fully assembled and ready for installation. Mounting screws are not provided. Screws for chain guide installation to meet the child safety standards are provided.
ULTIMATE ROUTER TABLE PLANS. By Dan Phalen
 ULTIMATE ROUTER TABLE PLANS By Dan Phalen January 2017 Ultimate Router Table Plans. Copyright 2012-2017 by Daniel Phalen. Published by Creston Hall Publishing Company. All rights reserved. No part of this
Ventilation System. Installation Manual. Hog Slat Inc. Newton Grove, NC USA March
 Installation Manual 1 Tunnel Door Framing Instructions It is import to make sure the Tunnel Door opening is flat and plumb. A maximum variation of +/- ½ throughout the length of the opening is acceptable.
ALL SEASON PATIO COVER
 ALL SEASON PATIO COVER 61 Where the All Season Patio Cover is to be attached to the home, create a level line showing where the top of the mounting rail is to be located. Install each section with the
SunTrackerTwo Preparation
 TOLL FREE:(888)29-2705 FAX:(941)77-9460 info@eco-smart.com SunTrackerTwo Preparation Cutting Holes and Preparing Curbs T.G.I Or Truss CIRALIGHT INSTALLATION MANUAL Page 1 Cutting Holes and Preparing Curbs
installation instructions
 installation instructions Easi-Plan WC Frame 820mm with Dual Flush Cistern ref: EPWC-05-1005 Easi-Plan WC Frame 980mm with Dual Flush Cistern ref: EPWC-05-1505 EASI-PLAN installation instructions Parts
Glass Front Sauna Room Assembly Manual
 Glass Front Sauna Room Assembly Manual Classic Bench Version: 1.3 Note: Above images are for illustrative reference only and may differ from actual item. Parts List Exterior *For room with full glass wall
LEGENDS RETRACTABLE DOOR SCREENS
 I N S T A L L A T I O N I N S T R U C T I O N S 1 MOUNTING OPTIONS Recess : Mount the Screen Cassette using Recess Mounting Clips Recess within the door jamb area. Recess installations are the most typically
The following instructions will guide you through the installation of your new vinyl railing.
 Installation Guide St. James Vinyl T-Rail Tools Required Protective eye glasses 3/8 x 3 Concrete Anchors/Fasteners (for Tape measure concrete installations) Variable speed drill/screwdriver Philips Driver
Extra Wide Designer Lockers Series Installation Instructions
 Extra Wide Designer Lockers 20000 Series Thank you for selecting the 20000 Series Extra Wide Designer Lockers. We are confident that the quality and construction of the lockers will prove to be a good
NEVADA ASSEMBLY INSTRUCTIONS
 NEVADA ASSEMBLY INSTRUCTIONS BASE SIZE: 2.700m x 1.500m NEVADA Tools Required: Battery Drill Riveter Hammer Tape Measure Ladder Skillsaw Level Screwdriver - Flat 3/8 Hex Drive bit 8mm Hex Drive bit Drill
NEPAL Installation procedure
 PART DESCRIPTION 1.- Door handle (1pc) 2.- Long tight bar (1pc) 3.- Short tight bar (1pc) 4.- Support block-lower (2pcs) 5.- Wall jamb cap (2pcs) 6.- Tight bar support (2 pcs) 7.- Acrilic base (1pc) 8.-
Chapter 7 - Porch Framing
 Chapter 7 - Porch Framing Contents Chapter 7 - Porch Framing... 7-1 Timing & Prerequisites... 7-2 Concrete Porches Caps (Contractor)... 7-3 Organize the Porch Framing Lumber... 7-3 Types of Porch Roofs...
Gambrel Barn with Overhang Manual
 Tools Needed: -Cordless Drill (12V or higher) -#2 Square Drive Bit -Hammer -6 Step Ladder -Tape Measure -Square utility knife w/ blade & hook blade -Speed Square Little Cottage Co. PO Box 455 Berlin, OH
GrowSpan Round Premium Corrugated Greenhouses
 GrowSpan Round Premium Corrugated Greenhouses Photo may show a different but similar model. 2018 Growers Supply All Rights Reserved. Reproduction is prohibited without permission. STK# DIMENSIONS 104933
Series 7650 Installation Instructions Sliding Glass Door
 Series 7650 Installation Instructions Sliding Glass Door Things to Know Before You Start Things to Know Before You Start Removal of Old Fenestration Products Ensure any old fenestration products are removed
Installation Guidelines
 Page 1 Tools You ll Need 4 ft. Carpenter s level Chalk line (to mark U channel locations) Cordless drill/nut driver Caulking gun Chop saw with a metal cutting blade on it (required to make accurate and
Art Rack Assembly Instructions:
 Art Rack Assembly Instructions: ** PIECES ARE POWDER COATED Do not lay pieces on top of each other or on a hard, rough surface if possible. All bolts will pass from outside towards inside of the cage.
TOYOTA MOTOR EUROPE CA Products Division Tel : Fax :
 TOYOTA MOTOR EUROPE CA Products Division Tel : + 32 2 745 26 77 Fax : + 33 2 745 26 99 Ordering part numbers Comments Part Numbers Wooden floor one hatch PZ449-D3C42-11 one hatch with carpet PZ449-D3C42-01
HIGH RISE Portable Restroom Assembly Instructions
 HIGH RISE Portable Restroom Assembly Instructions 2530 Xenium Lane North, Minneapolis, MN 55441 Telephone: 763-553-1900 / Fax: 763-553-1905 800-328-3332/ www.satelliteindustries.com PN 20930 REV C 8/16
12x8 Cabana Garden Shed Assembly Manual
 12x8 Cabana Garden Shed Assembly Manual Revision #15 Feb 13th, 2015 Thank you for purchasing our 12x8 Cabana Garden Shed. Please take the time to identify all the parts prior to assembly. Safety Points
Gambrel Barn Construction Manual 8x8 through 16x24 Units
 Gambrel Barn Construction Manual 8x8 through 16x24 Units Tools Needed: Cordless drill (12V or higher) #2 square drive bit Hammer 6 step ladder Tape measure Square utility knife w/ blade & hook blade Little
It can be either a 2½ seater bench seat (2 adult and a kid), or a 5 seater picnic table.
, or a 5 seater picnic table.") Page 1 Folding picnic table in both bench-seat and picnic table mode Introduction Description A single bench seat that can be changed into a picnic table with ease. This 'Bench come Picnic Table' is ideal
Page 1 Folding picnic table in both bench-seat and picnic table mode Introduction Description A single bench seat that can be changed into a picnic table with ease. This 'Bench come Picnic Table' is ideal
INSTALLATION INSTRUCTIONS. Deluxe Continuous Hinge Inline Door & Panel Shower Enclosure QCI5230
 INSTALLATION INSTRUCTIONS Deluxe Continuous Hinge Inline Door & Panel Shower Enclosure QCI5230 QCI5230 Rev 0 6 shower new QCI5230 Rev 0 Page 2 Certified 06/20/2016 Parts List A. Curb (w/ weep holes) (1)
Garden Chalet 4X2 Assembly Manual
 Revision #6 April 12th, 2010 Garden Chalet 4X2 Assembly Manual Thank you for purchasing a 4x2 Garden Chalet. Please take the time to identify all the parts prior to assembly. Please use Safety Eyewear
8x12 SpaceMaker Garden Shed Assembly Manual Revision #20 June 27th, 2017
 8x12 SpaceMaker Garden Shed Assembly Manual Revision #20 June 27th, 2017 Thank you for purchasing our 8x12 SpaceMaker Garden Shed. Please take the time to identify all the parts prior to assembly. Safety
LAMINATE FLOORING INSTALLATION INSTRUCTIONS READ ALL INSTRUCTIONS BEFORE BEGINNING INSTALLATION.
 READ ALL INSTRUCTIONS BEFORE BEGINNING INSTALLATION. If your starting wall is uneven, refer to Fig 11 to prevent having to uninstall rows. Taking measurements to ensure you will not have too small a final
Shetland Stalls Installation Instructions
 Shetland Stalls Installation Instructions RAMM Horse Fencing and Stalls 13150 Airport Hwy. Swanton, OH 43558-9615 1-800-434-8456 Rev. 1/9/18 Before you start Kit can accommodate up to 12 wide stall front
Installation Manual for Metal Emperor Lockers
 P a g e 1 Table of Contents Page General Notes and Tools Required 2-3 Assemble Shelves with Coat Hooks/Coat Rods 4 Fastening Chart 5 Knock Down Locker Assembly (Banks of Three) 6-12 Appendix A: Dress End
Sliding Door Kit
 YOU MUST READ THIS DOCUMENT BEFORE YOU BEGIN TO ASSEMBLE THE DOOR KIT. Thank you for purchasing this GrowSpan door kit. When properly assembled and maintained, this product will provide years of reliable
A Generic Sauna Room Assembly Manual
 A Generic Sauna Room Assembly Manual Parts List Exterior 1. Ceiling Assembly 2. Wall Elements 3. Exterior Mouldings 4. Top Exterior Mouldings 5. Bottom Exterior Mouldings 6. Main Base Frame 7. ABS Bolt
2.9 WINDOW & DOOR BUCKS
 2.9 WINDOW & DOOR BUCKS Bucks provide attachment surfaces for windows and doors while holding back concrete from these openings during concrete placement. Mark the center and edges of openings as you place
1 PREPARE HEADER AND ROUGH OPENING
 CONTENTS. HEADER & TRACK ASSEMBLY. END BRACKET PLAIN 3. FLOOR PLATE.. 8. 4. SPLIT STUD 6 5. CARRIER (987) 6. QUICK RELEASE PLATE (960) 7. DOOR GUIDE SET (9883) 3. 4. 7. 8. BUMPER KIT (988) 9. #8 X 3/4
MultiTable Mod-E 2 Electric Standing Desk
 The Height of Healthy Design MultiTable Mod-E 2 Electric Standing Desk ASSEMBLY INSTRUCTIONS MultiTable Mod-E 2 Electric Standing Desk Frame PARTS AND TOOLS PLEASE REVIEW these instructions before beginning
8x4 SpaceSaver Garden Shed Assembly Manual
 8x4 SpaceSaver Garden Shed Assembly Manual Revision #8 July 5, 2010 Thank you for purchasing an 8x4 SpaceSaver Garden Shed. Please take the time to identify all the parts prior to assembly. Safety Points
KWIK-KIT KK-S INSTALLATION INSTRUCTION PACKAGE
 KWIK-KIT KK-S-120-02 INSTALLATION INSTRUCTION PACKAGE INSTALLATION INSTRUCTIONS HAVIS KWIK-KIT KK-S-120-02 2002-2007 DODGE/FREIGHTLINER SPRINTER VAN PLEASE READ COMPLETE INSTRUCTIONS PRIOR TO INSTALLATION
Assembly Instructions
 V3-03.17 Assembly Instructions (W x D x H) 1.97m x 0.63m x 2.06m Product Name: Hampshire Arbour with Storage Box Pressure Treated products should not be treated with any other products for the first month.
How to Use the Jahn Forming System
 How to Use the Jahn Forming System 1. Preparation Gang drilling the plywood is the only preparation required. Holes need to be drilled 1/8" larger than the snap tie head. Normally, a 5/8" diameter drill
SteelChief Installation Instructions for pre-assembled panel form sheds GABLE ROOF
 SteelChief Installation Instructions for pre-assembled panel form sheds GABLE ROOF Please read fully before commencing work...any queries will be promptly answered, contact theboss@steelchief.com.aui MPORTANT
GE Monogram. Installation. Instructions. Microwave Oven. Under Cabinet Installation. and. JX827 Series Built-In Kit. Models.
 GE Monogram Installation Instructions Under Cabinet Installation and JX827 Series Built-In Kit Models ZEM200 Series CAUTION WARNING Before you begin Read these instructions completely and carefully. IMPORTANT:
INSTALL INSTRUCTIONS KK-XXX-02 XX-Specify length: FORD and CHEVY VAN PRISONER TRANSPORT INSERT
 INSTALL INSTRUCTIONS KK-XXX-02 XX-Specify length: 80 100 120 FORD and CHEVY VAN PRISONER TRANSPORT INSERT TOOLS REQUIRED: ¼ & 3/8 Ratcheting Wrenches ¼ & 3/8 Air Ratchets (recommended) 3/8 Impact Guns
Build Outdoor Stairs. Stair Building Terms There are five basic design elements you'll need to consider when planning outdoor stairs:
 Build Outdoor Stairs Stair Building Terms There are five basic design elements you'll need to consider when planning outdoor stairs: The Total Run (Fig. 1) is the total horizontal distance covered by the
INSTRUCTIONS. Taurus (BM) Unit Assembly
 Unit Assembly") INSTRUCTIONS Taurus (BM) Unit Assembly Tool Selection QTY Description QTY Description 1 Flat head screw driver 1 Air ratchet 1 Drill with ¼ Bit 1 7/16 deep well socket (for wood base) 1 Drill with 3/16
INSTRUCTIONS Taurus (BM) Unit Assembly Tool Selection QTY Description QTY Description 1 Flat head screw driver 1 Air ratchet 1 Drill with ¼ Bit 1 7/16 deep well socket (for wood base) 1 Drill with 3/16
OXYGEN INSTALLATION. Revision date
 12345 1 Hardware List 12345 Flat head wood screw #9 x 7/8 long with #2 Phillips drive, silver Used to attach surfaces and end panels Hex set screw ½-13 x 2 long with 1/4 hex drive, black Used on Legs Hex
Best Barns USA. the Brookhaven 10' x 16' Assembly Book. revised March 23, 2016
 Best Barns USA Assembly Book revised March 23, 2016 the Brookhaven 10' x 16' Manufactured by Reynolds Building Systems, Inc. 205 Arlington Drive Greenville, PA 16125 724-646-3775 This manual is copyrighted.
Grand Garden Chalet 6X3 Assembly Manual
 Revision #11 June 15, 2010 Grand Garden Chalet 6X3 Assembly Manual Thank you for purchasing a Grand Garden Chalet. Please take the time to identify all the parts prior to assembly. Please use Safety Eyewear
9x9 Penthouse Garden Shed Assembly Manual
 9x9 Penthouse Garden Shed Assembly Manual Thank you for purchasing a 9x9 Penthouse Garden Shed. Please take the time to identify all the parts prior to assembly. Version #18 Sept. 13th, 2017 Safety Points
How To Install Windows: Nail-Fin Application
 How To Install Windows: Nail-Fin Application Required Tools & Materials: Materials: 1 3/4" galvanized roofing nails. Nails must penetrate at least 1" into framing For mulled and/or DP50 or above units:
Plexidor Pet Door Wall Kit Instruction for All Sizes Plexidor : S, M, L, XL; BiteGuard KennelPlex TM 1113,1418, 1419 & 1825 and Plexidor Electronic LG
 Plexidor Pet Door Wall Kit Instruction for All Sizes Plexidor : S, M, L, XL; BiteGuard KennelPlex TM 1113,1418, 1419 & 1825 and Plexidor Electronic LG Congratulations on your purchase of the Plexidor Pet
10. Vents, Baffle Guard and Blocking
 10. Vents, Baffle Guard and Blocking 10.1 INSTALLING BATH FAN AND END CAP 10.2 INSTALLING RANGE PLENUM AND END CAP 10.3 INSTALLING PROPER VENTS 10.4 INSTALLING WIND WASHING BAFFLE GUARD 10.5 INSTALLING
B. Shop Drawings: Include elevations, door edge details, frame profiles, metal thicknesses, preparations for hardware, and other details.
 SECTION 081113 - HOLLOW METAL DOORS AND FRAMES PART 1 - GENERAL 1.1 SUMMARY A. Section Includes: 1. Standard hollow metal doors and frames. 1.2 SUBMITTALS A. Product Data: For each type of product indicated.
GrowSpan Series 500 Door Kits
 GrowSpan Series 500 Door Kits Double Swinging Door Finished Grade Finished Grade Diagram shows a double-swinging door centered and installed in an end wall frame. The door kit includes materials for the
PORCH-LOC INSTALLATION INSTRUCTIONS
 PORCH-LOC INSTALLATION INSTRUCTIONS 2017 HB&G Building Products, Inc. Porch-Loc Installation Instructions NOTE: DISCARD THE INSTALLATION INSTRUCTIONS AND HARDWARE THAT CAME IN YOUR PERMAPOST PACKAGING
GROWING BETTER THROUGH DESIGN. 6ft Lean-To LEAN-TO. Assembly Instructions 04/02
 GROWING BETTER THROUGH DESIGN 6ft Lean-To LEAN-TO Assembly Instructions 04/02 6ft Lean-To Greenhouse Base Plan Introduction/Tools/Contents / / Contents This is a copy of our Lean-To greenhouse base plan.
Ultra Fast Delivery SGL Toilet Cubicle Pack Fitting Instructions
 Ultra Fast Delivery SGL Toilet Cubicle Pack Fitting Instructions This instructional booklet should be read in full prior to undertaking any work. If in doubt please call Commercial Washrooms on 01202 650900,
Twin-Wall Double Swinging Door Kit
 115021 Twin-Wall Double Swinging Kit READ THIS DOCUMENT BEFORE YOU BEGIN Thank you for purchasing this GrowSpan door kit. When properly assembled and maintained, this product will provide years of reliable
THANK YOU FOR PURCHASING FROM HERITAGE PATIOS
 Installation Guide THANK YOU FOR PURCHASING FROM HERITAGE PATIOS Your purchase is engineered by nearly a half century of commercial and residential product design proudly manufactured in the USA from responsibly
8x8 Sunshed Garden Shed Assembly Manual Revision #9 June 11th, 2012
 8x8 Sunshed Garden Shed Assembly Manual Revision #9 June 11th, 2012 Thank you for purchasing an 8x8 SunShed Garden Shed from Outdoor Living Today. Please take the time to identify all the parts prior to
Building Instructions
 Building Instructions Tools Required Tape measure Straight edge Pencil/pen Jigsaw Table Saw Circular Saw Electric drill 1 Hole saw bit Saw horses/table Protractor Staple gun Caulk gun Paint brush Wrenches
Dundalk LeisureCraft Cedar Pod Sauna Assembly Instructions
 Dundalk LeisureCraft Cedar Pod Sauna Please read and understand the complete instructions prior to assembly and use of your sauna. Customer agrees not to hold Dundalk LeisureCraft Inc. and any of its authorized
Deauville Installation Guide
 vjul16 (for Recessed Wall Profiles) DO NOT ASSEMBLE WITHOUT FULLY READING THESE INSTRUCTIONS Page 2 Thank you for purchasing this Deauville shower enclosure. Please study these instructions carefully before
Ultra Space Saver American Bicycle Security Company
 The Ultra Space Saver is userfriendly and allows easy access to bikes. It provides convenient space for u-lock security on nearly any bike, including bikes with fenders and fork shocks. The double-sided
IDAHO ASSEMBLY INSTRUCTIONS. BASE SIZE: 1.800m x 1.200m
 IDAHO ASSEMBLY INSTRUCTIONS BASE SIZE: 1.800m x 1.200m IDAHO Tools Required: Battery Drill Riveter Hammer Tape Measure Ladder Skillsaw Level Square Drive Bit No.2 3/8 Hex Drive Bit 8mm Hex Drive Bit Drill
Elite Home-Attached Greenhouse
 Elite Home-Attached Greenhouse Photo may show a greenhouse of a different length. Elite Home-Attached Greenhouse Use these instructions for the following greenhouses: #104711 #104713 #104715 2007 ClearSpan
Almost Heaven Saunas THE AUTHENTIC SAUNA EXPERIENCE. Patterson Sauna Installation & Owner s Manual
 Almost Heaven Saunas THE AUTHENTIC SAUNA EXPERIENCE Patterson Sauna Installation & Owner s Manual Read this entire manual through to the end before proceeding with the assembly. ELECTRICAL REQUIREMENTS
9x6 Cabana Assembly Manual
 9x6 Cabana Assembly Manual Version #10 June 8, 2010 Thank you for purchasing a 9x6 Cabana. Please take the time to identify all the parts prior to assembly. Note, The General Assembly Manual illustrates
LEGENDS RETRACTABLE DOOR SCREENS
 LEGENDS RETRACTABLE DOOR SCREENS MAGNETIC LATCHING DESIGN SYSTEM 42 I N S T A L L A T I O N I N S T R U C T I O N S 1 MOUNTING OPTIONS Recess : Mount the Screen Cassette using Recess Mounting Clips Recess
GrowSpan Single Swinging Door Black-Out Door Kit
 GrowSpan Single Swinging Door Black-Out Door Kit ATTENTION: Door kit includes materials for door only. All other components shown in the diagram above and diagrams throughout this guide are not included
Best Barns USA Assembly Book
 Best Barns USA Assembly Book Revised August 17, 2017 the Roanoke 16'x32' Building w/ full loft Manufactured by Reynolds Building Systems, Inc 205 Arlington Drive Greenville, PA 16125 This manual is copyrighted
FORWARD FUSELAGE SIDES & REAR TOP SKINS
 FORWARD FUSELAGE SIDES & REAR TOP SKINS WORK REPORT Step No. Check Parts / Tools Qty Preparations. 1 [ ] 6F5-3 Upper Front Longerons 2 2 [ ] 6F5-5 Heel Support 1 3 [ ] 6F5-2 Front Floor Skin 1 3 [ ] Firewall
Vinyl Gazebo Instructions
 P a g e 1 Vinyl Gazebo Instructions 10 Vinyl Gazebo Shown Thank you for the purchase of your New Gazebo. Depending on the size of your Gazebo, installation can usually be completed in 1 to 2 days. These
Building small wooden boats in Myanmar
 19 12 ft & 18 ft Fit remaining floors The remaining floors can now be cut to size by taking measurements at the boat. The timber required is given in step 1. See step 10, 11 and 20 for installation procedures.
Scratch Build a Water Tower
 Here s some Prototype details Photos Courtesy of Rodney Doster Water Spout and Discharge Pipe Tank Bands Here s some more Prototype details Photos Courtesy of Rodney Doster Weather Vane as a Finial Using
Boom Concrete, Inc. Clovermist Precast Vault Toilets
 BOOM Clovermist Clovermist Precast Why purchse a BOOM Precast Concrete Restroom? Vault or Flush Styles Vandal Resistance ADA Compliant Low Maintenance Cost Effectiveness Will Not Rust or Rot Esthetics
Job no. 5241_Accessories Brochure_Size: 8.2 x 8.2 _ KOHLER Genuine Accessories
 KOHLER Genuine Accessories CHOOSING THE PERFECT WALL-HUNG TOILET FOR YOUR BATHROOM IS N0T ENOUGH. KOHLER presents a range of accessories to enhace your bathroom experience. INSTAFIT+ Specially designed
INSTALLATION MANUAL 32273/1205 C C-403 GB - F - D - NL - ES - I - S - SLO
 INSTALLATION MANUAL 32273/1205 C-402 - C-403 GB - F - D - NL - ES - I - S - SLO 1A 1B ENGLISH GENERAL INFORMATION The Cassette toilet is available in 2 types: C-402 Cassette toilet with built-in water