INSTALLATION MANUAL 32273/1205 C C-403 GB - F - D - NL - ES - I - S - SLO
|
|
|
- Oswald O’Connor’
- 5 years ago
- Views:
Transcription
1 INSTALLATION MANUAL 32273/1205 C C-403 GB - F - D - NL - ES - I - S - SLO
2
3 1A 1B
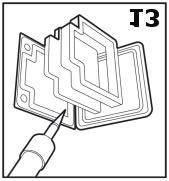
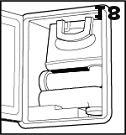
4 ENGLISH GENERAL INFORMATION The Cassette toilet is available in 2 types: C-402 Cassette toilet with built-in water tank. The flush is operated by a 12V electric pump. C-403 Cassette toilet which takes flush water from the central water tank of the caravan or motor home. The flush is operated by a 12V electric valve and a relay. Important! We advise you to have your Thetford Cassette toilet safely installed at a classified Service Center. For a Service Center near you, please visit - europe.com. The Thetford Cassette toilet is a semi portable integrated toilet system for caravans and motor homes. The unit is available in either right hand or left hand versions, depending on which side the cassette (waste tank) has to slide in and out as viewed from the seated position (see indication on packaging). It is recommended that the toilet is fitted together with a shower pan that has an upturned flange (see diagram 1). The flange fits between the two ribs under the base of the toilet to avoid shower leakage. The toilet can also be installed without a shower pan. INSTALLATION REQUIREMENTS 1. Minimum size requirements of bathroom are 670 mm wide (with wall seal add 2 more mm), free floor space depth to back wall 270 mm, free height 820 mm. At the bottom front outer side of the toilet is a removable e xtension front panel to create free space underneath the toilet of 85 x 70 mm for ducting (see diagram 1). 2. If bathroom is situated at the rear of the caravan or motor home, the distance from the cassette door aperture to the rear wall should be a min. 20mm for fitting of door frame. Outside trim to be taken into consideration. There should be a similar minimum clearance between the wheel arch (see diagram 3 & 4). 3. There has to be a vertical back wall to fit the toilet against. Attention! Be sure you have enough room to saw behind the wall to which the toilet is to be fitted (see diagram 5). Depending on the door type. Check with your caravan or motor home dealer to avoid damaging vital parts at the door aperture cut out. 4. A wooden frame or 4 aluminum strips of 3 mm should be inserted to the wall around door aperture for fixing screws (see diagram 6). Glue for rigidity. 5. Thetford advises that the door frame hinges face the driving direction. 6. The C-402 versions have an electric pump, which will draw 3 amp. Max (12V). Therefore a 12V DC electric supply must be available either direct (battery) or indirect via a transformer (5 amp. Min.). 7. The C-403 will be connected to the water system of the vehicle. To operate the electric valve and relay, a 12V DC electric supply must be available either direct (battery) or indirect via a transformer. In order to get a good flush the inlet of the toilet should have the following requirements: - A minimum pressure of 0.5 bar - A minimum flow of 6L/per minute.
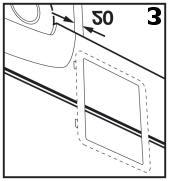
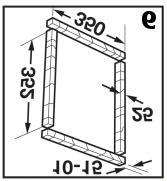
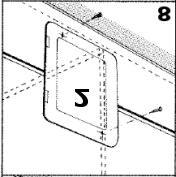
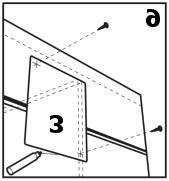
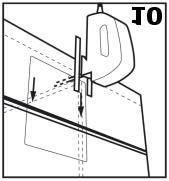
5 HELPFUL TIPS Drawings for making templates are included for easy installation. Assembly instructions should be followed step by step. The following tools are required: - (el.) drill and drill-bit 3 and 8 mm - an electric jig saw - Philips screwdriver number 2 - ruler - (felt) pen - safety glasses - butyl compound waterproof sealant The cut out of the outer wall will be used as door panel, therefore do NOT cut or drill any other holes than noted in this installation manual! INSTALLATION INSTRUCTIONS The toilet should be fixed to a vertical back wall. When a back wall is unavailable, one will have to be installed (see point 6, 8, 14). 1. Take the toilet out of the box. 2. Remove plastic bag with parts out of the bowl. Included should be the instructions for use and a holding tank cap. 3. Read instructions for use to get familiar with part names. Remove cassette waste tank by lifting the tank locking clip at the pour-out spout (see diagram 2). 4. Remove all loose parts from toilet fluid storage compartment. 5. Remove shower tray if it will not allow fitting of toilet and modify to suit if possible. 6. Position the toilet unit at the chosen place against outside wall and lift the cover to check for vertical clearance. If new vertical wall needs to be erected, put some scribe lines for the position of the back wall. Erect the rear wall temporarily into position. Check if the wall is vertical and square with the outside vehicle wall. Remove the toilet. 7. Position template 1 into the corner of the rear wall/outer vehicle wall and the surface where the to ilet will stand on. In case of carpet, take compressing into consideration (see diagram 7). 8. Drill two holes 3 mm through the vehicle wall from the inside. Positions are indicated on template 1. Remove the template. 9. Position template 2 on the outside, using two screws in drilled holes. Outer dimensions template 2 is for checking 20 mm (distance from trimming, body extrusions and, or wheel arch to aperture) (see diagram 8). 10. Replace template 2 with 3 and draw a line with a felt pen around template 3 to mark the cutting line for the door frame aperture (see diagram 9). 11. Remove template 3 and put tape for protection against scratching at the end and outside of the cutting line. Insert the jig saw blade according to diagram Make the cut out with a jig saw. Be sure to cut perpendicular to the outer wall (see diagram 10). 13. Prepare 4 wooden bars to be inserted into outer wall as reinforcement for locating outer frame.
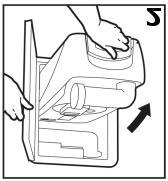
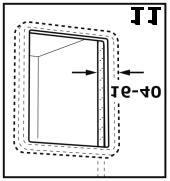
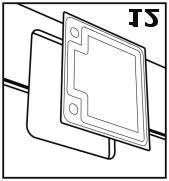
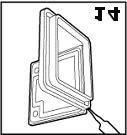
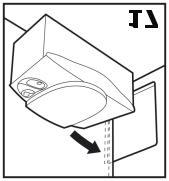
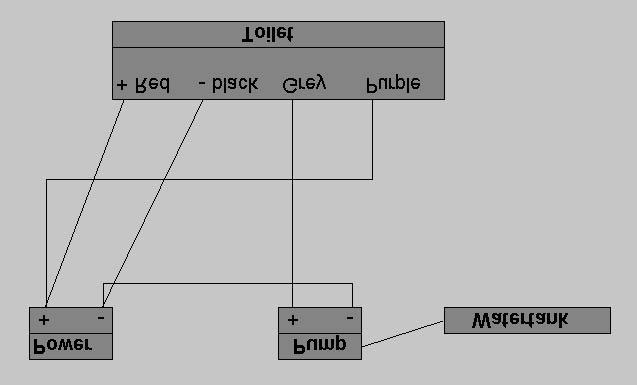
6 14. Bars should be glued for rigidity (see diagram 11). Reposition the rear wall and fix in position. The wall should be standing between 16 and 40 mm in front of aperture. 15. Trim the cut (from the door aperture) to fit the door panel according to template 4A or 4B (make sure you use the right template!). Make sure the decoration lines are lined up with the wall (see diagram 12). 16. Fill the groove of the door outer with sealant. Position the panel in the door outer (see diagram 13), and then push the door inner into the door outer. 17. Fill the groove of the frame outer to be placed in the opening with sealant (see diagram 14), place the complete door against the outside wall of the vehicle and fasten the door with 9 sheet-metal screws (4.2x12.5mm). 18. Mount the frame inner from the inside onto the door (see diagram 15). 19. If the kicking plate was removed before installation, then reassemble it, fix it with clips (3x) to the front bottom of the toilet. 20. In case of using wall brackets, fix these brackets to the rear wall using screws (see diagram 16). 21. Install the shower tray first in case of new designed or adjusted shower tray. 22. Before positioning the toilet, the electrical connection has to be made first. C-402 Red wire is the positive wire Black wire is the negative wire If the toilet is going to be connected to a pressure system: C-403 Red wire is the positive wire Black wire is the negative wire Drawing 1A Purple wire is not required - do not connect Grey wire is not required - do not connect If the toilet is going to be connected to a non-pressure system: Red wire is the positive wire Black wire is the negative wire Drawing 1B Purple wire is positive input (12V DC) - connect to electric supply Grey wire is positive output - connect to positive side of pump Remark: connect the negative wire to a common negative 23. Position the toilet against rear wall and aperture wall (see diagram 17). 24. Before installing the toilet, the C-403 has to be connected to the water supply system. Connect the water hose of the cassette (inside diameter 3/8 = 10mm) to the water hose of the water supply with a hose adapter. Fix the hoses to the adapter with a clamp (see diagram 1 8). 25. If using wall brackets, place the toilet over these brackets (see diagram 19). 26. Position the unit (through the door aperture from the outside) to the outside wall, by gripping it at the pockets in the base. Secure the back panel of the toilet to the bathroom rear wall with 4 screws (4 x 30mm) underneath the toilet seat. 27. Install a cover strip if necessary (see diagram 20). 28. Add a run of transparent sealing mastic from the outside between door and toilet (see diagram 21). The toilet is now installed.
Installation for Full Size Polaris Ranger Crew Doors
 Installation for Full Size Polaris Ranger Crew Doors Order of Installation: Heater Doors Wiper on to Windshield Windshield Top & Back Panel Note: Most of the steps in these instructions need to be repeated
Curium 19.4H Installation Instructions & Parts List
 Curium 19.4H Installation Instructions & Parts List Illustration Curium 19.4H Right Hand Page 1 of 21 30/06/2016 Revision 1.0 IMPORTANT This shower screen / enclosure must be installed by suitably qualified
Curium 19H Installation Instructions & Parts List
 Curium 19H Installation Instructions & Parts List Illustration Curium 19H Right Hand Page 1 of 15 01/07/2016 Revision 2.1 IMPORTANT This shower screen / enclosure must be installed by suitably qualified
WPS crew Doors Installation instructions
 WPS-132-133 crew Doors Installation instructions ORDER OF INSTALLATION FOR A COMPLETE ENCLOSURE OF A CREW WPS (Weather Protection System) IS AS FOLLOWS: 1. Heater 2. Rear Thresholds - Right Hand & Left
Jabiru Installation instructions
 Page 1 of 5 s Step Description 1 Mark out centre line of the installation 2 Align centre line of installation with the centre line of the "Front Panel Cut out" template. Align "FLOOR" on template with
Side and rear window, assembly overview
 64-7 Side and rear window, assembly overview 1 - Side/rear window Removing Unbroken Page 64-9 Broken Page 64-11 Installing Page 64-13 Curing time Page 64-21 Re-sealing Page 64-25 2 - PUR adhesive sealant
B A T H R O O M G L A S S
 mistley B A T H R O O M G L A S S vaug16 Page 2 Thank you for purchasing this Trinity shower screen. Please study these instructions carefully before assembly and installation and check all supplied parts
Dubnium 11 Installation Instructions & Parts List
 Dubnium 11 Installation Instructions & Parts List Illustration Dubnium, H1 Handle Right Hand: Open Out Page 1 of 25 IMPORTANT This shower screen / enclosure must be installed by suitably qualified individuals.
Deauville Installation Guide
 vjul16 (for 17 or 24 mm Surface Wall Profiles) DO NOT ASSEMBLE WITHOUT FULLY READING THESE INSTRUCTIONS Page 2 Thank you for purchasing this Deauville shower enclosure. Please study these instructions
TOYOTA MOTOR EUROPE CA Products Division Tel : Fax :
 TOYOTA MOTOR EUROPE CA Products Division Tel : + 32 2 745 26 77 Fax : + 33 2 745 26 99 Ordering part numbers Comments Part Numbers Wooden floor one hatch PZ449-D3C42-11 one hatch with carpet PZ449-D3C42-01
Gallium 03 Installation Instructions & Parts List
 Gallium 03 Installation Instructions & Parts List Illustration Gallium 03, H1 Handle Left Hand: Open Out 04/05/2016 Revision 1.1 Page 1 of 19 IMPORTANT This shower screen / enclosure must be installed
SLIDING DOOR for CORNER installation ONLY - this door closes to side panel -
 by KUDOS INSTALLATION INSTRUCTIONS SLIDING DOOR for CORNER installation ONLY - this door closes to side panel - Please read these instructions throughout before installing as incorrect fitting will invalidate
Under Seat Storage Drawer Installation Instructions
 Under Seat Storage Drawer Installation Instructions Parts List: 1) Drawer Assembly 8) Self Tapping Screws 1) Instructions 1) Template Tools Needed: Drill and/or Bit Driver Tape Measure Jigsaw or metal
Portofino Installation Guide
 vjul16 (for 17 or 24 mm Surface Wall Profiles) DO NOT ASSEMBLE WITHOUT FULLY READING THESE INSTRUCTIONS Page 2 Thank you for purchasing this Portofino shower enclosure. Please study these instructions
Portofino Case2 Installation Guide
 Portofino Case2 Installation Guide vjun16 (for 17 or 24 mm Surface Wall Profile) DO NOT ASSEMBLE WITHOUT FULLY READING THESE INSTRUCTIONS Page 2 Thank you for purchasing this Portofino Case 2 shower enclosure.
TOYOTA TACOMA LED BED LIGHTS Preparation
 Preparation Part Number: PT948-35160 Kit Contents Item # Quantity Reqd. Description 1 1 Hardware Kit 2 1 Driver Side LED assembly 3 1 Passenger Side LED assembly 4 1 Main Wire Harness Hardware Bag Contents
JEEP JK ( 5 DOOR ) SLIMLINE II - FULL TRAY EXTREME RACK KIT
 SLIMLINE II - FULL TRAY EXTREME RACK KIT") JEEP JK ( 5 DOOR ) SLIMLINE II - FULL TRAY EXTREME RACK KIT FAJK001 / KRJW014T INSTALL TIME: 2.5 Hours NOTE: Your Jeep JK (5 Door) Extreme Roof Rack Kit consists of four boxes. (1) the Tray, (2) the Roll
JEEP JK ( 5 DOOR ) SLIMLINE II - FULL TRAY EXTREME RACK KIT FAJK001 / KRJW014T INSTALL TIME: 2.5 Hours NOTE: Your Jeep JK (5 Door) Extreme Roof Rack Kit consists of four boxes. (1) the Tray, (2) the Roll
GE Monogram. Installation. Instructions. Microwave Oven. Under Cabinet Installation. and. JX827 Series Built-In Kit. Models.
 GE Monogram Installation Instructions Under Cabinet Installation and JX827 Series Built-In Kit Models ZEM200 Series CAUTION WARNING Before you begin Read these instructions completely and carefully. IMPORTANT:
INSTALLATION INSTRUCTIONS DANUBE ACRYLIC NEO ANGLE
 INSTALLATION INSTRUCTIONS DANUBE ACRYLIC NEO ANGLE March 2013 DOOR 2 Page 1 of 5 INSTALLATION INSTRUCTIONS NEO ANGLE 6MM FRAMELESS AND 4MM FRAMED SHOWER DOOR DANUBE, DELTA, SIGNATURE, OCEANIA, CASCADE
Frameless Inline Door With Return QCI5263
 INSTALLATION INSTRUCTIONS Frameless Inline Door With Return QCI5263 WALL MOUNT HINGES FRAMELESS DOOR / PANEL / RETURN PANEL QCI5263 REV. 0 Page 1 Certified 06/17/2016 Parts List with wall mount hinges
Prepare Base Assembly. (If pump is pre-assembled on base, go to step#8.)
") F L Instructions Maxim 3000 Turbo Flush Installation INTRODUCTION Satellite portable restrooms and accessories must be assembled according to approved assembly procedures. Avoid variations in assembly
F L Instructions Maxim 3000 Turbo Flush Installation INTRODUCTION Satellite portable restrooms and accessories must be assembled according to approved assembly procedures. Avoid variations in assembly
ASSEMBLY INSTRUCTIONS FOR SL500A AND SL500AL
 ASSEMBLY INSTRUCTIONS FOR SL500A AND SL500AL January 2013 The SL500A is a square upright glass cabinet with a single hinged lockable door. It has five adjustable shelves plus the base. It also has an optional
Radon 07 Installation Instructions & Parts List
 Radon 07 Installation Instructions & Parts List Illustration Radon 07, H1 Handle Right Hand: Open Out 14/06/2016 Revision 1.1 Page 1 of 21 IMPORTANT This shower screen / enclosure must be installed by
Low Headroom Rear Mount TorqueMaster
 Low Headroom Rear Mount Supplemental Instruction Insert This supplemental installation instruction is to be used as a supplement to the main Installation Instruction and Owner s Manual provided with the
Frameless Bypass Slider
 INSTALLATION INSTRUCTIONS Frameless Bypass Slider QCI-5301 Heavy Glass Bypass Slider with Exposed Rollers QCI5301 Rev 0 Page 1 Certified 11/1/2016 Tools: To install your New Shower Enclosure, you may need
Privacy Wall & Glass Selections Pivot-Hinged Door (For products manufactured after September 14, 2009)
") Privacy Wall & Glass Selections Pivot-Hinged Door (For products manufactured after September 14, 2009) 3/16" HEX BIT #2 ACR BIT 3/8" HEX SOCKET Full-Height (No Switch) Transom (No Switch) Full-Height (With
Privacy Wall & Glass Selections Pivot-Hinged Door (For products manufactured after September 14, 2009) 3/16" HEX BIT #2 ACR BIT 3/8" HEX SOCKET Full-Height (No Switch) Transom (No Switch) Full-Height (With
Bathroom Installation Manual
 Bathroom Installation Manual MAKING SPACE MORE VALUABLE May 2016 1 2 Contents page 1. Introduction Page 4 2. Tools required / key Page 5 3. Fittings Page 6 4. 600 cistern unit Page 7 5. 600 vanity unit
INSTRUCTION SHEET U19
 U19 All Refrigerator and All Freezer Trim Kit Installation Product Line: U19 All Refrigerator and All Freezer Models Parts Included in Kit TRIMKITEZ1 (Part# 297333500): Single Trim Kit Components Single
Xenon 05 Installation Instructions & Parts List
 Xenon 05 Installation Instructions & Parts List Illustration Xenon 05, H1 Handle Left Hand: Open Out 26/05/2016 Revision 2.1 Page 1 of 19 IMPORTANT This shower screen / enclosure must be installed by suitably
Build your own Drawer unit. D3 / D4
 Page1 Build your own Drawer unit. D3 / D4 1: Introduction. This guide will give you the plans, materials and how to information to build your own drawer unit. The dimensions given will fit a D3 or D4,
3.2.3 Rear Door Window and Quarter Window Carrier Assembly
 Tighten all bolts. Tighten bolts marked -1- and -2- in specified sequence. Tightening torque: 8 Nm Remaining bolts can be tightened in any sequence. Insert door window -3- through window recess without
tile redi redi DOOR Redi Redi Swing Slide g TM TM...Opening Doors to Stunning Showers! TM TM SERIES: CONFIGURATION: MOUNTING PACKAGE:
 redi DOOR INSTALLATION INSTRUCTIONS tile redi Redi Redi Swing Slide g TM TM...Opening Doors to Stunning Showers! TM TM SERIES: CONFIGURATION: MOUNTING PACKAGE: 3000 Door-Door Header, sliding doors RDQCI5301
JEEP JK ( 5 DOOR ) SLIMLINE II - FULL TRAY EXTREME RACK KIT
 SLIMLINE II - FULL TRAY EXTREME RACK KIT") JEEP JK ( 5 DOOR ) SLIMLINE II - FULL TRAY EXTREME RACK KIT FAJK002 / KRJW014T INSTALL TIME: 5 Hours NOTE: Your Jeep JK (5 Door) Extreme Roof Rack Kit consists of four boxes. (1) the Tray, (2) the Roll
JEEP JK ( 5 DOOR ) SLIMLINE II - FULL TRAY EXTREME RACK KIT FAJK002 / KRJW014T INSTALL TIME: 5 Hours NOTE: Your Jeep JK (5 Door) Extreme Roof Rack Kit consists of four boxes. (1) the Tray, (2) the Roll
IF INSTALLING ANY OF THE PORTMAN SELF CLOSING SYSTEMS, PLEASE READ THE CORRESPONDING FITTING INSTRUCTIONS SUPPLIED WITH THE CLOSING SYSTEM FIRST
 Set A Set B PFD60 Fire Door Kit FITTING INSTRUCTIONS IF INSTALLING ANY OF THE PORTMAN SELF CLOSING SYSTEMS, PLEASE READ THE CORRESPONDING FITTING INSTRUCTIONS SUPPLIED WITH THE CLOSING SYSTEM FIRST SUGGESTED
SS13R SAFARI R-SPEC SNORKEL Nissan GQ Patrol with 4.2L TD42 Diesel Engine and Horizontal Pre-Cleaner.
 SS13R SAFARI R-SPEC SNORKEL Nissan GQ Patrol with 4.2L TD42 Diesel Engine and Horizontal Pre-Cleaner. Parts List 01/04/2015 ITEM PART NO DESCRIPTION QTY 1 470-133-200R BODY - SNORKEL 1 2 000-135-800 3
Super Sky Surfer 2000 Assembly Instructions
 Super Sky Surfer 2000 Assembly Instructions Note: Plug and Play version of the Sky Surfer comes with fuselage pre-glued and motor/servos installed. If you wish to route antennas or wires through the tail,
Frameless Bypass Slider
 INSTALLATION INSTRUCTIONS Frameless Bypass Slider QCI-5301 3/8 or 1/4 Glass Bypass Slider with Exposed Rollers QCI5301 Rev 1 Page 1 Certified 6/5/2017 Tools: To install your New Shower Enclosure, you may
IMPULSE G2/PULSE STATIC BRIDGE & RETURN MODULE. Drill. Desk Connecting. Outside by fastening the supplied wood screws from the HK-67 kit through the
 PART # 1608990 STATIC BRIDGE & RETURN MODULE 1. This sheet covers the steps to install a static bridge or return module with the FX no hinged access panel back option to a height adjustable freestanding
Deauville Installation Guide
 vjul16 (for Recessed Wall Profiles) DO NOT ASSEMBLE WITHOUT FULLY READING THESE INSTRUCTIONS Page 2 Thank you for purchasing this Deauville shower enclosure. Please study these instructions carefully before
INFINITE RANGE - HINGE DOOR
 INFINITE RANGE - HINGE DOOR HINGE DOOR + 1 SIDE RETURN PANEL (CORNER) Please read these instructions before installing, as incorrect fitting will invalidate the guarantee-carry out each stage before moving
LANDING GEAR. 1. Fit landing gear into slots on bottom of fuselage.
 LANDING GEAR 1. Fit landing gear into slots on bottom of fuselage. 4. Use channel-lock pliers to press blind nuts into position (note: drilled hole should be slightly smaller than shaft of blind nut for
Installation Guide 2016
 Installation Guide 2016 BUILDERS EDGE INSTALLATION GUIDE This guide will show you the products of the Builders Edge family. It provides specific installation steps and application details. Our main goal
Ford Ranger / Bronco II Set Part # Rev B 5-04
 Ford Ranger / Bronco II Set Part # 21008 Rev B 5-04 Step 1: Prior to Installation: A) Fit: Verify the fit of the flares to vehicle. (Some filing, sanding, or cutting may be necessary to ensure proper fit).
Siding Components. Installation Guide
 Siding Components Installation Guide 2016 MID-AMERICA SIDING COMPONENTS INSTALLATION GUIDE This guide will show you the products of the Mid-America Siding Components family. It provides specific installation
INFINITE RANGE - CENTRE FOLDING DOOR
 INFINITE RANGE - CENTRE FOLDING DOOR CENTRE FOLDING DOOR ONLY ( RECESS) Please read these instructions before installing, as incorrect fitting will invalidate the guarantee-carry out each stage before
1/4 FRAMELESS SLIDING DOOR FOR TUB OR SHOWER 4400A-4500A
 1/4 FRAMELESS SLIDING DOOR FOR TUB OR SHOWER 4400A-4500A F AB GLASS AND MIRROR www.fabglassandmirror.com Call: +1 888-474-2221 Fax: (614)-334-4919 Office Timing: 8:30-18:00 EST info@fabglassandmirror.com
Installation Instructions
 DODGE 16K Industry Standard Rail Custom Mounting Kit #2728 Gross Trailer Weight (Maximum)...16,000 lbs. Vertical Load Weight (Max. Pin Weight)...4,000 lbs. SYSTEM TOW CAPACITY Please note, in order to
Traditional Wall Mounted Potfiller
 TOOLS NEEDED FOR INSTALLATION 1/4 hex wrench (provided in installation kit) 3/32 hex wrench (provided in installation kit) Pencil or marker PTFE tape Small level, or carpenters square Power Drill with
1: profile cross section. FD- profile. for sidewalls + backwalls. eaves profile. curved roof profile. Z - profile (alongside frame) L 60 x 60
 L 60 x 60") 1: profile cross section FD- profile for sidewalls + backwalls eaves profile curved roof profile Z - profile (alongside frame) L 60 x 60 for backwall Image 2: 1.) Insert feet from below in square tubes
1: profile cross section FD- profile for sidewalls + backwalls eaves profile curved roof profile Z - profile (alongside frame) L 60 x 60 for backwall Image 2: 1.) Insert feet from below in square tubes
PREMIUM GLASS BATH SCREEN
 PREMIUM GLASS BATH SCREEN INSTALLATION GUIDE Bath screens must be installed in situations where the floor of the bathroom has a waterproof membrane installed. For New Zealand, the bath screen must be installed
General Prisoner Transport Install Instructions PT-2-INST
 General Prisoner Transport Install Instructions PT-2-INST 50 or 60 high x 80, 100 & 120 inch long / Double Compartment Inserts Also refer to PT-A-3XX instructions for vehicle specific mounting measurements
Please read BOTH these Installation Instructions and the General Instructions before attempting to install or operate this equipment.
 Please read BOTH these and the General Instructions before attempting to install or operate this equipment. 1. Blue Ox towing products and accessories are intended to be installed by Blue Ox Dealers who
CUT OUT FLARES INSTALLATION INSTRUCTIONS FOR 20017, 20018, F100-F150 F250-F350 P.U. & BRONCO CUT OUTS
 20017 04/22/03 REV-A CUT OUT FLARES INSTALLATION INSTRUCTIONS FOR 20017, 20018, F100-F150 F250-F350 P.U. & BRONCO CUT OUTS Tools Required for Installation: (A) 3/16 Drill Bit (B) Pop-Rivet Gun (C) Air
ALLORA SWING PANEL INSTALLATION INSTRUCTIONS
 ALLORA SWING PANEL INSTALLATION INSTRUCTIONS Before Installation Please check that your Allora Swing Panel is undamaged SEQUENCE OF INSTALLATION These instructions are also available from the Athena website:
Privacy Wall Glass Selections - Polished Edge Slider Door
 Privacy Wall Glass Selections - Polished Edge Slider Door 3/6" HEX BIT PUTTY KNIFE #2 ACR BIT SUCTION CUP HOLDERS DOOR LEAF: Satin Tempered Clear Tempered LOCTITE 425 SIDE LIGHT ETCHED GLASS STYLES: Satin
Joiner Kit For Models N388, C450, E402B, E411T, E415H, E440T, E442B, E521T and E522B
 Joiner Kit For Models N388, C450, E402B, E411T, E415H, E440T, E442B, E521T and E522B KIT COMPONENTS Part Illustration Description Rear Bracket Front Lower Bracket Front Upper Bracket KIT APPLICATION This
Monaco Installation Guide - Surface Profiles
 v1 Page 1 Thank you for purchasing this Monaco shower screen. Please study these instructions carefully before assembly and installation and check all supplied parts immediately upon receipt. These instructions
mistley PELE Installation Guide vapr16 Mistley Bathroom Glass Limited No 4 One Mistley Quayside, High Street, Mistley, Essex CO11 1AL England
 mistley BAT HRO O M G LASS vapr16 Page 2 Thank you for purchasing this Pele shower screen. Please study these instructions carefully before assembly and installation and check all supplied parts immediately
a.k.a. casegoods instructions
 a.k.a. casegoods instructions a a.k.a. workwall installation IMPORTANT NOTES Failure to install product according to installation instruction will result in loss of warranty. Tools required for assembly
-1- Coach Instructions.
 -1- Coach Instructions. Insert the bogie pivot pins through the bottom of the coach body ensuring the dimples fit into the recesses. Glue the.06 x.25 short strips each side of the pivot head, bridge the
INFINITE RANGE - CENTRE FOLDING DOOR
 INFINITE RANGE - CENTRE FOLDING DOOR CENTRE FOLDING DOOR + 2 SIDE RETURN PANELS (PENINSULA) Please read these instructions before installing, as incorrect fitting will invalidate the guarantee-carry out
FRAMELESS DOOR / PANEL WITH WALL MOUNT HINGES QCI5274
 FRAMELESS DOOR / PANEL WITH WALL MOUNT HINGES QCI5274 QCI0274 QCI5274 REV. Rev. 1 0 Page Page 1 1 Date Certified: Certified 06/16/2016 10/01/10 Parts List with wall mount hinges ITEM NO. Part # DESCRIPTION
FlexFrame - Storage Components and Skins
 FlexFrame - Storage Components and Skins 1/4 Square Drive Ball-Point Hex-Bit Socket 1/8 Short Hex, 1-1/2 Overall Length McMaster Part # 54075A44 Table of Contents Topic Page Storage Components 2 General
Wall Profiles 2 Pozi Screwdriver. Wall Profile Covers 4 Sealant. Large Panel and Thin Panel Assemblies Sealant Gun
 Decem Sliding Door (Corner Fitting) Instruction Manual DXT Important Information Toughened glass is completely safe for use in our shower enclosures and bath screens; providing our products are installed
RTS518 - Rhino Heavy Duty 2 & 3 Crossbar System Hyundai iload, imax, i800, H-1.
 RTS518 - Rhino Heavy Duty 2 & 3 Crossbar System Hyundai iload, imax, i800, H-1. NOTE: Please read these instructions carefully prior to installation. Check the contents of kit before commencing fitment
Series 1500 Aluminum Door Canopy
 Series 500 Aluminum Door Canopy with Sidewings It is our recommendation that you read instructions carefully prior to assembly and installation. Series 500 with Sidewings mounting bar (A) top trim (B)
Stage 2: Preparing the door (read in conjunction with Hole Drilling Options on back of Template).
.") There are three stages to fitting the CL100 mortise case: Stage 1: Marking out the position of the lock. Stage 2: Preparing the door by mortising and drilling holes. Stage 3: Fitting lock, door furniture,
There are three stages to fitting the CL100 mortise case: Stage 1: Marking out the position of the lock. Stage 2: Preparing the door by mortising and drilling holes. Stage 3: Fitting lock, door furniture,
1 of 2 3/3/2017 4:49 PM
 1 of 2 3/3/2017 4:49 PM Front Door Window, Assembly Overview 1 - Window guide - Inserted on flange 2 - Door 3 - Inner window recess seal - Inserted on flange 4 - Bolt - 20 Nm 5 - Carrier assembly - Window
Method of Build 1. General
 Method of Build 1 General GLAZED ELEVATIONS Viso Double Glazed in glazed form differs from many other systems as the vertical joints can have Viso dry joints or the unique HIDDEN mullion post between glazed
V Installation instructions, accessories. Auxiliary seat. Volvo Car Corporation Gothenburg, Sweden V70 (00-08) 2002
 2002") Installation instructions, accessories Instruction No 8624018 Version 1.3 Part. No. 30749269, 30749270, 30749271, 30749272, 30749273, 30749274 Auxiliary seat M8901699 Volvo Car Corporation Auxiliary seat-
Installation instructions, accessories Instruction No 8624018 Version 1.3 Part. No. 30749269, 30749270, 30749271, 30749272, 30749273, 30749274 Auxiliary seat M8901699 Volvo Car Corporation Auxiliary seat-
FIXED SHOWER SCREEN For Wall Mount Hinges QCI5283
 FIXED SHOWER SCREEN For Wall Mount Hinges QCI5283 QCI5283 Page 1 Date Certified: 06/16/2016 Parts List with wall mount clamp ITEM NO. DESCRIPTION QTY. 1 FIXED GLASS PANEL 1 2 WALL MOUNT CLAMP 1 3 U-CHANNEL
SERIES: CONFIGURATION: MOUNTING PACKAGE: 1200 Door-Door Frameless, sliding door
 SERIES: CONFIGURATION: MOUNTING PACKAGE: 1200 Door-Door Frameless, sliding door RDQCI5022 Rev.0 Page 1 Certified 06/01/2016 Tools: To install your New Shower Enclosure, you may need the following: Pencil
Installing your new Bevella Top. L Shaped Countertop with Joints No Finished Ends (Fits Between Four Walls)
") Installing your new Bevella Top L Shaped Countertop with Joints No Finished Ends (Fits Between Four Walls) Bevella RTI Countertops are engineered and manufactured to the highest quality standards, built
Installing your new Bevella Top L Shaped Countertop with Joints No Finished Ends (Fits Between Four Walls) Bevella RTI Countertops are engineered and manufactured to the highest quality standards, built
*** All chrome surfaces should be cleaned using a clean damp cloth. *** No abrasive cleaning agents or materials should be used.
 Cleaning *** All chrome surfaces should be cleaned using a clean damp cloth. *** No abrasive cleaning agents or materials should be used. *** No chemical cleaners can be used on the glass use only mild
FUSELAGE CONSTRUCTION
 FUSELAGE CONSTRUCTION Note: prior to building and gluing on the work surface use protective covering on your building surface. (wax paper or clear wrap) Fit the laser cut Fuselage Front and Fuselage Rear
Tech Sheet. T4 Interior conversion kit how to - fitting instructions. 1. Rear seat belts. 2.
 Page 1 of 8 T4 Interior conversion kit how to - fitting instructions Thank you for purchasing our T4 interior conversion kit. This kit will enable you to convert any SWB left hand loading door T4 into
SYSTEM 42 SCREEN CASSETTE WITH 30mm SIDE RAIL
 LEGENDS VERTICAL WINDOW RETRACTABLE SCREEN SYSTEM 42 SCREEN CASSETTE WITH 30mm SIDE RAIL I N S T A L L A T I O N I N S T R U C T I O N NOTE: Screen components must be installed on a flat surface to ensure
Allora ALCOVE ENCLOSURE INSTALLATION BEFORE INSTALLATION CHECK THAT YOUR ALLORA SHOWER ENCLOSURE SYSTEM IS UNDAMAGED
 Allora ALCOVE ENCLOSURE INSTALLATION BEFORE INSTALLATION CHECK THAT YOUR ALLORA SHOWER ENCLOSURE SYSTEM IS UNDAMAGED ALCOVE SHOWER Your shower can be installed to open Left hand or Right hand by rotating
IMPORTANT INSTALLATION GUIDE VALENCIA ANGLE CORNER SHOWER READ ALL INSTRUCTIONS CAREFULLY BEFORE STARTING THE INSTALLATION
 INSTALLATION GUIDE VALENCIA ANGLE CORNER SHOWER SEALANT REQUIRED TO COMPLETE THIS INSTALLATION: (Supplied) Sika Sikasil NG (Arctic White) To seal the WHITE shower door and returns to the shower tray. Usage:
TOOL LIST FOR TAILGATE HIDDEN LATCH & LINK ASSY FOR FORD FLARESIDE TRUCKS
 TOOL LIST FOR TAILGATE HIDDEN LATCH & LINK ASSY FOR 53-87 FORD FLARESIDE TRUCKS Vise Grip Clamps C-clamps Sharpie Marker Ball Peen Hammer Center Punch 3/8 or 1/2 Drill 5/32, 7/32, 9/32, and 3/8 Drill Bits
INSTALLATION INSTRUCTIONS KK-K9-F14-K K9 KIT FOR FORD EXPEDITION
 INSTALLATION INSTRUCTIONS KK-K9-F14-K-32 32 K9 KIT FOR 2003-2016 FORD EXPEDITION TOOLS REQUIRED: Power Drill Drill Bit Set Standard & Metric Socket Sets Phillips Screw Driver Open End Wrench Set Wire Cutters
S H E D A S S E M B L Y I N S T R U C T I O N S
 T I T A N R A N G E S H E D A S S E M B L Y I N S T R U C T I O N S 6 X 4ft = 190 x 150 cm 6 X 6ft = 190 x 190 cm 6 X 8ft = 190 x 255 cm COMPONENT LIST Component illustrations are given as a visual guide
10 x 10 Flat Top Pergola
 0 x 0 Flat Top Pergola A S S E M B L Y G U I D E Models: Venetian, Tuscany, Luxor, Acadia O P T I O N A L A C C E S S O R I E S Arch Kit System ( Arches) Privacy Fence Panel System ( Panels & Middle Post)
Installation Guidelines
 Page 1 Tools You ll Need 4 ft. Carpenter s level Chalk line (to mark U channel locations) Cordless drill/nut driver Caulking gun Chop saw with a metal cutting blade on it (required to make accurate and
Potting Store Assembly Instructions
 Before assembly We recommend that time is taken to read the instructions before starting assembly, then follow the easy step by step guide. The instruction sheet is only a guide to the assembly. Certain
CLASSIC RANGE PLUS RANGE CREATE RANGE - PHOTO WALL
 CLASSIC RANGE PLUS RANGE CREATE RANGE - PHOTO WALL The following is an installation guide for fitting Multipanel CLASSIC RANGE, PLUS RANGE, CREATE RANGE AND PHOTO WALL Jig saw or Hand saw Measuring Tape
Thank you for your order
 Installation Guide Thank you for your order Ph: 09-9133110 Fax: 09-9133113 5 Smales Road. East Tamaki, Manukau PO Box 58031 Greenmount, Manukau 2013 AUCKLAND // WELLINGTON // CHRISTCHURCH www.bathroomdirect.co.nz
Cardo DOOR & RETURN SHOWER ENCLOSURE INSTALLATION PLEASE READ THESE INSTRUCTIONS CAREFULLY.
 Cardo DOOR & RETURN SHOWER ENCLOSURE INSTALLATION PLEASE READ THESE INSTRUCTIONS CAREFULLY. IT IS RECOMMENDED TO USE A TRAINED SHOWER INSTALLER FOR THIS SHOWER TO OBTAIN THE BEST INSTALLATION. D Square
S H E D A S S E M B L Y I N S T R U C T I O N S
 T I T A N R A N G E S H E D A S S E M B L Y I N S T R U C T I O N S 8 X 10 ft Approx = 2550 x 3140 cm COMPONENT LIST Component illustrations are given as a visual guide only and are not in proportion PART
40mm Thermoclick. Type II Class 1 Clear Satin Anodize - 201R1 (Mid Grade Commercial)
") http://www.sundancesupply.com 40mm Thermoclick Type II Class 1 Clear Satin Anodize - 201R1 (Mid Grade Commercial) U-Profile 12' Lengths $39 Out System offers a complete set of extrusions and accessories
http://www.sundancesupply.com 40mm Thermoclick Type II Class 1 Clear Satin Anodize - 201R1 (Mid Grade Commercial) U-Profile 12' Lengths $39 Out System offers a complete set of extrusions and accessories
Installation Operation Care
 Installation Operation Care Palm Beach Polysatin Shutters CONTENTS Getting Started Installation Overview...1 Unpacking...1 Tools and Materials Needed...1 Fasteners...2 Frame Assembly Assemble the Frame
INSTALLATION INSTRUCTIONS
 INSTALLATION INSTRUCTIONS TOOLS REQUIRED Rechargeable, variable speed drill 3/8 diameter drill bit 3 Robertson bits #0, #1 and #2 Slot screwdriver Non marring hammer with 1 head Level Caulk or sealant
10 x 10 Flat Top Two Tone Pergola
 0 x 0 Flat Top Two Tone Pergola Models: Bordeaux ASSEMBLY GUIDE OPTIONAL ACCESSORIES Arch Kit System ( Arches) Privacy Fence Panel System ( Panels & Middle Post) Bolt Down Bracket Kit ( for Pergola) Ver.0-00
IMPULSE G2/PULSE STATIC BRIDGE & RETURN MODULE. Drill. Desk Connecting. Outside by fastening the supplied wood screws from the HK-67 kit through the
 PART # 1608990 STATIC BRIDGE & RETURN MODULE 1. This sheet covers the steps to install a static bridge or return module with the FX no hinged access panel back option to a height adjustable freestanding
INSTALLATION INSTRUCTIONS KK-K9-C12-K CHEVY IMPALA
 INSTALLATION INSTRUCTIONS KK-K9-C12-K 2000-2005 CHEVY IMPALA READ ALL INSTRUCTIONS PRIOR TO INSTALLATION TOOLS REQUIRED: Power Drill Drill bits1/4 and 5/32 7/l6 wrench and socket 15,18 and\or 19mm socket
JEEP JK ( 3 DOOR ) SLIMLINE II - FULL TRAY EXTREME RACK KIT
 SLIMLINE II - FULL TRAY EXTREME RACK KIT") JEEP JK ( 3 DOOR ) SLIMLINE II - FULL TRAY EXTREME RACK KIT FAJK004 / KRJW016T INSTALL TIME: 2 Hours NOTE: Your Jeep JK (3 Door) Extreme Roof Rack Kit consists of four boxes. (1) the Tray, (2) the Roll
JEEP JK ( 3 DOOR ) SLIMLINE II - FULL TRAY EXTREME RACK KIT FAJK004 / KRJW016T INSTALL TIME: 2 Hours NOTE: Your Jeep JK (3 Door) Extreme Roof Rack Kit consists of four boxes. (1) the Tray, (2) the Roll
HBS-AP ASSEMBLING INSTRUCTIONS
 ALUMINIUM PIPEWORK - ALUMINIUM PIPEWORK - ALUMINIUM PIPEWORK 97 HBS-AP ASSEMBLING INSTRUCTIONS 1. INTRODUCTION 1.1. This manual is very easy to consult and we recommend reading it before starting work,
10 x 10 Arch Top Pergola
 0 x 0 Arch Top Pergola I N S T A L L A T I O N G U I D E O P T I O N A L A C C E S S O R I E S Privacy Fence Panel System ( Panels & Middle Post Included) Bolt Down Bracket Kit (Set of ) Additional Shade
Insolroll Clutch Operated Shades Installation Instructions Installation Instructions
 All clutch operated shades are shipped fully assembled and ready for installation. Mounting screws are not provided. Screws for chain guide installation to meet the child safety standards are provided.
" BASE CABINET
 INSTALLATION GUIDE INSTALLATION GUIDE Before You Begin Installing Your Kitchen Cabinets 1. Read through installation guide to understand all steps and gather tools needed. 2. Verify that all of the hardware,