PUZZLE EFFECTS 3D User guide JIGSAW PUZZLES 3D. Photoshop CC actions. User Guide
|
|
|
- Mildred Matthews
- 5 years ago
- Views:
Transcription

1 JIGSAW PUZZLES 3D Photoshop CC actions User Guide
2 CONTENTS 1. THE BASICS About the actions How the actions are organized The Classic effects (examples) The Special effects (examples) INSTALLATION & TROUBLESHOOTING Installing the actions in Photoshop Requirements Troubleshooting USING THE CLASSIC 3D PUZZLES ACTIONS Introduction Using the Classic actions in GROUP Load the photo Modify the style of the pieces Manually select up to 30 layers (pieces) From 2D to 3D Editing the 3D Scene Using the Classic actions in GROUP USING THE SPECIAL 3D PUZZLES ACTIONS Introduction Using the Special actions in GROUP Load and crop the photo Create and edit the 3D scene Using the Special actions in GROUP

3 1. THE BASICS 1.1. About the actions The Jigsaw Puzzles actions turn your photos into digital jigsaw puzzles. Τhe 3D actions make use of Photoshop s advanced features to create impressive 3D scenes and 3D animations. The actions create a remarkable range of different Jigsaw Puzzles. This guide describes the way the 2D Puzzle actions work How the actions are organized The 3D Jigsaw Puzzles include two sets of Photoshop actions: The Classic effects. The Special effects. 1
 of your preference and are turned into individual 3D objects.")

4 The Classic Jigsaw Puzzles, as their name indicates, make your photos look like classic paperboard jigsaw puzzles. You can create puzzles with up to 210 pieces. They let you select up to 20 pieces (or groups of pieces) of your preference and are turned into individual 3D objects. The Special Jigsaw Puzzles include an impressive assortment of creative Jigsaw Puzzles, such as spiral puzzles, hearts, or diamonds, to name a few. The example on the right shows a heart with 14 pieces that are slightly displaced from their positions. The extruded sides are made from glassy material. In these actions each piece is an individual 3D object. 2
")


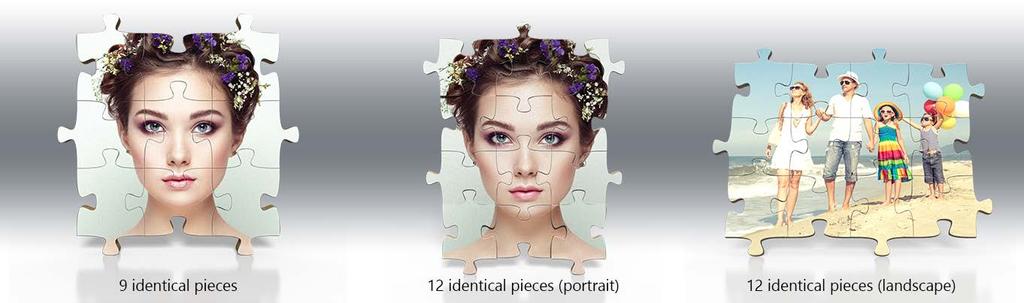
5 1.3. The Classic effects (examples) The examples below show 14 puzzles created using the 3D Classic actions: 3

6 4
")


7 1.4. The Special effects (examples) The examples below demonstrate the 23 effects produced by the Special 3D actions: 5


8 6

9 7
10 2. INSTALLATION & TROUBLESHOOTING 2.1. Installing the actions in Photoshop Once you download the product file, navigate to your "Downloads" folder. Unzip the file PFx-Jigsaw-Puzzles.zip. This will create a folder called "PFx Jigsaw Puzzles", which contains 4 files: PFx PUZZLES 2D - Classic.atn PFx PUZZLES 2D Special.atn PFx PUZZLES 3D - Classic.atn PFx PUZZLES 3D Special.atn LOADING THE ACTIONS IN PHOTOSHOP: USAGE: Method 1: Double-click the PFx PUZZLES 3D Classic.atn or the PFx PUZZLES 3D Special.atn files; the actions will be loaded automatically into the Actions Panel. Method 2: Open Photoshop and go to the Actions Panel (if it s not visible, select: Window > Actions). Click the panel s menu button (at the top-right panel corner) and select "Load Actions" from the pop-up menu. Navigate inside the " PFx Jigsaw Puzzles " folder and load any of the PFx PUZZLES 3D Classic.atn or the PFx PUZZLES 3D Special.atn files; the actions will be loaded automatically into the Actions Panel. Load a photo in Photoshop; select an action with your mouse; hit the Play button, located at the bottom of the Actions Panel. Follow the on-screen instructions Requirements The 3D Puzzles actions are compatible with the English Photoshop CC version. If you have a non-english Photoshop version, please refer to these instructions to switch temporarily to English: Your system should meet the minimum 3D requirements, as provided by Adobe: The 3D Photoshop menu becomes unavailable (grayed out) in systems with old graphics cards that are not supported anymore by Adobe. It is highly recommended that you use the 64 bit Windows version or macos. If you have less than 8GB of RAM, you may experience crashes while working in 3D or using 3D actions. It is also recommended you have 2GB of Video RAM (or more). 8

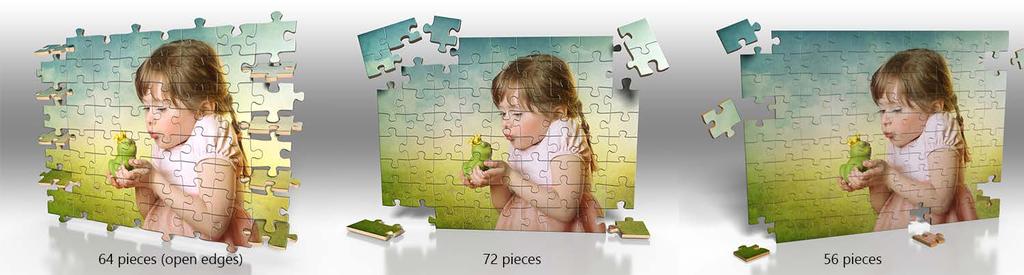
11 2.3. Troubleshooting Make sure you read the following pages, in order to understand how the actions work. If you notice that Photoshop behaves abnormally proceed with resetting the preferences the way described in this article: 3. USING THE CLASSIC 3D PUZZLES ACTIONS 3.1. Introduction The Classic 3D Puzzles actions are divided in two groups: GROUP 1 GROUP 2 Why are there 2 different groups? This division has to do with the maximum number of pieces that will be turned into individual 3D objects. Some actions create puzzles with a large number of pieces (e.g. 210 pieces). Turning every piece into a unique 3D object would take a lot of time and additional system resources. In the end, how many would need a 3D puzzle scene with e.g. 56 different 3D objects? The actions in the first group cut the photos in many pieces. These actions let you choose up to 20 pieces that will be turned into individual 3D objects. This number will cover most design needs. The actions in the second group cut the photos into fewer pieces (6, 9, 12, 15, 20, 24, or 30). In these actions each piece will be automatically turned into an individual 3D object. 9

12 3.2. Using the Classic actions in GROUP Load the photo Begin with loading a photo of landscape orientation. NOTE: If your photo has a portrait shape, rotate it by 90 degrees prior to running the actions, using the menu command: Image > Image Rotation > 90 Clockwise. When the action finishes, restore the original orientation using the 3D Panel: click on Scene objects (PS CS6: click on Scene ) and rotate the scene 90 degrees CCW. Select one of the actions in GROUP 1 and hit the Play button. The action will encourage you to downsize your photo, if it is very big. If you plan to publish the puzzle images on the web, you certainly don t need to use a very big photo. Smaller photos create 3D puzzles that can be edited more efficiently. Click on Continue. Then change the image size to your preference, or hit OK to use the original image size. The action will then cut the puzzle pieces, creating a different 2D layer for every puzzle piece. This may take a while, depending on the number of pieces and your system Modify the style of the pieces When all pieces are cut, the action prompts you to modify the default style setting for the top-left piece. Click on Continue. 10


13 To make the pieces look more realistic, the action applies two layer styles on every piece, the Bevel & Emboss and Drop Shadow : Click on Bevel & Emboss and modify the default settings. While modifying the settings, observe the effect on the top left piece. For maximum accuracy, I recommend you zoom to 100% by pressing Ctrl (Mac: cmd) and the plus key (+). TIP: If you can t see the top left piece after zooming to 100%, hold down the Space key and drag with your mouse. When you finish, press OK to move on. The style settings will be copied to all other pieces: 11
.")

14 Manually select up to 30 layers (pieces) In Photoshop CC, the action will prompt you to hit Stop and manually select up to 30 layers that will become the individual 3D objects. In Photoshop CS6 Extended you must select exactly 30 layers, no more, no less! Click on Stop and select the individual layers (pieces). If you select more than 30 layers, the action will stop in a latter step and ask you to start from the start. HOW TO USE YOUR MOUSE TO SELECT MULTIPLE PIECES: How to select the first layer: Press V and then right-click on the first piece whose layer you wish to select. A window pops-up; click on the layer name to select it: How to select the second (third, etc.) layer: Hold down Shift and right-click on the next piece that you wish to select; click on the layer name in the popup window. Repeat to select additional pieces. NOTE: In the Classic puzzles actions the pieces are arranged in rows and columns. The layer name format is: Row X X, indicating the position of the respective piece. For example layer Row 3 4 represents the 4 th piece in the 3 rd row. Alternatively you can use the Layers panel to select up to 30 pieces (layers). Hold down Ctrl (Mac: cmd) and click on each layer that you want to turn into an individual 3D object. Make a last check on the Layers panel to confirm that you have selected no more than 30 layers. Then click the Play button at the bottom of the Actions Panel, to resume the action: 12


15 From 2D to 3D Each one of the layers you selected will be transformed into an individual 3D object, that has its own properties and that can be moved or scaled in 3D. The creation of the 3D meshes may take some time, depending on the size of the image and the number of 3D objects. When it finishes, the action will prompt you to click on Continue if you have the English Photoshop version, or Stop if you have a different language version: If you have a non-english Photoshop version hit Stop; the few remaining action steps are language dependent and won t run in your version. Please refer to the extra PDF guide that is included in the product ZIP file, to find out the steps you need to perform manually. If you have the English Photoshop version, click on Continue. The action will add a reflection, and modify an array of 3D materials settings as well as the 3D lights. The action has finished its complex job. You should see the following message: Click on Stop. Then go to the Actions Panel and click the little down-arrow to the left of the action name you used, to collapse the action steps: 13

.")
16 Editing the 3D Scene At this point your 3D puzzle should look like this: At the first glance it doesn t look very 3D ish. Well, the reality is different. Time to dive in the 3D world! The action has already switched to the 3D workspace, because the 3D Panel becomes indispensable and should be omnipresent. The pieces that you turned into individual 3D objects are named Piece 1, Piece 2,., Piece X (where X<=20). All the other pieces have been merged into a single 3D object called All other pieces. In Photoshop CC, these 3D objects are grouped under Scene Objects : 14
.")

17 By default the 3D puzzle is displayed in a standing position (it stands vertically to the ground plane). To switch to a laying position, do the following: Click on Scene Objects on the 3D Panel (in CS6 click on Scene ). Go to the Properties panel and enter 90 in the X angle: Select 3D > Move Object to Ground Plane in Photoshop s menu. TIP: at this point I recommend you create a new snapshot in the History Panel, to be able to revert any changes you make. Let s change the position of the camera. Go to the 3D Panel and click on Current View : Press V ; click any the five tools at the top of your work area and use your mouse to change the camera position: Here s how my puzzle looks like, at this step: 15
.")


: You may even select multiple 3D objects in the 3D Panel and move")
18 Now let s detach, move and rotate the individual pieces. Go to the 3D Panel and click the second tab (called Filter By: Meshes). This tab shows the various individual 3D objects that make up the 3D scene: When you select any of these 3D objects, the 3D axes appear above the respective piece, on the puzzle image: Use your mouse on the 3D axes to move / rotate the piece: Do the same for the other pieces (select the piece in the 3D Panel and use your mouse to move it in 3D): You may even select multiple 3D objects in the 3D Panel and move / rotate them together. 16
: Then drag with your mouse to change")

19 HOW TO CHANGE THE DEFAULT 3D LIGHT SETTINGS: Go to the 3D Panel and click the fourth tab ( Filter By: Lights ): Then drag with your mouse to change the direction of the light source to your liking: Go to the Properties Panel, and change the Intensity and the Softness of the 3D light to your preference: 17
.")

.")
20 HOW TO CHANGE THE THICKNESS OF THE PIECES: Go to the 3D Panel and click the second tab ( Filter By: Meshes ). Hold down Shift and select all objects: Go to the Properties Panel, click the first tab and modify the Extrusion Depth to taste: HOW TO CHANGE THE EXTRUSION MATERIAL OF THE PIECES: The actions use Cork as the extrusion material for the pieces: To change the extrusion material, go to the 3D Panel and click the third tab ( Filter By: Materials ). Hold down the Ctrl key (Mac: cmd) and click to select all Extrusion Materials : 18

21 Go to the Properties Panel. Click the Materials dropdown list and select a material of your taste. RENDERING THE 3D SCENE: What you see on your screen so far is just a draft representation of the final image. To render it select 3D > Render from the menu. Alternatively you can press Shift-Ctrl-Alt-R (Mac: Shift-cmd-option-R), or click the render button on the 3D Panel or the Properties Panel. Rendering takes time to complete. You don t have to wait until it s done 100% : you can press the Esc key and stop it when you feel that the quality of rendered image is adequate for your needs Using the Classic actions in GROUP 2 The actions in GROUP 2 work similarly to those in GROUP 1. You must open a photo of landscape ratio prior to running the actions. Then you must select one of the actions in GROUP 2 and hit the Play button. The action will prompt you to change the image size (optional) and then modify the layer styles of the pieces, as was described in and Unlike the actions in GROUP 1, the actions in GROUP 2 won t ask you to stop and manually select up to 20 layers. They will automatically turn each 2D piece into a unique 3D object. This will take some time, depending on the size of your photo and the number of pieces. The next steps are exactly the same as those described in and

22 4. USING THE SPECIAL 3D PUZZLES ACTIONS 4.1. Introduction The Special 3D Puzzles actions are categorized in two groups: GROUP 1 GROUP 2 The reason for this categorization is described in

23 4.2. Using the Special actions in GROUP Load and crop the photo Begin with loading a photo of any aspect ratio. Select one of the actions in GROUP 1 and hit the Play button. The action creates a vector shape that serves two purposes: It lets you d efine which pixels will be included in the puzzle. It lets you preview the exact edges of each piece. Drag any of the 4 corner handles to resize the shape. Do not drag any of the middle handles. You can also rotate or move the vector shape using your mouse. When you finish, double click inside the shape to move on. The action will crop the photo and cut the puzzle pieces. The action will encourage you to downsize your photo, if it is too big. Use this (optional) step to create 3D puzzles that can be edited more efficiently and effectively. Click on Continue. Then change the image size to your preference, or hit OK to use the original image size Create and edit the 3D scene The remaining steps let you: Modify the layer style of the puzzle pieces (refer to ). Manually select up to 20 pieces that will become individual 3D objects (refer to ). Create the 3D puzzle (refer to ). Edit the 3D scene (refer to ). 21
24 4.3. Using the Special actions in GROUP 2 The actions in GROUP 2 work similarly to those in GROUP 1. The only difference is that you don t have to stop the action, select up to 20 layers and resume the execution: the actions in GROUP 2 will automatically turn each 2D piece into an individual 3D object. To recap: Start with opening one photo and running one of the actions in GROUP 2. The action will create a vector shape that defines the pixels that will be included in the puzzle. Resize, rotate, move the shape. When you are ready, double click to move on. Lower the size of the cropped photo (optional) if it is very big. The action will then create the 3D puzzle. Refer to and to find out how to edit the 3D scene. If you have any questions, please use the contact form on PanosFX.com, or use the site forum. Panos Efstathiadis 22


25 The photos used in this guide were kindly provided by Shutterstock. The Shutterstock image IDs are as follows: jpg jpg jpg jpg jpg jpg jpg jpg 23
PUZZLE EFFECTS 3D User guide PUZZLE EFFECTS 3D. Photoshop actions. For PS CC and CS6 Extended. User Guide
 PUZZLE EFFECTS 3D Photoshop actions For PS CC and CS6 Extended User Guide CONTENTS 1. THE BASICS... 1 1.1. About the actions... 1 1.2. How the actions are organized... 1 1.3. The Classic effects (examples)...
PUZZLE EFFECTS 2D Photoshop actions For Photoshop CC, CS6, CS5, CS4
 PUZZLE EFFECTS 2D Photoshop actions For Photoshop CC, CS6, CS5, CS4 User Guide CONTENTS 1. THE BASICS... 1 1.1. About the actions... 1 1.2. How the actions are organized... 1 1.3. The Classic effects (examples)...
JIGSAW PUZZLES User guide JIGSAW PUZZLES. Photoshop Elements actions. For PSE 2019, 2018, 15, 14, 13, 12, 11. User Guide
 JIGSAW PUZZLES Photoshop Elements actions For PSE 2019, 2018, 15, 14, 13, 12, 11 User Guide CONTENTS 1. THE BASICS...1 1.1. About the actions... 1 1.2. How the actions are organized... 1 1.3. The Classic
RETRO User guide RETRO. Photoshop actions. For PS CC, CS6, CS5, CS4. User Guide
 RETRO Photoshop actions For PS CC, CS6, CS5, CS4 User Guide CONTENTS 1. THE BASICS... 1 1.1. About the effects... 1 1.2. How the actions are organized... 1 1.3. Installing the actions in Photoshop... 2
VECTOR ART - User Guide VECTOR ART. For Adobe Photoshop CC, CS6, CS5, CS4. User Guide
 VECTOR ART For Adobe Photoshop CC, CS6, CS5, CS4 User Guide TABLE OF CONTENTS 1. THE BASICS... 1 1.1. About the effects... 1 1.2. How the actions are organized... 1 2. INSTALLATION & TROUBLESHOOTING...
PanosFX CARTOONS User guide PANOSFX CARTOONS. Photoshop actions - for PS CC, CS6, CS5, CS4, CS3. User Guide
 PANOSFX CARTOONS Photoshop actions - for PS CC, CS6, CS5, CS4, CS3 User Guide CONTENTS 1. THE BASICS... 1 1.1. About the effects... 1 1.2. How the actions are organized... 1 1.3. Installing the actions
PanosFX CARTOONS User guide PANOSFX CARTOONS. Photoshop actions - for PS CC, CS6, CS5, CS4. User Guide
 PANOSFX CARTOONS Photoshop actions - for PS CC, CS6, CS5, CS4 User Guide CONTENTS 1. THE BASICS... 1 1.1. About the effects... 1 1.2. How the actions are organized... 1 1.3. Installing the actions in Photoshop...
VECTOR PAINTINGS - User Guide VECTOR PAINTINGS. For Adobe Photoshop Elements 2019, 2018, 15, 14, 13, 12, 11. User Guide
 VECTOR PAINTINGS For Adobe Photoshop Elements 2019, 2018, 15, 14, 13, 12, 11 User Guide CONTENTS 1. THE BASICS...1 1.1. About the effects...1 1.2. How the actions are organized...1 1.3. Downloading and
SAVING, LOADING AND REUSING LAYER STYLES
 SAVING, LOADING AND REUSING LAYER STYLES In this Photoshop tutorial, we re going to learn how to save, load and reuse layer styles! Layer styles are a great way to create fun and interesting photo effects
12. Creating a Product Mockup in Perspective
 12. Creating a Product Mockup in Perspective Lesson overview In this lesson, you ll learn how to do the following: Understand perspective drawing. Use grid presets. Adjust the perspective grid. Draw and
VECTOR PAINTINGS - User Guide VECTOR PAINTINGS. For Adobe Photoshop CC, CS6, CS5, CS4, CS3. User Guide
 VECTOR PAINTINGS For Adobe Photoshop CC, CS6, CS5, CS4, CS3 User Guide TABLE OF CONTENTS 1. THE BASICS...1 1.1. About the effects...1 1.2. How the actions are organized...1 1.3. Downloading and installing
Mid_Term_Review_PhotoShop_Design Test B Name
 Mid_Term_Review_PhotoShop_Design Test B Name Multiple Choice Identify the choice that best completes the statement or answers the question. 1. Photoshop uses a mathematical process called when it changes
How to Create Website Banners
 How to Create Website Banners In the following instructions you will be creating banners in Adobe Photoshop Elements 6.0, using different images and fonts. The instructions will consist of finding images,
Creating Photo Borders With Photoshop Brushes
 Creating Photo Borders With Photoshop Brushes Written by Steve Patterson. In this Photoshop photo effects tutorial, we ll learn how to create interesting photo border effects using Photoshop s brushes.
Photoshop 1. click Create.
 Photoshop 1 Step 1: Create a new file Open Adobe Photoshop. Create a new file: File->New On the right side, create a new file of size 600x600 pixels at a resolution of 300 pixels per inch. Name the file
Step 1: Open A Photo To Place Inside Your Text
 Place A Photo Or Image In Text In Photoshop In this Photoshop tutorial, we re going to learn how to place a photo or image inside text, a very popular thing to do in Photoshop, and also a very easy thing
METAL TEXT EFFECT. Step 1: Create A New Document. Step 2: Fill The Background With Black
 METAL TEXT EFFECT In this text effects tutorial, we ll learn how to easily create metal text, a popular effect widely used in video games and movie posters! It may seem like there s a lot of steps involved,
Photoshop CC Editing Images
 Photoshop CC Editing Images Rotate a Canvas A canvas can be rotated 90 degrees Clockwise, 90 degrees Counter Clockwise, or rotated 180 degrees. Navigate to the Image Menu, select Image Rotation and then
Key Terms. Where is it Located Start > All Programs > Adobe Design Premium CS5> Adobe Photoshop CS5. Description
 Adobe Adobe Creative Suite (CS) is collection of video editing, graphic design, and web developing applications made by Adobe Systems. It includes Photoshop, InDesign, and Acrobat among other programs.
Understanding OpenGL
 This document provides an overview of the OpenGL implementation in Boris Red. About OpenGL OpenGL is a cross-platform standard for 3D acceleration. GL stands for graphics library. Open refers to the ongoing,
Managing images with NewZapp
 Managing images with NewZapp This guide is for anyone using the NewZapp Fixed editor as opposed to the Drag and Drop editor. The Image Manager is where images are uploaded and stored in your NewZapp account
Alibre Design Tutorial: Loft, Extrude, & Revolve Cut Loft-Tube-1
 Alibre Design Tutorial: Loft, Extrude, & Revolve Cut Loft-Tube-1 Part Tutorial Exercise 5: Loft-Tube-1 [Complete] In this Exercise, We will set System Parameters first, then part options. Then, in sketch
Adobe Photoshop CS5 Tutorial
 Adobe Photoshop CS5 Tutorial GETTING STARTED Adobe Photoshop CS5 is a popular image editing software that provides a work environment consistent with Adobe Illustrator, Adobe InDesign, Adobe Photoshop
Resizing Images for Competition Entry
 Resizing Images for Competition Entry Dr Roy Killen, EFIAP, GMPSA, APSEM TABLE OF CONTENTS Some Basic Principles 1 An Simple Way to Resize and Save Files in Photoshop 5 An Alternative way to Resize Images
Adobe Photoshop CS2 Workshop
 COMMUNITY TECHNICAL SUPPORT Adobe Photoshop CS2 Workshop Photoshop CS2 Help For more technical assistance, open Photoshop CS2 and press the F1 key, or go to Help > Photoshop Help. Selection Tools - The
Introduction to Photoshop CS6
 Introduction to Photoshop CS6 Copyright 2016, Faculty and Staff Training, West Chester University. A member of the Pennsylvania State System of Higher Education. No portion of this document may be reproduced
TURN A PHOTO INTO A PATTERN OF COLORED DOTS (CS6)
") TURN A PHOTO INTO A PATTERN OF COLORED DOTS (CS6) In this photo effects tutorial, we ll learn how to turn a photo into a pattern of solid-colored dots! As we ll see, all it takes to create the effect is
TURN A PHOTO INTO A PATTERN OF COLORED DOTS (CS6) In this photo effects tutorial, we ll learn how to turn a photo into a pattern of solid-colored dots! As we ll see, all it takes to create the effect is
ADD A REALISTIC WATER REFLECTION
 ADD A REALISTIC WATER REFLECTION In this Photoshop photo effects tutorial, we re going to learn how to easily add a realistic water reflection to any photo. It s a very easy effect to create and you can
LESSON 02: GET STRONGER FOR PS USERS COMPANION BOOK. Digital Scrapbook Academy. February 2018: Lesson 02 Get Stronger for Photoshop Users
 Digital Scrapbook Academy February 2018: Lesson 02 LESSON 02: GET STRONGER FOR PS USERS COMPANION BOOK Page 1 of 19 Table of Contents Table of Contents 2 Welcome to Lesson 02 for Photoshop Users 4 1: Add
NOISEWARE 5 USER'S GUIDE PLUG-IN BY IMAGENOMIC
 NOISEWARE 5 PLUG-IN USER'S GUIDE BY IMAGENOMIC 2012 Updated May 17, 2012 Contact Imagenomic at http://www.imagenomic.com/contact Copyright 2004-2012 Imagenomic, LLC. All rights reserved 2 TABLE OF CONTENTS
PHOTOSHOP PUZZLE EFFECT
 PHOTOSHOP PUZZLE EFFECT In this Photoshop tutorial, we re going to look at how to easily create a puzzle effect, allowing us to turn any photo into a jigsaw puzzle! Or at least, we ll be creating the illusion
Photo Within A Photo - Photoshop
 Photo Within A Photo - Photoshop Here s the image I ll be starting with: The original image. And here s what the final "photo within a photo" effect will look like: The final result. Let s get started!
ADOBE BRIDGE. Help and tutorials
 ADOBE BRIDGE Help and tutorials September 2013 Contents What s new... 1 What s new in Adobe Bridge CC... 2 What s new in Adobe Bridge CS6... 4 Adobe Bridge... 5 About Adobe Bridge... 6 Start Adobe Bridge...
Photoshop CS2. Step by Step Instructions Using Layers. Adobe. About Layers:
 About Layers: Layers allow you to work on one element of an image without disturbing the others. Think of layers as sheets of acetate stacked one on top of the other. You can see through transparent areas
Using Adobe Photoshop
 Using Adobe Photoshop 6 One of the most useful features of applications like Photoshop is the ability to work with layers. allow you to have several pieces of images in the same file, which can be arranged
PHOTOSHOP1 15 / WORKSPACE
 MassArt Studio Foundation: Visual Language Digital Media Cookbook, Fall 2013 PHOTOSHOP1 15 / WORKSPACE Imaging software, just like our computers, relies on metaphors from the physical world for their design.
Photoshop: a Beginner s course. by: Charina Ong Centre for Development of Teaching and Learning National University of Singapore
 Photoshop: a Beginner s course by: Charina Ong Centre for Development of Teaching and Learning National University of Singapore Table of Contents About the Workshop... 1 Prerequisites... 1 Workshop Objectives...
Photoshop CC 2018 Essential Skills
 Photoshop CC 2018 Essential Skills Adobe Photoshop Creative Cloud 2018 University Information Technology Services Learning Technology, Training, Audiovisual and Outreach Copyright 2018 KSU Division of
Table of Contents. Lesson 1 Getting Started
 NX Lesson 1 Getting Started Pre-reqs/Technical Skills Basic computer use Expectations Read lesson material Implement steps in software while reading through lesson material Complete quiz on Blackboard
COMPUTING CURRICULUM TOOLKIT
 COMPUTING CURRICULUM TOOLKIT Pong Tutorial Beginners Guide to Fusion 2.5 Learn the basics of Logic and Loops Use Graphics Library to add existing Objects to a game Add Scores and Lives to a game Use Collisions
ADDING RAIN TO A PHOTO
 ADDING RAIN TO A PHOTO Most of us would prefer to avoid being caught in the rain if possible, especially if we have our cameras with us. But what if you re one of a large number of people who enjoy taking
Color and More. Color basics
 Color and More In this lesson, you'll evaluate an image in terms of its overall tonal range (lightness, darkness, and contrast), its overall balance of color, and its overall appearance for areas that
Photoshop Essentials Workshop
 Photoshop Essentials Workshop Robert Rector idesign Lab - Fall 2013 What is Photoshop? o Photoshop is a graphics editing program. Despite the name it is used for way more than just photo editing! What
REALGRAIN 2 USER'S GUIDE PLUG-IN BY IMAGENOMIC
 REALGRAIN 2 PLUG-IN USER'S GUIDE BY IMAGENOMIC 2013 Realgrain 2 Plug-in User's Guide Realgrain 2 Plug-in User's Guide Updated July 12, 2013 Contact Imagenomic at http://www.imagenomic.com/contact Copyright
PHOTOSHOP DESIGN EFFECTS FOR INTERMEDIATE TO ADVANCED USERS
 PHOTOSHOP DESIGN EFFECTS FOR INTERMEDIATE TO ADVANCED USERS Copyright 2012, National Seminars Training Introduction This class is all about design effects in Adobe Photoshop. For example, let s say that
SolidWorks Tutorial 1. Axis
 SolidWorks Tutorial 1 Axis Axis This first exercise provides an introduction to SolidWorks software. First, we will design and draw a simple part: an axis with different diameters. You will learn how to
House Design Tutorial
 House Design Tutorial This House Design Tutorial shows you how to get started on a design project. The tutorials that follow continue with the same plan. When you are finished, you will have created a
Add Rays Of Sunlight To A Photo With Photoshop
 Add Rays Of Sunlight To A Photo With Photoshop Written by Steve Patterson. In this photo effects tutorial, we'll learn how to easily add rays of sunlight to an image, a great way to make an already beautiful
ADOBE 9A Adobe Photoshop CS3 ACE.
 ADOBE Adobe Photoshop CS3 ACE http://killexams.com/exam-detail/ A. Group the layers. B. Merge the layers. C. Link the layers. D. Align the layers. QUESTION: 112 You want to arrange 20 photographs on a
KODAK DIGITAL ROC Professional Plug-In 2.1
 KODAK DIGITAL ROC Professional Plug-In 2.1 Installing Kodak's DIGITAL ROC Professional Plug-In If you have not downloaded and installed DIGITAL ROC Professional, go to: http://www.asf.com/download/ Download
Perspective Shadow Text Effect In Photoshop
 Perspective Shadow Text Effect In Photoshop Written by Steve Patterson. In this Photoshop text effects tutorial, we ll learn how to create a popular, classic effect by giving text a perspective shadow
REVIT - RENDERING & DRAWINGS
 TUTORIAL L-15: REVIT - RENDERING & DRAWINGS This Tutorial explains how to complete renderings and drawings of the bridge project within the School of Architecture model built during previous tutorials.
11 Advanced Layer Techniques
 11 Advanced Layer Techniques After you ve learned basic layer techniques, you can create more complex effects in your artwork using layer masks, path groups, filters, adjustment layers, and more style
Adobe Photoshop CC 2018 Tutorial
 Adobe Photoshop CC 2018 Tutorial GETTING STARTED Adobe Photoshop CC 2018 is a popular image editing software that provides a work environment consistent with Adobe Illustrator, Adobe InDesign, Adobe Photoshop,
Copyright Notice. Trademarks
 Copyright Notice All rights reserved. No part of this publication may be reproduced, stored in a retrieval system, or transmitted in any form or by any means, electronic, mechanical, photocopying, recording,
Introduction to Photoshop
 Introduction to Photoshop Instructional Services at KU Libraries A Division of Information Services www.lib.ku.edu/instruction Abstract: This course covers the basics of Photoshop, including common tools
Next Back Save Project Save Project Save your Story
 What is Photo Story? Photo Story is Microsoft s solution to digital storytelling in 5 easy steps. For those who want to create a basic multimedia movie without having to learn advanced video editing, Photo
Advance Dimensioning and Base Feature Options
 Chapter 4 Advance Dimensioning and Base Feature Options Learning Objectives After completing this chapter you will be able to: Dimension the sketch using the autodimension sketch tool. Dimension the sketch
Photoshop CS6 automatically places a crop box and handles around the image. Click and drag the handles to resize the crop box.
 CROPPING IMAGES In Photoshop CS6 One of the great new features in Photoshop CS6 is the improved and enhanced Crop Tool. If you ve been using earlier versions of Photoshop to crop your photos, you ll find
CS Problem Solving and Structured Programming Lab 1 - Introduction to Programming in Alice designed by Barb Lerner Due: February 9/10
 CS 101 - Problem Solving and Structured Programming Lab 1 - Introduction to Programming in lice designed by Barb Lerner Due: February 9/10 Getting Started with lice lice is installed on the computers in
This Photoshop Tutorial 2012 Steve Patterson, Photoshop Essentials.com. Not To Be Reproduced Or Redistributed Without Permission.
 How To Replace The Sky In A Photo In this Photoshop tutorial, we ll learn how to easily replace the sky in a photo! We ll use a basic selection tool and a layer mask to separate the sky from the area below
User Guide. Version 1.2. Copyright Favor Software. Revised:
 User Guide Version 1.2 Copyright 2009-2010 Favor Software Revised: 2010.05.18 Table of Contents Introduction...4 Installation on Windows...5 Installation on Macintosh...6 Registering Intwined Pattern Studio...7
User Guide. Version 1.4. Copyright Favor Software. Revised:
 User Guide Version 1.4 Copyright 2009-2012 Favor Software Revised: 2012.02.06 Table of Contents Introduction... 4 Installation on Windows... 5 Installation on Macintosh... 6 Registering Intwined Pattern
Getting Started. with Easy Blue Print
 Getting Started with Easy Blue Print User Interface Overview Easy Blue Print is a simple drawing program that will allow you to create professional-looking 2D floor plan drawings. This guide covers the
Lab for Working with Adobe Photoshop
 Lab for Working with Adobe Photoshop Try the tasks listed with one of the sample images supplied (You will find them in the Course Materials section of Blackboard as the file sample_images.zip. You will
Organizing artwork on layers
 3 Layer Basics Both Adobe Photoshop and Adobe ImageReady let you isolate different parts of an image on layers. Each layer can then be edited as discrete artwork, allowing unlimited flexibility in composing
Blab Gallery Uploads: How to Reduce and/or Rotate Your Photo Last edited 11/20/2016
 Blab Gallery Uploads: How to Reduce and/or Rotate Your Photo Contents & Links QUICK LINK-JUMPS to information in this PDF document Photo Editors General Information Includes finding pre-installed editors
Okay, that s enough talking. Let s get things started. Here s the photo I m going to be using in this tutorial: The original photo.
 add visual interest with the rule of thirds In this Photoshop tutorial, we re going to look at how to add more visual interest to our photos by cropping them using a simple, tried and true design trick
SHAPE CLUSTER PHOTO DISPLAY
 SHAPE CLUSTER PHOTO DISPLAY In this Photoshop tutorial, we ll learn how to display a single photo as a cluster of shapes, similar to larger wall cluster displays where several photos, usually in different
Creating a Frame by Frame Animation for PhotoStory
 Creating a Frame by Frame Animation for PhotoStory There are an unlimited number of animation styles that you can create using the PhotoShop Elements software. Depending on the type of animation you want,
prepared by Allison Hwang for T. Purdy 2011
 This tutorial shows you how to create a basic screen display on a product in Adobe Photoshop. Creating details, such as shadows and reflections, can help make your product more realistic and convincing
OzE Field Modules. OzE School. Quick reference pages OzE Main Opening Screen OzE Process Data OzE Order Entry OzE Preview School Promotion Checklist
 1 OzE Field Modules OzE School Quick reference pages OzE Main Opening Screen OzE Process Data OzE Order Entry OzE Preview School Promotion Checklist OzESchool System Features Field unit for preparing all
Pull Down Menu View Toolbar Design Toolbar
 Pro/DESKTOP Interface The instructions in this tutorial refer to the Pro/DESKTOP interface and toolbars. The illustration below describes the main elements of the graphical interface and toolbars. Pull
IT154 Midterm Study Guide
 IT154 Midterm Study Guide These are facts about the Adobe Photoshop CS4 application. If you know these facts, you should be able to do well on your midterm. Photoshop CS4 is part of the Adobe Creative
Lesson 16 Text, Layer Effects, & Filters
 Lesson 16 Text, Layer Effects, & Filters Digital Media I Susan M. Raymond West High School In this tutorial, you will: Create a Type Layer Add and Format Type within a Type Layer Apply Layer Effects Apply
The original image. Let s get started! The final effect.
 Non-Destructive Infrared Glow Effect In this Photoshop tutorial, we ll learn how to quickly and easily add a dream-like infrared glow effect to an image, and we ll do it non-destructively using Smart Filters
Photoshop Weather Effects Rain
 Photoshop Weather Effects Rain In this photo effects tutorial, we ll learn how to add a simple yet convincing rain effect to a photo, a great way to add mood and atmosphere, without getting your camera
Photo/Image Controls
 Table of Contents Introduction... 2 Using Image Controls... 2 Using the Image Editor... 3 19 July 2017 TIP-2017-092 1 Introduction The Edge s photo controls now include image editing options. This document
4 LAYER BASICS. Lesson overview
 4 LAYER BASICS Lesson overview In this lesson, you ll learn how to do the following: Organize artwork on layers. Create, view, hide, and select layers. Rearrange layers to change the stacking order of
A quick note: We hope that you will find something from the Tips and Tricks that will add a little pizazz to your yearbook pages!
 A quick note: The following pages are tips and tricks for Basic Photoshop users. You may notice that some instructions indicate that non-awpc fonts were used, and that some colors were created using the
Digital Scrapbooking, Your First Digital Layout using FotoFusion
 Digital Scrapbooking, Your First Digital Layout using FotoFusion Like paper scrapbooking, digital scrapbooking utilizes a combination of digital kits, papers, alphas, stamps, ribbons, and a variety of
You ve Been Framed! (Adobe Photoshop)
") You ve Been Framed! (Adobe Photoshop) Tip of the Week by Linda Sattgast on September 28, 2009 Do you have a great photo of someone special that you want to bring into sharp focus the special person, that
You ve Been Framed! (Adobe Photoshop) Tip of the Week by Linda Sattgast on September 28, 2009 Do you have a great photo of someone special that you want to bring into sharp focus the special person, that
ITEC185 INTRODUCTION TO DIGITAL MEDIA
 1 ITEC185 INTRODUCTION TO DIGITAL MEDIA ADOBE PHOTOSHOP ITEC185 - Introduction to Digital Media ITEC185 - Introduction to Digital Media 2 What is Adobe Photoshop? Photoshop is the leading professional
Recitation 2 Introduction to Photoshop
 Recitation 2 Introduction to Photoshop What is Adobe Photoshop? Adobe Photoshop is a tool for creating digital graphics either by starting with a scanned photograph or artwork or by creating the graphics
By Washan Najat Nawi
 By Washan Najat Nawi how to get started how to use the interface how to modify images with basic editing skills Adobe Photoshop: is a popular image-editing software. Two general usage of Photoshop Creating
Step 1: Create A New Photoshop Document
 Film Strip Photo Collage - Part 2 In part one of this two-part Photoshop tutorial, we learned how Photoshop s shape tools made it easy to draw a simple film strip which we can then use as a photo frame,
ADD TRANSPARENT TYPE TO AN IMAGE
 ADD TRANSPARENT TYPE TO AN IMAGE In this Photoshop tutorial, we re going to learn how to add transparent type to an image. There s lots of different ways to make type transparent in Photoshop, and in this
TEXT PERSPECTIVE SHADOW EFFECT
 TEXT PERSPECTIVE SHADOW EFFECT In this Photoshop text effects tutorial, we ll learn how to create a popular, classic effect by giving text a perspective shadow as if a light source behind the text was
Introduction to 3D Printing. Activity 1: Design a keychain using computer-aided design software
 Introduction to 3D Printing Activity 1: Design a keychain using computer-aided design software 1 In this activity we ll design a keychain name tag and learn the fundamentals of computer-aided design, the
4 layer BASiCS lesson overview 104
 4 layer basics Lesson overview In this lesson, you ll learn how to do the following: Organize artwork on layers. Create, view, hide, and select layers. Rearrange layers to change the stacking order of
In the following sections, if you are using a Mac, then in the instructions below, replace the words Ctrl Key with the Command (Cmd) Key.
 Key.") Mac Vs PC In the following sections, if you are using a Mac, then in the instructions below, replace the words Ctrl Key with the Command (Cmd) Key. Zoom in, Zoom Out and Pan You can use the magnifying
Mac Vs PC In the following sections, if you are using a Mac, then in the instructions below, replace the words Ctrl Key with the Command (Cmd) Key. Zoom in, Zoom Out and Pan You can use the magnifying
Creating a Watercolor Painting From a Photo. Open the photo you want to appear to be a watercolor painting. I am using the photo below:
 Creating a Watercolor Painting From a Photo Open the photo you want to appear to be a watercolor painting. I am using the photo below: Make any adjustments as needed like cropping the photo before preceding
Resizing for ACCC Competition. Rev 1.0 9/12/2011
 Resizing for ACCC Competition Rev 1.0 9/12/2011 This document contains instructions for resizing your images to comply with the new Digital Image Competition Guidelines. In this document we have attempted
WORN, TORN PHOTO EDGES EFFECT
 Photo Effects: CC - Worn, Torn Photo Edges Effect WORN, TORN PHOTO EDGES EFFECT In this Photoshop tutorial, we ll learn how to take the normally sharp, straight edges of an image and make them look all
Lab 3 Introduction to SolidWorks I Silas Bernardoni 10/9/2008
 1 Introduction This lab is designed to provide you with basic skills when using the 3D modeling program SolidWorks. You will learn how to build parts, assemblies and drawings. You will be given a physical
Turn A Photo Into A Collage Of Polaroids With Photoshop
 http://www.photoshopessentials.com/photo-effects/polaroids/ Turn A Photo Into A Collage Of Polaroids With Photoshop Written by Steve Patterson. In this Photoshop Effects tutorial, we ll learn how to take
The original image. Let s get started! The final rainbow effect. The photo sits on the Background layer in the Layers panel.
 Add A Realistic Rainbow To A Photo In this Photoshop photo effects tutorial, we ll learn how to easily add a rainbow, and even a double rainbow, to a photo! As we ll see, Photoshop ships with a ready-made
1. Create a 2D sketch 2. Create geometry in a sketch 3. Use constraints to position geometry 4. Use dimensions to set the size of geometry
 2.1: Sketching Many features that you create in Fusion 360 start with a 2D sketch. In order to create intelligent and predictable designs, a good understanding of how to create sketches and how to apply
Photoshop CS6 Basics. Using Layers to Create a Magazine Cover
 Photoshop CS6 Basics Using Layers to Create a Magazine Cover If you re using Photoshop Elements to do this project, the steps I cover in this tutorial will hopefully be useful to you as a guide Photoshop
ADOBE PHOTOSHOP CS TUTORIAL
 ADOBE PHOTOSHOP CS TUTORIAL A D O B E P H O T O S H O P C S Adobe Photoshop CS is a popular image editing software that provides a work environment consistent with Adobe Illustrator, Adobe InDesign, Adobe