JIGSAW PUZZLES User guide JIGSAW PUZZLES. Photoshop Elements actions. For PSE 2019, 2018, 15, 14, 13, 12, 11. User Guide
|
|
|
- Jonathan Golden
- 5 years ago
- Views:
Transcription

1 JIGSAW PUZZLES Photoshop Elements actions For PSE 2019, 2018, 15, 14, 13, 12, 11 User Guide
2 CONTENTS 1. THE BASICS About the actions How the actions are organized The Classic effects (examples) The Special effects (examples) INSTALLATION & TROUBLESHOOTING Installing the actions in Photoshop Removing an older version (or a trial one) Requirements Troubleshooting USING THE CLASSIC PUZZLES ACTIONS Creating the Puzzle The various layers Modifying the style of the pieces Moving individual pieces USING THE SPECIAL PUZZLES ACTIONS Creating the Puzzle The various layers Modifying the style of the pieces... 16

3 1. THE BASICS 1.1. About the actions The Jigsaw Puzzles actions turn your photos into digital jigsaw puzzles. Each piece is an individual layer; this lets you create impressive puzzles in Photoshop Elements, and in other programs that can import PSD files. The actions create a remarkable range of different jigsaw puzzles. This guide describes the way the actions work How the actions are organized The Jigsaw Puzzles include two sets of Photoshop actions: The Classic effects. The Special effects. 1


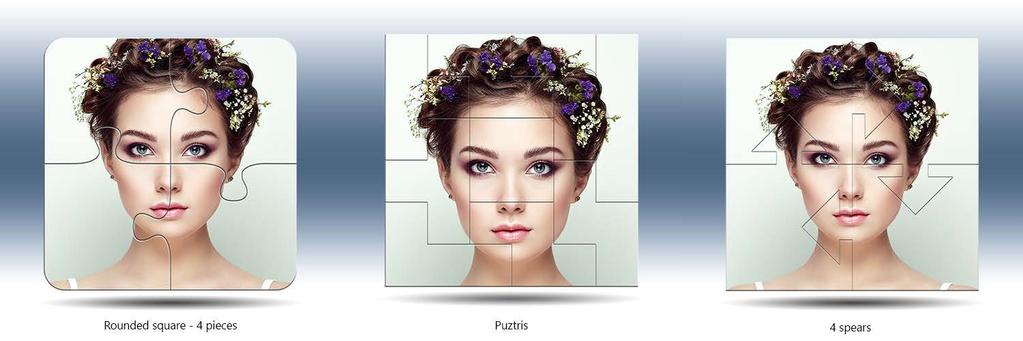
4 The Classic Puzzle effects, as the name indicates, replicate the look of a classic paperboard jigsaw puzzle. You can turn your photos into digital puzzles with up to 210 pieces. What s exceptionally useful is that each piece is an individual Photoshop layer. This allows you to move & rotate individual pieces or even whole groups of pieces! The Special Puzzle effects include an impressive assortment of creative puzzle effects, such as spiral puzzles (like the example on the right), hearts, or diamonds, to name a few. 2

5 1.3. The Classic effects (examples) The examples below demonstrate the 14 puzzles produced by the Classic actions: 3

6 4
")


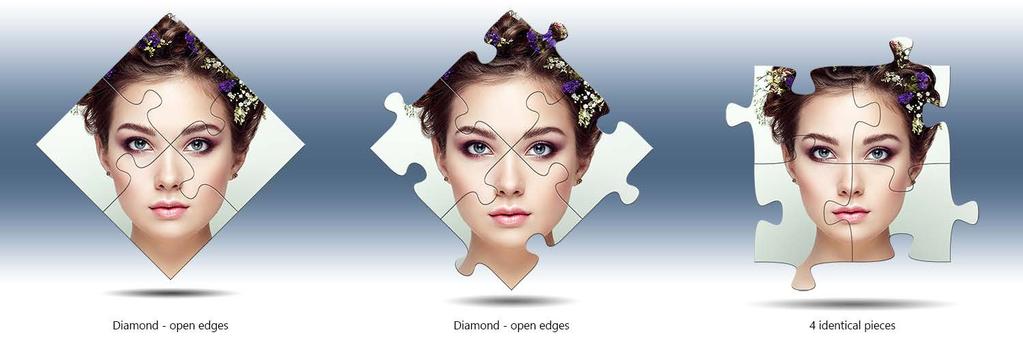
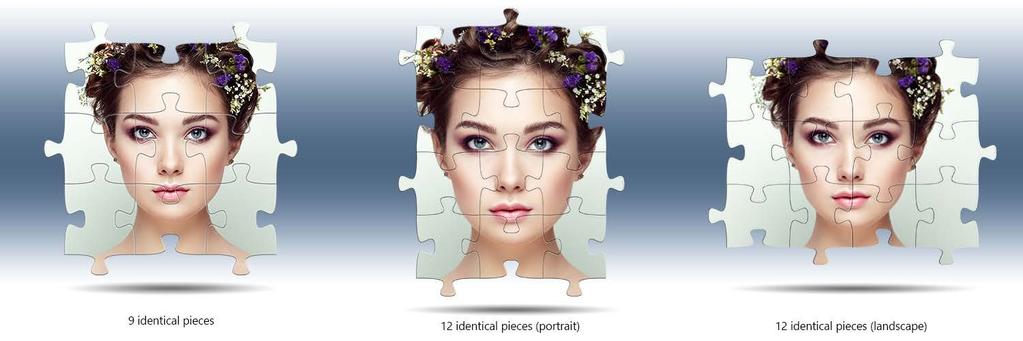
7 1.4. The Special effects (examples) The examples below demonstrate the 23 effects produced by the Special actions: 5

8 6

9 7
10 2. INSTALLATION & TROUBLESHOOTING 2.1. Installing the actions in Photoshop If you don t know how to install and use Photoshop actions, please refer to this article on PanosFX.com: Removing an older version (or a trial one) If you have an older product version installed, or if you installed the trial version before purchasing the full one, I recommend you remove it prior to installing the new files. This article shows you how to do it: Requirements The 2D Puzzles actions can be used with Photoshop Elements 11 or newer. Your system should meet the minimum requirements to run Photoshop, as provided by Adobe: Troubleshooting Make sure you read the following pages, in order to understand how the actions work. If you notice that Photoshop behaves abnormally proceed with resetting the preferences the way described in this article: 8

11 3. USING THE CLASSIC PUZZLES ACTIONS 3.1. Creating the Puzzle The actions in the Classic set create 14 different jigsaw puzzles, with up to 210 individual pieces. All actions work in the same way. Load one photo of landscape orientation. If your photo has a portrait shape, rotate it by 90 degrees prior to running the actions using the menu command: Image > Image Rotation > 90 Clockwise. When the action finishes, restore the original orientation using the command: Image > Image Rotation > 90 Counter Clockwise. Select one of the Classic actions and hit the Play button. The action will cut the puzzle pieces and create a different layer for every piece. This may take a while, depending on the number of pieces and your system. To make the pieces look more realistic, the action applies a combination of layer styles on every piece. When all pieces are cut, the action prompts you to modify the default style setting for the top-left piece: Click on Continue. The action applies two layer styles on each piece: the Drop Shadow and Bevel : 9
. If you can t see the top left piece, hold down the Space key and drag the photo with your mouse.")
12 If your photo is very large, you will have to increase the bevel Size. In small photos you need to decrease it. While moving the bevel Size slider, observe the effect on the top left piece. For maximum accuracy, I recommend you zoom to 100%, by pressing Ctrl and the + key (Mac: cmd +). If you can t see the top left piece, hold down the Space key and drag the photo with your mouse. When you finish, press OK to move on. The layer style settings of the top-left piece will be copied to all other pieces. The puzzle will be ready in a few seconds: 10

13 3.2. The various layers When the action finishes, each piece is an individual layer in the Layers panel. In the Classic puzzle actions, all pieces are arranged in rows and columns. The layer name format is: Row X X, indicating the position of the respective piece on the puzzle. Example: The layer Row 1 3 represents the 3 rd piece in the 1 st row. The background is the last layer in the layers panel. You can select it and add a Gradient / Pattern / Solid Color adjustment layer. You may also delete this layer and insert a background image of your preference, using the File > Place command. Finally, you can modify the canvas size using either the Image > Resize > Canvas Size menu command, or the Crop tool. If you increase the canvas size, don t forget to fill the background layer with white color, using the Edit > Fill menu command Modifying the style of the pieces If you find that the pieces edges look very thick or very flat, you can go back and modify their layer style when the action finishes. Make sure you edit the style settings with the zoom set to 100%. Photoshop displays layer styles less accurately in different magnifications. When you zoom out (e.g. by pressing Ctrl/cmd and the - key), the piece bevels will look thicker, which may be misleading. To modify the layer styles of the pieces, follow these steps: Double click the fx button for the first layer. Modify the default settings and observe the change on the upper left piece. Press Ctrl + (Mac: cmd +) to zoom to 100%. If you can t see the top left piece, press Space and drag the photo with your mouse. Press OK to apply your changes. Right click the first layer thumbnail and select Copy Layer Style from the pop-up menu: Scroll down the Layers Panel, press Shift and click the layer of last puzzle piece. Right click on any layer thumbnail and select Paste Layer Style. This will apply the new style settings to all other pieces. 11

, press Ctrl-T (Mac: cmd-t).")
14 3.4. Moving individual pieces When the action finishes you can create an image that looks like an incomplete jigsaw puzzle, by moving one or more individual pieces, or even groups of pieces. This technique will make your puzzle images look even more interesting. To select one piece, right click on it and select its layer from the popup menu: To select additional pieces, hold down Shift-Alt (Mac: Shift-option) and right click on each piece. Having selected a piece (or multiple pieces), press Ctrl-T (Mac: cmd-t). Use your mouse to move and/or rotate the pieces: You may want to drag the selected layers at the top of the Layers Panel if they overlap with the other pieces. 12


15 4. USING THE SPECIAL PUZZLES ACTIONS 4.1. Creating the Puzzle The actions in the Special puzzles group create 23 different jigsaw puzzles. To begin, load one photo of any ratio in Photoshop. Select one action and hit the Play button. The action begins with laying a vector shape over your photo. It serves two purposes: It lets you define which pixels will be included in the puzzle. It lets you preview the exact edges of each piece. Drag any of the 4 corner handles to resize the shape. Do not drag any of the middle handles! You can also rotate or move the vector overlay using your mouse. When you finish, double click inside the vector shape to move on. The action will crop the photo and cut the individual puzzle pieces. While cutting the puzzle pieces, the action creates a unique layer for every puzzle piece. When it finishes, it will prompt you to modify the layer style of the top-left (or the top) piece: Note: In the Spiral & the 4 Concentric circles actions you will be asked to modify the style of the central piece. 13
. If you can t see the top left piece, hold down the Space key and drag the photo with your mouse.")
16 Click on Continue. The action applies two layer styles on each piece: the Drop Shadow and Bevel : While moving the Bevel Size slider, observe the effect on the top (or the top left) piece. For maximum accuracy, I recommend you zoom to 100%, by pressing Ctrl and the + key (Mac: cmd +). If you can t see the top left piece, hold down the Space key and drag the photo with your mouse. When you finish, press OK to move on. Your settings will then be copied to all pieces. The puzzle will be ready in a few seconds: 14
 and reposition it, or resize it to your preference. The background is the last layer in the layers panel.")
17 4.2. The various layers When the action finishes, each piece is an individual layer in the Layers Panel. The Shadow layer is located at the bottom of the layers panel, above the background layer. You can change its opacity to preference. You can also press Ctrl-T (Mac: cmd-t) and reposition it, or resize it to your preference. The background is the last layer in the layers panel. You can add a Gradient / Pattern / Solid Color adjustment layer. You may delete this layer and insert a background image of your preference, using the File > Place command. Finally, you can modify the canvas size using either the Image > Resize> Canvas Size menu command, or the Crop tool. If you increase the canvas size, do not forget to fill the background layer with white color using the Edit > Fill Layer command. Unlike the Classic puzzles actions, in the Special puzzles the pieces are not always arranged in rows and columns. This is the case e.g. in the Spiral puzzles or the Hearts. The layers naming approach is therefore different: the layer name indicates the position of the piece in the puzzle (e.g. Top, Left, etc.). In the Spiral puzzles, the numbering of the layers begins from the outer piece. 15
18 4.3. Modifying the style of the pieces The actions apply two layer styles on each piece: Bevel and Drop Shadow. If you find that the pieces edges look very thick or very flat, you can go back and modify their layer style when the action finishes. Make sure you edit the style settings with the zoom set to 100%. Photoshop displays layer styles less accurately in different magnifications. When you zoom out (e.g. by pressing Ctrl/cmd and the Minus key), the piece bevels will look thicker, which may be misleading. To modify the layer style of the pieces, follow these steps. Double click the fx button for the first puzzle piece layer: Modify the default settings and observe the effect on the layer (piece). Press OK to apply your changes. Right-click the first layer thumbnail and select Copy Layer Style from the menu: Scroll down the Layers Panel, press Shift and click the layer of last puzzle piece. Right click on any layer thumbnail and select Paste Layer Style. This will apply the new style settings to all other pieces. If you have any questions, please use the contact form on PanosFX.com, or use the site forum. Panos Efstathiadis 16

19 The photos used in this guide were kindly provided by Shutterstock. The Shutterstock IDs are as follows: jpg jpg 17
PUZZLE EFFECTS 2D Photoshop actions For Photoshop CC, CS6, CS5, CS4
 PUZZLE EFFECTS 2D Photoshop actions For Photoshop CC, CS6, CS5, CS4 User Guide CONTENTS 1. THE BASICS... 1 1.1. About the actions... 1 1.2. How the actions are organized... 1 1.3. The Classic effects (examples)...
PUZZLE EFFECTS 3D User guide PUZZLE EFFECTS 3D. Photoshop actions. For PS CC and CS6 Extended. User Guide
 PUZZLE EFFECTS 3D Photoshop actions For PS CC and CS6 Extended User Guide CONTENTS 1. THE BASICS... 1 1.1. About the actions... 1 1.2. How the actions are organized... 1 1.3. The Classic effects (examples)...
PUZZLE EFFECTS 3D User guide JIGSAW PUZZLES 3D. Photoshop CC actions. User Guide
 JIGSAW PUZZLES 3D Photoshop CC actions User Guide CONTENTS 1. THE BASICS...1 1.1. About the actions... 1 1.2. How the actions are organized... 1 1.3. The Classic effects (examples)... 3 1.4. The Special
RETRO User guide RETRO. Photoshop actions. For PS CC, CS6, CS5, CS4. User Guide
 RETRO Photoshop actions For PS CC, CS6, CS5, CS4 User Guide CONTENTS 1. THE BASICS... 1 1.1. About the effects... 1 1.2. How the actions are organized... 1 1.3. Installing the actions in Photoshop... 2
PanosFX CARTOONS User guide PANOSFX CARTOONS. Photoshop actions - for PS CC, CS6, CS5, CS4, CS3. User Guide
 PANOSFX CARTOONS Photoshop actions - for PS CC, CS6, CS5, CS4, CS3 User Guide CONTENTS 1. THE BASICS... 1 1.1. About the effects... 1 1.2. How the actions are organized... 1 1.3. Installing the actions
VECTOR PAINTINGS - User Guide VECTOR PAINTINGS. For Adobe Photoshop Elements 2019, 2018, 15, 14, 13, 12, 11. User Guide
 VECTOR PAINTINGS For Adobe Photoshop Elements 2019, 2018, 15, 14, 13, 12, 11 User Guide CONTENTS 1. THE BASICS...1 1.1. About the effects...1 1.2. How the actions are organized...1 1.3. Downloading and
VECTOR ART - User Guide VECTOR ART. For Adobe Photoshop CC, CS6, CS5, CS4. User Guide
 VECTOR ART For Adobe Photoshop CC, CS6, CS5, CS4 User Guide TABLE OF CONTENTS 1. THE BASICS... 1 1.1. About the effects... 1 1.2. How the actions are organized... 1 2. INSTALLATION & TROUBLESHOOTING...
PanosFX CARTOONS User guide PANOSFX CARTOONS. Photoshop actions - for PS CC, CS6, CS5, CS4. User Guide
 PANOSFX CARTOONS Photoshop actions - for PS CC, CS6, CS5, CS4 User Guide CONTENTS 1. THE BASICS... 1 1.1. About the effects... 1 1.2. How the actions are organized... 1 1.3. Installing the actions in Photoshop...
Step 1: Open A Photo To Place Inside Your Text
 Place A Photo Or Image In Text In Photoshop In this Photoshop tutorial, we re going to learn how to place a photo or image inside text, a very popular thing to do in Photoshop, and also a very easy thing
How to Create Website Banners
 How to Create Website Banners In the following instructions you will be creating banners in Adobe Photoshop Elements 6.0, using different images and fonts. The instructions will consist of finding images,
VECTOR PAINTINGS - User Guide VECTOR PAINTINGS. For Adobe Photoshop CC, CS6, CS5, CS4, CS3. User Guide
 VECTOR PAINTINGS For Adobe Photoshop CC, CS6, CS5, CS4, CS3 User Guide TABLE OF CONTENTS 1. THE BASICS...1 1.1. About the effects...1 1.2. How the actions are organized...1 1.3. Downloading and installing
prepared by Allison Hwang for T. Purdy 2011
 This tutorial shows you how to create a basic screen display on a product in Adobe Photoshop. Creating details, such as shadows and reflections, can help make your product more realistic and convincing
METAL TEXT EFFECT. Step 1: Create A New Document. Step 2: Fill The Background With Black
 METAL TEXT EFFECT In this text effects tutorial, we ll learn how to easily create metal text, a popular effect widely used in video games and movie posters! It may seem like there s a lot of steps involved,
TURN A PHOTO INTO A PATTERN OF COLORED DOTS (CS6)
") TURN A PHOTO INTO A PATTERN OF COLORED DOTS (CS6) In this photo effects tutorial, we ll learn how to turn a photo into a pattern of solid-colored dots! As we ll see, all it takes to create the effect is
TURN A PHOTO INTO A PATTERN OF COLORED DOTS (CS6) In this photo effects tutorial, we ll learn how to turn a photo into a pattern of solid-colored dots! As we ll see, all it takes to create the effect is
Key Terms. Where is it Located Start > All Programs > Adobe Design Premium CS5> Adobe Photoshop CS5. Description
 Adobe Adobe Creative Suite (CS) is collection of video editing, graphic design, and web developing applications made by Adobe Systems. It includes Photoshop, InDesign, and Acrobat among other programs.
Photo Within A Photo - Photoshop
 Photo Within A Photo - Photoshop Here s the image I ll be starting with: The original image. And here s what the final "photo within a photo" effect will look like: The final result. Let s get started!
SAVING, LOADING AND REUSING LAYER STYLES
 SAVING, LOADING AND REUSING LAYER STYLES In this Photoshop tutorial, we re going to learn how to save, load and reuse layer styles! Layer styles are a great way to create fun and interesting photo effects
Creative Cut-Outs. 1Go to File>New>Blank File to create a new document and enter. Projects EXTRAS: GET MORE ONLINE!
 ALL IMAGES MIKE RODRIGUEZ Creative Cut-Outs By Mike Rodriguez Are you interested in applying some of your rapidly developing layer skills? In the May/June issue, we covered the basics of layers (Layers
CREATE A BURNT EDGE EFFECT
 CREATE A BURNT EDGE EFFECT One of the all-time classic effects in Photoshop is the burnt edge, and there s lots of different ways to create it, but in this Adobe Photoshop tutorial, we re going to look
SHAPE CLUSTER PHOTO DISPLAY
 SHAPE CLUSTER PHOTO DISPLAY In this Photoshop tutorial, we ll learn how to display a single photo as a cluster of shapes, similar to larger wall cluster displays where several photos, usually in different
Organizing artwork on layers
 3 Layer Basics Both Adobe Photoshop and Adobe ImageReady let you isolate different parts of an image on layers. Each layer can then be edited as discrete artwork, allowing unlimited flexibility in composing
Photo One Digital Photo Shoots and Edits
 Photo One Digital Photo Shoots and Edits You will submit photo shoots, unedited and you will submit selected edited images. The shoots will be explained first and the edits will be explained later on this
Managing images with NewZapp
 Managing images with NewZapp This guide is for anyone using the NewZapp Fixed editor as opposed to the Drag and Drop editor. The Image Manager is where images are uploaded and stored in your NewZapp account
Photoshop CC 2018 Essential Skills
 Photoshop CC 2018 Essential Skills Adobe Photoshop Creative Cloud 2018 University Information Technology Services Learning Technology, Training, Audiovisual and Outreach Copyright 2018 KSU Division of
BORDERS AND FRAMES - DROP SHADOW
 BORDERS AND FRAMES - DROP SHADOW In this tutorial in our series on creating photo borders and frames in Photoshop, we ll learn how to quickly add canvas space and a drop shadow to an image to create a
The original image. Let s get started! The final result.
 Miniature Effect With Tilt-Shift In Photoshop CS6 In this tutorial, we ll learn how to create a miniature effect in Photoshop CS6 using its brand new Tilt-Shift blur filter. Tilt-shift camera lenses are
Photoshop CS2. Step by Step Instructions Using Layers. Adobe. About Layers:
 About Layers: Layers allow you to work on one element of an image without disturbing the others. Think of layers as sheets of acetate stacked one on top of the other. You can see through transparent areas
WORN, TORN PHOTO EDGES EFFECT
 Photo Effects: CC - Worn, Torn Photo Edges Effect WORN, TORN PHOTO EDGES EFFECT In this Photoshop tutorial, we ll learn how to take the normally sharp, straight edges of an image and make them look all
Add Rays Of Sunlight To A Photo With Photoshop
 Add Rays Of Sunlight To A Photo With Photoshop Written by Steve Patterson. In this photo effects tutorial, we'll learn how to easily add rays of sunlight to an image, a great way to make an already beautiful
The original photo. The final result.
 giving a photo painted edges In this Adobe Photoshop tutorial, we re going to combine a couple of different effects. First, we ll give the photo easy-tocreate painted edges, and then we ll make it look
LESSON 02: GET STRONGER FOR PS USERS COMPANION BOOK. Digital Scrapbook Academy. February 2018: Lesson 02 Get Stronger for Photoshop Users
 Digital Scrapbook Academy February 2018: Lesson 02 LESSON 02: GET STRONGER FOR PS USERS COMPANION BOOK Page 1 of 19 Table of Contents Table of Contents 2 Welcome to Lesson 02 for Photoshop Users 4 1: Add
11 Advanced Layer Techniques
 11 Advanced Layer Techniques After you ve learned basic layer techniques, you can create more complex effects in your artwork using layer masks, path groups, filters, adjustment layers, and more style
Photoshop Backgrounds: Turn Any Photo Into A Background
 Photoshop Backgrounds: Turn Any Photo Into A Background Step 1: Duplicate The Background Layer As always, we want to avoid doing any work on our original image, so before we do anything else, we need to
Photoshop: Manipulating Photos
 Photoshop: Manipulating Photos All Labs must be uploaded to the University s web server and permissions set properly. In this lab we will be manipulating photos using a very small subset of all of Photoshop
The original image. As I said, we ll be looking at a few different variations on the effect. Here s the first one we ll be working towards:
 DIGITAL PIXEL EFFECT In this Photoshop tutorial, we re going to look at how to create a digital pixel effect, which is often used in ads that sell anything to do with digital. We re going to first pixelate
The original image. Let s get started! The final effect.
 Non-Destructive Infrared Glow Effect In this Photoshop tutorial, we ll learn how to quickly and easily add a dream-like infrared glow effect to an image, and we ll do it non-destructively using Smart Filters
3. Notice how you can barely see my leaf brush? And what you can see is extremely transparent. But it s there. Now, to get rid of that transparency.
 Some brushes were made to be transparent, others were not. And because of the nature of Photoshop (or PSP/GIMP) brushes, sometimes they end up looking that way when they shouldn t. This tutorial will explain
Photoshop: a Beginner s course. by: Charina Ong Centre for Development of Teaching and Learning National University of Singapore
 Photoshop: a Beginner s course by: Charina Ong Centre for Development of Teaching and Learning National University of Singapore Table of Contents About the Workshop... 1 Prerequisites... 1 Workshop Objectives...
ADD A REALISTIC WATER REFLECTION
 ADD A REALISTIC WATER REFLECTION In this Photoshop photo effects tutorial, we re going to learn how to easily add a realistic water reflection to any photo. It s a very easy effect to create and you can
Lesson 16 Text, Layer Effects, & Filters
 Lesson 16 Text, Layer Effects, & Filters Digital Media I Susan M. Raymond West High School In this tutorial, you will: Create a Type Layer Add and Format Type within a Type Layer Apply Layer Effects Apply
digitization station DIGITAL SCRAPBOOKING 120 West 14th Street
 digitization station DIGITAL SCRAPBOOKING 120 West 14th Street www.nvcl.ca techconnect@cnv.org DIGITAL SCRAPBOOKING With MyMemories Suite 6 The MyMemories Digital Scrapbooking software allows you to create
Creating Photo Borders With Photoshop Brushes
 Creating Photo Borders With Photoshop Brushes Written by Steve Patterson. In this Photoshop photo effects tutorial, we ll learn how to create interesting photo border effects using Photoshop s brushes.
Clipping Masks And Type Placing An Image In Text With Photoshop
 Clipping Masks And Type Placing An Image In Text With Photoshop Written by Steve Patterson. In a previous tutorial, we learned the basics and essentials of using clipping masks in Photoshop to hide unwanted
Miniature Effect With Tilt-Shift In Photoshop CS6
 Miniature Effect With Tilt-Shift In Photoshop CS6 This effect works best with a photo taken from high overhead and looking down on your subject at an angle. You ll also want a photo where everything is
Lab for Working with Adobe Photoshop
 Lab for Working with Adobe Photoshop Try the tasks listed with one of the sample images supplied (You will find them in the Course Materials section of Blackboard as the file sample_images.zip. You will
A quick note: We hope that you will find something from the Tips and Tricks that will add a little pizazz to your yearbook pages!
 A quick note: The following pages are tips and tricks for Basic Photoshop users. You may notice that some instructions indicate that non-awpc fonts were used, and that some colors were created using the
The original image. Let s get started! The final rainbow effect. The photo sits on the Background layer in the Layers panel.
 Add A Realistic Rainbow To A Photo In this Photoshop photo effects tutorial, we ll learn how to easily add a rainbow, and even a double rainbow, to a photo! As we ll see, Photoshop ships with a ready-made
Adobe Photoshop CS5 Tutorial
 Adobe Photoshop CS5 Tutorial GETTING STARTED Adobe Photoshop CS5 is a popular image editing software that provides a work environment consistent with Adobe Illustrator, Adobe InDesign, Adobe Photoshop
Photoshop: Manipulating Photos
 Photoshop: Manipulating Photos All Labs must be uploaded to the University s web server and permissions set properly. In this lab we will be manipulating photos using a very small subset of all of Photoshop
Mid_Term_Review_PhotoShop_Design Test B Name
 Mid_Term_Review_PhotoShop_Design Test B Name Multiple Choice Identify the choice that best completes the statement or answers the question. 1. Photoshop uses a mathematical process called when it changes
Blend Photos Like a Hollywood Movie Poster
 Blend Photos Like a Hollywood Movie Poster Written By Steve Patterson In this Photoshop tutorial, we're going to learn how to blend photos together like a Hollywood movie poster. Blending photos is easy
Introduction to Photoshop CS6
 Introduction to Photoshop CS6 Copyright 2016, Faculty and Staff Training, West Chester University. A member of the Pennsylvania State System of Higher Education. No portion of this document may be reproduced
Introduction to Photoshop
 Introduction to Photoshop Instructional Services at KU Libraries A Division of Information Services www.lib.ku.edu/instruction Abstract: This course covers the basics of Photoshop, including common tools
Recitation 2 Introduction to Photoshop
 Recitation 2 Introduction to Photoshop What is Adobe Photoshop? Adobe Photoshop is a tool for creating digital graphics either by starting with a scanned photograph or artwork or by creating the graphics
4 layer BASiCS lesson overview 104
 4 layer basics Lesson overview In this lesson, you ll learn how to do the following: Organize artwork on layers. Create, view, hide, and select layers. Rearrange layers to change the stacking order of
PHOTOSHOP PUZZLE EFFECT
 PHOTOSHOP PUZZLE EFFECT In this Photoshop tutorial, we re going to look at how to easily create a puzzle effect, allowing us to turn any photo into a jigsaw puzzle! Or at least, we ll be creating the illusion
Step 1: Create A New Photoshop Document
 Film Strip Photo Collage - Part 2 In part one of this two-part Photoshop tutorial, we learned how Photoshop s shape tools made it easy to draw a simple film strip which we can then use as a photo frame,
Photoshop CS6 automatically places a crop box and handles around the image. Click and drag the handles to resize the crop box.
 CROPPING IMAGES In Photoshop CS6 One of the great new features in Photoshop CS6 is the improved and enhanced Crop Tool. If you ve been using earlier versions of Photoshop to crop your photos, you ll find
Digital Photography 1
 Digital Photography 1 Photoshop Lesson 3 Resizing and transforming images Name Date Create a new image 1. Choose File > New. 2. In the New dialog box, type a name for the image. 3. Choose document size
KODAK DIGITAL ROC Professional Plug-In 2.1
 KODAK DIGITAL ROC Professional Plug-In 2.1 Installing Kodak's DIGITAL ROC Professional Plug-In If you have not downloaded and installed DIGITAL ROC Professional, go to: http://www.asf.com/download/ Download
ADDING FIREWORKS TO A PHOTO
 ADDING FIREWORKS TO A PHOTO In this Photoshop tutorial, we re going to learn how to add fireworks to a photo. What you ll need is a photo of fireworks and the photo you want to add the fireworks to (preferably
TEXT PERSPECTIVE SHADOW EFFECT
 TEXT PERSPECTIVE SHADOW EFFECT In this Photoshop text effects tutorial, we ll learn how to create a popular, classic effect by giving text a perspective shadow as if a light source behind the text was
This Photoshop Tutorial 2012 Steve Patterson, Photoshop Essentials.com. Not To Be Reproduced Or Redistributed Without Permission.
 How To Replace The Sky In A Photo In this Photoshop tutorial, we ll learn how to easily replace the sky in a photo! We ll use a basic selection tool and a layer mask to separate the sky from the area below
4 LAYER BASICS. Lesson overview
 4 LAYER BASICS Lesson overview In this lesson, you ll learn how to do the following: Organize artwork on layers. Create, view, hide, and select layers. Rearrange layers to change the stacking order of
Adobe Photoshop CS2 Workshop
 COMMUNITY TECHNICAL SUPPORT Adobe Photoshop CS2 Workshop Photoshop CS2 Help For more technical assistance, open Photoshop CS2 and press the F1 key, or go to Help > Photoshop Help. Selection Tools - The
How to blend, feather, and smooth
 How to blend, feather, and smooth Quite often, you need to select part of an image to modify it. When you select uniform geometric areas squares, circles, ovals, rectangles you don t need to worry too
Photo Editing in Mac and ipad and iphone
 Page 1 Photo Editing in Mac and ipad and iphone Switching to Edit mode in Photos for Mac To edit a photo you ll first need to double-click its thumbnail to open it for viewing, and then click the Edit
Adding Fireworks To A Photo With Photoshop
 Adding Fireworks To A Photo With Photoshop Written by Steve Patterson. In this Photoshop Effects tutorial, we re going to learn how to add fireworks to a photo. What you ll need is a photo of fireworks
Creating Pastel Images and other effects in Photoshop
 Creating Pastel Images and other effects in Photoshop Martin Addison 2015 Creating pastel images Page 1 Martin Addison FRPS Using White Layers in Photoshop 1. Create a new empty Layer 2. Edit> Fill 3.
All Creative Suite Design documents are saved in the same way. Click the Save or Save As (if saving for the first time) command on the File menu to
 command on the File menu to") 1 The Application bar is new in the CS4 applications. It combines the menu bar with control buttons that allow you to perform tasks such as arranging multiple documents or changing the workspace view.
1 The Application bar is new in the CS4 applications. It combines the menu bar with control buttons that allow you to perform tasks such as arranging multiple documents or changing the workspace view.
Exploring Photoshop Tutorial
 Exploring Photoshop Tutorial Objective: In this tutorial we will create a poster composed of three distinct elements: a Bokeh, an image and title text. The Bokeh is an effect which is sometimes seen in
Contents: Bibliography:
 ( 2 ) Contents: Sizing an Image...4 RAW File Conversion...4 Selection Tools...5 Colour Range...5 Quick Mask...6 Extract Tool...7 Adding a Layer Style...7 Adjustment Layer...8 Adding a gradient to an Adjustment
INTRO TO LAYERS (PART 2)
") Adobe Photoshop Elements INTRO TO LAYERS (PART 2) By Dave Cross In Part 1, we talked about the main concept behind layers and why they re so important. Now we ll take it a step further and show how to
Adobe Photoshop Elements INTRO TO LAYERS (PART 2) By Dave Cross In Part 1, we talked about the main concept behind layers and why they re so important. Now we ll take it a step further and show how to
Using Adobe Photoshop
 Using Adobe Photoshop 6 One of the most useful features of applications like Photoshop is the ability to work with layers. allow you to have several pieces of images in the same file, which can be arranged
ADD TRANSPARENT TYPE TO AN IMAGE
 ADD TRANSPARENT TYPE TO AN IMAGE In this Photoshop tutorial, we re going to learn how to add transparent type to an image. There s lots of different ways to make type transparent in Photoshop, and in this
12. Creating a Product Mockup in Perspective
 12. Creating a Product Mockup in Perspective Lesson overview In this lesson, you ll learn how to do the following: Understand perspective drawing. Use grid presets. Adjust the perspective grid. Draw and
COMPUTING CURRICULUM TOOLKIT
 COMPUTING CURRICULUM TOOLKIT Pong Tutorial Beginners Guide to Fusion 2.5 Learn the basics of Logic and Loops Use Graphics Library to add existing Objects to a game Add Scores and Lives to a game Use Collisions
How to Create a Landscape Wallpaper for your Desktop
 How to Create a Landscape Wallpaper for your Desktop Why not create a vector landscape wallpaper? In this simple tutorial, you will learn how to create an eye-appealing wallpaper quickly and effectively.
Adobe Photoshop CC 2018 Tutorial
 Adobe Photoshop CC 2018 Tutorial GETTING STARTED Adobe Photoshop CC 2018 is a popular image editing software that provides a work environment consistent with Adobe Illustrator, Adobe InDesign, Adobe Photoshop,
Digital Photography 1
 Digital Photography 1 Photoshop Lesson 1 Photoshop Workspace & Layers Name Date Default Photoshop workspace A. Document window B. Dock of panels collapsed to icons C. Panel title bar D. Menu bar E. Options
Adobe Photoshop Chapter 2 Study Questions /50 Total Points
 Name: Class: Date: Adobe Photoshop Chapter 2 Study Questions /50 Total Points True/False Indicate whether the statement is true or false. 1. The essence of working with images in Photoshop is based on
6 MASKS AND CHANNELS. Lesson overview
 6 MASKS AND CHANNELS Lesson overview In this lesson, you ll learn how to do the following: Create a mask to remove a subject from a background. Refine a mask to include complex edges. Create a quick mask
Using Adobe Photoshop
 Using Adobe Photoshop 4 Colour is important in most art forms. For example, a painter needs to know how to select and mix colours to produce the right tones in a picture. A Photographer needs to understand
Perspective Shadow Text Effect In Photoshop
 Perspective Shadow Text Effect In Photoshop Written by Steve Patterson. In this Photoshop text effects tutorial, we ll learn how to create a popular, classic effect by giving text a perspective shadow
You ve Been Framed! (Adobe Photoshop)
") You ve Been Framed! (Adobe Photoshop) Tip of the Week by Linda Sattgast on September 28, 2009 Do you have a great photo of someone special that you want to bring into sharp focus the special person, that
You ve Been Framed! (Adobe Photoshop) Tip of the Week by Linda Sattgast on September 28, 2009 Do you have a great photo of someone special that you want to bring into sharp focus the special person, that
Photoshop CC Editing Images
 Photoshop CC Editing Images Rotate a Canvas A canvas can be rotated 90 degrees Clockwise, 90 degrees Counter Clockwise, or rotated 180 degrees. Navigate to the Image Menu, select Image Rotation and then
Line Art Directions. Link to line art coloring pages. Ctrl + Click to access the link. Coloring pages - Coloring Book
 Line Art Directions Link to line art coloring pages Ctrl + Click to access the link Coloring pages - Coloring Book www.coloring-book.info/coloring/ More than 5.000 printable coloring sheets. Free coloring
Photoshop 1. click Create.
 Photoshop 1 Step 1: Create a new file Open Adobe Photoshop. Create a new file: File->New On the right side, create a new file of size 600x600 pixels at a resolution of 300 pixels per inch. Name the file
ADDING RAIN TO A PHOTO
 ADDING RAIN TO A PHOTO Most of us would prefer to avoid being caught in the rain if possible, especially if we have our cameras with us. But what if you re one of a large number of people who enjoy taking
Reveal the mystery of the mask
 Reveal the mystery of the mask Imagine you're participating in a group brainstorming session to generate new ideas for the design phase of a new project. The facilitator starts the brainstorming session
Module All You Ever Need to Know About The Displace Filter
 Module 02-05 All You Ever Need to Know About The Displace Filter 02-05 All You Ever Need to Know About The Displace Filter [00:00:00] In this video, we're going to talk about the Displace Filter in Photoshop.
Source photo, sketchbook collage and digital collage
 Source photo, sketchbook collage and digital collage Develop a mixed media project using traditional media, digital camera, scanner and image manipulation software. This technique encourages a creative
PHOTOSHOP1 15 / WORKSPACE
 MassArt Studio Foundation: Visual Language Digital Media Cookbook, Fall 2013 PHOTOSHOP1 15 / WORKSPACE Imaging software, just like our computers, relies on metaphors from the physical world for their design.
Outlined Doodle Element
 Outlined Doodle Element digitalscrapper.com/blog/qt-outlined-doodles Jen White Outlined Doodle Element by Jen White Repurpose the doodles in your stash into trendy outlined elements. Important Design Concept:
Using Adobe Photoshop to enhance the image quality. Assistant course web site:
 Using Adobe Photoshop to enhance the image quality Assistant course web site: http://www.arches.uga.edu/~skwang/edit6170/course.htm Content Introduction 2 Unit1: Scan images 3 Lesson 1-1: Preparations
Okay, that s enough talking. Let s get things started. Here s the photo I m going to be using in this tutorial: The original photo.
 add visual interest with the rule of thirds In this Photoshop tutorial, we re going to look at how to add more visual interest to our photos by cropping them using a simple, tried and true design trick
ReMask 2 TOPAZ REMASK 2. How It Works
 TOPAZ REMASK 2 Having a thorough understanding of the new Topaz and how it works will allow you to use the program and its tools most effectively. This will help you achieve optimal results with every
OzE Field Modules. OzE School. Quick reference pages OzE Main Opening Screen OzE Process Data OzE Order Entry OzE Preview School Promotion Checklist
 1 OzE Field Modules OzE School Quick reference pages OzE Main Opening Screen OzE Process Data OzE Order Entry OzE Preview School Promotion Checklist OzESchool System Features Field unit for preparing all
A.J. Wood on Instagram
 A.J. Wood http://ajwood.com ajwood@adobe.com @adobewan on Instagram The Photoshop Environment Photoshop's Start Workspace provides info at a glance including recent files, CC files, and presets for starting
Digital Scrapbooking, Your First Digital Layout using FotoFusion
 Digital Scrapbooking, Your First Digital Layout using FotoFusion Like paper scrapbooking, digital scrapbooking utilizes a combination of digital kits, papers, alphas, stamps, ribbons, and a variety of