MS - VERSATILE INSTRUCTION MANUAL
|
|
|
- Timothy Gordon
- 5 years ago
- Views:
Transcription


1 MS - VERSATILE INSTRUCTION MANUAL Mesrutiyet caddesi. Hatay Sokak. 17/B Kızılay / Ankara Turkey Tel : Fax : Web : oliser@oliser.com.tr


 This operation opens clogged nozzles")

.")
2 >>WARNING<< Suggestions when using Oliser s Inkjet Filling Machines 1. Oliser suggests using water when operating the machine for the first time 2. A pencil eraser can be used to clean the circuits on a cartridge CARTRIDGE CLEANING BY STEAM GENERATOR Please clean the cartridge print head using the steam generator. (Oliser sells TWO versions of Steam generators; one has a closed in housing, whereas the other is an open-environment environment unit) This operation opens clogged nozzles where dried ink cements itself in the jets. This is a very important function that needs performing before filling or evacuation procedures are undertaken. Empty the cartridge if necessary (we recommend all old ink is evacuated). To undertake this step, you will first need to connect the evacuation pipe-peripheral in the correct and allotted slot into the suitable cradle (fixture).
3 RECOMMENDED FILLING VOLUMES >>We suggest you to fill the below listed amounts<< Oem Code Ink Volume C1823D 10ml each color = 30ml 51625A 7ml each color = 21ml C6625A 10ml each color = 30ml C8728A 4ml each color = 12ml CMY 42ml 51641A 13ml each color = 39ml HP CMY 42ml 51649A 7ml each color = 21ml C6657 6ml each color =18ml C6578D 10ml each color = 30ml C6614A 40ml C6615A 42ml 51626A 40ml C8727A 15ml 51629A 40ml ml 51640A 42ml 51645A 42ml C ml 8R ml 8R7638 / 8R ml 108R ml 108R319 35ml Xerox C4 / Olivetti 15ml 8R ml 8R7880 7ml each color = 21ml 108R ml each color = 21ml Xerox C4 4ml each color = 12ml 10N ml 12A ml 12A ml 13400HC 35ml 13620HC ml 17G0050 Black 35ml 10N0026 Color 4ml each color = 12ml 12A1980 7ml each color = 21ml 13619HC Color 7ml each color = 21ml 15M0120 7ml each color = 21ml 17G0060 Color 7ml each color = 21ml BC-01 26ml BC-02 / BX 3 26ml BC-20 40ml BC-05 7 ml each color = 21ml

4 CLENING AND EVACUATION CONTROL PANEL Pressurizing Time Setting Button 0-9 Sec. Cleaning Time display/minutes Filling Start/Stop Button Filling Time Adjustment Button Evacuation Start/Stop Button
.")
.")

5 26/29/14 EVACUATION Empty the cartridge if necessary (we recommend all old ink is evacuated). To undertake this step, you will first need to connect the evacuation pipe-peripheral in the correct and allotted slot into the suitable cradle (fixture). Place the cradle fixture on the machine base platform in its correct park position - as shown above. Push the evacuation button to activate the function of emptying the old ink from the cartridge. Note: Empty weight of 26/29/14 cartridges is 20 Grams.


 is automatic, as the machine has built-in intelligence to undertake and perform")
6 14/26/29 FILLING HP small-profile cartridges, such as 51626A, 51629A, C6614 use different inks. Older HP51626A cartridges use dye-based ink, whereas 51629A and C6614 units require pigmented inks (although both inks will work in either type of model). Connect the filling connector to the cartridge holder and flip the select switch to DYE or PIGMENT depending on the cartridge and/or your own selection. You can fill cartridges through both methods, namely: - MAZE HOLE or PRINT HEAD. Pressurizing (also known as Equalizing or balancing) is automatic, as the machine has built-in intelligence to undertake and perform this function for you. Set the filling time to 2.40 and pressurizing to 9-seconds. Push the filling start button to commence operations. *** Cartridge is ready to test print ***


7 15/45 EVACUATION Please clean the cartridge print head using the steam generator. This operation opens clogged nozzles where dried ink cements itself in the jets. This is a very important function that needs performing before filling or evacuation procedures are undertaken. Connect the evacuation connector to the 45/15 cradle. Place the cradle fixture on the machine base platform in its correct park position - as shown above. Push the evacuation button to activate the function of emptying the old ink from the cartridge. Note: Empty weight of 15/45 cartridges is 66 Grams.
 to the relevant inlet connector")


8 15/45 FILLING After you have evacuated and weighed the cartridge, connect the pigment ink line (pipe) to the relevant inlet connector on the cradle holder. Now place the cartridge cradle back in its park position. Set the filling time to 2.40 and pressurizing to 9-seconds. After push to the filling start button. Note: Full weight of cartridge will be around Grams. *** Cartridge is ready to test print ***


.")

 Set the filling time to 0.")


 onto the")
9 27/56 FILLING Connect the supplied needle to the pigment filling connector, by screw-in action Peel off the OEM sticker; revealing 3 fill hole positions. Place the cartridge into the allocated cradle holder and insert the needle into front hole (forward: towards the cartridge electronics side). Caution: - Make sure you insert the needle diagonally and NOT straight down (otherwise you will puncture the bubble-breaker diaphragm) Set the filling time to 0.55 for #27 and 1.05 for #56 cartridges. Important Note: - Pressurizing time 0 (See Point 16 for priming functions) PRIMING: After filling is completed: connect the vacuum (suction cap) to the evacuation connector. Remove the cartridge from the cradle. Place the suction boot (cap) onto the cartridge nozzle plate. Push the evacuation button and suck for between 3-5 seconds, as shown above. *** Cartridge is ready to test print ***


 Place the suction boot (cap) onto the")


10 LEXMARK BLACK FILLING Place the empty cartridge into its relevant holder. Insert the filling needle through ventilation hole in cartridge lid; you might need to use screwing action to widen hole slightly. Set the filling time to 1.40 for lexmark 1970, 13400, Xerox similar cartridges. Important Note: - Pressurizing time 0 (See Point 16 for priming functions) Place the suction boot (cap) onto the cartridge nozzle plate. Push the evacuation button and suck for between 3-5 seconds, as shown above. *** Cartridge is ready to test print *** Set the filling time to 0.32 for lexmark #17 and 1.06 for lexmark #16. Important Note: - Pressurizing time 0 (See Point 16 for priming functions)


.")


11 HP-25/49 FILLING Remove cartridge cap using Oliser Lid Opener Insert the needles into the sponges in synchronization with correct colour matching Place the cartridge into its designated cradle holder. Set the ink filling capacities as required (For 25/49 it will be 7 ml per chamber (per colour). Push the filling / start button. You can select which color you want to fill optionally using the manual (toggle) switches. After filling do the priming/balancing function *** Cartridge is ready to test print ***

.")


12 Removing the Ventilotion Plugs HP-23/25/41/78 FILLING Remove the ventilation plugs (screws) by pushing them through the cartridge outside casing. (You may achieve this, through a multitude of methods, however Oliser makes its own special tool for ease of use: MS-PLUG PUSHER. We recommend this method) Before going further, we recommend that the cartridge be drained. The best manual method is to use paper towel. First steam cartridge nozzles, with Oliser MS-STEAM, then place cartridge in upright position (propped up against a wall or other object so cartridge is in vertical position). This may take time (maybe even overnight). Oliser we will not be in a full position to advise you on best to do this if the client is waiting for the said refill in your storefront. If you know this will cause a bottleneck in your business, then you will have to invest in the Oliser MS-CENTRIFUGE, which can evacuate all old ink within seconds. CENTRIFUGE The mixing of aftermarket inks with original inks is not advised. The main reason is that homogenization between the two types may not occur, and as such inhibit ink flow at a later stage. Oliser has spent thousands of hours in R&D on inkflow and ink formulae, and as such advises the use of its inks. In the case of 6578 cartridges our inks are very good and homogenization is more likely than with using many other inks on the market. The empty weights of the large profile cartridges is as follows: - C6578 (92g); 1823 (94~98g); 6625 (92g); (92g)


. The next function to perform is pump-priming and air bubble air removal.")
 as shown. This must be done for each individual colour.")

 in the print.")
13 HP-23/25/41/78 FILLING You may also aid the evacuation process, in part, by using the suction pipe on the MS-Versatile. Insert the needles into the sponges in synchronization with correct colour matching. As per the illustration (picture shown) the colors, from left to right, are: YEL- LOW, MAGENTA and CYAN. Place the cartridge on the right hand side of the machine, in its correct park position - as shown. You notice the cartridge is inverted. Filling in an upside down position (without vacuum) has been proven to yield the most successful results. Push the filling START/STOP button to activate the filling of the cartridge. Adjust the ink volume for C/M/Y as per your own selection. After filling is completed, remove the cartridge from its designated park position and remove the needles (always take care to keep needles clean to avoid crosscontamination). The next function to perform is pump-priming and air bubble air removal. This is undertaken with pump (included) in shipments (from 1 July 2004); alternatively it can be purchased as an optional extra. Place the pump over ventilation holes (at bottom of cartridge, when inverted) as shown. This must be done for each individual colour. Push the pump gently and attentively watch the head (nozzle plate) for results. If bubbles (foam) appear, this has to be removed. Clean the nozzle plate immediately and rapidly to avoid cross-contamination. Repeat this process until clear flowing ink is achieved (no bubbles at all must be present). This must be repeated for each colour. The reason we need to remove foam is so that it will not involve itself in the inkflow cycle and cause white lines (banding) in the print. Once you have performed this careful function on all three chambers, dab, in a downward motion the cartridge nozzle place onto padded paper towel. Ensure that all three colors appear in a rectangular fashion. *** Cartridge is ready to test print ***


14 INSTALLATION & REFILL INSTRUCTIONS of for use on HP -2000/2050/2500 InkJet Cartridges HP 2000/2500/2200/2250 cartridges are fitted with lockout chips located in a chip cavity specifically made to house these chips and are located at the same end as the dispensing membrane and pump units The tools to refill the cartridge and fit the chip are basic. A rubber-nozzle filling syringe, a short needle priming syringe, a beveled side and chisel type cutting tool and a plug removing tool. The use of each tool will be described below. All tools are available from OLISER as a tool kit however most of the tools are available from your local hobby or hardware store Cut the adhesive label where the label connects to the base and the cartridge cap on both sides of the cartridge. Once cut - remove the cap. This can easily be done by hand - no special tools are required


15 Turn the cartridge cap so that the chip is exposed and use the bevelled cutting tool to remove the OEM chip. This chip is expired and can be discarded. Do not remove the sticky double sided tape which held the OEM chip in place as this tape will be useful to keep the chip in place. Turn the cartridge the around, the cavity mould will be accessible. Use the chisel cutting tool to cut the edge of the cavity mould at a 45 degree angel corner of the right hand corner of the cavity box. With a bit of practice, this shear cut will become easy and can be done in a single sweep. The result should be a slot about 12mm long and 3mm in width. This is the most difficult part of the refilling process. Use the side cutting tool to remove any unwanted material and clean up the slot. 1 A close-up of the modification should look like the graphic below. The chip can now be fitted. When fitting the chip, the component side should remain inside the cartridge while the contact board is positioned into the slot. 2


16 Use the plug removing tool to hook and extract the rubber ball plug as shown. The plug is elongated and can be used ov er again. A good tool will remove the plug without any damage to the plug. This tool can be used to replace the plug after filling. Do not worry about pushing the plug into the cartridge, it has a stopper to prevent this. The cartridge can now be refilled using the rubber nozzle syringe. Charge the syringe with the prescribed amount of ink depending on colour. Place the nozzle squarely over the plug opening and use small push-pull actions on the syringe to displace the air in the cartridge with the ink in the syringe. Once complete, replace the ball plug. It is neccessary to remove all the air still trapped inside in the cartridge, as the next step will remove it. Removing the air or priming the cartridge is accomplished by holding the cartridge in an upright position with the air at the top and then inserting the short needle syringe into the center of the membrane shaft.gently pull on the syringe plunger to cause a vacuum in the cartridge. This action will remove any air trapped from the refill process.

17 Repeat the priming process until all air is replaced by ink in the transparent membrane shaft. Reattach the top cover to the base of the cartridge. Where the OEM label was originally cut, you can use transparent tape to re-secure the cap to the base of the cartridge. Once done your cartridge is now ready to for use. HP 4844 HIGH YIELD - BLACK EMPTY INK HP SMALL INK TANKS EMPTY INK 44 grams 69 ml 113 grams 32 grams 28 ml 60 grams


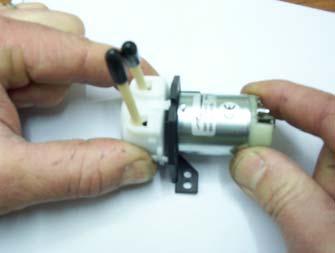


18 Tube replacement of motors
HP 564 and 920 InkJet Cartridges Refill Instructions (Professional Version)
") HP 564 and 920 InkJet Cartridges Refill Instructions (Professional Version) For the following cartridges: 934, 934XL, 935, and 935XL Series 5869 Terminal Ave. I Colorado Springs, CO 80915 PH: 719-578-0506
HP 564 and 920 InkJet Cartridges Refill Instructions (Professional Version) For the following cartridges: 934, 934XL, 935, and 935XL Series 5869 Terminal Ave. I Colorado Springs, CO 80915 PH: 719-578-0506
Refilling. Want to be a professional in cartridge refilling
 ?Cartridge Refilling Want to be a professional in cartridge refilling Business Guide beginners guide to cartridge refilling MIS Computer Beginners Guide to Cartridge Refilling Ismail Selman Kimyacioglu
Fotospeed PROFESSIONAL INKJET MEDIA & INKS. Instructions. Tubeless INKFLOW for Epson SC-P600. Fotospeed 4K Vivid Inks from new
 Fotospeed PROFESSIONAL INKJET MEDIA & INKS Instructions Tubeless INKFLOW for Epson SC-P600 Fotospeed 4K Vivid Inks from new Contents Introduction Page 2 Box contents Page 2 Preparing your cartridges Pages
GENERAL INSTRUCTIONS AND FAQ S
 GENERAL INSTRUCTIONS AND FAQ S GENERAL INSTRUCTIONS IMPORTANT: Please read these general instructions BEFORE REFILLING 1) To avoid any potential spill or mess, refill your cartridge over a workbench or
Black 22 Cyan 10 Magenta 10 Yellow 10
 Installation Instructions: Filled Epson 860 CFS Procedure: 1. Fill Cartridges with Ink Get a place to work where you can spill a little ink and not ruin anything. Spread some newspapers down and have plenty
IMPORTANT: DO NOT LEAVE THE CARTRIDGE STANDING ON TISSUE.
 Remove Label Yellow s Cyan s Light s Light Cyan s Remove Label Hewlett Packard Cartridges Refill instructions for the HP Cartridges: 22, 27, 28, 56, 57 & 58. DeskJet: 220, 310, 450, 450nt, 450ci, 450cbi,
Epson Work Force 1100 CFS System Installation Instructions
 Epson Work Force 1100 CFS System Installation Instructions Epson Work Force 1100 with MIS CFS System Prerequisite - Before starting this installation, you MUST test your printer to make sure it is printing
Continuous Ink Supply System for HP Business Inkjet K550. Installation Instruction
 Continuous Ink Supply System for HP Business Inkjet K550 Installation Instruction For ST Prefilled Version With Auto Reset Chips This Version of the Continuous Ink Flow System comes with Prefilled Cartridges
Continuous Ink Supply System for Canon ip 6000 Printer. Installation Instruction
 Continuous Ink Supply System for Canon ip 6000 Printer Installation Instruction For XM Empty Cartridge Version With Auto Reset Chips CIS for Canon ip 6000 Instruction READ ALL INSTRUCTION PRIOR TO INSTALLING
Installation Instructions: Epson 1430 CFS
 Installation Instructions: Epson 1430 CFS Prerequisite - Before starting this installation, you MUST test your printer to make sure it is printing 100% correctly. The best way to do this is to first print
USING ABSOLUTE BLACK INKS FOR MAKING SCREEN POSITIVES ON THE EPSON STYLUS PRO 3800 & 3880
 USING ABSOLUTE BLACK INKS FOR MAKING SCREEN POSITIVES ON THE EPSON STYLUS PRO 3800 & 3880 The following instructions explain how the i2i Absolute Black ink for making screen positives is installed on an
C-Bot. User Guide. Cautionary and Warning Statements
 C-Bot User Guide Cautionary and Warning Statements This kit is designed and intended for educational purposes only. Use only under the direct supervision of an adult who has read and understood the instructions
IMPORTANT - For best results, refill whilst ink still remains in cartridge. Empty cartridges should be refilled immediately.
 Aperture B Do Not Place Adhesive Tape Over Print Head. Aperture A Do Not Pierce View From The Bottom Of The Cartridge Aperture C Seal With Adhesive Tape. Place Adhesive Tape Over Aperture C. Print Head
Must read this before installation Important instructions about your CISS system HP8500/HP8000
 Must read this before installation Important instructions about your CISS system HP8500/HP8000 1. If your printer is brand new you must first install the original cartridges that came with your printer.
Installation Instructions: Epson R200 CFS
 Installation Instructions: Epson R200 CFS Photo Stylus R200 Installation Procedure Prerequisite - Before starting this installation, you MUST test your printer to make sure it is printing 100% correctly.
Epson T069 Refillable Cartridges
 Epson T069 Refillable Cartridges Important new information is below Thank you for contacting Tech Support regarding your Epson T069 Cartridges. Our R & D department is currently testing those cartridges.
USING ABSOLUTE BLACK INKS FOR MAKING SCREEN POSITIVES ON THE EPSON STYLUS PRO 4900
 USING ABSOLUTE BLACK INKS FOR MAKING SCREEN POSITIVES ON THE EPSON STYLUS PRO 4900 The following instructions explain how the i2i Absolute Black ink for making screen positives is installed on an Epson
Installation Instructions: Epson R800 CFS
 Installation Instructions: Epson R800 CFS Photo Stylus R800 Installation Procedure Prerequisite - Before starting this installation, you MUST test your printer to make sure it is printing 100% correctly.
Refillable Cartridge Ink Fill and Use Instructions for Epson 7800/9800 and 7880/9880 Printer Models
 Refillable Cartridge Ink Fill and Use Instructions for Epson 7800/9800 and 7880/9880 Printer Models This document includes instructions for TWO DIFFERENT style cartridges: **If you have the INTERNAL BAG
REFILLABLE CARTRIDGE SYSTEM FOR THE EPSON STYLUS PRO 4900
 REFILLABLE CARTRIDGE SYSTEM FOR THE EPSON STYLUS PRO 4900 Thank you for purchasing an Ink2image bulk ink feed system. You have just taken the first step to enjoying the cost saving and superior performance
Termination Procedure
 Connector Piece Parts Contact/Connector Head Twist On Nut MX MX Boot Procedure Chart Procedure Tool Required Tool Part Number Cable Preparation & Fiber Cleaning Jacket Stripper 86710-0004 Cable Preparation
installation instructions
 installation instructions Easi-Plan WC Frame 820mm with Dual Flush Cistern ref: EPWC-05-1005 Easi-Plan WC Frame 980mm with Dual Flush Cistern ref: EPWC-05-1505 EASI-PLAN installation instructions Parts
GRANDIO G R E E N H O U S E S GRANDIO ASCENT ADDITIONAL ROOF VENT KIT FOR NEW AND EXISTING GREENHOUSE CUSTOMERS
 GRANDIO G R E E N H O U S E S GRANDIO ASCENT ADDITIONAL ROOF VENT KIT FOR NEW AND EXISTING GREENHOUSE CUSTOMERS (GRA-ASC-VENT) ASCENT ROOF VENT PACKING LIST GRAPHIC PART NAME SIZE/LOCATION QUANTITY GRAPHIC
T-Bot II. Challenge Set. Activity Guide. Cautionary and Warning Statements
 T-Bot II Challenge Set Activity Guide Cautionary and Warning Statements This kit is designed and intended for educational purposes only. Use only under the direct supervision of an adult who has read and
Applications Engineering Notes
 Applications Engineering Notes Document Title Document Number 24 Fiber MTP Brand Connector Installation Onto Multimode or Single-mode 3.0 mm and 3.6 mm Jacketed Round Cable With Stranded or Bundled Loose
installation instructions WC Frame 1180mm with Dual Flush Cistern
 installation instructions WC Frame 1180mm with Dual Flush Cistern (C,D,E) K F/G N L M 12 13 14 16 1 2 11 A 5 6 Q O Y 3 C 10 E D B P,Z,AA R T V S 4 U 2 No. Part no. Description Quantity A WC Frame with
1) Ink accumulated at printer waste-ink tank, when printing, color mixed.
 Ink accumulated at printer waste-ink tank, when printing, color mixed.") 1. Cleaning Problems 2. Ink Problems 3. Color Resolution Problem 4. Lubricating Problem 5. Problem on Installation 6. Long Time no Work on Printer 7. Air Leak on Ink Cartridge 8. Damage on Cartridge Chips
1. Cleaning Problems 2. Ink Problems 3. Color Resolution Problem 4. Lubricating Problem 5. Problem on Installation 6. Long Time no Work on Printer 7. Air Leak on Ink Cartridge 8. Damage on Cartridge Chips
PRO 400 M401 MFP M425 CF-280A/X TONER CARTRIDGE REMANUFACTURING INSTRUCTIONS
 HP PRO 400 M401 MFP M425 CF-280A/X TONER CARTRIDGE REMANUFACTURING INSTRUCTIONS HP CF-280A/X TONER CARTRIDGE REMANUFACTURING THE HP LASERJET PRO 400 M401/MFP M425 (CF-280A/X) TONER CARTRIDGE By Mike Josiah
The Bowflex Revolution XP Home Gym Assembly Instructions. P/N: Rev ( /0 )
") P/N: 001-7057 Rev ( /0 ) The Bowflex Revolution XP Home Gym Assembly Instructions 2 Table of Contents Before You Start... 2 Tools You Will Need / Hardware Contents... 3 Box Contents... 6 Assembling Your
P/N: 001-7057 Rev ( /0 ) The Bowflex Revolution XP Home Gym Assembly Instructions 2 Table of Contents Before You Start... 2 Tools You Will Need / Hardware Contents... 3 Box Contents... 6 Assembling Your
Using Your Chip Priming Station
 s1 Using Your Chip Priming Station The Chip Priming Station, part number 5065-4401, is for use with the Agilent 2100 Bioanalyzer LabChip Kits. Refer to Figure 1 and 2 for a picture of the Chip Priming
XEROX PHASER 3600 TONER CARTRIDGE REMANUFACTURING INSTRUCTIONS
 XEROX PHASER 3600 TONER CARTRIDGE REMANUFACTURING INSTRUCTIONS XEROX PHASER 3600 TONER CARTRIDGE REMANUFACTURING THE XEROX PHASER 3600 TONER CARTRIDGE By Mike Josiah and the Technical Staff at UniNet The
G. H. I. N. J. O. 22"x 28" Poster Holder. P. Q. romotional wall displ
 Wall Display Assembly Instructions Tools necessary for assembly 1. Electric drill with Phillips head 2. Adjustable wrench or pliers 3. One or two step ladders or stools Due to the weight of the side panels
Harmony Remote Repair
 Harmony Remote Repair harmonyremoterepair.com How to install your new Harmony One Front Cover/Touch Screen Important! Before you begin working on your Harmony One, you must discharge any static electricity
I specifically did this for my 1980 Suzuki GS450L which uses the Mikuni BS34SS.
 This is a carburetor cleaning guide for the Mikuni BS34SS which is used on the Suzuki GS450 E, L, and S models. Confirm that you have the same carburetors by looking at the pictures provided on the next
SUPERSEDED REVISION. Reasons for reissue of this instruction sheet are provided in Section 7, REVISION SUMMARY.
 PRO BEAM Jr. EB cable plug connectors are designed to be installed onto jacketed fiber optic cable with KEVLAR strength members. The connector must be assembled using a cable plug connector shell kit,
Hydraulic Clamp Carrier. Installation & Operation Manual
 Hydraulic Clamp Carrier Installation & Operation Manual Hydraulic Clamp Carrier Installation & Operation Manual Quick Machinery Company 8272 Peninsula Drive Kelseyville, CA 95451 phone: (707) 272-6719
The Rubley Building Instructions for Assembly of the N scale kit. v1.1
 The Rubley Building Instructions for Assembly of the N scale kit. v1.1 Kit Contents: 197 ea. laser cut 1/16" acrylic parts. 1ea. adhesive backed.020 styrene part. 10 ea..060 x 1" styrene alignment pins.
TITLE: GUIDELINES FOR SAMPLE COLLECTION U + B
 TITLE: GUIDELINES FOR SAMPLE COLLECTION U + B 1 THE ARFL SAMPLE AND BARCODED SECURITY DOCUMENTATION SYSTEM 1.1 Range of Sampling Kits The small Sampling Kit contains one urine sample pack and one blood
Quick Reference Guide
 Quick Reference Guide Table of Contents Defoamer - Composite Blocks...1 Zirlux FC2...1 Milling a Restoration...2 Tool Gauges and Warnings...3 Automatic Tool Changer...4 Maintenance Reminders...5 Clean/Refill
Depending on the size you ordered you will have either 5 Foot sections which will build the 10 Foot frame or 6 Foot sections which will build the 12
 XL Quilting Frame 1 Depending on the size you ordered you will have either 5 Foot sections which will build the 10 Foot frame or 6 Foot sections which will build the 12 Foot frame Printed 2 June 2014 Updated
Notification System Installation Guide
 Notification System Installation Guide NOTE: It is strongly recommend that you hire a licensed electrician to perform the installation of this product. Materials Provided 1. Directory Sign (1) a. Directory
Rocketry Challenge - Technical Document I
 Rocketry Challenge - Technical Document I This document includes a list of what is inside the kit with pictures for hard to decipher parts and a simple step-by-step process of how to assemble and launch
JEWEL, SAPPHIRE, STAR and NOVA Turntables
 sotaturntables@kwom.com - www.sotaturntables.com JEWEL, SAPPHIRE, STAR and NOVA Turntables PLEASE READ THE INSTRUCTIONS COMPLETELY BEFORE BEGINNING SET UP AND OPERATION! UNPACKING The SOTA turntable comes
3 Emergency Breakaway Coupling
 SM64227 July 2008 Applicable addition manuals: N/A Aerospace Group Conveyance Systems Division Carter Ground Fueling Maintenance & Repair Manual 3 Emergency Breakaway Coupling Model 64227 Table of Contents
Using Your Chip Priming Station
 Using Your Chip Priming Station The Chip Priming Station (5065-4401), is for use with the Agilent 2100 Bioanalyzer Analysis Kits. Refer to Figure 1 on page 2 for a picture of the Chip Priming Station.
isel=vakuum UV exposure device
 isel=vakuum UV exposure device Manual I isel-vakuum UV exposure device About these instructions In this instructions, you find different symbols marking important information for easy and fast reference.
MAXIMIST ULTRA PREMIER HVLP SPRAY TANNING SYSTEM
 MAXIMIST ULTRA PREMIER HVLP SPRAY TANNING SYSTEM DO NOT USE EQUIPMENT BEFORE READING THIS MANUAL This manual contains important warnings and instructions. Please read these instructions carefully and keep
TONER CARTRIDGE REMANUFACTURING INSTRUCTIONS DELL 1130 TONER CARTRIDGE
 DELL 1130 TONER CARTRIDGE REMANUFACTURING INSTRUCTIONS DELL 1130 TONER CARTRIDGE REMANUFACTURING THE DELL 1130 CARTRIDGE By Mike Josiah and the Technical Staff at UniNet DELL 1130 CORE CHANGE UNINET TECH
Epson Stylus Photo R800
 Printer Parts User Replaceable Parts Paper support and extension Left edge guide Sheet feeder Printer cover User replaceable part Reference number Part number CD tray 12 1262744 CD adapter ring 8 1264619
By using the system correctly you will obtain very high quality repairs.
 HBC System E English Dear user, We hope that you will enjoy your new HBC system. We recommend that you take our training programme and that you study the manual thoroughly before taking the system into
Step by Step Wing Bagging
 Step by Step Wing Bagging By Evan Shaw 073 589 9339 evanevshaw@gmail.com Preparing the Leading Edge 1. Cut cores. (Cutting of wing cores is covered in another article elsewhere) 2. Sand the LE to a nice
InkJetCarts presents Canon Large Format ipf SOLUTIONS
 InkJetCarts presents Canon Large Format ipf SOLUTIONS Our Cartridges shown below Overview The Refillable cartridges are 700ml and are easy to refill and reuse over and over utilizing your original factory
1200 DPS Programmable Digital Powder System
 1200 DPS Programmable Digital Powder System WARNINGS AND CAUTIONS: If the 1200 DPS does not read zero on the display, DO NOT DISPENSE POWDER. The scale must be zeroed before use. If powder is dispensed
Parts Catalog MIXERS
 Parts Catalog MIXERS MODELS: SP0 & SPC0 SP0-3-2 IMPORTANT! TO EXPEDITE SHIPMENT OF PARTS, ALWAYS SPECIFY MODEL, REV, PART NUMBER, AND SERIAL NUMBER OF MIXER. GLOBE FOOD EQUIPMENT COMPANY 225 East River
BrewsBySmith.com STC DIY Kit
 BrewsBySmith.com STC-1000 + DIY Kit Contact Information: Greg Smith www.brewsbysmith.com greg@boostbysmith.com I. Hardware Included: STC-1000 flashed with latest software (v1.06 currently) (if purchased)
INSTALLATION MANUAL. Decoration panel BYCQ140E2W1 BYCQ140E2W1W BYCQ140E2W1B
 INSTALLATION MANUAL Decoration panel BYCQ0EW BYCQ0EWW BYCQ0EWB PEN0-A.book Page Thursday, January 0, 09 :0 PM c b a e b g a +6 d f h g g 6 6 mm 6 6 7 9 8 8 0 BYCQ0EW BYCQ0EWW BYCQ0EWB Decoration panel
COACT MEDIA UNIT ASSEMBLY WITH X9 OPEN SHELF STORAGE OPTION PART # INSTALLATION INSTRUCTIONS
 PART # 1609103 MEDIA UNIT ASSEMBLY WITH X9 OPEN SHELF STORAGE OPTION 1. Begin by placing the back panel on a flat non-marring surface, making sure the pre-drilled holes are facing up. Next, position the
General Help. Last revised: Winter When I try to print something on the computer, it appears to work, but nothing comes out of the printer.
 General Help Last revised: Winter 2015 Problem Solution When I try to print something on the computer, it appears to work, but nothing comes out of the printer. See the next item. When I try to print something
Instructions to Convert a 4-foot Florescent Fixture to LEDs Using 60W Power Supply Using 2 or 3 strips 30Dec15
 Instructions to Convert a 4-foot Florescent Fixture to LEDs Using 60W Power Supply Using 2 or 3 strips 30Dec15 Thank you for purchasing the Shoplight Solutions 4-ft conversion kit. This is a companion
firepickdelta Assembling the Frame Instructions for the assembling the frame for the FPD. Written By: Neil Jansen
 firepickdelta Assembling the Frame Instructions for the assembling the frame for the FPD. Written By: Neil Jansen 2017 firepickdelta.dozuki.com Page 1 of 10 INTRODUCTION Inventory your parts first and
 www.wildmanconstruction.com Changing your toilet is an easy project that should take half a day or less. The most common toilet has a separate tank that mounts on top of the bowl. These instructions apply
Panel Riser Kit Option 1. Installation Instructions 226BEE 0117CH
 Panel Riser Kit Option 1 Installation Instructions 226BEE 0117CH Before you Start Please read these instructions fully before starting. Although these instructions are comprehensive we always recommend
Volvo 240/260 New Face Overlay Installation Models By Dave Barton
 Volvo 240/260 New Face Overlay Installation 1975-80 Models By Dave Barton These custom faces are the product of years of research and experimentation. They are printed with a special printer using waterproof
*** All chrome surfaces should be cleaned using a clean damp cloth. *** No abrasive cleaning agents or materials should be used.
 Cleaning *** All chrome surfaces should be cleaned using a clean damp cloth. *** No abrasive cleaning agents or materials should be used. *** No chemical cleaners can be used on the glass use only mild
OPERATION AND MAINTENANCE FOR MODEL MRV050A REVERSIBLE
 OPERATION AND MAINTENANCE FOR MODEL MRV050A REVERSIBLE MANUAL AIR MOTOR 04666770 Edition 1 April, 1999 IMPORTANT SAFETY INFORMATION ENCLOSED. READ THIS MANUAL BEFORE OPERATING TOOL. FAILURE TO OBSERVE
BIPPMM03 (Published) Book specs- Dates: / / Lang: ENG01 Applic: PPM
 Book specs- Dates: / / Lang: ENG01 Applic: PPM") BIPPMM03 (Published) Book specs- Dates: 20060412 / 20060412 / 20060412 Lang: ENG01 Applic: PPM Installing the Milnor Diaphragm in the Single Stage Press This document applies to models MP160Axx, MP1604xx,
BIPPMM03 (Published) Book specs- Dates: 20060412 / 20060412 / 20060412 Lang: ENG01 Applic: PPM Installing the Milnor Diaphragm in the Single Stage Press This document applies to models MP160Axx, MP1604xx,
The Park Hotel Instructions for Assembly of N Scale Kit
 The Park Hotel Instructions for Assembly of N Scale Kit Kit Contents: 198 ea. Laser Cut Acrylic Parts, 2 ea. Chimney Parts Sheets, 1 ea.2".040 styrene rod, 5 ea. Sidewalk Parts, 14 ea. Cast Resin Dormers,
Pneumatic Clamp Carrier. Installation & Operation Manual
 Pneumatic Clamp Carrier Installation & Operation Manual Pneumatic Clamp Carrier Installation & Operation Manual Quick Machinery Company 8272 Peninsula Drive Kelseyville, CA 95451 phone: (707) 272-6719
Frameless Inline Door QCI5288
 Frameless Inline Door QCI5288 QCI5288 Rev. 0 Page 1 Date Certified: 06/21/2016 Tools: To install your New Shower Enclosure, you may need the following: Pencil Drill Hack Saw Low Tack Tape 1/8 & 3/16 Drill
EMO. Service Instruction. created by Frank Weithöner. Table of contents: Special Tools Assembling Mixing Chamber
 EMO Service Instruction created by Frank Weithöner Table of contents: - Special Tools Disassembling Mixing Chamber Assembling Mixing Chamber Adjustment Rotor / Level Indicator Unit Temperature Compensating
Build your own. Pack. Stages 19-22: Continue building Robi s left arm
 Build your own Pack 06 Stages 19-22: Continue building Robi s left arm Build your own All rights reserved 2015 Published in the UK by De Agostini UK Ltd, Battersea Studios 2, 82 Silverthorne Road, London
EPSON Stylus COLOR 300. Accessories. Printer Specifications. User Replaceable Parts. Cartridge. Media. Printing
 paper support Accessories edge guides left edge guide lock lever paper thickness lever power switch Ink Cartridge Use only the ink cartridge specified in the table below with the EPSON Stylus COLOR 300.
Float Tank Plans Copyright 2006 All Rights Reserved
 Float Tank Plans Copyright 2006 All Rights Reserved Tank Material list: 5 4x8 sheets ½ Plywood 5 4x8 sheets ¼ Plywood 5 4x8 sheets 1 ½ Rigid Styrofoam 24 8 2 x 2 s (1 ½ x 1 ½ actual dimensions) 1 Door
400 SERIES GRINDER PUMPS 41502, 42202,43302, AND MODELS
 Section: MOYNO 500 PUMPS Page: 1 of 6 Date: March 1, 1998 SERVICE MANUAL MOYNO 500 PUMPS 400 SERIES GRINDER PUMPS 41502, 42202,43302, AND 44402 MODELS DESIGN FEATURES Housing: Cast iron Pump Rotor: Chrome
HYDRO-TOWER INSTALLATION INSTRUCTIONS
 HYDRO-TOWER 300 300 INSTALLATION INSTRUCTIONS IN-WALL TANK K-4179T/K-4178T/K-10611T K-4177T/K-8857T/K-20341T/K-75890T/K-75891T BEFORE YOU BEGIN Read installation guide in illustration and word file carefully,
Coat Rack. Materials: Directions:
 Coat Rack 2x2 wooden poplar (foundation of the rack) 3/4 inch diameter wood dowels (5-8 depending on how many arms you want) 1/4 inch dowel screw 1/4 inch drill bit Power drill Ruler Pencil Paint/spray
Build the. Steam Locomotive. Pack 06
 Build the Steam Locomotive Pack 06 Build the Steam Locomotive Contents Step by step Stage 38: The boiler band Stage 39: Sand spreader pipe main cocks Stage 40: Building up the dome Stage 41: The sand spreader
POWER PET. Low-E Automatic Patio Pet Door Installation and Operating Instructions
 POWER PET Low-E Automatic Patio Pet Door Installation and Operating Instructions Power Pet, Regular Height, Patio Door Assembly Steps Estimated assembly time: Under 1 hour STEP 1: Assemble the tools you
The Severn Instructions for Assembly of the N scale kit.
 The Severn Instructions for Assembly of the N scale kit. Kit ontents: 172 each laser cut 1/16" acrylic parts 102 each adhesive backed styrene parts 1 each cast entryway 3 each cast balcony 4 each cast
MaxiMist Pro Series Spray Gun
 MaxiMist Pro Series Spray Gun Your purchase includes the MaxiMist Pro Series Spray Gun Please read these instructions carefully and keep for your reference. Refer to the included instruction manual as
M-5 PRO CORE BORE PARTS LIST DRILLING MACHINE. (March 2017) Part #
 Part #") M- PRO CORE BORE DRILLING MACHINE PARTS LIST (March 07) Part #809 Table of Contents Description Page No. Carriage Assembly....... - Combo Base Assembly....... - 7 Anchor Base Assembly........8 Anchor
M- PRO CORE BORE DRILLING MACHINE PARTS LIST (March 07) Part #809 Table of Contents Description Page No. Carriage Assembly....... - Combo Base Assembly....... - 7 Anchor Base Assembly........8 Anchor
4. Partially open the operating panel and tilt the top toward the interior of the door (Figure 4). Lift the panel off the sill and set it aside.
. Lift the panel off the sill and set it aside.") Effective Date: 10/1/2017 Tools Needed Kit Contents Hardware Kit Safety Glasses Cordless drill Phillips screw bit Two-step drill bit (3/8-1/8 ) utility knife Interior Mullion Exterior Mullion Cover clamps
Effective Date: 10/1/2017 Tools Needed Kit Contents Hardware Kit Safety Glasses Cordless drill Phillips screw bit Two-step drill bit (3/8-1/8 ) utility knife Interior Mullion Exterior Mullion Cover clamps
EPSON Stylus Photo 780. Accessories. Ink Cartridges. Media. User Replaceable Parts
 sheet feeder left edge guide Accessories Ink Cartridges Cartridge Black Color Media Part number T007201 (U.S.) T007311 (Canada) T008201 (U.S.) T008311 (Canada) name Size Part number EPSON 360 dpi Ink Jet
Instructions to Convert a 4-foot Florescent Fixture to LEDs Using 100W Power Supply Using 1-4 strips 30Dec15
 Instructions to Convert a 4-foot Florescent Fixture to LEDs Using 100W Power Supply Using 1-4 strips 30Dec15 Thank you for purchasing the Shoplight Solutions 100W conversion kit. This is a companion document
Basic Stenciling Techniques
 Metal Stencil Techniques For each technique you ll need the equipment listed in addition to your stencil and removable tape. To avoid bending your stainless steel stencils, keep them flat at all times.
MaxiMist SprayMate Pro HVLP TANNING SYSTEM
 MaxiMist SprayMate Pro HVLP TANNING SYSTEM DO NOT USE EQUIPMENT BEFORE READING THIS MANUAL This manual contains important warnings and instructions. Please read these instructions carefully and keep for
INTERCOOLER UPGRADE INSTALLATION INSTRUCTIONS PART NUMBER D APPLICATION: F87 M2
 INTERCOOLER UPGRADE INSTALLATION INSTRUCTIONS PART NUMBER D330-0026 APPLICATION: 2016-17 F87 M2 Congratulations for being selective enough to use a Dinan Intercooler Upgrade Kit. We have spent many hours
AUC Cell Assembly Torque Stand. User Manual
 AUC Cell Assembly Torque Stand User Manual WARRANTY Spin Analytical Inc., warrants this product to be defect free in both material and workmanship for 90 days from the date of shipment. Labor services
MAXIMIST ULTRA PRO HVLP SPRAY TANNING SYSTEM
 MAXIMIST ULTRA PRO HVLP SPRAY TANNING SYSTEM DO NOT USE EQUIPMENT BEFORE READING THIS MANUAL This manual contains important warnings and instructions. Please read these instructions carefully and keep
Parts Catalog MIXERS
 Parts Catalog MIXERS MODELS: SP20 & SPC20 SP20 0--2 IMPORTANT! TO EXPEDITE SHIPMENT OF PARTS, ALWAYS SPECIFY MODEL, REV, PART NUMBER, AND SERIAL NUMBER OF MIXER. GLOBE FOOD EQUIPMENT COMPANY 225 East River
Liner Replacement (Stainless Steel Internal Components)
") Page 1 of 15 WARNING The stainless steel edges, especially around the propeller cylinder, are very sharp. Use extreme caution when working in and around the front housing. WARNING Be sure to disconnect
Page 1 of 15 WARNING The stainless steel edges, especially around the propeller cylinder, are very sharp. Use extreme caution when working in and around the front housing. WARNING Be sure to disconnect
CATALOG OF REPLACEMENT PARTS
 CATALOG OF REPLACEMENT PARTS LT1 DISHWASHER ML-104239 LT1 A product of HOBART 701 S. RIDGE AVENUE TROY, OHIO 45374-0001 FORM 18581 Rev. D (June 2017) F-18581 Rev. D (June 2017) - 2 - HOBART 2017 Table
35 mw HeNe Laser Ballast Resistor Insulation Upgrade Instructions
 35 mw HeNe Laser Ballast Resistor Insulation Upgrade Instructions A video that demonstrates the laser upgrade process can be found at: http://www.reoinc.com/site/14309- instructions General Notes Please
Block Frame Inovo Patio Door/Transom/Sidelite Field Mulling Instructions. simonton.com/installation. If mulling sidelites, skip to Step 5.
 Effective Date: 10/1/17 Tools Needed Kit Contents Safety Glasses Cordless Drill Phillips Screw Bit Two-step Drill Bit (3/8-1/8 ) Utility Knife Interior Mullion Exterior Mullion Cover Hardware Kit Clamps
Three possible chassis for the KD1JV Para80set Transceiver
 Three possible chassis for the KD1JV Para80set Transceiver Shown above are two of the three possible variations of homemade chassis for the KD1JV Para80set Transceiver. The one on the left is a complete
Technical Instructions Supplies Tools 1
 HP2500/HP1500TECH Technical Instructions Supplies Tools 1 CORPORATE LOS ANGELES, USA US 1 800 394.9900 Int l +1 818 837.8100 FAX 1 800 394.9910 Int l +1 818 838.7047 ATLANTA, USA US 1 877 676.4223 Int
Sentinel Series Cigar Humidor End Tables
 Sentinel Series Cigar Humidor End Tables Assembly Instructions Models: Sentinel 500, 1000 and 1500 Style: Contemporary SENTINEL ASSEMBLY INSTRUCTIONS Congratulations! You have purchased a superior cigar
Pneumatic Clamp Carrier. Installation & Operation Manual
 Pneumatic Clamp Carrier Installation & Operation Manual Pneumatic Clamp Carrier Installation & Operation Manual Quick Machinery Company 8272 Peninsula Drive Kelseyville, CA 95451 phone: (707) 272-6719
Fidelity & Guaranty Building
 Fidelity & Guaranty Building N Scale Model Kit Instructions for Assembly of the Fidelity & Guaranty Building Kit Contents: 69 each laser cut acrylic parts. Sidewalk material 1 each Window Glass Templates
TYPE 3740/3740D WET/DRY RUNNING CARTRIDGE SPLIT SEAL
 1 Foreword These instructions are provided to familiarize the user with the seal and its designated use. The instructions must be read and applied whenever work is done on the seal, and must be kept available