london calling bag a sewing pattern by
|
|
|
- Jennifer Crawford
- 6 years ago
- Views:
Transcription


1 a sewing pattern by
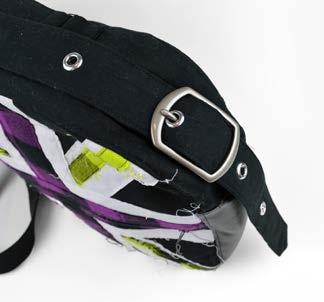
2 london calling bag This project on its own is a very big gusseted bag with a zippered top closure. But the optional details include a front pocket with Union Jack applique, buckle adjustable strap, and loads of inner pockets. difficulty: makes: This one is pretty tough; there are a lot of extra details and accuracy to consider. one 13 x 13 x 4 bag materials & tools 1 yd. of 45 wide or 3/4 of 60 wide medium to heavyweight fabric for outer bag (I used twill) 1/4 yd. vinyl for bag bottom 1 1/2 yds. of lightweight fabric for lining (I used quilting cotton) 1 2/3 yds. of 20 wide or 3/4 yd. of 45 wide light to medium weight fusible interfacing 21 zipper (or longer; for top) 14 zipper (or longer; for front) 10 zipper (or longer; for lining) 2 wide belt buckle Two 1 wide rectangular metal rings Five 3/8 wide grommets Grommet setting tools Magnetic snap 3 x 3 scrap of fleece interfacing Appliqué supplies: 1/4 yd. of background stripe fabric (white) 1/8 yd. of main stripe fabric (purple) 1/8 yd. of accent stripe fabric (green) Matching sewing thread Basic sewing tools (sewing machine, scissors, iron, needles, pins, fabric marker, seam ripper) before you begin: 1. Print out the project pattern, pages Assemble the pattern pieces by lining up the page markings (A1 to A2, B3 to B4, and so on) 3. Lay out the pattern pieces on your fabric and cut them out 4. Mark the fabric pieces with the guidelines from the pattern 2


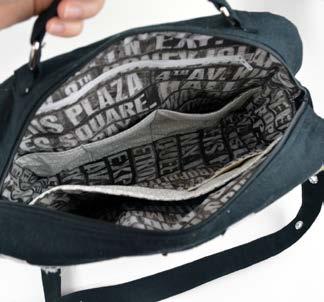
3 the inner front gather 2 Tall Pocket (B) lining pieces, 2 Short Pocket (A) lining pieces, and 1 Front/Back (C) lining piece 1 The inner front of the bag has two pockets, one large, the other shorter. Align a pair of Tall Pocket (B) and Short Pocket (A) pieces with right sides together (I used two different lining fabrics to eat up my scraps more), and sew them along the top straight edge. When finished, turn them right side out and press the top seam nice and crisp. 2 Layer the Short Pocket (A) over the Tall Pocket (B) and line up the raw edges at the bottom with all right sides facing up. Baste the layers in place and also add any extra lines going through the Short Pocket (A) to create separations. For instance I created some pencil pockets that were about 1 1/2 apart. 3

 lining pieces, 1 Front/Back (C) lining piece, 2 Short Pocket (A) lining pieces, and 10 zipper The Inner Back has a set of short pockets and")
4 Now sew this whole configuration on top of one of your Front/Back (C) lining pieces. Align the raw edges along the bottom with all right sides facing up and baste the sides and bottom in place. This finishes the Inner Front! Set this aside until the Bringing the Inside Together section. 3 the inner back gather 2 Hidden Pocket (D) lining pieces, 1 Front/Back (C) lining piece, 2 Short Pocket (A) lining pieces, and 10 zipper The Inner Back has a set of short pockets and a zippered hidden pocket. We start first with the hidden pocket. The Hidden Pocket (D) has a zipper window; line this up with the zipper window on one of the Front/Back (C) lining pieces with right sides together. Sew around this rectangle to create the window. 4 4


5 5 Open up the window by cutting down the middle (lengthwise), then diagonally into the corners as close as you can without actually cutting the threads. 6 Turn the pieces right side out by slipping the Hidden Pocket (D) into the opening you ve cut and flatten out the pieces and the seam. The corners will be a little tight, but press them really well to get a clean looking window for your zipper. 5
.")
 piece to the current one with right sides together.")
6 Install the zipper by placing it under this opening and centering the zipper teeth through the opening. Make sure the zipper slider is within the window, then pin it in place (taping or gluing also works and is less obtrusive). From the front side of this piece, sew around the edge of the window as close as you can to the seam a zipper foot really helps here. 7 When you ve finished 8 sewing the zipper, trim off the excess tape and add the last Hidden Pocket (D) piece to the current one with right sides together. Sew the two together with a 1/4 seam allowance. You ll likely need to move the Front/Back (C) piece out of the way to do this. 6


7 9 To finish the Inner Back, we re just adding one more set of short pockets. Take your two Short Pocket (A) pieces and line them up along the top straight edge. Sew them together along this edge and turn the pieces right side out and press when complete. 10 Align the short pocket on top of the Front/Back piece from step 8. Match up the bottom edges with right sides both facing up. Baste the pocket in place along the sides and bottom as well as any separating lines you d like to sew to make particular pockets for anything. You ll want to move the hidden pocket out of the way so you don t accidentally sew over it. Your Inner Back is all done; set it aside until the Bringing the Inside Together section. 7
 and Front/Back (C) outer fabric pieces.")
 which would otherwise be the same as the rest of the outer fabric if I weren t using assorted fabrics to bust my stash.")
8 gather 1 Tall Pocket (B) outer fabric piece, 1 Tall Pocket (B) interfacing piece, 1 Tall Pocket (B) lining piece, 1 Front/Back (C) outer fabric piece, 1 Front/Back (C) interfacing piece, fusible fleece scrap, and magnetic snap the outer back Fuse the interfacing pieces to their corresponding Tall Pocket (B) and Front/Back (C) outer fabric pieces. Since the Tall Pocket (B) interfacing is without seam allowances, make sure the interfacing is centered properly in the middle of the pocket before fusing. Note here that I m using purple plaid for an accent on my Tall Pocket (B) which would otherwise be the same as the rest of the outer fabric if I weren t using assorted fabrics to bust my stash. 11 Bring together both Tall 12 Pocket (B) pieces, the outer fabric and the lining and align them by the top straight edge. Sew these two pieces in place along this edge, then turn right side out and press flat. 8


9 13 Up next is to install the magnetic snap. To give the snap some extra support, fuse the scrap of fusible fleece interfacing around where the snap will be placed, centered on the upper edge of the Tall Pocket (B) lining. 14 To install the snap where the pattern guideline indicates, press the prongs of the thin half of the snap into the right side of the lining fabric. Cut two little slits where the prongs dented the fabric, then push the snap through the slits. Add the base on the other side and bend the prongs back with a pair of pliers. 9

 piece and install the other half of the snap there.")
10 Now take the Tall Pocket (B) and layer it over the Front/Back (C) outer fabric piece with all right sides facing up. Align the bottom edges and baste the sides and bottom in place. 15 With the Tall Pocket (B) 16 all basted, it ll be easier to tell exactly where to place the socket half of your magnetic snap. See where the upper half of the snap lands on the Front/Back (C) piece and install the other half of the snap there. And this section s finished! Set aside this piece until the Bringing the Outside Together section. 10
 interfacing piece, all of your appliqué pieces, and the 14 zipper 17 Apply the Front Pocket (E) fusible interfacing to the Front Pocket (E) outer fabric pieces.")

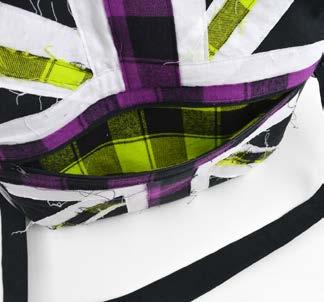
11 the outer front gather 2 Front Pocket (E) outer fabric pieces, 2 Front Pocket (E) interfacing pieces, 2 Front Pocket (E) lining pieces, 4 Zipper Tab (F) appliqué fabric pieces, 1 Front/Back (C) outer fabric piece, 1 Front/Back (C) interfacing piece, all of your appliqué pieces, and the 14 zipper 17 Apply the Front Pocket (E) fusible interfacing to the Front Pocket (E) outer fabric pieces. 18 For the appliqué, I opted not to use any fusible web because I wanted my appliqué edges to stay raw and get frayed. Grab all your applique pieces and lay them out in this order. First up is the background diagonal stripes. Line those up in the corners and they should overlap near the top. After that put in the diagonal accent stripes. Sew them around the edges either with a zigzag stitch or a straight stitch as I ve done. 11


12 After that are the straight background stripes; vertical first, then horizontal. These overlap the diagonal ones. Lastly there are the main stripes done the same way. The last horizontal main strip will go against the edge so the zipper seam only has 2 layers of fabric; less bulk that way. 19 When all of your appliqué is done, use the paper 20 pattern to trim the fabric and round off the corners where the diagonal stripes end. 12
 and sew through all 3 layers.")
 outer fabric piece (complete with appliqué) and the Front Pocket (E) lining piece with the right side of the zipper")
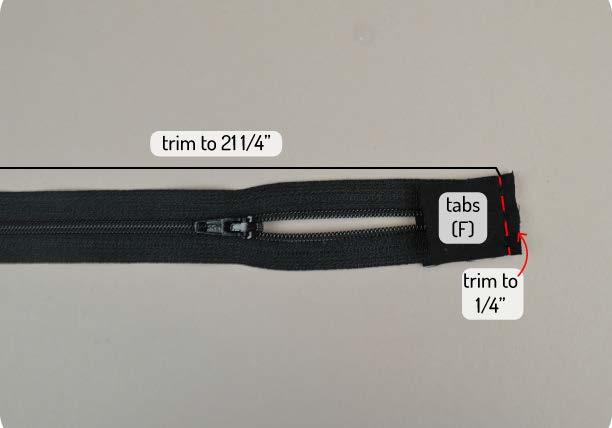
13 21 Time to prepare the zipper! To get it ready to sew, we re adding some zipper tabs to each end. Trim the zipper to 13 long, then sandwich each end of the zipper with two Zipper Tabs (F) and sew through all 3 layers. When finished, trim the seam allowance to 1/4 and press the fabric away from the zipper. Install it to your front 22 pocket by sandwiching it between the Front Pocket (E) outer fabric piece (complete with appliqué) and the Front Pocket (E) lining piece with the right side of the zipper facing the outer fabric. Match up the upper edge and sew through all three layers with a 1/4 seam allowance. Note here that I m using more green plaid as my lining instead of more of the lining fabric you had seen before. Repeat this with the other side of the pocket and the other Front Pocket (E) outer fabric and lining pieces. 13


14 When the seams are complete, press the fabric away from the zipper and edge stitch the seam close to the zipper for a professional finish. 23 We re ready to attach these pockets to a base, 24 but first that base needs a layer of interfacing. Fuse the Front/Back (C) interfacing piece to the back of the Front/Back (C) outer fabric piece. Note that I m using more green plaid as my outer fabric here to use up my stash XD but also for a nice pop of color. So it s not the typical black outer fabric as in the rest of the bag. 14


15 25 Lay your Front Pocket (E) piece on top of the Front/Back (C) piece with both right sides facing upward. Then baste around the entire perimeter of the layers to hold everything in place. That completes the Outer Front! Set this piece aside until the Bringing the Outside Together section. the strap & handle gather your Strap (L) outer fabric and Strap (L) interfacing, the Handle (G) outer fabric and the Handle (G) interfacing, 2 Tab (H) outer fabric pieces, 2 Tab (H) interfacing pieces, the belt buckle, the grommets, and the two rectangular metal rings Up first is the strap. Just 26 like with a lot of the other pieces, apply your Strap (L) interfacing to the Strap (L) outer fabric by ironing it in place. When finished, trim off 6 at the end of the strap, this will be your Buckle Tab. Set this aside until step
 right")

16 Fold the Strap (L) in half lengthwise and sew down the entire length. 27 Trim the extra seam allowance from the pointed 28 end and turn the Strap (L) right side out. It s best to use a blunt tool like the wrong end of a chopstick or a dowel to get this started, since it s quite easy to accidentally poke a hole in your strap with something sharper. 16


17 29 When the Strap (L) is all turned. Press it so the edges are all nice and crisp, then edge stitch around the perimeter of the strap. Next up, install the grommets near the pointed end 30 of your Strap (L). Center them along the strap and space them out about 3 or so apart. It really depends on how much you want your strap to adjust, but that s what I went with. The strap is ready to go! Set this aside until the Bringing the Outside Together section. 17


18 Get out the Buckle Tab back from step 26 and start assembling it. Fold under the long edges by 1/2 and press them in place. Then fold the whole piece in half lengthwise with wrong sides together. When everything s folded, edge stitch both sides just like in step 29 with the strap. 31 Fold the finished Buckle Tab in half widthwise 32 and cut a small hole in the center, this is for your buckle tine. Loop the buckle through the tab, inserting the tine in the hole. Put a dab of fray-blocking liquid on the hole for a bit of insurance. Bring together the raw edges of the tab and baste them together. Buckle s all ready now! Set this aside until the Bringing the Outside Together section. 18
 interfacing piece to the Handle (G) outer fabric piece as well as the")
, fold 34 under each long edge by 1/2 and iron in place, then fold under each short edge by")
19 33 Up next is the handle. First of course is to fuse the Handle (G) interfacing piece to the Handle (G) outer fabric piece as well as the Tab (H) interfacing pieces to the Tab (H) outer fabric pieces. For the Handle (G), fold 34 under each long edge by 1/2 and iron in place, then fold under each short edge by 1/2 and iron in place. To finish, fold the entire handle in half lengthwise with wrong sides together and iron the whole thing flat. 19
 to the rectangular metal rings 36 by folding over the short edges by 1 and wrapping those edges around the rectangular metal rings, one on each side.")
20 With your Handle (G) looking neat and spiffy, edge stitch around the entire piece. 35 Attach the Handle (G) to the rectangular metal rings 36 by folding over the short edges by 1 and wrapping those edges around the rectangular metal rings, one on each side. With the overlap, sew the ends of the handle in place by going back and forth with a straight stitch for extra strength. 20

 vinyl piece, your Handle (G), Strap (L), 21 zipper, and outer Back and Front sections First we start off with the 38 Top Front (I) and Top")
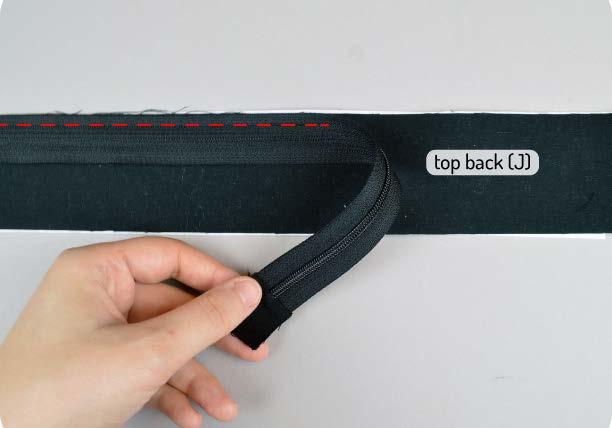
21 37 To make the tabs, fold under each long edge by 1/2, then each short edge by 1/2 and iron the folds in place. Then fold the whole tab in place widthwise. Set those aside until the Bringing the Outside Together section. bringing the outside together gather your Top Front (I) outer fabric and interfacing pieces, the Top Back (J) outer fabric and interfacing pieces, 4 Zipper Tab (F) outer fabric pieces, the Bottom (K) vinyl piece, your Handle (G), Strap (L), 21 zipper, and outer Back and Front sections First we start off with the 38 Top Front (I) and Top Back (J). Just like with a lot of the other pieces, we iron the corresponding interfacing pieces before we can get started. 21
22

.")
23 41 When the zipper is installed, press the fabric away from the zipper. To keep everything nice and flat, edge stitch close to the previous seam on both sides of the zipper. Up next is to add the 42 handle. Take your Handle (G) piece from step 36 and the Tabs (H) as well. Loop the tabs around the other end of the rectangular metal rings, then align the tabs onto the pattern guidelines on the Top Back (J). When everything is aligned (dabs of glue or tape help here if pins are too obtrusive), sew around the Tab (H) in a little square to anchor the Handle (G). 23

 with those of the top section you just created.")
24 After the handle, add in the Strap (L) and Buckle Tab on each side. I wear my bag on my right hand side and I want people to see the buckle, so basted the Buckle Tab on the left and side and the Strap (L) on the right. Center the raw ends over the zipper and baste in place with all right sides facing upward. 43 Now to add the bottom. Align the short edges of 44 the Bottom (K) with those of the top section you just created. Sew through all the layers and repeat with the other side to form a ring. 24


25 45 Since we re working with vinyl, it s going to react to topstitching a lot better than ironing. So after finishing the seam, fold it towards the vinyl and edge stitch the previous seam to flatten things out nicely. 46 Your top and bottom are all complete! Now we can add it to the front and back. Take the edge of the Top/Bottom with the Top Back (J) side and line it up with the edge of the Outer Back section we completed in step 16. You ll see that the seams from step 44 should line up with the square markings from the pattern. Pin up the edges the rest of the way, noting that you might want to clip about 3/8 into the seam allowance at the corners to make turning around the curves easier. When everything s all lined up, sew the edges in place. Move the zipper slider to the middle and repeat this step with the Outer Front section and the other side of the Top/Bottom. 25
 and Top Back (J) lining pieces and fold")
, there should be about a 1/2 gap in the middle where the folded edges rest. Sew the edges together here.")
26 bringing the inside together gather your Top Front (I) lining fabric piece, the Top Back (J) lining fabric piece, the Bottom (K) lining piece, the Inner Front section, Outer Front section, and the whole Outer Bag for last Take your Top Front (I) and Top Back (J) lining pieces and fold under one long edge of each by 1/2 and press them flat. 47 Align the short edge of these with the short edge 48 of the Bottom (K) lining piece. When aligned flush with the Bottom (K), there should be about a 1/2 gap in the middle where the folded edges rest. Sew the edges together here. 26
 gets pinned")

27 49 Press the seam allowances towards the Bottom (K) piece and edge stitch the finished seam just as in step 45. Grab your Inner Front 50 piece and align the Top/ Bottom section you just created around it, making sure the edge with the Top Front (I) gets pinned to the Inner Front. We re repeating the same thing as step 46, sewing the Top/ Bottom around the sides of the Inner Front and Back pieces. Be sure to match up the square markings and clip the seam allowances in the corners to help with the curves. When you ve sewn the Inner Front and Back to both sides, your Inner Bag is all done! 27

28 To join the Inner Bag to the Outer Bag, first turn 51 the Outer Bag inside out. Turn the Inner Bag right side out and nestle the Outer Bag inside. The folded opening in the Inner Bag should line up with the zipper from the Outer bag, allowing you to stitch all around and join the two halves. Sew it all in place with a slip stitch as well as a few more tacking stitches around the side seams to keep the lining anchored within the bag. 28
29 B1 B2 Pg. 1/15 zipper window (back lining only) side seam point London Calling Bag PATTERN FRONT & BACK (C) Cut 2 on fold of outer fabric Cut 2 on fold of lining fabric Cut 2 on fold of fusible interfacing ½ seam allowance cut on fold A1 A2
30 B3 B4 Pg. 2/15 London Calling Bag PATTERN SHORT POCKET (A) Cut 4 on fold of lining fabric ½ seam allowance cut on fold A3 A4 1 A2
31 B5 B6 Pg. 3/15 zipper window 3 A4 London Calling Bag PATTERN HIDDEN POCKET (D) Cut 2 on fold of lining fabric ¼ seam allowance cut on fold A5 A6 cut on fold
32 B7 B8 A7 A8 Pg. 4/15 5 A6 handle tab placement
33 B9 B10 Pg. 5/15 7 A8 metal ring fold line London Calling Bag PATTERN HANDLE (G) Cut 1 of outer fabric Cut 1 of fusible interfacing ½ seam allowance metal ring fold line TABS (H) Cut 2 of outer fabric Cut 2 of fusible interfacing ½ seam allowance London Calling Bag PATTERN ZIPPER TABS (F) Cut 4 of outer fabric Cut 4 of main strip applique fabric ½ seam allowance
34 D1 D2 C1 C2 1 B2 Pg. 6/15 snap placement London Calling Bag PATTERN TALL POCKET (B) Cut 3 on fold of lining fabric Cut 1 on fold of outer fabric Cut 1 on fold of fusible interfacing (sans seam allowances) ½ seam allowance cut on fold
35 D3 D4 3 B4 Pg. 7/15 applique guidelines 1 C2 London Calling Bag PATTERN FRONT POCKET (E) Cut 2 of outer fabric Cut 2 of lining fabric Cut 2 of fusible interfacing ½ seam allowance C3 C4
36 D5 D6 5 B6 Pg. 8/15 3 C4 London Calling Bag PATTERN BOTTOM (K) Cut 1 of vinyl Cut 1 of lining fabric ½ seam allowance C5 C6
37 D7 D8 7 B8 Pg. 9/15 5 C6 TOP FRONT (I) Cut 1 of outer fabric Cut 1 of lining fabric Cut 1 of fusible interfacing ½ seam allowance C7 C8 London Calling Bag PATTERN London Calling Bag PATTERN TOP BACK (J) Cut 1 of outer fabric Cut 1 of lining fabric Cut 1 of fusible interfacing ½ seam allowance handle tab placement
38 D9D10 9 B10 Pg. 10/15 7 C8 ACCENT STRIP APPLIQUE (DIAGONAL STRIPE) Cut 4 of accent fabric London Calling Bag PATTERN BACKGROUND APPLIQUE (VERTICAL STRIPE) Cut 2 of background fabric London Calling Bag PATTERN
39 E1 E2 1 D2 Pg. 11/15 note: cut points on one end only
40 3 D4 5 Pg. 12/15 1 E2 London Calling Bag PATTERN London Calling Bag PATTERN E3 E4 London Calling Bag PATTERN STRAP (L) Cut 1 on fold of outer fabric Cut 1 on fold of fusible interfacing ½ seam allowance
41 5 Pg. 13/15 5 D6 MAIN STRIPE APPLIQUE (HORIZONTAL) Cut 2 of main applique fabric 3 E4 BACKGROUND APPLIQUE (HORIZONTAL STRIPE) Cut 2 of background fabric E5 E6
42 E7 E8 5 Pg. 14/15 7 D8 5 E6 London Calling Bag PATTERN BACKGROUND APPLIQUE (DIAGONAL STRIPE) Cut 4 of background fabric
43 5 Pg. 15/15 9D10 7 E8 cut on fold London Calling Bag PATTERN MAIN STRIPE APPLIQUE (VERTICAL) Cut 2 of main applique fabric
tri-fold wallet a sewing pattern by
 a sewing pattern by tri-fold wallet This project is for a basic wallet that folds up into thirds, but it features a contrast front band, snap closure, credit card pockets, cash pocket, and zippered coin
hard core hook case a sewing pattern by
 hard core hook case a sewing pattern by hard core hook case This case is something I designed for myself to store my crochet hooks and other tools. What gives it an edge are the contrast patches, skull
the totoro bag a sewing pattern by
 the totoro bag a sewing pattern by the totoro bag sewing tutorial the totoro bag This bag was inspired by the character Totoro from the movie My Neighbor Totoro. It features an inner pocket, raw edge applique,
the big shopping bag a sewing pattern by
 the big shopping bag a sewing pattern by big shopping bag sewing tutorial the big shopping bag This project is a basic tote, but in an extra large size. With added vinyl bottom and sides, as well as a
a free sewing pattern by
 a free sewing pattern by 2 kitty wallet This project is a fun companion piece to my Kitty Purse pattern. It's a bi-fold wallet with the traditional slots for cards (6) and one for receipts or bills. A
scientist's satchel a sewing pattern by
 scientist's satchel a sewing pattern by scientist s satchel sewing tutorial scientist s satchel This project is a steampunk inspired messenger bag with a vertical zippered pocket on the front flap. It
battie treat bag a sewing pattern by
 a sewing pattern by battie treat bag This project is for a simple small bucket bag but with added details that make it perfect for stashing away treats for Halloween. It features tiny bat wings, ears,
sakura purse a sewing pattern by
 a sewing pattern by sewing tutorial sakura purse This little purse was inspired by sakura (cherry) blossoms and springtime in general. It features a snap closure and interesting curved shape at the opening.
gothic lolita satchel
 gothic lolita satchel a sewing pattern by gothic lolita satchel sewing tutorial gothic lolita satchel This satchel was inspired by the Gothic Lolita style so popular amongst Harajuku fashionistas in Japan.
box pouch a sewing pattern by
 a sewing pattern by box pouch This project is a basic zippered pouch pattern, but with every corner boxed out for lots of extra holding room. It s constructed with French seams for a neat interior, and
retro circle purse a sewing pattern by
 a sewing pattern by retro circle purse This purse design was just kind of a crazy experiment I had to create a purse that opened out on the side instead of on the top. It s finished off with a mod-like
tablet sleeve a sewing pattern by
 a sewing pattern by tablet sleeve This project is a simple zippered pouch made to fit most 7 tablets. It features a zipper that wraps around the top half of the pouch so it opens wide and fits snugly around
ringo shiina sling a sewing pattern by
 ringo shiina sling a sewing pattern by ringo shiina sling sewing tutorial ringo shiina sling This bag is basically just a sling style bag shaped like a guitar, but the inspiration is from my favorite musician,
pleated clutch a sewing pattern by
 a sewing pattern by pleated clutch This project is for a small and simple clutch, assembled with a French seam, and a front decorated in lots of detailed pleats. It also features a wrist strap for holding
the give me all the bacon & eggs you have tablet case a sewing pattern by
 the give me all the bacon & eggs you have tablet case a sewing pattern by bacon & egg tablet case This project on its own is just a simple zippered pouch, sized for a 7 tablet with accompanying small pouch.
gunter plush a sewing pattern by
 a sewing pattern by gunter plush This project is a huggable little plush made to look like Gunter, the mischievous little penguin and the Ice King s buddy from Adventure Time. It features little wings
ruffled strip clutch a sewing pattern by
 a sewing pattern by ruffled strip clutch This project is a simple zippered pouch but has an interesting textural twist. It features contrast corner patches and is also covered in an array of frayed and
tiny totoro tote a sewing pattern by
 a sewing pattern by sewing tutorial tiny totoro tote This simple tote was inspired by the chibi-totoro that turn in up the movie My Neighbor Totoro. The applique is optional, but on its own it s a great
side cinch tote a sewing pattern by
 a sewing pattern by sewing tutorial side cinch tote This bag features a set of purchased handles, patchwork stripes, boxed out corners, and sides that cinch up with cording or ribbon to create cute bows
Escape Mini Bags Finished size: 8" x 10" x 2" Makes 2 Bags
 TM Escape Mini Bags Finished size: 8" x 10" x 2" Makes 2 Bags SUPPLIES NEEDED 2-1 Yard Cottons (Escape Brown Floral and ) 2 - ¼ Yard Cottons (Escape Green Floral) 3 8 yd. Pellon 987F Fusible Fleece 1 ½
Cut 1 lightweight interfacing
 1 2 A note on interfacing for this bag: This pattern is intended to produce a slouchy bag, so you will want to look carefully at your fabrics before you decide on which interfacing and stabilisers to use.
energy tank cup sleeve a sewing pattern by
 energy tank cup sleeve a sewing pattern by energy tank cup sleeve This project is inspired by the Megaman video games, and is made to look like the energy tank one collects in the games. What better place
yoshi egg potholder a sewing pattern by
 yoshi egg potholder a sewing pattern by yoshi egg potholder These rounded potholders were inspired by the eggs laid by the character Yoshi from the Super Mario video games. They feature a bias bound edge
Frou Frou Bag Intermediate
 Frou Frou Bag Intermediate Sewn By Sara Lawson http://www.sewsweetness.com This bag features ruffled flaps, snap closure and an adjustable strap. The small front pockets are 3-dimensional. Beautiful detailing
Urban Jungle Bag Advanced
 Urban Jungle Bag Advanced Designed by Sara Lawson Sewn By Sara Lawson http://sewsweetness.com This adorable bag features leather handles and accent detailing on the front and sides. With a zipper top,
All seam allowances are 1/2 unless otherwise noted. All pattern pieces include the seam allowance. Please read all instructions before beginning.
 This small bag will allow you to try out several fun bag-making techniques; adding a metal twist lock, using piping in a bag, making darts, and adding elastic pockets. Use your favorite print and combine
MewnicorN. pillow plush. a sewing pattern by
 MewnicorN pillow plush a sewing pattern by 2 A super cute plush that's big and cuddly enough to be a pillow! This simple stuffed cat is sure to warm the heart of any magic-lover with its majestic unicorn
mermaid quilt a sewing pattern by
 a sewing pattern by mermaid quilt This project is a simple and straightforward piece for applique lovers. I personally designed it for a coworker s daughter -- a sweet little girl who s current obsession
shiba cube puppy plush a sewing pattern by
 shiba cube puppy plush a sewing pattern by If you ve ever sewn a cube before, this pattern takes it to the next level! The classic geometric shape forms a chubby little puppy body complete with four stubby
Bon Voyage - bag pattern -
 ~~~ Bon Voyage Bag Pattern ~~~ 2014 Geta Grama; www.romanianquiltstudio.com Bon Voyage - bag pattern - Size: 18 wide at top; 21 wide at bottom; 15'' tall (without straps); 5'' deep; two interior pockets;
a free sewing pattern by
 a free sewing pattern by 2 Kupo! Fans of Final Fantasy are sure to love this extra fuzzy Moogle! It has all the classic details that make the character so adorable -- including little wings, kitty ears,
One Step Quilts - handbag and pouch
 One Step Quilts - handbag and pouch A sweet handbag and pouch pattern sewn from one yard of pre-printed fabric from Lecien. Fabric and notions: 1 yard of the One Step Quilts handbag and pouch fabric 1
c) Fold & press the Binding in half lengthwise, Wrong Sides facing, and unfold.
 Fold & press the Binding in half lengthwise, Wrong Sides facing, and unfold.") OTHER TOOLS & SUPPLIES - 1 yd of quilt batting (58 wide) - (2) 1-1/2 to 2 metal rings - (10) 7/16 metal grommets - paper printer - basic sewing supplies: - sewing machine with even feed foot - needle &
OTHER TOOLS & SUPPLIES - 1 yd of quilt batting (58 wide) - (2) 1-1/2 to 2 metal rings - (10) 7/16 metal grommets - paper printer - basic sewing supplies: - sewing machine with even feed foot - needle &
a free sewing pattern by
 a free sewing pattern by 2 witch kitty plush Ready your broom and cape! This adorable little kitty is all decked out for Halloween. The pattern comes with loads of cute details, including a capelet with
love koi plushies a sewing pattern by
 love koi plushies a sewing pattern by love koi plushies This project was both inspired by the Japanese pun where koi means both carp and love and the beautiful yin-yang moon-spirit carp from Avatar: The
Cargo Duffle Pattern. structured duffle // cargo pockets // great for traveling
 Cargo Duffle Pattern structured duffle // cargo pockets // great for traveling Fabric Requirements & Notions: + Requirements based on 44 wide fabric. 1 yard exterior main 3/4 yard bottom accent/bottom
The Sunshine An in-the-hoop project
 The Sunshine An in-the-hoop project All the music I walk to is on my phone, but my new iphone 6+ is too big to fit in my pocket. This case is the perfect solution. That s my iphone 6+ peeking out of it
1. Print our the Fox Hat pattern (pages 8-11 of this tutorial) at 100% of actual size. Cut out the
 at 100% of actual size. Cut out the") Other Supplies - 2 black buttons (for eyes) - One bag of fiber stuffing - Paper printer - Basic sewing supplies: - sewing machine - needle & coordinating thread - straight pins - scissors & fabric shears
Other Supplies - 2 black buttons (for eyes) - One bag of fiber stuffing - Paper printer - Basic sewing supplies: - sewing machine - needle & coordinating thread - straight pins - scissors & fabric shears
wampa plush a sewing pattern by
 a sewing pattern by difficulty: wampa plush This project is an geeky Star Wars homage to the monster from the beginning of The Empire Strikes back. The creature features a detachable arm with a bloody
Kindle Case with Pocket 1 An In-the-Hoop Project
 Kindle Case with Pocket 1 An In-the-Hoop Project 2011, 2015 Peggy Severt, Pegboard Crafts Updated April 2015. Minor improvements. pegboard1@yahoo.com or peggy@pegboardcrafts.com http://www.pegboardcrafts.com
furoshiki casserole carrier a sewing pattern by
 a sewing pattern by furoshiki casserole carrier This project is inspired by the Japanese art of furoshiki, which makes squares of cloth into bags and carriers by strategically folding and tying. This patchwork
NIGHT FURY HOODIE HACK. a free sewing pattern by
 NIGHT FURY HOODIE HACK a free sewing pattern by 2 NIGHT FURY HOODIE These instructions are meant to work alongside my cosplay hoodie pattern, but you can use the tips and templates here to modify your
neko atsume plushies a sewing pattern by
 neko atsume plushies a sewing pattern by neko atsume plushies These plushies are of course inspired by the adorable Neko Atsume (kitty collector) kitties -- specifically Pepper, Dottie, and Misty. They
OTHER TOOLS & SUPPLIES
 OTHER TOOLS & SUPPLIES - Fat Eighth of fusible fleece - 1/4 yd of fusible cotton interfacing (22 wide) - 1 yd of piping in coordinating color - (1) 1 D-Ring - (1) 1 swivel hook - (1) 8 closed-end zipper
Sewing Tutorial: The Wampa Plush
 Sewing Tutorial: The Wampa Plush This plush is one of the many free projects I ve started posting on my website as part of an adventure to destash my huge collection of scrap fabrics ^-^ I wanted to make
skeleton tie a sewing pattern by
 skeleton tie a sewing pattern by skeleton tie sewing tutorial skeleton tie This project on its own is just a basic tie, simplified to be an easy costume piece. The optional applique makes it look just
Kindle Case with Pocket 3 An In-the-Hoop Project
 Kindle Case with Pocket 3 An In-the-Hoop Project 2011, 2015 Peggy Severt, Pegboard Crafts Updated April 2015. Minor improvements. pegboard1@yahoo.com or peggy@pegboardcrafts.com http://www.pegboardcrafts.com
Note: Yardage and supplies listed are for all three bags.
 Stash Pouches Finished sizes: Large 10" (25.4 cm) wide x 81/2" (21.6 cm) tall x 31/2" (8.9 cm) deep Medium 9" (22.9 cm) wide x 7" (17.8 cm) tall x 3" (7.6 cm) deep Small 8" (20.3 cm) wide x 6" (15.2 cm)
Night fury. plush. a sewing pattern by
 Night fury plush a sewing pattern by 2 Night Fury Plush skills used: Get ready for your own dragon-riding adventure with this fun night fury plush! This pattern will show you how to make this cute dragon
*All seam allowances are 1/4 unless otherwise noted. All pattern pieces include the seam allowance.
 Kelley Crossbody Bag Supplemental Instructions to Online Video Course www.craftygemini.com http://craftygemini.com/2016cgbagclub 2015 Crafty Gemini LLC. All rights reserved. *This pattern cannot be photocopied,
The Katey An in-the-hoop project
 The Katey An in-the-hoop project An over-the-shoulder/cross-body purse with 3 pockets. Back pocket is zippered and full length of the purse. Middle pocket is open. Front pocket has a flap closure and includes
The Allie An in-the-hoop project
 The Allie An in-the-hoop project A wallet/coin purse for the 5x7 hoop. The Allie has 3 credit card slots in the front section which features a large flap with a snap closure. You can carry coins or other
CHOCOBO. plush. a free sewing pattern by
 CHOCOBO plush a free sewing pattern by 2 chocobo plush Kweh! Final Fantasy fans are sure to love this chibi version of the classic rideable bird. It has a large head, a prominent beak and a big feather
Cargo Duffle Pattern. structured duffle // cargo pockets // great for traveling
 Cargo Duffle Pattern structured duffle // cargo pockets // great for traveling Fabric Requirements & Notions: Cut Pattern Pieces: + requirements based on 44 wide fabric+ 1 yard exterior main 3/4 yard bottom
What you will need: 9 x 12 piece of fabric (interior pocket) 9 x 8.5 piece of fabric (bottom of zipper pocket) 4 x 9 piece of fabric (top of zipper
 9 x 8.5 piece of fabric (bottom of zipper pocket) 4 x 9 piece of fabric (top of zipper") What you will need: 9 x 12 piece of fabric (interior pocket) 9 x 8.5 piece of fabric (bottom of zipper pocket) 4 x 9 piece of fabric (top of zipper pocket) 6 x 9 piece of fabric (zipper pocket lining)
What you will need: 9 x 12 piece of fabric (interior pocket) 9 x 8.5 piece of fabric (bottom of zipper pocket) 4 x 9 piece of fabric (top of zipper pocket) 6 x 9 piece of fabric (zipper pocket lining)
Plenty of Pockets Duffel Bag
 Plenty of Pockets Duffel Bag By: Cheryl Bush of www.sewcando.com A bag that's amazing for organizing on the go. Two rows of pockets on the outside, another full row of pockets on the inside, with a drawstring
Sunday: My Way-Life s Little Everything Bag
 Sunday: My Way-Life s Little Everything Bag The Sunday Bag was designed to be like a lazy Sunday afternoon- A Blank Canvas. The design was created to be simple; a beginner sew, but an open canvas for those
Canadian Quilters Association Pattern: Quilting Tools Tote Bag
 Canadian Quilters Association Pattern: Quilting Tools Tote Bag Description: * Size: 24 x 28", storage for: 6 x 24" ruler and 18 x 24" cutting mat, and all other equipment. * Easy to carry to workshops
~~~ Little Wonders Pouch Patterns ~~~ 2014 Geta Grama; Boxy Pouch
 Boxy Pouch Pouch size: 6 wide at bottom; 9 wide at top; 7½ tall; 3 deep ~ Please read all the instructions carefully before starting to make the pouch ~ Page 1 1. Materials List Main fabric: 10 x 20 (I
Hip Packing Holster. ¼ yd lining fabric one - 7 ½ x 24 lining one - 8 x 4 ½ (C) elastic pocket. ¼ yd fusible fleece one - 7 ½ x 24
 elastic pocket. ¼ yd fusible fleece one - 7 ½ x 24") Hip Packing Holster Read directions before starting. Seam allowances are ¼, basting is 1/8. Options are given to make slits for a belt or for a strap. Or you can do both. Make the following cuts in the
Hip Packing Holster Read directions before starting. Seam allowances are ¼, basting is 1/8. Options are given to make slits for a belt or for a strap. Or you can do both. Make the following cuts in the
Make a small zipped bag or pencil case from upcycled fabric
 Make a small zipped bag or pencil case from upcycled fabric FAMILY CRAFTS MAKE USE OF YOUR FABRIC SCRAPS WITH THIS HANDY GUIDE. ONCE MASTERED, IT CAN BE ADAPTED TO CREATE BAGS OF ALL SIZES. YOU WILL NEED
Hot Pads with Ribbon & Decorative Stitch Accents
 Published on Sew4Home Hot Pads with Ribbon & Decorative Stitch Accents Editor: Liz Johnson Friday, 01 September 2017 1:00 Hot pads provide a great small surface to experiment with some embellishment. Obviously,
Terrie Sandelin Miniatures in Minutes
 Terrie Sandelin Miniatures in Minutes http://www.terriesandelin.com http://terriesandelin.blogspot.com/ Tumbler Foundation: Tote Bag Finished Foundation: 7" by 7" Approximate size of bag: 12" by 10" by
Big Pocket Baby Clutch Tutorial The pattern pieces all include a 3/8'' seam allowance.
 Big Pocket Baby Clutch Tutorial The pattern pieces all include a 3/8'' seam allowance. You will need: 3-4 fat quarters of fabric (depending on how many different fabrics you want to use). More fabric will
a free sewing pattern by
 a free sewing pattern by 2 sloth plush Bask in your lazy side with this adorable and interactive sloth plush. The claws have Velcro so it's able to hang on anything at the ready like the corner of a door,
Fast Gift Wrap Sleeves in Felt & Cotton
 Published on Sew4Home Fast Gift Wrap Sleeves in Felt & Cotton Editor: Liz Johnson Thursday, 07 December 2017 1:00 Slice, stitch, tie, give. Just four steps to fast and festive (and reusable!) gift wrap
Baby Gifts: Pretty Bird Quick Trip Diaper Bag
 Published on Sew4Home Baby Gifts: Pretty Bird Quick Trip Diaper Bag Editor: Liz Johnson Wednesday, 14 July 2010 9:00 Our smaller (and cuter) diaper bag isn't meant to supplant the full-size, workhorse
The Beth An in-the-hoop project
 The Beth An in-the-hoop project A classic wristlet. Tab on front pocket snaps closed to keep your phone safe. The back zipper opens to reveal 6 credit card slots and room to hold other necessities. Comes
Closet Hanger Safe for Travel & More
 Published on Sew4Home Closet Hanger Safe for Travel & More Editor: Liz Johnson Friday, 15 May 2015 1:00 We originally designed this clever little storage solution for the frequent travelers out there.
PLANNER COVER BY SARAH THOMAS OF SARIDITTY
 XXy asdf asdfy XXX Star Blazer PLANNER COVER BY SARAH THOMAS OF SARIDITTY Thank you for downloading this pattern for your Quilter s Planner. Sarah originally developed her Star Blazer Mini for Modern Quilts
Beaded Clutch. Other Supplies 7 zipper
 Beaded Clutch Other Supplies 7 zipper Preparation 1. Print out the templates found on the last three pages of this tutorial at 100% of actual size and trace them onto folded double layers of your fabric
Sleek Fabric Wallet with Zippered Coin Pouch
 Published on Sew4Home Sleek Fabric Wallet with Zippered Coin Pouch Editor: Liz Johnson Thursday, 18 February 2016 1:00 Someone told me the other day that he believed money would soon become completely
narwhal plush a free sewing pattern by
 narwhal plush a free sewing pattern by 2 narwhal plush Make your own 'unicorn of the sea' with this cute pocket-sized narwhal! With just 4 pattern pieces, it sews up quickly and is great for a beginner
Crossbody Canvas Bucket Tote
 Published on Sew4Home Crossbody Canvas Bucket Tote Editor: Liz Johnson Tuesday, 16 May 2017 1:00 This modern canvas bucket bag has great slouchy style and tough construction details, making it a good choice
mario block plush a sewing pattern by
 mario block plush a sewing pattern by mario block plush difficulty: This plush was of course inspired by the? block from the various Super Mario games. It s a simple cube done up with the details to make
dragon & unicorn hooded cowl a free sewing pattern by
 dragon & unicorn hooded cowl a free sewing pattern by 2 hooded cowl When you re ready to break out a scarf or hat for chilly weather, try putting on this cozy cowl! It s a hood and scarf in one with cute
Child s Purse An In-the-Hoop Project
 Child s Purse An In-the-Hoop Project Shoulder bag in two sizes, with optional quilting. You may also choose to close the bag with Velcro or with a snap or other type of closure. Files and instructions
Embroidered Scrap Bag and Bed Caddy Carol A. Brown
 Embroidered Scrap Bag and Bed Caddy Carol A. Brown Materials: 1. Outer fabric for Scrap Bag (sturdy fabric such as poplin): at least 12-1/2 wide by 22 high. 2. Outer fabric for Bed Caddy (sturdy fabric
Double Zipper Device Sleeve with Wrist Strap
 Published on Sew4Home Double Zipper Device Sleeve with Wrist Strap Editor: Liz Johnson Thursday, 13 July 2017 1:00 We love the idea of concealing a cutting-edge electronic device inside a vintage wrapper.
Small Messenger Bag. Supplies:
 Small Messenger Bag Supplies: -main fabric: 3/4 yard -lining fabric: 1/3 yard (more if not using contrast for inner pockets) -contrast fabric for inner pockets (optional): approx 1/2 yard, depending on
Messenger Bag Tutorial
 Messenger Bag Tutorial The finished measurements of this bag are 15 wide X 13 long X 3 ½ deep. Prepare: Begin by cutting out your pattern pieces. You ll need two inner, two outer and two hidden fleece
Blues & Jazz. Pack Designs
 Pack 12369 10 Designs Note: Some designs in this collection may have been created using unique special stitches and/or techniques. To preserve design integrity when rescaling or rotating designs in your
a free sewing pattern by
 a free sewing pattern by 2 rat plush Whether you think rats are adorable or excitingly scary, this pattern is sure to make something you'll love! The instructions here go over making a sweet little rodent
love dragon plush a free sewing pattern by
 love dragon plush a free sewing pattern by 2 love dragon plush A combination of a Valentine's and Chinese New Year celebration with the most adorable result! This little dragon pattern is done in the more
sugar skull kit ty plush a sewing pattern by
 sugar skull kit ty plush a sewing pattern by sugar skull kit ty plush This pattern pays homage to the beautiful calaveras seen in Dia de Muertos art. It s a simple kitty plush with button jointed limbs
maneki neko coin pouch a sewing pattern by
 maneki neko coin pouch a sewing pattern by maneki neko coin pouch Maneki Neko is Japanese for beckoning cat, often known as a Lucky Cat in English. These adorable kitties are used in Asian businesses to
owl bear plush a free sewing pattern by
 owl bear plush a free sewing pattern by 2 owl bear plush This pattern is a variation of my previous owl plush, an adorable bear version that's an homage to the classic monsters from Dungeons and Dragons
eevee evolution blob plush a free sewing pattern by
 eevee evolution blob plush a free sewing pattern by 2 eevee blob plush Everyone s got a favorite Eevee evolution! This pattern will take you through making ALL 9 evolutions in cute blob plush form! At
Original Recipe. Let s Go Trippin by Polly Monica
 Original Recipe Let s Go Trippin by Polly Monica Hello again! I m Polly from Aunt Polly s Porch blog {auntpollysporch.blogspot.com} and I m so happy to be sharing my designs again on the Moda Bake Shop!
The Granny An in-the-hoop project
 The Granny An in-the-hoop project An over-the-shoulder/around the neck purse with 3 pockets. Back pocket is zippered and full length of the purse. Middle pocket is open, behind the flap. Front pocket has
Evie Carry All Trio. Tools: Needle and thread PURSE
 Evie Carry All Trio Purse Make Up Bag Sunglasses Case 9 zipper 1 spool all purpose thread SUNGLASSES CASE 1/8 yd exterior 1/8 yd 810 Tru-Grid 1/8 yd interior 1/8 yd 987 Fusible Fleece ½ dia. Circular Velcro
sting plush glows in the dark! a sewing pattern by
 glows in the dark! a sewing pattern by sting plush This plush is of course inspired by the weapon used by Bilbo and Frodo in The Hobbit & The Lord of the Rings books and movies. It features a filigree
Embroidered Scrap Bag Carol A. Brown
 Embroidered Scrap Bag Carol A. Brown Materials: 1. Outer fabric (sturdy fabric such as poplin): at least 12 1/2 wide by 22 high. 2. Medium weight fusible interfacing: same size as for fabric. 3. Lining
Prima Diva. .Style, function and loads of compliments That s what the Stella Sling Bag brings!!
 .Style, function and loads of compliments That s what the Stella Sling Bag brings!! Supplies: 1/2 Yard Main Print (Outside of wallet, Outside of pockets, optional strap, etc..) 5/8 Yard Accent Print (Lining
astrobunny & cosmokitty plush a sewing pattern by
 astrobunny & cosmokitty plush a sewing pattern by astrobunny & cosmokitty plushies Ever on an adventure, best friends Astrobunny and Cosmokitty are searching the farthest reaches of space to see what new
Sew Sweetness. Oriole Bag. Sara Lawson
 Sew Sweetness Oriole Bag Sara Lawson Oriole Bag This bag comes in 2 different sizes and comes together quickly with the creative use of darts and front and back fabrics! Try your hand at using a bit of
a free sewing pattern by
 kitty bean plush a free sewing pattern by 2 kitty bean plush This cute and simple plush is a variation on a tsum-tsum in that it has a long round body that's perfect for stacking! Though the basic shape
Sewing Organiser Pattern
 Sewing Organiser Pattern Requirements: 1m Outer Fabric 1m Lining Fabric 1m Cobweb fusible web (or similar) 1m Bag Batting 1m Parlon 4 x 30cm Open ended Zip Optional extras Fat Quarter of Clear Vinyl for
Cosmetics Case with Vinyl Interior Skill Level: Intermediate
 Cosmetics Case with Vinyl Interior Skill Level: Intermediate Designed By Lindsey Rhodes Sewn By Lindsey Rhodes http://lrstitched.com Use this step by step tutorial to create a roll-up cosmetics case with
Full details of the products you ll need including the colours of Decracraft Felt, can be found on the next page.
 PATTERN BY Our light yet sturdy drawstring bag features a combination of stunning colours from our Decracraft Felt range. Create your own drawstring bag using this pattern. Full details of the products