OVERVIEW You are installing 2 Major components: SITE PREP Remove organics
|
|
|
- Samson Hart
- 5 years ago
- Views:
Transcription


1


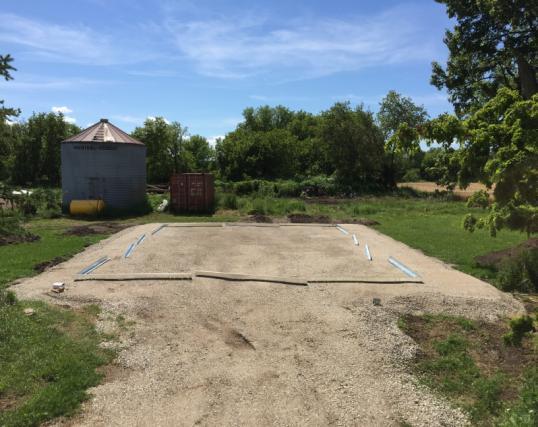
2 OVERVIEW You are installing 2 Major components: Dimensionally stable exterior frame with pre-drilled thread-bar holes. High yield thread-bar in a predetermined grid pattern (slab) and a heavy concentration of High Yield 100 Grade Bar around the exterior beam SITE PREP Remove organics to the hardpan, 3 to 4 wider than the building Footprint for drainage and frost protection Install A gravel min 6 to 10 thick, compact level in 4 intervals


3 Corner channels have a concentration of slotted holes on the end; refer to your permit drawings for amount of corner bars required in the corners and their position in the exterior beam Spacer channels will have splice plate holes on the ends and are installed between the corner channels Splice the corners first Overlay cee-channels to create a corner, bolt through holes and tighten

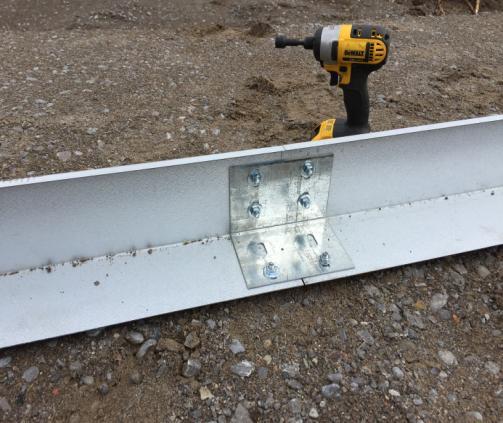
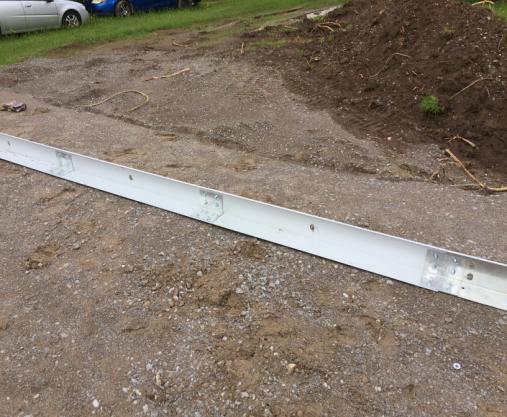
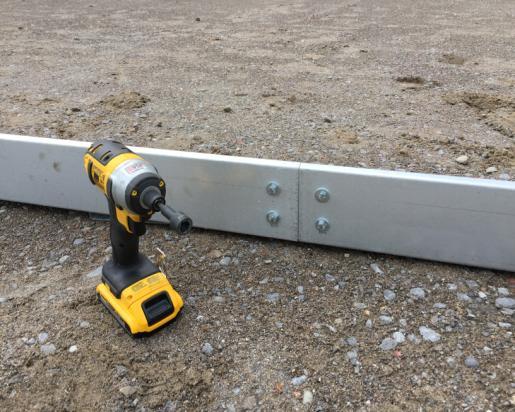
4 ASSEMBLE FORM SPLICE PLATES/BOLTS/WASHERS SPLICE EXTERIOR CHANNEL LENGTHS AS PER FOUNDATION DRAWINGS

 NEXT: INSTALL THE SLAB GRID BARS IN WIDTH THEN LENGTH")

5 BAR INSTALL SEQUENCE BEAM BAR CHAIRS SUPPORT THE LOWER AND UPPER EXTERIOR BEAM BARS SINGLE CHAIRS ARE PROVIDED FOR THE SLAB GRID FIRST: INSTALL THE BOTTOM BEAM BARS IN LENGTH (SEE PERMIT DRAWINGS SECTION A) SECOND: INSTALL THE BOTTOM BEAM BARS IN WIDTH (SEE PERMIT DRAWINGS SECTION B) NEXT: INSTALL THE SLAB GRID BARS IN WIDTH THEN LENGTH MEASURE AND LOCK IN EACH LOCATION LAST: INSTALL THE UPPER EXTERIOR BEAM BARS IN LENGTH RESTING ON THE BEAM BAR CHAIRS SQUARE FORM FIRST WIRE TIE ALL BAR CROSSES AS THE FINAL STEP


6 Be sure the return flange of the channel is flat on the ground, lift the form channel while lock tightening the nuts to be sure Install the Slab Grid before locking the width bars to ensure a more accurate measurement and create a minor tension IMPORTANT: Install the lower corner channel beam bars first, in length then in width Continue installing the grid bars and lock nuts in width Cross measure the form and square The upper beam bars are installed after all the slab grid bars


7 Install the Length bars with Lock nuts as above Measure Grid Bars in both directions to ensure grids are perfectly square Install re-bar chairs at every other bar cross, wire tie those connections after the form is squared Tighten the exterior Lock- nuts with a crescent wrench after all slab bars are installed Tape un-used beam holes from the inside


8 You have 5 levels of Extreme Strength Bar


9 ANCHOR BOLT LOCATION TEMPLATES FASTEN ANCHOR BOLTS TO TEMPLATE C/W NUTS TOP AND BOTTOM LOCATE ANCHOR BOLT TEMPALTES AS PER STRUCTURAL DRAWING ANCHOR BOLT LAYOUT INSTALL ANCHOR BOLTS AS PER ANCHOR BOLT DETAIL LOCATE ENDWALL COLUMN ANCHOR BOLT TEMPLATES


10 Stake and line one side in length prior to re-bar installation Prior to pour check the exterior lock nuts are tight Cross measure and check for square Confirm the Level


11 Pour with Fibre-Mesh 32MPA concrete Protect the Anchor bolt threads Finish the Slab Remove the exterior nuts and Glue 2 SM to the exterior face of the form Back-Fill over the SM frost protection wings as per the Permit drawings


12 L or J BOLT ANCHORS FOR 5 SLABS LIFT THE PLATE AND HAND FINISH AROUND THE TEMPLATE POURED IN PLACE ANCHORS- NO DRILLING REQUIRED

13 WARNING!!! PROPER LEVEL PROCEDURE CORRECT CHANNEL POSITION ON LEVEL BASE DO NOT ADJUST THE CHANNEL LEVEL USING ROCKS CONCRETE WEIGHT WILL TIP AND DEFORM THE CHANNEL CONCRETE PATIO STONE BLOCK ON FLAT LEVEL FORM USE CONCRETE PATIO STONES, PAVERS, DIMENSIONAL LUMBER, ETC.
14 Re: Cap 1. Corner channels have a concentration of slotted holes; refer to your permit drawings for amount of corner bars required in the corners and their position in the exterior beam (Quantity of bars on the top slots and Quantity of bars on the lower slots) are important. 2. Spacer channels will have splice plate holes on the ends and are installed between the corner channels. 3. Splice the corners first with the splice plate and hardware provided. Hold a carpenters square to the corner and tighten the nuts/bolts/lock-washers 4. Splice the spacers to complete a solid frame. 5. Stake and line one side of the frame. 6. Install the lower corner channel beam bars first, in both directions, the upper beam bars are installed after all the slab grid bars, roughly square the frame. 7. Install the Re-Bar chairs before locking the width bars to ensure a more accurate measurement. 8. Be sure the return flange of the channel is flat on the ground, lift the form channel while lock tightening the nuts by hand to be sure. 9. Continue installing the grid bars and lock nuts in width. 10. Cross measure the form and square. 11. Install the Length bars with Lock nuts as above. Measure bar to bar in both directions to ensure grids are perfectly. Install Re-bar chairs at every other cross bar, wire tie those connections. 12. Tighten the exterior Lock- Nuts with a crescent wrench after all slab bars are installed. 13. Measure and install the upper perimeter beam bars in both directions. Interior lock nuts are only required every 2 nd beam bar. Install upper beam Re-bar chairs, wire tie all beam connections.
15 14. Prior to pour check the exterior Lock Nuts. Cross measure check for square. Confirm the Level.
Installation Instructions
 Important 1. Acclimate materials 24 hrs before installation. Maintain temperature controlled environment after installation 2. Install in accordance with manufacturer s installation instructions. Failure
Independent Containment System (ICS)
") Installing the Independent Containment System (ICS) Complete these instructions to install the Independent Containment System (ICS). Prerequisites This installation requires a team of at least two people.
Installing the Independent Containment System (ICS) Complete these instructions to install the Independent Containment System (ICS). Prerequisites This installation requires a team of at least two people.
Owner's Manual & Assembly Instructions
 Owner's Manual & Assembly Instructions PK01 BASE KIT Model No. FDN106 71706011 CAUTION: SOME PARTS HAVE SHARP EDGES. CARE MUST BE TAKEN WHEN HANDLING THE VARIOUS PIECES TO AVOID A MISHAP. FOR SAFETY SAKE,
Allow 60 from door face
 Setbacks Allow 60 from door face TOOLS NEEDED Tape Measure Marker or Pencil Masonry Drill Bit 3/8 Hammer Drill Hammer Socket Wrenches and Wrench: 9/16, 1/2, 7/16, 1/4 drive socket wrench and 1/2 socket
IMPORTANT -- SPECIAL INSTALLATION INSTRUCTIONS
 IMPORTANT -- SPECIAL INSTALLATION INSTRUCTIONS ** READ ALL INSTALLATION INSTRUCTIONS BEFORE STARTING!** If at any point, you have questions, call 1-800-851-0865...(The manufacturer will not be responsible
Installation Instructions - Model V4JSD 1
 Installation Instructions - Model V4JSD 1 Support Assemblies: Parts list: (Note see enclosed cut sheet for quantities and dimensional information) A vertical structural member (1 ½ x 1 ½ modular frame)
YUKON PATIO COVER INSTALLATION INSTRUCTIONS
 YUKON PATIO COVER INSTALLATION INSTRUCTIONS Before You Begin: Consult your local building department for any required permits You may be required to obtain a building permit for this structure. Contact
Installation Guidelines
 Page 1 Tools You ll Need 4 ft. Carpenter s level Chalk line (to mark U channel locations) Cordless drill/nut driver Caulking gun Chop saw with a metal cutting blade on it (required to make accurate and
KOLO SHELTER Installation Instructions Parts List
 Parts List Roof Cap Rafter Upright Polycarbonate Polycarbonate Drop Polycarbonate Flange Center Weldment (Short length shown above) Polycarbonate Edge Bolt.25 x 6.5 Bolt.625 x 7.5 Threaded Rod.75 x 14
MODERN PERGOLA INSTALLATION GUIDE. When only the best will do.
 MODERN PERGOLA INSTALLATION GUIDE When only the best will do. TOOLS LIST Drill(s) 3/8" Magnetic Driver (s) 12" Drill Extension #2 Square Drive bit for Drill or Driver Level Tape Measure Hammer Drill if
Double Beam Freestanding Pergola Installation Guide
 Double Beam Freestanding Pergola Installation Guide Patent Pending. Copyright 2011 USAVinyl, LLC - All Rights Reserved The information contained in these instructions are proprietary to USAVinyl, LLC and
INSTALLATION INTRUCTIONS
 INSTALLATION INTRUCTIONS Page 1 of 9 Installation Instructions 1. 2. Check all items against parts list to ensure all parts have been included (see pages 6,7,8,9). Locate and drill holes for concrete footings.
GRANDIO G R E E N H O U S E S CONCRETE ANCHORING KIT FOR GRANDIO SUMMIT FLAT MOUNT BASE KITS CONCRETE ANCHORING KIT PARTS LIST FOR ALL SIZES
 GRANDIO G R E E N H O U S E S CONCRETE ANCHORING KIT FOR GRANDIO SUMMIT FLAT MOUNT BASE KITS CONCRETE ANCHORING KIT PARTS LIST FOR ALL SIZES GRAPHIC PART NAME 2X8 2X2 2X6 2X20 2X24 2X28 2X32 TAPCON 44
GlideRite Retractable Cover System For Hot Spot Spas (SE & SLX only)
") List of Contents Quantity Description 12 #10 x 1 ½ Flat Head Phillips Screw (see pg. 2) 2 #10 x ½ Pan Head Phillips Screw (see pg. 2) 8 ¼ x 2 ½ Lag Bolt (see pg. 2) 7 ¼ 20 x 5 / 8 Hex Head Bolt (see pg.
List of Contents Quantity Description 12 #10 x 1 ½ Flat Head Phillips Screw (see pg. 2) 2 #10 x ½ Pan Head Phillips Screw (see pg. 2) 8 ¼ x 2 ½ Lag Bolt (see pg. 2) 7 ¼ 20 x 5 / 8 Hex Head Bolt (see pg.
Installation Instruction
 Tools Needed for Assembly Stud finder (for wood stud wall) Pencil Mark Electric drill Wood Stud Wall Installation Step 1. Locate the Wood Studs Installation Instruction Drill bit (for wood stud wall) Masonry
GlideRite Retractable Cover System For HotSpring & Tiger River Spas (except Classic & pre-2000 Landmark Spas)
") List of Contents Quantity Description 12 #10 x 1 ½ Flat Head Phillips Screw (see pg. 2) 2 #10 x ½ Pan Head Phillips Screw (see pg. 2) 8 ¼ x 2 ½ Lag Bolt (see pg. 2) 7 ¼ 20 x 5 / 8 Hex Head Bolt (see pg.
List of Contents Quantity Description 12 #10 x 1 ½ Flat Head Phillips Screw (see pg. 2) 2 #10 x ½ Pan Head Phillips Screw (see pg. 2) 8 ¼ x 2 ½ Lag Bolt (see pg. 2) 7 ¼ 20 x 5 / 8 Hex Head Bolt (see pg.
IMPORTANT -- SPECIAL INSTALLATION INSTRUCTIONS
 IMPORTANT -- SPECIAL INSTALLATION INSTRUCTIONS ** READ ALL INSTALLATION INSTRUCTIONS BEFORE STARTING!** If at any point, you have questions, call 1-800-851-0865...(The manufacturer will not be responsible
BASEBALL FOUL POLES SURFACE MOUNTED
 Page 1 of 5 Installation Instructions 1. 2. Check all items against parts list to ensure all parts have been included. Locate and drill holes for concrete footings. See Details A and B for critical information
Pergola Installation Guide
 Pergola Installation Guide When only the best will do. 1 Tools Needed Installation Tools for assembly Drill(s) Miter or Circular Saw with carbide blade (cut slowly) ½" Drill Bit 5 /8" Drill Bit 5 /16"
IMPORTANT -- SPECIAL INSTALLATION INSTRUCTIONS
 IMPORTANT -- SPECIAL INSTALLATION INSTRUCTIONS ** READ ALL INSTALLATION INSTRUCTIONS BEFORE STARTING!** If at any point, you have questions, call 1-800-851-0865...(The manufacturer will not be responsible
English/French 06/04
 E000 PLEASE READ ASSEMBLY INSTRUCTIONS COMPLETELY BEFORE ASSEMBLING YOUR BUILDING CAUTION: Some parts have sharp edges. Care must be taken when handling the various pieces to avoid a mishap. For safety
Installation Manual For ToddPod Outdoor Shower Enclosures
 Installation Manual For ToddPod Outdoor Shower Enclosures Contact us at 888-545-9763 or email us at office@toddpod.com with any questions during the installation process. Our service team is available
Model No. EP84-A, EP84AR-A, P84L
 E000 Model No. EP84-A, EP84AR-A, P84L PLEASE READ ASSEMBLY INSTRUCTIONS COMPLETELY BEFORE ASSEMBLING YOUR BUILDING CAUTION: Some parts have sharp edges. Care must be taken when handling the various pieces
Installation Guidelines
 Page 1 Tools You ll Need 4 ft. Carpenter s level Chalk line (to mark U channel locations) Cordless drill/nut driver Caulking gun Chop saw with a metal cutting blade on it (required to make accurate and
INSTALLATION INSTRUCTIONS
 INSTALLATION INSTRUCTIONS HIGH PRESSUE LAMINATE (HPL) TOILET PARTITIONS 1030 TrimLineSeries 1040 DesignerSeries Includes continuous hardware option.65. IMPORTANT: Storage and Handling Information on last
INSTALLATION INSTRUCTIONS
 INSTALLATION INSTRUCTIONS MAXIMUM PRIVACY HIGH PRESSURE LAMINATE (HPL) TOILET PARTITIONS 2030 TrimLineSeries 2040 DesignerSeries IMPORTANT: Storage and Handling Information on last page. Review these instructions
Installation Instructions
 Please read all instructions before installing Installation Instructions Important 1. Acclimate materials 24 hrs before installation. Maintain temperature controlled environment after installation 2. Install
4-SIDED NAVAJO SHELTER ARIZONA MODEL INSTALLATION INSTRUCTIONS
 4-SIDED NAVAJO SHELTER ARIZONA MODEL INSTALLATION INSTRUCTIONS Recommended Tools: Before You Begin: Saftey Glasses, Tape Measure, Carpenters Level, Framing Square, Hex Head Nut Drivers, Chalk Line, Elec.
Installation Instructions
 Column & Beam Units with Debris Netting Installation Instructions Laminated Wood Systems, Inc. Seward, Nebraska 800-949-3526 2015 LWS, INC. AVR-NET INSTALL 05-12-16 AVR Installation Notes 1 Safety The
Pergola Installation Guide. When only the best will do.
 Pergola Installation Guide When only the best will do. Tools Needed Installation Tools for assembly Drill(s) Miter or Circular Saw with carbide blade (cut slowly) 5 /8" Drill Bit 5 /16" Magnetic Driver
Procedure for Wrench Calibration and Snug Tightening
 Procedure for Wrench Calibration and Snug Tightening 1. Scope: This procedure provides the method for calibration of a manual torque wrench or an adjustable impact wrench and the snug tightening procedure
HOOP RACK HEAVY DUTY Setbacks WALL 36" WALL 42" 36" STREET 59" STREET Dero
 Setbacks WALL 36" WALL 42" STREET 36" 59" STREET Installation Instructions Tape Measure Marker or Pencil Masonry Drill Bit Drill (Hammer drill recommended) Hammer Wrench 9/16 Level RECOMMENDED BASE MATERIAL
INSTALLATION INSTRUCTIONS
 INSTALLATION INSTRUCTIONS SOLID PHENOLIC TOILET PARTITIONS 1080 DuraLineSeries Class-A Fire Rated Includes Institutional Hardware Option.67 IMPORTANT: Storage and Handling Information on last page. Review
The Festival Assembly Instructions
 The Festival Assembly Instructions Toll Free: 866.768.8465 Hours: 9-5 Monday-Friday EST www.homeplacestructures.com Package ships as shown CONTACT INFORMATION: HomePlace Structures 301 Commerce Drive New
BBULTRA Basketball Tower Installation
 Ph: 1300 500 314 Basketball Tower Installation Thank you for your purchase of the Ultra adjustable Basketball system. To ensure that our equipment will provide years of use to you, we are including this
Downtown Rack. Custom logo option available
 Custom logo option available Downtown Rack The Downtown Rack uses thick, square-tube construction that can t be cut with a pipe cutter. The extended width of the Downtown Rack makes for easy bike parking
ASSEMBLY INSTRUCTIONS FOR STORETTE STA42
 ASSEMBLY INSTRUCTIONS FOR STORETTE STA42 A01 CAUTION: Some parts have sharp edges. Care must be taken when handling the various pieces to avoid a mishap. For safety sake, please read the safety information
BEST PRACTICE GUIDE. Socket Bases. Working with Concrete Slabs
 Working with Concrete Slabs When working with concrete slabs the barrier protection can be erected in three ways - with socket bases, adjustable slab edge brackets and multi slab clamps. Socket Bases 1
E N G L I S H GARDEN SHED. Assembly Instructions. Suitable for Models WITH VARYING DEPTHS
 GARDEN SHED Assembly Instructions Suitable for Models 6' Wide 8' Wide 0' Wide WITH VARYING DEPTHS GI0003 November 0 INSTALLATION ADVICE It's Not That Difficult! The construction of your shed isn't as complicated
Chapter 1. Beam and Sill Plates
 Chapter 1. Beam and Sill Plates 1.1 ESTABLISHING SQUARE SILL PLATE CHALK LINES 1.2 INSTALLING TREATED SILL PLATES 1.3 INSTALLING LAMINATE BEAM Tools needed by volunteers: Hammer Nail apron Tape measure
Swerve Rack CUSTOM RACKS AVAILABLE
 CUSTOM RACKS AVAILABLE Swerve Rack The design of the Swerve mirrors the bike frame, thus providing superior bike support while making it easy to secure both the bike frame and wheel with a standard u-lock.
6a. Eight Steps to Chain-Link Fence Installation
 6a. Eight Steps to Chain-Link Fence Installation Before You Start You will need the following tools to install your chain-link fence: Post hole digger Wheelbarrow, shovel and hoe for mixing concrete Tape
BRIDGE RAILING, 4 TUBE B-26-F POST DETAILS MICHIGAN DEPARTMENT OF TRANSPORTATION
 \ ƒ" x 1 " SLOTTED HOLE IN POST AND \ ƒ"! HOLE IN RAIL \ "! x 6" SLOTTED ROUND HEAD BOLTS, WITH 1 PLATE WASHER, 1 LOCK WASHER AND HEX. NUT \ ƒ" x 1 " SLOTTED HOLE IN POST AND \ ƒ"! HOLE IN RAIL \ "! x
Clopay Models 835/837 Sliding Door System Installation Guide
 Clopay Models 835/837 Sliding Door System Installation Guide The aim of this instruction is to guide you through the process of construction and fitting of Sliding Doors. Due to the number of sizes available
Owner's Manual & Assembly Instructions
 BO01 Owner's Manual & Assembly Instructions PATIO COVER/CARPORT Model No. PC1010 Attached 705221006 UNIT DIMENSIONS *Size rounded off to the nearest foot CAUTION: SOME PARTS HAVE SHARP EDGES. CARE MUST
Modular Bi-File Lateral
 Modular Bi-File Lateral Installation Instructions 920-563-6362 E-mail: ssc@spacesaver.com Internet: www.spacesaver.com Contents Hardware Identification..................................3 Pre-Installation........................................6
6 1/2 x 6 1/2 Wood Grain Flat Top Pergola
 / x / Wood Grain Flat Top Pergola A S S E M B LY G U I D E Models: Lakewood OPTIONAL ACCESSORY Bolt Down Bracket Kit V.-09 Ta b l e o f Co n t e n t s The PAGE Introduction & Overview.......................................................
BASEBALL FOUL POLES GROUND SLEEVE MOUNTED
 X X Page 1 of 6 GROUND SLEEVE INSTALLATION Ground Sleeve Foul Pole Size "A" F39901 32' and 40' 67 5/8" F39902 24' 67 5/8" F39903 16' 43 5/8" 00402000 12' 29 3/8" 7" ONE SET OF SLOTS MUST BE PARALLEL AND
WALL TO FABRICATED FLOOR
 WALL TO FABRICATED FLOOR PERIMETER WALL IS HELD IN PLACE BY WOODEN STRIP SCREED OPTIONAL NSF COVED FLOOR IS SHOWN PARTITION WALL IS HELD IN PLACE BY WOODEN STRIP SCREED OPTIONAL NSF COVED FLOOR IS SHOWN
IMPORTANT -- SPECIAL INSTALLATION INSTRUCTIONS
 IMPORTANT -- SPECIAL INSTALLATION INSTRUCTIONS ** READ ALL INSTALLATION INSTRUCTIONS BEFORE STARTING!** If at any point, you have questions, call 1-800-851-0865...(The manufacturer will not be responsible
Installation and Assembly: Flat Video Wall Mount For 40" to 65" Flat Panel Displays
 Installation and Assembly: Flat Video Wall Mount For 40" to 65" Flat Panel Displays Model: DS-VW665 Maximum Load Capacity: 125 lb (57 kg) 1 of 11 ISSUED: 03-22-12 SHEET #: 125-9288-4 06-25-13 NOTE: Read
Equilibrium. Conference Table. Installation Instruction. Revision B 11/07/16
 Equilibrium Conference Table Installation Instruction Revision B 11/07/16 Equilibrium End User Agreement Enwork Equilibrium table bases must be installed directly onto a four inch minimum thickness concrete
Installation Instructions
 edium + Heavy duty READ BEFORE INSTALLING UNIT Preliminary instructions: 1. Check window opening size: the mounting parts furnished with this air conditioner are made to install in a wooden sill double-hung
IMPORTANT -- SPECIAL INSTALLATION INSTRUCTIONS FOR AZTEC SHELTER
 IMPORTANT -- SPECIAL INSTALLATION INSTRUCTIONS FOR AZTEC SHELTER ** READ ALL INSTALLATION INSTRUCTIONS BEFORE STARTING!** If at any point, you have questions, call 1-800-851-0865...(The manufacturer will
READ BEFORE INSTALLING UNIT INSTALLATION WARNINGS AND CAUTION
 edium + Heavy duty READ BEFORE INSTALLING UNIT INSTALLATION WARNINGS AND CAUTION Carefully read the installation manual before beginning. Pay attention to danger and safety notices. be exposed: Carefully
CertainTeed INSTALLATION GUIDE SIMTEK FENCE PRODUCTS. Fence Installation Guide 3', 4' & 6' High
 CertainTeed INSTALLATION GUIDE SIMTEK FENCE PRODUCTS Fence Installation Guide 3', 4' & 6' High INSTALLATION GUIDE These instructions are designed to assist both professional installers and do-it-yourselfers
Qwik-Fence Installation Instructions
 Qwik-Fence Installation Instructions 1 Tools Required The following installation instructions should be used as a guide for installing Folding Guard Qwik-Fence Partitions. Good common sense and appropriate
INSTALLATION INSTRUCTIONS for the JOMY RETRACTABLE LADDER. If there are any questions, please call (800)
") INSTALLATION INSTRUCTIONS for the JOMY RETRACTABLE LADDER If there are any questions, please call (800) 255-2591 INSTALLATION INSTRUCTIONS WARNING! Ladder Sections Lock When Closed. Do Not Install or Close
INSTALLATION INSTRUCTIONS for the JOMY RETRACTABLE LADDER If there are any questions, please call (800) 255-2591 INSTALLATION INSTRUCTIONS WARNING! Ladder Sections Lock When Closed. Do Not Install or Close
96 (Standard Length)
") Setbacks 96 (Standard Length) Bike Files may be lined up end to end to fill the available space. A 36 aisle should be left between the ends of bikes in racks facing one another. 36 aisle 50 Installation
Setbacks 96 (Standard Length) Bike Files may be lined up end to end to fill the available space. A 36 aisle should be left between the ends of bikes in racks facing one another. 36 aisle 50 Installation
IMPORTANT: installation. FLOOR ANCHORED CEILING HUNG OVERHEAD BRACED FLOOR-TO- CEILING ANCHORED
 INSTALLATION INSTRUCTIONS MAXIMUM PRIVACY COMPACT LAMINATE TOILET PARTITIONS 2080 DuraLineSeries 2180 DuraLineSeries Class-A Fire Rated Includes Institutional Hardware Option.67 IMPORTANT: Storage and
Secure Bike Parking. Patent Pending Dero
 VE LO P O RT Secure Bike Parking The graceful lines and modern laser-cut design makes the Veloport stand out while still offering the security and durability you need in your long-term bike parking. Each
General Features. Low Profile. The SMART BOXX stands only 1.5 off of the bed of your truck so cargo space is maximized
 General Features Low Profile. The SMART BOXX stands only 1.5 off of the bed of your truck so cargo space is maximized Two Sizes Short Box :74 L X 47 W X 7 T and Long Box 92 L X 47 W X 7 T All Aluminium
SB-WM-ART2-L-BL SB-WM-ART2-XL-BL
 SB-WM-ART2-L-BL SB-WM-ART2-XL-BL Weatherproof Universal Dual-Arm Articulating Mount for Large TVs INSTALLATION MANUAL WARNING The maximum weight of this wall mount is 150 lbs (68.04 kg). Use with heavier
Installation Instructions 1200/1255/G Handrails International Compliant
 Important 1. Acclimate materials 24 hrs before installation. Maintain temperature controlled environment after installation 2. Install in accordance with manufacturer s installation instructions. Failure
Fortress Fe Posts must always be secured to the deck framing. Fortress Fe Posts should never be attached to only the deck boards.
 Installation Instructions for FortressCable H-Series Stair Panels with Simplified Stair Bracket SSB-05 and Fe Posts It is the responsibility of the installer to meet all code and safety requirements, and
Installation Instructions
 Important 1. Acclimate materials 24 hrs before installation. Maintain temperature controlled environment after installation. 2. Install in accordance with manufacturer s installation instructions. Failure
Horizontal Cable Systems
 ALUMINUM RAILING INSTALLATION INSTRUCTIONS v2012 orizontal Cable Systems 1) Check Contents Of Packages: Verify that all parts have arrived and that they match the packing list. 1A) Coastal applications:
Modular XP Ramp Assembly Manual
 Modular XP Manual 1 Contents Overview... 2-5 1.1 Tools required...6 1.2 Hardware list...6 Ramp & Platform Standard Parts 2.1 Ramp Parts...7 2.2 Platform Parts...8 2.3 Standard Platform Configurations...
INSTALLATION INSTRUCTIONS
 INSTALLATION INSTRUCTIONS HIGH PRESSUE LAMINATE (HPL) TOILET PARTITIONS 1030 TrimLineSeries 1040 DesignerSeries Includes continuous hardware option.65. IMPORTANT: Storage and Handling Information on last
Installation and Assembly - Universal Articulating Swivel Double-Arm for 42" - 60" Plasma Screens
 Installation and Assembly - Universal Articulating Swivel Double-Arm for 42" - 60" Plasma Screens Models: PLAV 70-UNL, PLAV 70-UNL-S PLAV 70-UNLP, PLAV 70-UNLP-S R This product is UL Listed. It must be
Installation Guide 406TH
 Installation Guide 406TH (High Roof Shown) Kargo Master Rancho Cordova, CA 95742 800-343-7486 CustomerService@KargoMaster.com DATE: Installation Instructions 406TH *PLEASE READ ALL INSTRUCTIONS AND WARNINGS
Installing flat panels on the MPL15 wall mount
 Installing flat panels on the MPL15 wall mount The MPL15 (DS-VW775) is a full-service video wall mount that can accommodate tiled LCD panels with up to a 400 x 400 mm VESA pattern in portrait and landscape
KO LO SH E LT E R. High Capacity and Flexibility
 KO LO SH E LT E R High Capacity and Flexibility The unique styling of our redesigned Dero Kolo Shelter will help beautify your facility and provide secure, covered bike parking for cyclists. The Kolo is
INSTALLATION INSTRUCTIONS
 INSTALLATION INSTRUCTIONS COMPACT LAMINATE TOILET PARTITIONS 1080 DuraLineSeries 1180 DuraLineSeries Class-A Fire Rated Includes Institutional Hardware Option.67 IMPORTANT: Storage and Handling Information
Kai Installation Instructions
 Kai Installation Instructions Before Beginning Installation Read through the entire instruction thoroughly A minimum of 2 people are required for this assembly These instructions reflect typical assemblies;
PLAYLAND 72 SPIRAL SLIDE 3.5 Posts, 3.5 Posts / 48 Grid and 5 Posts
 PLAYLAND 72 SPIRAL SLIDE 3.5 Posts, 3.5 Posts / 48 Grid and 5 Posts USER GROUP: 2-12 RECOMMENDED CREW: 2 people TOOLS REQUIRED: T-30 TORX tool (supplied by manufacturer) T-45 TORX tool (supplied by manufacturer)
Safe and secure Dero
 B I K E D E P OT Safe and secure Whether the project is at a transit station, university campus, or residential building, the Bike Depot s modular design lets customers easily build out to meet their space
Vinyl Gazebo Instructions
 P a g e 1 Vinyl Gazebo Instructions 10 Vinyl Gazebo Shown Thank you for the purchase of your New Gazebo. Depending on the size of your Gazebo, installation can usually be completed in 1 to 2 days. These
Installing BACKRACK Cab Guards on Ford F ft Bed
 Installing BACKRACK Cab Guards on 2004-2012 Ford F-150 5.5 ft Bed In the past, the 5.5 ft bed F-150 was installed by drilling holes through the top plastic of the truck bed rail ( 10512 SC ) The installation
SB-WM-ART1-M-BL. Weatherproof Universal Single-Arm Articulating Mount for Medium Displays INSTALLATION MANUAL
 SB-WM-ART1-M-BL Weatherproof Universal Single-Arm Articulating Mount for Medium Displays INSTALLATION MANUAL WARNING The maximum weight of this wall mount is 90 lbs (41 kg). Use with heavier than the maximum
CYCL E STAT IO N. High Capacity
 CYCL E STAT IO N High Capacity The Dero Cycle Station provides high-capacity, covered bike parking for bicycle commuters. With a high roof and open platform, the Dero Cycle Station allows bike corrals,
Installation and Assembly - Universal Articulating Swivel Double-Arm for 42" - 60" Plasma Screens
 Installation and Assembly - Universal Articulating Swivel Double-Arm for 42" - 60" Plasma Screens Models: PLAV 70-UNL, PLAV 70-UNL-S PLAV 70-UNLP, PLAV 70-UNLP-S R This product is UL Listed. It must be
Posts INSTALLATION INSTRUCTIONS
 Posts Pedestrian gates are up to 4 wide and up to 7 tall. 5.5 min. 3.5 min. Gate and posts should be aligned as needed to accommodate hinges and / or latching mechanisms. Refer to appropriate installation
TOYOTA MOTOR EUROPE CA Products Division Tel : Fax :
 TOYOTA MOTOR EUROPE CA Products Division Tel : + 32 2 745 26 77 Fax : + 33 2 745 26 99 Ordering part numbers Comments Part Numbers Wooden floor one hatch PZ449-D3C42-11 one hatch with carpet PZ449-D3C42-01
Installation Instructions
 For Medium (15-18.5K) + Heavy duty (22-28.5K) Air Conditioner READ BEFORE INSTALLING UNIT To avoid risk of personal injury, property damage, or product damage due to the weight of this device and sharp
Leveling Feet, Base Plates and Casters
 Leveling Feet, Base Plates and Casters 77 Leveling Foot 1 1 Fastening to profile end Fastening in T-slot of profile For leveling tables and light equipment. Ratchet-type height adjustment requires no tools.
THANK YOU FOR PURCHASING FROM HERITAGE PATIOS
 Installation Guide THANK YOU FOR PURCHASING FROM HERITAGE PATIOS Your purchase is engineered by nearly a half century of commercial and residential product design proudly manufactured in the USA from responsibly
5 ACCESS PANEL INSTALLATION SPACER *SLIDE TO LOCATION OF FASTENER DURING INSTALLATION OF EACH FASTENER
 1/2 K.O. (3/8 K.O. on 165 with factory supplied 3/8 flex conduit fitting) TR - Trim Flange Side Blocking Install Method Secure fixture to structure following instructions below: 1. Remove lens and internal
WOVEN WOOD SHADES Corded, Continuous Cord Loop or Upended
 WOVEN WOOD SHADES Corded, Continuous Cord Loop or Upended GETTING STARTED HARDWARE INFORMATION A few simple tools are required: The hardware you received with your product are REQUIRED for proper installation.
Installation Instructions HR910 Handrail
 Important 1. Acclimate materials 24 hrs before installation. Maintain temperature controlled environment after installation. 2. Install in accordance with manufacturer s installation instructions. Failure
INSTALLATION INSTRUCTIONS FOR FRONT CASTING DECK RAIL Ranger
 INSTALLATION INSTRUCTIONS FOR FRONT CASTING DECK RAIL Ranger TOOLS REQUIRED FOR INSTALLATION: Drill motor, (1) 5/16 inch drill bit, (1) 13/64 drill bit, (1) 3/16 inch hex wrench (1) 3/32 inch hex wrench.
CONTENTS TOOL LIST U P S I D E I N N O V A T I O N S, L L C RAMP AND STEP SYSTEM ASSEMBLY INSTRUCTIONS. Revised: June 2013
 U P S I D E I N N O V A T I O N S, L L C RAMP AND STEP SYSTEM ASSEMBLY INSTRUCTIONS TOOL LIST Required Tools: - Reciprocating Saw with Metal Cutting Blade - Drill - 7/16 Drill Bit for Metal Drilling -
Model 209 Fireback Replacement
 Model 209 Fireback Replacement Please read all the instructions before you begin the procedure. Confirm that you have all the necessary tools and materials. If you have any questions, technical support
City of Manteca Boarding Requirements
 City of Manteca Boarding Requirements There should be no boarding above the first floor unless entry is possible without use of a ladder, and the opening is large enough for a person to easily pass through.
Intercooler Shroud and Belt Cover for WRX
 Intercooler Shroud and Belt Cover for 2015+ WRX 2016-05-18 Thank you for purchasing this PERRIN product for your car! Installation of this product should only be performed by persons experienced with installation
VINYL CLASSIC FREESTANDING PERGOLA ASSEMBLY INSTRUCTIONS
 P a g e 1 VINYL CLASSIC FREESTANDING PERGOLA ASSEMBLY INSTRUCTIONS Shown: 8' x 12' Vinyl Classic Pergola with 12" Top and Main Runner Spacing The design of this pergola is based on all posts being installed
Garage Design Guide. October 2018
 Garage Design Guide October 2018 The Corporation of the Township of Hamilton 8235 Majestic Hills Drive, P.O. Box 1060, Cobourg Ontario K9A 4W5 Tel: 905-342-2810 Fax: 905-342-2818 Email: Tim Jeronimus (Chief
6625 WEST WILSHIRE BLVD. OKLAHOMA CITY, OK (405) FAX (405)
 FAX (405)") INSTALLATION INSTRUCTIONS FOR THE TAILGATE WITH LATCH AND LINK ASSEMBLY 76-87 FORD SHORT & 53-87 FORD LONG FLARESIDES 1. Assemble the bed and make sure the box is square. Measure the distance between the
INSTALLATION INSTRUCTIONS FOR THE TAILGATE WITH LATCH AND LINK ASSEMBLY 76-87 FORD SHORT & 53-87 FORD LONG FLARESIDES 1. Assemble the bed and make sure the box is square. Measure the distance between the
CSS Central Mount System
 CSS-20 Installation Manual CSS-20 Safety Notifications Below are the installation instructions for the CSS-20-2 Long Span Beam Mounting System. Please read these safety notifications prior to beginning
STRATUS SHELTER. Take bike parking to new heights
 Take bike parking to new heights The Stratus Shelter is a striking bike shelter option for any transit station, university campus, or multi-family residential building project. It is constructed of American