Page 3. Using the worksheet on page 24, draw a plan of your proposed deck.
|
|
|
- Amanda Annabelle Hutchinson
- 5 years ago
- Views:
Transcription

1
2
3 EverX Radius Edge Decking has been independently tested and certified to meet or exceed the BOCA requirements for use as decking and stair treads when installed as recommended by the manufacturer s application instructions. EverX is not suitable for structural use. It should not be used for primary load-bearing members such as posts, joists, beams or stringers. The same common sense precautions should be taken when handling EverX as with wood or other building materials. Dust masks and eye protection devices are recommended to avoid possible irritation from sawdust and chips. Gloves will help to protect the hands. Hands should be washed after doing construction work. When looking to improve the value and appearance of your present home...few home improvements can compare to an EverX deck for usefulness, attractiveness and enhanced value. Decks offer outdoor living space for entertaining, sun bathing and dining. They furnish a wonderful expanded play area for children. But the best news about a deck is that it is an ideal home improvement project for the typical homeowner. No advanced carpentry skills or complex tools are needed. Design is straight to the point and easy to follow. If you can utilize a few standard tools, then constructing a deck will be no problem. What's more, using QUALITY WOOD pressure-treated wood products for the substructure and EverX composites for the decking, railings and balusters will assure you of years of enjoyment, satisfaction and low maintenance thanks to the benefits of EverX composite wood technology. This "Deck Ideas" booklet will supply you with enough information to help you design and build a beautiful deck. However, for additional information on deck construction, check your library for magazine articles or reference books and our web site Considerations Before e You Get Started... ted... Decks originally became popular as a way of adding outdoor living space on hillside lots. Today, many decks are built on level ground where they offer firm, dry footing close to the home. Decks can be built just inches from the ground or elevated several feet from ground level. They may be freestanding or attached to the home or other building. Before you begin actual deck construction, you need to take into account some of these basic considerations; anticipated use, air currents, existing design, sunlight, seclusion, view, security, access to home and terrain. Building Code And Zoning Requirements... Many areas require building permits and your plan may need to be reviewed by your local building code office to make sure that it meets the standards set forth in local codes. Make sure you comply with any setbacks specified in local regulations. Some communities have rigorous design guidelines and require review committee approval of alterations to the exterior of properties. Contact your local utilities to be sure that your proposed deck won't interfere with access to utility lines. Finally, don't interfere with the functioning or servicing of your septic tank if you have one. Final Considerations... How you plan to use your deck will determine the size of deck you need. For family meals and entertaining, select a large deck (or combination of decks) with plenty of space for tables and benches, and consider adding built-in benches along the railings to seat more people. An entry deck can be small, but make it large enough to stand and talk comfortably with guests as they arrive or leave Quality Wood Treating Co., Inc. Prairie du Chien, Wisconsin (608) Page 1
4 Decks involve six primary components: footings, posts, beams, joists, decking and railings. In planning for these, you have three primary considerations: purpose, structural stability, and appearance. The distinctive characteristics of your deck will probably be most recognizable in your selection of railing and decking, but the position of posts and beams can have a crucial impact on the appearance of an elevated deck. In most cases, your decision is between several small pieces of lumber or comparatively fewer large ones. For example, a railing may be held by 2x4 posts spaced every 16 inches or less, or it may have 4x4 posts capped by a 2x6 spaced as far apart as eight feet. (Note: A 2x4 isn't 2"x4". Actual size of finished dry lumber is given in Table 1.) Not all species of wood have the same strength characteristics. Ask your lumber dealer what species of treated wood is obtainable in your area, then refer to the tables on page three for appropriate sizing. Your best guide, at this point, is to look at assorted deck plans and survey decks constructed by friends and neighbors to assist in determining what you like best. Drawing a site plan, similar to the one shown below, will help you to get a feel for how well your new deck will fit into your surroundings. A well designed deck will blend with your home and landscaping. Design your deck to be an extension of your home by using architectural details that reflect your home's character. Be sure to consider traffic patterns as well as available views and your intended use when designing your deck. To achieve your desired look, remember to pay close attention to your choice of railings and steps as well as the landscaping around the base of your deck. Your local lumber dealer may be able to assist you in your design. Some may even offer computer aided design. Page 2
5 To familiarize yourself with the components of a basic deck, please see pages 12 and 13 of this manual. DECK SIZE Enter overall dimensions of your deck. JOISTS Locate joist size and span using Table 2. BEAMS Locate beam size and span using Table 3. POSTS Locate post size using Table 4. DECKING Selecting a deck surface material. Using the worksheet on page 24, draw a plan of your proposed deck. Length... (Along House) Projection... (Out from House) Joist Size... Joist Span... Beam Size... Beam Span... Post Size 4x4 4x6 6x6 Decking 2x4 2x6 5 /4x6 ESTIMATING TING QUANTITIES Assuming that your joists project out from your house, the following formulas will help figure your material list. JOISTS Divide length along house by 1.33 and add 1 to the result. Length /1.33 = Number of joists +1 DECKING Installed straight across joists: 5 /4x6 EverX decking Installed diagonally across joists: Calculate square footage of your deck. 5 /4x6 Factor = 2.1 Remember EverX decking is normally available in increments of 2' and sold in lengths from 8' to 16'. Number of deck boards Projection * 2.1 = Length * Projection = Sq. Ft. * Factor = Lineal Ft. of Decking Diagonal decking may slightly increase the amount of decking material needed due to waste. Notes for Tables #2 - #4: 1) All spans rounded down to nearest foot. 2) All Tables based on the following: 40# Live Load 10# Dead Load l/360 Deflection 3) For loads other than stated above or for deck heights over 10', please consult a professional Engineer or Architect. Page 3
6 Determine the location of your deck in relation to the house. Roughly layout the deck area with a string. This will help you envision the proportions of your deck. Now is the time to make any final adjustments in the size of the deck. You will need to install "batterboards" to help square up the deck and to assist as a guide for excavation and post location. Batterboards are installed approximately 2' - 3' outside the perimeter of the deck as illustrated here. Install a ledger to anchor the deck to the house and to serve as a reference for laying out footings. The placement of the ledger determines the level of the deck floor. Remember to place the ledger low enough to allow for the thickness of the deck boards. The deck floor should be a minimum of 2" - 4" below the interior floor. The ledger must be securely fastened to the house. Using lag bolts into the box sill is the most common method of attaching the ledger. Placing a couple of washers between the ledger board and the house will allow space for drainage behind the ledger board. It is important that the ledger is positioned at the correct height and is level. If you are unsure how to do this crucial step, consult a professional contractor, or design your deck to be freestanding. This will eliminate the need for a ledger board. Before preparing the site, you must square up the deck area. Use batterboards and mason's string to mark off the deck area and locate footings. Attach the string to the ledger and the batterboards making sure that it is level. Batterboards will be used to hold and adjust strings which define the deck area and height. Use a felt tip marker to mark the string 3' from the corner and 4' from the corner in the other direction. Adjust the string until the diagonal connecting these two points is exactly 5'. Page 4 (continued on next page)
7 This will create a 90 angle in the corner. This way of squaring a corner is commonly called the triangle method. Decks usually will shade the soil beneath them to prevent most weed growth, but removing the grass and weeds first will make construction easier. After measuring and marking the deck area, remove sod from the staked area to a depth of 4"- 6". Replace the soil with sand or gravel and level the surface. To prevent weeds and unwanted vegetation from growing up through the deck, spread a sheet of polyethylene film or special landscaping fabric over the area. If you use polyethylene you will have to slit the poly to install the posts and to permit drainage of rainwater. After the posts have been installed, cover the sheet with gravel or bark chips. Measure in from the batterboard strings the distances given in the plan for the location of the posts. The post holes should be at least 2' deep and can be up to 4' deep. The actual depth depends on the height of the column and the depth of the frost line in your area. Posts need to be set deeper than the frost line to avoid heaving. Check with your dealer for requirements for depth and width of post holes. Fill the bottom of the hole with gravel and place a treated wood block or concrete block on the gravel. Set the posts in the holes, check for level and brace securely. Fill the hole with concrete or alternating layers of gravel and earth. Make sure the posts are plumb and in alignment with one another. Let posts set in concrete overnight. Setting posts in-ground is the method recommended, but there are several options available. If you have rocky soil, you may want to use one of the several types of pier blocks illustrated below. You do not have to dig holes when using pier blocks, and, depending on the type you choose, the posts can be attached in a variety of ways. Post length is determined by measuring from the top of the deck to the ground plus the length of post set in the ground minus the thickness of the decking and the width of the joists. Height of posts that extend above the decking to support railings or benches is determined by adding the length of the post underground plus the distances from ground level to the top of the railing, bench or features, minus the thickness of the railing cap, seating boards or other materials. Do not cut posts to finished length yet. Allow extra length to accommodate settling. (continued on next page) Page 5
8 Perimeter posts over 5' high from ground to deck level need to be braced. While there are several methods of bracing, cross bracing is the strongest and is the method we recommend. In cross bracing, 2x4 or 2x6 boards run diagonally from just below the beams on one post to approximately one foot above ground level on the neighboring post. If the diagonal distance is less than 8', use 2x4; if 8' or greater, use 2x6. On corner posts, run the brace to the outside corner of the post, secure with 3 /8"x 4" lag screws or 3 /8"x 5 1 /2" carriage bolts. Trim the end flush with the post. Braces that meet at middle posts are cut to meet at the center line of the posts (leaving a slight gap for drainage), and attached with lag screws or carriage bolts. Where braces cross between posts, fasten them with a single 3 /8"x 3 1 /2" carriage bolt. Attaching Beams to Posts Use a string and level to find the desired deck floor height on the posts. Subtract the thickness of the deck boards and joist (use actual dimensions not nominal) to determine the correct height for securing the top of the beam to the post. Make a mark on all four sides of the post at this point. Use carriage bolts to fasten the beams flush with the mark. You can cut the posts that do not serve as railing supports before attaching the beams. We recommend using double beam and post construction, but you have the option of using 4" thick beams and attaching them to the posts with readymade connectors. Attaching Joists It is important that the surface of the deck has a rock-hard feel, especially elevated decks. To achieve this, we recommend that joists be spaced a maximum of 16" on center. Joists are attached to the ledger with joist hangers or by toe nailing. They must also be attached to the beams and ribbon joists. Blocking consists of 2x6 pieces nailed between joists to prevent buckling or twisting. Measure and cut blocking and nail through joists into ends of the block pieces. For ease of nailing, snap a chalk line across the joists where the blocking will go and stagger the pieces to the left and right of the line. Blocking should be installed every 2' - 3' along the joists. Page 6
9 Stair construction...the nightmare of do-it-yourself deck building! Not necessarily. Probably no aspect of deck construction requires more care and thought than building a set of stairs. The following discussion is intended to help remove the mystery that surrounds designing and building stairs. First decide where and how wide your stairs will be. They should be at least 3' wide, but will often look and work better if they are wider. Check your local code for any special requirements for stairs. You need to determine what size of lumber to use for the treads. Treads are that part of the stairs that you step on. Using multiple pieces is normally better than one wide one as they allow for drainage and tend to cup less. Common sizes used for treads are two 5 /4x6 EverX decking boards. Calculate the total rise by measuring the distance from the ground to the top of the deck surface. Remember to take into account any slope in the ground. Divide the total rise by 7 to get the approximate number of risers. For example, if your deck is 36" from the ground...36"/ 7= This means that you need 5 risers. To find the exact height of each riser divide the total rise by the number of risers. Example; total rise=36"/5 risers=7.2". In our example you need 5 risers of 7.2". You can round 7.2" to 7 3 /16" for ease of laying out your stairs. The small difference can be made up on the bottom riser. The number of treads is equal to the number of risers minus one. When figuring the tread width, you may want to allow for a nosing or overhang. The total run is equal to the number of treads multiplied by the tread width. Some rules of thumb to keep in mind as you figure out your steps are that tread widths of 9" to 11 " and riser heights of 7" to 8 1 /2" are the most common. The width of one tread plus the height of one riser should equal 17" - 18" or the width of one tread multiplied by the height of one riser should equal approximately 72" - 75". Stringers should be spaced a maximum of two feet apart. Now that you know the tread width and the riser height, you are ready to lay out the stairs on the stringer. You will need a framing square to mark out the stairs. A handy item to have is a set of stair gauges. They are small gauges that clamp onto the square to set the rise and run and ensure that all steps are marked the same. Stair gauges are available at most building supply dealers. Position the square, as illustrated, with the tread width on one leg and the riser height on the other leg. Mark along the outside of the square. Move the square up the stringer so that the next riser starts where the tread left off and mark the next tread and riser. Continue this process until all treads and risers are marked. When you mark the bottom riser mark and cut it short of the actual rise by the thickness of one tread. This will ensure that all risers are the same height. For cut out stringers, use a circular saw to cut out the marked areas. For cleated stairs, attach a 2x4 cleat on each tread line. On cleated stairs the treads will attach to the top of the 2x4 cleats. If you plan to close in the risers it is easier to do it prior to installing the treads. Closed risers are normally made from 1 " boards. Stringers must be securely attached where they meet the deck and need support where they meet the ground. At the ground level, posts may be used to attach the stringers to and may serve as supports for the stair railing. A small concrete pad can also serve as a suitable support for the stringers. Stairs can be attractively designed to wrap around a corner of the deck. Setting your stairs on an angle will add visual interest to your deck. Stairs can also be built by creating a series of platforms, each one lower than the previous one. Page 7
10 EverX decking will be one of the deck s most visible features, so make every effort to lay decking boards straight and in line. Additionally, for best appearance and ease of installation (pilot hole and counter sinking is not needed) we recommend using 2 1 /2 OMG FastenMaster Trap Ease composite wood deck screws. If the homeowner prefers a fastening system Hidden by Design, we recommend Deck One Stealth Decking Fasteners. If using other coarse thread deck screws, best appearance and ease of fastening is achieved by pre-drilling a pilot hole and countersink prior to driving screws. Screws should be driven flush with the EverX surface. Do not over drive. Use 2 fasteners per deck board at each joist. Install the EverX 5 /4x6 deck boards starting at the edge of the deck furthest from the building, working back toward the building. Notch deck boards to fit around the 4x4 pressure-treated rail posts. See figure F. Additional blocking may be necessary on 4x4 for fastening deck boards. After all of the decking has been attached snap a chalk line flush with or up to 1 1 /2 out from the deck framing and cut with a circular saw. Joist Span - 16 on center (12 on center for diagonal installation) Side. Gapping - 1 /8 minimum. End Spacing - allow a minimum of 1 /16 gap for every 20 degrees F of difference between installation temperature and the hottest temperature expected. In addition to laying straight planking, you can choose from a variety of different patterns, some of which are shown below, for attaching decking. Parquet patterns, diagonal or herringbone designs all add visual interest to the surface of your deck. These attractive patterns usually require slightly more material than straight planking. More cutting and attention to precision is required. Special framing may be required to support some of these patterns. Page 8

11 EverX Railing - Installation Instructions Prior to construction, check for special code requirements in your area. Common railing heights are 36" or 42" depending on application. Structural support for EverX railing should come from either the continuation of deck support posts that extend up through the deck floor or railing posts that are bolted to the outside joists or rim joists. Never span more than 6' between railing posts. Install railing posts before deck boards are fastened to the joists. For proper railing alignment, do not notch railing posts. Predrilling and countersinking of all EverX deck and railing components is essential to the successful installation of the EverX system. Step 1: Determine the number of railing posts needed for your deck. Example - a 12' x 16' deck attached to a building along one 16' side of the deck. Each 12' end will have a continuous rail requiring three posts, 12' 6' = 2 posts plus 1 starting post. The 16' side will have a 12' long rail section leaving a 4' opening for access to the deck. 12' 6' = 2 posts, the corner post from the 12' end rail will act as the starting post. Eight posts total (3+3+2) will be needed for the example deck. See figure A. Note: Maximum post space is 6'. Step 2: Pressure-treated 4x4's provide the structural strength for your EverX railing. The length of each post is determined by adding the joist width plus the 1" thickness of the EverX decking plus the finished railing height minus the 1" thickness of the cap rail. The 12' x 16' example deck is constructed using 2x8's as joists. The actual width of a 2x8 is 7-1 /4". The finished rail height for the example deck is 36". See figure B. The 4x4's should be cut to 43-1 /4" lengths (7-1 /4" + 1" + 36" 1 "). Do not notch the 4x4 pressure-treated railing posts. See figure C. Step 3: Position, plumb with a level, and clamp the rail post on the interior face of the joist. Check again that the post is plumb using a level. 4x4 pressure-treated railing posts should be bolted to the rim joists or outside joists using two 1 /2" x 6" hot dipped galvanized carriage bolts. See figure D. Corner posts use a third carriage bolt inserted through the joist adjacent to the joist with two bolts. See figure E. Step 4: Cut a 4x4 EverX Post Sleeve to length for each of the rail posts. In the example deck they would be cut to 35" (36" rail height - 1 " thickness of EverX deck boards). The tops of the treated post and post sleeve should be even. Step 5: Determine the 2x2 baluster length. In the case of the example deck, a 36" finished rail height will require 31-1 /2" balusters (36" - 1" thickness of cap rail /2" space between the deck surface and bottom rail). See figure G. Page 9

12 Step 6: Slide a trimmed to length EverX Post Sleeve over each 4x4 pressure-treated rail post. Locate a 2x2 baluster on the side of the post that the rail is attached to, 3 /8" from the outer face of the Post Sleeve. The top end of the 2x2 baluster should be even with the top end of the EverX Post Sleeve. Fasten the baluster, drilling through the post sleeve, to the 4x4 pressure-treated post using three #8 x 3" flat head screws. See figure H. Repeat for each point that a rail section is attached to a rail post. Step 7: Determine the length of the 2x4 top and bottom rails by measuring the distance between posts at the deck surface. See figure I. For the example deck, this measurement would be 63-3 /8". Attach a 1-1 /2" nominally-sized metal angle bracket at each end of the bottom edge of both rails using two #8 x 1" Pan Head Screws. Be sure to predrill. See figure J. Step 8: Locate the upper edge of the top rail even with the top of the baluster and post sleeve so that the rail is on the interior face of the baluster, toward the center of the deck. Fasten the rail to the post assembly with the angle bracket using two #8 x 1-1 /2" Pan Head Screws. Be sure to predrill. Position the lower edge of the bottom rail even with the bottom of the baluster on the post assembly. Fasten the rail to the post assembly with the angle bracket using two #8 x 1-1 /2" Pan Head Screws. Be sure to predrill. See figure K. Step 9: The final connection of the EverX rails is completed by carefully predrilling and countersinking through the ends of the top and bottom 2x4 rails into the 2x2 balusters attached to the post assembly. Fasten the rails to the balusters using 2-1 /2" flat head screws. Do not over tighten screws. See figure L. Step 10: Attach EverX balusters to the 2x4 top and bottom rails by predrilling & countersinking; fasten with 2-1 /2" flat head screws. Most building codes allow a maximum space of 4" between balusters. Using a 2x4 block will create a 3-1 /2" space between balusters. See figure M. The 12' x 16' example deck will require fourteen 2x2 EverX balusters for each of the six 63-3 /8" railing sections. 84 balusters total (14 x 6) will be needed to complete the example deck. Step 11: 5 /4x6 EverX is used for the cap rail. Three 12' pieces will be needed for the example deck. Cap rails that meet at corners should be cut at 45 angles to create 90 miter joints. Fasten to the 4x4 pressure-treated rail posts using 3" flat head screws. Cap rail should be attached to the EverX 2x4 top rail using 2" flat head screws every 16". Remember to predrill and countersink prior to driving screws. Page 10
13 Adding Benches Built-in benches are a very practical and functional way to provide seating on a deck. Benches can be free-standing, consolidated into railings, or combined with planter boxes. Seats should be at least 15" wide and 15"-18" above the deck floor. Page 11
14 Page 12
15 Page 13
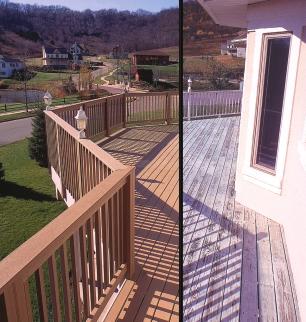
16 Upkeep and Maintenance tips EverX is a low maintenance building material that will provide many years of enjoyment. Periodic cleaning is all that s required to keep your outdoor project looking good. Cleaning EverX is easy when soils are promptly addressed. Follow these simple steps to care for your EverX deck. 1. Wash your deck periodically with water from the garden hose, even if it appears to be clean. A quick rinse can prevent the build up of airborne pollen and debris that can sustain mold and mildew growth. 2. Deal with spills quickly! Hose off or wipe up stains immediately. Do not allow stains to penetrate the deck's surface or bake on under direct sun. 3. If you use a barbecue grill on your deck, keep a splatter guard beneath it, as grills are a major source of grease stains and burns. 4. Soap and water will maintain the appearance of EverX in most cases. If grime, ground-in dirt, or rust marks become a problem, use a cleaning product with a phosphoric acid base. 5. Mold may form on any surface where moisture is prevalent, where there is heavy shading, or where pollen and debris are allowed to collect. To eliminate mold, use conventional deck wash and cleaning products containing sodium percarbonate (oxygen bleach). 6. Grease and oil stains can be treated with commercial degreasers. Use spot removers or petroleum based thinners sparingly on stubborn grease and oil stains; they will attack the embossed grain pattern if not neutralized with a water wash. 7. For stains that have been allowed to penetrate the surface of the board and set, or have been baked by the sun, abrasives like steel wool, soap pads, or medium grit sandpaper will be necessary to remove permanently stained material. This may remove the embossed grain texture and expose unweathered EverX. Over time, the sanded area will age to match the rest of the deck. 8. Use a plastic shovel to remove snow from your EverX deck. Metal shovels or scrapers are likely to cause gouge marks. Calcium chloride can be used to melt ice. Rinse the deck with water when the temperature rises above freezing to prevent buildup of calcium chloride residue. EverX Limited War arranty ranty EverX Extruded Wood Products will not rot, decay, check, splinter, or suffer termite damage for a period of 20 years from the original consumer purchase. See the limited warranty certificate for details at our web site Page 14
17 Needs Gloves Chalk line Level 2 minimum Hammer Circular saw, Mitre saw Square Tape measure Drill and Drill bits Deck fasteners Checklist Posts Bracing material Gravel Cement Pier blocks Mansons string Batter board material Ledger boards Lag bolts Beams Carriage bolts Floor joists Joist hangers Cross bracing material if needed Decking Railing Balusters Stairs Stringer materials Riser materials Tread material Cleats
 326-2481 EVXPQ001WEB1")
18 2002 Quality Wood Treating Co., Inc. Prairie du Chien, Wisconsin (608) EVXPQ001WEB1
A ledger/header board is the next step if you are attaching your deck to an existing structure.
 CE 101, Spring 2006 Step-by-Step Deck Construction 1 / 7 Step 1 Mark off the deck area using string and "batterboards" (Fig. 2) making sure that it is level and square. The string will help you visualize
installation care & maintenance instructions lifecycledecking.com 25-year limited residential warranty 20-year limited commercial warranty
 installation care & maintenance instructions lifecycledecking.com 25-year limited residential warranty 20-year limited commercial warranty Installation Instructions As with any building project, use proper
installation care & maintenance instructions moistureshield.com limited lifetime warranty
 installation care & maintenance instructions 866.729.2378 moistureshield.com limited lifetime warranty It s comforting to know that you re about to build a deck that gives you every possible advantage.
CONTRACTOR CERTIFICATION COURSE
 CONTRACTOR CERTIFICATION COURSE 1 Learning Objectives After completing this course you will be able to: Explain appropriate methods for storing and installing ChoiceDek decking Discuss care and maintenance
DECKING INSTALLATION GUIDE
 STAIR TREAD INSTALLATION GUIDE Step 7: Install the Remaining Treads Repeat steps 2 to 6 for the remaining stair treads. Step 8: Install the Fascia 1. Measure the riser height. 2. Rip the fascia to the
The following instructions will guide you through the installation of your new vinyl railing stair kit.
 Installation Guide Vinyl Standard Stair Railing Tools Required Protective eye glasses Tape measure Variable speed drill/screwdriver Rotary hammer or hammer drill and masonry percussion bit recommended
COMPOSITE RAILING INSTALLATION
 COMPOSITE RAILING INSTALLATION Tools All you ll need is a hammer and screw gun, circular saw (carbidetipped blade with fewer than 20 teeth is recommended), level, tape measure, rasp and blue chalk line.
Step 2 - Measure and install joist hangers every 16". See Figure "B" above. Fill every hole in each
 Adding a deck is one of the most useful projects a homeowner can do to improve their home. Each deck is different and presents it's own set of challenges, so contact us with unique questions if they are
CXT PRO RAILING INSTALLATION INSTRUCTIONS For Installations Using Aluminum and Glass Balusters Sold Separately
 CXT PRO RAILING INSTALLATION INSTRUCTIONS For Installations Using Aluminum and Glass Balusters Sold Separately CCRR-0171 PFS AA-652 Drill/power screwdriver Assorted drill bits Hammer Miter or circular
The following instructions will guide you through the installation of your new vinyl railing.
 Installation Guide St. James Vinyl T-Rail Tools Required Protective eye glasses 3/8 x 3 Concrete Anchors/Fasteners (for Tape measure concrete installations) Variable speed drill/screwdriver Philips Driver
Deck Designer Specification Kit. TimberTech Designer. All rights reserved copyright 2007 DIY Technologies
 Deck Designer Specification Kit TimberTech Designer All rights reserved copyright 2007 DIY Technologies Deck layout diagram Top view without planks Bottom view with planks Top view with planks Page 2 Deck
Installation Instructions for. Before You Begin TOOLS REQUIRED
 Composite Railing System STEP-BY-STEP Installation Instructions for Spectrum Composite Railing Virtually maintenance free 20-year warranty EverNew Spectrum Railing system is designed to work with a number
Build Outdoor Stairs. Stair Building Terms There are five basic design elements you'll need to consider when planning outdoor stairs:
 Build Outdoor Stairs Stair Building Terms There are five basic design elements you'll need to consider when planning outdoor stairs: The Total Run (Fig. 1) is the total horizontal distance covered by the
UltraDeck. Decking & Railing Installation Guide.
 UltraDeck Decking & Railing Installation Guide www.midwestmanufacturing.com Table of Contents: General Guidelines for Deck Installation 4 Plank Board Installation 6 QuickCap Installation 8 Cladding & Endcap
SHIPLOCK CLADDING PRODUCT GUIDE INSTALLATION TECHNICAL SPECIFICATIONS CARE & MAINTENANCE
 SHIPLOCK CLADDING PRODUCT GUIDE INSTALLATION TECHNICAL SPECIFICATIONS CARE & MAINTENANCE SHIPLOCK CLADDING CN-04E / CN-04W / CN-W008 Prior to the installation of any form of Cladding, it is recommended
U. M. ARMY Texas Conference. Wheel Chair Ramp Manual
 U. M. ARMY Texas Conference Wheel Chair Ramp Manual June 2014 U. M. ARMY Texas Conference Building & Repair Tips Wheelchair Ramps Complete a site survey to determine the design and layout of the ramp.
Installation Guide (888)
") BamDeck Installation Guide (888) 788-2254 The Collection Decking Systems BAMDECK 4G 5-7/16 Wide Plank Dims: 192 L x 5-7/16 W x 13/16 H BAMDECK 4G WIDE 8-1/4 Wide Plank Dims: 96 L x 8-1/4 W x 13/16 H BAMDECK
BamDeck Installation Guide (888) 788-2254 The Collection Decking Systems BAMDECK 4G 5-7/16 Wide Plank Dims: 192 L x 5-7/16 W x 13/16 H BAMDECK 4G WIDE 8-1/4 Wide Plank Dims: 96 L x 8-1/4 W x 13/16 H BAMDECK
INSTALLATION INSTRUCTIONS MILLENNIUM DECKING Before Installing Millennium Decking, please read these instructions in their entirety.
 INSTALLATION INSTRUCTIONS MILLENNIUM DECKING Before Installing Millennium Decking, please read these instructions in their entirety. Safety PRE-INSTALLATION Compliance with all applicable local, state
PAINT & MISC. Notes. Table of Contents. Front Handrail Posts Front Handrails Closet Shelving Exterior Deck...
 118 PAINT & MISC. Table of Contents Front Handrail Posts... 119 Front Handrails... 122 Closet Shelving... 125 Exterior Deck... 127 Look for painter s tape on the hammer drill for where to set the depth.
SECTION R507 DECKS DECKING LEDGER BOARD BEAM. FOOTING BEAM SPAN CANTILEVER For SI: 1 inch = 25.4 mm FIGURE R507.2 DECK CONSTRUCTION
 SECTION R507 DECKS R507.1 Application. The provisions of this section shall provide prescriptive requirements for the design and construction of all uncovered, wood-framed, single-span exterior decks.
COMPACT DECK. Compact Deck Project Plan #850 Sheet 1 of Riverside Dr., Suite 212 Metairie, LA SouthernPine.com SouthernPineDecks.
 COMPACT DECK Project Plan #850 Sheet 1 of 6 This plan contains an attractive deck design that two handy persons with intermediate building skills can construct in a weekend. Build it with versatile pressure-treated
4. Components and Stairs
 4. Components and Stairs 4.1 BUILDING WINDOW AND DOOR COMPONENTS 4.2 BUILDING STAIRS Tools needed by volunteer: Hammer Nail apron Tape measure Square Utility knife Pencil Tools and equipment needed: Materials
Installation Guide (888)
") BamDeck Installation Guide (888) 788-2254 The Collection Decking Systems BAMDECK 3G 5-7/16 Wide Plank Dims: 96 L x 5-7/16 W x 13/16 H BAMDECK 3G 16FT. 5-7/16 Wide Plank Dims: 192 L x 5-1/2 W x 13/16 H
BamDeck Installation Guide (888) 788-2254 The Collection Decking Systems BAMDECK 3G 5-7/16 Wide Plank Dims: 96 L x 5-7/16 W x 13/16 H BAMDECK 3G 16FT. 5-7/16 Wide Plank Dims: 192 L x 5-1/2 W x 13/16 H
Installation Guide. Capped Cellular PVC Fencing. Table of Contents. Storage and Handling Tools Needed Fence Layout and Locating Posts
 Capped Cellular PVC Fencing Installation Guide Table of Contents Storage and Handling Tools Needed Fence Layout and Locating Posts Installation instructions 4 x 4 Over Sleeve Post - 3.5 Rail Privacy Shadowbox
SHADOWBOX INSTALLATION FOR: Standard 6 H x 8 W Shadowbox Fence 5 x 5 Routed Posts Dog Ear or Straight-Edge Pickets 1.75 x 3.5 Rail
 SHADOWBOX INSTALLATION FOR: Standard 6 H x 8 W Shadowbox Fence 5 x 5 Routed Posts Dog Ear or Straight-Edge Pickets 1.75 x 3.5 Rail Storage and Handling Fence Preparation and Layout Locate and Set Posts
TREX ENHANCE RAILING (Also Applies to Trex Select Railing) Installation Instructions
 Installation Instructions") TREX ENHANCE RAILING (Also Applies to Trex Select Railing) NOTE: All Enhance Railing lengths are manufactured at CLEAR SPAN dimensions (spanning between space of posts): 7" for 6' clear span. Note that
TREX ENHANCE RAILING (Also Applies to Trex Select Railing) NOTE: All Enhance Railing lengths are manufactured at CLEAR SPAN dimensions (spanning between space of posts): 7" for 6' clear span. Note that
PRIVACY INSTALLATION FOR: Standard 6 H x 8 W Privacy Fence 4 x 4 Post Sleeve & Brackets Dog Ear or Straight-Edge Pickets 1.75 x 3.
 PRIVACY INSTALLATION FOR: Standard 6 H x 8 W Privacy Fence 4 x 4 Post Sleeve & Brackets Dog Ear or Straight-Edge Pickets 1.75 x 3.5 Rail Storage and Handling Fence Preparation and Layout Locate and Set
Chapter 1. Beam and Sill Plates
 Chapter 1. Beam and Sill Plates 1.1 ESTABLISHING SQUARE SILL PLATE CHALK LINES 1.2 INSTALLING TREATED SILL PLATES 1.3 INSTALLING LAMINATE BEAM Tools needed by volunteers: Hammer Nail apron Tape measure
Customer Service: Installation, Care and Maintenance
 Customer Service: 800-951-5117 Installation, Care and Maintenance Installation Instructions Easy step-by-step instructions for decking, railing and stairs. As with any building project, use proper eye
A Step-by-Step How To Guide
 HOW TO REMODEL YOUR STAIR A Step-by-Step How To Guide Add new life to your staircase and achieve professional results. 1 Renovating your staircase is more than a remodel, it s a transformation of your
42" Hybrid Composite Railing Installation Guide. v
 42" Hybrid Composite Railing Installation Guide v20180420 CONTENTS Important notes 1-3 Straight Railing and Post Parts 4 Straight Railing Installation 5-12 Stair Railing and Post Parts 13 Stair Railing
Build Like a Pro: Building a Deck
 This is an excerpt from the book Build Like a Pro: Building a Deck by Scott Shuttner Copyright 2002 by The Taunton Press www.taunton.com JOISTS PRO TIP Step up to a larger joist whenever you come close
Deck Designer Specification Kit For. TimberTech. All rights reserved copyright 2016 DIY Technologies
 Deck Designer Specification Kit For TimberTech All rights reserved copyright 2016 DIY Technologies Deck layout diagram Top view without planks Bottom view with planks Top view with planks Page 2 Deck Part
TREX TRANSCEND RAILING
 RAILING NOTES:» RAILINGS ARE DESIGNED TO BE INSTALLED OVER THE DECKING FRAME OR ON INSIDE OF RIM JOIST. NOTCHING OF PRESSURE-TREATED POSTS OR POSTS INSTALLED ON OUTSIDE OF RIM JOIST IS NOT ALLOWED.» All
ONE AND TWO FAMILY DWELLINGS Uncovered Decks July, 2007
 ONE AND TWO FAMILY DWELLINGS Uncovered Decks July, 2007 In the City of Lee s Summit, the construction of uncovered decks with a floor surface more than 30 inches above the adjacent grade level requires
TREX SELECT RAILING. Installation Instructions PARTS
 RAILING NOTE : All Trex Select Railing lengths are manufactured at ON CENTER dimensions (spanning from center of each post): 67-5/8" (76.8 cm) for 6' (.83 m) on center, and 9-5/8" (35.3 cm) for 8' (.44
AZEK Porch Install Guide
 TRIM MOULDING DECK PORCH RAIL PAVERS AZEK Porch Install Guide Installation Guidelines...2 Tools Required...2 Installation Preparation...3 Fasteners...4 Expansion and Contraction...4 Installation Instructions...5-6
Installation Guide. Deckorum. Composite Decking
 Installation Guide Deckorum Composite Decking 1. Introduction Welcome to Deckorum Installation Guide Please fully read the installation guide before commencing any installation works. This will provide
2x2 Baluster Railings FPO REDWOOD. Naturally beautiful Easy to use Practical and economical Durable and stable Resistant to decay and insects
 B U I L D I T W I T H REDWOOD 2x2 Baluster Railings FPO R E D W O O D Naturally beautiful Easy to use Practical and economical Durable and stable Resistant to decay and insects 2x2 Baluster Railings RAILING
DuraLife Porch Collection Installation Instructions
 DuraLife Porch Collection Installation Instructions Updated: 1/11 www.gaf.com 1 Getting Started... ilation and Drainage Plan the design of the porch it is the beginning of a successful project. DuraLife
Before You Begin IMPORTANT. Always wear safety glasses when cutting and drilling railing or decking products.
 Before You Begin IMPORTANT Always wear safety glasses when cutting and drilling railing or decking products. HELPFUL HINTS Use carbide-tipped, multi-purpose blade for cutting. Do not lay components on
PRO-RIB FENCE PANELS INSTALLATION GUIDELINES. Virtually Maintenance Free Available in 24 Colors Custom Heights Available by the Inch
 PRO-RIB FENCE PANELS INSTALLATION GUIDELINES Virtually Maintenance Free Available in 24 Colors Custom Heights Available by the Inch www.midwestmanufacturing.com Page 2 TOOLS NEEDED Measuring Tape Drill
GROUND-LEVEL DECK. Ground-Level Deck Riverside Dr., Suite 212 Metairie, LA SouthernPine.com SouthernPineDecks.com
 GROUND-LEVEL DECK Project Plan #857 Sheet 1 of 6 Decks can work wonders in many different ways...contemporary in style, yet simple and natural. They blend home and landscape with broad, inviting vistas
Installation Guide. deckorum Composite Decking
 Installation Guide deckorum Composite Decking 1. Introduction Welcome to Deckorum installation Guide Please fully read the installation guide before commencing any installation works. This will provide
Chapter 17 - Porch Trim
 Chapter 17 - Porch Trim Contents Chapter 17 - Porch Trim... 17-1 Timing & Prerequisites... 17-2 Trim on Porch Beams (Volunteer)... 17-4 Smart Trim on the Bottom of the Beam... 17-4 Smart Trim on the Inside
Chapter 23. Garage Construction
 Chapter 23. Garage Construction 23.1 ESTABLISHING CHALK LINES 23.2 MEASURING AND CUTTING WALL PLATES 23.3 MARKING WINDOW & DOOR LOCATIONS ON EXTERIOR WALL PLATES 23.4 MARKING STUDS ON EXTERIOR WALL PLATES
MODERN PERGOLA INSTALLATION GUIDE. When only the best will do.
 MODERN PERGOLA INSTALLATION GUIDE When only the best will do. TOOLS LIST Drill(s) 3/8" Magnetic Driver (s) 12" Drill Extension #2 Square Drive bit for Drill or Driver Level Tape Measure Hammer Drill if
Vinyl Gazebo Instructions
 P a g e 1 Vinyl Gazebo Instructions 10 Vinyl Gazebo Shown Thank you for the purchase of your New Gazebo. Depending on the size of your Gazebo, installation can usually be completed in 1 to 2 days. These
Stair Parts Installation. Tricks
 Stair Parts Installation Tips & Tricks Introduction Your DIY staircase guide Welcome to the Stairpart home installation guide. Your stairway is both a functional and focal point in your home, so keeping
10x10 Trellis Pergola
 0x0 Trellis Pergola ASSEMBLY GUIDE Ver.0-7 Table of Contents PAGE Introduction & Overview...................................................... Pergola Materials Overview..............................................................
Chapter 7 - Porch Framing
 Chapter 7 - Porch Framing Contents Chapter 7 - Porch Framing... 7-1 Timing & Prerequisites... 7-2 Concrete Porches Caps (Contractor)... 7-3 Organize the Porch Framing Lumber... 7-3 Types of Porch Roofs...
How to Build Good Decks..
 How to Build Good Decks.. Worldwide Sleeping Company, Inc Cary, North Carolina Decking Overview.. Decking Overview.. more Decking Joist.... Joist Hanger Ledger Lag Screw House Wall Decking House Floor
COMPACT DECK. Compact Deck SOUTHERN FOREST PRODUCTS ASSOCIATION SOUTHEASTERN LUMBER MANUFACTURERS ASSOCIATION
 COMPACT DECK SOUTHERN FOREST PRODUCTS ASSOCIATION SOUTHEASTERN LUMBER MANUFACTURERS ASSOCIATION P.O. BOX 641700 KENNER, LA 70064-1700 (504) 443-4464 FAX (504) 443-6612 www.southernpine.com Compact Deck
12ft X 12ft Attached Breeze Pergola Assembly Manual. Outdoor Living Today. (For Both 9 and 12 High Posts) June 1st/2012 Version #4
 June 1st/2012 Version #4") 12ft X 12ft Attached Breeze Pergola Assembly Manual (For Both 9 and 12 High Posts) Outdoor Living Today June 1st/2012 Version #4 Note: Installation of Wall Side Girders (P) and Wall Mount Brackets (M)
12ft X 12ft Attached Breeze Pergola Assembly Manual (For Both 9 and 12 High Posts) Outdoor Living Today June 1st/2012 Version #4 Note: Installation of Wall Side Girders (P) and Wall Mount Brackets (M)
Before You Begin IMPORTANT. Always wear safety glasses when cutting and drilling railing or decking products.
 Before You Begin IMPORTANT Always wear safety glasses when cutting and drilling railing or decking products. HELPFUL HINTS Use carbide-tipped, multi-purpose blade for cutting. Do not lay components on
Now available at participating Feeney (2/14) AF# A. Stores. 1/8'' Stainless Steel Cable Assemblies to Enhance Any Railing and Any View!
 AF# A. Stores. 1/8'' Stainless Steel Cable Assemblies to Enhance Any Railing and Any View!") 2014 Feeney (2/14) AF# 2009-236A Now available at participating Stores 1/8'' Stainless Steel Cable Assemblies to Enhance Any Railing and Any View! Easy-to-install, prefabricated cable assemblies are an
2014 Feeney (2/14) AF# 2009-236A Now available at participating Stores 1/8'' Stainless Steel Cable Assemblies to Enhance Any Railing and Any View! Easy-to-install, prefabricated cable assemblies are an
Salter Industries Spiral Stair
 Salter Industries Spiral Stair The Leader in Spiral Staircases Continuous Sleeve Stair Installation Instructions TOOLS NEEDED: 1. Electric drill with hex chuck and Phillips bit 2. Drill bits 1/8", 1/4",
ATLANTIS RAIL Contact Information
 ATLANTIS RAIL Contact Information Customer Service (800) 541-6829 (508) 732-9191 Spectrum System Installation Instructions Atlantis Rail s Spectrum System is an easy to install, universal cable railing
Installation Instructions for. Handrail Component System
 Handrail STEP-BY-STEP Installation Instructions for Handrail Component System Rise in Inches Run in Inches 8 8.5 9 9.5 10 10.5 11 11.5 12 12.5 13 13.5 14 14.5 15 8.5 47 45 43 42 40 39 38 36 35 34 33 32
Create cable assemblies to fit your style
 2015 Feeney (11/15) Quick-Connect Brochure #2015-975B Create cable assemblies to fit your style Quick-Connect Solutions Guide The fast and easy way to create your own CableRail assemblies! Our CableRail
TREX SELECT RAILING Installation Instructions
 RAILING NOTE : All Trex Select Railing lengths are manufactured at ON CENTER dimensions (spanning from center of each post): 67-5/8" (76.8 cm) for 6' (.83 m) on center, and 9-5/8" (35.3 cm) for 8' (.44
woodworkersjournal.com MATERIAL LIST
 MATERIAL LIST T x W x L 1 Legs (2) 1 1 2" x 3 1 2" x 36 7 16" 2 End Uprights (2) 1 1 2" x 3 1 2" x 32 1 2" 3 Stringers (4) 1 1 2" x 3 1 2" x 42" 4 Top Cladding, Long (2) 3/4" x 7 1 4" x 65 3 4" 5 Side
Installa on Guide: Fence Distributors. YourNextFence.com
 YourNextFence.com Plan Your Fence each line by dividing the length of each line in inches by 96. Round any remainder up. 2 Calculate Materials * For standard single gates (46 1/4 opening) : (1) small Trex
CCC Project Manual WHEELCHAIR RAMPS
 CCC Project Manual WHEELCHAIR RAMPS Project Components & How-To s Common Materials Wheelchair Ramp Specific Tools 4x4 for posts 2x6 for joists and handrails 2x4 for handrails 5/4 x 6 decking Cap blocks
T r e x Art i s a n Se r i e s Railing
 T r e x Art i s a n Se r i e s Railing I n s t a l l a t i o n In s t ru c t i o n s Trex Railing Components A. Trex Top Rail B. Trex Bottom Rail C. Trex Railing Support Bracket D. TrexExpress Railing
Flex Fence Instruction Manual
 The Safer Stronger Smarter Choice Flex Fence Instruction Manual Table of contents 2 3 4 4 5 5 6 7 8 10 10 11 11 12 13 13 15 18 18 19 20 22 Table of contents Supplies, tools and equipment Introduction Laying
Deck Evaluation Checklist
 Date: Reported By: Project Name/Client: Year Deck was Built: I. Stairs A. Not Applicable B. Are there any visible signs of cracks, decay or over-notching? No Yes 1. If yes, where? C. Stairway width: (Hint:
When is a Building Permit Required? Deck Details: What Must be Submitted with a Building Permit Application?
 P.O. Box 1190, Fort Collins, Colorado 80522-1190, Planning (970) 498-7683, Building (970) 498-7700, Larimer.org When is a Building Permit Required? A permit is required if ANY of the following is true:
Installation Guide. 203 Chesterra Drive, Dahlonega, GA Toll-Free ~ Fax ~
 Congratulations and Thank You for your purchase! DryJoistEZ is an easy to install structural aluminum joist that also provides an under-deck drainage system that you install over your deck framing system
10X12 Arched Breeze Pergola Assembly Manual Outdoor Living Today
 10X12 Arched Breeze Pergola Assembly Manual Outdoor Living Today ITEM# BZ1012ARCH Revision 2 March 25th/2015 Note: Post Mounting Hardware is NOT included in this kit. Please confirm with your local building
INDEX PAGE RELEASE SECTION NUMBER DATE
 INSTALLATION INSTRUCTIONS For Wind Zone 1 (other Wind Zones available on request) Version 11/20/2002 INDEX PAGE RELEASE SECTION NUMBER DATE Approval INTRODUCTION 2 2/26/2001 GENERAL INSTALLATION 3 2/26/2001
8x8 Spa Breeze Pergola Assembly Manual Outdoor Living Today
 8x8 Spa Breeze Pergola Assembly Manual Outdoor Living Today Revision 3. Feb 18th/2015 Note: Post Mounting Hardware is NOT included in this kit. Please confirm with your local building permit office to
INSTALLATION INSTRUCTIONS GUIDE
 CERTAINTEED RAILING AND DECKING INSTALLATION INSTRUCTIONS GUIDE Kingston Vinyl Railing and Vinyl Decking CONTENTS Important Information Before You Begin...3 Helpful Hints, Tips, Fire Information and Tools
Boardwalk Construction Guidelines
 Boardwalk Construction Guidelines Acton Land Stewardship Committee Acton, Massachusetts 1 Rev. 2-2/9/2018 NOTICE TO AGENCIES OUTSIDE THE ACTON LAND STEWARDSHIP COMMITTEE THE BOARDWALK CONSTRUCTION GUIDELINES
VINYL CLASSIC FREESTANDING PERGOLA ASSEMBLY INSTRUCTIONS
 P a g e 1 VINYL CLASSIC FREESTANDING PERGOLA ASSEMBLY INSTRUCTIONS Shown: 8' x 12' Vinyl Classic Pergola with 12" Top and Main Runner Spacing The design of this pergola is based on all posts being installed
CertainTeed INSTALLATION GUIDE SIMTEK FENCE PRODUCTS. Fence Installation Guide 3', 4' & 6' High
 CertainTeed INSTALLATION GUIDE SIMTEK FENCE PRODUCTS Fence Installation Guide 3', 4' & 6' High INSTALLATION GUIDE These instructions are designed to assist both professional installers and do-it-yourselfers
10 x 10 Flat Top Two Tone Pergola
 0 x 0 Flat Top Two Tone Pergola Models: Bordeaux ASSEMBLY GUIDE OPTIONAL ACCESSORIES Arch Kit System ( Arches) Privacy Fence Panel System ( Panels & Middle Post) Bolt Down Bracket Kit ( for Pergola) Ver.0-00
STACKING MULTI-SLIDE DOOR SYSTEM INSTALLATION INSTRUCTIONS
 STACKING MULTI-SLIDE DOOR SYSTEM INSTALLATION INSTRUCTIONS 1290363 Revision 1 12/16 Page 1 Weather Shield Mfg., Inc. NOTICE CAUTION! Failure to install and maintain our product according to these instructions
12 x 12 Flat Top Pergola
 x Flat Top Pergola Model: Regency, Roosevelt A S S E M B L Y G U I D E O P T I O N A L A C C E S S O R Y Bolt Down Bracket Kit ( for Pergola) Ver./MAR 0 Ta b l e o f Co n t e n t s PAGE x Flat Top Pergola
Deck Design Guide. One and Two Family Residential Dwellings
 Deck Design Guide One and Two Family Residential Dwellings The City of Lake Oswego is providing this information to help you design your deck, obtain a building permit and pass inspections. The standards
Pergola Installation Guide
 Pergola Installation Guide When only the best will do. 1 Tools Needed Installation Tools for assembly Drill(s) Miter or Circular Saw with carbide blade (cut slowly) ½" Drill Bit 5 /8" Drill Bit 5 /16"
Pergola Installation Guide. When only the best will do.
 Pergola Installation Guide When only the best will do. Tools Needed Installation Tools for assembly Drill(s) Miter or Circular Saw with carbide blade (cut slowly) 5 /8" Drill Bit 5 /16" Magnetic Driver
Installa on Guide: Fence Distributors. YourNextFence.com
 TM YourNextFence.com Plan Your Fence each line by dividing the length of each line in inches by 97. Round any remainder up. 2 Calculate Materials Tools Needed Stakes Circular Saw String Line Drill Marking
12 x 12 Flat Top Pergola
 x Flat Top Pergola A S S E M B LY G U I D E Model: Freemont OPTIONAL ACCESSORY Bolt Down Bracket Kit ( for Pergola) Ver /NOV 00 AI-BP0-0- Ta b l e o f Co n t e n t s PAGE x Flat Top Pergola Introduction
12 x 12 Flat Top Pergola
 x Flat Top Pergola Model: Freemont A S S E M B L Y G U I D E O P T I O N A L A C C E S S O R Y Bolt Down Bracket Kit ( for Pergola) Ver.-057 Ta b l e o f Co n t e n t s PAGE x Flat Top Pergola Introduction
Ranch Rail Vinyl Fence
 Ranch Rail Vinyl Fence INSTALLATION INSTRUCTIONS These instructions are to be used as general guidelines for the installation of your vinyl fence under normal installation conditions. Local conditions
6 1/2 x 6 1/2 Flat Top Pergola
 6 / x 6 / Flat Top Pergola A S S E M B L Y G U I D E Models: Portland, Liberty O P T I O N A L A C C E S S O R Y Bolt Down Bracket Kit V.-0506 Ta b l e o f Co n t e n t s PAGE The Introduction & Overview......................................................
INSTALLATION INSTRUCTIONS
 New installation instructions effective May 1, 2001 TimberTech Deck/Railing INSTALLATION INSTRUCTIONS ANDWARRANTY General Information TOOLS For all TimberTech Engineered Decking Systems products, standard
I N S TA L L AT I O N & M A I N T E N A N C E G U I D E
 I N S TA L L AT I O N & M A I N T E N A N C E G U I D E E N V I R O B U I L D. C O M + 4 4 ( 0 ) 2 0 8 0 8 8 4 8 8 8 Version 3.2 EnviroBuild 2018 C O N T E N T S Storage & Handling 03 Tools 04 Calculating
Chapter 16. Underlayment and Finish Stairs
 Chapter 16. Underlayment and Finish Stairs 16.1 INSTALLING UNDERLAYMENT & DRICORE 16.2 FINISHING STAIRS Tools needed by volunteers: Hammer Nail apron Tape measure Tools and equipment needed: Extension
A Quick Reference Guide to Planning an Installation
 PAGE 1 A Quick Reference Guide to Planning an Installation Plan and Measure Your Aluminum Fence Layout Before installing your fence, draw a plan to scale on a piece of graph paper as shown in the example.
10x10 Trellis Pergola
 0x0 Trellis Pergola ASSEMBLY GUIDE Ver.-007 Table of Contents PAGE 0x0 Trellis Pergola Introduction & Overview...................................................... Pergola Materials Overview..............................................................
Redwood 3. Install the chair back Finishing A d i r o n d a c k C h a i r Grades Materials For Adirondack Chair Quantity Size Length 4.
 Adirondack Chair Adirondack Chair BUILD THE CHAIR FRAME The rounded wooden slats, oversized armrests and inviting slant-back design identify the classic Adirondack chair. Born a century ago in upstate
6 1/2 x 6 1/2 Wood Grain Flat Top Pergola
 6 / x 6 / Wood Grain Flat Top Pergola A S S E M B LY G U I D E Models: Lakewood OPTIONAL ACCESSORY Bolt Down Bracket Kit Ver /AUG/0 Ta b l e o f Co n t e n t s PAGE The 6.5 x 6.5 Wo o d Grain Flat Top
DUTCH GABLE FREESTANDING CARPORT
 DUTCH GABLE FREESTANDING CARPORT STRATCO OUTBACK ASSEMBLY INSTRUCTIONS. Your complete guide to building a FREESTANDING Outback DUTCH GABLE CARPORT BEFORE YOU START Carefully read these instructions. If
Sawn Baluster Sizing and Installation Guide
 Sawn Baluster Sizing and Installation Guide Welcome to the Durabrac sizing and installation guide for Sawn Balusters. This guide has been prepared to answer any questions you may have about our Sawn Balusters
Before You Begin IMPORTANT. Always wear safety glasses when cutting and drilling railing or decking products.
 Before You Begin IMPORTANT Always wear safety glasses when cutting and drilling railing or decking products. HELPFUL HINTS Use carbide-tipped, multi-purpose blade for cutting. Do not lay components on
10 x 10 Arch Top Pergola
 0 x 0 Arch Top Pergola I N S T A L L A T I O N G U I D E O P T I O N A L A C C E S S O R I E S Privacy Fence Panel System ( Panels & Middle Post Included) Bolt Down Bracket Kit (Set of ) Additional Shade
GREEN WORLD LUMBER GENUINE MAHOGANY DECKING INSTALLATION GUIDE
 GREEN WORLD LUMBER GENUINE MAHOGANY DECKING INSTALLATION GUIDE Genuine Mahogany is among the most durable natural wood decking available. When properly installed and maintained, you should have a beautiful
Spiral Slide
 IMPORTANT Page 1 PLEASE READ THESE INSTRUCTIONS BEFORE COMMENCING ASSEMBLY. All equipment must be installed in accordance with these instructions. Check your shipment against Bill of Lading and Parts list.