CONTRACTOR CERTIFICATION COURSE
|
|
|
- Tyrone Higgins
- 5 years ago
- Views:
Transcription

1 CONTRACTOR CERTIFICATION COURSE 1
2 Learning Objectives After completing this course you will be able to: Explain appropriate methods for storing and installing ChoiceDek decking Discuss care and maintenance requirements for ChoiceDek products List the performance advantages of ChoiceDek products, along with the warranties 2
3 Course Overview Section 1: Why ChoiceDek? Section 2: Storing and Installing ChoiceDek Decking & Railing Section 3: ChoiceDek Care & Maintenance 3
4 Why ChoiceDek? 4
5 The ChoiceDek Advantage ChoiceDek decking and railing are Lowe s exclusive products and available thru all Lowe s stores across the country. ChoiceDek is manufactured with a 50/50 blend of recycled wood fibers and recycled polyethylene plastics including kiln-dried Red Oak mill waste, waste pallets, construction debris, milk jugs, grocery bags, detergent bottles, pallet wrap, and food packaging waste. ChoiceDek contains more than 95% recycled materials 38% from postconsumer and 57% from pre-consumer sources. 5


6 How To Purchase ChoiceDek Decking ChoiceDek is available exclusively through Lowe s across the US. To find a store near you visit. 6

7 ChoiceDek Foundations ChoiceDek Foundations ChoiceDek Foundations is a superior, environmentally friendly, composite decking built for value, durability and ease. It s the ideal choice for homeowners who want a value option for a composite decking that is stain, mold and mildew resistant. Available exclusively at Lowe's, the wide range of ChoiceDek Foundations composite decking and railing products gives you the flexibility to create a truly distinctive, custom deck. Expertly designed to be safe and easy to work with, every piece is created with an unmatched level of durability. - 1 x 5.5 8, 12, 16 or Year Warranty - Available in 3 colors 7

8 Decking Options 8

9 Railing System 9
10 Warranty ChoiceDek composite decking is manufactured by Advanced Environmental Recycling Technologies, Inc. (A.E.R.T.), which warrants ChoiceDek products against rot, decay and termite damage with a 25-year warranty. ChoiceDek products must be installed according to A.E.R.T. s printed installation instructions and all building codes adopted by federal, state or local governments or government agencies as applicable to the installation. Failure to properly install the product per the manufacturer s published instructions including proper gapping and spacing may affect product performance and void the warranty. Note: Because all ChoiceDek products are fully encapsulated, they can be installed on the ground, in the ground or in the water without voiding the warranty For complete warranty information, visit: 10
11 Storing and Installing ChoiceDek Decking & Railing 11
12 Prior to Installation Before installation begins, consult local building codes and secure all required contracts and permits. Some common building code requirements for decking include: Residential minimum handrail height is generally 36 inches. Multi-family minimum handrail height is generally 42 inches. Baluster maximum spacing is generally 4 inches (clear distance between balusters**). Maximum gap between bottom rail and deck surface is generally 4 inches.** Some codes require a 2-inch maximum gap for multi-family applications. Prior to installation of decking and railing, substructure and joist system must be installed per local code requirements. ChoiceDek posts must then be blocked and attached to rim joists with a maximum distance of 72 inches from center of post to center of post. ** Spacing Note: The precise language is generally do not allow passage of a sphere 4 inches in diameter. Be sure to check on the tolerance of your local building code. 12


13 Storing ChoiceDek Decking When storing ChoiceDek decking at a jobsite for an extended period of time, it is best to place materials on a flat surface to prevent deck boards from bending and conforming to uneven ground. To prevent tannin stains and inconsistent weathering all materials should be covered. NEED PHOTO OF CHOICEDEK WRAPPED PRODUCT 13


 Blue")

14 Tools To install ChoiceDek decking, you will need: Hammer Level Screw Gun Tape measure Rasp Circular saw (carbide-tipped blade with fewer than 20 teeth is recommended) Blue chalk line (ChoiceDek recommends blue since other colored chalk may stain the deck) 14


15 Fasteners Decking and Railing: For deck board fasteners, ChoiceDek recommends #7, 2-1/4-inch stainless steel trim head screws for the decking and railing. Some part of the railing require #8, 3-inch stainless steel trim head screws. If you do not want the screw heads to show, use the countersinking technique shown in the next slide. ChoiceDek products are also compatible with most hidden fastener systems. Please consult the installation instructions provided by the hidden fastener manufacturer, or contact ChoiceDek customer service at


16 Concealing Screw Heads Using a #7, 2-1/4-inch stainless steel trim head screw, countersink the screw into the decking material approximately ¼ inch. Using your thumb, lightly push the displaced decking material over the hole left by the trim head screw. Tap with a hammer to cover the trim head screw with decking material. Installation Tips: Using a 2-inch drive bit allows you to better gauge screw depth. Tap hole with edge of hammer for best results. 16

17 Post & Decking Installation Step 1: Layout and install joists at either 16 inches on-center when decking will be installed perpendicular to the joists, or 12 inches on-center when deck boards will be installed diagonally or at an angle to the joists. Joists must be level. Installation Tip: Recommended spacing provides for proper drainage and prevents buckling from normal expansion and contraction. 17
.")
18 Post & Decking Installation Step 2: Attach posts to decking frame. DO NOT NOTCH POSTS. The maximum distance center from center of post to center of post is 72-inches. Square and level posts. Block posts and attached to rim joists with two bolts (1/2-inch carriage bolts 8-inch minimum length with 1-1/4 flat washer and nut on back). Installation Tip: Bolt positions: The top bolt to be no more than 3-inches below the finished deck surface and the bolt spacing no less than 4-inches on center. 18
 end-toend spacing between ends of boards (butt joints).")
19 Post & Decking Installation Step 3: Install ChoiceDek decking using 2-1/4-inch, #7 stainless steel trim head screws, two screws per board per joist recommended. Screws should be a minimum of ½-inch from the board end. Allow ¼-inch spacing between deck boards. Allow 1/8-inch (or greater) end-toend spacing between ends of boards (butt joints). If installing in freezing weather, leave ¼-inch between butt joints. Cut deck boards to fit around posts. Leave 1/8-inch gap between boards and posts. Installation Tips: Double joist at butt joint to ensure plenty of room for fasteners. Pre-drill using 7/64-inch bit when close to the edge to prevent splitting. Drive screw at a light angle into joist. 19

20 Post & Decking Installation Step 3 (continued) Staggering butt joints on long decks usually improves the overall appearance of the finished deck. Some people also prefer a distinctive pattern for the deck boards. To achieve an interesting design, install a pattern board, which eliminates butt joints. Once the boards are in place, adjust the blade depth of your saw to match the thickness of your deck boards. Use a blue chalk line to mark your cut. To avoid staining the deck boards, use blue carpenter s chalk. Rasp the edges to finish. Installation Tips: Router or rasp end of deck board using ¼-inch round for a finished look Allow 3/16-inch overhang for any rim joist imperfections (straight) If you choose not to use the trim board, maximum recommended overhang is 1-inch 20
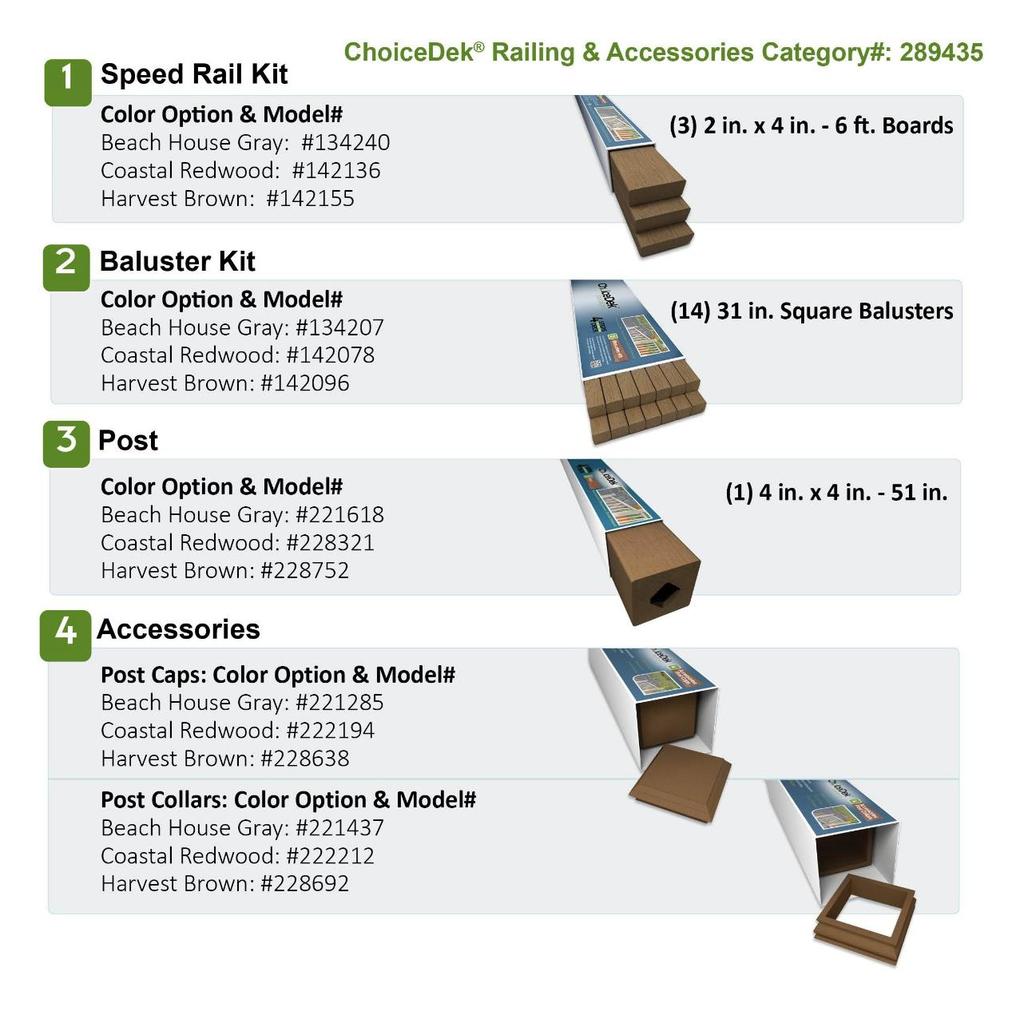
21 Railing Installation Railing Orientation: To use the railing, measure and cut the first 2x4 flush to the inside length between the posts. The speed rails allow the baluster to face either toward or away from the deck depending on which way the consumer prefers the rail system to be installed. For ease of installation, the railing system is available in the following pieces: 1 box of 3 6-foot speed rails 1 box of 14 balusters 1 post 1 post cap 1 post collar 21

22 Railing Installation Step 4: Slip post collar over post onto deck. 22
23 Railing Installation Step 5: Cut two support blocks to the height you want the toe sweep (no less than 2-inches nor greater than 4-inches. Refer to your building code). Drill a lead hole with a 1/8-inch drill bit in the center of the support block until you reach 1½-inch from the bottom of the block. Use one 2¼-inch #7 stainless steel trim head screw to fasten the support block to the 2-inch side of the bottom rail spaced no more than 24-inches from each post. Installation Tips: Use clamps to secure for easier installation. Using scrap material between the clamps and railing may help avoid clamp marks. 23
24 Railing Installation Step 5: (continued) A. Set one 2x4 rail edge wise on blocks. Position 2x4 to account for balusters facing toward the deck or away from the deck. B. Measure 1-inch into the inside of post and place baluster against post sitting with its end flush with the bottom of the 2x4 (1¼-inch side against the post). C. Using two 2¼-inch #7 stainless steel trim head screws, secure baluster to post, two screws at each end, and two additional screws evenly spaced between the end of the connections. D. Use two 2¼-inch #7 stainless steel trim head screws to secure the bottom rail to the baluster. E. Place second baluster against opposite post and repeat steps C and D. 24

25 Railing Installation Step 6: Place second 2x4 flush with the top of the balusters and using two 2¼- inch #7 stainless steel trim head screws secure the baluster to the top rail. Repeat this step on the opposite end. 25
. Outside edges of both 2x4 s should be flush.")

26 Railing Installation Step 7: Place finishing 2x4 over the top rail in a flat position (with 4-inch side against 2-inch side of top rail). Outside edges of both 2x4 s should be flush. Secure finishing 2x4 to top rail using one 2¼-inch #7 stainless steel trim head screw on each end and three additional screws evenly spaced across the top of the finishing 2x4. Screws should be centered into top rail with a minimum ¾-inch from the edge of the flat 2x4. 26

27 Railing Installation Step 8: use the formula below to determine the amount of balusters you need and the spacing between them. Measure the distance in inches between the inside of one post baluster to the inside of the other post baluster. This is your total space. A. Divide the total space by 5, and round it off to a whole number. This is the number of additional balusters you will need. B. Multiply the value in (A) by 1.5 and subtract it from your total space. C. Divide the value in (B) by the value of (A+1). This is the spacing between the balusters. You may want to cut two spacer blocks from scrap material or a baluster, the same width as answer C and use these two spacers at top and bottom to place baluster. Installation Tips: If installing balusters that are not ChoiceDek brand, please refer to the manufacturer s installation instructions. 27

28 Railing Installation Step 9: Evenly space balusters on the inside of the top and bottom rails with 1½-inch side facing outward. Secure each baluster to the top and bottom rails with one 2¼-inch #7 stainless steel trim head screws at each rail. Balusters should be placed according to the required building code but no more than 4-inches apart. 28

29 Railing Installation Step 10: Attach post caps to top of post. Installation Tips: Quality outdoor adhesive can be used for caps. 29

30 Trim Board Installation Step 11: Additionally, for a finished look, install trim boards over the rim joists. Position flush with the top of the decking. Attach using 2¼-inch, #7 stainless steel trim head screws. One screw through the end or side of the decking and three screws into the rim joist vertically. Repeat this step every inches horizontally through the length of the trim board. We recommend putting the screw through the thickest part of the deck board (center between the top of the board and the bottom of a rib) when attaching the trim board, then the other three into the rim joist. 30


31 45-Degree Railing Step 12: Determine the angle of the top 2x4 rail. Lay a top 2x4 rail centered on top of the two posts and mark angle (see railing orientation) and cut. Mark and cut the bottom 2x4 rail the same way except that the orientation of the board is edge wise. The thin edge down. 31

32 45-Degree Railing Step 13: Place bottom rail on blocks that are cut to the toe sweep height desired (no less than 2 inches nor greater than 4 inches) Place baluster with 45-degree cut side against the post positioned at the 45- degree corner and sitting against the bottom rail. Attach it to the post using step #5C. Place a regular baluster against the diagonal baluster, sitting on bottom rail and attach with three, 2-1/4-inch, #7 stainless steel trim head screws, evenly spaced top to bottom. 32
.")
33 45-Degree Railing Step 14: Finish with steps #5D through #11 with the exception of the post baluster that has been installed already in the 45-degree section (step #13). 33

34 Stair Railing Step 15: Be sure posts measure no more than 72- inches from outside at the angle of the stairway when using as a stair rail. Guard rail sections are sold in 72-inch lengths and must be trimmed to fit between the posts. Allow for decrease in length from angle cuts. 34
 along each stair rise. Install post collars if desired. Cut and install trim board on stringers if desired. Use procedures in step #11. 35")
35 Stair Railing Step 16: Install deck boards. Boards may be flush with riser or extend past the riser by 1-inch. Use two, 2-1/4-inch, #7 stainless steel trim head screws per board per stringer. Optional: Cut and install kick boards (deck boards) along each stair rise. Install post collars if desired. Cut and install trim board on stringers if desired. Use procedures in step #11. 35
36 Stair Railing Step 17: Lay a top and bottom 2x4 rail along the edges of the steps and up next to the post. Position both 2x4 rails for marking by lying on the steps. Mark the rails on the inside faces of the two upright posts. Cut each rail along this mark (line). 36
 and support on blocks cut from scrap")
37 Stair Railing Step 18: Position bottom rail ½-inch above edges of steps (check local code) and support on blocks cut from scrap material. 37

38 Stair Railing Step 19: Cut ends of two balusters at the same angle as the top and bottom 2x4 rails and use them as the post balusters. Step 20: To complete stair railing follow steps #5B through #11. 38
39 Care & Maintenance 39
40 Periodic Cleaning ChoiceDek decking requires periodic cleaning to keep it looking new. Suggested cleaners for periodic maintenance: Olympic Premium Deck Cleaner Spray & Forget Pour-N-Restore Pressure washer: You can use a pressure washer to clean the deck. Always use a fan tip blade no more than 1300 PSI, and do not apply closer than 8-10 from the deck surface, as doing so may cause damage to the deck boards. 40
41 Specific Cleaning Issues & Instructions Dirt and debris Keep the deck clean by sweeping to remove dirt and debris. Using a leaf blower can be a very helpful quick clean once a week. If necessary, mild soap and warm water can be used with a scrub brush to gently remove stubborn spots. Scratches or surface abrasions Markings of this type should fade within weeks of installation. Using a deck wash containing hypochlorite (bleach) can speed this process after natural weathering has occurred. Mold Based on our testing the most effective cleaner for quickly removing mold stains is Olympic Premium Deck Cleaner. Please note that Olympic Deck Cleaner is a bleach based cleaner and may temporarily lighten the surface appearance. After cleaning, for long lasting results use Spray and Forget as an inhibitor. Spray and Forget can also be used as a cleaner in situations where instant results are not needed. Please note that Spray and Forget is a nonbleach cleaner that will not lighten the deck. Removing ice or snow Calcium chloride or rock salt can be used to remove ice from ChoiceDek products. 41
42 Specific Cleaning Issues & Instructions Chalk lines We recommend using a blue or white chalk line when installing your deck. DO NOT USE RED CHALK. Scrub the affected area with soap and hot water to help remove the stain. For stubborn stains, bleach can be added to the cleaning solution to achieve the desired result. Oil and grease stains Household degreasing agents, such as Dawn dishwashing detergent, should be used to remove the oil and grease stain as soon as the stain is noticed. Be sure to thoroughly rinse the detergent off the deck with hot water. If the stain sit for more than a few hours the most effective method of removing it is with an oil stain remover such as OSR or Pour-N-Restore. Rust Stains/Stubborn Spots A cleaner containing oxalic acid, commonly known as deck brighteners, can be used to remove these stains. In order to achieve desired results, the cleaner may need to sit on the stain for up to 15 minutes prior to rinsing. For specific product recommendations please contact ChoiceDek Customer Service at * Follow all package directions for proper usage, safety precautions and disposal. In some cases more stubborn stains will require reapplying cleaners until the desired level of cleanliness is achieved. At times, brushing the deck with a hard bristle brush may be necessary to remove any stubborn staining. Remember to always test chosen cleaners in a small inconspicuous area of your deck for approved results. Never mix any other cleaners (ammonia, phosphoric acid, etc.) with bleach. 42
43 Questions? Thank you for taking the time to enhance your knowledge of ChoiceDek decking and railing products. If you have any questions pertaining to the content included in this course, please contact us at or 43
installation care & maintenance instructions moistureshield.com limited lifetime warranty
 installation care & maintenance instructions 866.729.2378 moistureshield.com limited lifetime warranty It s comforting to know that you re about to build a deck that gives you every possible advantage.
Customer Service: Installation, Care and Maintenance
 Customer Service: 800-951-5117 Installation, Care and Maintenance Installation Instructions Easy step-by-step instructions for decking, railing and stairs. As with any building project, use proper eye
installation care & maintenance instructions lifecycledecking.com 25-year limited residential warranty 20-year limited commercial warranty
 installation care & maintenance instructions lifecycledecking.com 25-year limited residential warranty 20-year limited commercial warranty Installation Instructions As with any building project, use proper
COMPOSITE RAILING INSTALLATION
 COMPOSITE RAILING INSTALLATION Tools All you ll need is a hammer and screw gun, circular saw (carbidetipped blade with fewer than 20 teeth is recommended), level, tape measure, rasp and blue chalk line.
SHIPLOCK CLADDING PRODUCT GUIDE INSTALLATION TECHNICAL SPECIFICATIONS CARE & MAINTENANCE
 SHIPLOCK CLADDING PRODUCT GUIDE INSTALLATION TECHNICAL SPECIFICATIONS CARE & MAINTENANCE SHIPLOCK CLADDING CN-04E / CN-04W / CN-W008 Prior to the installation of any form of Cladding, it is recommended
UltraDeck. Decking & Railing Installation Guide.
 UltraDeck Decking & Railing Installation Guide www.midwestmanufacturing.com Table of Contents: General Guidelines for Deck Installation 4 Plank Board Installation 6 QuickCap Installation 8 Cladding & Endcap
DECKING INSTALLATION GUIDE
 STAIR TREAD INSTALLATION GUIDE Step 7: Install the Remaining Treads Repeat steps 2 to 6 for the remaining stair treads. Step 8: Install the Fascia 1. Measure the riser height. 2. Rip the fascia to the
RAILING SYSTEM INSTALLATION INSTRUCTIONS
 RAILING SYSTEM INSTALLATION INSTRUCTIONS Failure to follow these instructions risks voiding the GeoDeck warranty. www.geodeck.com July 2010: V10R.3 Page 1 of 13 www.geodeck.com July 2010: V10R.3 Page 2
DuraLife Porch Collection Installation Instructions
 DuraLife Porch Collection Installation Instructions Updated: 1/11 www.gaf.com 1 Getting Started... ilation and Drainage Plan the design of the porch it is the beginning of a successful project. DuraLife
INSTALLATION INSTRUCTIONS MILLENNIUM DECKING Before Installing Millennium Decking, please read these instructions in their entirety.
 INSTALLATION INSTRUCTIONS MILLENNIUM DECKING Before Installing Millennium Decking, please read these instructions in their entirety. Safety PRE-INSTALLATION Compliance with all applicable local, state
I N S TA L L AT I O N & M A I N T E N A N C E G U I D E
 I N S TA L L AT I O N & M A I N T E N A N C E G U I D E E N V I R O B U I L D. C O M + 4 4 ( 0 ) 2 0 8 0 8 8 4 8 8 8 Version 3.2 EnviroBuild 2018 C O N T E N T S Storage & Handling 03 Tools 04 Calculating
Now available at participating Feeney (2/14) AF# A. Stores. 1/8'' Stainless Steel Cable Assemblies to Enhance Any Railing and Any View!
 AF# A. Stores. 1/8'' Stainless Steel Cable Assemblies to Enhance Any Railing and Any View!") 2014 Feeney (2/14) AF# 2009-236A Now available at participating Stores 1/8'' Stainless Steel Cable Assemblies to Enhance Any Railing and Any View! Easy-to-install, prefabricated cable assemblies are an
2014 Feeney (2/14) AF# 2009-236A Now available at participating Stores 1/8'' Stainless Steel Cable Assemblies to Enhance Any Railing and Any View! Easy-to-install, prefabricated cable assemblies are an
INSTALLATION GUIDE HEALTH & SAFETY NATURAL VARIANCES & WEATHERING. Ekodeck Should Not: Warnings
 INSTALLATION GUIDE INSTALLATION GUIDE To achieve a safe and long lasting Ekodeck installation, it is read the following guide in full. The installation guide is intended to be viewed along with the Ekodeck
The following instructions will guide you through the installation of your new vinyl railing.
 Installation Guide St. James Vinyl T-Rail Tools Required Protective eye glasses 3/8 x 3 Concrete Anchors/Fasteners (for Tape measure concrete installations) Variable speed drill/screwdriver Philips Driver
Installation Guide (888)
") BamDeck Installation Guide (888) 788-2254 The Collection Decking Systems BAMDECK 3G 5-7/16 Wide Plank Dims: 96 L x 5-7/16 W x 13/16 H BAMDECK 3G 16FT. 5-7/16 Wide Plank Dims: 192 L x 5-1/2 W x 13/16 H
BamDeck Installation Guide (888) 788-2254 The Collection Decking Systems BAMDECK 3G 5-7/16 Wide Plank Dims: 96 L x 5-7/16 W x 13/16 H BAMDECK 3G 16FT. 5-7/16 Wide Plank Dims: 192 L x 5-1/2 W x 13/16 H
Installation Guide (888)
") BamDeck Installation Guide (888) 788-2254 The Collection Decking Systems BAMDECK 4G 5-7/16 Wide Plank Dims: 192 L x 5-7/16 W x 13/16 H BAMDECK 4G WIDE 8-1/4 Wide Plank Dims: 96 L x 8-1/4 W x 13/16 H BAMDECK
BamDeck Installation Guide (888) 788-2254 The Collection Decking Systems BAMDECK 4G 5-7/16 Wide Plank Dims: 192 L x 5-7/16 W x 13/16 H BAMDECK 4G WIDE 8-1/4 Wide Plank Dims: 96 L x 8-1/4 W x 13/16 H BAMDECK
T r e x Art i s a n Se r i e s Railing
 T r e x Art i s a n Se r i e s Railing I n s t a l l a t i o n In s t ru c t i o n s Trex Railing Components A. Trex Top Rail B. Trex Bottom Rail C. Trex Railing Support Bracket D. TrexExpress Railing
LOOKS AND FEELS LIKE TIMBER
 LOOKS AND FEELS LIKE TIMBER SMART COMPOSITE MATERIALS WHAT IS EKODECK AND EKODECK+? A composite decking that looks and feels like natural timber and is naturally weather resistant. Their unique design
Installa on Guide: Fence Distributors. YourNextFence.com
 TM YourNextFence.com Plan Your Fence each line by dividing the length of each line in inches by 97. Round any remainder up. 2 Calculate Materials Tools Needed Stakes Circular Saw String Line Drill Marking
INSTALLATION INSTRUCTIONS
 New installation instructions effective May 1, 2001 TimberTech Deck/Railing INSTALLATION INSTRUCTIONS ANDWARRANTY General Information TOOLS For all TimberTech Engineered Decking Systems products, standard
Installation Guide: Fence
 N Installation Guide: Fence Visit trexfencing.com Trex Horizons Fencing www.trexfencing.com PLESE RE REFULLY Trex Horizons Fence olors Saddle Woodland rown Winchester Grey* *When it is new, Winchester
Build Outdoor Stairs. Stair Building Terms There are five basic design elements you'll need to consider when planning outdoor stairs:
 Build Outdoor Stairs Stair Building Terms There are five basic design elements you'll need to consider when planning outdoor stairs: The Total Run (Fig. 1) is the total horizontal distance covered by the
Installation Instructions for. Handrail Component System
 Handrail STEP-BY-STEP Installation Instructions for Handrail Component System Rise in Inches Run in Inches 8 8.5 9 9.5 10 10.5 11 11.5 12 12.5 13 13.5 14 14.5 15 8.5 47 45 43 42 40 39 38 36 35 34 33 32
The following instructions will guide you through the installation of your new vinyl railing stair kit.
 Installation Guide Vinyl Standard Stair Railing Tools Required Protective eye glasses Tape measure Variable speed drill/screwdriver Rotary hammer or hammer drill and masonry percussion bit recommended
Before You Begin IMPORTANT. Always wear safety glasses when cutting and drilling railing or decking products.
 Before You Begin IMPORTANT Always wear safety glasses when cutting and drilling railing or decking products. HELPFUL HINTS Use carbide-tipped, multi-purpose blade for cutting. Do not lay components on
Sawn Baluster Sizing and Installation Guide
 Sawn Baluster Sizing and Installation Guide Welcome to the Durabrac sizing and installation guide for Sawn Balusters. This guide has been prepared to answer any questions you may have about our Sawn Balusters
GREEN WORLD LUMBER GENUINE MAHOGANY DECKING INSTALLATION GUIDE
 GREEN WORLD LUMBER GENUINE MAHOGANY DECKING INSTALLATION GUIDE Genuine Mahogany is among the most durable natural wood decking available. When properly installed and maintained, you should have a beautiful
CXT PRO RAILING INSTALLATION INSTRUCTIONS For Installations Using Aluminum and Glass Balusters Sold Separately
 CXT PRO RAILING INSTALLATION INSTRUCTIONS For Installations Using Aluminum and Glass Balusters Sold Separately CCRR-0171 PFS AA-652 Drill/power screwdriver Assorted drill bits Hammer Miter or circular
Installation Instructions for. Before You Begin TOOLS REQUIRED
 Composite Railing System STEP-BY-STEP Installation Instructions for Spectrum Composite Railing Virtually maintenance free 20-year warranty EverNew Spectrum Railing system is designed to work with a number
Dura Deck. Installation Manual and Care Guide. Timber Composite Decking
 V3. Nov 20 13 Dura Deck Timber Composite Decking Installation Manual and Care Guide Strong and durable, Dura Deck looks and feels like natural wood and its unique formula provides longer lasting decking
3. Use base plate as template (see FIG. 4-1) to mark location for fasteners.
 to mark location for fasteners.") Plan the layout of the railing it is the beginning of a successful project. Getting Started... 1. Completely read the application instructions before starting the installation of the railing. 2. Properly
Plan the layout of the railing it is the beginning of a successful project. Getting Started... 1. Completely read the application instructions before starting the installation of the railing. 2. Properly
Installa on Guide: Fence Distributors. YourNextFence.com
 YourNextFence.com Plan Your Fence each line by dividing the length of each line in inches by 96. Round any remainder up. 2 Calculate Materials * For standard single gates (46 1/4 opening) : (1) small Trex
2x Bottom Bracket. 1x Rail Support STEP 1 STEP 2
 Level Railing Top Rail Bottom Rail Aluminum Baluster 2x Bottom Bracket 1x Rail Support Kit Includes: 1 - Top Rail (with Baluster Connectors installed) 1 - Bottom Rail (with Baluster Connectors installed)
I N S T A L L A T I O N & M A I N T E N A N C E G U I D E
 I N S T A L L A T I O N & M A I N T E N A N C E G U I D E E N V I R O B U I L D. C O M + 4 4 ( 0 ) 2 0 8 0 8 8 4 8 8 8 Version 3.7 EnviroBuild 2018 C O N T E N T S 03 Storage & Handling 04 Tools 05 Calculating
Before You Begin IMPORTANT. Always wear safety glasses when cutting and drilling railing or decking products.
 Before You Begin IMPORTANT Always wear safety glasses when cutting and drilling railing or decking products. HELPFUL HINTS Use carbide-tipped, multi-purpose blade for cutting. Do not lay components on
INSTALLATION GUIDE INSTALLATION GUIDE EKODECK SHOULD NOT: IMPORTANT INFORMATION
 INSTALLATION GUIDE INSTALLATION GUIDE EKODECK SHOULD NOT: To achieve a safe and long lasting Ekodeck installation, it is important to read the following guide in full. Be used as a structural or load bearing
Before You Begin IMPORTANT. Always wear safety glasses when cutting and drilling railing or decking products.
 Before You Begin IMPORTANT Always wear safety glasses when cutting and drilling railing or decking products. HELPFUL HINTS Use carbide-tipped, multi-purpose blade for cutting. Do not lay components on
1/8 Stainless Steel Cable Assemblies to Enhance Any Railing and Any View!
 2015 Feeney (3/15) Packaged Products Catalog #2011-338D 1/8 Stainless Steel Cable Assemblies to Enhance Any Railing and Any View! Standard Cable Assemblies Easy-to-install, prefabricated cable assemblies
Before You Begin IMPORTANT. Always wear safety glasses when cutting and drilling railing or decking products.
 Before You Begin IMPORTANT Always wear safety glasses when cutting and drilling railing or decking products. HELPFUL HINTS Use carbide-tipped, multi-purpose blade for cutting. Do not lay components on
PAINT & MISC. Notes. Table of Contents. Front Handrail Posts Front Handrails Closet Shelving Exterior Deck...
 118 PAINT & MISC. Table of Contents Front Handrail Posts... 119 Front Handrails... 122 Closet Shelving... 125 Exterior Deck... 127 Look for painter s tape on the hammer drill for where to set the depth.
woodworkersjournal.com MATERIAL LIST
 MATERIAL LIST T x W x L 1 Legs (2) 1 1 2" x 3 1 2" x 36 7 16" 2 End Uprights (2) 1 1 2" x 3 1 2" x 32 1 2" 3 Stringers (4) 1 1 2" x 3 1 2" x 42" 4 Top Cladding, Long (2) 3/4" x 7 1 4" x 65 3 4" 5 Side
TREX TRANSCEND RAILING
 RAILING NOTES:» RAILINGS ARE DESIGNED TO BE INSTALLED OVER THE DECKING FRAME OR ON INSIDE OF RIM JOIST. NOTCHING OF PRESSURE-TREATED POSTS OR POSTS INSTALLED ON OUTSIDE OF RIM JOIST IS NOT ALLOWED.» All
Create cable assemblies to fit your style
 2015 Feeney (11/15) Quick-Connect Brochure #2015-975B Create cable assemblies to fit your style Quick-Connect Solutions Guide The fast and easy way to create your own CableRail assemblies! Our CableRail
INSTALLATION INSTRUCTIONS. Level Rail With Cap: Page 2 Level Rail Without Cap: Page 8 Stair Rail: Page 12
 INSTALLATION INSTRUCTIONS Level Rail With Cap: Page 2 Level Rail Without Cap: Page 8 Stair Rail: Page 12 LEVEL RAIL WITH CAP The testing was performed in accordance with procedures and methods referenced
Step 2 - Measure and install joist hangers every 16". See Figure "B" above. Fill every hole in each
 Adding a deck is one of the most useful projects a homeowner can do to improve their home. Each deck is different and presents it's own set of challenges, so contact us with unique questions if they are
1/8 Stainless Steel Cable Assemblies to Enhance Any Railing and Any View!
 2017 Feeney (2/17) Packaged Products Catalog #2011-338G 1/8 Stainless Steel Cable Assemblies to Enhance Any Railing and Any View! Standard Cable Assemblies Easy-to-install, prefabricated cable assemblies
Before You Begin IMPORTANT. Always wear safety glasses when cutting and drilling railing or decking products.
 Before You Begin IMPORTANT Always wear safety glasses when cutting and drilling railing or decking products. HELPFUL HINTS Use carbide-tipped, multi-purpose blade for cutting. Do not lay components on
AZEK Porch Install Guide
 TRIM MOULDING DECK PORCH RAIL PAVERS AZEK Porch Install Guide Installation Guidelines...2 Tools Required...2 Installation Preparation...3 Fasteners...4 Expansion and Contraction...4 Installation Instructions...5-6
Effective February, 2015
 Effective February, 2015 Table of Contents Ensuring System Performance 1 Components 2 Frequently Asked Questions 3 List of Tools 3 Before you Begin Preparation 3 Quality Tips 4 Cold Weather Tips 4 Cleaning
PORCH RAIL INSTALLATION INSTRUCTIONS. Level Rail... 2 Stair Rail... 8 Care & Maintenance, Finishing... 15
 PORCH RAIL INSTALLATION INSTRUCTIONS Level Rail... 2 Stair Rail... 8 Care & Maintenance, Finishing... 15 COMPONENT LIST LEVEL RAIL KIT Porch Rail was designed to meet the most stringent building codes.
Level Railing. Installation Guide. v2.5 W W W. S O L U T I O N S A L U M I N U M. C O M
 Level Railing Installation Guide Top Rail Bottom Rail Aluminum Baluster 2x Bottom Bracket 1x Rail Support #909915 Kit Includes: 1 - Top Rail (with Baluster Connectors installed) 1 - Bottom Rail (with Baluster
Wave Profile Installation Guide
 Wave Profile Installation Guide American Pa o Covers Plus Proudly Builds With Tools & Hardware Wave Profile Installation Guide Tape Measure Square Level Felt tipped Marker and/or grease pencil 3/8" Nut
RAILING. Installation Guide
 RAILING Installation Guide THE BEST CHOICE FOR STRONG & DURABLE RAILING SYSTEMS Our exclusive manufacturing process ensures our vinyl railing will provide superior strength plus it is virtually maintenance
EASY INSTALLATION GUIDE WPC DECKING.
 EASY INSTALLATION GUIDE WPC DECKING www.eva-last.com EASY INSTALLATION GUIDE Condensed / Quick glance Installation Instructions Thank you for your interest in our Eva-tech WPC product range. Whether you
12ft Octagon Bayside Gazebo Assembly Manual
 We recommend reviewing this Assembly Manual thoroughly before starting this project. Become familiar with the tools required and where and when assistants are necessary. If you re planning on finishing
Install Instructions. SCR-48N Crash Rail. Please read these instructions thoroughly prior to beginning the SCR-48N Crash Rail installation!
 Please read these instructions thoroughly prior to beginning the installation! This instruction sheet is intended to provide a specific guide to follow for the installation of this. Contained within is
Installation Guide. deckorum Composite Decking
 Installation Guide deckorum Composite Decking 1. Introduction Welcome to Deckorum installation Guide Please fully read the installation guide before commencing any installation works. This will provide
Page 3. Using the worksheet on page 24, draw a plan of your proposed deck.
 EverX Radius Edge Decking has been independently tested and certified to meet or exceed the BOCA requirements for use as decking and stair treads when installed as recommended by the manufacturer s application
PolyCarb has good resistance to many chemicals. Some chemicals may harm the PolyCarb sheets. Contact us when in doubt about any chemical.
 Polycarbonate Panels This manual provides the basic information for working with and installing PolyCarb sheets. Due to their hollow core, prior preparation is needed before the actual installation, with
HALLMARK DECKING INSTALLATION MANUAL
 HALLMARK DECKING INSTALLATION MANUAL CARE AND MAINTENANCE Congratulations on the purchase of your Hallmark composite decking. To ensure that you keep your low maintenance decking looking its best we recommend
10 x 10 Flat Top Two Tone Pergola
 0 x 0 Flat Top Two Tone Pergola Models: Bordeaux ASSEMBLY GUIDE OPTIONAL ACCESSORIES Arch Kit System ( Arches) Privacy Fence Panel System ( Panels & Middle Post) Bolt Down Bracket Kit ( for Pergola) Ver.0-00
A Step-by-Step How To Guide
 HOW TO REMODEL YOUR STAIR A Step-by-Step How To Guide Add new life to your staircase and achieve professional results. 1 Renovating your staircase is more than a remodel, it s a transformation of your
Vinyl Gazebo Instructions
 P a g e 1 Vinyl Gazebo Instructions 10 Vinyl Gazebo Shown Thank you for the purchase of your New Gazebo. Depending on the size of your Gazebo, installation can usually be completed in 1 to 2 days. These
10 x 10 Arch Top Pergola
 0 x 0 Arch Top Pergola I N S T A L L A T I O N G U I D E O P T I O N A L A C C E S S O R I E S Privacy Fence Panel System ( Panels & Middle Post Included) Bolt Down Bracket Kit (Set of ) Additional Shade
Transform Cable Rail MUST be installed on 4" x 4" wooden posts sleeved with Transform post sleeves to support cable tension!
 CABLE RAIL INSTALLATION INSTRUCTIONS OVERVIEW...2 LEVEL...3 STAIR...13 Transform Cable Rail MUST be installed on 4" x 4" wooden posts sleeved with Transform post sleeves to support cable tension! 1 Need
TimberTech Composite Decking Installation & Maintenance
 TimberTech Composite Decking Installation & Maintenance Installing TimberTech Decking Contents 03 Introduction: Installing TimberTech Decking 04 Tools Required 04 Read Before You Start Dear Valued Customer...
INSTALLATION MANUAL. 2. Check with local utility companies for locations of underground cables or pipe lines.
 INSTALLATION MANUAL Install our maintenance free fencing system yourself! About 90% of our residential clientele install our fencing systems themselves. Why hire and pay someone to install it when you
Balustrade Systems / Installation Instructions
 A. PARTS AND SUPPLIES NEEDED FOR INSTALLATION Hardware included for each 10 section of rail: 2 3 x 1-1/2 L-brackets 4 1-3/4 x 3/16 Blue hex-head screws for anchoring the L-brackets to the newel cap, column
Constable Oak Extension Dining Table
 Constable Oak Extension Dining Table Assembly Instructions - Please keep for future reference 176/0325 Dimensions Width - 160/ 200cm Depth - 90cm Height - 75cm Important - Please read these instructions
10ft Octagon Bayside Gazebo Assembly Manual
 We recommend reviewing this Assembly Manual thoroughly before starting this project. Become familiar with the tools required and where and when assistants are necessary. If you re planning on finishing
Chapter 1. Beam and Sill Plates
 Chapter 1. Beam and Sill Plates 1.1 ESTABLISHING SQUARE SILL PLATE CHALK LINES 1.2 INSTALLING TREATED SILL PLATES 1.3 INSTALLING LAMINATE BEAM Tools needed by volunteers: Hammer Nail apron Tape measure
Make every component count.
 Make every component count. Technical Bulletin Installation Instructions ABOUT THE MATERIAL The frame and material have been thoroughly tested for strength, durability and low maintenance, offering a never
COMPOSITE SIDING INSTALLATION GUIDE
 CENTURY HOME LIVING COMPOSITE SIDING INSTALLATION GUIDE Read all instructions prior to installing any siding product. Failure to install and finish this product in accordance with all local building codes,
Effective April 1, 2013
 Effective April 1, 2013 Table of Contents Ensuring System Performance 1 Components 2 Frequently Asked Questions 3 List of Tools 3 Before you Begin Preparation 3 Quality Tips 4 Cold Weather Tips 4 Cleaning
CertainTeed INSTALLATION GUIDE SIMTEK FENCE PRODUCTS. Fence Installation Guide 3', 4' & 6' High
 CertainTeed INSTALLATION GUIDE SIMTEK FENCE PRODUCTS Fence Installation Guide 3', 4' & 6' High INSTALLATION GUIDE These instructions are designed to assist both professional installers and do-it-yourselfers
Durabrac Gable Bracket Installation Guide
 Durabrac Gable Bracket Installation Guide Durabrac vinyl gable brackets are manufactured from high quality natural white vinyl with UV inhibitors. There are currently six styles and three sizes to choose
1. TOOLS + MATERIALS REQUIRED
 R INSTALLATION INSTRUCTIONS PRODUCT: BALDUR + ODEN CONFIGURATION: BI-PARTING DOOR MOUNT: TOP MOUNT Product is covered by U.S. patents. For more information visit www.krownlab.com. TOOLS + MATERIALS REQUIRED
TREX ENHANCE RAILING (Also Applies to Trex Select Railing) Installation Instructions
 Installation Instructions") TREX ENHANCE RAILING (Also Applies to Trex Select Railing) NOTE: All Enhance Railing lengths are manufactured at CLEAR SPAN dimensions (spanning between space of posts): 7" for 6' clear span. Note that
TREX ENHANCE RAILING (Also Applies to Trex Select Railing) NOTE: All Enhance Railing lengths are manufactured at CLEAR SPAN dimensions (spanning between space of posts): 7" for 6' clear span. Note that
Wood Molding Installation Guide
 Wood Molding Installation Guide 1 P age Estimating the Quantity of Molding Required for the Job. Calculate the following: 1. Total lineal feet of Wall Base required for the job: Lineal feet 2. Total lineal
FENCE INSTALLATION GUIDE 8 HIGH WALLS
 FENCE INSTALLATION GUIDE 8 HIGH WALLS 1.866.648.9336 www.simtekfence.com INSTALLATION GUIDE These instructions are designed to assist both professional installers and do-it-yourselfers of SimTek decorative
INSTALLATION INSTRUCTIONS GUIDE
 CERTAINTEED RAILING AND DECKING INSTALLATION INSTRUCTIONS GUIDE Kingston Vinyl Railing and Vinyl Decking CONTENTS Important Information Before You Begin...3 Helpful Hints, Tips, Fire Information and Tools
NyloDeck Installation Guidelines
 Page 1 of 5 NyloDeck Installation Guidelines Thank-you for choosing NyloDeck decking products, please take a few minutes and read the following installation guidelines along with the NyloDeck Care and
INSTALLATION MANUAL. 2. Check with local utility companies for locations of underground cables or pipe lines.
 INSTALLATION MANUAL Install our maintenance free fencing system yourself! About 90% of our residential clientele install our fencing systems themselves. Why hire and pay someone to install it when you
TREX SELECT RAILING. Installation Instructions PARTS
 RAILING NOTE : All Trex Select Railing lengths are manufactured at ON CENTER dimensions (spanning from center of each post): 67-5/8" (76.8 cm) for 6' (.83 m) on center, and 9-5/8" (35.3 cm) for 8' (.44
Installation Instructions Palladium Wall Panels - Demountable Factory Finished Edges and Field Cut Edges
 Please read all instructions before installing Palladium Wall Panel System. 1. Before installation: a. Acclimate Palladium Panels, reveals, adhesives and wall substrates to room temperature 24 hours before
2x2 Baluster Railings FPO REDWOOD. Naturally beautiful Easy to use Practical and economical Durable and stable Resistant to decay and insects
 B U I L D I T W I T H REDWOOD 2x2 Baluster Railings FPO R E D W O O D Naturally beautiful Easy to use Practical and economical Durable and stable Resistant to decay and insects 2x2 Baluster Railings RAILING
INSTALLATION MANUAL STORAGE
 IMVersion 1.1 INSTALLATION MANUAL GENERAL GUIDE: The information in this IM is intended to serve as a general guide to proper installation with no warranties intended or implied. Prime Panels assumes no
Installation Guide. Capped Cellular PVC Fencing. Table of Contents. Storage and Handling Tools Needed Fence Layout and Locating Posts
 Capped Cellular PVC Fencing Installation Guide Table of Contents Storage and Handling Tools Needed Fence Layout and Locating Posts Installation instructions 4 x 4 Over Sleeve Post - 3.5 Rail Privacy Shadowbox
Pathway Stair System For use with the Pathway Modular Ramp System, as freestanding stair, or with other structures.
 Assembly Manual Pathway Stair System For use with the Pathway Modular Ramp System, as freestanding stair, or with other structures. Manufactured in the USA LIFETIME WARRANTY. Please register at www.ezaccess.com/warranty-satisfaction.
Decking Installation Instructions IMPORTANT EVERGRAIN AND EVERGRAIN ENVISION PRODUCT INFORMATION CUTTING & DRILLING LUMBER SIZES & DIMENSIONS
 Decking Installation Instructions IMPORTANT EVERGRAIN AND EVERGRAIN ENVISION PRODUCT INFORMATION DECKING PRODUCTS BEGIN TO AGE AS SOON AS THEY ARE EXPOSED TO NATURE. BUILDINGS EXPERIENCE AGING FACTORS
Before You Begin IMPORTANT. Always wear safety glasses when cutting and drilling railing or decking products.
 Before You Begin IMPORTANT Always wear safety glasses when cutting and drilling railing or decking products. HELPFUL HINTS Use carbide-tipped, multi-purpose blade for cutting. Do not lay components on
Deck Evaluation Checklist
 Date: Reported By: Project Name/Client: Year Deck was Built: I. Stairs A. Not Applicable B. Are there any visible signs of cracks, decay or over-notching? No Yes 1. If yes, where? C. Stairway width: (Hint:
SlipGrip Data Sheet & Installation Guide
 SlipGrip Data Sheet & Installation Guide Stair Treads Landing Covers Flat Sheets 9/2015 SlipGrip Technical Data Description SlipGrip products are high performance safety stair treads, landing covers and
> Installation Instructions
 SmarterFence BY BEDFORD TECHNOLOGY > Installation Instructions BEFORE YOU START > Check to see if a permit is needed in your area. > Check with your local utility companies to locate any underground utilities.
LUX INSTALLATION GUIDE. LUX Panel V Groove Installation. Installation Guide. February
 LUX Panel V Groove Installation Installation Guide February 2017 www.luxpanel.ca LUX Panel V Groove Installation LUX panel steel cladding is designed to be installed vertically, horizontally, diagonally
ATLANTIS RAIL Contact Information
 ATLANTIS RAIL Contact Information Customer Service (800) 541-6829 (508) 732-9191 Spectrum System Installation Instructions Atlantis Rail s Spectrum System is an easy to install, universal cable railing
Information Guide for Tools and Fabrication Techniques
 Information Guide for Tools and Fabrication Techniques Our Innovation. Your Imagination. Table of Contents General Tooling Information.... 4-5 Standard woodworking tools.. 4 Pocket screw.. 4 Heat guns
NewTech - CleverDeck Composite Decking Installation Guidelines
 NewTech - CleverDeck Composite Decking Installation Guidelines Composite decking has unique characteristics and requires specific fixing requirements that differ from timber. We strongly recommend that
PRODUCT: LOKI INSTALLATION INSTRUCTIONS. Product is covered by U.S. patents. For more information visit
 R INSTALLATION INSTRUCTIONS PRODUCT: LOKI CONFIGURATION: SINGLE DOOR MOUNT: GLASS MOUNT Product is covered by U.S. patents. For more information visit www.krownlab.com . TOOLS + MATERIALS REQUIRED TOOLS