Curly Cherry Highboy
|
|
|
- Jasper Green
- 6 years ago
- Views:
Transcription

1 Curly Cherry Highboy Combine hand and machine techniques to produce an American furniture classic by Randall O'Donnell W hen I watch a sawyer cut open a hardwood log that has highly figured wood inside, it's like stumbling across a buried treasure. Wood like that is a gift of nature, and it deserves the best showcase I can provide. Most of the pieces that I make are reproductions of Early American furniture, and for showing off unusually beautiful lumber, there's nothing quite like a high chest of drawers. Unlike a tabletop, a highboy can be appreciated from a distance and the character of the wood really becomes three-dimensional. Add a bonnet top with a dramatic gooseneck molding, brasses and carved fans and finials all dancing on cabriole legs and the result is a piece of furniture with real presence (see the photo above). I've examined a number of original highboys. Only a few stand out as true masterpieces, but many include wonderful details that provide a rich palette for the period furnituremaker. This piece is my interpretation of a Massachusetts style from about The blocked apron, finials, arch cutouts and shells are based on designs from Boston in that era. The highboy exercises just about every skill of the traditional cabinetmaker: turning, sculpting, mortise-and-tenon joinery, dovetailing, carving and (gasp!) even driving nails where appropriate. Colonial cabinetmakers usually had apprentices handle routine
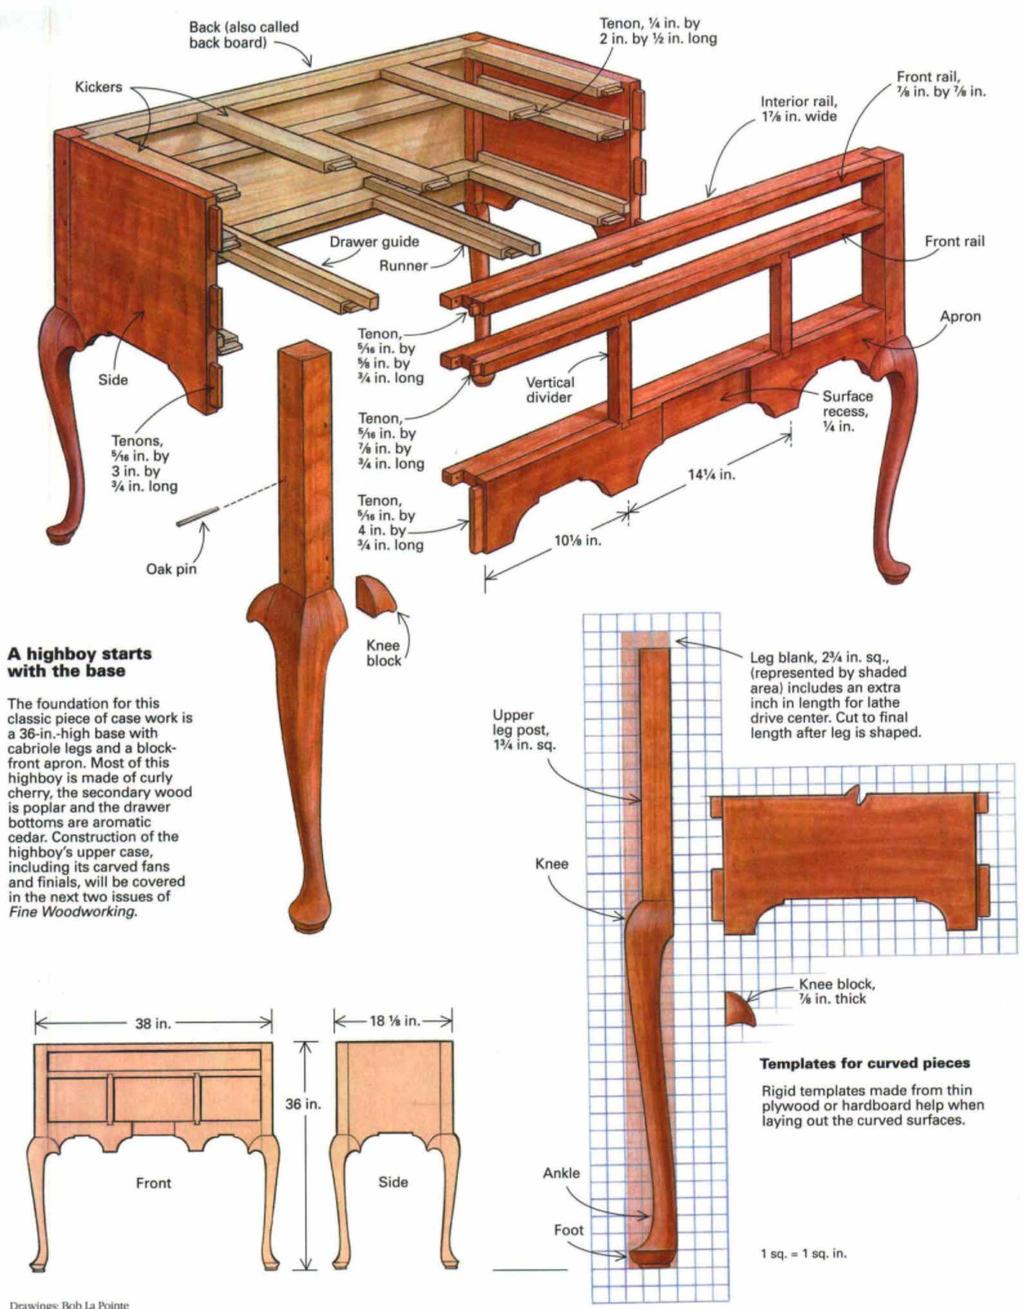
2


3 Run the growth rings diagonally from the inside corner to the outside corner when laying out the legs. With this orientation, the grain flows with the cabriole curve. Don't cut the waste completely free of the blank. Leave a small connecting bridge so waste pieces don't need to be taped or nailed back into place when the stock is rotated to saw the other face. tasks. As an independent craftsman, my apprentices are machines that prepare stock quickly so that I can devote my time to the critical hand skills that set this piece apart from factory-made furniture. Fine carving, hand-cut dovetails and handplaned surfaces remove any trace of the machines that did the grunt work before me. Economic reality has taught me that even though I can replicate a period piece of furniture, I can't slavishly follow every method of the Colonial makers. Building this highboy is well within the abilities of the serious amateur cabinetmaker. (This article deals with the lower case. In the next two issues of FWW, we'll build the rest of the highboysee the box on p. 85.) Although it may appear daunting, much of the work amounts to executing just a few traditional joinery techniques over and over. With so many pieces to cut and assemble (see the drawing on p. 81), organization is as important as technique. Select stock carefully All the curly cherry flat stock needs to finish out at in. thick, so I usually start with roughsawn, 1 in. stock. The gooseneck molding and lower finials are made from curly cherry stock, and I use sound straight-grained stock for the legs and the top finials. All secondary wood is poplar, except drawer bottoms. All internal frame parts are in.-thick stock to match the cherry, Drawer sides and backs are in.-thick poplar, back Only the foot is turned. With the leg still mounted in the lathe, shape it with a spokeshave and rasp. boards are in. thick and drawer bottoms are in. aromatic cedar. Before cutting any wood, select the best figured stock for the most prominent areas: the drawer fronts, the front apron and the wide scroll board at the top of the upper case. Careful stock selection provides a kind of visual rhythm to the piece, uniting upper and lower cases. If I can, I use boards from the same log. Start by shaping the legs Even when empty, this is a heavy piece of furniture. Leg strength is important. That's why I look for sound, straight-grained stock to rip into 2 in.-sq. leg blanks. Make the blanks an inch longer at the upper end so the lathe drive center has material to bite into. This extra inch of stock will be cut off later, after the leg is shaped and mortised. When laying out the leg profile, align the blanks so the annual rings run diagonally from the inside corner to the outside corner (see the photo above left). This makes the strongest possible leg as well as the most attractive one. The grain lines flow with the contour of the cabriole shape. First make a full-sized template of the cabriole leg profile on thin plywood or hardboard. Using this template, mark out the leg profile on all four blanks. Before bandsawing the cabriole profile, I define the shoulder line at the junction of the upper post and the curve of the knee. All I do is crosscut the two outside faces of each leg on the tablesaw to a depth just shy of the finished surface.
.")
4 Careful bandsawing makes sculpting the leg much easier. When bandsawing the cabriole profile, I don't saw off the waste completely. Instead, I leave a small, connecting bridge between the leg and the waste. This gives the leg good support as I make the cuts on each face of the leg (see the photo at left). Finally, I return to the first face, and cut through the remaining bridged segments. This bridging method ensures perfect alignment of the sawn faces with the template and eliminates the fussy process of reattaching the sawn waste in some other way to make all the cuts. Once the leg is sawn to rough shape, mark the centers on both ends of the blank, and turn the foot on the lathe. Be sure to make a crisp top edge on the foot (see the bottom photo on the facing page). This gives a nice reference edge from which to rasp and file the shape. From this point, I shape the rest of the cabriole profile by hand, using the lathe as a vise to hold the stock. I start with a spokeshave to remove a lot of waste quickly. For shaping, though, a patternmaker's rasp gives the best results. Finally, I use files and sandpaper to finish the curved leg and foot. Leave edges at the knees sharp, and be careful not to round over any edges where the knee blocks will be attached. Mortise the leg posts At this point, the upper part of the leg has been laid out but is still 2 in. sq. This is when I lay out and cut the mortises for the back, sides and all three front rails. The full width of the leg stock (see the top photo at right) and the extra inch of length provide stable support for the router. I use a plunge router fitted with a spiral upcut bit. The bit diameter is slightly smaller than the finished mortise width so that I can shave the cut exactly to my scribed lines. After plunging the mortises, pare to the layout lines, and square up the inside corners with a chisel. Once all the mortises are cut, rip and crosscut the upper leg posts to size. Stay outside the layout line by about in. The excess will be planed flush with the sides after assembly. Also, be sure to mark and save the waste pieces from the upper part of the legs. These pieces will be used for making the knee blocks and will give the best possible grain match with the leg. Prepare the stock for the carcase Loggers in my area call me when they find an exceptional treeone that is big, straight and, if I'm lucky, figured. I have to act fast, though, because it's always a race against the veneer-log buyers who also want dazzling wood Midway through this project, I had to drop everything and dash off to the woods to check out a tip. But that's how I get the figured wood I need for my furniture. Start by sawing the rough wood so that it's a few inches longer than needed and about in. wider. Normally, I'd surface one face and true up one edge on the jointer and move to the thickness planer. Highly figured wood like this, though, is prone to tearout, so I do the final thicknessing on a wide-belt sander. Later, I'll handplane and scrape all the parts to clean up the fuzzy sanded surface and get the silky, hand-worked texture that's so essential to period furniture. Tool marks reveal an intimacy between wood and maker. But to me, it really doesn't matter whether the stock initially was thicknessed by a power planer or with scrub and jack planes. A plunge router with a spiral bit roughs out the mortises. The full stock width of the blank provides support for the router. After the router, use a chisel to pare and square the mortises to the scribed lines. Cutting tenons by the batch saves time. Clamping the runners and kickers together also makes it easier to keep tenons uniform. Mark the shoulder line on the narrow edge of each tenon. Cut the waste away on the handsaw. Cut out the front rails, sides and back Three tenons connect each case side and the back with the legs, making for some 17 in. of cross-grain construction. With seasonal


5 Plane the upper leg posts flush with the front. A file, chisel and scraper help to bring all the leg posts flush with the front, sides and back. Interior rails glued to the front rails and back board reinforce the case and permit longer tenons to be used on drawer runners and kickers. humidity changes, there's a strong possibility of a crack developing in the sides or the back. None of my furniture has developed any cracks, but it is quite common on original pieces. Because a crack along the grain of a side or back doesn't affect structural integrity and gives a look of authenticity, I don't worry about it. With stock for the sides and back cut to their finished width and length, I use the router and edge guide to start the tenons by cutting a long tongue in each end of the sides and back. Next lay out and cut the individual tenons with the bandsaw, and then use a chisel to pare the ragged bandsaw cuts to the shoulder lines. Don't cut the bottom scroll yet. Wait until the joints have been dry-fit. The three horizontal front rails (including the apron) are cut from a single board. Mark the stock to keep the rails in sequence. For these parts, it's easier to lay out and cut the tenons first before ripping the stock into individual rails. Sides, back and rails should be test-fitted to the legs. If all fits well, take the case apart. Using full-sized patterns, lay out the scroll on the bottom edge of the apron, sides and back. Bandsaw to shape, and clean up the sawn surfaces with a spokeshave and rasp. The center area on the apron is recessed (or blocked) to align with the fan carving on the drawer above it. Remove the bulk of the waste in this area with the bandsaw, and then finish with a rasp and scraper. Drill the two in.-dia. holes in the bottom of the apron for the turned tenons of the drop finials. The two vertical dividers between the three lower drawers are milled to size and a dovetail cut on each end. The divider is in. deep, but the dovetail only extends in. deep. Fit these pieces to the middle rail and apron after the front legs and rails are glued up. Make the interior framing members Along with the parts already made, the case needs additional framing to reinforce joints and support the drawers. The next step is to cut stock for the drawer runners and kickers. Collect all of these pieces, and cut the tenons on the ends at one time (see the third photo from the top on p. 83). Leg post-to-rail joint strength is my chief concern, so I reinforce this area with interior rails that are notched around the inside corners of the posts. These pieces are glued to both the front rails and the back of the case. There are three pairs of interior rails. The front interior rails are made of cherry to match the front rails. The back rails are made of poplar. With the exception of the wood species, they are identical. Group the rail pairs. Lay out and cut all the mortises first, and then fit the tenons. Assemble the base in three stages A sure way to induce a panic attack is by trying to glue all the parts at once. Having a bunch of glue-slathered parts dripping everywhere is bad enough, but with so many parts to handle, glue can

. Clamping pressure must squeeze the knee block into the flat on the leg blank and the apron and side.")

6 Glue the roughshaped knee blocks in place. After the glue dries, use chisels, rasps and sandpaper to blend the entire knee. Attach the knee blocks Knee blocks provide a graceful transition between the legs and neighboring surfaces. You'll need six blocks: two each on the three sides that show. Using a template, lay out the profile on leg-post offcuts. Bandsaw the block profile, dress surfaces that butt against the leg and side or apron, and rough shape the curve. Now glue the knee blocks in place (see the photo above). Clamping pressure must squeeze the knee block into the flat on the leg blank and the apron and side. After the glue has dried, fair the entire knee area with carving tools, rasps, files and sandpaper. Some excess wood still must be removed on the inside curve of all four legs so that they'll blend with the apron scroll. start to set before all the joints are seated and the case squared up. So I begin with just the front assembly. Glue up the two front legs and the three front rails. Be sure to check that the assembly remains square after the clamps are in place (for more on this, see FWW #113 pp ). After the glue has cured, use a jointer plane, chisel and a rasp to fair the leg posts flush with the rails (see the top left photo on the facing page). Now position the two vertical dividers over the middle rail and apron, and scribe and cut the dovetails. The dividers can now be glued into place. The backboard is glued up with the back legs, clamped and allowed to dry. Once the back assembly has been removed from the clamps, fair the back leg posts flush with the back. Once you've glued the interior rails on the front and back assemblies (see the bottom left photo on the facing page), dry-fit the sides and all the drawer runners and kickers. If everything fits well, apply glue to all the mortises and tenons, and bring the whole assembly together and clamp. This operation may take extra hands. Two people certainly make the assembly less nerve-racking. Be sure that the case remains square after the clamps are tightened. After the glue has dried, clean up any glue squeeze-out, and then fair the leg posts flush with the case sides. Now install drawer-side guides, which prevent the drawers from cocking when pushed into place. The guides are pieces of poplar, glued and nailed (as was done on the originals) to the runners. Fit the tenon pins After sanding the case, drill holes in the leg posts for the tenon pins. They should be made of riven (split) oak. A riven pin is less likely to split or break. Spokeshave the pin with a slight taper to give a tight fit. Before driving them into place, test-fit the pins in a scrap block. Cut these pins slightly proud of the surface using a piece of sandpaper as a gauge, and peen the ends to give an aged look. Randall O'Donnell is a period furnituremaker living in the countryside near Bloomington, Ind. With the lower case complete, the next step is building the graceful upper cabinet that crowns this highboy. Randall O'Donnell details that project in the May/June issue of Fine Woodworking. The last of the three articles in this series, which will appear in the July/ August issue, covers the finials and carved fans.
Shaker Classic Change the legs to change the look
 Shaker Classic Change the legs to change the look 2 Ways B Y C H R I S T I A N BECKSVOORT not long ago, a couple ordered a set of cherry side tables from me, one for each side of their pencil-post bed.
Traditional glass-pane and wood-muntin doors highlight this free-standing piece.
 Bookcase Traditional glass-pane and wood-muntin doors highlight this free-standing piece. As the saying goes, there's nothing like good books. But they can present some storage problems--especially if
Demilune 4. Apron Joinery. Curved Apron Tenon. Bridle Joint Legs. Bridle Joint Front Apron
 Demilune Email 4 Apron Joinery There are two types of joints used in connecting the aprons and legs. The rear legs use conventional mortise and tenon joints, while the front legs use the less conventional
Corner Cupboard. This space-saving piece enhances any room 46 FINE WOODWORKING
 Corner Cupboard This space-saving piece enhances any room BY G A R R E T T H A C K On every trip to the Shelburne Museum near Burlington, Vt., I visit a favorite object a small hanging corner cabinet.
craftsman rocker Classic style meets comfort in this sturdy oak rocking chair BY MICHAEL PEKOVICH 34 FiNE woodworking
 craftsman rocker Classic style meets comfort in this sturdy oak rocking chair BY MICHAEL PEKOVICH 34 FiNE woodworking photo, this page: Michael pekovich shape the rear legs designing a chair can be a tough
Floating-Top Table. Creative joinery adds spark to this versatile piece
 Floating-Top Table Creative joinery adds spark to this versatile piece By Michael Pekovich 28 FINE woodworking This is one of those projects that almost wasn t. Rachel, my wife, had asked for a small,
Butterfly Leaf Dining Table Plans
 Butterfly Leaf Dining Table Plans Part 1 An attractive dining table with a secret: the leaf folds and stores inside the table. Season 1, Episode 7 P a g e 2 I first saw a butterfly leaf table in a back
HANDCRAFTED LIDDED CHEST IN CHERRY With Red Cedar Lining
 HANDCRAFTED LIDDED CHEST IN CHERRY With Red Cedar Lining Design A chest was desired as a gift to family. The Shaker style of furniture was identified as a pleasing style. After viewing a number of pictures
Project 13586EZ: Writing Desk. Writing Desk Materials List
 Project 13586EZ: Writing Desk This writing desk will make a handsome addition to just about any room in the house. The one shown is made of cherry, a logical choice for a piece like this, but mahogany
Dining Table with Two-Way Drawers
 Dining Table with Two-Way Drawers DOUBLE-FRONTED DRAWERS MAKE THIS PIECE UNIQUE With two drawer fronts, a center beam, plywood bottoms, and custom pulls, these drawers are both distinctive and durable.
Sleek and Shapely Coffee Table
 Sleek and Shapely Coffee Table Hand-shaping brings out the beauty in this elemental piece BY MICHAEL CULLEN At the time I first made this table, in 1995, I had been building a lot of complex furniture
ARTS AND CRAFTS CHAIR
 ARTS AND CRAFTS CHAIR 491 MATERIALS LIST--DINING CHAIR Key No. Size and description (use) A 2 1-3/4 x 1-3/4 x 16-1/4'' oak (front leg) B 2 1-3/4 x 3-3/4 x 40-1/2'' oak (rear leg) C 1 1-3/4 x 3-3/16 x 15''
The WoodWorker s Edge
 The WoodWorker s Edge Draw-leaf Game Table 1. 2. Layout the area for the tenons. The tenons are 3/8 thick x 4-1/2 long x 1-1/4 deep and offset to the inside. Create the tenons using the step method to
Grade 11 Woods Lift Lid Coffee Table. Based on Under the big Top from Popular Mechanics Website
 Grade 11 Woods Lift Lid Coffee Table Based on Under the big Top from Popular Mechanics Website TABLE TOP 1. Select enough lumber to construct a top that is between 22 ½ and 24 wide after jointing. Ensure
Reasons to Own a Shoulder Plane
 9 Reasons to Own a Shoulder Plane Fine-tune your joinery with these tips and techniques B y C h r i s G o c h n o u r It s easy to dismiss the shoulder plane as a specialty plane, another way of saying
BUILDING A STORM DOOR
 BUILDING A STORM DOOR BY NEAL BARRETT Illustrations by George Retseck If you're in the market for a storm door, you probably know that there are many styles and models available. However, most of them
Arched. Building an. Passageway. Although my company specializes in high-end jobs
 Building an Arched Passageway All photos by Brian Striegler This straightforward approach combines basic shop methods with simple site joinery to create an elegant frame-and-panel archway by Gary Striegler
Serving Tray. When some good friends got married recently, An exercise in template-making yields a great gift project that s easy to duplicate
 Serving Tray An exercise in template-making yields a great gift project that s easy to duplicate END Create from 3 8 2 8" piece. By Geoff Noden When some good friends got married recently, I decided to
Tilt-Top Table Elegant project builds hand-tool and machine skills
 Tilt-Top Table Elegant project builds hand-tool and machine skills BY M A R I O R O D R I G U E Z As a woodworking instructor, I m always looking for interesting and challenging projects to present in
Half-Blind Dovetails in Half the Time
 Half-Blind Dovetails in Half the Time Get the hand-cut look with the speed and consistency of machines B Y S T E P H E N H A M M E R Bandsawn tails Zip, zip. A simple jig delivers accurate and uniform
 America s leading woodworking authority To download these plans, you will need Adobe Reader installed on your computer. If you want to get a free copy, visit: http://adobe.com/ reader. Having trouble downloading
Project 17884EZ: Shaker End Table
 Project 17884EZ: Shaker End Table With its clean, simple lines, this piece is unmistakably Shaker style. Ours is made from cherry, a wood commonly used by Shaker craftsman, but we ve also seen this piece
DOCUMENT CHEST. Curly Maple, White Pine
 25 DOCUMENT CHEST Curly Maple, White Pine 100 MAKING THE DOCUMENT CHEST After the stock has been thicknessed, ripped to width, and cut to length, plough a 1/4" X 3 /8" groove on the inside faces of the
This is a solid wood cabinet. The only plywood used is for the back and drawer bottoms.
 Sideboard Sideboard Overview: This project requires basic woodworking skills and access to woodworking machines. Woodworking machines have sharp cutting edges and are NOT forgiving. You should be properly
Classic Project. Cherry Drop-leaf Dining Table. In this plan you ll find: Step-by-step construction instruction. A complete bill of materials.
 America s leading woodworking authority Classic Project n this plan you ll find: Step-by-step construction instruction. A complete bill of materials. Construction drawings and related photos. Cherry Drop-leaf
A Classic Case. Floating-tenon joinery and curly cherry update a traditional Arts and Crafts design
 A Classic Case Floating-tenon joinery and curly cherry update a traditional Arts and Crafts design B Y G R E G O R Y P A O L I N I Anyone familiar with American furniture would immediately identify this
Mid-Century Credenza Thoughtful details and modern joinery merge in this sleek design
 Mid-Century Credenza Thoughtful details and modern joinery merge in this sleek design BY LIBBY SCHRUM Mid-Century Modern furniture has not been wildly popular since, well, the mid-century. But fashion
Tilt-Top Table. Clean lines and a clever pivot highlight this attractive and useful table
 Tilt-Top Table READY FOR DINNER swing the top down and you have a beautiful table ready for a cozy meal. 60 SMALL FOOTPRINT with the top swung up, the table fits neatly against a wall, freeing up floor
WOODWORKING GUIDE: BASIC JOINERY
 WOODWORKING GUIDE: BASIC JOINERY Close isn't really good enough. A perfect fit is what counts. When building furniture, there are many ways to construct joints. The simplest are those that use mechanical
Silverware Chest Plan
 Silverware Chest Plan 05L14.01 Introduction 1. Measure the space required for your cutlery before beginning this project to be sure that it will fit in the drawers and top compartment. The best way to
Shaker Lap Desk. The classic Shaker lap desk, designed two centuries ago to. Celebrate pen and ink with this quintessential case
 Shaker Lap Desk Celebrate pen and ink with this quintessential case BY CHRISTIAN BECKSVOORT The classic Shaker lap desk, designed two centuries ago to function as a miniature traveling office, was the
Arts & Crafts with an English Accent
 Arts & Crafts with an English Accent Desk and wall cabinet make an elegant matched set B y N a n c y H i l l e r For several years around the turn of the 20th century, an English manufacturing firm, Harris
Cherry Chest of Drawers. Dovetail joinery decorates this Shaker-inspired case piece
 Cherry Chest of Drawers Dovetail joinery decorates this Shaker-inspired case piece BY M I C H A E L P E K O V I C H DRESSER CONSTRUCTION Case top Rabbet, 9 6 in. deep 4 in. 0 7 8 in. 9 2 in. 4 in. Top
Classic Project. Two-drawer Platform Bed. In this plan you ll find: Step-by-step construction instruction. A complete bill of materials.
 America s leading woodworking authority Classic Project In this plan you ll find: Step-by-step construction instruction. Two-drawer Platform Bed A complete bill of materials. Construction drawings and
ENJOY THIS SELECTION FROM. Woodworking 101. Includes Step-by-Step Instructions for 8 Projects. Woodworking
 W ENJOY THIS SELECTION FROM Woodworking 101 Includes Step-by-Step Instructions for 8 Projects Woodworking 101 Aimé Fraser, Matthew Teague, and Joe Hurst-Wajszczuk To purchase your copy of Woodworking 101,
Hand Dovetails. They're really not that hard to do. by Alphonse Mattia
 Hand Dovetails They're really not that hard to do by Alphonse Mattia Dovetailing is one of the strongest and most attractive methods of joining the ends of boards together. Traditionally, handcut dovetails
COMPLIMENTARY WOODWORKING PLAN
 COMPLIMENTARY WOODWORKING PLAN COFFEE TABLE PLAN This downloadable plan is copyrighted. Please do not share or redistribute this plan in any way. It has been paid for on your behalf by JET Tools, a division
Dress up your dining room with this Southern delicacy. that was used to serve drinks after a hunt. Breeches and jodhpurs are optional.
 Dress up your dining room with this Southern delicacy that was used to serve drinks after a hunt. Breeches and jodhpurs are optional. Huntboard Classic Six-Legged My dad has been making this six-legged
SHAKER COUNTER. Build a Classic. This shallow chest of drawers is a catalog of traditional joinery details. By Chris Hedges
 Build a Classic SHAKER COUNTER This shallow chest of drawers is a catalog of traditional joinery details. By Chris Hedges O f the many reasons I am drawn to Shaker furniture, the one that stands strongest
Heirloom Tool Chest. This classic chest offers a lesson in efficient woodworking
 Heirloom Tool Chest This classic chest offers a lesson in efficient woodworking BY CH R I S G O C H N O U R A COMFORTABLE HOME FOR TOOLS Made of cherry and constructed entirely with hand tools, the tool
FINISH CARPENTRY. Installing Arched Casing How to make three different arched trim details look like they grew there
 FINISH CARPENTRY 1 2 3 Installing Arched Casing How to make three different arched trim details look like they grew there Photos by Gary Striegler BY GARY STRIEGLER I love the challenge of trimming arched
COPYRIGHT 2011 by The Taunton Press, Inc. Copying and distribution of this article is not permitted.
 30 FINE woodworking Shaker Side Table 1 2 in. Build a delicate version of this iconic round stand Subtop, 3 4 in. thick by 7 in. dia. Top, 1 2 in. thick by 16 1 8 in. dia. top edge Profile 3 4 in. BY CHRISTIAN
Router Table. In a recent article, I wrote about the router table I built for the Center. 5 Essential Jigs for the
 5 Essential Jigs for the Router Table Great fixtures and fences offer better control and new possibilities BY PETER SCHLEBECKER In a recent article, I wrote about the router table I built for the Center
Durable Outdoor Table
 54 F I N E W O O D W O R K I N G Durable Outdoor Table Ipé table will seat six and weather many seasons B Y D A V I D B E D R O S I A N Last summer brought a new pool to our backyard. With it came more
30 FINE woodworking. Photo, this page: Michael Pekovich
 30 FINE woodworking Photo, this page: Michael Pekovich Arts & Crafts Bed White-oak bed is loaded with Stickley style and topped off with traditional inlay by Kevin Rodel This bed design is a close copy
Kitchen Step Stool. Premium Plan. In this plan you ll find: America s leading woodworking authority
 America s leading woodworking authority Premium Plan In this plan you ll find: Step-by-step construction instruction. A complete bill of materials. Construction drawings and related photos. Tips to help
Iearn my living by making cabinetry not cookie-cutter
 Supporting Shelves Five methods for installing by Stephen Winchester Iearn my living by making cabinetry not cookie-cutter kitchens, but one-of-a-kind pieces and custom built-ins. Every cabinet I build
Dovetail Saw Guides. Figure 1: Dovetail saw guide, exploded view. Guide Block. UHMW Friction Pad. Sliding Clamp. Rare-Earth Magnet
 Dovetail Saw Guides U.S. Pat. No. 6,607,016 Dovetail joints have traditionally been the hallmark of a cabinetmaker who had acquired an expert level of skill. They are also a mark of quality and attention
The cabriole leg is one of the iconic motifs of 18th century furniture. It comes in
 Chapter 1 Cabriole Leg The cabriole leg is one of the iconic motifs of 18th century furniture. It comes in many sizes from a 6-inch version on a bombé chest, a 30-inch one on a pier table, or a robust
A Shaker Sewing Stand
 America s leading woodworking authority Step by Step construction instruction. A Shaker Sewing Stand A complete bill of materials. Exploded view and elevation drawings. How-to photos with instructive captions.
Nojo Design: Large Step Cabinet: February 2012
 Nojo Design: Large Step Cabinet: February 2012 The largest single piece of furniture I ve ever made is this stepped cabinet. Finished piece is 8! tall and over 10 long. This project has been great, although
Display Case (for J&S)
") Display Case (for J&S) This is constructed of maple plywood with solid maple (soft maple) edge banding. It was made to fit between a door and a kitchen cabinet, and has an elegant circular taper between
Display Case (for J&S) This is constructed of maple plywood with solid maple (soft maple) edge banding. It was made to fit between a door and a kitchen cabinet, and has an elegant circular taper between
An Everyday Cabinet. Straightforward construction methods for building a case with doors and drawers 66 FINE WOODWORKING
 An Everyday Cabinet Straightforward construction methods for building a case with doors and drawers BY S C O T T G I B S O N 66 FINE WOODWORKING A Leg with Flare square = 2 in. 4 in. Leg, 4 in. square
A Unique Cutting Board
 A Unique Cutting Board When I was asked to make a cutting board as a special gift, I wanted to do something new and eye-catching. Tired of squares and straight lines, I envisioned curving accents not shallow
World. Old. Dining Table YOU CAN BUILD AN
 YOU CAN BUILD AN Old World Dining Table This design combines heavy oak timbers with period specific elements. The result brings an old world look to a modern sized dining table. Publisher: Jeff Branch
Using hand tools Prepared by. Paul Roberts Neville Comins
 Using hand tools Prepared by Paul Roberts Neville Comins Why use hand tools? What hand-tools? Where to buy hand tools? Sharpening Power tools & machinery Conclusion Hand tools have many benefits such as:
National 5 Practical Woodwork
 Exercise C. The legs of a chair are turned on the wood lathe. (a) (i) Sketch and name the tool used to produce the square shoulder shown at A. Name of tool: Sketch and name the tool used to check the diameter
Morris Chair. Make the mortises in the legs before you shape the curve near the bottom or make cutouts on the top.
 Morris Chair Make the mortises in the legs before you shape the curve near the bottom or make cutouts on the top. Make the mortises in the legs before you shape the curve near the bottom or make cutouts
Build A Cedar Chair And Ottoman
 Build A Cedar Chair And Ottoman If you've ever dreamed of extending the comfort of your living room to your deck, patio or yard, our porch chair-and-ottoman combination is a great place to start making
Jeff Branch WOODWORKING YOU CAN BUILD A. By adding subtle design elements, a traditional furniture style becomes decidedly modern.
 Jeff Branch WOODWORKING YOU CAN BUILD A By adding subtle design elements, a traditional furniture style becomes decidedly modern. Jeff Branch WOODWORKING Publisher: Jeff Branch Editor: Jeff Branch Art
Stand & Bowls. optional. Online Extra
 Online Extra optional Stand & Bowls Once you make a bowl using the jig and technique from Woodsmith No. 229, it s only natural to see what else you can do with it. The starting point is to make copies
Bookcases. When customers arrive at my. A Choice of Three. it's up to you. Spend a day, a weekend. or a week
 A Choice of Three Bookcases BY PHILIP C. LOWE Spend a day, a weekend or a week it's up to you When customers arrive at my shop inquiring about having a piece of furniture made, it's part of my job to ascertain
Perfect Tapers. on the Tablesaw. Make tapered legs of all types, quickly and safely
 Perfect Tapers on the Tablesaw Make tapered legs of all types, quickly and safely B Y S T E V E L A T T A 30 F I N e W o o D W o r K I N G COPYRIGHT 2012 by The Taunton Press, Inc. Copying and distribution
Shoulder Plane. dovetailed. fine tools. Make an heirloom tool and learn the secret to creating double dovetails in metal it s easier than you think.
 fine tools dovetailed Shoulder Plane Make an heirloom tool and learn the secret to creating double dovetails in metal it s easier than you think. I ve always been fascinated by old, metal hand planes.
Instructables Butcher Block Top
 Instructables Butcher Block Top Project Overview: This project requires basic woodworking skills and access to woodworking machines. Woodworking machines have sharp cutting edges and are NOT forgiving.
Classic Project. Contemporary Table. In this plan you ll find: Step-by-step construction instruction. A complete bill of materials.
 America s leading woodworking authority Classic Project In this plan you ll find: Step-by-step construction instruction. Contemporary Table A complete bill of materials. Construction drawings and related
Keeping Plank Doors Flat
 Keeping Plank Doors Flat Five solutions, from standard to stylish BY CHRISTIAN BECKSVOORT Working strictly with solid wood, I take frame-andpanel doors almost for granted. To me it's a no-brainer: Isolate
Build a Pencil-Post Bed
 Build a Pencil-Post Bed Figured wood, subtle details, and a rich finish bring charm and elegance to this traditional design B Y L O N N I E B I R D The pencil-post bed remains popular several centuries
World. Old. Dining Table YOU CAN BUILD AN
 YOU CAN BUILD AN Old World Dining Table This design combines heavy oak timbers with period specific elements. The result brings an old world look to a modern sized dining table. Publisher: Jeff Branch
Congratulations on your purchase of the Divided Light Door Set. This set will help you create beautiful cabinet doors with true divided light panels.
 Divided Light Door Set User Instructions Congratulations on your purchase of the Divided Light Door Set. This set will help you create beautiful cabinet doors with true divided light panels. Following
Building a Sawbench. Precision Sawing at The Woodwright's School August 2010
 Building a Sawbench Precision Sawing at The Woodwright's School August 2010 Introduction: Though I work with both machinery and hand tools, I consider a pair of traditional old-school sawbenches to be
This tailor s cabinet was brought to my attention by a customer
 So what if you don t sew? This authentic Shaker case piece is drop-dead gorgeous in any room. This tailor s cabinet was brought to my attention by a customer who wanted one just like it. She had seen the
Ten Essential. These bits will conquer the majority of woodworking tasks. b y G a r y R o g o w s k i. Operating: handheld vs.
 Ten Essential Router Bits These bits will conquer the majority of woodworking tasks b y G a r y R o g o w s k i You ve bought a new router, unpacked it, and even found the switch on it. But that s only
Alaska Bird Observatory Shelves Christopher Swingley
 Introduction Alaska ird Observatory Shelves Christopher Swingley These are the bookshelves I built for the Alaska ird Observatory s new building at Wedgewood Resort in Fairbanks. My version was built from
Nineteenth-Century Dough Box
 Nineteenth-Century Dough Box T he dough box was a functional piece found in many a country kitchen. The idea was that the cook would make a large batch of bread dough, knead it on the large work surface
Workbench. Process Guide
 Workbench Process Guide Design, Lumber, Tools & Nails Made entirely from 2x and 4x construction lumber Hardware speeds up the consturction while also reduces the amount of planing we have to do by using
A candle stick addresses transferring and reproducing dimensions from a plan and breaking the project into steps.
 Activities Discussion These projects allow more skill development including making items to match a drawing, sizing projects to specific dimensions, and just trying fun stuff for the first time! A candle
add Muscle to your Miters Shopmade L-shaped tenons create a powerful joint BY DUNCAN GOWDY, TIMOTHY COLEMAN, AND REED HANSULD 52 FIne WOODWORKInG
 add Muscle to your Miters Shopmade L-shaped tenons create a powerful joint BY DUNCAN GOWDY, TIMOTHY COLEMAN, AND REED HANSULD 52 FIne WOODWORKInG Photos, except where noted: jonathan Binzen Three versions
Framework joints FABRICATION - WOOD JOINTS. Corner joints. Tee joints. Worksheet 15a. Cable Educational Ltd
 FABRICATION - WOOD JOINTS The word: fabricate means to join together. Most wooden products are held together with adhesive. Adhesive works very well when the edge of a piece of wood is being glued to the
Gleanings from Townsend Dovetail Joinery
 Gleanings from Townsend Dovetail Joinery Jeffrey Greene 2014 The dovetailing of drawers and cases, the most fundamental and essential joint in the cabinetmaker s repertoire, has long been a subject of
MAKING THE TV RISER CUTTING A STOPPED GROOVE ON THE TABLE SAW
 TV RISER Cherry 19 MAKING THE TV RISER First, the material that will make up the riser is glued together. Then, dress down the glued-up panel to a flat surface and a consistent thickness. In a shop with
pad foot slipper foot
 48 W270BR.indd 48 pad foot slipper foot The most familiar foot of the three, the pad foot has plenty of variations. In the simplest and most common version the rim of the foot is 3 4 in. to 1 in. off the
Curved Pieces are a Common Woodworking Challenge
 Curved Pieces are a Common Woodworking Challenge I recently created a set of four dining chairs that required three curved back rest pieces each. On the top piece of each chair I wanted to inlay a marquetry
hanging mirror Two-piece desk set Handmade Gifts Photo: John Tetreault
 hanging mirror Two-piece desk set Handmade Gifts 44 FINE woodworking Photo: John Tetreault Flatware carrier Tea light candle holder 4 Tasteful projects made quickly from scraps BY CHRISTIAN BECKSVOORT
Sawhorses. for the Shop. Three horses that cover all of your shop needs
 w J ANUARY/FEBRUARY 2003 Sawhorses for the Shop Three horses that cover all of your shop needs BY CHRISTIAN BECKSVOORT Sawhorses are an indispensable part of my shop equipment. No matter what the process
Step-by-Step Instructions for Making the Wall-hung Bookcase
 Step-by-Step Instructions for Making the Wall-hung Bookcase When a piece of furniture has an air and look of simplicity, you can be sure that it deftly conceals the complexity of its making. I wanted this
The dovetail joint looks deceptively easy to create. This feature takes you through the difficult process of making perfect, elegant dovetails.
 Home > Projects & Advanced Woodworking > Perfect Dovetails Perfect Dovetails AddThis Feature 5 The dovetail joint looks deceptively easy to create. This feature takes you through the difficult process
Build a Stout Workbench
 Build a Stout Workbench Tail vise is at the heart of this versatile bench by chris gochnour I ve done a fair amount of handplaning during my 32 years as a professional furniture maker, and I ve found that
Trimming Windows. Get the jambs flush with the drywall, and the miters come easily THE PARTS AND PIECES OF WINDOW TRIM BY JIM BLODGETT
 Trimming Windows Get the jambs flush with the drywall, and the miters come easily BY JIM BLODGETT THE PARTS AND PIECES OF WINDOW TRIM Traditional window trim includes a stool, which most people think of
Project 11010EZ: Gun/Bookcase/Curio Cabinet
 Project 11010EZ: Gun/Bookcase/Curio Cabinet No man can be all things to all people, but this cabinet comes as close to fitting multiple uses as any inanimate object can. We ve pictured it as a gun cabinet
Build a Michigan Sloyd. Spoon Mule
 Build a Michigan Sloyd Spoon Mule Contents Materials Choosing and milling wood.... 3 Base Legs.... 4 Rails.... 5 Seat Assembly and shaping...10 Fin options....10 Riser Assembly....11 Wedge....12 Head Laminations....13
Knockdown Bookcase. This slant-sided bookcase was a popular mail-order item in the early 1900s.
 Knockdown Bookcase This slant-sided bookcase was a popular mail-order item in the early 1900s. The Arts & Crafts movement was part of an interesting social change in America the advent of mail-order purchases.
Ahead of the curve 2 Part
 F&C PROJECT Ahead of the curve 2 Part In the second part of this series, Chris Tribe constructs the table for his stylised cabinet which we looked at last month in F&C Accuracy in turning the legs for
Copyright WilkerDos.com Dining Table. Project Designed By April Wilkerson - Plan Created By Jay Bates (jayscustomcreations.
 Copyright WilkerDos.com 2017 Project Designed By April Wilkerson - Plan Created By Jay Bates (jayscustomcreations.com) Layout & Shopping List Page 2 of 12 Layout & Shopping List Item Quantity Description
Jigsaw Puzzle Tray. Premium Plan. In this plan you ll find: America s leading woodworking authority
 America s leading woodworking authority Premium Plan In this plan you ll find: Step-by-step construction instruction. A complete bill of materials. Construction drawings and related photos. Tips to help
Stepstool. Shaker. Back when the Shakers started making furniture in the late. Discover what it was like to work wood 200 years ago when all you
 Shaker Discover what it was like to work wood 200 years ago when all you had was a few well-tuned saws, a couple chisels and a steady hand. Stepstool Photo by Al Parrish Back when the Shakers started making
Ways to get the most out of your
 5 Ways to get the most out of your router table When you mount a router on a table, you expand your shop s potential. To help you take advantage of this potential, we assembled five router table techniques
Carcase Construction. Choosing and making the right joints. by Tage Frid
 Carcase Construction Choosing and making the right joints by Tage Frid Furniture construction is broken down into two main categories: frame and carcase. In frame construction, relatively narrow boards
Cactus Routed Bowl. MLCS Items Needed:
 Cactus Routed Bowl MLCS Items Needed: Cactus Bowl and Tray Template #9188 Top Mounted Bearing Dish Cutter Router Bit #7817 1/2 Router Collet Extension and Wrenches #9465 45* Degree Chamfer Bit #7676 1-3/8
indicates a diagram detailing the dimensions of a project part and/or the placement for pocket holes, screws, nails, etc.
 f a r m h o u s e d i ni ng c h a i r What You'll Need lumber Beginner 1-1 x2x4 1-1 x2x8 3-2x3x8 1-2x4x8 1-3/4 x 2 x 4 sheet of plywood (availability will vary) Intermediate Intermediate Beginner About