How to pull the rear cap to repair basement air ducting An article by Don Wiyninger
|
|
|
- Veronica Caldwell
- 6 years ago
- Views:
Transcription
1 How to pull the rear cap to repair basement air ducting An article by Don Wiyninger (Thank you Don for taking the time to document this project! Let me add a couple of of tips use a non-contact thermometer to check for cold air leakage on the rear cap. You are looking for any area that is much colder than surrounding areas. While pulling the rear cap sounds a bit dramatic, you might be able to repair the ducting but cutting an access in the rear closet assuming you have one. John Canfield) A month ago I replaced the basement heat pump. It had actually died in September but we persevered until we got back to our property so I could replace it. The outside fan motor had fried and while checking the system discovered that the circuit board had malfunctioned for a previous owner and had been monkeyed with. I could not find an exact replacement for the circuit board; wiring would need to be modified to the new terminal configuration. So rather than spending $500 for new parts, and having a 10 year old unit that may have other problems, we opted for a new heat pump. $3018 with shipping. Duner has excellent details on how to replace a heat pump ( so I won t go into that. However, after using this new heat pump for a while we were not impressed. Then one day I was under the back of the coach doing something and got hit by a blast of cold air. A closer look at the duct revealed the dreaded typical Winnebago duct failure. Apparently when I looked at it previously it either was not as bad or not visible unless the blower was on. What to do? I searched for topics about repairing such a problem and did not like what I found. Apply tape with a stick, hire it done for mucho dinero and possibly a poor job, or take it to Iowa and have Winnebago take another shot at it. I wanted to remove the section of damaged duct and repair it properly and permanently. I could find no information on the internet about how to remove the rear cap to gain access to this duct. MWSartain on irv2.com has some photos of his repair on a Vectra but it s not clear about what he did to get the cap loose. So, being slightly mental, I decided Nothing ventured, nothing gained and went for it. And it s really not that difficult.


2 Remove the caulking and screws on the roof closure strip. Do not remove the closure strip. The mastic under the closure strip will keep the cap from moving while being flexible enough to allow the bottom of the rear cap to be pulled out. The rivets holding the ladder to the roof will need to be removed to allow movement of the cap. I had to use #14 screws to reattach the ladder. I also removed the screws holding the ladder to the stand-off mounts; to allow the ladder to flex more. You may opt to remove the ladder completely. The trim pieces on each side will need to be removed. The center strip is held on by a double sided tape. I had to order tape from Amazon to reinstall the strip (TapeCase

3 4492W 0.5in X 5yd White Foam Tape). There are a number of screws under the tape. If you are as lucky as me you will have a few with rusted heads. (Time to rant: All exterior screws on RVs should be stainless steel. I don t know how many rusted screws I have had to deal with; either drilling out the head and/or increasing the screw size. Every time I work on our coach I replace all screws with stainless steel. How much extra can it possible cost to use SS screws at the factory? Expensive RV units held together with cheap rusting hardware. Where has quality gone?) Once the trim pieces are removed there will be a couple more screws underneath holding the cap to the wall. There are other attachment points: Inside the compartment doors,


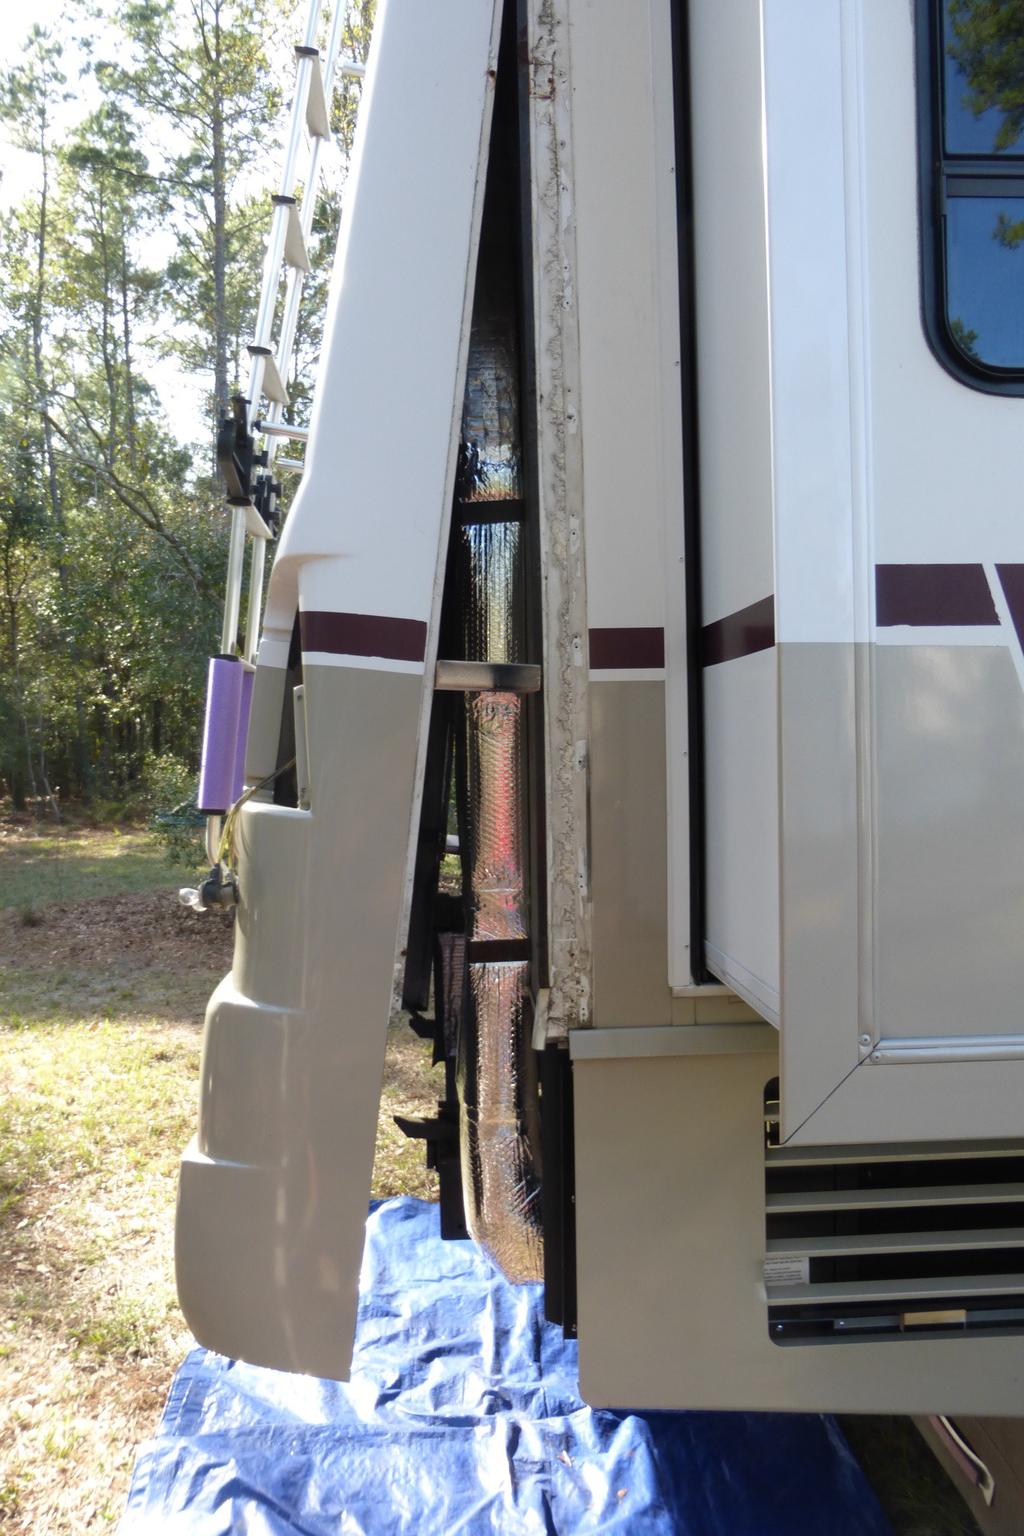
4 At the end of the frame rails. There are also two screws that hold on the third brake light to a stand-off bracket. The intake/exhaust port for the furnace will also need to be removed. There may be other connection points on your particular coach. You ll know if you missed any as soon as you try pulling out on the bottom of the cap. I also removed the tail lights to allow more light behind the cap, but this is optional. And then just grab the bottom edge of the cap and start pulling. Have a couple of blocks handy to prop it open. At one point I had the bottom edge of the cap out about 18. I kept checking the top of the cap to make sure it was not moving. Now you can remove the ducting.

5 The upper wye is molded plastic, like the elbow that is attached to the heat pump, so it won t fail. It s the straight section between these two plastic pieces that comes apart. This straight section is made of ductboard which is attached to the upper wye with black mastic and 10 screws. The screws on the back of the duct are difficult. Don t pull the upper wye out too much or you ll tear the upper connections loose. A small right angle screwdriver worked for me.

6 Isn t this lovely? All I had done to this point was remove the duct. The only thing holding it together was the tape at each end where it connected to the plastic plenums. The tape along the joint fell off while I was removing the duct.

7 This is what is used to reinforce the corner joint. This photo shows the left over 12 piece that was randomly placed on one edge. The Corner Guard comes in 4 lengths and since the duct is only 36 long they have a 12 piece of scrap to discard, so they just stick it somewhere. This Corner Guard is a product intended to protect the corners of the interior walls of your house. It is not well suited to hold a duct together.

8 I removed all tape and mastic and thoroughly cleaned the surface of the ductboard with rubbing alcohol. I tried to find new ¼ ductboard but was unsuccessful. The closest thing I found was Thermo-ply which is not really designed for this use. I would rather have replaced it with sheetmetal but this thing is an odd dimension. 4 x 13 x 36¾. I probably should have gone to a heat and air contractor and had a duct made, but I think my fix will last as long as the coach. If you have a duct made check the dimensions at all four corners between the two plenums. A photo below shows that the plenums on this coach are not perfectly aligned and a properly made new duct would need to be constructed for this.

9 I taped all edges and corners to reinforce them.
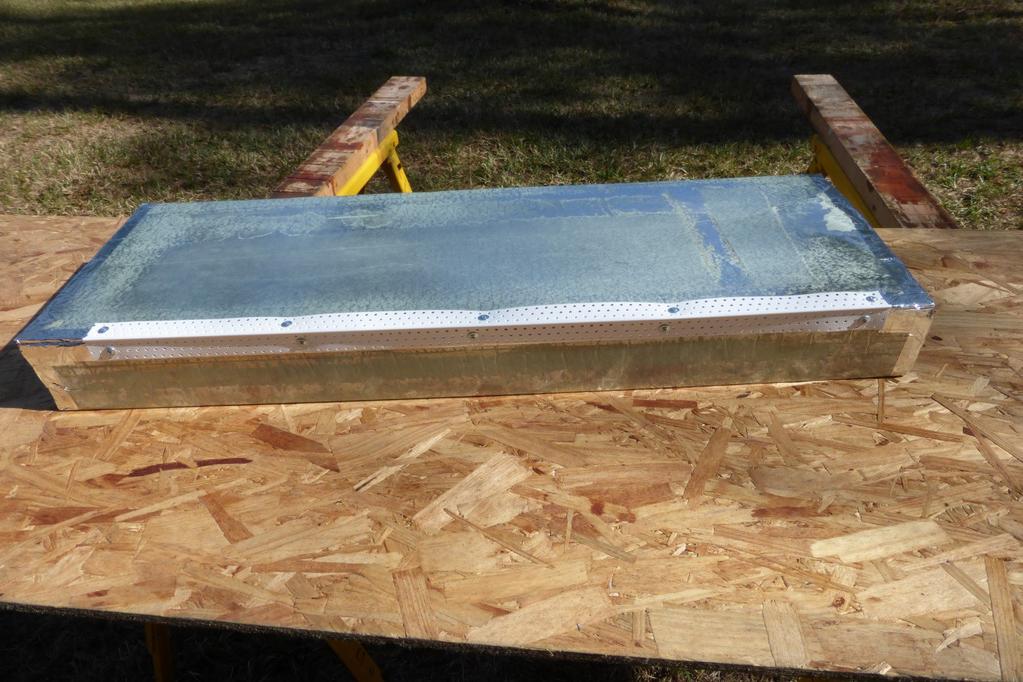
10

11 I used plastic drywall corner bead to hold the joint together. A piece on the inside and one on the outside with screws. It needs to be kept a few inches from the ends so it doesn t interfere with attachment to the plastic plenums. The completed duct. Extra tape on everything. Be sure to wipe down the surfaces with clean rubbing alcohol before applying the foil tape. Do not use duct tape. I used Nashua 330X Extreme Weather Foil Tape. If applied properly it will last a long time. I never had it fail on any of the houses I worked on. I insulated part of the duct before installing it. I also added insulation to the lower plastic plenum while it was in my hands. I used Reflective Insulation, which is the same insulation Winnebago used, only applied with a lot more care. Attach the duct to the upper wye plenum with a few screws and tape. I used some strips of the plastic drywall corner bead on the face of the duct to keep from burying the screws. Winnebago just screwed through the face of the ductboard which is why the edges were in such poor condition and needed to be reinforced with tape. Sorry, no photo.

12 After I had the upper connection done and reinstalled the lower elbow plenum I saw that the lower connection was not square; about a ¾ gap at one end. This is the misalignment I mentioned earlier. I just used extra tape to cover the gap. I figure that if it fails it s at the bottom and can be easily reached. I did not use screws at this joint since it is basically held in place by compression.

13
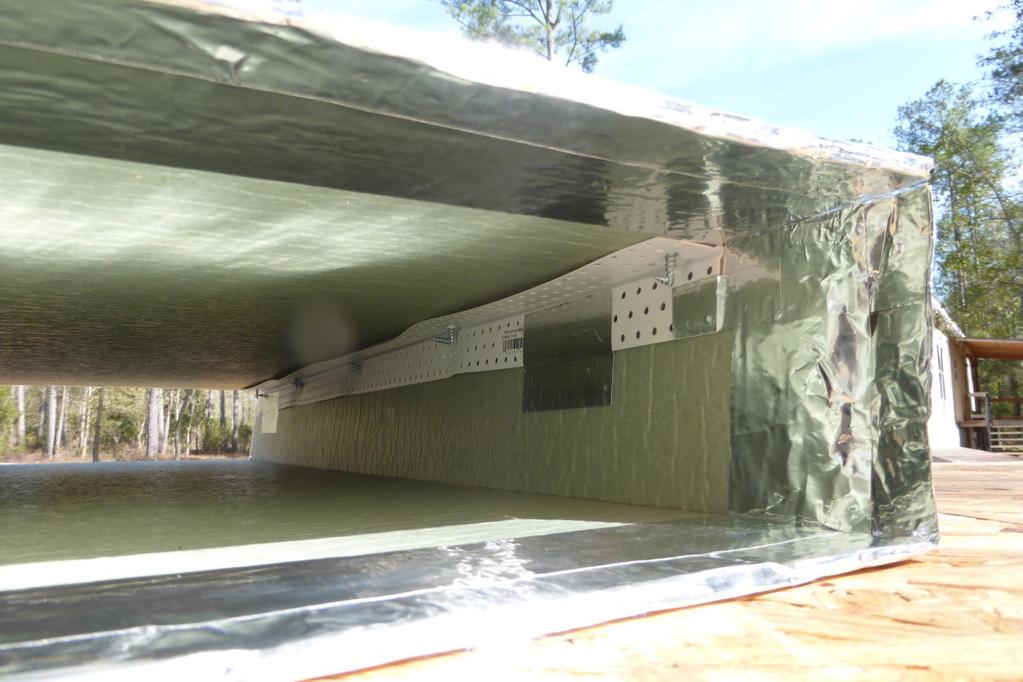
14 The finished installation. Plenty of insulation, which it did not have before. Just don t add too much insulation because it will affect the strapping of the duct to the wall of the coach and the alignment of the duct and plenums.
15
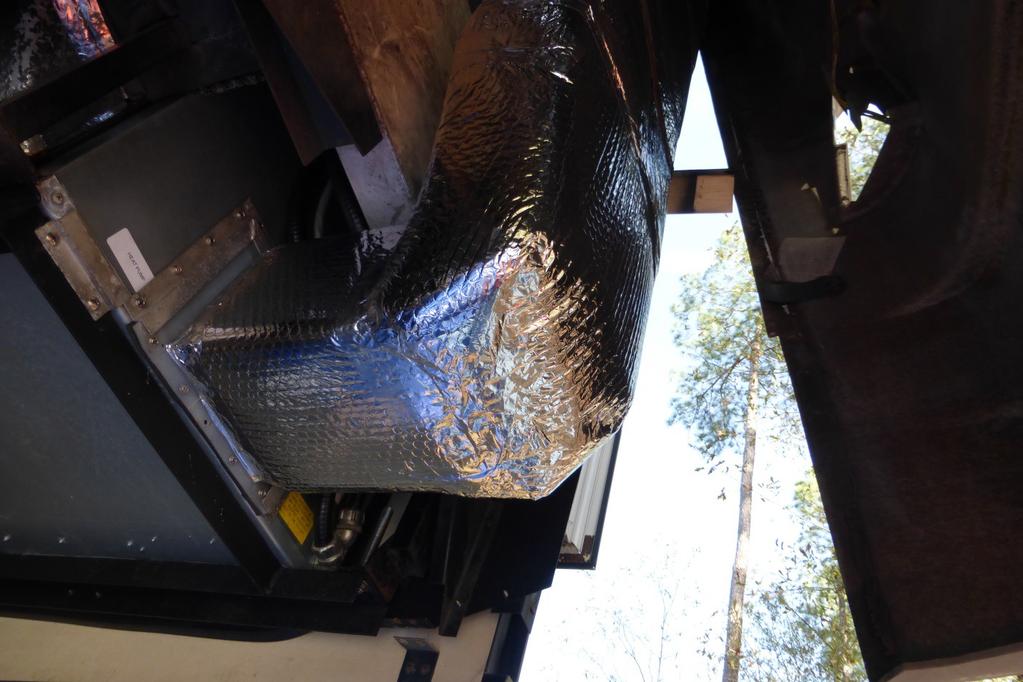
16 A side view which shows how much I pulled the cap out. Replacing the cap is just a matter of reversing everything you did to remove it. Once the duct was repaired I turned on the blower. Wow! I guess most the air had been blowing outside for a while. We are now quite satisfied with the new heat pump.
General Prisoner Transport Install Instructions PT-2-INST
 General Prisoner Transport Install Instructions PT-2-INST 50 or 60 high x 80, 100 & 120 inch long / Double Compartment Inserts Also refer to PT-A-3XX instructions for vehicle specific mounting measurements
10. Vents, Baffle Guard and Blocking
 10. Vents, Baffle Guard and Blocking 10.1 INSTALLING BATH FAN AND END CAP 10.2 INSTALLING RANGE PLENUM AND END CAP 10.3 INSTALLING PROPER VENTS 10.4 INSTALLING WIND WASHING BAFFLE GUARD 10.5 INSTALLING
Rugged Ridge Body Armor Guard Kit, 5 Pieces, Black (07-Current JK 4-door)
") Rugged Ridge Body Armor Guard Kit, 5 Pieces, Black (07-Current JK 4-door) Installation Time: 60 Minutes Tools Required: Notes: Phillips head screwdriver 3/8 socket or Flat head screwdriver 1/2 socket 7
Rugged Ridge Body Armor Guard Kit, 5 Pieces, Black (07-Current JK 4-door) Installation Time: 60 Minutes Tools Required: Notes: Phillips head screwdriver 3/8 socket or Flat head screwdriver 1/2 socket 7
OVER THE RANGE MICROWAVE OVEN INSTALLATION INSTRUCTIONS
 OVER THE RANGE MICROWAVE OVEN INSTALLATION INSTRUCTIONS Please read and save these installation instructions. MODEL NO.: DOTR12CWIV/DOTR12CBIV P/N: 3828W5U0202 YOUR SAFETY FIRST Read this entire manual
Plexidor Pet Door Wall Kit Instruction for All Sizes Plexidor : S, M, L, XL; BiteGuard KennelPlex TM 1113,1418, 1419 & 1825 and Plexidor Electronic LG
 Plexidor Pet Door Wall Kit Instruction for All Sizes Plexidor : S, M, L, XL; BiteGuard KennelPlex TM 1113,1418, 1419 & 1825 and Plexidor Electronic LG Congratulations on your purchase of the Plexidor Pet
INS A KSCR INSTALLATION INSTRUCTIONS STANDARD PROCEDURE. 1. Unpacking the KSCR Splicing the KSCR (If Required)...
...") INS-88.500-0A KSCR INSTALLATION INSTRUCTIONS STANDARD PROCEDURE 1. Unpacking the KSCR... 2 2. Splicing the KSCR (If Required)... 4 3. Assemble Curb and Rail Corners... 5 4. Install Cross Bracing (If Required)...
INS-88.500-0A KSCR INSTALLATION INSTRUCTIONS STANDARD PROCEDURE 1. Unpacking the KSCR... 2 2. Splicing the KSCR (If Required)... 4 3. Assemble Curb and Rail Corners... 5 4. Install Cross Bracing (If Required)...
Phone # La Jolla Doors. Block Frame Installation Manual Aluminum Frame with either Vinyl or Aluminum Panels
 Phone # 800-440-8785 www.lajolladoors.com La Jolla Doors Block Frame Installation Manual Aluminum Frame with either Vinyl or Aluminum Panels Thank you for choosing La Jolla Doors In this manual you will
INSTALLATION GUIDE MICROWAVE OVEN UPMC3084ST. MFL _00
 INSTALLATION GUIDE MICROWAVE OVEN UPMC3084ST MFL06208710_00 www.thesignaturekitchen.com YOUR SAFETY FIRST BEFORE YOU START Proper installation is the installer's responsibility! Proper installation by
Ford Ranger / Bronco II Set Part # Rev B 5-04
 Ford Ranger / Bronco II Set Part # 21008 Rev B 5-04 Step 1: Prior to Installation: A) Fit: Verify the fit of the flares to vehicle. (Some filing, sanding, or cutting may be necessary to ensure proper fit).
Premium Light Filtering Sheer Shade
 Premium Light Filtering Sheer Shade Installation Instructions Email: customerservice@blindster.com Call us: (888) 256-8672 Mon - Fri 8am - 7pm (CT) Congratulations on purchasing a Premium Light Filtering
UNIT No FRAMELESS PIVOT SHOWER DOOR
 INSTALLATION INSTRUCTIONS UNIT No. 3600 FRAMELESS PIVOT SHOWER DOOR NEED INSTALLATION HELP? Call 1-800-45-BASCO (452-2726) Monday - Friday 8:00 A.M. - 4:30 P.M. Eastern Time QCI0020 Rev. 3 Page 1 of 8
Installing your new Bevella Top. L Shaped Countertop with Joints No Finished Ends (Fits Between Four Walls)
") Installing your new Bevella Top L Shaped Countertop with Joints No Finished Ends (Fits Between Four Walls) Bevella RTI Countertops are engineered and manufactured to the highest quality standards, built
Installing your new Bevella Top L Shaped Countertop with Joints No Finished Ends (Fits Between Four Walls) Bevella RTI Countertops are engineered and manufactured to the highest quality standards, built
Household Appliances. Over-the-Range Microwave. Installation Instructions. For Models: HMV9302, HMV9305, HMV9306, HMV9307
 Over-the-Range Microwave Household Appliances Installation Instructions For Models: HMV9302, HMV9305, HMV9306, HMV9307 PLEASE READ ENTIRE INSTRUCTIONS BEFORE PROCEEDING IMPORTANT: Save these instructions
Installation Guide. Model #400. Corporate Office: 349 Highland Road East Macedonia, Ohio
 Installation Guide Model #400 Corporate Office: 349 Highland Road East Macedonia, Ohio 44056 1.866.822.7328 www.ezbreathe.com Copyright 2006, EZ Breathe, LLC WHAT S INSIDE Before installing your EZ Breathe
Weatherization Workforce Training Program
 Weatherization Workforce Training Program Weatherization Basics > Weatherization Tools and Equipment Weatherization Tools and Equipment You will use many tools in weatherization work that will help you
JK Rear Crusher Flares
 INSTALLATION INSTRUCTIONS INST-17-05-010_A JK Rear Crusher Flares IMPORTANT: Thank you for purchasing this Poison Spyder product. Please read through this entire document before proceeding with installation.
FOLDING DOOR - FOR FACTORY ASSEMBLED JAMBS WITH APPLIED SILL
 FOLDING DOOR - FOR FACTORY ASSEMBLED JAMBS WITH APPLIED SILL READ SPECIFIC INSTALLATION INSTRUCTIONS COMPLETELY BEFORE STARTING ANY INSTALLATION Failure to install and maintain our product according to
Pocket Door Installation Instructions
 Installation Instructions Before getting started: Read instructions thoroughly. Be sure that you have the necessary tools and materials before starting the installation. Consult your local building code
INSTALL INSTRUCTIONS KK & KK KWIK-KIT PRISONER TRANSPORT INSERT FORD and CHEVY VAN PRISONER TRANSPORT
 INSTALL INSTRUCTIONS KK-100-03 & KK-120-03 KWIK-KIT PRISONER TRANSPORT INSERT FORD and CHEVY VAN PRISONER TRANSPORT TOOLS REQUIRED: ¼ & 3/8 Ratcheting Wrenches ¼ & 3/8 Air Ratchets (recommended) 3/8 Impact
Common Safety Concerns
 9/26/14 Common Safety Concerns Heights Safety Ensure all heights-safety policies are being followed at all times. This includes: Only workers comfortable and trained to work on heights should work there.
INS A KSR INSTALLATION INSTRUCTIONS STANDARD PROCEDURE. 1. Verify Curb Installation Required Installation Tools...
 INS-88.300-0A KSR INSTALLATION INSTRUCTIONS STANDARD PROCEDURE 1. Verify Curb Installation... 2 2. Required Installation Tools... 2 3. Unpacking the KSR... 3 4. Attach KSR Bottom Rail to Curb... 5 5. Attach
RV ENTRY DOOR REMOVAL AND SHIPPING BLOCK INSTALLATION AND ALIGNMENT
 RV ENTRY DOOR REMOVL ND SHIPPING BLOCK INSTLLTION ND LIGNMENT Purpose This document provides the steps to remove, reinstall and align an RV entry door for motorized and towable units. Moving parts can
Heavy Wall Applied Stop Tube Frame and Door Installation
 INSTALLATION INSTRUCTIONS Heavy Wall Applied Stop Tube Frame and Door Installation Read all instructions before beginning installation. These instructions are provided to help prevent installation problems
Atrium Patio Door Field Service Manual
 Atrium Patio Door Field Service Manual December 2005 Table of contents Service Agreement Pg 2 Release Agreement Pg 5 Inspection form Pg 6 Warranty Pg 8 Replacing swing panel Pg 12 Replacing sliding panel
CUT OUT FLARES INSTALLATION INSTRUCTIONS FOR 20017, 20018, F100-F150 F250-F350 P.U. & BRONCO CUT OUTS
 20017 04/22/03 REV-A CUT OUT FLARES INSTALLATION INSTRUCTIONS FOR 20017, 20018, F100-F150 F250-F350 P.U. & BRONCO CUT OUTS Tools Required for Installation: (A) 3/16 Drill Bit (B) Pop-Rivet Gun (C) Air
Aluminum Clad Wood Window 1/2 Reinforced Field Mulling and Stacking Supplement
 Aluminum Clad Wood Window 1/2 Reinforced Field Mulling and Stacking Supplement 1 Aluminum Clad Wood Window 1/2 Reinforced Field Mulling and Stacking Supplement The following instructions are a supplement
Instruction Manual. Banner Grip -banner stretching frame. Manual Version Sept27, Any size made: by Graphic size, OD Size, Live Area -1 or 1,000!
 Instruction Manual Banner Grip -banner stretching frame Above: Open frame to reveal clamps pulling banner tight. Above: Closed frame to conceal all mounting hardware, NICE! Manual Version Sept27, 2012
Pet Door Panel Installation Manual
 Pet Door Panel Installation Manual 400-558-1 1 4/3/03, 3:26 PM Components: Pet Door Panel Panel Latch Assembly Foam Weather-stripping Glass Sweep (4) Binding Posts (6) #6 x 1/2 Sheet Metal Screws (4) 8-32
In the 30-plus years that I ve been a remodeling contractor, I ve
 New Window in Redundant s and attention to detail keep out air and water By Mike Sloggatt In the 30-plus years that I ve been a remodeling contractor, I ve replaced hundreds of windows. The difficulties
IMPORTANT: PLEASE RETAIN THIS INSTRUCTION MANUAL FOR FUTURE REFERENCE
 IMPORTANT: PLEASE RETAIN THIS INSTRUCTION MANUAL FOR FUTURE REFERENCE 005-07 Cadillac STS Classic 3D Z, Classic Dual Weave, Classic Mesh & Classic Black Mesh Grilles B 7 HR 3 STS Classic 3D Z Grille Part
PATIO INSTALLATION MANUAL
 PATIO INSTALLATION MANUAL A few minutes spent reviewing the following instructions will help insure quick and proper assembly. The Patio Sauna Kit will arrive on a stretchwrapped pallet including pre-built
Set Part # Rev
 Set Part # 21007 Rev-3 06-06-11 Step 1: Prior to Installation: A) Bushwacker only approves installing the flares according to these written instructions with the hardware provided. WARNING: Failure to
INSTALLATION INSTRUCTIONS
 INSTALLATION INSTRUCTIONS Thermally Broken Framing and Door Installation SL-450TB (2" x 4-1/2" with 1" Glazing) & SL-600TB (2" x 6" with 1" Glazing) IMPORTANT: Read all instructions before beginning installation.
Thermally Broken Framing and Door Installation
 INSTALLATION INSTRUCTIONS Thermally Broken Framing and Door Installation IMPORTANT: Read all instructions before beginning installation. These instructions are provided to help prevent installation problems
FIB-R-MAX STANDARD SINGLE DOOR
 FIB-R-MAX STANDARD SINGLE DOOR Style 1, 4, 4.4 and 11 Unitized Single Door Assembly By Fib-R-Max for Existing Openings 1. Set the crate, which will be marked with the specific opening location, at the
MISCELLANEOUS CABINET REPAIRS
 MISCELLANEOUS CABINET REPAIRS 167 168 NOTES MISCELLANEOUS CABINET REPAIRS Cabinet Panel Repairs 175 SIDE PANEL REPLACEMENT - GDM SERIES INSTALLATION INSTRUCTIONS Tools Required 1/8" drill Rivet Tool Silicone
PRO CYCTM PRO CYC, INC. SYSTEM 1.5 FS
 ASSEMBLY INSTRUCTIONS Congratulations on your decision to use the world s most advanced and user-friendly cyclorama system. We have taken a great deal of care to create and ship your cyc, so please take
INSTALL INSTRUCTIONS KK-XXX-02 XX-Specify length: FORD and CHEVY VAN PRISONER TRANSPORT INSERT
 INSTALL INSTRUCTIONS KK-XXX-02 XX-Specify length: 80 100 120 FORD and CHEVY VAN PRISONER TRANSPORT INSERT TOOLS REQUIRED: ¼ & 3/8 Ratcheting Wrenches ¼ & 3/8 Air Ratchets (recommended) 3/8 Impact Guns
Installation of Desert Aire FreshAire Evacuator Bench System
 Installation of Desert Aire FreshAire Evacuator Bench System Unpack Evacuator and check for shipping damage. If there is damage, immediately notify shipper and contact Paddock Evacuator. Confirm that all
Frameless Fixed Panel Slider
 INSTALLATION INSTRUCTIONS Frameless Fixed Panel Slider QCI-5279 SINGLE ROLLER WITH ANTI-JUMP DOUBLE ROLLERS QCI5279 Rev Page Certified 08/09/6 Tools: To install your New Shower Enclosure, you may need
Mira Premium Series Bi-Parting French Sliding Patio Door Installation Instructions
 PREMIUM SERIES W I N D O W S Mira Premium Series Bi-Parting French Sliding Recommended Tools & Accessories Tape Measure Level (3 or longer) Hammer Power Screwdriver Load bearing Shims Flashing (recommended)
INSTALLATION PROCEDURE
 Vinyl Siding INSTALLATION PROCEDURE Tools Needed and Preparation MOST ESSENTIAL TOOLS The proper tools, materials and equipment can make the installation of Durabuilt Vinyl Siding much easier. Here are
675 Quick N Stall Neo Angle Framed Hinge Shower Enclosure
 INSTALLATION INSTRUCTIONS 675 Quick N Stall Neo Angle Framed Hinge Shower Enclosure Call Technical Dept @ 1-800-452-2726 QCI1003 Page 1 of 9 Certified 10/01/09 INSTALLATION NOTES: Unpack your unit carefully
AUDI A8 D3 REPLACING THE OUTSIDE DRIVER DOOR HANDLE
 AUDI A8 D3 REPLACING THE OUTSIDE DRIVER DOOR HANDLE The keyless entry system in the D3 is a great feature. If you have the car key fob in your pocket, putting your hand under the door handle will unlock
JK Crusher Corners. *Includes ONE of the Hardware Kits (not both)
") INSTALLATION INSTRUCTIONS INST-18-05-020_A JK Crusher Corners IMPORTANT: Thank you for purchasing this Poison Spyder product. Please read through this entire document before proceeding with installation.
INSTALLATION INSTRUCTIONS INST-18-05-020_A JK Crusher Corners IMPORTANT: Thank you for purchasing this Poison Spyder product. Please read through this entire document before proceeding with installation.
Instruction Manual. Banner Grip -banner stretching frame. Manual Version Feb 14, Any size made: by Graphic size, OD Size, Live Area -1 or 1,000!
 Instruction Manual Banner Grip -banner stretching frame Above: Open frame to reveal clamps pulling banner tight. Above: Closed frame to conceal all mounting hardware, NICE! Manual Version Feb 14, 2017
BMW Z3/M Roadster
 Convertible Top Installation Guide 1996-2002 BMW Z3/M Roadster What s Included A new convertible top includes sewn-in plastic retainers and tinted plastic window. Also, we enclose new BMW original metal
Wall Panel Installation Instructions
 Panel Installation Instructions Demolition - Common Tools Needed Reciprocating Saw Allen Wrench Set Hole Saw Set Pry Bar Dust Pan and Brush Putty Knife / Scraper Hex Bit Socket Set All Necessary Safety
FrameSaver Jamb Bottom Replacement Instructions
 FrameSaver Jamb Bottom Replacement Instructions 8817 West Market Street Colfax, NC 27235 800.334.2006 www.enduraproducts.com Utility Knife Straight Edge Circular Saw Reciprocating Saw Miter Saw Shims Screws
INSTALLATION INSTRUCTIONS
 INSTALLATION INSTRUCTIONS BUILDERS CHOICE FRAMED Shower Height Swing Door Model: L533 Rev. 09.03.13 MAINTENANCE: Two primary materials are used to manufacture your new Aquatic enclosure; tempered glass
Bushwacker Jeep Flat Style Fender Flares Front Pair
 Bushwacker Jeep Flat Style Fender Flares Front Pair Note: These instructions involve cutting parts of your vehicle. Please read all instructions prior to starting. Installation Time: 3-4 Hours Tools Required:
Instructions to Convert a 4-foot Florescent Fixture to LEDs Using a SS 25W Power Supply and a 4 LED strip 30Dec15
 Instructions to Convert a 4-foot Florescent Fixture to LEDs Using a SS 25W Power Supply and a 4 LED strip 30Dec15 Thank you for purchasing the Shoplight Solutions 4-ft conversion kit. This is a companion
HANDRAIL HEIGHT PER LOCAL CODE AUTHORITY
 WITH OPTIONAL S.S. S PLEASE READ PLEASE READ THESE INSTRUCTIONS THOROUGHLY PRIOR TO BEGINNING THE INSTALLATION! THIS INSTRUCTION SHEET IS INTENDED TO PROVIDE A SPECIFIC GUIDE TO FOLLOW FOR THE INSTALLATION
INSTALLATION INSTRUCTIONS KK-K9-C12-K CHEVY IMPALA
 INSTALLATION INSTRUCTIONS KK-K9-C12-K 2000-2005 CHEVY IMPALA READ ALL INSTRUCTIONS PRIOR TO INSTALLATION TOOLS REQUIRED: Power Drill Drill bits1/4 and 5/32 7/l6 wrench and socket 15,18 and\or 19mm socket
FRAMED SLIDING DOOR FOR TUB OR SHOWER ENCLOSURE 6150A-7150A
 FRAMED SLIDING DOOR FOR TUB OR SHOWER ENCLOSURE 6150A-7150A F AB GLASS AND MIRROR www.fabglassandmirror.com Call: +1 888-474-2221 Fax: (614)-334-4919 Office Timing: 8:30-18:00 EST info@fabglassandmirror.com
C70 Window Roller Repair Taken from: Heres the problem:
 C70 Window Roller Repair Taken from: http://www.volvospeed.com/vs_forum/topic/115086-how-to-c70-window-rollers-permanent-fix/ Heres the problem: This happened to two separate window assemblys on my c70
Hatchback Wing Riser Kit
 Hatchback Wing Riser Kit 2015-06-11 Thank you for purchasing this PERRIN product for your car! Installation of this product should only be performed by persons experienced with installation of aftermarket
WPS crew Doors Installation instructions
 WPS-132-133 crew Doors Installation instructions ORDER OF INSTALLATION FOR A COMPLETE ENCLOSURE OF A CREW WPS (Weather Protection System) IS AS FOLLOWS: 1. Heater 2. Rear Thresholds - Right Hand & Left
Bushwacker Jeep Flat Style Fender Flares Rear Pair (JK Wrangler 2dr)
") Bushwacker Jeep Flat Style Fender Flares Rear Pair (JK Wrangler 2dr) Note: These instructions involve cutting parts of your vehicle. Please read all instructions prior to starting. Installation Time: 3-4
Bushwacker Jeep Flat Style Fender Flares Rear Pair (JK Wrangler 2dr) Note: These instructions involve cutting parts of your vehicle. Please read all instructions prior to starting. Installation Time: 3-4
Cellular Shades SLUMBERSHADE. with energy saving blackout sidetracks. Installation & Care Instructions
 Cellular Shades SLUMBERSHADE with energy saving blackout sidetracks Installation & Care Instructions 152725 B 9/14/2017 GETTING STARTED A few simple tools are required: - Measuring tape - Power drill,
FRAMED SLIDING DOOR FOR TUB OR SHOWER ENCLOSURE INSTALLATION INSTRUCTIONS
 FRAMED SLIDING DOOR FOR OR SHOWER ENCLOSURE INSTALLATION INSTRUCTIONS QCI5023 REV. 0 Page 1 Certified 06/22/2016 INSTALLATION NOTES: Unpack your unit carefully and inspect for freight damage. Lay out and
2. Sanding the Modules Sand the entire surface of each cyc module with 60-grit sandpaper. This will provide for better paint adhesion.
 ASSEMBLY INSTRUCTIONS SYSTEM SUPER 2.5 EZ Congratulations on your decision to use the world s most advanced and user-friendly cyclorama system. We have taken a great deal of care to create and ship your
KWIK-KIT KK-S INSTALLATION INSTRUCTION PACKAGE
 KWIK-KIT KK-S-120-02 INSTALLATION INSTRUCTION PACKAGE INSTALLATION INSTRUCTIONS HAVIS KWIK-KIT KK-S-120-02 2002-2007 DODGE/FREIGHTLINER SPRINTER VAN PLEASE READ COMPLETE INSTRUCTIONS PRIOR TO INSTALLATION
BMW X5 OEM RUNNING BOARD PART#SBBW
 INSTALLATION INSTRUCTIONS 2014-2016 BMW X5 OEM RUNNING BOARD PART#SBBW-146-74 QTY HARDWARE 1 Driver Side OEM Running Board 1 Passenger Side OEM Running Board 8 Rivet Pin 1 Page Step 1: Verify all parts
Tech Sheet. T4 Interior conversion kit how to - fitting instructions. 1. Rear seat belts. 2.
 Page 1 of 8 T4 Interior conversion kit how to - fitting instructions Thank you for purchasing our T4 interior conversion kit. This kit will enable you to convert any SWB left hand loading door T4 into
Unit No. 6150, 7150 Deluxe Framed Sliding Tub/Shower Enclosure
 INSTALLATION INSTRUCTIONS Unit No. 6150, 7150 Deluxe Framed Sliding Tub/Shower Enclosure QCI0023 Rev. 1 Page 1 of 8 Certified 8/20/10 MAINTENANCE: Two primary materials are used to manufacture your new
YJ DeFenders. These installation instructions apply to the following Poison Spyder products:
 INSTALLATION INSTRUCTIONS INST-13-02-070_A YJ DeFenders IMPORTANT: Thank you for purchasing this Poison Spyder product. Please read through this entire document before proceeding with installation. If
Chapter 9. Windows and Exterior Doors
 Chapter 9. Windows and Exterior Doors 9.1 INSTALLING WINDOWS 9.2 INSTALLING EXTERIOR HOUSE DOORS 9.3 INSTALLING SHED DOOR 9.4 INSTALLING EGRESS COMPONENTS Tools needed by volunteers: Hammer Nail apron
BBF Series Blower Base Frame Assembly Instructions Rev.: BFA-9105
 BBF Series Blower Base Frame Assembly Instructions Rev.: BFA-9105 These assembly instructions are to be used as a general reference guide to facilitate assembly. Please consult the blower, bushing, sheave,
INSTALLATION INSTRUCTIONS
 INSTALLATION INSTRUCTIONS BUILDERS CHOICE FRAMED Bypass Door Model: L0516 (Tub Height), L0517 (Shower Height) Rev. 09.20.13 INSTALLATION NOTES: Unpack your unit carefully and inspect for freight damage.
Patrol Box Plans by David J. Yarusso Troop 609
 Patrol Box Plans by David J. Yarusso Troop 609 Materials List: 1. One 4 x8 sheet of ½ thick cabinet grade (birch or oak) or AC plywood. If using AC grade, use the A grade surface on the outside for a clean
PRO CYC PRO CYC, INC. SYSTEM SUPER 3EZ
 ASSEMBLY INSTRUCTIONS SYSTEM SUPER 3 EZ Congratulations on your decision to use the world s most advanced and user-friendly cyclorama system. We have taken a great deal of care to create and ship your
INSTALLATION INSTRUCTIONS FOR REPLACEMENT FORGENT WOOD GLASTRA WINDOWS RECOMMENDATIONS FOR COMMON INSTALLATION OF ALL REPLACEMENT WINDOWS.
 INSTALLATION INSTRUCTIONS FOR REPLACEMENT FORGENT WOOD GLASTRA WINDOWS RECOMMENDATIONS FOR COMMON INSTALLATION OF ALL REPLACEMENT WINDOWS. Installer: DO NOT DISCARD Please leave the Installation Guide
Articulating Retina Monitor. Created by Phil Herlihy
 Articulating Retina Monitor Created by Phil Herlihy Last updated on 2014-11-25 01:00:12 PM EST Guide Contents Guide Contents Introduction - Tools, Parts and Pitfalls Preparing Your Lamp Preparing The ipad
START HERE BEFORE YOU BEGIN FIG 1 STEP 2
 PROFESSIONAL INSTALL RECOMMENDED REAR MODULAR / MULTI LED ROOF MOUNTS PART#: Z350040 / Z350050 REAR ROOF LED LIGHT MOUNTS Parts included (1) - Driver Side Roof Mount Upright (1) - Passenger Side Roof Mount
Chapter 9. Windows and Exterior Doors
 Chapter 9. Windows and Exterior Doors 9.1 INSTALLING WINDOWS 9.2 INSTALLING EXTERIOR HOUSE DOORS 9.3 INSTALLING SHED DOOR 9.4 INSTALLING BASEMENT EGRESS COMPONENTS Tools needed by volunteers: Hammer Nail
Sliding Glass Door Assembly and Installation Guide
 Sliding Glass Door Assembly and Installation Guide Index Door System Components and Hardware The following components are needed to complete the installation of your Sliding Patio Door unit. Check all
EmagiKit. Privacy Pod Plus. Quiet. Easy. Affordable. INSTRUCTIONS ASSEMBLY
 EmagiKit Privacy Pod Plus Quiet. Easy. Affordable. INSTRUCTIONS ASSEMBLY DIMENSIONS AND COMPONENTS 47 47 Ceiling Unit 2-B 2-L 2-R Glass Door Corner Trim Door Handle 90 Adjustable Height Work Surface 1-B
JK Front Crusher Flares
 INSTALLATION INSTRUCTIONS INST-17-03-030_A JK Front Crusher Flares IMPORTANT: Thank you for purchasing this Poison Spyder product. Please read through this entire document before proceeding with installation.
PLEASE READ THIS NOTICE BEFORE BEGINNING ANY PHASE OF INSTALLATION!!!!
 PLEASE READ THIS NOTICE BEFORE BEGINNING ANY PHASE OF INSTALLATION!!!! This kit is designed to be installed by someone with a fair amount of mechanical aptitude. However, if you are not comfortable making
Assembly Instructions 10 X 10 Aluminum Frame Building
 Assembly Instructions 10 X 10 Aluminum Frame Building 27 97 9 8 47 36 74 52 10 10 X 10 Square Building W/ Dome Includes: The Steel Entry Door with a Dead Bolt Lock assembly and Aluminum Door Frame. Metal
HOW TO HOME IMPROVEMENT INSTRUCTIONS (Steps to make changes and before and after photos) Entrance to Front and Back of House
 Entrance to Front and Back of House") HOW TO HOME IMPROVEMENT INSTRUCTIONS (Steps to make changes and before and after photos) Entrance to Front and Back of House 1. Outdoor Grab Bar To install a weatherproof grab bar into a brick wall: 1.
HOW TO HOME IMPROVEMENT INSTRUCTIONS (Steps to make changes and before and after photos) Entrance to Front and Back of House 1. Outdoor Grab Bar To install a weatherproof grab bar into a brick wall: 1.
VACUSEAL MODEL 200. HOT TUB PRODUCTS 233 Carrington Road Bethany CT
 VACUSEAL MODEL 200 J G F G H L HOT TUB PRODUCTS 233 Carrington Road Bethany CT 06524 860-469-2580 www.vacusealcoverlift.com www.hottubproducts.com Made in USA H K E D C I A P B 10 9 8 7 6 5 4 3 2 1 0 SPAS
Installation Instructions for easy to install Texture Plus faux wall panels
 Installation Instructions for easy to install Texture Plus faux wall panels Questions? Web chat, phone or email us. Easy Instructions For Use We make easy to install faux wall panels that look amazingly
Fold-A-Way Patio Door ASSEMBLY & INSTALLATION GUIDE
 Fold-A-Way Patio Door ASSEMBLY & INSTALLATION GUIDE This instruction guide provides the minimum recommended procedures to correctly prepare the rough opening, install a fold-a-way patio door unit and apply
Instructions to Convert a 4-foot Florescent Fixture to LEDs Using 60W Power Supply Using 2 or 3 strips 30Dec15
 Instructions to Convert a 4-foot Florescent Fixture to LEDs Using 60W Power Supply Using 2 or 3 strips 30Dec15 Thank you for purchasing the Shoplight Solutions 4-ft conversion kit. This is a companion
JK Brawler Rockers. *Includes ONE of the Hardware Kits (not both)
") INSTALLATION INSTRUCTIONS INST-17-08-200_A JK Brawler Rockers IMPORTANT: Thank you for purchasing this Poison Spyder product. Please read through this entire document before proceeding with installation.
INSTALLATION INSTRUCTIONS INST-17-08-200_A JK Brawler Rockers IMPORTANT: Thank you for purchasing this Poison Spyder product. Please read through this entire document before proceeding with installation.
Installation Operation Care
 Installation Operation Care Designer Banded Shades Cassette with Custom Clutch and UltraGlide CONTENTS Getting Started Product View Custom Clutch... 1 Product View UltraGlide... 2 Tools and Fasteners Needed...
INSTALLATION INSTRUCTIONS KK-K9-F14-K K9 KIT FOR FORD EXPEDITION
 INSTALLATION INSTRUCTIONS KK-K9-F14-K-32 32 K9 KIT FOR 2003-2016 FORD EXPEDITION TOOLS REQUIRED: Power Drill Drill Bit Set Standard & Metric Socket Sets Phillips Screw Driver Open End Wrench Set Wire Cutters
Installation for Full Size Polaris Ranger Crew Doors
 Installation for Full Size Polaris Ranger Crew Doors Order of Installation: Heater Doors Wiper on to Windshield Windshield Top & Back Panel Note: Most of the steps in these instructions need to be repeated
Chevy Colorado. INSTALLATION GUIDE Front Bumper
 Chevy Colorado INSTALLATION GUIDE Front Bumper FIG 1A First, we ll start by removing the small allen bolts from the inside fender wells that hold the stock front bumper in place. FIG 1B You will also need
Firehouse Manual. Tools Needed:
 Tools Needed: -Cordless Drill (12V or higher) -#2 Square Drive Bit -Hammer -6 Step Ladder -Tape Measure -Square utility knife w/ blade & hook blade -Speed Square Little Cottage Co. PO Box 455 Berlin, OH
HEAVY DUTY 11 STEEL CABINET
 HEAVY DUTY STEEL CABINET ASSEMBLY INSTRUCTIONS ONE DRAWER BASE CABINET 05-206 Parts List Part No Description Qty Image ONE DRAWER BASE CABINET Part No Description Qty Image SB- Cabinet Body EH-0 Euro Hinge
Instructions and best practices for installing the fitting along with ducting tips when using 4 flex duct
 Patent pending: Liberator &EZSoffitVent Professional grade soffit Termination system Detailed Installation instructions Detailed Instructions and best practices for installing the fitting along with ducting
Hughes Engines Installation Instructions 2 Piece Big Block Intake Sealing Kit
 Hughes Engines Installation Instructions 2 Piece Big Block Intake Sealing Kit Kit Contents: 1 Stainless Steel RH valley cover section w/ ears 1 Stainless Steel LH valley cover section 6 Stainless button-head
rmoire Materials Hardware
 A rmoire No house ever has enough storage space, and I built this armoire to satisfy a couple of needs. Inside the armoire is a shelf large enough for the television. Under the shelf are six drawers that
Shop Projects. Plans NOW. Each Built from One Sheet of Plywood!
 Plans NOW www.plansnow.com 5 Shop Projects Each Built from One Sheet of Plywood! Tool Tote - Sawhorse - Workbench - Wood Bin - Wall Cabinet PLUS: 7 SHOP SECRETS Working with Plywood Dread the thought of
PRO CYC PRO CYC, INC. SYSTEM SUPER 1.5 EZ
 ASSEMBLY INSTRUCTIONS SYSTEM SUPER 1.5 EZ Congratulations on your decision to use the world s most advanced and user-friendly cyclorama system. We have taken a great deal of care to create and ship your
GENUINE PARTS INSTALLATION INSTRUCTIONS
 GENUINE PARTS INSTALLATION INSTRUCTIONS 1. 2. 3. 4. DESCRIPTION: APPLICATION: PART NUMBER: KIT CONTENTS: Kit G Coupe 999J2 JxxxxB4 (xxxx Designates model year and color) Item Qty. Description Part Number
CertainTeed INSTALLATION GUIDE SIMTEK FENCE PRODUCTS. Fence Installation Guide 3', 4' & 6' High
 CertainTeed INSTALLATION GUIDE SIMTEK FENCE PRODUCTS Fence Installation Guide 3', 4' & 6' High INSTALLATION GUIDE These instructions are designed to assist both professional installers and do-it-yourselfers