BN6-BN7 Hardtop Restoration
|
|
|
- Delphia Casey
- 5 years ago
- Views:
Transcription

1 BN6-BN7 Hardtop Restoration By John Homonek Here is how I restored mine: I disassembled the hardtop - but did this with a camera in hand. Take many pictures and take way more pictures than you think you need of each little piece and connector and how it fits. In addition, document everything in detail on paper. Bag all of the screws, nuts bolts and other fastener pieces as they come off and identify where they go and the quantity of each. You will go to a hardware store later to replace all of these. Send the aluminum trim pieces out to be polished or anodized and the chrome to be rechromed. Polish the Persplex rear glass

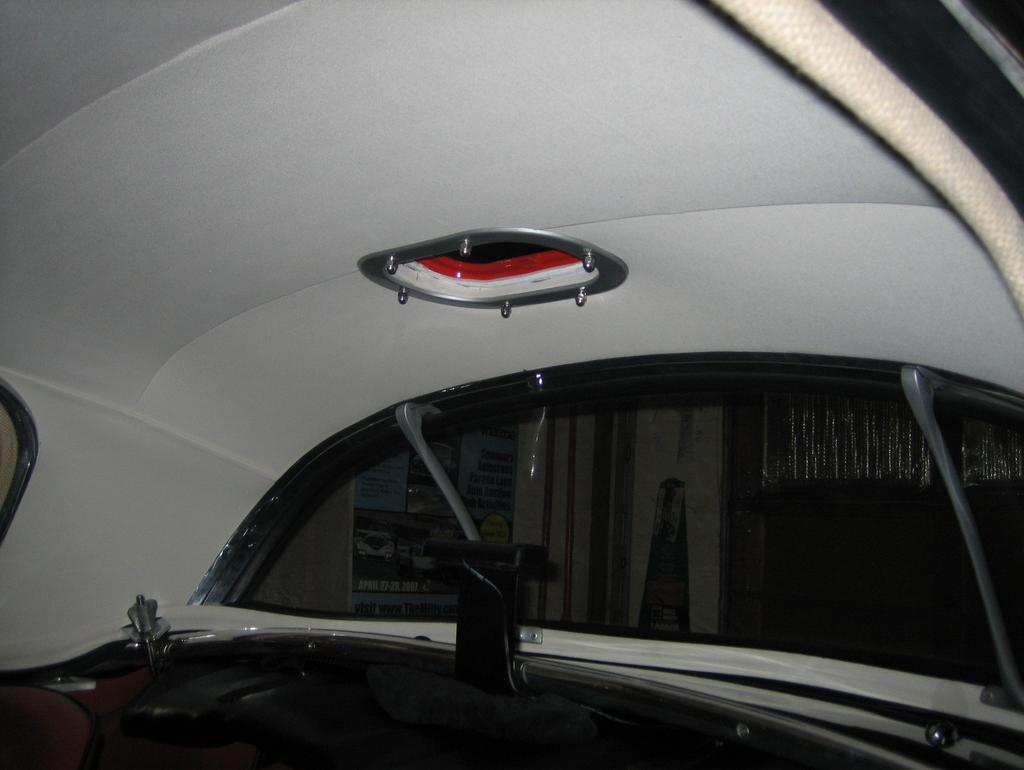
2 Order a vent kit from Bill Bolton at TRICARB@aol.com, measure the cutout and cut it with a Dremel tool.

3 At the time of this order, also order the headliner, seal, weather strip kits and necessary wood parts from Bill. Send the fiberglass shell to someone who can repair the stress cracks, prime it and paint it with the hole for the vent already cut in it.. Send the headliner to an upholsterer to be covered on the frame. I covered the side panels and padded front piece myself.


4 Buy 3M Strip Caulk (dum-dum) and 3M weather strip adhesive and a lubricant called Sil-Glyde, a silicone gel in a tube. Sil-Glyde is available at NAPA stores and at Amazon.com.

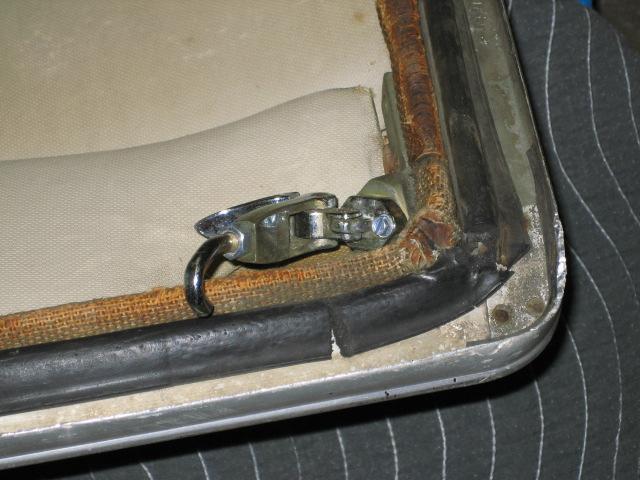
5 Buy new catches from Moss

6 Bill Bolton also makes the wood pieces for me that go on the back of the upright aluminum trim. Paint the uprights inside the rear glass the and front catch brackets a gray color such as Valspar Medium Gray and clear coat it to soften the color Wire brush and paint the posts that go into the body of the car a gloss black. Print all of the pictures you took before and match the prints with the notes that you took.. Go to a hardware store and buy replacement screws, washers, bolts and a few extras of each (I used a lot of stainless on mine). You will probably have to make more than one trip to the hardware store.

7 When the shell is returned, paint the shell the appropriate color and then glue the vinyl on the inside of rear bottom aluminum piece. Put aluminum pieces back around the shell in this order: front piece, side pieces and then attach the small alum plate with little screws and now attach the wood pieces and posts that go down to the holes in the car on each side. Attach the window opening pieces and then bottom alum piece. NOTE: Every piece of aluminum should have dum-dum behind it to keep water out. This takes the most time and the fit is important as the fiberglass really wants to be flat again Glue in vinyl in front corners

8 and re glue the carpet pieces that you found under the headliner frame upon disassembly.


9

10 Once the shell is now outlined with aluminum, the headliner that floats can be pushed into place. Attach the gray inside rear supports in the rear glass opening Now comes the rear glass. Line up new rubber next to old and cut much at the same angle but maybe a 1 longer.double, triple check you measurements with the rubber and the opening you are trying to seal on top and bottom. Then, a tri-angular rubber piece goes in the outside center to spread the seal and hold it in place. Use the Sil-Glyde on this process Now attach the inner and outer rear seal that floats down to the body on the rear shroud Attach and glue the weather strip into place on the front and sides.


11

12 Push on the measured and precut basket weave white cloth inner pieces on front and around side screen areas. These help hold on the weather stripping there also. Carefully fit on the car and see how the fit is. It may need to move forward or backwards. Use your side curtains too. They may have to be ground down and smoothed out. Adjust as necessary by bending posts and shortening or lengthening hooks on catches.not much fun either

13

14

15

16 When you are finished, you will have a beautiful hard top on the inside:

17
18

19 . And on the outside.

20

21

22

23
Interior CHAPTER 21. Phantom Roadster Instruction Manual 273
 CHAPTER 21 Interior When you get to this chapter you are now starting on the finish that will make your car one that will be complete your hard work. This chapter will cover the installation of the door
INSTALLATION INSTRUCTIONS CONTOURED LIGHT BAR APPLICATION: CHEVY EQUINOX/ GMC TERRAIN PART NUMBERS: ,
 INSTALLATION INSTRUCTIONS CONTOURED LIGHT BAR APPLICATION: 2010-2014 CHEVY EQUINOX/ GMC TERRAIN PART NUMBERS: 32-21020, 32-21025 ITEM QUANTITY DESCRIPTION TOOLS NEEDED 1 1 CONTOUR BAR TORQUE WRENCH 2 1
*Patent Pending. *Trademarked. Series II. Glass Conversion Kit. (888) One-Products (888)
 One-Products (888)") *Patent Pending *Trademarked Series II Glass Conversion Kit www.onepieceproducts.com (888) One-Products (888) 663-7763 Installation Manual Full One Piece Door Glass Conversion Kit Series II 1967-1972 Chevy
*Patent Pending *Trademarked Series II Glass Conversion Kit www.onepieceproducts.com (888) One-Products (888) 663-7763 Installation Manual Full One Piece Door Glass Conversion Kit Series II 1967-1972 Chevy
WEAR SAFETY GLASSES WHEN INSTALLING THIS KIT.
 INSTALLATION INSTRUCTIONS Trans4mer Mounting Systems Part No. 29753 (black) Part No. 65654 (stainless) for full size GM pickups, and Blazer, Yukon, Suburban, Tahoe As you read these instructions, you will
INSTALLATION INSTRUCTIONS 3 BULL BAR 99-04, 04 "HERITAGE" F-150/250LD 2WD, 97-04, 04 "HERITAGE" 4WD WD EXPEDITION/ WD EXPEDITION PART
 INSTALLATION INSTRUCTIONS 3 BULL BAR PART #B-F1971;B-F2971 PARTS LIST: 1 Bull Bar 2 12-1.75mm x 130mm x 40mm Hex Bolts 1 Driver/Left Mounting Bracket 4 12-1.75mm x 35mm Hex Bolts 1 Passenger/Right Mounting
INSTALLATION INSTRUCTIONS KK-K9-C12-K CHEVY IMPALA
 INSTALLATION INSTRUCTIONS KK-K9-C12-K 2000-2005 CHEVY IMPALA READ ALL INSTRUCTIONS PRIOR TO INSTALLATION TOOLS REQUIRED: Power Drill Drill bits1/4 and 5/32 7/l6 wrench and socket 15,18 and\or 19mm socket
Ford Raptor Venom Front Bumper Installation Instructions
 PREPARATION 2010 2014 Ford Raptor Venom Front Bumper Installation Instructions 1. Disconnect the negative terminal on the battery. Park the vehicle on level ground and set the emergency brake. 2. We recommend
INSTALLATION INSTRUCTIONS PART#:17A096400MSS\17A096400MA MODULAR GRILL GUARD FOR TOYOTA TACOMA 05-09
 INSTALLATION INSTRUCTIONS PART#:17A096400MSS\17A096400MA MODULAR GRILL GUARD FOR TOYOTA TACOMA 05-09 1 guard, center section 1 brush guard, left side 1 brush guard, right side 1 wire guard insert, left
HONDA RIDGELINE (KIT #601) Installation Instructions (to be used in addition to owners manual)
 Installation Instructions (to be used in addition to owners manual)") HONDA RIDGELINE (KIT #601) Installation Instructions (to be used in addition to owners manual) IMPORTANT NOTE: Read before beginning installation. These instructions replace all of Step 1 of the instructions
HONDA RIDGELINE (KIT #601) Installation Instructions (to be used in addition to owners manual) IMPORTANT NOTE: Read before beginning installation. These instructions replace all of Step 1 of the instructions
SOCCER TABLE. Assembly Instructions
 Updated: 9/30/2015 SOCCER TABLE Assembly Instructions Table of Contents Parts Identifier... 3 Hardware Identifier. 4 Table Assembly Instructions... 5 Table Assembly Pictures..... 6, 7, 8 2 Page Parts Identifier
INSTALLATION INSTRUCTIONS / DODGE RAM CREW CAB 2500/3500
 INSTALLATION INSTRUCTIONS 225019 / 225019-2 2010 DODGE RAM CREW CAB 2500/3500 PARTS LIST: Qty Description Qty Description 1 Driver/Left Side Bar 4 Plastic Square Retainer 1 Side Bar 2 12mm x 120mm Hex
Early Mustang & Cougar cowl repair
 Early Mustang & Cougar cowl repair Okay, I m no expert but Bob suggested that I describe my experiences in replacing a rusty cowl in my 68 Mustang fastback I thought the cowl was good when I bought this
IMPORTANT: WILL NOT FIT COUNTRYMAN MODELS
 Part #1410-0102-07 2 3 1 IMPORTANT: WILL NOT FIT COUNTRYMAN MODELS Apply masking tape around the bottom grille opening and across the bottom of the upper facto ry grille.. Open the hood and remove the
START HERE BEFORE YOU BEGIN FIG 1 STEP 2
 PROFESSIONAL INSTALL RECOMMENDED REAR MODULAR / MULTI LED ROOF MOUNTS PART#: Z350040 / Z350050 REAR ROOF LED LIGHT MOUNTS Parts included (1) - Driver Side Roof Mount Upright (1) - Passenger Side Roof Mount
INSTALLATION INSTRUCTIONS
 INSTALLATION INSTRUCTIONS Trans4mer Grille Guard/Winch Mount Kit 6334 For Chevrolet Silverado 500HD & 3500 This WARN Trans4mer system can be customized to give your Chevy Silverado a wide variety of looks,
INSTALLATION INSTRUCTIONS GRILLE GUARD RAM 1500 PART # 5058/5058-2
 INSTALLATION INSTRUCTIONS GRILLE GUARD PART # 5058/5058-2 PARTS LIST: Qty Description Qty Description 1 Grille Guard 8 12-1.75mm x 35mm Hex Bolts 2 Upper Frame Mounting s (for trucks without tow hooks
INSTALLATION INSTRUCTIONS
 TEL:1-866-XANATOS INSTALLATION INSTRUCTIONS FOR 07-13 CHEVY SILVERADO 1500 PART#RU-CHSI07-B PARTS LIST: 1 Main Body 28 12mm x 37mm OD x 3mm Large Flat Washers 1 Driver/Left Brush Guard 8 12-1.75mm x 40mm
3. Remove the flue collar by backing out the two Phillips round head machine screws.
 SERVICE MANUAL SERVICE PROCEDURES Defiant Non-Catalytic Model 1610 Woodstove **Wear gloves, a dust mask and protective eyewear when servicing a stove. ** Replacing the Fountain Assembly 1. Remove the doors,
RH-412 STEEL DOORS INSTALLATION INSTRUCTIONS
 RH-412 STEEL DOORS INSTALLATION INSTRUCTIONS By following the steps outlined below, the assembly, installation and adjustment of the steel doors, will be a simple process. Let s start with the Driver Side.
INSTALLATION INSTRUCTIONS RH 412 STEEL DOORS
 By following the steps outlined below, the assembly, installation and adjustment of the steel doors, will be a simple process. Let s start with the Driver Side. Note: Having the hood open makes the job
Installation Instructions:
 NOTE: Carefully read entire instructions thoroughly before attempting to install this part. (SB76904) Parts Included Qty 94-241CA001 Front Upright: Drvr 1 94-241CA002 Front Upright: Pass 1 94-241CA003
968 Side Cladding Rubber Beading Replacement
 968 Side Cladding Rubber Beading Replacement A common and simple wear-oriented project for the 968 is the replacement of the rubber seals or beading on the lower side body cladding. These seals become
D. Drill Bolt Holes Through Topper Shell and Bed Rails
 A. Check Mounting Kit Check to make sure that all of the following items are included in the mounting kit. Call 515-272-4372 if you need to obtain a part from BrandFX. Double-stick tape (1 roll) White
INSTALLATION INSTRUCTIONS
 INSTALLATION INSTRUCTIONS Trans4mer Grille Guard/Winch Mount Kit 7646 & 766 For GMC Sierra 500 As you read these instructions, you will see NOTES, CAUTIONS and WARNINGS. Each message has a specific purpose.
FRONT BUMPER INSTALLATION INSTRUCTIONS Toyota 4Runner
 Aluminess Products Inc 9402 Wheatlands Ct. #A Santee, CA 92071 619-449-9930 FRONT BUMPER INSTALLATION INSTRUCTIONS 2003-2009 Toyota 4Runner Please read before beginning Stainless steel hardware may bind
INSTALLATION MANUAL FRONT. See pages 2 and 3 of this manual for configuration options. Level of Difficulty. Product Photo (center section only)
") INSTALLATION MANUAL FRONT Level of Difficulty Moderate Product Photo (center section only) All hardware listed below will be provided with the bumpers center section. Additional hardware will be supplied
INSTALLATION MANUAL FRONT Level of Difficulty Moderate Product Photo (center section only) All hardware listed below will be provided with the bumpers center section. Additional hardware will be supplied
INSTALLATION INSTRUCTIONS PART#:17GT23MSS\17GT23MA MODULAR GRILL GUARD FOR CHEVY SILVERADO 1/2 TON 99-02
 INSTALLATION INSTRUCTIONS PART#:17GT23MSS\17GT23MA MODULAR GRILL GUARD FOR CHEVY SILVERADO 1/2 TON 99-02 1 guard, center section 1 brush guard, left side 1 brush guard, right side 1 wire guard insert,
INSTRUCTIONS INSTRUCCIONES CONSIGNES
 AUTOMOTIVE PRODUCTS, INC. INSTRUCTIONS INSTRUCCIONES CONSIGNES APPLICATION: 2007-2010 CHEVY/GMC SILVERADO/SIERRA 2500/3500 (EXCLUDES CLASSIC) APP PART #46-23715, 40-92315/45-92310 MAX WINCH TRAY, SPORTSMAN
INSTALLATION INSTRUCTIONS KK-K9-F14-K K9 KIT FOR FORD EXPEDITION
 INSTALLATION INSTRUCTIONS KK-K9-F14-K-32 32 K9 KIT FOR 2003-2016 FORD EXPEDITION TOOLS REQUIRED: Power Drill Drill Bit Set Standard & Metric Socket Sets Phillips Screw Driver Open End Wrench Set Wire Cutters
STYLE BAR & TONNEAU COVER INSTALLATION
 STYLE BAR & TONNEAU COVER INSTALLATION INSTALLATION MANUAL: 2005 to '09 Mustang P/N: 10-8002-C12071B Saleen Performance, Inc. 1225 East Maple Rd., MI 48083 800-888-8945 www.saleen.com 1 IF YOU ARE NOT
INSTALLATION INSTRUCTIONS
 TEL1-866-XANATOS INSTALLATION INSTRUCTIONS PART#: BB080800\BB080800A 2 CITY BAR FOR JEEP PATRIOT 4X4 & 4X2 08-09 PARTS LIST: 1 City Bar 2 12-1.75mm x 50mm Hex Head Bolts 1 Center Tube Bracket 4 12-1.75mm
Atomic Mercury Frame Kit Assembly Manual
 Atomic Mercury Frame Kit Assembly Manual Thank you for purchasing the Atomic Aviation Mercury RACEframe! Please read through the entire manual first before beginning assembly of your kit. The order of
IMPORTANT: PLEASE RETAIN THIS INSTRUCTION MANUAL FOR FUTURE REFERENCE
 IMPORTANT: PLEASE RETAIN THIS INSTRUCTION MANUAL FOR FUTURE REFERENCE 005-07 Cadillac STS Classic 3D Z, Classic Dual Weave, Classic Mesh & Classic Black Mesh Grilles B 7 HR 3 STS Classic 3D Z Grille Part
INSTALLATION INSTRUCTIONS
 INSTALLATION INSTRUCTIONS Trans4mer Grille Guard/Winch Mount Kit 6367 For Chevrolet Silverado 1500, Suburban 1500 and Tahoe As you read these instructions, you will see NOTES, CAUTIONS and WARNINGS. Each
INSTALLATION INSTRUCTIONS
 INSTALLATION INSTRUCTIONS Trans4mer Grille Guard/Winch Mount For GMC Sierra 2500HD & 3500, + 03 Kit 76248/76249 This WARN Trans4mer system can be customized to give your Chevy Silverado a wide variety
Cable Tray Kit: - Cable Tray - Cable Tray Cover - Power Block Support (x2) Top Support Kit: (x2) - 2 Top Supports. Quantities are per bench
 Top Support Kit: (x2) - 2 Top Supports. Quantities are per bench") Parts Included (per back to back bench) Column Kit: (x2) - 1 LH & 1 RH Column - Control Box - Hand Switch Cable Tray Kit: - Cable Tray - Cable Tray Cover - Power Block Support (x2) Depth Support Kit: -
Parts Included (per back to back bench) Column Kit: (x2) - 1 LH & 1 RH Column - Control Box - Hand Switch Cable Tray Kit: - Cable Tray - Cable Tray Cover - Power Block Support (x2) Depth Support Kit: -
S H E D A S S E M B L Y I N S T R U C T I O N S
 T I T A N R A N G E S H E D A S S E M B L Y I N S T R U C T I O N S 8 X 10 ft Approx = 2550 x 3140 cm COMPONENT LIST Component illustrations are given as a visual guide only and are not in proportion PART
WARNING. Failure to observe these instructions could lead to severe injury or death.
 INSTALLATION INSTRUCTIONS WINCH MOUNTING KIT Part Number: 80156, 80160 Application: 2008 Ford F150 Your safety, and the safety of others, is very important. To help you make informed decisions about safety,
Assembly Instructions 10 X 10 Aluminum Frame Building
 Assembly Instructions 10 X 10 Aluminum Frame Building 27 97 9 8 47 36 74 52 10 10 X 10 Square Building W/ Dome Includes: The Steel Entry Door with a Dead Bolt Lock assembly and Aluminum Door Frame. Metal
JK Rear Crusher Flares
 INSTALLATION INSTRUCTIONS INST-17-05-010_A JK Rear Crusher Flares IMPORTANT: Thank you for purchasing this Poison Spyder product. Please read through this entire document before proceeding with installation.
One Piece Products. Series III El Camino ( ) One Piece Door Glass Conversion Manual.
 One Piece Door Glass Conversion Manual.") One Piece Products Series III El Camino (1964-1967) One Piece Door Glass Conversion Manual *Registered Trademark www.onepieceproducts.com (888)One Products (888)663-7763 1 Installation Instructions_ 1964-1967
One Piece Products Series III El Camino (1964-1967) One Piece Door Glass Conversion Manual *Registered Trademark www.onepieceproducts.com (888)One Products (888)663-7763 1 Installation Instructions_ 1964-1967
INSTALL INSTRUCTIONS K9-F14-PT K9/PRISONER TRANSPORTATION SYSTEM FORD EXPEDITION
 INSTALL INSTRUCTIONS K9-F14-PT K9/PRISONER TRANSPORTATION SYSTEM 2003-2017 FORD EXPEDITION HARDWARE: QTY: DESCRIPTION: PART #: 28 ¼-20 x ½ Stainless carriage bolt GSM32022 8 ¼-20 x ¾ Stainless carriage
INSTALLATION INSTRUCTIONS
 INSTALLATION INSTRUCTIONS Trans4mer Grille Guard/Winch Mount For Chevrolet Silverado 1500HD & 2500 Kit 68162 This WARN Trans4mer system can be customized to give your Chevy Silverado a wide variety of
INSTALLATION INSTRUCTIONS
 TEL:1-866-XANATOS INSTALLATION INSTRUCTIONS PART#: 17A110200MSS\17A110200MA MODULAR GRILL GUARD FOR NISSAN FRONTIER 05-10//PATHFINDER 05-07 1 guard, center section 1 brush guard, left side 1 brush guard,
JK Front Crusher Flares
 INSTALLATION INSTRUCTIONS INST-17-03-030_A JK Front Crusher Flares IMPORTANT: Thank you for purchasing this Poison Spyder product. Please read through this entire document before proceeding with installation.
Thor Audi A4/S4 Skid Plate Installation Instructions
 Thor Audi A4/S4 Skid Plate Installation Instructions Parts List: 1 Aluminum Skid Plate 2 Aluminum Side Wings 10 10mm Flat Washers 3 8mm Flat Washers 3 8mm Speed Clips 2 10x40mm Bolts 3 8x35mm Bolts 2 Rivet-nuts
INSTALLATION MANUAL WEEKENDER STEEL LADDER RACK
 TRUCK STORAGE SOLUTIONS SECURING YOUR REPUTATION INSTALLATION MANUAL WEEKENDER STEEL LADDER RACK STEEL & ALUMINUM SIDE BOX WITH PACK RAT DRAWER UNITS MODELS ATTENTION: PLEASE READ AND UNDERSTAND ALL INSTRUCTIONS
HOME GYM Owner s Manual
 HOME GYM Owner s Manual Content Content-------------------------------------------------------------1 Safety precautions----------------------------------------------------2 Assembly instruction-------------------------------------------------3-12
Gardman Lean-to Greenhouse Assembly Instructions
 Page 1 Gardman Lean-to Greenhouse Assembly Instructions Our Help Line provides support and advice to customers of Summer Garden Buildings after ordering. For advice before you buy you can phone us free
10-1.5mm x 40mm Hex Bolt 1 Driver/Left Front Inner Support Bracket (2WD & 4WD Vehicles W/O Skid Plate Only) 2
 2") PARTS LIST: 1 Driver/Left sidebar 4 12mm x 32mm OD x 3mm Flat Washer 1 Passenger/Right sidebar 4 12mm x 24mm OD x 2.5mm Flat Washer 1 Driver/Left Mounting Bracket 6 12mm Lock Washers 1 Passenger/Right
PARTS LIST: 1 Driver/Left sidebar 4 12mm x 32mm OD x 3mm Flat Washer 1 Passenger/Right sidebar 4 12mm x 24mm OD x 2.5mm Flat Washer 1 Driver/Left Mounting Bracket 6 12mm Lock Washers 1 Passenger/Right
Installation Instructions
 For Medium (15-18.5K) + Heavy duty (22-28.5K) Air Conditioner READ BEFORE INSTALLING UNIT To avoid risk of personal injury, property damage, or product damage due to the weight of this device and sharp
INSTALLATION INSTRUCTIONS PART#:17A045200MSS\17A045200MA MODULAR GRILL GUARD FOR FORD SUPER DUTY F250/F
 INSTALLATION INSTRUCTIONS PART#:17A045200MSS\17A045200MA MODULAR GRILL GUARD FOR FORD SUPER DUTY F250/F350 08-09 1 guard, center section 1 brush guard, left side 1 brush guard, right side 1 wire guard
Showpiece Cabinet Integrated Stand For 32" - 52" LCD HDTV
 Showpiece Cabinet Integrated Stand For 32" - 52" LCD HDTV Installation and Assembly Instructions 2009 Incredible Technologies Inc. Version 0109 Showpiece Cabinet Integrated Stand for 32" - 52" LCD HDTV
Installation Instructions
 edium + Heavy duty READ BEFORE INSTALLING UNIT Preliminary instructions: 1. Check window opening size: the mounting parts furnished with this air conditioner are made to install in a wooden sill double-hung
READ BEFORE INSTALLING UNIT INSTALLATION WARNINGS AND CAUTION
 edium + Heavy duty READ BEFORE INSTALLING UNIT INSTALLATION WARNINGS AND CAUTION Carefully read the installation manual before beginning. Pay attention to danger and safety notices. be exposed: Carefully
INSTALLATION INSTRUCTIONS
 INSTALLATION INSTRUCTIONS Trans4mer Gen II Mount System For 2011-2012 Dodge Ram HD 4500/5500 Bracket Kit 90160 Your safety, and the safety of others, is very important. To help you make informed decisions
28" Adjustable Solar Tilt Mount ADJ-28. Owner's Manual. Please read this manual BEFORE installing your solar tilt mount
 28" Adjustable Solar Tilt Mount ADJ-28 Owner's Manual Please read this manual BEFORE installing your solar tilt mount SECTION 1 Introduction Mounting your solar panel inclined to an optimized angle with
Simply lift up on the flexible cover to remove it from the radiator support panel and factory grille, exposing the upper mounting hardware.
 2 Simply lift up on the flexible cover to remove it from the radiator support panel and factory grille, exposing the upper mounting hardware. Apply masking tape to the top of the bumper cover underneath
INSTALLATION INSTRUCTIONS GRILLE GUARD CHEVY TAHOE / AVALANCHE 1500/ SUBURBAN 1500 PART # /502795
 (W) INSTALLATION INSTRUCTIONS GRILLE GUARD PART # 502794/502795 PARTS LIST: 1 Grille Guard 2 12-1.75mm x 140mm Hex Bolts 2 Frame Mounting Brackets 8 12-1.75mm x 30mm Hex Bolts 2 Lower Support Brackets
1104. Clean up the door striker plates with a hand grinder using a wire brush and WD-40.
 Chapter 31 - Misc. Putting VW Back Together (Video Clip 31) 1104. Clean up the door striker plates with a hand grinder using a wire brush and WD-40. 1105. Install both door striker plates on the VW body
Do-it-yourself plastic repair kit by Jaeger Aviation
 Do-it-yourself plastic repair kit by Jaeger Aviation If your aircraft is adorned by yellowed, cracked and broken window trim, side panels or headliner there is something you can do about it! In the past,
INSTALLATION INSTRUCTIONS
 INSTALLATION INSTRUCTIONS SNYPER TUBULAR FENDERS APPLICATION: 2007-2017 Jeep Wrangler JK PART NUMBER: 62-1005, 62-1015 ITEM QUANTITY DESCRIPTION TOOLS NEEDED 1,2 2 FRONT FENDERS, DRIVER (1) AND PASSENGER
INSTALLATION INSTRUCTIONS
 INSTALLATION INSTRUCTIONS Trans4mer Grille Guard/Winch Mount Kit 76139 & 7643 For Chevrolet Silverado 1500 As you read these instructions, you will see NOTES, CAUTIONS and WARNINGS. Each message has a
INSTALLATION INSTRUCTIONS
 INSTALLATION INSTRUCTIONS Trans4mer Winch Mount For 2007-2010 Chevrolet Silverado HD and GMC Sierra HD Bracket Kit 90140 Your safety, and the safety of others, is very important. To help you make informed
INSTALLATION INSTRUCTIONS
 INSTALLATION INSTRUCTIONS Trans4mer Grille Guard/Winch Mount Kit 63470 For Ford 4x4 F150, F250 Light Duty & Expedition As you read these instructions, you will see NOTES, CAUTIONS and WARNINGS. Each message
Assembly Instructions 10 X 10 Aluminum Roof Support
 Assembly Instructions 10 X 10 Aluminum Roof Support Aluminum Roof Support Bolt Package 16-5/16 X 2 ¼ SS Bolt 24-5/16 X 1 SS Bolt 40-5/16 SS Nylon Lock Nuts 16-5/16 SS Flat Washers 28-4 ½ Wood Screws 36-1
Volvo Car Customer Service QB Instruction VCC
 Volvo Car Customer Service Title Inflatable curtain Page 1 ( 24 ) Action Bolt replacements Operation number: 97184-2 Issue Date Reason 1 2017-02 First issue 2 2017-03 Technical content change Affected
======================================================================================== ( DR / DR) JK WRANGLER MOD RACK
 JK WRANGLER MOD RACK") (10984 4DR / 10982 2DR) JK WRANGLER MOD RACK INSTALLATION SHEET Important Notes: Some brands of windshield light brackets and snorkels may not be compatible with the 10984 MOD Rack System. Body lifts are
(10984 4DR / 10982 2DR) JK WRANGLER MOD RACK INSTALLATION SHEET Important Notes: Some brands of windshield light brackets and snorkels may not be compatible with the 10984 MOD Rack System. Body lifts are
MODULAR BUMPER INSTALLATION MANUAL
 MODULAR BUMPER INSTALLATION MANUAL Parts List* 1 Center section 1 Side extension, passenger / right 1 Side extension, driver / left 1 Side cap, passenger / right 1 Side cap, driver / left 1 Brush guard,
GRILLE GUARD SPRINTER VAN (EXCLUDES X4) INCLUDES MERCEDES, FREIGHTLINER AND DODGE PARTS LIST:
 INCLUDES MERCEDES, FREIGHTLINER AND DODGE PARTS LIST:") PARTS LIST: 1 Grille Guard 8 12mm Hex Nuts 1 Driver/Left Side Frame Mounting Bracket 2 10-1.50mm x 25mm Button Head Bolts 1 Passenger/Right Side Frame Mounting Bracket 4 10mm x 20mm OD x 2mm Flat Washers
PARTS LIST: 1 Grille Guard 8 12mm Hex Nuts 1 Driver/Left Side Frame Mounting Bracket 2 10-1.50mm x 25mm Button Head Bolts 1 Passenger/Right Side Frame Mounting Bracket 4 10mm x 20mm OD x 2mm Flat Washers
Black Moon Products CTS-V Splitter Unfinished [ Cadillac CTS-V Coupe, Sedan & Wagon]
![Black Moon Products CTS-V Splitter Unfinished [ Cadillac CTS-V Coupe, Sedan & Wagon]](/thumbs/96/127099986.jpg "Black Moon Products CTS-V Splitter Unfinished [ Cadillac CTS-V Coupe, Sedan & Wagon]") Black Moon Products CTS-V Splitter Unfinished [2009-2015 Cadillac CTS-V Coupe, Sedan & Wagon] The information contained in this manual is updated periodically. While great care is taken in compiling the
Black Moon Products CTS-V Splitter Unfinished [2009-2015 Cadillac CTS-V Coupe, Sedan & Wagon] The information contained in this manual is updated periodically. While great care is taken in compiling the
INSTALLATION INSTRUCTIONS
 INSTALLATION INSTRUCTIONS Brush Guard Kit Kit no. 67730 (black), 67731 (stainless) for GMC Trucks Your safety, and the safety of others, is very important. To help you make informed decisions about safety,
AFCO-Rail Post INSTALLATION INSTRUCTIONS AFCO-RAIL POST
 AFCO-Rail Post INSTALLATION INSTRUCTIONS TOOLS REQUIRED: Drill Bits (for the appropriate fastener) Drill (with adjustable clutch, recommended) Level String Line Tape Measure Tools to install fasteners
K9 KIT INSTALLATION INSTRUCTIONS CROWN VIC KK-K9-F7-K
 K9 KIT INSTALLATION INSTRUCTIONS 1998-2011 CROWN VIC KK-K9-F7-K TOOLS REQUIRED: Power Drill (Cordless preferable) Drill Bit Set Standard Wrench and Socket Set Metric Socket Set Screwdriver Set Torx Bit
JEEP JK ( 5 DOOR ) SLIMLINE II - FULL TRAY EXTREME RACK KIT
 SLIMLINE II - FULL TRAY EXTREME RACK KIT") JEEP JK ( 5 DOOR ) SLIMLINE II - FULL TRAY EXTREME RACK KIT FAJK001 / KRJW014T INSTALL TIME: 2.5 Hours NOTE: Your Jeep JK (5 Door) Extreme Roof Rack Kit consists of four boxes. (1) the Tray, (2) the Roll
JEEP JK ( 5 DOOR ) SLIMLINE II - FULL TRAY EXTREME RACK KIT FAJK001 / KRJW014T INSTALL TIME: 2.5 Hours NOTE: Your Jeep JK (5 Door) Extreme Roof Rack Kit consists of four boxes. (1) the Tray, (2) the Roll
ELEGANCE SHOWER DOOR/ENCLOSURE INSTALLATION INSTRUCTIONS. Style A Style B Style C Style D
 ELEGANCE SHOWER DOOR/ENCLOSURE INSTALLATION INSTRUCTIONS IMPORTANT DreamLine reserves the right to alter, modify or redesign products at any time without prior notice. For the latest up-to-date technical
C70 Window Roller Repair Taken from: Heres the problem:
 C70 Window Roller Repair Taken from: http://www.volvospeed.com/vs_forum/topic/115086-how-to-c70-window-rollers-permanent-fix/ Heres the problem: This happened to two separate window assemblys on my c70
TRUCK BANNER INSTALLATION GUIDE
 TRUCK BANNER INSTALLATION GUIDE This method explains an inexpensive and easy way to install a vinyl billboard banner onto a box truck or trailer. This method uses simple tools and materials that you can
(2) 12mm x 40mm Bolt Plate (long) pictured w/plastic retainer. (6) 12mm x 40mm Bolt Plate (short) Support Bracket Driver/left Front
 12mm x 40mm Bolt Plate (long) pictured w/plastic retainer. (6) 12mm x 40mm Bolt Plate (short) Support Bracket Driver/left Front") PARTS LIST: 1 Driver/left Running Board w-1 Backing 8 12mm Plastic Retainers 1 Passenger/right Running Board w-1 Backing 8 12mm x 32mm x 3mm Flat Washers 2 2 inch tall rubber backing (SX & Limited only)
PARTS LIST: 1 Driver/left Running Board w-1 Backing 8 12mm Plastic Retainers 1 Passenger/right Running Board w-1 Backing 8 12mm x 32mm x 3mm Flat Washers 2 2 inch tall rubber backing (SX & Limited only)
INSTALLATION INSTRUCTIONS
 INSTALLATION INSTRUCTIONS Trans4mer Mounting System Dodge Ram Kit No. 65220, 73132, 75525, 76253 (black) or 65221, 73133, 75530, 76254 (stainless) As you read these instructions, you will see NOTES, CAUTIONS
INSTALLATION INSTRUCTIONS
 INSTALLATION INSTRUCTIONS SPORTSMAN WINCH MOUNT GRILLE GUARD APPLICATION: 2016-2018 Toyota Tacoma PART NUMBER: 40-93885, 45-93880, 46-23885 ITEM QUANTITY DESCRIPTION TOOLS NEEDED 1 1 WINCH TRAY 15MM SOCKET
Greenhouse Assembly Instructions
 Greenhouse Assembly Instructions Our Help Line provides support and advice to customers of Summer Garden Buildings after ordering. For advice before you buy you can phone us free 7 days a week on 0800
MGB V8 Roadster restoration project Report 72
 8th September 2016. I thought it would be useful to try this product and report how I got on with it. Reading the instructions it all seemed quite easy. You push the tube down into the box section. Press
40mm Thermoclick. Type II Class 1 Clear Satin Anodize - 201R1 (Mid Grade Commercial)
") http://www.sundancesupply.com 40mm Thermoclick Type II Class 1 Clear Satin Anodize - 201R1 (Mid Grade Commercial) U-Profile 12' Lengths $39 Out System offers a complete set of extrusions and accessories
http://www.sundancesupply.com 40mm Thermoclick Type II Class 1 Clear Satin Anodize - 201R1 (Mid Grade Commercial) U-Profile 12' Lengths $39 Out System offers a complete set of extrusions and accessories
Portofino Case2 Installation Guide
 Portofino Case2 Installation Guide vjun16 (for 17 or 24 mm Surface Wall Profile) DO NOT ASSEMBLE WITHOUT FULLY READING THESE INSTRUCTIONS Page 2 Thank you for purchasing this Portofino Case 2 shower enclosure.
Installation Instructions
 For Medium (15-18.5K) + Heavy duty (-8.5K) Air Conditioner READ BEFORE INSTALLING UNIT To avoid risk of personal injury, property damage, or product damage due to the weight of this device and sharp edges
4-lite Patio Door. Installation Instructions
 4-lite Patio Door Installation Instructions IMPORTANT: Read the instructions and familiarize yourself with the door parts and pieces before beginning assembly and installation. Note: Only the 5-0 x 6-8
Slide the stock rubber tank mount caps onto the ends of the CS-1 tank mount:
 RYCA CS-1 BODY PARTS INSTALLATION GUIDE [The CS-1 installation guides should be used as supplements to the videos found on our Youtube Channel. There is no strict order to the build process, but it is
BY ALIEN TECHNOLOGIES CORP
 BY ALIEN TECHNOLOGIES CORP Assembly Instructions TopLift Pros YOU MAY ALSO REVIEW OUR ASSEMBLY VIDEO, PLAY AND PAUSE AT YOUR CONVENIENCE. JUST VISIT US AT WWW.TOPLIFTPROS.COM AND GO TO Customer Support
Ram Promaster Rack. Installation instructions for
 Installation instructions for Ram Promaster Rack MyGlassTruck.com 200 Acorn Road LOCAL 856-595-9069 WEB www.myglasstruck.com Glassboro, NJ 08028 FAX 856-863-1480 1-844-364-4022 Version 1.0 November 2015
10-1.5mm x 40mm Hex Bolt 1 Driver/Left Front Inner Support Bracket (2WD & 4WD Vehicles W/O Skid Plate Only) 2
 2") PARTS LIST: 3" ROUND SIDEBARS 1 Driver/Left sidebar 4 12mm x 32mm OD x 3mm Flat Washer 1 Passenger/Right sidebar 4 12mm x 24mm OD x 2.5mm Flat Washer 1 Driver/Left Mounting Bracket 6 12mm Lock Washers
PARTS LIST: 3" ROUND SIDEBARS 1 Driver/Left sidebar 4 12mm x 32mm OD x 3mm Flat Washer 1 Passenger/Right sidebar 4 12mm x 24mm OD x 2.5mm Flat Washer 1 Driver/Left Mounting Bracket 6 12mm Lock Washers
INSTALLATION INSTRUCTIONS 3"/4 BENT END SIDEBARS FORD F-150 SUPERCREW PART # DZ /DZ
 INSTALLATION INSTRUCTIONS 09-12 FORD F-150 SUPERCREW PART # DZ 372697/DZ 372699 PARTS LIST: 1 Driver/Left Sidebar 4 1/2 Lock Washers 1 Sidebar 4 12mm x 32mm OD x 3mm Flat Washers 1 Driver/Left Mounting
INSTALLATION INSTRUCTIONS 6 OVAL BENT END SIDEBARS DODGE RAM 1500, CREW CAB PART#: /241533B
 PARTS LIST: 1 Driver/Left Sidebar 24 8mm x 24mm x 2mm Flat Washers 1 Passenger/Right Sidebar 12 8mm Lock Washers 3 Driver/left, Passenger Center and Rear 6 8mm Hex Nuts 3 INSTALLATION INSTRUCTIONS 6 OVAL
CRYSTEEL S. this manual must be included with the vehicle after completing the installation.
 Website: www.tbei.com E-mail: sales@tbei.com CRYSTEEL S Grain Tipper mounting and operating instructions this manual must be included with the vehicle after completing the installation. Web Site E-Mail
1/4 Rubber Spacer, 26 pcs. M5-.8 Machine Screw, 26 pcs 13. Female Wire Connector, 4 pcs
 97-06 Jeep Wrangler TJ Set Part #10920-07 Rev-3 12-15-08 A) B) C) D) E) F) G) STEP 1 - PRIOR TO INSTALLATION Bushwacker only approves installing the fl ares according to these written instructions with
INSTRUCTIONS INSTRUCCIONES CONSIGNES
 AUTOMOTIVE PRODUCTS, INC. INSTRUCTIONS INSTRUCCIONES CONSIGNES APPLICATION: 2007 13 CHEVY SILVERADO 1500 (except Classic ) MAX WINCH TRAY: HDX 46-22275 SPORTSMAN WINCH MOUNT GRILLE GUARD: 45-92270, 40-92275
KITCHEN INSTALLATION GUIDE
 KITCHEN INSTALLATION GUIDE The step-by-step guide to installing your new kitchen right The materials and tools you ll need This brochure is your guide to preparing and installing your new kitchen. Inside
CABANA / PAVILION ASSEMBLY ALUMINUM FRAME MODELS
 Assembled cabanas are large & heavy. Assemble at place of use. CABANA / PAVILION ASSEMBLY ALUMINUM FRAME MODELS Step 1 CAUTION: To avoid damage to the finish of your Cabana frame, prepare a smooth, non-scratch
K9 KIT INSTALLATION INSTRUCTIONS CROWN VIC with Fire Suppression System Model KK-K9-F7-K-FS
 K9 KIT INSTALLATION INSTRUCTIONS 2005-2011 CROWN VIC with Fire Suppression System Model KK-K9-F7-K-FS TOOLS REQUIRED: Power Drill (Cordless preferable) Drill Bit Set Standard Wrench and Socket Set Metric
Tech Sheet. T4 Interior conversion kit how to - fitting instructions. 1. Rear seat belts. 2.
 Page 1 of 8 T4 Interior conversion kit how to - fitting instructions Thank you for purchasing our T4 interior conversion kit. This kit will enable you to convert any SWB left hand loading door T4 into