In this rather technical follow-up article to my original
|
|
|
- Philippa Joseph
- 5 years ago
- Views:
Transcription

. I will also discuss readying a photograph for print (magazines, catalogs, brochures, etc.). I rely on printers, or web professionals to provide me with size/pixel information as to what they need for their use.")

1 Adjusting Photographs for Print or Web Use In this rather technical follow-up article to my original photography article, I will discuss how I use Photoshop CS5 after taking photos of flow blue or mulberry ironstone to adjust curves. Please remember that I am writing about only what I know, and I m sure others might approach processing their photos in a different manner. This article will give you a general idea regarding basic information on adjusting curves (called that because you create a curve while adjusting lights/darks/mid tones of a photo, in the Photoshop curve dialog box). I will also discuss readying a photograph for print (magazines, catalogs, brochures, etc.). I rely on printers, or web professionals to provide me with size/pixel information as to what they need for their use. At the end of the article I will include examples of items shot with the same technique to illustrate problems, as well as a better end product images. The images to the right are screenshots from my computer to clarify what each step is. It looks like a lot of steps but when you become proficient in doing this, it is a relatively quick procedure. If a person is working with a lot of photos, there is also a batching process you can use in Photoshop. Many photos can have the same effects quickly applied to all of them. For example, if you want to convert RGB images to CMYK you can set up a batching process to do that. Photoshop will run through your many images, converting them very quickly for you. That one step then, is something you don t have to think about doing. This has been real helpful for me in processing 600 or more images for a project I might be working on. After taking photos I import them into my computer. These images are large (how large depends upon your camera setting for that initial photo capture). They are also in RGB format. RGB is red, green, blue, which is an additive color model in which those colors of light are added together to reproduce a broad array of color. Typical RGB input devices are TV and video cameras, video games or digital cameras. If your photos are being used on the web, they should remain in RGB format. I would resample the image size to 300dpi by whatever pixel dimension requested by whomever I am preparing it for. If I am working on a print project, I would know the dimensions from what I ve designed, and adjust the raw photo according to what final size I needed in my print piece. Image #1 illustrates the original image size. At 72 dpi it measures 3456x2304 pixels, or 48 x32. That s big 22.8 MB (megabytes) big. 1. Raw photo capture 72dpi, 48 x32 or 3456 pixel x 2304 pixels
.")
, then you can adjust the inch x inch size to whatever inch size needed, as long as you don t make it larger")


2 To resample or change the image size in image #2 you ll see at the top, under image, you select Image Size. This opens up the image dialog box shown in image #3. You can change the image to 300dpi (used for print). When you change 72dpi to 300 you would next enter into to the pixel size area the original capture which was 3456 (seen in image #1 in the Width: 3456 pixel box), then you can adjust the inch x inch size to whatever inch size needed, as long as you don t make it larger than the original image size. After doing this, and after importing the resampled image into your page layout application, you can enlarge this image up to 150% without losing quality. That is the standard rule as given to me by a printer a few years ago. For this example, I chose 6 x4. You would want to check constrain your proportions box as well. This keeps your proportions the same as in your orginal image, not distorting it. You ll see the image size is now reduced to 6.18 MB and originally it was 22.8 MB which was very large. 2. Change image size dialog box 3. Changed image to 300 dpi, 6 x 4


3 Image #4 shows the image > mode > color model box. This image shows the raw, resampled image as an RGB image which was discussed earlier. If using this image for print, you want to select CMYK just beneath RGB shown in image #5. Some people leave it in RGB mode to work on curves which is a matter of personal preference. There are also variants of adjusting curves (using the same curve box). If you Google adjusting photoshop curves on the internet you can find different approaches. Image #6 shows the steps to find the curve dialog box. Go to Image > Adjustments > Curves. This is the beginning of adjusting the curves, or adjusting the values in your image, and setting your light and dark values for print. 4. RGB Mode shown 5. Change to CMYK 6. Curve dialog box
. Each color plate is printed separately.")
4 Image #7 shows the base curve dialog box, showing CMYK mode towards the top of the box, just under Default. For your information: CMYK stands for cyan, magenta, yellow and black (k) used in printing. Each CMYK plate used in printing contains only dots of that particular color (Cyan for instance for C, Magenta for M, etc.). Each color plate is printed separately. Upon magnification you see only cyan dots, if it happens to be the cyan plate. The rest of the plates are printed separately on the paper. The dots appear in a rotated pattern, your eye seeing the dots combined, will then see the spectrum of colors we see. If you view a printed piece with a magnifying glass you will see these colors in that rosette pattern. Image #8 deals with setting the light point, or lightest area in the image. You select the eyedropper at the far right located near the bottom of the dialog box. It has a box around it after being selected, shown in this image. You would take the eyedropper and touch/click/select the lightest area in your photo. I chose the white paper in this case since of course it should be very light, almost white. 7. Base curve dialog box with unadjusted photo 8. Setting the light point
5 Image #9 deals with setting the dark point, or darkest area of the image. The step is the same as in #7, but in this case you select the dark eyedropper to the far left at the bottom of the curves dialog box. After clicking/setting the dark point, I then adjusted by touching/dragging the light setting point to the right a bit, in this case keeping the output at 4. This could have been 3, or even 0, if you want no color tone at all in the light area. The light point is near the output and input near the lower left part of the dialog box. There isn t any order mandate in adjusting your curve line dots/points. You could adjust the dark, light, or mid points in whatever order you want. Input and Output boxes will show when you start adjusting/dragging the light/dark set points. These show in the lower left part of the box in image #10. Input is the reading in the current photo, output is what you want the end percentage to be. As a side note... you ll notice in the dialog box too, the graph shapes in the background. This is called a histogram. You can also adjust contrast/lights/darks using this histogram. I don t use this technique but it is useful in seeing the levels of values within the photographic image. You can google histogram if you would like more information regarding that. Image #10 shows the photo after adjusting the curve to achieve the look you want. For printing, according to printers I ve worked with, the dark point should be set at 97%. The process is the same as adjusting the light point, you drag the dark upper right point to 97 output (seen in under the Output box, lower left, with the Input being 100 in the Input box, which of course stands for 100%. Setting the darks at 97% allows for a bit of what is called dot gain. If it were kept at 100% images would likely print too dark because of oversaturation of ink. That s the reason the curve is adjusted as well, to avoid the middle tones in an image from printing way too dark because of dot gain. If you see a dark image, it will print darker. I m sure we ve all seen this happen. Paper, and the quality thereof, is another variable in the printing process. If it is newsprint, or an absorbent type paper, you get the most dot gain. High quality magazine paper stock, or coated paper stock, will have less dot gain. 9. Setting the dark point after adjusting the light point 10. Final adjusted curve after setting dark point

.")
6 #11 deals with sharpening your image. If you feel it is out of focus or a bit too blurry you can adjust this by using Filter > Sharpen > Unsharp Mask. This will bring up a dialog box and you can adjust the sharpness by a little, to a lot. Sharpening an image too much can cause hard item edges within your photo and you should avoid doing that. 11. Sharpen Unsharp Mask if needed #12 shows the format options for saving your file in. If you are saving for print, you would want to save as a TIFF. To save for internet use you would want JPEG, or Photoshop PDf files (in RGB format, not CMYK as the image currently is in now). I generally use Photoshop format only if I m saving a layered file that I m still working on. Personally I don t use any of the other formats listed here. I ve just never encountered a need for using them 12. Save as Tiff Option for Print
 isn t that useful to me if I m searching in the future for an Oregon Compote on")


7 #13 is basically the same step at #12, but in this case you rename your file to what you want to call it for easy identification. I don t know about you, but IMG_3687 (the camera named file) isn t that useful to me if I m searching in the future for an Oregon Compote on my computer. #14 shows an extra option you can implement if you want to. There are just a few minor glare spots on this piece. You can retouch those out. I use a rubber stamp tool to do this. It is the fifth tool down on the left side of your Photoshop Tools seen in image #14. Some people use the healing tool, or you can even copy some near-by image area, paste that over the offending glare, and merge down if you want to approach it that way. I ve used mostly the rubber stamp and copy/paste tool while using Photoshop. 13. Final name and save as tiff 14. Retouching glare spots

8 #15 shows your final adjusted image. I hope this article helps you pick up some tips to use in your own photo editing programs. I think there should be similarities to Photoshop, but I m not familiar with all of the programs. My cell phone has editing tools on it for photographs. You can adjust contrast and value using it, as well as adjust color. Remember you can watch videos of this curve process on your computer by googling adjusting photoshop curves. 15. Final retouched image


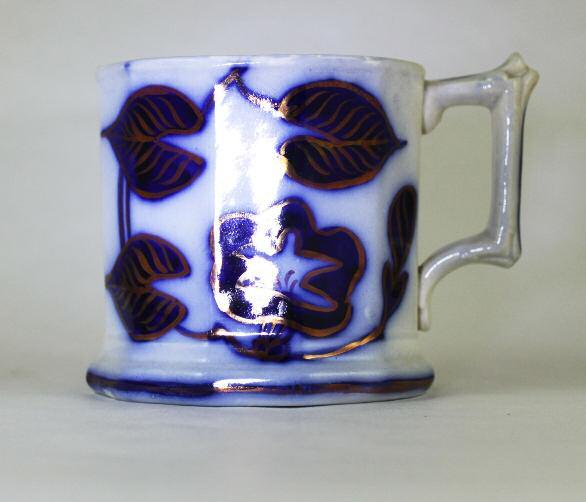
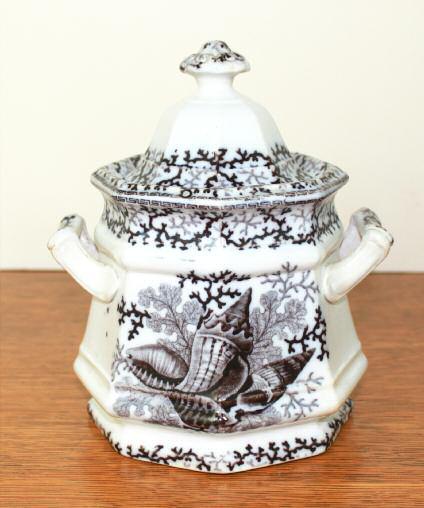
9 As an afterthought... I ve recently seen photos taken on a gradient background. I don t know if that background is commercially available or not, but it would be a nice alternative to use instead of a white background, such as what I use. Other colored backgrounds could be used as a variant too, depending on the flow blue or mulberry you are photographing. The Seaweed sugar bowl accompanying this article could have been shot on a gray background for an improved look. I ve left the background with a bit of tone in it for contrast between the sugar bowl and the background. Teapot spout outlined, copy/paste, reduced in size, rotated a bit and placed in a layered file. Color also adjusted to better match the mug. And for fun... Photoshop is also useful for creating RARITIES. You can make anything you want to impress your friends. We ve all seen what tabloids can create while we wait in supermarket lines. Attached is a very rare mug in the Morning Glory pattern. This piece was created using an Oregon teaspout and the base Morning Glory Mug. Because of competition for the Best Of The Best... I ve also created rare and very expensive rainbow colored glass using clear glass from my collection to impress glass collecting friends. My collection is growing. This rainbow bowl is huge in this image... but in reality it is only 7 inches in diameter. glass collector friends and dealers too, were envious. It is a short term joke of course, but I had fun doing it at the time. Color on spout adjusted a bit more to match mug better. Leaf copied, distorted and placed Pattern copied, flipped and placed


10 Curved Background no flash Curved Background no flash, with glare unadjusted Background Seam flash - harsh shadow Background Seam flash - harsh shadow


11 Curved Background No Flash Wood Background Flash Glare Curved Background Flash Hard Shadow Background Seam Flash - Harsh Shadow


12 Curved Background no flash Curved Background Flash - Harsh Shadow Background Seam Flash - Harsh Shadow Flash Background Seam


13 Curved Background No Flash Curved Background No flash with glare Background Seam Flash - Harsh Shadow Background Seam Flash Some Glare


14 Curved Background No Flash Background tone left for contrast Curved Background Flash Harsh Shadow Background Seam No Flash Background Seam Flash - Harsh Shadow


15 Curved Background No Flash Curved Background No Flash Background Seam Flash - Harsh Shadow Background Seam Flash - Harsh Shadow
Adobe Photoshop PS2, Part 3
 Adobe Photoshop PS2, Part 3 Basic Photo Corrections This guide steps you through the process of acquiring, resizing, and retouching a photo intended for posting on the Web as well as for a print layout.
PHOTOSHOP. pixel based image editing software (pixel=picture element) several small dots or pixels make up an image.
 several small dots or pixels make up an image.") Photoshop PHOTOSHOP pixel based image editing software (pixel=picture element) several small dots or pixels make up an image. RESOLUTION measurement of the total number of pixels displayed determines the
Photoshop PHOTOSHOP pixel based image editing software (pixel=picture element) several small dots or pixels make up an image. RESOLUTION measurement of the total number of pixels displayed determines the
CS 547 Digital Imaging Lecture 2
 CS 547 Digital Imaging Lecture 2 Basic Photo Corrections & Retouching and Repairing Selection Tools Rectangular marquee tool Use to select rectangular images Elliptical Marque Tool Use to select elliptical
Guidance on Using Scanning Software: Part 5. Epson Scan
 Guidance on Using Scanning Software: Part 5. Epson Scan Version of 4/29/2012 Epson Scan comes with Epson scanners and has simple manual adjustments, but requires vigilance to control the default settings
THE 3 BIGGEST MISTAKES TO AVOID WHEN USING GRAPHIC IMAGES IN PRINT
 THE 3 BIGGEST MISTAKES TO AVOID WHEN USING GRAPHIC IMAGES IN PRINT Nothing beats great color and crisp images in a printed marketing piece. But if you ve ever had a print job rejected for poor image resolution,
Digital Imaging - Photoshop
 Digital Imaging - Photoshop A digital image is a computer representation of a photograph. It is composed of a grid of tiny squares called pixels (picture elements). Each pixel has a position on the grid
Color and More. Color basics
 Color and More In this lesson, you'll evaluate an image in terms of its overall tonal range (lightness, darkness, and contrast), its overall balance of color, and its overall appearance for areas that
Learning Photo Retouching techniques the simple way
 Learning Photo Retouching techniques the simple way Table of Contents About the Workshop... i Workshop Objectives... i Getting Started... 1 Photoshop Workspace... 1 Setting up the Preferences... 2 Retouching
Preparing Images For Print
 Preparing Images For Print The aim of this tutorial is to offer various methods in preparing your photographs for printing. Sometimes the processing a printer does is not as good as Adobe Photoshop, so
Capturing and Editing Digital Images *
 Digital Media The material in this handout is excerpted from Digital Media Curriculum Primer a work written by Dr. Yue-Ling Wong (ylwong@wfu.edu), Department of Computer Science and Department of Art,
Digital imaging requirements for offset print
 Printing Services Vol. 11, No. 5 Digital Imaging for Print Media October 2005 Figure 1. A very low resolution digital image where each pixel is visible. Digital imaging requirements for offset print media
Making Digital POSiTiVES & Negatives for Contact Printing Sandra C. Davis
 Making Digital POSiTiVES & Negatives for Contact Printing 2005-13 Sandra C. Davis Suggested reading: Making Digital Negatives for Contact Printing by Dan Burkholder, Twin Palms Press, and The Inkjet Negative
Extended Studies - Intro to Adobe Photoshop
 Working with Curves Curves are the Swiss Army knife of Photoshop. They re great for adjusting both the contrast and color balance of an image in one window. They can lighten and darken areas without selections
By Washan Najat Nawi
 By Washan Najat Nawi how to get started how to use the interface how to modify images with basic editing skills Adobe Photoshop: is a popular image-editing software. Two general usage of Photoshop Creating
GETTING STARTED. 0 P a g e B a s i c s o f A d o b e P h o t o s h o p A g a P r i v a t e I n s t i t u t e f o r c o m p u t e r s c i e n c e
 GETTING STARTED 0 P a g e B a s i c s o f A d o b e P h o t o s h o p Adobe Photoshop: is a popular image editing software that provides a work environment consistent with Adobe Illustrator, Adobe InDesign,
2 BASiC PHOTO COrrECTiOnS lesson overview
 2 basic photo corrections Lesson overview In this lesson, you ll learn how to do the following: Understand image resolution and size. Straighten and crop an image. Adjust the tonal range of an image. Remove
A quick overview of the basics of my workflow in. Those gaps in Photoshop s Histogram indicate missing information.
 Another Photoshop tutorial by Bruce Philpott Copyright 2007 Bruce Philpott A quick overview of the basics of my workflow in Adobe Camera Raw This short tutorial certainly won t cover everything about Adobe
printing An designer s guide to newsprint printing
 7 Toptips printing An designer s guide to newsprint printing The Meeting Place of Intelligent Business Introduction Our aim in producing this guide is to help you modify your files to meet our paper and
WORKING WITH COLOR Monitor Placement Place the monitor at roughly right angles to a window. Place the monitor at least several feet from any window
 WORKING WITH COLOR In order to work consistently with color printing, you need to calibrate both your monitor and your printer. The basic steps for doing so are listed below. This is really a minimum approach;
Mullingar Camera Club Basic introduction to Digital Printing using Photoshop CC.
 Mullingar Camera Club Basic introduction to Digital Printing using Photoshop CC. Table of Contents Course aims: 1 Course presentation notes: 1 Introducing Photoshop: 1 Adjusting the Brightness or Contrast
Extreme Makeovers: Photoshop Retouching Techniques
 Extreme Makeovers: Table of Contents About the Workshop... 1 Workshop Objectives... 1 Getting Started... 1 Photoshop Workspace... 1 Retouching Tools... 2 General Steps... 2 Resolution and image size...
Adobe Photoshop. Levels
 How to correct color Once you ve opened an image in Photoshop, you may want to adjust color quality or light levels, convert it to black and white, or correct color or lens distortions. This can improve
Photoshop Domain 2: Identifying Design Elements When Preparing Images
 Photoshop Domain 2: Identifying Design Elements When Preparing Images Adobe Creative Suite 5 ACA Certification Preparation: Featuring Dreamweaver, Flash, and Photoshop 1 Objectives Demonstrate knowledge
The Camera Club. David Champion January 2011
 The Camera Club B&W Negative Proccesing After Scanning. David Champion January 2011 That s how to scan a negative, now I will explain how to process the image using Photoshop CS5. To achieve a good scan
4/23/12. Improving Your Digital Photographs + ABOUT ME. + CHANGES in PHOTOGRAPHY. CAMERA and DARKROOM Pro? Cons? DIGITAL PHOTOS Pro? Con?
 Improving Your Digital Photographs Dana Baumgart Marketing Consultant UW Oshkosh Adjunct Faculty ABOUT ME 1997-2001 Attended UWO 2003-2004 Attended Marian College 2001-2003 Marketing Coordinator 2003-2007
SAQA. How to Submit an Online Entry. Art by Mary Kay Fosnacht
 SAQA KS MO OK How to Submit an Online Entry Art by Mary Kay Fosnacht Registration Process Locate and read the Prospectus Open the Registration Form Preview 1. About the Artist 2. About the Art 3. Upload
ADOBE PHOTOSHOP CS 3 QUICK REFERENCE
 ADOBE PHOTOSHOP CS 3 QUICK REFERENCE INTRODUCTION Adobe PhotoShop CS 3 is a powerful software environment for editing, manipulating and creating images and other graphics. This reference guide provides
printing A guide to newsprint printing
 A guide to newsprint A guide to newsprint Introduction Our aim in producing this guide is to help you modify your files to meet our paper and requirements, so you can receive the best print result possible.
Adobe Photoshop CS5 Tutorial
 Adobe Photoshop CS5 Tutorial GETTING STARTED Adobe Photoshop CS5 is a popular image editing software that provides a work environment consistent with Adobe Illustrator, Adobe InDesign, Adobe Photoshop
Printing on the Epson You should save a second.psd or tiff version of your image for printing
 Printing on the Epson 9600 Preparing your image to print You should save a second.psd or tiff version of your image for printing Resizing To observe the image size and resolution of an existing file, you
Photoshop: Manipulating Photos
 Photoshop: Manipulating Photos All Labs must be uploaded to the University s web server and permissions set properly. In this lab we will be manipulating photos using a very small subset of all of Photoshop
Making a Printable Business Card Using Pixelmator
 Page 1 of 8 In this project, I will demonstrate for you how to design a simple business card in Pixelmator that will be ready for print. Step 1 Creating a New Document Things sent to commercial printers
Image Smoothing. Controlling printed output. Printing. Using color. Paper handling. Maintenance. Troubleshooting. Administration.
 Your printer driver provides you with the best quality output for various types of printing needs. However, you may want more control over how your printed document will look. 1 Your printer default is
Chapter 11. Preparing a Document for Prepress and Printing Delmar, Cengage Learning
 Chapter 11 Preparing a Document for Prepress and Printing 2011 Delmar, Cengage Learning Objectives Explore color theory and resolution issues Work in CMYK mode Specify spot colors Create crop marks Create
Color Correction with Curves
 Lecture 02 wk 07 with Curves Channels o Photoshop uses Channels to provide access to the different color components of an image. o In most cases, an image is composed of one or more 8-bit channels. o Channels
ADOBE PHOTOSHOP CS TUTORIAL
 ADOBE PHOTOSHOP CS TUTORIAL A D O B E P H O T O S H O P C S Adobe Photoshop CS is a popular image editing software that provides a work environment consistent with Adobe Illustrator, Adobe InDesign, Adobe
Adobe Ph3shop. Tips & Tricks... General Preferences. Color Settings in Photoshop. with Kevin Slimp
 Adobe Ph3shop Tips & Tricks... with Kevin Slimp General Preferences Let s take a look at a few of the general preferences. Color Settings in Photoshop 85 255 Change your settings to look like these in
PHOTO 11: INTRODUCTION TO DIGITAL IMAGING
 1 PHOTO 11: INTRODUCTION TO DIGITAL IMAGING Instructor: Sue Leith, sleith@csus.edu EXAM REVIEW Computer Components: Hardware - the term used to describe computer equipment -- hard drives, printers, scanners.
15 Photoshop Tips. Changing Photoshop rulers from inches to picas
 5 Photoshop Tips Changing Photoshop rulers from inches to picas What s the difference between inches and picas? a 6x inch RGB JPEG file is.9 MB a 6x pica RGB JPEG file is. MB a 6x inch RGB TIFF file is.
Orientation (Rotate Canvas)
") Most Common Problems Intro to PhotoShop Common Tips and Tricks James Falkofske UW-Rock County Orientation Exposure Color Balance Incorrect Cropping Incorrect Image Size Blemishes or Distracting Backgrounds
Most Common Problems Intro to PhotoShop Common Tips and Tricks James Falkofske UW-Rock County Orientation Exposure Color Balance Incorrect Cropping Incorrect Image Size Blemishes or Distracting Backgrounds
In order to manage and correct color photos, you need to understand a few
 In This Chapter 1 Understanding Color Getting the essentials of managing color Speaking the language of color Mixing three hues into millions of colors Choosing the right color mode for your image Switching
What is real? What is art?
 HDCC208N Fall 2018 We ll fix it in post The Digital Darkroom What is real? What is art? We have been discussing this pair of questions at various points this semester, with drawings, paintings, the camera
Chapter 4. Incorporating Color Techniques
 Chapter 4 Incorporating Color Techniques Color Modes Photoshop displays and prints images using specific color modes A mode is the amount of color data that can be stored in a given file format 2 Color
Using Photoshop for Color Demonstration
 (Submitted to the 1997 IGAEA Visual Communication Journal) Using Photoshop for Color Demonstration Bob Chung, RIT Abstract Photoshop features, such as layers and channels, are used to demonstrate how concepts
Color theory Quick guide for graphic artists
 Quick guide for graphic artists We can talk about color using two kinds of terminology: Color generation systems. Color harmony system. Graphic artists and photographers certainly have to understand color
Photoshop: Manipulating Photos
 Photoshop: Manipulating Photos All Labs must be uploaded to the University s web server and permissions set properly. In this lab we will be manipulating photos using a very small subset of all of Photoshop
Introduction to Color Theory
 Introduction to Color Theory This overview will give you an essential primer on the definition of color, from its origins to current day definitions. It provides a deeper understanding of the printing
USB Scanner USER GUIDE
 USB Scanner USER GUIDE The TWAIN Dialog Box Appendices 2 Copyright Information All rights reserved. No part of this publication may be reproduced, transmitted, stored in a retrieval system, or translated
Digital Files File Format Storage Color Temperature
 Digital Files Digital Files File Format Storage Color Temperature PIXELS Pixel = picture element - smallest component of a digital image - MEGAPIXEL 1 million pixels = MEGAPIXEL PIXELS more pixels per
Photoshop Elements Hints by Steve Miller
 2015 Elements 13 A brief tutorial for basic photo file processing To begin, click on the Elements 13 icon, click on Photo Editor in the first box that appears. We will not be discussing the Organizer portion
FILE ASSEMBLY GUIDE. ~ File Assembly Guidelines ~
 To reduce your costs in prepress and turn-around time for proofs, Standard Printing Company recommends using the following information as a guide for correct file assembly: Acceptable File Formats QuarkXpress
MassArt Studio Foundation: Visual Language Digital Media Cookbook, Fall 2013
 21 / TONAL SCALE 1 In this section we ll be exploring tonal scale and how to adjust it using Photoshop to address common problems such as blown out highlights, murky images lacking contrast or a colorcast
Applying mathematics to digital image processing using a spreadsheet
 Jeff Waldock Applying mathematics to digital image processing using a spreadsheet Jeff Waldock Department of Engineering and Mathematics Sheffield Hallam University j.waldock@shu.ac.uk Introduction When
HISTOGRAMS. These notes are a basic introduction to using histograms to guide image capture and image processing.
 HISTOGRAMS Roy Killen, APSEM, EFIAP, GMPSA These notes are a basic introduction to using histograms to guide image capture and image processing. What are histograms? Histograms are graphs that show what
Using Adobe Photoshop
 Using Adobe Photoshop 4 Colour is important in most art forms. For example, a painter needs to know how to select and mix colours to produce the right tones in a picture. A Photographer needs to understand
PixaGraphic. PixaGraphic. transforms glass into a creative medium without limitation. Colour matching. Overview
 DESIGN GUIDELINES PixaGraphic Overview Viridian PixaGraphic is a state of the art decorative glass product, manufactured using ceramic coated ink which is printed directly onto the glass. The PixaGraphic
Photoshop Elements Week 1 - Photoshop Elements Work Environment
 Menu Bar Just like any computer program, you have several dropdown menus to work with. Explore them all! But, most importantly remember to SAVE! Photoshop Elements Toolbox (with keyboard shortcut) Photoshop
Photoshop CC: Essentials
 Photoshop CC: Essentials Summary Workspace Overview... 2 Exercise Files... 2 Selection Tools... 3 Select All, Deselect, And Reselect... 3 Adding, Subtracting, and Intersecting... 3 Working with Layers...
Adobe Photoshop CC 2018 Tutorial
 Adobe Photoshop CC 2018 Tutorial GETTING STARTED Adobe Photoshop CC 2018 is a popular image editing software that provides a work environment consistent with Adobe Illustrator, Adobe InDesign, Adobe Photoshop,
Contents. Introduction
 Contents Introduction 1. Overview 1-1. Glossary 8 1-2. Menus 11 File Menu 11 Edit Menu 15 Image Menu 19 Layer Menu 20 Select Menu 23 Filter Menu 25 View Menu 26 Window Menu 27 1-3. Tool Bar 28 Selection
Resizing Images in Photoshop
 Resizing Images in Photoshop Dr Roy Killen, EFIAP, GMPSA, GMAPS, APSEM (c) 2017 Roy Killen Resizing images v4.0 1 Resizing Images in Photoshop CC Roy Killen, EFIAP, GMPSA, GMAPS, APSEM These notes assume
Photoshop CC Editing Images
 Photoshop CC Editing Images Rotate a Canvas A canvas can be rotated 90 degrees Clockwise, 90 degrees Counter Clockwise, or rotated 180 degrees. Navigate to the Image Menu, select Image Rotation and then
Introduction THE FIRST
 Introduction Whether you are a new to the world of digital photography or have already got your feet wet, this guide will show you the many features of Photoshop. Although this guide was specifically geared
Basic Scanning in Adobe Photoshop
 Basic Scanning in Adobe Photoshop 1996 2004 solutions solutions provides comprehensive training on design and prepress applications to graphic professionals and multimedia developers utilizing primarily
Correction Techniques
 10 Advanced Color Correction Techniques Learning Objectives After completing this chapter, you will be able to: Explain how a computer monitor displays color. Describe how color is created in the printing
Resizing images for the web using. Version 1.3. WrightWay. Design.
 Resizing images for the web using Version 1.3 WrightWay Design www.wrightwaydesign.com.au Why would we need to re-size our images? Images taken with digital cameras are captured at very high levels of
Contents: Bibliography:
 ( 2 ) Contents: Sizing an Image...4 RAW File Conversion...4 Selection Tools...5 Colour Range...5 Quick Mask...6 Extract Tool...7 Adding a Layer Style...7 Adjustment Layer...8 Adding a gradient to an Adjustment
Editing your digital images:
 Editing your digital images: 1 By Garry Sankowsky zodpub@rainforestmagic.com.au All images taken with a digital camera need to be edited. You will usually get software with your camera that can do at least
Movie 7. Merge to HDR Pro
 Movie 7 Merge to HDR Pro 1 Merge to HDR Pro When shooting photographs with the intention of using Merge to HDR Pro to merge them I suggest you choose an easy subject to shoot first and follow the advice
Alpha channels are basically saved selections. They do not affect how your image will be printed.
 Ben Willmore s Banish the fog of techno-babble with Ben s plain-english translations of the high-tech terminology behind Photoshop! For more Freebies and Goodies, go to: DigitalMastery.com 30-bit Alpha
A Basic Guide to Photoshop CS Adjustment Layers
 A Basic Guide to Photoshop CS Adjustment Layers Alvaro Guzman Photoshop CS4 has a new Panel named Adjustments, based on the Adjustment Layers of previous versions. These adjustments can be used for non-destructive
Photoshop Techniques Digital Enhancement
 Photoshop Techniques Digital Enhancement A tremendous range of enhancement techniques are available to anyone shooting astrophotographs if they have access to a computer and can digitize their images.
Black and White Photoshop Conversion Techniques
 Black and White Photoshop Conversion Techniques Andrew Gibson on Jan 27th 2011 Final Product What You'll Be Creating A quick glance through any photography or fashion magazine, or at the photos on social
This PDF file is best viewed at actual size (Command-H on the Mac; Control-H on the PC) to maximize the clarity of photos and screenshots.
 to maximize the clarity of photos and screenshots.") BLACK & WHITE CORRECTIONS IN PHOTOSHOP This PDF file is best viewed at actual size (Command-H on the Mac; Control-H on the PC) to maximize the clarity of photos and screenshots. INITIAL SCANS: Resolution
BLACK & WHITE CORRECTIONS IN PHOTOSHOP This PDF file is best viewed at actual size (Command-H on the Mac; Control-H on the PC) to maximize the clarity of photos and screenshots. INITIAL SCANS: Resolution
Coreldraw Crash Course
 Coreldraw Crash Course Yannick Kremer Vrije Universiteit Amsterdam, February 27, 2007 Outline - Introduction to the basics of digital imaging - Bitmaps - Vectors - Colour: RGB vs CMYK - What can you do
It makes sense to read this section first if new to Silkypix... How to Handle SILKYPIX Perfectly Silkypix Pro PDF Contents Page Index
 It makes sense to read this section first if new to Silkypix... How to Handle SILKYPIX Perfectly...145 Silkypix Pro PDF Contents Page Index 0. 0.Overview and Introduction...9 0.1. Section Names...9 0.1.1.
Essential Post Processing
 Essential Post Processing By Ian Cran Preamble Getting to grips with Photoshop and Lightroom could be described in three stages. One is always learning and going through stages but there are three main
SCANNING GUIDELINES Peter Thompson (rev. 9/21/02) OVERVIEW
 OVERVIEW") SCANNING GUIDELINES Peter Thompson (rev. 9/21/02) OVERVIEW WHAT S A SCANNER? A machine that lets you input an image into your and save it as a digital file to be enhanced or altered by image editing software
SCANNING GUIDELINES Peter Thompson (rev. 9/21/02) OVERVIEW WHAT S A SCANNER? A machine that lets you input an image into your and save it as a digital file to be enhanced or altered by image editing software
Painting Special Effects on Photographs
 TUTORIAL 7 Painting Special Effects on Photographs In this tutorial you will learn how to transform a photo into a striking color composition with paintbrushes, masks, blending modes, color, and paper
Adding Dimension to Your Monochrome Images
 Adding Dimension to Your Monochrome Images Printing Duotones, Tritones, and Quadtones 2004, Glenn E. Mitchell II, Ph.D. of The Light s Right Studio, http://www.thelightsrightstudio.com Computer programs,
MY ASTROPHOTOGRAPHY WORKFLOW Scott J. Davis June 21, 2012
 Table of Contents Image Acquisition Types 2 Image Acquisition Exposure 3 Image Acquisition Some Extra Notes 4 Stacking Setup 5 Stacking 7 Preparing for Post Processing 8 Preparing your Photoshop File 9
One Week to Better Photography
 One Week to Better Photography Glossary Adobe Bridge Useful application packaged with Adobe Photoshop that previews, organizes and renames digital image files and creates digital contact sheets Adobe Photoshop
The student will: download an image from the Internet; and use Photoshop to straighten, crop, enhance, and resize a digital image.
 Basic Photoshop Overview: Photoshop is one of the most common computer programs used to work with digital images. In this lesson, students use Photoshop to enhance a photo of Brevig Mission School, so
PHOTOTUTOR.com.au Share the Knowledge
 THE DIGITAL WORKFLOW BY MICHAEL SMYTH This tutorial is designed to outline the necessary steps from digital capture, image editing and creating a final print. FIRSTLY, BE AWARE OF WHAT CAN AND CAN T BE
Understanding Color Theory Excerpt from Fundamental Photoshop by Adele Droblas Greenberg and Seth Greenberg
 Understanding Color Theory Excerpt from Fundamental Photoshop by Adele Droblas Greenberg and Seth Greenberg Color evokes a mood; it creates contrast and enhances the beauty in an image. It can make a dull
Kent Messamore 3/6/2010
 Post Processing Kent Messamore 3/6/2010 What we will cover Post Processing Photoshop, Lightroom, Elements, and others JPEG or RAW Photoshop Elements Workflow Organization, Create, share Photoshop Elements
IMAGING WEB GRAPHICS IN PHOTOSHOP
 IMAGING WEB GRAPHICS IN PHOTOSHOP Steve Heriot Department of Technological Studies Bemidji State University Bemidji, Minnesota 56601 sheriot@bemidjistate.edu A Need for a Simple Imaging Tutorial In the
STANDARDS? We don t need no stinkin standards! David Ski Witzke Vice President, Program Management FORAY Technologies
 STANDARDS? We don t need no stinkin standards! David Ski Witzke Vice President, Program Management FORAY Technologies www.foray.com 1.888.849.6688 2005, FORAY Technologies. All rights reserved. What s
Retouching Portraits in Photoshop
 Retouching Portraits in Photoshop I Removing Blemishes When removing blemishes, acne or other imperfections on the skin, our goal is to maintain as much of the original skin texture as possible. That way,
Converting and editing raw images
 Converting and editing raw images Raw v jpeg As we have found out, jpeg files are processed in the camera and much of the data is lost. Raw files are not. Raw file formats: General term for a variety of
CONVERTING AND EDITING RAW IMAGES
 CONVERTING AND EDITING RAW IMAGES RAW V JPEG As we have found out, jpeg files are processed in the camera and much of the data is lost. Raw files are not and so all of the data is preserved. RAW FILE FORMATS:
Lab for Working with Adobe Photoshop
 Lab for Working with Adobe Photoshop Try the tasks listed with one of the sample images supplied (You will find them in the Course Materials section of Blackboard as the file sample_images.zip. You will
Pacific New Media David Ulrich
 Pacific New Media David Ulrich pacimage@maui.net www.creativeguide.com 808.721.2862 Digital Imaging Workflow in Adobe Photoshop All color and tonal correction editing should be done in a non-destructive
Vector VS Pixels Introduction to Adobe Photoshop
 MMA 100 Foundations of Digital Graphic Design Vector VS Pixels Introduction to Adobe Photoshop Clare Ultimo Using the right software for the right job... Which program is best for what??? Photoshop Illustrator
18 1 Printing Techniques. 1.1 Basic Printing Techniques
 Printing Techniques 1 There are various methods of printing your own photographs. We only address one method in detail printing using inkjet printers. In this chapter, we take a glance at different printing
design guide for print
 design guide for print edited by august 2015 CONTENTS resolution bleed/ trim/ safety size colour using black fonts format additional guidelines introduction UNIPRINT is a print shop, part of the creative
Genuine Fractals 4.1 Evaluation Guide
 Genuine Fractals 4.1 Evaluation Guide Table of Contents Contents Introducing Genuine Fractals 4.1... 3 Introduction to Image Resampling... 3 Interpolation Methods Available in Photoshop... 3 Image Scaling
Laser Photo Engraving By Kathryn Arnold
 Laser Photo Engraving By Kathryn Arnold --This article includes a link to watch the video version! Learn online courtesy of LaserUniversity! -- Society is now in the digital age and so too must the world
IMAGE SIZING AND RESOLUTION. MyGraphicsLab: Adobe Photoshop CS6 ACA Certification Preparation for Visual Communication
 IMAGE SIZING AND RESOLUTION MyGraphicsLab: Adobe Photoshop CS6 ACA Certification Preparation for Visual Communication Copyright 2013 MyGraphicsLab / Pearson Education OBJECTIVES This presentation covers
Title goes Shadows and here Highlights
 Shadows Title goes and Highlights here The new Shadows and Highlights command in Photoshop CS (8) is a great new tool that will allow you to adjust the shadow areas of an image while leaving the highlights