Holz-Her Sliding Table Saw Kit Installation Instructions: For 1243 Cross-Cut Kits 2 DRO Retrofit
|
|
|
- Gyles Daniels
- 6 years ago
- Views:
Transcription
1 Holz-Her Sliding Table Saw Kit Installation Instructions: For 1243 Cross-Cut Kits 2 DRO Retrofit Please note this installation kit is designed solely for installation on Holz-Her Sliding Panel Saws, Model Accurate Technology manufactures kits for other sliding table saws in which some or all of the components may be different. For more information about ProKits feel free to contact Accurate Technology. Warranty Accurate Technology, Inc., warrants ProKit systems against defective parts and workmanship for one year, commencing from the date of original purchase. Upon notification of a defect, Accurate Technology, Inc. shall have the option to repair or replace any defective part. Such services shall be the customer's sole and exclusive remedy. Expenses incidental to repair, maintenance, or replacement under warranty, including those for labor and material, shall be borne by Accurate Technology, Inc. Except as expressly provided in this warranty, Accurate Technology, Inc., does not make any warranties with respect to the product, either expressed or implied, including implied warranties of merchantability or fitness for a particular purpose, except as expressly provided in this agreement. Accurate Technology, Inc., shall not be liable for any special, incidental, or consequential damages or for loss, damage or expense directly or indirectly arising from the customer's use of or inability to use the equipment either separately or in combination with other equipment, or for personal injury or loss or destruction of other property, or from any other cause. Tools Required Drill Motor Center punch Drill and tap for machine screw Drill and tap for 8-32 machine screw Tap Handle Phillips screw driver SAE Hex wrench set READ ALL INSTRUCTIONS BEFORE BEGINNING INSTALLATION! Some of the parts for this installation kit may have been pre-assembled for your convenience by Accurate Technology.

 Readout")

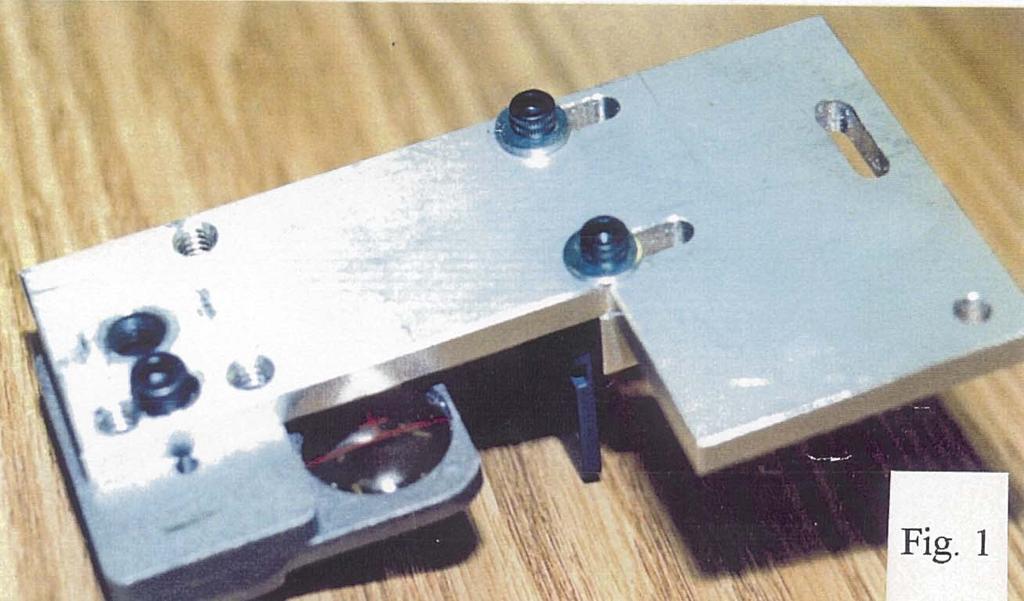
2 Guide Clip Encoder/Readhead (cable not shown) Readout Hinge General Purpose Readout Digital Scale
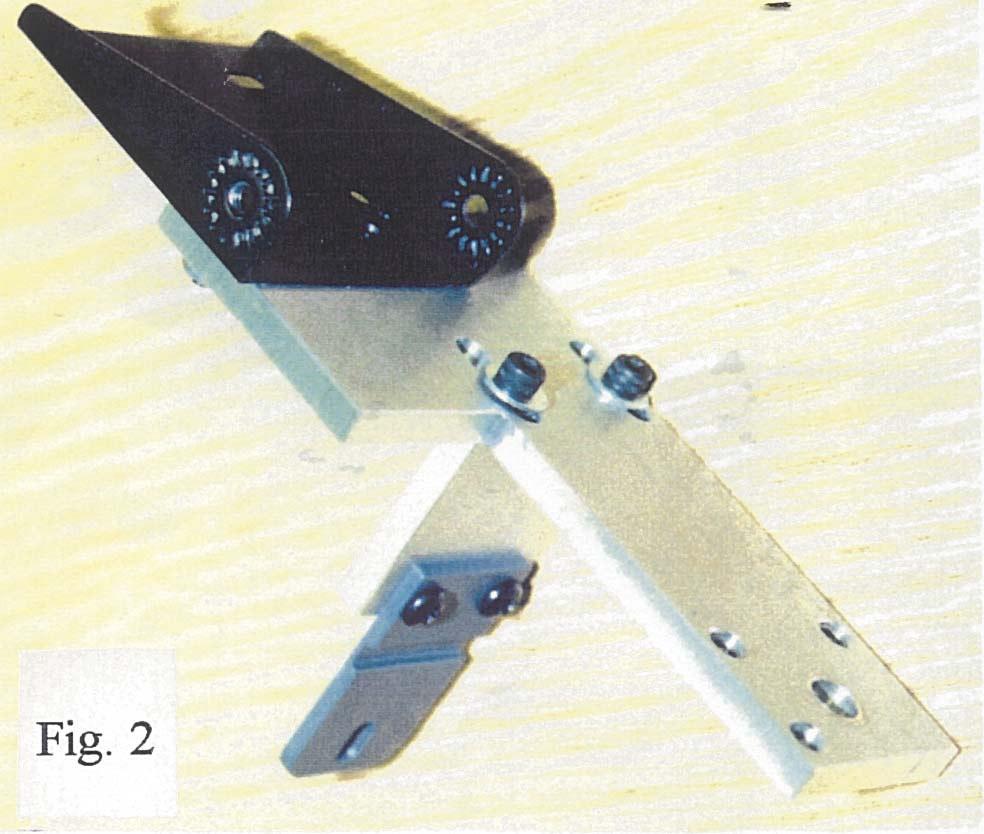
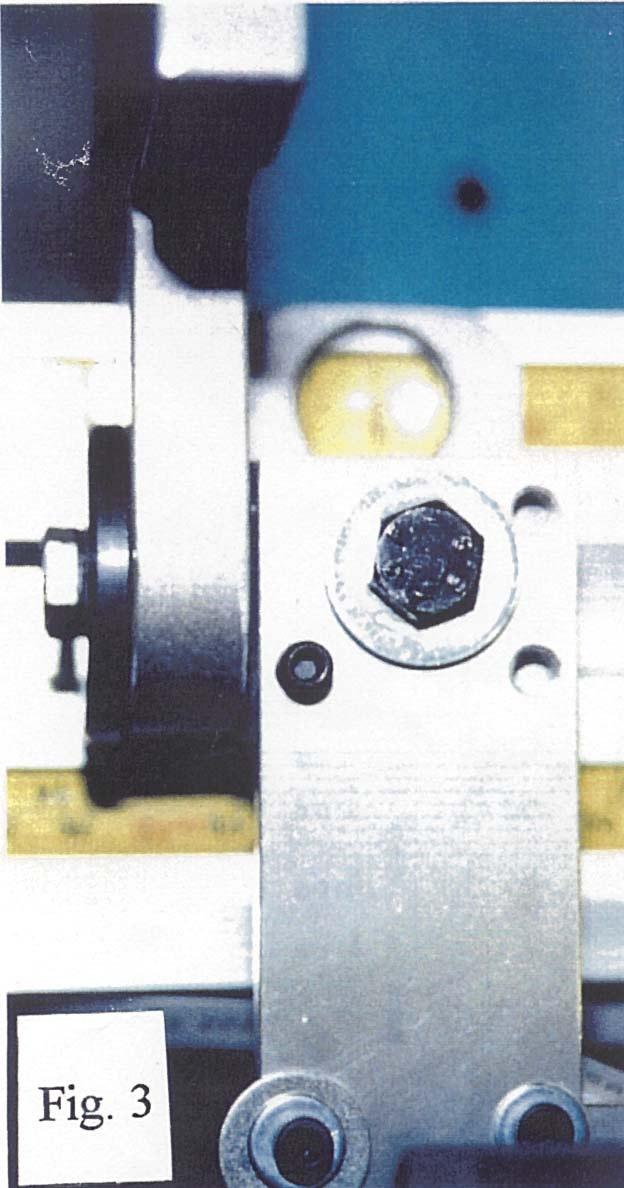
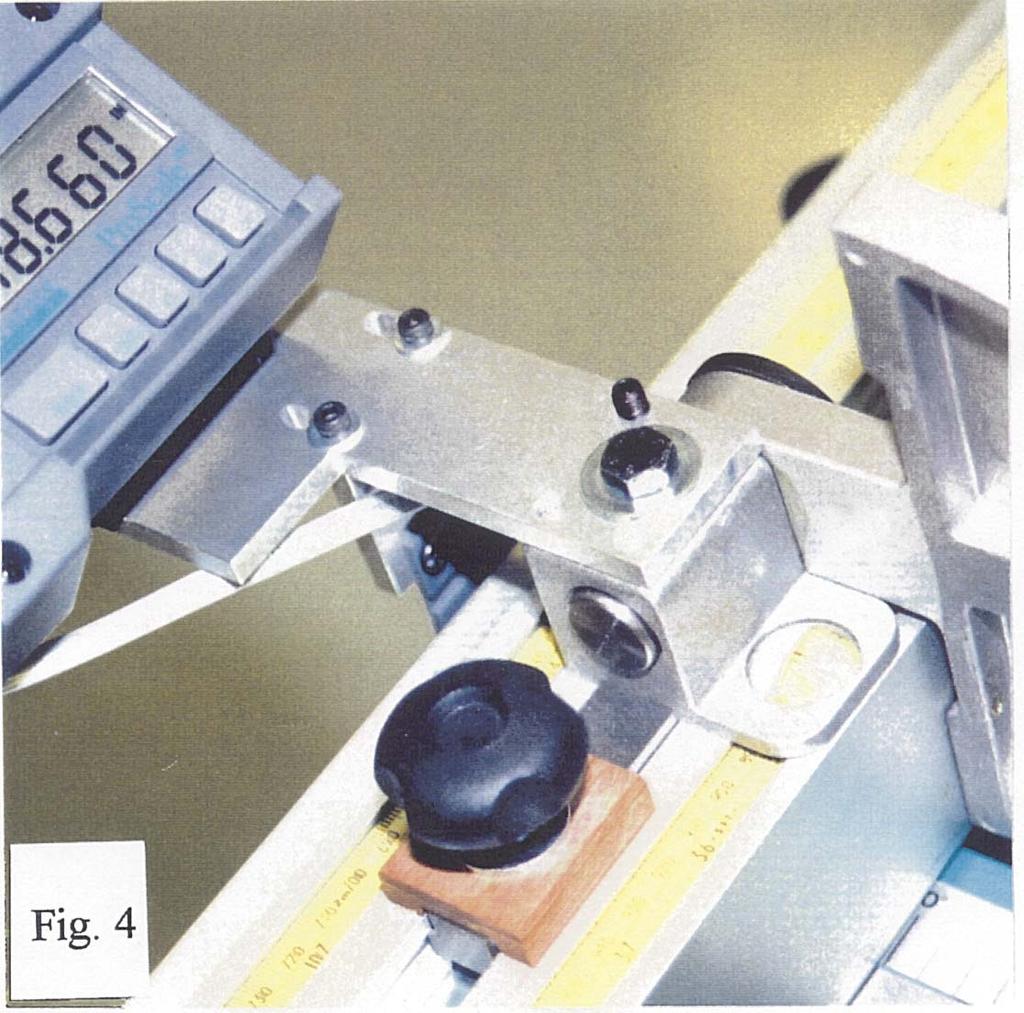
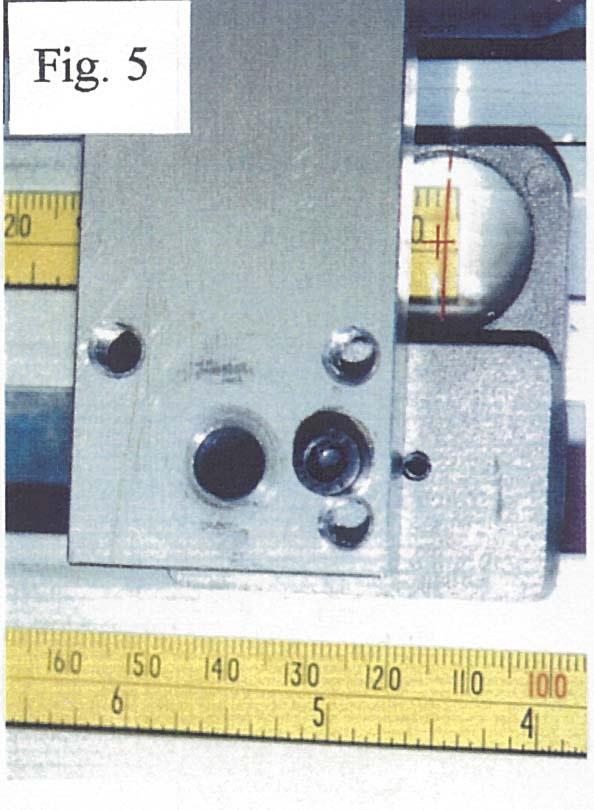
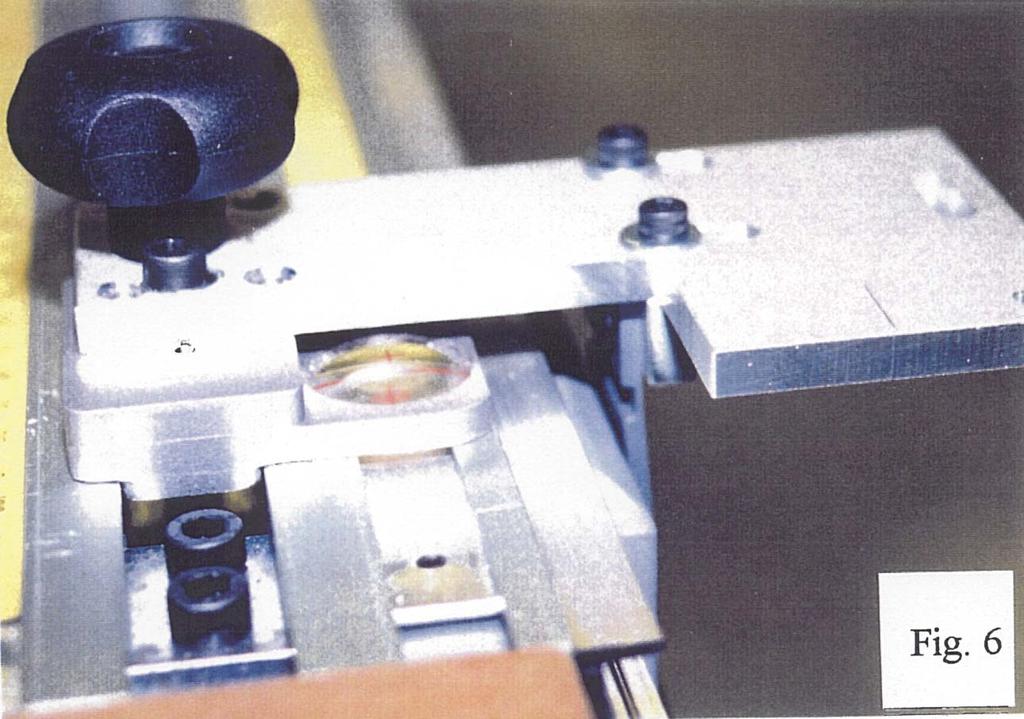
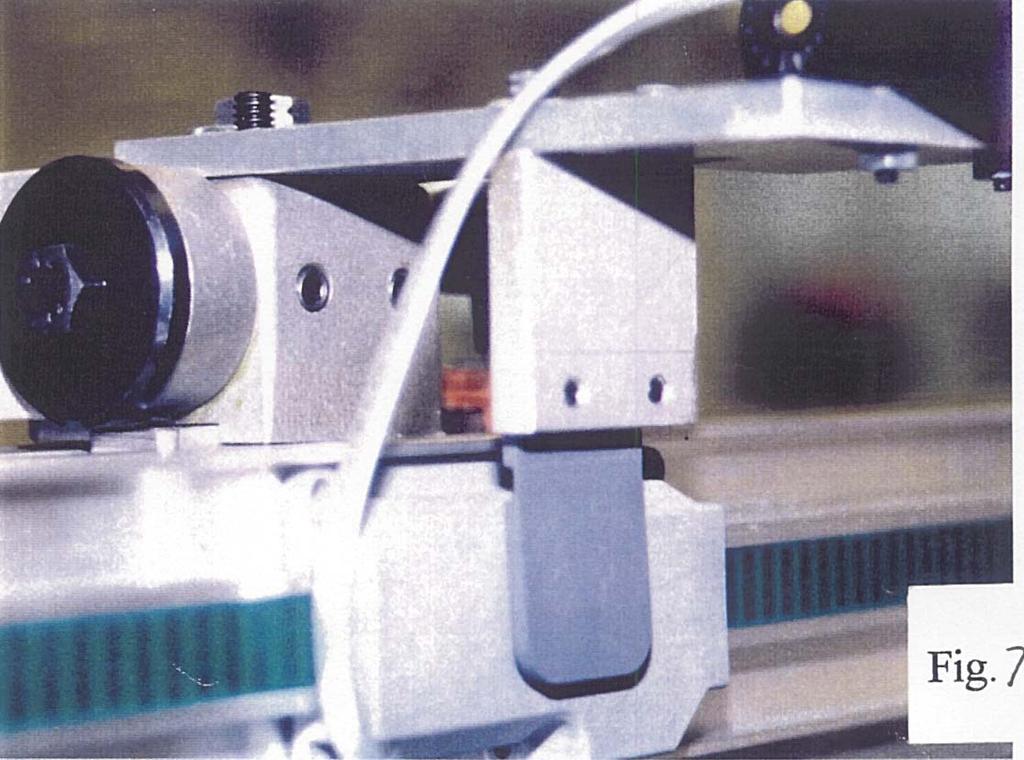
3 Getting Started: Be sure to keep the parts for the rip and cross-cut retrofits separated if you have purchased both. Installation: 1. Place strips of the foam tape across the back of the digital scale. Position the digital scale so that the top of the scale is even with the top of the fence. Press in place. See figures 3, 6, and 7 for more detail. (Alternatively, the scale may be bolted in place using the 8-32 flathead screws that have been provided.) 2. Assemble one half of each readout hinge to the 1243 Cross-Cut brackets using the screws and nuts as shown in figure Attach the guide clip to the 1243 clip bracket using the 8-32 x 3/8 screws as shown in figure 2. Attach the second guide clip to the 1243 extension clip bracket using the 8-32 x 3/8 screws as shown in figure Mount the 1243 crosscut bracket under the bolt at the main stop as shown in figures 4 and 5. Insert the ¼-20 cup point set screws and tighten gently (these prevent the bracket from twisting under the bolt). Place the other 1243 Cross-cut bracket on the extension stop in the location shown in figure 5. Mark the location of the non-threaded hole. Drill and tap this hole to Install the crosscut bracket using the x 5/8 socket head screw. 5. Slide the encoders onto the scale such that their cables exit towards the floor. 6. Attach the clip mount bracket to the crosscut bracket using the two 8-32 x 5/8 socket head screws and washers. Place a ¼ flat washer under the screw closest to the flip stop to act as a bumper to protect the digital scale. Position the clip mount bracket so the guide clip flexes slightly when engaging the post on the encoder. Reference the sketch to the right and figures 2, 4, 7. Readhead Model 250 Scale 33.0mm (1.3") Guide Clip 21.2mm (.83") 7. Attach the extension clip mount bracket to the crosscut bracket using two 8-32 x 5/8 socket head screws and washers. Position the extension clip mount bracket so the guide clip flexes slightly when it engages the post on the encoder. Refer to the sketch above and figures 1 and Verify that the guide clips engage the encoders properly over the full range of stop travel. Make any necessary adjustments. 9. Attach the other half of the readout hinge to the digital readouts using the 4-40 self-tapping screws. Install the readouts onto the stops.
4 10. Drill and tap ¼-20 holes into both flip stops as shown in the sketch to the right. Install the nylon screws (these act as bumpers to keep the flip stops from damaging the scale extrusion). 11. Move each stop away from the blade. If the displayed value gets smaller, reverse the orientation of the encoder on the scale (so the wires exit up), OR change the reading direction parameter inside the digital readout (refer to the Operation Manual for additional information about programming). Calibration of the Digital Readouts: 1. Check that both readouts are in ABS mode (ABS will be showing in the upper left corner of the display). If either readout is in INC mode, press and hold the ABS/INC key for 3-4 seconds to change it back to ABS mode. 2. Be sure the readouts are not locked (LOCK should NOT be showing in the upper left corner). If either of the readouts are in LOCK mode: a. Press and hold the ON/OFF key. b. Momentarily press the UNITS key. c. Release the ON/OFF key. 3. Lock each stop in place. Cut a piece of scrap material at each stop and measure the cut parts with the best measuring tool available. Record the measurements. 4. Enter the measurements into the readouts, using the PLUS and MINUS keys. (NOTE: When the PLUS or MINUS key is held down, the readings will change slowly at first, and then speed up.) 5. On each readout: a. Press and hold the ON/OFF key. b. Momentarily press the UNITS key. c. Release the ON/OFF key. The keyboard is now locked. It can be unlocked by repeating this procedure. LOCK should appear in the upper left corner of the display. 6. The above calibration procedure should be repeated each time a saw blade is changed and after the batteries are changed. HINT: Record the reading before changing batteries to expedite the recalibration procedure.
5 Kerf compensation for repetitive cuts: The digital readout can also be programmed to automatically compensate for the blade kerf when making repetitive cuts. This is done by programming the blade kerf into the ABS/INC key. This feature is useful when one or more strips are to be cut to a desired dimension. Programming: 1. Determine the blade kerf. 2. Lock the stop in position. The ABS indicator should be displayed in the upper left corner. 3. Momentarily press the ABS/INC key. The ABS indicator will turn off, and the INC indicator will turn on. 4. Enter the blade kerf using the PLUS key. 5. Momentarily press the ABS/INC key again. The blade kerf is now programmed. 6. Press and hold the ABS/INC key for 3-4 seconds to return to the absolute distance (from the blade). Operation: 1. Load a panel into the machine and place it against the sliding stop. 2. Make a clean-up (squaring) cut if necessary. 3. Momentarily press the ABS/INC. The readout will display the kerf value. 4. Unlock the sliding stop and adjust to the desired cutoff dimension. Notice that the digital readout first counts off the kerf amount, then counts up to the cutoff dimension. Lock the stop in the desired position, and cut the panel. 5. Repeat steps 3-4 as many times as needed. 6. When complete, press the ABS/INC key for 3-4 seconds to return to the absolute distance (from the blade).
6 , , Fax Instructions # HolzHer 1243 CC Kit, Inductive Technology, 06/2008
7 Troubleshooting: The battery clips seem loose when changing the batteries: DO NOT bend these clips. They are specially designed to compress and hold the batteries when the readout halves are screwed together. Avoid touching the clips as much as possible. The display does not change when the stop is moved: The encoder is not properly engaged by the guide clip and is not moving. Check to be sure the encoder remains properly engaged. The digital readout has been programmed with a very small linear scaling factor. Reset the scaling factor to The displayed measurement is off by inches (1.524mm): There has been a very large static electricity discharge into the measuring system. Ensure the machine and its dust collection tubing is properly grounded. Recalibration is necessary. The displayed measurement is off by a value other than inches (1.524mm): Check that all bolts and fasteners are tight. Check that the saw blade has not been changed. If it has been changed (kerf changed), recalibration may be necessary. The PLUS, MINUS, or DATUM keys have been accidentally pressed. Recalibration is needed. The encoder is not properly engaged by the guide clip and is not moving. Check to be sure the encoder remains properly engaged. The digital readout has been programmed with an obscure linear scaling factor. Reset the scaling factor to There have been several very large static electricity discharges into the measuring system. Ensure the machine and its dust collection tubing is properly grounded. Recalibration is necessary. ProScale resets itself while saw is running and the stop is locked: The readout has been accidentally reset. Large voltage spikes from nearby motors, inverters, or dust collection systems can cause this. Be sure that all devices are properly grounded. Also, extreme vibration may cause this. Mount the digital readout in a different location. Be sure the DATUM key or ABS/INC key have not been pressed. Recalibration may be necessary. ProScale resets itself while the saw is not running and the stop is locked: Be sure the DATUM key or ABS/INC key have not been pressed. Recalibration may be necessary. ProScale readout reads No Enc : The encoder has been removed from the scale, or its cable is damaged. The encoder is not connected to the readout. The readout displays a battery symbol: The batteries need to be changed. ProScale uses two standard AA alkaline cells. To change the batteries, unscrew the top cover (two screws) and remove old batteries. Do not mix old and new batteries. Only install alkaline batteries. Recalibrate the readout after replacing the batteries.
SCMI Cross Cut Kit Installation Instructions
 SCMI Cross Cut Kit Installation Instructions Please note this installation kit is designed for installation on SCMI Sliding Table Saws (models SI12,SI16, SI16N, Hydro 3200, 300 Nova), Cross-Cut fences.
Elcon Vertical Panel Saw Kit Installation Instructions: For Vertical Scale, Horizontal Cuts
 Elcon Vertical Panel Saw Kit Installation Instructions: For Vertical Scale, Horizontal Cuts Please note this installation kit is designed solely for installation on Elcon DSX 155 Vertical Panel Saws. Accurate
Putsch Meniconi Vertical Scale Instructions
 Putsch Meniconi Vertical Scale Instructions Please note this installation kit is designed solely for installation on Putsch Meniconi Vertical Panel Saws, vertical measurement. Accurate Technology manufactures
Digi-Stop. Installation & Operation
 Digi-Stop Installation & Operation WARRANTY Accurate Technology, Inc. warrants the ProScale Systems against defective parts and workmanship for 1 year commencing from the date of original purchase. Upon
Digi-Stop. User Manual for: Digi-Stop. Digital Readout Firmware version d & Higher
 Digi-Stop User Manual for: Digi-Stop Digital Readout Firmware version d 2.000 & Higher Warranty Accurate Technology, Inc., warrants this product against defective parts and workmanship for 1 year commencing
Digi-Fence. User Manual for: Digi-Fence (all models) Digital Readout Firmware version d & Higher
 Digital Readout Firmware version d & Higher") Digi-Fence User Manual for: Digi-Fence (all models) Digital Readout Firmware version d 2.000 & Higher Warranty Accurate Technology, Inc., warrants this product against defective parts and workmanship for
Digi-Fence User Manual for: Digi-Fence (all models) Digital Readout Firmware version d 2.000 & Higher Warranty Accurate Technology, Inc., warrants this product against defective parts and workmanship for
ProScale. Compact LCD Readout. Installation & Operation
 ProScale Compact LCD Readout Installation & Operation WARRANTY Accurate Technology, Inc. warrants the ProScale Measurement Systems against defective parts and workmanship for 1 year commencing from the
ProScale Compact LCD Readout. Operation. Firmware version C 2.xxx and higher
 ProScale Compact LCD Readout Operation Firmware version C 2.xxx and higher WARRANTY Accurate Technology, Inc., warrants this product against defective parts and workmanship for 1 year commencing from the
Firmware Version d & higher Installation & Operation
 DIGI LCD Readout Firmware Version d 2.100 & higher Installation & Operation Warranty Accurate Technology, Inc., warrants this product against defective parts and workmanship for 1 year commencing from
Digi-Fence. User Manual (all models) For All Models with Digital Readout Firmware version d & Higher
 For All Models with Digital Readout Firmware version d & Higher") Digi-Fence User Manual (all models) For All Models with Digital Readout Firmware version d 2.000 & Higher Warranty Accurate Technology, Inc., warrants this product against defective parts and workmanship
Digi-Fence User Manual (all models) For All Models with Digital Readout Firmware version d 2.000 & Higher Warranty Accurate Technology, Inc., warrants this product against defective parts and workmanship
Firmware Version d & higher Installation & Operation
 DIGI LCD Readout Firmware Version d 2.100 & higher Installation & Operation READOUT SERIAL # SCALE SERIAL # TO MAXIMIZE THE ACCURACY OF YOUR SYSTEM, THE FOLLOWING PROGRAMMING PARAMETER HAS BEEN PRE-CONFIGURED
User Manual. ProRF Encoder Transmitter & Receiver
 User Manual ProRF Encoder Transmitter & Receiver WARRANTY Accurate Technology, Inc. warrants the ProScale Systems against defective parts and workmanship for 1 year commencing from the date of original
Transmitter. User Manual. Firmware version 1.0 and greater
 ProRF SPC Transmitter User Manual Firmware version 1.0 and greater FCC NOTICE This equipment has been tested and found to comply with the limits for a class B digital device, pursuant to part 15 of the
Fletcher F-3000 / F-3100 Accessory Laser Kit
 Fletcher F-3000 / F-3100 Accessory Laser Kit Shown Assembled on F-3000 Machine Product Warranty The Fletcher-Terry Company warrants the product purchased to be free from defects in parts and workmanship
THANK YOU FOR PURCHASING OUR STUDIO RTA PROJECT STATION
 THANK YOU FOR PURCHASING OUR STUDIO RTA MODEL# 50040 BLACK/MAPLE, 50042 PEWTER/CHERRY IF YOU REQUIRE ANY ASSISTANCE WITH ASSEMBLY, PARTS, OR INFORMATION ON OTHER PRODUCTS, PLEASE VISIT OUR WEBSITE: www.studiorta.com
Assembly Instructions and Parts Manual JPSF-1 Fence and JPSR Rail Set
 Assembly Instructions and Parts Manual JPSF-1 Fence and JPSR Rail Set WALTER MEIER (Manufacturing) Inc. 427 New Sanford Road LaVergne, Tennessee 37086 Part No. M-708482 Ph.: 800-274-6848 Revision C2 02/2013
Assembly Instructions and Parts Manual JPSF-1 Fence and JPSR Rail Set #
 Assembly Instructions and Parts Manual JPSF-1 Fence and JPSR Rail Set #1002493 JET 427 New Sanford Road LaVergne, Tennessee 37086 Part No. M-708482 Ph.: 800-274-6848 Revision C3 02/2014 www.jettools.com
Instruction Sheet D-CPU. Secure CPU Holder
 Instruction Sheet D-CPU Secure CPU Holder I-00457 Rev A PARTS LIST NOTE: Select Security Components when a more secure application is desired. Mounting Track with Mounting Tape Security Bracket Assembly
Installation Manual Roof Zone Ladder Rack
 Installation Manual Roof Zone Ladder Rack 102113,E1346 Installation Time: About 90 minutes. Depending on truck and Do-it-Yourself experience level Tools Required: Electric Drill with 1/2 Chuck 1/2 & 7/32
Please Do Not Return This Product To The Store!
 MODEL NOS. T81 TABLE TENNIS TABLE OWNER'S MANUAL 1. Read this manual carefully before starting assembly. Read each step completely before beginning each step.. Some smaller parts may be shipped inside
Please Do Not Return This Product To The Store!
 MODEL NO. T8176 QUICK SERVE 3000 TABLE TENNIS TABLE OWNER'S MANUAL 1. Read this manual carefully before starting assembly. Read each step completely before beginning each step. 2. Some smaller parts may
Biesemeyer fi T-Square fi Commercial Fence Systems 50 Capacity (Model ) 30 Capacity (Model ) INSTRUCTION MANUAL
 30 Capacity (Model ) INSTRUCTION MANUAL") iesemeyer fi T-Square fi Commercial Fence Systems 50 Capacity (Model 78-904) 30 Capacity (Model 78-907) INSTRUCTION MNUL D T E D 3-5-96 P RT NO. 1349984 'Delta International Machinery Corp. 1996 INTRODUCTION
iesemeyer fi T-Square fi Commercial Fence Systems 50 Capacity (Model 78-904) 30 Capacity (Model 78-907) INSTRUCTION MNUL D T E D 3-5-96 P RT NO. 1349984 'Delta International Machinery Corp. 1996 INTRODUCTION
Installation Instructions HOSS Hardtop Organized Storage System
 Installation Instructions HOSS Hardtop Organized Storage System Application: Hard Top and Doors Storage System Part Number: 42801 www.bestop.com - We re here to help! Visit our web site and click on Ask
Loading Dock Safety Gate
 Installation Instructions/Operation and Maintenance Manual Models LDSG-120-PCY LDSG-144-PCY Table of Contents Product Information...2 Parts List...3 Installation Instructions...5 Operation...13 Inspection
THANK YOU FOR PURCHASING OUR STUDIO RTA CREATION STATION
 THANK YOU FOR PURCHASING OUR STUDIO RTA MODEL# 20672 IF YOU REQUIRE ANY ASSISTANCE WITH ASSEMBLY, PARTS, OR INFORMATION ON OTHER PRODUCTS, PLEASE VISIT OUR WEBSITE: www.studiorta.com OR CALL OR WRITE THE
OWNER'S MANUAL. Please Do Not Return This Product To The Store!
 MODEL NO. T8190SA TABLE TENNIS TABLE OWNER'S MANUAL 1. Read this manual carefully before starting assembly. Read each step completely before beginning each step.. Some smaller parts may be shipped inside
Install Instructions. NewAge Steel Welded Tall Locker
 Kit Contains Full Width Adjustable Steel Shelves (4) Height-Adjustable Steel Leveling Legs (4) Aluminum Door Trim (2) 2.5 x ¼ Cabinet Mounting Lag Bolts (4) Large Zinc Plated Mounting Washers (4) 5/8 x
INSTALL INSTRUCTIONS WELCOME TO THE NEWAGE PERFORMANCE CABINETRY SERIES NEWAGE STEEL WELDED CABINETRY
 NEWAGE STEEL WELDED CABINETRY WELCOME TO THE NEWAGE PERFORMANCE CABINETRY SERIES ALL CABINETS MUST BE MOUNTED TO STUDS ON A SECURE WALL, AS PER THESE INSTRUCTIONS. FAILURE TO DO SO MAY RESULT IN SERIOUS
OWNER'S MANUAL JST-48 Sliding Table
 OWNER'S MANUAL JST-48 Sliding Table (shown mounted on JET 708663PK) JET EQUIPMENT & TOOLS, INC. P.O. BOX 1349 Phone:253-351-6000 A WMH Company Auburn, WA 98071-1349 Fax: 1-800-274-6840 www.jettools.com
SawStop. T-GlideTM. Fence System- Professional Series II OWNER S MANUAL
 SawStop T-GlideTM Fence System- Professional Series II OWNER S MANUAL Warranty SawStop warrants to the original retail purchaser of a new T-Glide Fence System - Professional Series II from an authorized
INSTALLATION INSTRUCTIONS
 CREATING POSITIVE CUSTOMER EXPERIENCES INSTALLATION INSTRUCTIONS Universal Low Profile Tilt Mount for 42 to 63 Flat Panels NORTH AMERICA 3130 East Miraloma Avenue Anaheim, CA 92806 USA USA and Canada Phone:
FSCTD Dual Back to Back Flat Screen Ceiling Mount
 Page 1 of 6 FSCTD Dual Back to Back Flat Screen Ceiling Mount The FSCTD Dual Back to Back Flat Screen Ceiling Mount is designed to suspend a monitor from a single flange mounted to structure in the ceiling.
Shop Style Miter Saw Stand Kit
 Quality Power Tool Accessories OWNER S MANUAL Assembled Unit Shown Without Shelves & Wings Assembled With Shelves & Wings Shop Style Miter Saw Stand Kit Model 2850 IMPORTANT Read and understand all safety
INSTALLATION INSTRUCTIONS
 INSTALLATION INSTRUCTIONS Universal Short Throw Projector Arm Model: UNI-STA/UNI-EXT NORTH AMERICA 3130 East Miraloma Avenue Anaheim, CA 92806 USA USA and Canada Phone: 1-800-368-9700 Fax: 1-800-832-4888
SawStop. Contractor Fence Assembly OWNER S MANUAL. Model CNS-SFA
 Contractor Fence Assembly OWNER S MANUAL Model CNS-SFA Warranty warrants to the original retail purchaser of the Contractor Fence Assembly accompanying this manual that the fence assembly will be free
Fletcher-Terry Titan Series Rotary Trimmers
 Fletcher-Terry Titan Series Rotary Trimmers Instruction Manual Provided By http://www.mybinding.com http://www.mybindingblog.com OWNER S MANUAL Fletcher Titan The Fletcher-Terry Company 65 Spring Lane
ECM Installation Guide Installationsanleitung, Guía de Instalacíon, Guida de Installazione, Guide d Installation, Installatie gids
 Elliptical Ceiling Mount for 37 to 63 Flat Panels Model: ECM-3000 Warranty, Garantie, Garantía, Garanzia, Garantie, Waarborg: http://www.mounts.com/warranty 9531-000-001-0X Rev.0 www.mounts.com North America
HARVIL 3-in-1 FLIP TABLE ASSEMBLY INSTRUCTIONS
 HARVIL 3-in-1 FLIP TABLE ASSEMBLY INSTRUCTIONS CONTACT INFORMATION We work around the clock and around the globe to ensure that Harvil products maintain the highest possible quality. However, in the rare
Spa & Hot Tub Necessities. Cover Removal System Installation & Use Manual
 Spa & Hot Tub Necessities Cover Removal System Installation & Use Manual SET-UP AND ASSEMBLY BEFORE BEGINNING ASSEMBLY, CAREFULLY READ THE FOLLOWING INFORMATION AND INSTRUCTIONS: Place all parts in a cleared
Installation Instructions Factory Style Bow Kit
 INSTALLATION TIME Installation Instructions Factory Style Bow Kit SKILL LEVEL Vehicle Application: Jeep Wrangler JK 2 Door 2007 Current Part Number: 55000 Compatible with original equipment soft tops,
GlideRite Retractable Cover System For Hot Spot Spas (SE & SLX only)
") List of Contents Quantity Description 12 #10 x 1 ½ Flat Head Phillips Screw (see pg. 2) 2 #10 x ½ Pan Head Phillips Screw (see pg. 2) 8 ¼ x 2 ½ Lag Bolt (see pg. 2) 7 ¼ 20 x 5 / 8 Hex Head Bolt (see pg.
List of Contents Quantity Description 12 #10 x 1 ½ Flat Head Phillips Screw (see pg. 2) 2 #10 x ½ Pan Head Phillips Screw (see pg. 2) 8 ¼ x 2 ½ Lag Bolt (see pg. 2) 7 ¼ 20 x 5 / 8 Hex Head Bolt (see pg.
Installation Instructions Tailgate Rack Bracket
 Installation Instructions Tailgate Rack Application: Jeep Wrangler 1986 Current Part Number: 41411 www.bestop.com - We re here to help! Visit our web site and click on Ask a Question. Click here for more
Installation Instructions Hinged Roof Rack
 Installation Instructions Hinged Roof Rack Application: Jeep Wrangler Unlimited 2004 - Current Part Number: 41435-01 www.bestop.com - We re here to help! Visit our web site and click on Ask a Question
Guitar Mobile Storage Rack
 Assembly Instructions Guitar Mobile Storage Rack CONTENTS Safety Precautions.................................. 2 Warranty.......................................... 2 Operation.........................................
Installation Instructions TrekStep Side Mount
 Installation Instructions TrekStep Side Mount Vehicle Application Ford F150 Regular Cab and Super Cab 2009 Current Part Number: 75402-15 Fits both Driver s and Passenger Side www.bestop.com - We re here
Record the serial number and date of purchase in your manual for future reference.
 10 Woodworking Bandsaw Model: 10-305 Parts List Record the serial number and date of purchase in your manual for future reference. Serial number: Date of purchase: Part # 10-305PL1 For more information:
SERIES M MIXER MASTS
 SERIES M MIXER MASTS T AB L E O F C O N T E N T S V e n d o r D a t a Material Data Sheet 4-in. Mixer Mast Specification 3-in. Mixer Mast Specification 2 - in. M i x e r M a s t S p e c i f i c a t i o
GlideRite Retractable Cover System For HotSpring & Tiger River Spas (except Classic & pre-2000 Landmark Spas)
") List of Contents Quantity Description 12 #10 x 1 ½ Flat Head Phillips Screw (see pg. 2) 2 #10 x ½ Pan Head Phillips Screw (see pg. 2) 8 ¼ x 2 ½ Lag Bolt (see pg. 2) 7 ¼ 20 x 5 / 8 Hex Head Bolt (see pg.
List of Contents Quantity Description 12 #10 x 1 ½ Flat Head Phillips Screw (see pg. 2) 2 #10 x ½ Pan Head Phillips Screw (see pg. 2) 8 ¼ x 2 ½ Lag Bolt (see pg. 2) 7 ¼ 20 x 5 / 8 Hex Head Bolt (see pg.
LC200C9F Ceiling Mount for up to 32" Flat Panel Screens with 200mm x 200mm VESA Mounting Patterns
 Page 1 of 6 LC200C9F Ceiling Mount for up to 32" Flat Panel Screens with 200mm x 200mm VESA Mounting Patterns The LC200C9F Flat Screen Ceiling Mount is designed to suspend a monitor from a round flange
INSTALLATION INSTRUCTIONS FOR SMLS/SMSS Surface Mount Lock Shear & Surface Mount Strike Shear
 Securitron Magnalock Corp. Tel 775.355.5625 550 Vista Boulevard Fax 775.355.5633 Sparks, NV 89434 info@securitron.com www.securitron.com ASSA ABLOY, the global leader in door opening solutions INSTALLATION
P4263TP. Installation Guide. Low-Profile Tilting Portrait Mount for Flat-Panels
 Low-Profile Tilting Portrait Mount for Flat-Panels 1321 S. State College Blvd., Fullerton, CA 92831 USA Weight Limit Maximum Flat Panel Weight: 175 lbs. Warning Statements THE WALL STRUCTURE MUST BE CAPABLE
INSTALLATION & OPERATING INSTRUCTIONS. REDCO LETTUCE KING I and LETTUCE KING IV
 INSTALLATION & OPERATING INSTRUCTIONS for REDCO LETTUCE KING I and LETTUCE KING IV Lettuce King I Shown with optional Drum Ring Lettuce King IV TO BE SERVICED ONLY BY AUTHORIZED PERSONS P/N: 2802381 REV:
Manual Carton Closing Staplers
 Operator s Manual Manual Carton Closing Staplers SHB00-A Item No. 6400 -/8" Crown Carton Closing Stapler 5/8" and /4" (5mm and 8mm) Ask for Genuine INTERCHANGE A58 and A4 Staples SHB50-C Item No. 640 -/4"
LC200DS2 Double Stud Dual Articulating Wall Mount for Flat Panel Screens up to 32" with up to 200mm x 200mm VESA Mounting Patterns
 LC200DS2 Double Stud Dual Articulating Wall Mount for Flat Panel Screens up to 32" with up to 200mm x 200mm VESA Mounting Patterns Multi-position triple pivoting arms allows you to position the monitor
ATTENTION: PLEASE READ AND UNDERSTAND ALL INSTRUCTIONS AND WARNINGS BEFORE ASSEMBLING, INSTALLING OR USING THIS PRODUCT.
 PLAN YOUR VAN (TIPS FOR FASTER INSTALLATION) Installing your Transit bulkhead is very clear cut following these instructions. Before cutting or drilling in the floor, verify the location of you gas tank,
Please Do Not Return This Product To The Store!
 MODEL NOS. T8512 TOURNAMENT SERIES 3 TABLE TENNIS TABLE OWNER'S MANUAL 1. Read this manual carefully before starting assembly. Read each step completely before beginning each step. 2. Some smaller parts
Installation Instructions HighRock 4x4 TM
 Installation Instructions HighRock 4x4 TM Slider Step Vehicle Application: Jeep CJ Wrangler 1976 1986 Part Number: 49311 www.bestop.com - We re here to help! Visit our web site and click on Ask a Question.
Assembly Instructions
 1 BLT-27565 FDB Stand Assembly Instructions BLT-27565 FDB Stand Part Drawing Description Qty Part Drawing Description Qty P-1 Top Shelf 1 EA P-10 LL Lower Leg 1 EA P-11 Middle Shelf 1 EA P-2 L-Upper Leg
OWNER S MANUAL. Safety. Please read this owner s manual before use and keep it at hand for reference. Warranty
 Please read this owner s manual before use and keep it at hand for reference. OWNER S MANUAL Safety Important safety instructions for using the INCRA Miter5000 Before using the INCRA Miter5000, read and
00108/00110 INSTRUCTION MANUAL
 00108/00110 INSTRUCTION MANUAL Removable and Adjustable Mudflap System IMPORTANT! Please Read this Instruction Booklet prior to assembly of your Rock Tamer Kit. IMPORTANT! Exhaust Systems Note: Any modifications
Installation and Assembly: Articulating Swivel Arm for 37" - 60" Flat Panel Displays
 Installation and Assembly: Articulating Swivel Arm for 37" - 60" Flat Panel Displays Models: PLA60, PLA60-S, PLAV60, PLAV60-S Max UL Load Capacity: 175 lb (79 kg) 2300 White Oak Circle Aurora, Il 60502
INSTALLATION INSTRUCTIONS
 INSTALLATION INSTRUCTIONS P4263F Universal Low Profi le Flat Mount for 42 to 63 Flat Panels NORTH AMERICA 3130 East Miraloma Avenue Anaheim, CA 92806 USA USA and Canada Phone: 1.800.368.9700 Fax: 1.800.832.4888
Tilting, Swiveling & Rotating Flat Panel Wall Mount
 Tilting, Swiveling & Rotating Flat Panel Wall Mount Model: VXA980TC +5 to -5 +5 to -5 Supports most 0-80 Flat Panel TVs Maximum Weight Capacity: 32 lbs. Supports VESA Sizes up to 600x500 For technical
ATTENTION: PLEASE READ AND UNDERSTAND ALL INSTRUCTIONS AND WARNINGS BEFORE ASSEMBLING, INSTALLING OR USING THIS PRODUCT.
 INSTALLATION MANUAL Models 96111-3-02 & 96511-3-02 Bulkheads for 2014 and Later Ford Transit Connect Vans ATTENTION: PLEASE READ AND UNDERSTAND ALL INSTRUCTIONS AND WARNINGS BEFORE ASSEMBLING, INSTALLING
340 & 350 SERIES DELUXE FRAMELESS BYPASS
 BATH ENCLOSURES An Alcoa Company Tel: 800-643-1514 Fax: 870-234-3181 www.alumaxbath.com INSTALLATION INSTRUCTIONS 340 & 350 SERIES DELUXE FRAMELESS BYPASS BATH ENCLOSURES Copyright Alumax Bath Enclosures
INSTALLATION INSTRUCTIONS
 INSTALLATION INSTRUCTIONS CTM-MS1 Flat Panel Display Mount (26 to 37 ) NORTH AMERICA 3130 East Miraloma Avenue Anaheim, CA 92806 USA USA and Canada Phone: 800-368-9700 Fax: 800-832-4888 Other Locations
AM500-U Installation Guide
 1321 S. State College Blvd., Fullerton, CA 92831 USA Included Components Maximum Flat Panel Weight: 500 lb. / 226.79 kg. Wall Mount Bracket (Qty 2) Cross Bar 5/16 Flat Washers (Qty 6) Universal Spacers
MODEL T28000 HEAVY-DUTY MOBILE BASE INSTRUCTIONS
 MODEL T28000 HEAVY-DUTY MOBILE BASE INSTRUCTIONS For questions or help with this product contact Tech Support at (570) 546-9663 or techsupport@grizzly.com Introduction Your new Model T28000 Heavy-Duty
PRIMO 56" FOOSBALL TABLE ASSEMBLY INSTRUCTIONS
 PRIMO 56" FOOSBALL TABLE ASSEMBLY INSTRUCTIONS NG1035 THANK YOU! Thank you for purchasing this product. We work around the clock and around the globe to ensure that our products maintain the highest possible
INSTALLATION INSTRUCTIONS CJ-5 M38A PART # With Doors
 INSTALLATION INSTRUCTIONS CJ-5 M38A1 1955-1975 PART #109-011 With Doors Thank you for purchasing Specialty s Convertible Top for your Jeep vehicle. It has been designed for great fit and long wear. Please
Installation Procedures For Corvette Basic/C-6 SNS 28
 Installation Procedures For 2005-2013 Corvette Basic/C-6 SNS 28 Warning: Please read directions completely before starting. If you have any questions please contact BMPP before beginning your installation.
Heavy-Duty Gate Latch (Self-Latching)
") Heavy-Duty Gate Latch (Self-Latching) Installation Instructions PLEASE READ OWNER'S MANUAL COMPLETELY BEFORE INSTALLING YOUR HINGE KIT. 5010EPN V1 4/14 Owner's Manual Version 1.0 For use with; aluminum
Heavy-Duty Gate Latch (Self-Latching) Installation Instructions PLEASE READ OWNER'S MANUAL COMPLETELY BEFORE INSTALLING YOUR HINGE KIT. 5010EPN V1 4/14 Owner's Manual Version 1.0 For use with; aluminum
One Shelf, Wall Mounted A/V Component Stand Installation Guide Model: EX101SS
 One Shelf, Wall Mounted A/V Component Stand Installation Guide Model: EX0SS For technical assistance or troubleshooting please call -855-994-3832. This product is intended for use only with Audio/Video
LC200WT Security Wall Mount with Tilt for up to 32" Flat Screens
 Page 1 of 6 The LC200WT Security Wall Mount with Tilt is designed to secure up to a 32" flat panel monitor to the wall while still allowing the monitor to tilt. The VESA mounting patterns on the front
Sea Doo Spark Engine Access Kit
 Sea Doo Spark Engine Access Kit PART# - RS4-130-EAK APPLICATION(S): Sea Doo Spark. 2up & 3up Models. We strongly recommend the use of a service manual to familiarize yourself with the various components
HUSTLER 7' & 8' POOL TABLE ASSEMBLY INSTRUCTIONS
 HUSTLER 7' & 8' POOL TABLE ASSEMBLY INSTRUCTIONS Please Do Not Hesitate to Contact Our Consumer Hotline at 800-759-0977 with Any Questions That May Arise During Assembly or Use of This Product! NG2515PB/NG2520PB
340 & 350 SERIES BATH ENCLOSURES
 INSTALLATION INSTRUCTIONS 340 & 350 SERIES BATH ENCLOSURES 800-643-1514 www.alumaxbath.com Copyright Alumax Bath Enclosures 2010. All rights reserved. LIMITED WARRANTY AND REMEDY ALUMAX BATH ENCLOSURES
25-A Shawnee Way Bozeman, MT Fed ID PH FAX
 25-A Shawnee Way Bozeman, MT 59715 Fed ID 81-0414516 PH 406-586-9393 FAX 406-585-7378 SkyBar Mount for UTV with 1 ¾ 2 Roll Bar Standard Mount (optional mount on page 3) This gun rack is supplied with brackets
Portable Platform Scale
 Installation Manual Portable Platform Scale BPP1000 Series BPP2000 Series 1990-2015 by Fairbanks Scales, Inc. All rights reserved 50699 Revision 5 08/2015 Disclaimer Every effort has been made to provide
Powered by. For further installation assistance: prxperformance.com/pages/murphy-rack
 Powered by The 90 Fold-in Murphy Rack is made by the creators of the original Profile Folding Rack at PRx Performance and is Patent Pending. An up-to-date record of patents and patent pending items can
Worktop. Weight Capacity. 100 lbs. 21 Corner Worktop. 48 Worktop. Fits over 2 Cabinets. 72 Worktop. Fits over 3 Cabinets. 200 lbs. 150 lbs.
 Bold.0 Warning: Excessive weight hazard! Use two or more people to move, assemble or install cabinets and locker to avoid back injury. Do not leave children unattended near cabinets. High risk of tipping
LC6X4WTM Security Wall Mount with Tilt for up to 60" Flat Screens with VESA 600mm x 400mm or less
 Page 1 of 6 The LC6X4WTM Security Wall Mount with Tilt is designed to secure a flat screen, up to a 60", to the wall while still allowing the monitor to tilt. The VESA mounting patterns on the front of
Installation Procedures Dodge Charger R/T Scat Pak, SRT/Hellcat. SNS 66a
 Installation Procedures 2015-2017 Dodge Charger R/T Scat Pak, SRT/Hellcat SNS 66a Warning: Please read directions completely before starting. If you have any questions please contact BMPP before beginning
V-Groover SIMPLEX INSTRUCTION AND OPERATION MANUAL M O DEL 703. For best results use only authentic Logan blades.
 www.logangraphic.com SIMPLEX M O DEL 703 INSTRUCTION AND OPERATION MANUAL For best results use only authentic Logan blades CAUTION: BLADES EXTREMELY SHARP Use replacement blades #1258 Logan Graphic Products,
Installation Instructions Lower Cargo Rack Bracket
 Installation Instructions Lower Cargo Rack Application: Jeep Wrangler 2003 Current Part Number: 41437 US Patent 6799706 www.bestop.com - We re here to help! Visit our web site and click on Ask a Question.
O W N E R S M A N U A L
 O W N E R S M A N U A L TABLE TENNIS TABLE MODEL NO. T1 Please Do Not Return This Product to the Store! Contact Escalade Sports customer service department at: Phone: 1-66-73-3 Toll-Free! Fax: 1-66-73-333
AM95 Installation Guide
 1321 S. State College Blvd., Fullerton, CA 92831 USA Included Components: Maximum Flat Panel Weight: 95 lb. / 43.1 kg. M4 X 25mm M5 X 25mm M6 X 12mm (Qty 2) M6 X 25mm M8 X 25mm Allen Key Plastic Cover
RBP-1215B-RX DODGE RAM QUAD CAB RX3
 RBP-1215B-RX3 2002-2017 DODGE RAM 15-3500 QUAD CAB RX3 Passenger side RX-3 Side Step Drill Template Passenger side rear Modular Bracket (6) L Support Brackets Driver side rear Modular Bracket Driver side
Sunset Swings By Health in Motion, LLC
 Sunset Swings By Health in Motion, LLC Model 421 Lounge Swing Assembly and Operation Manual Record Serial Number Here www.sunsetswings.com by Health In Motion, LLC. 11/6/2009 421 Owners Assembly and Operation
Hollywood Swing Away 2 and 4 Bike Racks Assembly and Installation Guide
 Hollywood Swing Away 2 and 4 Bike Racks Assembly and Installation Guide Tools Required: two adjustable wrenches, pliers, ¾ socket wrench recommended Note: please do assembly near your vehicle as you Can
Installation Procedures For 2013 Mustang V-6 and 5.0
 Installation Procedures For 2013 Mustang V-6 and 5.0 Warning: Please read directions completely before starting. If you have any questions please contact BMPP before beginning your installation.. Also
HT281 Dat e Code: 2 - HT WJ Purchase Date: PLEASE RETAIN THIS INSTRUCTION MANUAL FOR FUTURE REFERENCE. All Rights Reserved
 We strive to ensure that our products are of the highest quality and free of manufacturing defects or missing parts. However, if you have any problems with your new product, D O NOT RETURN IT TO THE STORE,
INSTALLATION INSTRUCTIONS DODGE RAM 2 & 4WD 1500 PART # P5058
 INSTALLATION INSTRUCTIONS 2009-13 DODGE RAM 2 & 4WD 1500 PART # P5058 PARTS LIST: Qty Description Qty Description 1 Grille Guard 12 12-1.75mm Hex Nuts 2 Upper Frame Mounting s (for trucks without tow hooks
DIAMOND CONCRETE SAW PARTS LIST MODEL CC1113-XL P R O D U C T S. June Part #
 DIAMOND P R O D U C T S CONCRETE SAW PARTS LIST MODEL CC1113-XL June 013 Part #10 TABLE OF CONTENTS Description Page No. Saw Assembly (Normal Cut).... - Saw Assembly (Up-Cut)...... - Gas Engine Assembly......
Single Arm Pole Mount. Installation Manual Edition v1.01. For models: UNI-SA/14 UNI-SA/21.5 UNI-SA/26 UNI-SA01-MAN
 Pole Mount Installation Manual 2016 Edition v1.01 For models: UNI-SA/14 UNI-SA/21.5 UNI-SA/26 UNI-SA01-MAN Table of Contents 1 1 2 3 4 5 5 Introduction Customer Support Project Essentials Assembly: Steps
OPERATORS MANUAL WEEKENDER STEEL LADDER RACK
 OPERATORS MANUAL WEEKENDER STEEL LADDER RACK WWW.WEATHERGUARD.COM MODELS 1450 & 1475 1475 Shown INSTALLATION TIME Approximate installation time: 60 minutes (depending on truck equipment installation experience
Installation Instructions TrekStep Side Mount
 Installation Instructions TrekStep Side Mount Vehicle Application Chevrolet Silverado / GMC Sierra All Bed Sizes 1999 Current Part Number: 75400-15 www.bestop.com - We re here to help! Visit our web site
M ACS Instructions
 APPLICABLE MODELS: Nissan Frontier 2005 and up short bed with Utili-Trak mounting rails PACKAGE CONTENTS 00-0060-M-01-1205 ACS Instructions Leitner Designs 25675 Taladro Circle Unit E Mission Viejo, CA
INSTALLATION INSTRUCTIONS GRILLE GUARD RAM 1500 PART # 5058/5058-2
 INSTALLATION INSTRUCTIONS GRILLE GUARD PART # 5058/5058-2 PARTS LIST: Qty Description Qty Description 1 Grille Guard 8 12-1.75mm x 35mm Hex Bolts 2 Upper Frame Mounting s (for trucks without tow hooks
VAN STORAGE SOLUTIONS FOR THE WAY YOU WORK
 WWW.WEATHERGUARD.COM VAN STORAGE SOLUTIONS FOR THE WAY YOU WORK Weather Guard / KNAACK 420 E. Terra Cotta Ave. Crystal Lake, IL 60014 USA 800-456-7865 (Toll Free) 800-334-2981 (Fax) Knaack.OrderEntry@wernerco,.com