Three-Thread Flatlock (Narrow and Wide)
|
|
|
- Polly McDonald
- 5 years ago
- Views:
Transcription

1 Three-Thread Flatlock (Narrow and Wide)


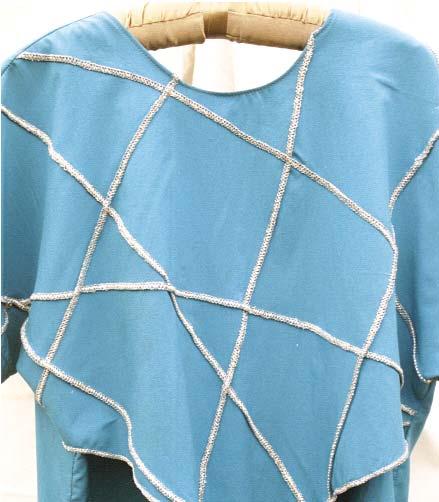
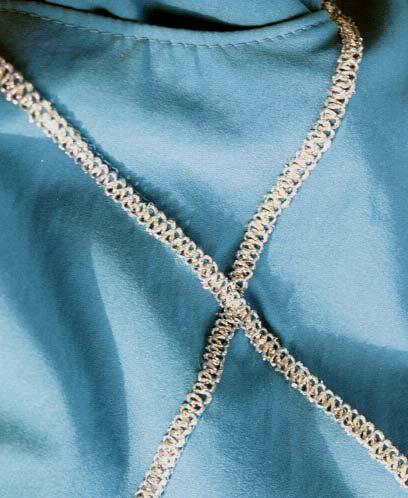
2 Three-Thread Flatlock (Narrow) The Flatlock Stitch is used decoratively to achieve the look of applied trim on a garment, craft or home decorator projects. Special decorative threads are used for a textured and dramatic embellishment effect. The Flatlock Stitch can also be used to serge non-bulky seams. The Flatlock Stitch is sewn with one needle and the upper and lower loopers. Both sides of the Flatlocking Stitch are considered decorative. The decorative loop effect is achieved when the Flatlock seams are stitched with the fabrics wrong sides together. The ladder stitch is achieved when the Flatlock seams are stitch with the fabrics right sides together. There are 2 different ways to set up for a Three-Thread Flatlock stitch. For a more narrow stitch (4.0) select the right overedge needle; for a wider stitch (6.0) the left overedge needle is used. Three-Thread Flatlock (narrow) page 1
3 Needle: Set Up: ATD: Auto Tension Dial Left Cover Stitch Needle C Middle Cover Stitch Needle D Right Cover Stitch Needle E Overedge Left Needle A Overedge Right Needle B (Blue) Upper Looper (Green) Spreader Lower Looper (Red) Chain Stitch Looper (Brown) Upper Knife Seam Guide Plate Seam Width Dial F Unthreaded and Remove Needle Unthreaded and Remove Needle Unthreaded and Remove Needle Unthreaded and Remove Needle Threaded Looper Engaged and Threaded Disengaged Threaded Unthreaded Engaged Not Installed, use Knife Cover Plate N Stitch Length Dial 2 Presser Foot Pressure Differential Feed Dial Stitch Finger N N N Three-Thread Flatlock (narrow) page 2


4 The Flatlock stitch, with fabric s right sides together, form a ladder stitch. A ribbon can then be woven by hand in and out of the stitches. The ladder stitch is ideal for joining laces together, as seen in heirloom sewing. Another idea for the ladder stitch is to use decorative thread through the needle to form a bold embellishment to projects. Three-Thread Flatlock (narrow) page 3
5 Three-Thread Flatlock (narrow) page 4


6 Turn Auto Tension Dial to F. Turn Stitch Length Dial to 2. Engage Upper Knife.The knife will not trim the fabric when it is disengaged. 1. Open Looper Cover. 2. Pull the movable knife holder (silver screw) to the right as far as it will go. 3. Turn the holder clockwise until the knife clicks into a lock position. Upper Knife Disengaged Upper Knife Engaged Three-Thread Flatlock (narrow) page 5


7 Turn Presser Foot Pressure to N. Turn Differential Feed Dial to N. Turn Seam Width Dial to N. Set Stitch Finger to N. Three-Thread Flatlock (narrow) page 6


8 Install the Knife Cover. Engage Upper Looper. Engaging the Upper Looper causes the looper to move when sewing. Even though the Upper Looper is not threaded it needs to be engaged. 1. Push the clutch button to the left and down to engage. 2. Turn handwheel. Upper Looper Disengaged Upper Looper Engaged Three-Thread Flatlock (narrow) page 7
 the looper s hole. The Spreader is disengaged when the Upper Looper is engaged/operative and threaded.")

9 Disengage Spreader. The Upper Looper has a hole for the thread on the top of the looper. If the stitch requires that the looper be engaged but not threaded then the Spreader is used. The Spreader simply plugs-in (or closes) the looper s hole. The Spreader is disengaged when the Upper Looper is engaged/operative and threaded. The Spreader is used with a stitch that requires only one looper thread. With the help of the Spreader the single looper thread wraps around the fabric s edge. 1. Lower the white handle on the Spreader to open the eye of the Upper Looper. Eye of Looper Spreader Engaged Spreader Disengaged Thread Upper Looper with regular overlock thread. 1. Raise the Presser Foot to release the tension disks. Thread the Lower Looper as illustrated Pass thread from back to the front through the thread guide. Two-Thread Flatlock (narrow) page 8
10 3. Thread the top cover thread guide by pulling the thread towards the left until it slips under the guide. Then pull the thread along the right side of the button as illustrated. 4. While holding the thread firmly, pull the thread between the tension disks. 5. Turn the handwheel toward you until the lower looper extends 5-10mm (approximately ½ inch) from the needle plate edge. 6. Thread the looper area of the machine following the green color coded thread guides 4-9. Three-Thread Flatlock (narrow) page 9

11 7. Thread the hole in the Upper Looper from front to back. Pull about 4 inches of thread through the looper and place to the back of the throat plate. Thread Lower Looper with regular overlock thread. 1. Raise the Presser foot to release the Tension disks. Thread the Lower Looper as illustrated Pass thread from back to the front through the thread guide. 3. Thread the top cover thread guide by pulling the thread towards the left until it slips under the guide. Then pull the thread along the right side of the button as illustrated. Three-Thread Flatlock (narrow) page 10
 on threader.")

12 10. Thread the looper eye (A) from front to back. Pull about 4 inches of thread. Position thread into V cutout (B) on threader. Firmly hold thread tail with left hand and pull Threader lever (C) up into place (D). V cutout Threader Lever NOTE: Make sure the Upper Looper thread is behind the Lower Looper thread. Three-Thread Flatlock (narrow) page 11
13 Thread Right Overedge needle with regular overlock thread. 1. Raise the Presser Foot to release the tension disks. Thread the right needle as illustrated Pass thread from back to the front through the thread guide. 3. Thread the top cover thread guide by pulling the thread towards the left until it slips under the guide. Then pull the thread along the right side of the button as illustrated. 4. While holding the thread firmly, pull the thread between the tension disks. Three-Thread Flatlock (narrow) page 12


14 5. Continue to thread points 4-8. Slip the thread into the rear slot of the thread guide. Go over the take up lever. Continue by slipping the thread into the right slot of the thread guides and. 8. Before threading the eye of the needle, make sure the thread is behind the thread guide located on the bottom of the needle clamp. 9. Draw about 4 inches of the thread through the needle eye towards the back of the machine. 10. Place the thread to the back, under the Presser Foot. Three-Thread Flatlock (narrow) page 13


15 Fold T-shirt interlock fabric wrong sides together lengthwise. Align the fabric so that the fabric s fold is not being trimmed by the knife. Sew. Gently pull the fabric flat and press. Hint: If the fabric is not laying flat, align the fabric farther to the left of the knife. Three-Thread Flatlock (narrow) page 14
16 Three-Thread Flatlock (Wide) The Three-Thread Flatlock (wide) has the same set up as the Three-Thread Flatlock (narrow) Stitch. The only exception is the Right Overedge Needle is now unthreaded and removed and the Left Overedge Needle is threaded. By using the left needle, the stitch becomes wider. Left Overedge Needle Thread Right Overedge Needle Thread Three-Thread Flatlock (wide) page 1
17 Needle: Set at: ATD: Auto Tension Dial Left Cover Stitch Needle C Middle Cover Stitch Needle D Right Cover Stitch Needle E Overedge Left Needle A (Orange) Overedge Right Needle B Upper Looper (Green) Spreader Lower Looper (Red) Chain Stitch Looper (Brown) Upper Knife Seam Guide Plate Seam Width Dial F Unthreaded and Remove Needle Unthreaded and Remove Needle Unthreaded and Remove Needle Threaded Unthreaded and Remove Needle Looper Engaged and Threaded Disengage Threaded Unthreaded Engaged Not Installed, use Knife Cover Plate N Stitch Length Dial 2 Presser Foot Pressure Differential Feed Dial Stitch Finger N N N Three-Thread Flatlock (wide) page 2

 Fabric Right Sides Together")

18 Left Overedge Needle Thread Upper Looper Thread Right Overedge Needle Thread Lower Looper Thread Decorative Ladder Effect (wide) Fabric Right Sides Together Decorative Loop Effect (wide) Fabric Wrong Sides Together Three-Thread Flatlock (wide) page 3

19 Thread Left Overlock needle with regular thread. 1. Raise the Presser Foot to release the tension disks. Thread the left needle as illustrated Pass thread from back to the front through the thread guide. 3. Thread the top cover thread guide by pulling the thread towards the left until it slips under the guide. Then pull the thread along the right side of the button as illustrated. 4. While holding the thread firmly, pull the thread between the tension disks. Three-Thread Flatlock (wide) page 4


20 5. Continue to thread points 4-8. Slip the thread into the middle slot of the thread guide. Go over the take up lever. Continue by slipping the thread into the middle slot of the thread guides and. 6. Before threading the eye of the needle, make sure the thread is behind the thread guide located on the bottom of the needle clamp. 7. Thread the eye of the left needle. 8. Draw about 4 inches of the thread through the needle eye towards the back of the machine. 9. Place the thread to the back, under the Presser Foot. Lower foot and sew. Three-Thread Flatlock (wide) page 5


21 Fold sweatshirt fabric wrong sides together, lengthwise. Align the fabric so that the fabric s fold is not being trimmed by the knife. Sew. Gently pull the fabric flat and press. Hint: If the fabric is not laying flat, align the fabric farther to the left of the knife. Three-Thread Flatlock (wide) page 6
Four-Thread Safety Stitch
 Four-Thread Safety Stitch Four-Thread Safety Stitch This stitch is an alternative to the Five-Thread Safety Stitch. It offers the same type of Two-Thread Chainstitch. However the Three-Thread Overlock
Cover Stitch Wide. Cover Stitch Looper Thread. Cover Stitch Wide page 1
 Cover Stitch Wide Cover Stitch Wide This professional Cover Hem stitch is a necessary requirement for today s sewing. The stitch is often seen in ready-to-wear garments. Two needles create parallel rows
BERNINA. Overlocker Workbook 2
 Overlocker Plus For current BERNINA models 2016 BERNINA of America. Permission granted to copy and distribute in original form only. Content may not be altered or used in any other form or under any other
Serging Ahead For all current BERNINA serger models
 2 Serging Ahead For all current BERNINA serger models 2011 BERNINA of America, Inc. Permission granted to copy and distribute in original form only. Content may not be altered or used in any other form
My BERNINA. Serger Workbook 1. Basic Serger Use For all current BERNINA sergers
 My BERNINA Serger Workbook 1 Basic Serger Use For all current BERNINA sergers 2011 BERNINA of America, Inc. Permission granted to copy and distribute in original form only. Content may not be altered or
O w n e r s M a n u a l
 Owner s Manual This household sewing machine is designed to comply with IEC/EN 60335-2-28 and UL1594 IMPORTANT SAFETY INSTRUCTIONS When using an electrical appliance, basic safety precautions should always
41P PFAFF HOBBY SERGER
 41P PFAFF HOBBY SERGER ow po On top of it. or damage to machine. threading and sewing. PERFORMANCE CHECKLIST 12 CHANGING NEEDLE 12 CARING FOR YOUR MACHINE 12 JOIN TWO PIECES OF FABRIC 12 DECORATIVE FLATLOCK
Overlocker Threading Overview
 BERNINA ebook Series JUST OVERLOCK IT! Overlocker Threading Overview BERNINA L 450 / L 460 Threading Written by: Jaime David, BERNINA Educator, Overlocker Specialist Threading Aids Threading Steps Machine
QUADRANT 3 Exercises Unit 2 Questions
 QUADRANT 3 Exercises Unit 2 Questions 1. Temporary lifting of presser foot is achieved by. 2. Thread take up spring is also known as.. 3. Stitches per Inch can be controlled by. 4. The distance from the
8-Thread Serger. Top of the Line
 Top of the Line 8-Thread Serger The Triumph conquers serging in a way you never thought possible thanks to RevolutionAir threading. Thread the loopers with just the touch of a button and then thread the
coverlocktm 4.0 Owner s Manual
 coverlocktm 4.0 Owner s Manual This household sewing machine is designed to comply with IEC/EN 60335--8 and UL594 IMPORTANT SAFETY INSTRUCTIONS When using an electrical appliance, basic safety precautions
Intro to the Sewing Machine
 Intro to the Sewing Machine 1. Bobbin Cover Opens to allow you to put the bobbin and bobbin case in the machine. 2. Stitch Plate Where the seam allowance guidelines are found. Each line is 1/8 apart, beginning
14T967DC Instruction Book
 4T967DC Instruction Book 4T967DC PREFACE Thank you for your purchase of this Combination Overlock, Chain Stitch and Cover Stitch Sewing Machine. This machine, that is intended for household use, will provide
SAVE THESE INSTRUCTIONS
 INSTRUCTION BOOK IMPORTANT SAFETY INSTRUCTIONS Your sewing machine is designed and constructed only for HOUSEHOLD use. Read all Instructions before using this appliance. DANGER To reduce the risk of electric
Practicing Basic Machine Operation Sample #1
 Practicing Basic Machine Operation Sample #1 Listed below are various tasks required in basic sewing machine operation. Demonstrate your ability to perform each task by creating a sample. The samples that
the needle, the user must take sufficient care to avoid injury and observe the sewing area continuously while sewing.
 / - nstruct0fl maflua 7 the needle, the user must take the light bulb is 15 watts. agent. by anyone but an authorized Pfaff D) The drive belt must never be adjusted B) When leaving the machine, chan C)
hobbylock 4752 Instruction Manual
 hobbylock 4752 Instruction Manual Parts of the hobbylock 4752 Right needle thread tension (green) Setting screw for presser foot pressure Telescoping thread guide Thread guides Left needle thread tension
n/r Stitch selection dial Stitch finger setting Woven medium Cotton, chino, wool, satin, etc
 overview The settings shown in the table below are our recommendations based on normal conditions. The correct tension is set automatically when using the Selection Dial. It may be necessary to adjust
Janome 204D Instruction Manual. MODEL 204D. 204D Owners Manual/ User Guide
 Janome 0D Instruction Manual Janome 0D serger Janome 0D Instruction Manual MODEL 0D 0D Owners Manual/ User Guide Janome 0D Instruction Manual IMPORTANT SAFETY INSTRUCTIONS Your sewing machine is designed
Stitch selection dial n/r Stitch inger setting. Stitch length S/c Setting for upper cutter, clutch lever and use of cutter cover S Cutting width
 Overview The settings shown in the table below are our recommendations based on normal conditions. The correct tension is set automatically when using the Selection Dial. It may be necessary to adjust
Overlocker Model. Air, Flow,Go! janome.co.uk
 Overlocker Model Air, Flow,Go! janome.co.uk The JANOME AirThread 2000D PROFESSIONAL unites ease-of-use with the specialised functionality of an advanced overlocker. It s our easiest to thread overlocker
INTRODUCTION THANK YOU FOR CHOOSING OUR OVERLOCK MACHINE FOR YOUR SAFETY BEFORE YOU USE - 1 -
 INTRODUCTION THANK YOU FOR CHOOSING OUR OVERLOCK MACHINE This overlock machine can stitch dependable seams on all kinds of fabric, both light and heavy, including cotton, wool, rayon, tricot, jersey, and
e-reader Case materials and tools materials and tools step one
 materials and tools materials and tools Serger Outer fabric Lining fabric OESD Fuse & Fleece 1 spool of variegated thread 2 spools of serger thread Narrow ribbon or ribbon floss Clear quilters ruler Fabric
Serger. Mid-Level
 Mid-Level Serger Your serging is about to receive a new level of critical Acclaim! The Baby Lock Acclaim features RevolutionAir Threading that threads the loopers with just the touch of a button and then
3 nights to interpret my scribbles
 BERNINA L 460 L 450 L 220 14 appointments in one week 3 nights to interpret my scribbles 1,500 durable, flexible and beautiful stitches per minute 3 nights of takeout from my neighborhood deli 1 versatile
MAIN PARTS
 MAIN PARTS 7 8 9 10 11 12 13 1 2 3 17 4 5 6 01 02 03 04 05 12 23 34 45 56 13 24 35 46 57 14 25 36 47 58 15 16 26 27 37 38 48 49 59 60 06 07 08 09 10 17 18 28 29 39 40 50 51 61 62 19 30 41 52 63 20 21 31
Specialty Techniques
 Specialty Techniques On your Huskylock By Husqvarna Viking... How and Where to Use Them VSM Sewing Inc. Printed in USA 2005 Sewing today is much easier, and much faster with your Husqvarna Viking Huskylock.
CAUTION- SAVE THESE INSTRUCTIONS This product is for household use, or equivalent.
 Never operate this sewing machine if it has a damaged cord or plug, if it is not working properly, if it has been dropped or damaged, dropped into water. Return this sewing machine to the nearest authorized
First published : May 1997 Fourth edition : January No
 First published : May 1997 Fourth edition : January 2006 No. 050153 INTRODUCTION Thank you for your purchasing Kansai Special's FX Series. Read and study this instruction manual carefully before beginning
14HD854 ( THREAD HEAVY DUTY OVERLOCK MACHINE) Instruction Manual
 Instruction Manual") 14HD854 (2. 3. 4 THREAD HEAVY DUTY OVERLOCK MACHINE) Instruction Manual 14HD854 overlock machine.,, fabric overlock machine, overlock capabilities, overlock machine when SINGER Overlock Machine was tested
14HD854 (2. 3. 4 THREAD HEAVY DUTY OVERLOCK MACHINE) Instruction Manual 14HD854 overlock machine.,, fabric overlock machine, overlock capabilities, overlock machine when SINGER Overlock Machine was tested
Getting to Know: A-LINE SERIES Model BL450A. Baby Lock Consumer Helpline:
 Getting to Know: A-LINE SERIES Model BL450A Baby Lock Consumer Helpline: 800-313-4110 www.babylock.com Model BL450A Introducing Lauren, the easy-to-use serger from the Baby Lock A-Line series of sewing
Serging Ahead For all current BERNINA serger models
 2 Serging Ahead For all current BERNINA serger models 2010 BERNINA of America, Inc. Permission granted to copy and distribute in original form only. Content may not be altered or used in any other form
SERVICE MANUAL FOR HOMELOCK M1034D 2034D 1134DW 1134D
 SERVICE MANUAL FOR HOMELOCK M1034D 2034D 1134DW 1134D 11.2000 2.2012 I HOW TO USE THIS MANUAL... 1 II HOW TO ADJUST... 2 1. Height of needle bar... 2 2. Position of the lowerlooper... 3 3. Timing of the
Sample Packet. Directions: Describe the functions of the following basic parts of a sewing machine.
 Sample Packet NAME: Directions: Describe the functions of the following basic parts of a sewing machine. SEWING MACHINE PARTS: Needle stitch plate: Feed dog system: Presser foot: Bobbin case: Spool pin:
SEWING MACHINE For use with Janome HD 1000
 SEWING MACHINE For use with Janome HD 1000 YALE CENTER FOR ENGINEERING INNOVATION AND DESIGN Table of Contents p. 3-5... Winding the Bobbin p. 6-7... Threading the Bobbin p. 8-10... Threading the Needle
SECTION IV DIFFERENTIAL FEED
 SECTION IV DIFFERENTIAL FEED Differential feed allows you to sew many different types of fabrics eliminating puckering on lightweight woven fabrics and stretching on knits. When working on a serger without
STARTED! Get. Let s. Americana Series AMERICAN DENIM Model SA1100 Use This Guide First. Simplicity Sewing Machine Education Helpline:
 Let s Get STARTED! Americana Series AMERICAN DENIM Model SA1100 Use This Guide First To help you get started using your new sewing machine, this booklet shows you, step-by-step, how to thread your machine
Sewing Machine 911 with Claudia Miller
 Sewing Machine 9 JAMMED MACHINE MACHINE IS NOT STITCHING Threads are too long and get caught in the bobbin holder Machine is dirty Bobbin thread was not drawn up through the machine Threads are stuck when
This versatile foot may also be used with zigzag and decorative stitches, as the guide does not extend through the needle opening.
 Ditch Quilting Foot (S) Linda Pidzamecky, Education Consultant, Janome Canada Ltd. Part Number: 200-341-002 The Ditch Quilting Foot is a very useful addition to your sewing machine, when you want a perfectly
UK10 UK11. First published: June No.KX03023
 UK10 UK11 First published: June 2003 No.KX03023 INTRODUCTION Thank you for purchasing Kansai Special s UK series machine. Please study this instruction manual carefully before operating the machine. 1.
INSTRUCTION MANUAL 2263
 INSTRUCTION MANUAL 2263 TABLE OF CONTENTS Congratulations on the purchase of your new SINGER sewing machine! May we recommend that before you start using your machine, you take time to discover the many
simply PERFECT seams More stitches, more features, more stunning techniques to inspire and enhance your creativity.
 simply PERFECT seams More stitches, more features, more stunning techniques to inspire and enhance your creativity. 1150MDC 800DL 700D 009DCC Exclusively from Bernina. Micro Thread Control (mtc) lets you
MCS-1500 INSTRUCTION MANUAL. 3-Needle, 2/3/4-Thread Cover Stitch Sewing Machine IMPORTANT:
 -Needle, //-Thread Cover Stitch Sewing Machine MCS-100 INSTRUCTION MANUAL EN IMPORTANT: Read all safety regulations carefully and understand them before using your sewing machine. Retain this instruction
Serger. Mid-Level
 Mid-Level Serger Can you imagine how easy serging would be if you didn't have to thread the machine? Look no further than the Imagine -- Baby Lock's most popular serger. This advanced home serger includes
CV3440 & CV3550 CV3440 & CV3550. Coverstitch machines NEW
 CV3440 & CV3550 NEW Top cover stitches with CV3550 CV3440 & CV3550 Coverstitch machines The essential tools for a professional finish and awe-inspiring creations CV3440 4, 3 and 2 threads CV3550 5, 4,
Perfect Finish. Model ET-1
 Over 1,000 Stitch Functions Select from over 1,000 Stitch Functions. Fulfill your creative dreams with a large selection of decorative stitches, alphabet stitches, and construction stitches. Large Back-Lit
coverlock 4852 Owner s manual
 coverlock 4852 Owner s manual Parts of the coverlock 4852 1 Upper needle-thread tension 2 Upper needle-thread tension 3 Carry handle 4 Thread tension/upper looper thread 5 Thread tension/lower looper
The 787 Dreamstitcher Portable Serger
 The 787 Dreamstitcher Portable Serger INSTRUCTION MANUAL TABLE OF CONTENTS 1. KNOWING YOUR MACHINE Identification chart 2 Accessories 3 Setting up your machine 4 Preparation for threading 5-6 Lint tray,
Serger Daygown. It's Sew Easy. By Kathy McMakin Martha Pullen Company
 Serger It's Sew Easy By Kathy McMakin 2014 Martha Pullen Company Serger It's Sew Easy By Kath y McMaki n Expand your serger skills while making this soft batiste daygown for that special baby. Constructed
Carry Sew Table and Hoop Bag Created by Joy Harvey
 www.bernina.com.au Carry Sew Table and Hoop Bag Created by Joy Harvey Materials List What to do with all those leftover cords, ribbon, braids, pearls and sequins? Your answer, foot #12C my favourite presser
Bobbin Holders 101. By Nancy Fiedler. Standard Bobbin Holder all Janome top loading bobbin machines.
 Bobbin Holders 101 By Nancy Fiedler Standard Bobbin Holder all Janome top loading bobbin machines. Usually this bobbin holder will have a small red triangle or red marking on the tension screw. It is always
O w n e r s m a n u a l
 Owner s manual 17 1 2 3 4 5 6 16 15 14 13 12 11 10 7 9 8 Parts of the coverstyle 1 Upper needle-thread tension 2 Upper needle-thread tension 3 Carry handle 4 Thread tension/upper looper thread 5 Thread
Getting to Know: Model BL30A. A-Line Series. Baby Lock Consumer Helpline:
 Getting to Know: A-Line Series Model BL30A Baby Lock Consumer Helpline: 800-33-40 www.babylock.com Model BL30A Molly loves her DIY, individual style, and she always encourages you to add your own touch.
Combined overlock and cover stitch machines
 M Combined overlock and cover stitch machines COMBINED OVERLOCK AND COVER STITCH MACHINE ACCESSORIES Ready to wear details and decorative accents are easily duplicable with Janome's combined overlock and
SAVE THESE INSTRUCTIONS
 INSTRUCTION BOOK IMPORTANT SAFETY INSTRUCTIONS When using an electrical appliance, basic safety precautions should always be followed, including the followings: Read all instructions before using this
Basic Sewing Machine Parts/Their Purpose and Function
 Basic Sewing Machine Parts/Their Purpose and Function Basic Sewing Machine Parts/Their Purpose and Function: 1) Bobbin Provides the bottom thread, the underside of the stitches a sewing machine forms.
Baby Lock Sergers. Baby Lock Retailer Commitment. will change the way you serge forever.
 Baby Lock Retailer Commitment Baby Lock Sergers will change the way you serge forever. Baby Lock and its independent Retailer network are committed to sewers like you. By providing the highest quality
INSTRUCTION BX1425P,PSM,PTV BX1433P,PSM,PTV BX1025P,PSM BX1033P,PSM. No First published : November 1997
 INSTRUCTION Industrial Sewing Machines BX1425P,PSM,PTV BX1433P,PSM,PTV BX1025P,PSM BX1033P,PSM First published : November 1997 No. 970112 INTRODUCTION Thank you for your purchasing Kansai Special's BX
Janome Compulock Instruction Manual. CompuLock. Compulock888 Owners Manual/ User Guide
 Janome Compulock 888 Instruction Manual CompuLock IMPORTNT SFETY INSTRUCTIONS When using an electrical appliance, basic safety precautions should always be followed, including the following. Read all instructions
INSTRUCTION MANUAL 624?
 INSTRUCTION MANUAL 624? 6142 604 IMPORTANT SAFETY INSTRUCTIONS When using an electrical appliance, basic safety precautions should always be followed, including the following: Read all instructions before
Cut from: Sewing. Blue nylon fabric - All pattern pieces. Blue pile fabric - All pattern pieces for lining 2 ribbing pieces 2 3/8" x 7" (6 cm x 18 cm)
") Dog Apparel Sewing supplies Pattern Huskylock s15 Husqvarna Viking Designer sewing machine Blue nylon fabric 12" x 55" (30 x 140 cm) Blue pile fabric 12" x 55" (30 x 140 cm) Blue Ribbing Blue sewing thread
Dog Apparel Sewing supplies Pattern Huskylock s15 Husqvarna Viking Designer sewing machine Blue nylon fabric 12" x 55" (30 x 140 cm) Blue pile fabric 12" x 55" (30 x 140 cm) Blue Ribbing Blue sewing thread
Happy December! On the wrong side of Fabric A, mark 1/4" from each edge on all four corners.
 Happy December! The holidays are almost here, but there is still time to whip up some of these fun napkins. Not only did I need napkins for table, but I love any opportunity to sit down at the Horizon
Top Innovations, Inc. Innovative Products to Make Your Life Easier. Model SP-402 Owner s Manual
 Top Innovations, Inc. Innovative Products to Make Your Life Easier Model SP-402 Owner s Manual THIS IS NOT A TOY! Adult supervision recommended Item contains sharp functional points and small parts Machine
Join The Baby Lock Serger revolution. Revolutionize the way you serge
 Join The Baby Lock Serger revolution Revolutionize the way you serge It Started With A Revolutionary Idea In 196, several engineers and middle managers at a Japanese industrial company believed that they
INSTRUCTION BOOK BUPEFILDCK 634D. W H ITE Sewing machine company
 INSTRUCTION BOOK BUPEFILDCK 634D W H ITE Sewing machine company POLARIZED PLUG CAUTION To reduce the risk of electric shock, this appliance has a polarized plug (one blade is wider than the other). This
Table of Contents. Overview Series Series Series Series Series Series 24-27
 ISO Numbers Table of Contents Overview...3 100 Series...4-7 200 Series...8-9 300 Series 10-14 400 Series 15-18 500 Series 19-23 600 Series 24-27 3/26/2018 Kohl's Department Stores 2 ISO Numbers Stitch
SEWING UNIT MANUAL I R O N I N G
 SEWING UNIT MANUAL S A F E T Y I R O N I N G S E W I N G M A C H I N E P A R T S and F U N C T I O N S H O W T O T H R E A D T H E B O B B I N and U S E T H E A U T O M A T I C N E E D L E T H R E A D
To register your machine warranty and receive Baby Lock product updates and offers, go to If you have questions with
 To register your machine warranty and receive Baby Lock product updates and offers, go to www.babylock.com/profile. If you have questions with registration, visit your Authorized Baby Lock Retailer. CONTENTS
MACHINE SEW HOW TO POT HOLDER. Project
 GET TO KNOW YOUR ING BY TRYING OUT THE VARIOUS STITCHES AVAILABLE, THEN TURN YOUR STITCH SAMPLER INTO A USEFUL. CUSTOMIZE YOUR PROJECT BY CHOOSING YOUR OWN FABRIC AND MATCHING OR CONTRASTING THREAD COLOURS.
Brother PQ- Series Accessories
 Brother PQ- Series Accessories The PQ-series of high-speed straight stitch machines (1300, 1500 and 1500S) are designed to sew quickly and accurately with a wide variety of fabrics, even combinations of
Project #2: Bookmark. Shopping List:
 Project #2: Bookmark This is the 2nd project in our Get Kids Sewing Series with SINGER and SkipToMyLou.org. Bookmarks are fun to make and are great gifts for anyone. Choose fabric for the receiver s interest
How To Make A Quillow
 How To Make A Quillow A quillow is a quilt which folds into a built-in pocket, to form a pillow. Sizing: The measurements and fabric are for a 44" x 72" lap quilt which will fold into an 18" square. To
Company s Coming! Visit bernina.com: Projects Webinars Promotions. Supplies. Created by Susan Beck
 Company s Coming! Created by Susan Beck Add a fresh look to your guest room with these simple-to make pillows and a thoughtful bedside basket. Finished size: 12 x 12 Ruffled Ribbon Pillow Finished size:
Ruffle Dishtowel by Lindsay Wilkes from The Cottage Mama
 Ruffle Dishtowel by Lindsay Wilkes from The Cottage Mama Intro: Differential feed is a really fun component of your serger that you may not have thought about much.until now. Your serger is set up with
MF-7000 Series 2-3 Needle Cylinder Bed Coverseam Machine
 R 2-3 Needle Flat Bed Coverseam Machine MF-7000 Series 2-3 Needle Cylinder Bed Coverseam Machine MFC-7000 Series ENGINEER S MANUAL 29275609 No.02 PREFACE This Engineer s Manual is written for the technical
Article 1: Introduction to the Elna expressive 920
 Article 1: Introduction to the Elna expressive 920 Elna machines are known for their ease of use, and the Elna expressive 920 is no exception. A range of features are available at your fingertips to make
When using an electrical appliance, basic safety precautions should always be followed, including the following:
 Instruction book IMPORTANT SAFETY INSTRUCTIONS This appliance is not intended for use by persons (including children) with reduced physical, sensory or mental capabilities, or lack of experience and knowledge,
FBX-PA-2AC. Third edition : April No
 FBX-PA-2AC Third edition : April 2006 No. 060058 INTRODUCTION Thank you very much for purchasing Kansai Special FBX series. Read and study this Instruction Manual carefully before you start any of the
INSTRUCTION. Industrial Sewing Machines V7100/D,DE,F,ML W8100/D,DE,F,C W8042 W V7002-1S W8103-1S. No Third edition : March 2001
 INSTRUCTION Industrial Sewing Machines V7100/D,DE,F,ML W8100/D,DE,F,C W8042 W8042-1 V7002-1S W8103-1S Third edition : March 2001 No. 010012 INTRODUCTION Thank you for your purchasing Kansai Special's V.W
SAVE THESE INSTRUCTIONS
 INSTRUCTION BOOK IMPORTANT SAFETY INSTRUCTIONS When using an electrical appliance, basic safety precautions should always be followed, including the followings: Read all instructions before using this
User s Guide. Prelude 350, 370 KEEPING THE WORLD SEWING
 User s Guide Prelude 350, 370 KEEPING THE WORLD SEWING This houshold sewing machine is designed to comply with IEC/EN 60335-2-28 and UL1594 IMPORTANT SAFETY INSTRUCTIONS When using an electrical appliance,
Ruffler. The Ruffler IN MOTION. Specialty Feet: Ruffler
 Ruffler The Ruffler is one of the most time saving attachments you can add to your sewing machine. This accessory is used to create perfectly spaced pleats and gathers. There are several adjustments that
4-H Fabrics & Fashions
 OKLAHOMA COOPERATIVE EXTENSION SERVICE 4-H Fabrics & Fashions Setting Your Stitch Length 1. Stitch, as shown, using six inches to one inch. --------------------------------------------------------------------------------------------------------------------
Getting to know your machine. Application. For seams in tricot and stretch fabrics. For sewing on lace, bands and appliqués.
 Stitches Stitch Stitch no. 1, 2, 3 4, 5, 6 7, 8, 9 10, 11, 12 13 Stitch name Straight Stitch, left center and right needle position Stretch Stitch, left,center and right needle position Reinforced Straight
ABM International, Inc.
 ABM International, Inc. Lightning Stitch required 1 1.0: Parts List head and motor assembly (Qty. 1) Reel stand (Qty. 1) Needle bar frame clamp (Qty. 1) Motor drive (Qty. 1) 2 Cable harness with bracket
WX8800 WX8700 LX5801 WX8842 WX MC30
 WX8800 WX8700 LX5801 WX8842 WX8842-1 MC30 First published : August 1991 Third edition : August 2004 No. 040037 INTRODUCTION Thank you for your purchasing Kansai Special's WX Series. Read and study this
TABLE OF CONTENTS NAME OF MAIN COMPONENTS. 4-5 SETTONG UP YOUR MACHINE 6-8. The position of thread pole 6 Cone holders 6.
 z Cl) c C-) -I 0 z z C I- E ẕ I CD D CD p C) C m 0 m I a) C-) Controlling sewing speed 7 The position of thread pole 6 Cone holders 6 Connecting the foot control 7 Spool caps 6 SETTONG UP YOUR MACHINE
Table of Contents NAMES OF PARTS 7 GETTING READY TO SEW 10 DECORATIVE STITCHING 48 BASIC SEWING 28 PROGRAMMING PATTERNS AND LETTERS 55
 Instruction Manual Table of Contents NAMES OF PARTS 7 Names of Parts 7 Standard Accessories 8 Extension table 8 Sewing Table and Accessory box 9 Free-arm sewing 9 Stitch overview 9 GETTING READY TO SEW
FBX1104P FBX1104 FBX1106P FBX1106
 FBX1104P FBX1104 FBX1106P FBX1106 Second edition : September 2004 No. 040037 INTRODUCTION Thank you for your purchasing Kansai Special's FBX Series. Read and study this instruction manual carefully before
GXT3200 : DRY-HEAD type, variable top feed, safety stitch machine GXT5200 DRY-HEAD type, variable top feed, overedger
 GXT3200 : DRY-HEAD type, variable top feed, safety stitch machine : GXT5200 DRY-HEAD type, variable top feed, overedger Top Feed Machine and Machine and Feed p To Dry Head Technology Dry Head Technology
User's Guide KEEPING THE WORLD SEWING
 User's Guide KEEPIG THE WORLD EWIG This householdsewing machine is designed to comply with IEC/E 0228 and UL 194 IMPORTAT AFETY ITRUCTIO When using an electrical appliance, basic safety precautions should
NAMES OF PARTS. 1 Thread guide for bobbin winding 2 Take-up lever. 3 Upper thread tension dial. 4 Face cover. 5 Thread guide for upper threading
 6 Presser foot thumb screw 9 Spool pins (retractable) 8 Shuttle cover 5 Thread guide for upper threading 7 Presser foot 4 Face cover NAMES OF PARTS.r4r : VjN S* ;WWE7-17 16 15 MODEL 860.-.-.- --. :.---.-
Baby Lock Ovation. Celebrate Life s Moments with an. It s Time for an Outstanding Performance
 It s Time for an Outstanding Performance Baby Lock Ovation Celebrate Life s Moments with an Some of the most memorable performances occur off stage. From your daughter s first steps to the day she walks
BEL0093 Sewing Machine
 4 BEL0093 Sewing Machine THE SCIENCE BEHIND SEWING BEL0093 Sewing Machine 5 4 8 10 9 21 11 12 1 2 14 19 13 23 7 6 5 21 3 17 18 22 15 6 BEL0093 Sewing Machine 16 22 Auto Low Foot Pedal Auto High THE SCIENCE
This sewing machine is for Household Use
 z 0 -I C 0 0 zw0 0 C*) m -I z m m B C ) POLARIZED PLUG CAUTIOfJ To reduce the risk of electric shock, this appliance has a polarized plug (one blade is wider than the other). This plug will fit in a polarized
Innov-ís 2500D PREMIUM PACKAGE
 Innov-ís 2500D PREMIUM PACKAGE Version 2 Upgrade Kit Operation Manual Before using this upgrade kit, be sure to read this Operation Manual for information on its correct use. CONTENTS Before You Start...
EasyStitch. Instruction and guarantee manual 1 YEAR GUARANTEE
 EasyStitch Instruction and guarantee manual 1 YEAR GUARANTEE CONTENTS: 1. Machine Parts 2. Accessories 3. Safety Instructions 4. Battery Installation 5. Threading 6. Fitting fabric and sewing 7. Adjusting
Operating Manual. Huskylock 901
 Operating Manual Huskylock 901 OVERLOCK MACHINE Record in space provided below the Serial No. of this appliance. The Serial No. is located rear of arm. Serial No. Model No. 901 Retain these numbers for
SERVICE MANUAL AND PARTSLIST
 SERVICE MANUAL AND PARTSLIST Next 20 CONTENTS WHAT TO DO WHEN... 1~3 SERVICE ACCESS FACE COVER... 4 TOP COVER... 4 BASE COVER... 5 REAR COVER... 6 FRONT COVER... 7 MECHANICAL ADJUSTMENT NEEDLE THREAD TENSION...
SINGER PROJECTS Accent Pillow with Free-Motion Stitching PROJECT SKILL LEVEL:
 SINGER PROJECTS Accent Pillow with Free-Motion Stitching This small accent pillow features free-motion stitching and 3D embellishments. Although this project sheet provides instructions for using these