SEWING MACHINE For use with Janome HD 1000
|
|
|
- Randolf Harris
- 6 years ago
- Views:
Transcription

1 SEWING MACHINE For use with Janome HD 1000 YALE CENTER FOR ENGINEERING INNOVATION AND DESIGN
2 Table of Contents p Winding the Bobbin p Threading the Bobbin p Threading the Needle p Drawing Up the Bobbin Thread p Beginning to Sew p Troubleshooting

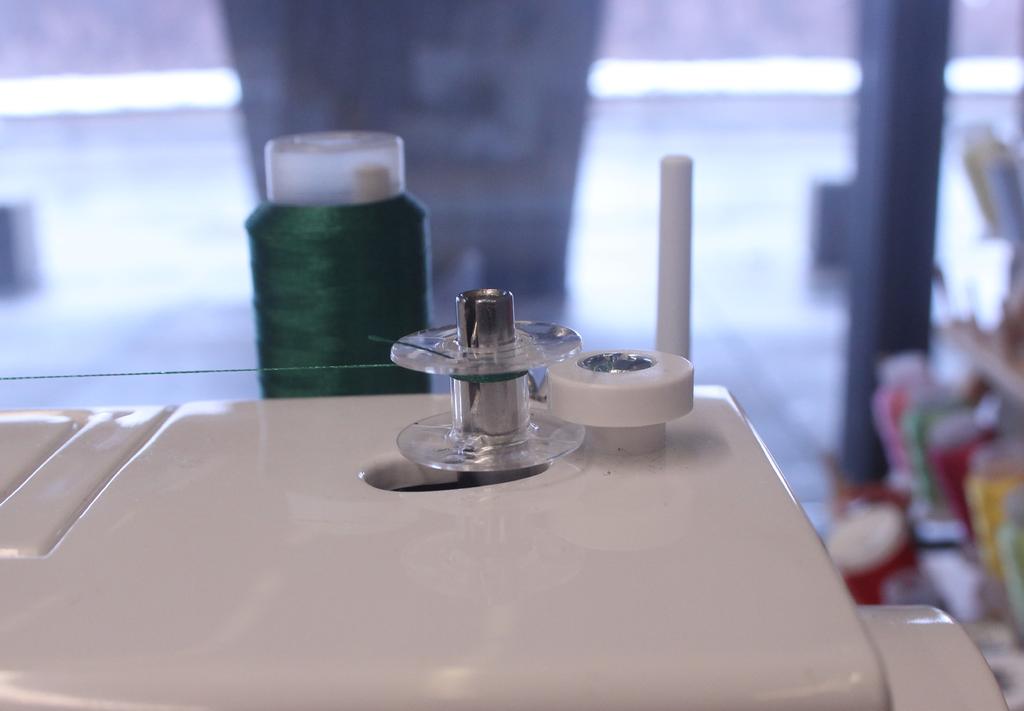
3 Winding the Bobbin 1. While holding the outside of the hand wheel with your left hand, turn the stop motion knob towards you. 2. Choose the color thread that you want to sew with and place the spool on the vertical spool holder located towards the back right of the sewing machine. 3. Draw thread from the spool. From right to left, pass the thread through the topcover thread guide. From left to right, clip the thread under the screw in between the bobbin winder thread guide. Grab a new, empty bobbin, and thread the bobbin from the inside out through the holes located on the top and bottom of the flat sides of the bobbin. 1. 3
 to begin winding the thread.")
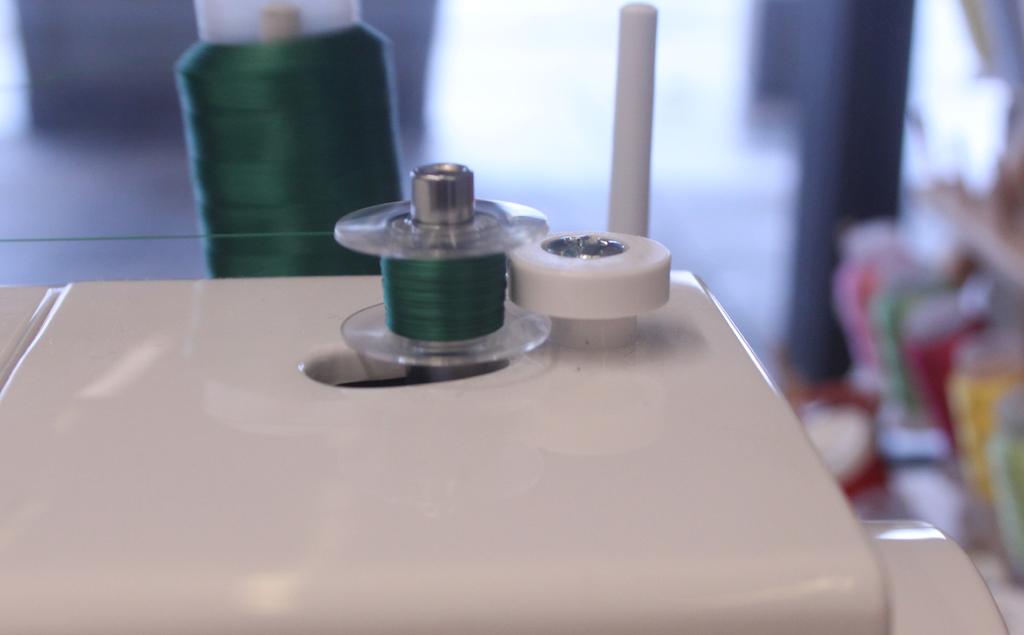
4 3. 4. Make sure the bobbin spindle is pushed to the left. Put the bobbin onto the winder spindle and push it to the right. Hold the excess thread with your left hand and with your right, turn the hand wheel several full turns (towards you) to begin winding the thread. Once you have some thread wound, you can trim the excess thread, and use the pedal to wind the bobbin. The bobbin will automatically stop winding when it is full. 5. To remove the bobbin, push it back towards the left and cut the thread. Tighten the stop motion knob by twisting the knob in the opposite direction in step 1. 4
5


6 Threading the Bobbin 1. Once you have wound your bobbin, place the bobbin in the case, making sure that the thread feeds clockwise from the bobbin (the thread should make a P ) 2. Follow the slot of the case to get the thread under the tension spring out through the rectangular opening. You can leave about an inch of thread hanging

7 3. Position the bobbin case into the shuttle by lining up the profile of the bobbin case with the shuttle. Push the bobbin case into the machine to lock it in place. It is okay to have some extra thread hanging for now. 7

8 Threading the Needle 1. Place your thread on the vertical spool holder. 2. Raise the take-up lever by turning the hand wheel towards you. It should be peeking up from the top of the machine. Refer to fig 2. on page Raise the presser foot. Refer to fig 3. on page 8 4. Pass the thread through the top cover thread guide. From left to right, pass the thread behind the upper thread guide. 4. 8


9 5. Draw the thread down, and then from left to right, draw the thread over and up to the take up lever. Your thread should be engaged with the spring holder. 6. From left to right, draw the thread through the uptake lever. You may have to pull the thread slightly towards you. 2. 9


10 7. Draw the thread down through the lower thread guides and then through the needle thread guide located towards the left of the needle. 8. Thread the needle from the front to the back, and guide the thread through the presser foot opening


11 Drawing up the Bobbin Thread 1. Make sure that the presser foot lever is UP 2. While holding the needle thread (just enough to make sure the thread stays above the plate) with your left hand, advance the hand wheel towards you with your right hand. 3. As you turn, you should see a loop come up through the plate. 11

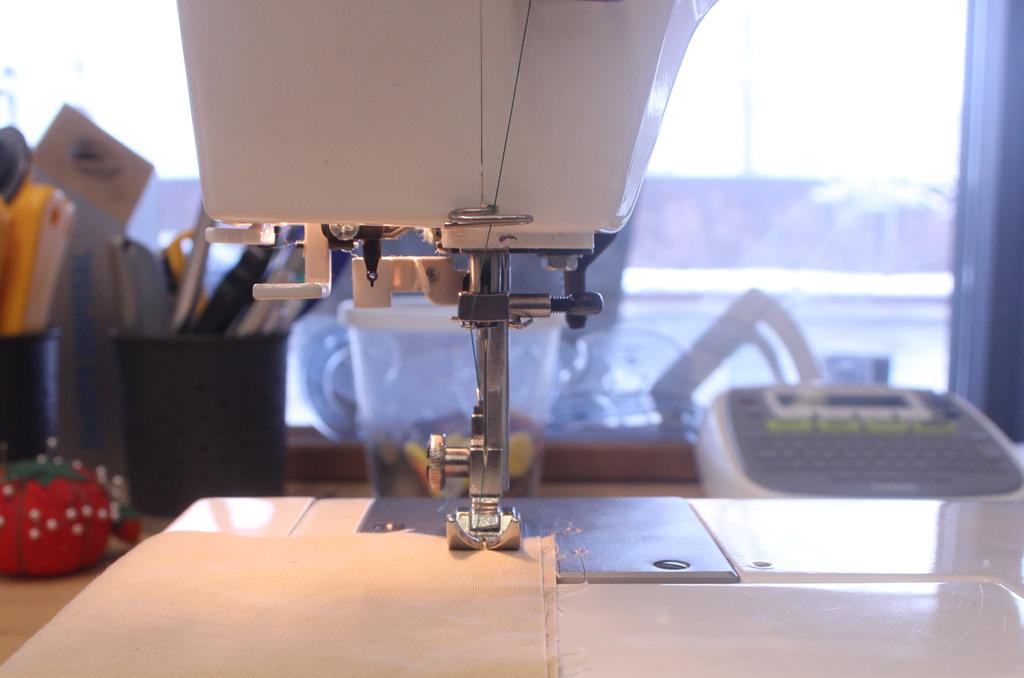
12 Beginning to Sew Before you sew, make sure that you have completed threading the machine. Make sure that you have left a few inches of thread from both the needle and bobbin. Make sure that the bobbin case is covered and that you have replaced the extension table. 1. Lift the presser foot, and place your fabric that your wish to sew underneath the presser foot. Use the guides on the needle plate to ensure your stitch is always a certain length away from the edge of your fabric. 2. Lower the presser foot onto your fabric by putting the lever in the DOWN position. This will secure your fabric as you begin to sew.

13 13


14 3. You can now begin sewing by either advancing the hand wheel a few stitches and then continuing with the pedal, or you can start to sew right away by using the pedal. The harder you press on the pedal, the faster the machine will stitch. Below are some of the stitches using different stitch lengths: The letter refers to the letter on the stitch selector wheel, and the number refers to the stitch length located below the stitch selector wheel B 4 B 2 D 2 D 4 H 4 H 2 14
15 Troubleshooting The top and bottom of my stitch do not look the same: Refer to the full manual for more troubleshooting help, there is a physical copy next to the machine, or you can visit 15
MAIN PARTS
 MAIN PARTS 7 8 9 10 11 12 13 1 2 3 17 4 5 6 01 02 03 04 05 12 23 34 45 56 13 24 35 46 57 14 25 36 47 58 15 16 26 27 37 38 48 49 59 60 06 07 08 09 10 17 18 28 29 39 40 50 51 61 62 19 30 41 52 63 20 21 31
EasyStitch. Instruction and guarantee manual 1 YEAR GUARANTEE
 EasyStitch Instruction and guarantee manual 1 YEAR GUARANTEE CONTENTS: 1. Machine Parts 2. Accessories 3. Safety Instructions 4. Battery Installation 5. Threading 6. Fitting fabric and sewing 7. Adjusting
Sewing Machine 911 with Claudia Miller
 Sewing Machine 9 JAMMED MACHINE MACHINE IS NOT STITCHING Threads are too long and get caught in the bobbin holder Machine is dirty Bobbin thread was not drawn up through the machine Threads are stuck when
S-85SCH
 4411-4423-4432-4443-4452 5511-5523-5532-5554 44S-85SCH Service Manual 104 73 14-26 2014-02-24 CONTENTS 1. Names of principal parts...2 2. Removing methods of external parts 2-1 Sewing table...3 2-2 Face
Intro to the Sewing Machine
 Intro to the Sewing Machine 1. Bobbin Cover Opens to allow you to put the bobbin and bobbin case in the machine. 2. Stitch Plate Where the seam allowance guidelines are found. Each line is 1/8 apart, beginning
Cover Stitch Wide. Cover Stitch Looper Thread. Cover Stitch Wide page 1
 Cover Stitch Wide Cover Stitch Wide This professional Cover Hem stitch is a necessary requirement for today s sewing. The stitch is often seen in ready-to-wear garments. Two needles create parallel rows
NAMES OF PARTS. 1 Thread guide for bobbin winding 2 Take-up lever. 3 Upper thread tension dial. 4 Face cover. 5 Thread guide for upper threading
 6 Presser foot thumb screw 9 Spool pins (retractable) 8 Shuttle cover 5 Thread guide for upper threading 7 Presser foot 4 Face cover NAMES OF PARTS.r4r : VjN S* ;WWE7-17 16 15 MODEL 860.-.-.- --. :.---.-
Getting to Know: Model BL30A. A-Line Series. Baby Lock Consumer Helpline:
 Getting to Know: A-Line Series Model BL30A Baby Lock Consumer Helpline: 800-33-40 www.babylock.com Model BL30A Molly loves her DIY, individual style, and she always encourages you to add your own touch.
BEL0093 Sewing Machine
 4 BEL0093 Sewing Machine THE SCIENCE BEHIND SEWING BEL0093 Sewing Machine 5 4 8 10 9 21 11 12 1 2 14 19 13 23 7 6 5 21 3 17 18 22 15 6 BEL0093 Sewing Machine 16 22 Auto Low Foot Pedal Auto High THE SCIENCE
HOW TO USE YOUR LONG SHUTTLE MANUAL SEWING MACHINE. 4çJ MODEL NO.768
 NO.768 MODEL 4çJ Ii SEWING MACHINE LONG SHUTTLE MANUAL HOW TO USE YOUR INDEX Zigzag Formation 18 Zigzag Sewing And Pattern Formation 17 Turning a Corner 14 Placement of Needle 4 Picking Up Bobbin Thread
Four-Thread Safety Stitch
 Four-Thread Safety Stitch Four-Thread Safety Stitch This stitch is an alternative to the Five-Thread Safety Stitch. It offers the same type of Two-Thread Chainstitch. However the Three-Thread Overlock
STARTED! Get. Let s. Americana Series AMERICAN DENIM Model SA1100 Use This Guide First. Simplicity Sewing Machine Education Helpline:
 Let s Get STARTED! Americana Series AMERICAN DENIM Model SA1100 Use This Guide First To help you get started using your new sewing machine, this booklet shows you, step-by-step, how to thread your machine
Top Innovations, Inc. Innovative Products to Make Your Life Easier. Model SP-402 Owner s Manual
 Top Innovations, Inc. Innovative Products to Make Your Life Easier Model SP-402 Owner s Manual THIS IS NOT A TOY! Adult supervision recommended Item contains sharp functional points and small parts Machine
We have made a summary with a few steps to follow, to help you solve the most common problems.
 Matri will do everything possible to identify and resolve any problems that occur with your machine, within the warranty period. But it is not always necessary to send back your machine to be repaired.
Basic Sewing Machine Parts/Their Purpose and Function
 Basic Sewing Machine Parts/Their Purpose and Function Basic Sewing Machine Parts/Their Purpose and Function: 1) Bobbin Provides the bottom thread, the underside of the stitches a sewing machine forms.
SEWING UNIT MANUAL I R O N I N G
 SEWING UNIT MANUAL S A F E T Y I R O N I N G S E W I N G M A C H I N E P A R T S and F U N C T I O N S H O W T O T H R E A D T H E B O B B I N and U S E T H E A U T O M A T I C N E E D L E T H R E A D
pô1e -/C INSTRUCTION MANUAL FOR SEWING MACHINE WHITE
 pô1e -/C -- INSTRUCTION MANUAL I FOR SEWING MACHINE WHITE Retain these numbers for future reference. Model No. Serial No. The Model No. is located on Rating Plate. The Serial No. is located on Bed Plate.
Replacing the Reciprocator on the SWF Compact Series Machine (601C and 1201C)
") Follow the instructions below to replace the reciprocator in the SWF Compact series machines. The tools required can be found in the tool kit that came with the machine. Preparation 1. First, place the
Follow the instructions below to replace the reciprocator in the SWF Compact series machines. The tools required can be found in the tool kit that came with the machine. Preparation 1. First, place the
To register your machine warranty and receive Baby Lock product updates and offers, go to If you have questions with
 To register your machine warranty and receive Baby Lock product updates and offers, go to www.babylock.com/profile. If you have questions with registration, visit your Authorized Baby Lock Retailer. CONTENTS
Symbols used. Move the part in the direction of the arrow. Set the clearance as indicated. Move the part to its highest or lowest position.
 4.1999. This service manual was compiled for use when repairing the XL5300, 5200, 5100, 5030, 5020, 5010,PX300,200,100 Zigzag Stitch Sewing Machines. Use this manual, together with the Parts Catalog, when
First published : May 1997 Fourth edition : January No
 First published : May 1997 Fourth edition : January 2006 No. 050153 INTRODUCTION Thank you for your purchasing Kansai Special's FX Series. Read and study this instruction manual carefully before beginning
16U288 SINGER' SEWING MACHINE. From the library of: Superior I Sewing Machine & Supply LLC INSTRUCTIONS. Form UIO3 (Rev, 377)., THE SINGER COMPANY
., THE SINGER COMPANY") iiv^- Form UIO3 (Rev, 377)., INSTRUCTIONS FOR USING AND ADJUSTING SINGER' SEWING MACHINE 16U288 THE SINGER COMPANY From the library of: Superior I Sewing Machine & Supply LLC CONTENTS PAGE DESCRIPTION
iiv^- Form UIO3 (Rev, 377)., INSTRUCTIONS FOR USING AND ADJUSTING SINGER' SEWING MACHINE 16U288 THE SINGER COMPANY From the library of: Superior I Sewing Machine & Supply LLC CONTENTS PAGE DESCRIPTION
SERVICE MANUAL AND PARTSLIST
 SERVICE MANUAL AND PARTSLIST Next 20 CONTENTS WHAT TO DO WHEN... 1~3 SERVICE ACCESS FACE COVER... 4 TOP COVER... 4 BASE COVER... 5 REAR COVER... 6 FRONT COVER... 7 MECHANICAL ADJUSTMENT NEEDLE THREAD TENSION...
CAUTION- SAVE THESE INSTRUCTIONS This product is for household use, or equivalent.
 Never operate this sewing machine if it has a damaged cord or plug, if it is not working properly, if it has been dropped or damaged, dropped into water. Return this sewing machine to the nearest authorized
Three-Thread Flatlock (Narrow and Wide)
") Three-Thread Flatlock (Narrow and Wide) Three-Thread Flatlock (Narrow) The Flatlock Stitch is used decoratively to achieve the look of applied trim on a garment, craft or home decorator projects. Special
Three-Thread Flatlock (Narrow and Wide) Three-Thread Flatlock (Narrow) The Flatlock Stitch is used decoratively to achieve the look of applied trim on a garment, craft or home decorator projects. Special
Out-Of-The-Box Basics: ID the Main Parts of a Sewing Machine
 Published on Sew4Home Out-Of-The-Box Basics: ID the Main Parts of a Sewing Machine Editor: Liz Johnson Tuesday, 27 September 2016 1:00 Sewing is an art. But it does rely on science and technology as well.
A. Preparing the fabric (not shown):
:") INSERTING ZIPPERS - CENTER INSERTION The zipper can be snapped on to the right or to the left side of the needle so that you can sew close to the zipper. When sewing on the right side of the zipper, attach
INSERTING ZIPPERS - CENTER INSERTION The zipper can be snapped on to the right or to the left side of the needle so that you can sew close to the zipper. When sewing on the right side of the zipper, attach
CONTENTS PRECAUTIONS BEFORE STARTING OPERATION PREPARATION FOR OPERATION CAUTIONS ON USE OPERATION
 CONTENTS PRECAUTIONS BEFORE STARTING OPERATION ------------------------------------- 1 PREPARATION FOR OPERATION 1. Adjustment of needle bar stop position ---------------------------------------------------------
INSTRUCTION BX1425P,PSM,PTV BX1433P,PSM,PTV BX1025P,PSM BX1033P,PSM. No First published : November 1997
 INSTRUCTION Industrial Sewing Machines BX1425P,PSM,PTV BX1433P,PSM,PTV BX1025P,PSM BX1033P,PSM First published : November 1997 No. 970112 INTRODUCTION Thank you for your purchasing Kansai Special's BX
CONTENTS. LOCATE AND IDENTIFYTHE PARTS... WlNDTHE BOBBIN... PREPARE YOUR TOP THREAD... WHAT TO DO WH EN...
 SERVICE MANUAL SEWING MACHINE MODEL 385.11206300 MARCH, 2003 CONTENTS LOCATE AND IDENTIFYTHE PARTS... WlNDTHE BOBBIN... PREPARE YOUR TOP THREAD... WHAT TO DO WH EN... 1 2 3 4-6 SERVICE ACCESS FACE COVER...
FBX1104P FBX1104 FBX1106P FBX1106
 FBX1104P FBX1104 FBX1106P FBX1106 Second edition : September 2004 No. 040037 INTRODUCTION Thank you for your purchasing Kansai Special's FBX Series. Read and study this instruction manual carefully before
Bobbin Holders 101. By Nancy Fiedler. Standard Bobbin Holder all Janome top loading bobbin machines.
 Bobbin Holders 101 By Nancy Fiedler Standard Bobbin Holder all Janome top loading bobbin machines. Usually this bobbin holder will have a small red triangle or red marking on the tension screw. It is always
week ONE Sewing 101 Getting Familiar with your Sewing Machine NOTES TO THE ADULTS #janomecamp18 Page 1
 se 2018 week ONE Sewing 101 with Getting Familiar with your Sewing Machine If this is your first time sewing, or a refresher, this week s activities are sure to be fun! Here s an overview of some of the
Replacing the Reciprocator on an SWF Multi-head.
 Replacing the Reciprocator on an SWF Multi-head. Follow the instructions below to replace the reciprocator in the SWF multi-head machines. The tools required are found in the tool kit that came with the
41P PFAFF HOBBY SERGER
 41P PFAFF HOBBY SERGER ow po On top of it. or damage to machine. threading and sewing. PERFORMANCE CHECKLIST 12 CHANGING NEEDLE 12 CARING FOR YOUR MACHINE 12 JOIN TWO PIECES OF FABRIC 12 DECORATIVE FLATLOCK
Q-Zone Hoop-Frame. Assembly Instructions. Copyright July 11, 2018 Grace Company (Reproduction Prohibited) Version 1.8
 Version 1.8") Q-Zone Hoop-Frame Assembly Instructions Copyright July 11, 2018 Grace Company (Reproduction Prohibited) Version 1.8 Table of Contents Table of Contents... i Warranty... ii Parts List Box 1...iii Box 2...
Q-Zone Hoop-Frame Assembly Instructions Copyright July 11, 2018 Grace Company (Reproduction Prohibited) Version 1.8 Table of Contents Table of Contents... i Warranty... ii Parts List Box 1...iii Box 2...
Twin-needle stitching By: julstech
 1T Twin-needle stitching By: julstech http://www.burdastyle.com/techniques/twin-needle-stitching Twin-needle stitching can be used for quick hem finishes, pintucking and even decorative stitching. Twin-needle
CONTENTS LOCATE AND IDENTIFY THE PARTS... WIND THE BOBBIN... PREPARE YOUR TOP THREAD... STITCH SELECTOR / STITCH LENGTH/STITCH WIDTH CONTROLS...
 SERVICE MANUAL SEWING MACHINE MODEL 385. 15208400 OCTOBER, 2003 CONTENTS LOCATE AND IDENTIFY THE PARTS... WIND THE BOBBIN... PREPARE YOUR TOP THREAD... STITCH SELECTOR / STITCH LENGTH/STITCH WIDTH CONTROLS...
Practicing Basic Machine Operation Sample #1
 Practicing Basic Machine Operation Sample #1 Listed below are various tasks required in basic sewing machine operation. Demonstrate your ability to perform each task by creating a sample. The samples that
Clothing Construction I Samples Packet
 Clothing Construction I Samples Packet Name Objectives: 1. To identify how to use and care for the sewing machine and tools. (#1 & #2) 2. Demonstrate how to use a variety of stitches and presser feet.
Sample Packet. Directions: Describe the functions of the following basic parts of a sewing machine.
 Sample Packet NAME: Directions: Describe the functions of the following basic parts of a sewing machine. SEWING MACHINE PARTS: Needle stitch plate: Feed dog system: Presser foot: Bobbin case: Spool pin:
PARTS LIST MODEL: HDEJ1800
 First Edition: June 0 PARTS LIST 0 8 4 8 8 4 8 0 KEY PARTS NO. NO. DESCRIPTION 0400 Top cover (unit) 00 Top cover (unit) 0000 Top cover 4 40A04 Flip-top sewing instruction panel 000 Hinge rod (right) 00
SERVICING MANUAL 419S/423S
 SERVICING MANUAL 415 419S/423S TROUBLESHOOTING PROBLEM CAUSE REMEDY REFERENCE 1. SKIPPING 1. NEEDLE IS NOT INSERTED INSERT THE NEEDLE PROPERLY. STITCHES PROPERLY. 2. NEEDLE IS BENT OR WORN. CHANGE THE
SINGER 591D200A 591D240A 591D303A 591D305A 591C308A. rom the library of: Superior Sewing Machine & Supply LLC 591D300A
 SINGER 591D200A 591D240A 591D300A 591D303A 591D305A 591D308A 591C200A 591C240A 591C300A 591C308A CONTENTS Page Introducingtlie NewSINGER* Sewing Machine Model 591 \ Oiling the Machine 2 Oiling the Puller
SERVICE MANUAL MODEL: 13512, 14412, 15312
 SERVICE MANUAL MODEL: 13512, 14412, 15312 CONTENTS TROUBLESHOOTING... 1-3 SERVICE ACCESS (1) FACE COVER, BELT COVER... 4 SERVICE ACCESS (2) BASE PLATE... 5 SERVICE ACCESS (3) FRONT COVER... 6 SERVICE ACCESS
TIPS & TROUBLESHOOTING
 Achieving good stitch quality 5450 North W Street Pensacola FL 32505 850-433-1414 www.martellinotions.com TIPS & TROUBLESHOOTING Understanding how your long arm machine makes a stitch will help you make
Operation Manual GF MH/L38 GF MH/L38 GF MH/L38 GF MH/L38
 Operation Manual GF-137-443 MH/L38 GF-137-448 MH/L38 GF-237-443 MH/L38 GF-237-448 MH/L38 ANITA B, s.r.o. Průmyslová 2453/7 680 01 Boskovice Czech Republic tel: +420 516 454 774 fax: +420 516 452 751 e-mail:
SEWING MACHINE MODEL 385, 15358
 SERVICE MANUAL SEWING MACHINE MODEL 385, 15358 BER, 2006 CONTENTS LOCATE AND identify THE PARTS... WiND THE BOBBIN... PREPAREYOURTOPTHREAD... WHAT TO DO WHEN... 1 2 3 4-6 SERVICE ACCESS FACE COVER... BELT
Part 1: Operating Instructions Cl. 271 to 274
 Contents Page: Preface and General Safety Notes Part 1: Operating Instructions Cl. 271 to 274 1. Product Description 1.1 Short Description and Proper Use..................... 5 1.2 Technical Data................................
Happy December! On the wrong side of Fabric A, mark 1/4" from each edge on all four corners.
 Happy December! The holidays are almost here, but there is still time to whip up some of these fun napkins. Not only did I need napkins for table, but I love any opportunity to sit down at the Horizon
Copyright December 17, 2018 Grace Company (Reproduction Prohibited) Version 3.4
 Version 3.4") Copyright December 17, 2018 Grace Company (Reproduction Prohibited) Version 3.4 IMPORTANT SAFETY INSTRUCTIONS When using an electrical machine, basic safety precautions should always be followed, including
Copyright December 17, 2018 Grace Company (Reproduction Prohibited) Version 3.4 IMPORTANT SAFETY INSTRUCTIONS When using an electrical machine, basic safety precautions should always be followed, including
Basic steps to time the Gammill quilting machine s rotary sewing hook
 Basic steps to time the Gammill quilting machine s rotary sewing hook 1.) Turn the machine off and unplug it. 2.) With the needle bar in the raised position, remove the bobbin and bobbin case. 3.) Remove
Brother Industries, Ltd. Nagoya, Japan
 4. 2001. This service manual has been compiled for explaining repair procedures of the MODEL XL-6562, XL6452, XR- 46. This was produced based on up-to-date product specifications at the time of issue,
Owner s Manual For Sit Down
 Owner s Manual For Sit Down Feb 2015 Table of Contents Warranty...3 Your Light Fixture...4 Attaching the Belt Guard...4 Your Thread Stand...5 Control panel...6 Needle position...7 Speed Setting...8 What
INSTRUCTION. Industrial Sewing Machines V7100/D,DE,F,ML W8100/D,DE,F,C W8042 W V7002-1S W8103-1S. No Third edition : March 2001
 INSTRUCTION Industrial Sewing Machines V7100/D,DE,F,ML W8100/D,DE,F,C W8042 W8042-1 V7002-1S W8103-1S Third edition : March 2001 No. 010012 INTRODUCTION Thank you for your purchasing Kansai Special's V.W
Owner s Manual For Sit Down
 Owner s Manual For Sit Down Table of Contents Warranty...3 Attaching your square tubing...4 Your Light Fixture...5 Your Thread Stand...6 What is the Tension Release Lever?...7 How Do I Adjust the Height
Understanding the Controls
 Understanding the Controls Your new Millennium or Freedom SR machine uses simple controls and has handy features to make your quilting more fun and enjoyable. The charts below give you a quick overview
When using an electrical appliance, basic safety precautions should always be followed, including the following:
 Instruction book IMPORTANT SAFETY INSTRUCTIONS This appliance is not intended for use by persons (including children) with reduced physical, sensory or mental capabilities, or lack of experience and knowledge,
Sew Beautiful. with Kirei NX7 JUKI: SEWING MACHINES WITH HISTORY
 Sew Beautiful with Kirei N7 JUKI: SEWING MACHINES WITH HISTORY Since their introduction in 1947, JUKI s home sewing machines have been a brand loved around the world. JUKI's home sewing machines contain
ABM International, Inc.
 ABM International, Inc. Lightning Stitch required 1 1.0: Parts List head and motor assembly (Qty. 1) Reel stand (Qty. 1) Needle bar frame clamp (Qty. 1) Motor drive (Qty. 1) 2 Cable harness with bracket
Chapter 1: Introduction: The Machine, Needle, and Thread
 Training: HAPPY HCH-701 Operations & Maintenance For HCH Journey with Touch Screen Chapter 1: Introduction: The Machine, Needle, and Thread Introduction to your machine p.2 Diagram of major parts p. 2
TORO 4000 TORO and. INSTRUCTION and SPARE PARTS MANUAL. artisanu. TORO 3000 and TORO Threading Diagram
 Please make sure that the thread is inserted between the two thread tension disks. If your brand of Thread pops-out of the tension disks, wind the thread all the way around the disks and back through the
Sewing and Embroidery Machine
 Mid-Level Sewing and Embroidery Machine Discover new paths to creativity with the Baby Lock Aventura II sewing and embroidery machine. Powered by Baby Lock IQ TechnologyTM, the Aventura II makes every
SCHACHT STANDARD FLOOR LOOMTM
 SCHACHT STANDARD FLOOR LOOMTM FL3109 FL3111 FL3113 FL3115 FL3121 FL3123 FL3125 FL3127 FL3310 FL3312 FL3314 FL3316 FL3322 FL3324 FL3326 FL3328 Assembly instructions LOW CASTLE LOOM IN MAPLE Find out more
...r.smcefbdb. DNSEWe CONSOLIDATED SEWING MACHINE CORP. L INDUSTRIAL SEWING & CUTTING EQUIPMENT OPERATING INSTRUCTIONS. and PARTS LIST.
 ...r.smcefbdb DNSEWe CONSOLIDATED SEWING ACHINE CORP. L INDUSTRIAL SEWING & CUTTING EQUIPENT OPERATING INSTRUCTIONS and PARTS LIST for CONSEW ODELS 18 and 118 INDUSTRIAL SEWING ACHINES IDA TED SEWING ACHINE
assembly instructions
 THE LILLI LOOM assembly instructions Find out more at schachtspindle.com Schacht Spindle Company 6101 Ben Place Boulder, CO 80301 p. 303.442.3212 800.228.2553 f. 303.447.9273 2017 Schacht Spindle Company,
INSTRUCTION MANUAL 2263
 INSTRUCTION MANUAL 2263 TABLE OF CONTENTS Congratulations on the purchase of your new SINGER sewing machine! May we recommend that before you start using your machine, you take time to discover the many
WOLF PUP LOOM TM & WOLF PUP LT LOOM TM
 WOLF PUP LOOM TM & WOLF PUP LT LOOM TM Assembly Instructions FL3000 FL3006 FL3009 WOLF PUP WOLF PUP LT Find out more at schachtspindle.com Schacht Spindle Company 6101 Ben Place Boulder, CO 80301 p. 303.442.3212
The Mini Pinni Quilting Frame
 The Mini Pinni Quilting Frame Copyright September 2007 Jim M. Bagley, GraceWood, Inc (Reproduction Prohibited) Print Date 10-16-07 1 The Mini Pinni Quilting Frame By The Grace Company Part List Parts List
Getting to Know: A-LINE SERIES Model BL450A. Baby Lock Consumer Helpline:
 Getting to Know: A-LINE SERIES Model BL450A Baby Lock Consumer Helpline: 800-313-4110 www.babylock.com Model BL450A Introducing Lauren, the easy-to-use serger from the Baby Lock A-Line series of sewing
SERVICE MANUAL FOR HOMELOCK M1034D 2034D 1134DW 1134D
 SERVICE MANUAL FOR HOMELOCK M1034D 2034D 1134DW 1134D 11.2000 2.2012 I HOW TO USE THIS MANUAL... 1 II HOW TO ADJUST... 2 1. Height of needle bar... 2 2. Position of the lowerlooper... 3 3. Timing of the
CONTENTS LOCATE AND IDENTIFY THE PARTS... WIND THE BOBBIN... PREPARE YOUR TOP THREAD... STITCH SELECTOR / STITCH LENGTH/STITCH WIDTH CONTROLS...
 SERVICE MANUAL SEWING MACHINE MODEL 385. 15218400 OCTOBER, 2003 CONTENTS LOCATE AND IDENTIFY THE PARTS... WIND THE BOBBIN... PREPARE YOUR TOP THREAD... STITCH SELECTOR / STITCH LENGTH/STITCH WIDTH CONTROLS...
4300B. /".y, instructions. Z1GoZAG SEWING MACHINE # 4300B
 4300B,r /".y, k instructions Z1GoZAG SEWING MACHINE # 4300B TABLE OF CONTENTS Adjusting for Good Stitches... 24 Adjusting Pressure of Presser Foot... 10 Adjusting Tensions... 12-13 Blind Stitching... 19
SINGER PROJECTS Accent Pillow with Free-Motion Stitching PROJECT SKILL LEVEL:
 SINGER PROJECTS Accent Pillow with Free-Motion Stitching This small accent pillow features free-motion stitching and 3D embellishments. Although this project sheet provides instructions for using these
NV1100 & NV1300 NV1100 & NV1300
 NV1100 & NV1300 NV1100 & NV1300 Get creative and tackle large projects with these easy to use computerised sewing and quilting machines. Create beautiful sewing and quilting projects with a wide range
CORNELY FD. OPERATING MANUAL English
 CORNELY FD OPERATING MANUAL English NV. A. DE KONINCK SA. Avenue Sleeckx 84-86 B-1030 BRUSSELS - BELGIUM Phone : ++32/2 216 31 40 Fax : ++32/2 242 41 89 E-mail : info@titansew.com Web : www.titansew.com
SAVE THESE INSTRUCTIONS
 INSTRUCTION MANUAL IMPORTANT SAFETY INSTRUCTIONS This appliance is not intended for use by persons (including children) with reduced physical, sensory or mental capabilities, or lack of experience and
FBX-PA-2AC. Third edition : April No
 FBX-PA-2AC Third edition : April 2006 No. 060058 INTRODUCTION Thank you very much for purchasing Kansai Special FBX series. Read and study this Instruction Manual carefully before you start any of the
Brother PQ- Series Accessories
 Brother PQ- Series Accessories The PQ-series of high-speed straight stitch machines (1300, 1500 and 1500S) are designed to sew quickly and accurately with a wide variety of fabrics, even combinations of
11210 INSTRUCTION MANUAL
 11210 INSTRUCTION MANUAL Important Safety Instructions When using an electrical appliance, basic safety precautions should always be followed, including the following: Read all instructions before using
Stained Glass Block Mini Quilt By Joanna Marsh
 By Joanna Marsh If you have a case of the winter blues, this mini quilt will be a great way to brighten up your day! Select your favorite colors (bright colors or gem tones will work wonderfully with this
Computerised Models. The World s leading sewing machine manufacturer
 Computerised Models The World s leading sewing machine manufacturer www.janome.co.uk Computerised sewing machines are more versatile machines with added features which help to make sewing easier and more
Innov-ís 2500D PREMIUM PACKAGE
 Innov-ís 2500D PREMIUM PACKAGE Version 2 Upgrade Kit Operation Manual Before using this upgrade kit, be sure to read this Operation Manual for information on its correct use. CONTENTS Before You Start...
SERVICE MANUAL PARTS LIST MODEL: NH40
 SERVICE MANUAL & PARTS LIST MODEL: NH40 CONTENTS What to do when... 1-3 SERVICE ACCESS Face Cover... 4 Bed Cover... 5 Free-arm Cover... 6 Front Cover... 7 Rear Cover... 8 MECHANICAL ADJUSTMENT Presser
Hats on the PR-620. The PR620 has two specialized hat frames to allow caps to be embroidered in a natural tubular fashion.
 How to set up the cap frame driver and the mounting jig are covered in these instructions. Learn hat loading, attaching the frame cap to the machine and screen settings for hats. Combine innovative designs
Machine Quilting Frame assembly, and instruction manual
 Machine Quilting Frame assembly, and instruction manual Table of Contents Parts List................. Pg. 2 Step 1 - Legs............... Pg. 4 Step 2 - Lower Leg Brace....... Pg. 5 Step 3 - Frame Ends..........
SAVE THESE INSTRUCTIONS
 INSTRUCTION BOOK IMPORTANT SAFETY INSTRUCTIONS When using an electrical appliance, basic safety precautions should always be followed, including the followings: Read all instructions before using this
Year 8 Textiles KNOWLEDGE BOOKLET. You will be set homework every 2 weeks.
 Year 8 Textiles At the end of this unit you will have an assessment. 50% = The quality of the Textiles cushion cover you have made 50% = The information you have learnt KNOWLEDGE BOOKLET You will be set
SAFETY MAINTENANCE THE LONG ARM MACHINE
 SAFETY MAINTENANCE THE LONG ARM MACHINE Quilting Machine Usage Guidelines All general safety guidelines apply to this piece of equipment Befoaoe Use: Use only attachments recommended by the manufacturer
Embroidery process - EC on PC
 66 Software EC on PC Embroidery process - EC on PC PC display Motif the motif is displayed in color the smallest possible hoop for the selected motif is displayed the needle position (marked by a fine
UK10 UK11. First published: June No.KX03023
 UK10 UK11 First published: June 2003 No.KX03023 INTRODUCTION Thank you for purchasing Kansai Special s UK series machine. Please study this instruction manual carefully before operating the machine. 1.
GrandQuilter. Owner s manual
 GrandQuilter Owner s manual This household sewing machine is designed to comply with IEC/EN 60335-2-28 and UL1594 IMPORTANT SAFETY INSTRUCTIONS When using an electrical appliance, basic safety precautions
803, 806, 807 instruction book 800., 801, 802, Hobbymatic
 A 803, 806, 807 instruction book 800., 801, 802, Hobbymatic I 4 Fold out this page Contents Page Removing the carrying case cover 1 Foot control receptacle 1 Electrical connection 2 Foot control 2 Disengaging
Project #2: Bookmark. Shopping List:
 Project #2: Bookmark This is the 2nd project in our Get Kids Sewing Series with SINGER and SkipToMyLou.org. Bookmarks are fun to make and are great gifts for anyone. Choose fabric for the receiver s interest
WHITE SEWING MACHINE CORPORATION WHITE SEWING MACHINE PRODUCTS LTD. Toronto 16, Ontario, Canada
 V -a a; S a a a. a,.. I.. I S. Co Toronto 16, Ontario, Canada CLEVELAND 11, OHIO WHITE SEWING MACHINE PRODUCTS LTD. WHITE SEWING MACHINE CORPORATION tension adjustments, maintenance, or any of the operations
MACHINE SEW HOW TO POT HOLDER. Project
 GET TO KNOW YOUR ING BY TRYING OUT THE VARIOUS STITCHES AVAILABLE, THEN TURN YOUR STITCH SAMPLER INTO A USEFUL. CUSTOMIZE YOUR PROJECT BY CHOOSING YOUR OWN FABRIC AND MATCHING OR CONTRASTING THREAD COLOURS.
Janome. Janome 7312 Instruction Manual. Magnolia 7312 Owners Manual/ User Guide
 Janome Magnolia 732 Instruction Manual IMPORTANT SAFETY INSTRUCTIONS This sewing machine is not a toy. Do not allow children to play with this machine. The machine is not intended for use by children or
PFAFF. rom the library of: Superior Sewing Machine & Supply LLC. Service Manual Justieranl. engi. 7.92
 PFAFF 5642 Service Manual 296-12-13925 Justieranl. engi. 7.92 Notes on safety The machine must only be commissioned in full knowledge of the instruction book and operated by persons with appropriate training.
Owyhee County 4-H. Cloverbud. Activity Book
 Owyhee County 4-H Cloverbud Activity Book Name Age Year in 4-H 20 Club Name Member s Signature Parent/Guardian s Signature Leader s Signature Projects or activities I worked on this year were: I attended
This sewing machine is designed and manufactured for household use only. Read all instruction before using this sewing machine.
 Instruction book IMPORTANT SAFETY INSTRUCTIONS This sewing machine is not a toy. Do not allow children to play with this machine. The machine is not intended for use by children or mentally infirm persons