My BERNINA. Serger Workbook 1. Basic Serger Use For all current BERNINA sergers
|
|
|
- Alexis Norris
- 6 years ago
- Views:
Transcription

1 My BERNINA Serger Workbook 1 Basic Serger Use For all current BERNINA sergers 2011 BERNINA of America, Inc. Permission granted to copy and distribute in original form only. Content may not be altered or used in any other form or under any other branding.


2 Table of Contents Introduction thread Balanced Stitch... 6 Adjusting Tension Settings... 7 Micro Thread Control... 8 Stitch Length... 9 Cutting Width Differential Feed Securing Serged Seams Presser Foot Tape Guide Thread Balanced Stitch: Wide and Narrow Inside Corners Outside Corners Thead Rolled Hem Thread Flatlock Stitch Thread Rolled Hem Thread Flatlock Color-Coded Threading Charts MDA 800DL Basic Serger Use 1300MDC 700D 009DCC The information in this workbook applies to the current line of BERNINA Sergers. Note: Some exercises apply only to certain models equipped with the feature being highlighted. 2
3 Introduction Congratulations on the purchase of your new BERNINA serger. The information in this workbook will help you learn the basics of using your new piece of sewing equipment. Even though it is very different from your sewing machine, once you learn to incorporate serging techniques into your sewing, you ll wonder how you ever got along without it. Sometimes called the microwave of sewing, your serger will speed your sewing in several ways, letting you produce more in less time. The speed of the serger is faster than a sewing machine and because it performs several operations (trimming, seaming, and overcasting) at the same time, you sew faster, and in the process, produce neater and more professional-looking results. 4-thread Balanced Stitch 3-thread Balanced Stitch 2-thread Balanced Stitch Because the serger is a specialized piece of equipment, it only sews a limited number of techniques and even though the workings are more complex than a sewing machine, it doesn t take long to learn the basics. The stitching exercises in this workbook use four, three, and two thread stitch formations. Once you have completed the exercises designated for your BERNINA overlock machine, attach the sewn samples to the indicated pages and insert the pages into plastic page protectors and store them in a 3-ring binder. They can then be used as a reference tool in the future as you use your serger and explore the creative possibilities it affords you. BERNINA of America, Inc. strives to provide its customers with quality sewing and overlock machines, and also with informative publications and classes. Along with providing My BERNINA Classes, your local BERNINA dealer stocks BERNINA books and magazines, such as Feet-ures, Serger Technique Reference Guide, Through the Needle Online magazine. You will also find a wealth of serger information on the BERNINA of America website at Each BERNINA serger is identified by a model number followed by a series of letters. These letters indicate special features for that particular model. Current BERNINA models: 1300MDC 1150MDA 800DL 700D Overlock Model Name Example: 1300 MDC Model Number A = Automatic Needle Threader C = Coverstitch / Chainstitch D = Differential L = Looper Threading Device M = Micro Thread Control Special Features 3


4 Needle and Thread Serger Needles BERNINA sergers use the same type of needle as most sewing machines: 130/705H. Note: An exception to this is the JLx2 needles that can help perfect the cover stitch on models 1300 MDC and 009DCC. Use size 80/12 or 90/14 needle in your serger; larger needles can interfere with looper movement and cause damage; smaller needles may not form the stitches correctly. Always make sure needles are fully inserted as high as possible, with the flat side to the back. When using both the right needle and the left needle, the needles will not be even with they are fully inserted. The left needle will be slightly higher than the right one. Serger Thread Serger threads are usually polyester and are finer (lighter weight) than many sewing machine threads to avoid thread build-up and excessive bulk in seams. It is important that serger thread is smooth without variations in diameter as it needs to feed smoothly through many thread guides for good stitch formation. You also want a good-quality thread such as Mettler Metrocor that is not fuzzy and does not leave excessive lint in the lower part of your overlock machine. Serger threads are sold on cones for economy and convenience; regular spools of thread may be used but will not last very long when forming serger stitches. Along with serger thread, there are applications that call for specialty and decorative threads. Listed below are some of these threads commonly used in the serger: Texturized Nylon Thread such as YLI Woolly Nylon and Mettler Metroflock. A very elastic thread with excellent coverage; perfect for rolled edges and knit seams. Available in solid and variegated colors, and metallics. Polyester Topstitching Thread such as YLI Jeans Stitch & Mettler Cordonnet this heavy thread is used for decorative stitching (flatlocked seams and overcast edges). Also nice for cover and chain stitching. Available in solid and variegated colors. Rayon Decorative Threads such as YLI Pearl Crown Rayon & YLI Designer 6 shiny threads for decorative applications. Pearl Crown Rayon is twisted, while Designer 6 is untwisted. Available in solid and variegated colors. Metallic Decorative Threads such as YLI Candlelight adds a bit of glitz to seams and edgings. Decorative Sewing Threads sewing machine threads can also be used in the serger, and are particularly effective when several are used together as one thread. 4

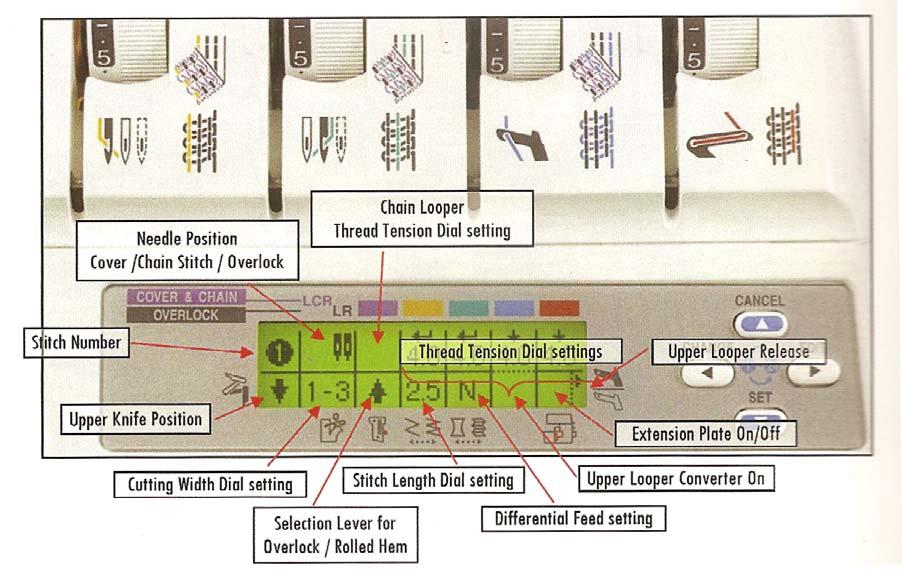
5 1300MDC Screen Information 5


6 4-Thread Balanced Stitch Fabric: Firm fabric, 6 x 6 Thread: 4 cones of serger thread (blue, red, green, yellow) Stitch: 4-thread overlock Thread the serger for a 4 thread overlock stitch using thread colors to match the color-coded threading path on the serger. Adjust all thread tension settings as indicated below. Fold the fabric in half to 3 x 6. To begin stitching, lift the front of the presser foot with your right thumb and slide the fabric under the presser foot. Release the tip of the presser foot and begin serging, trimming the fold away. Serge to the end of the fabric. Continue stitching off the fabric until you have a 3-4 thread chain. Cut thread chain. Examine the serger stitch formation: Blue: Loops should extend to the edge of the fabric, interlocking with the red loops of the lower looper. Red: Loops should extend to the edge of the fabric, interlocking with the blue loops of the upper looper. Yellow: Needle stitches should appear along the inside edge of the stitch as straight stitches or tiny dots of thread. Green: Needle stitches should appear as a line of straight stitching running through the middle of the serger stitching See the following page for tension adjustment information. Make any necessary tension adjustments and serge another row of stitching. Upper Looper 3-5 Lower Looper 3-5 Left Needle 3-5 Right Needle 3-5 Stitch Length 2.5 Cutting Width 2-3 Differential Feed N 6


.")
7 Adjusting Tension Settings Examine Your 4-thread sample. The illustrations below show examples of unbalanced stitches and how To correct the settings to balance the stitch. When making corrections in the tension settings, increase or decrease the settings as needed, moving the dial ½ to 1 number at a time. Stitch a seam using the new settings and then evaluate the new stitch. Continue in this manner until the stitch is balanced. Upper and Lower Loopers - Tight Tension Unbalanced: The looper threads bite into the edge of the fabric and/or the seam allowance is folded or scrunched in the stitch. Correction: Decrease (lower number) one or both looper tensions until the seam allowance is flat and loopers meet at the edge. Note: This problem might also result from an incorrect cutting width setting; see page 10 for more information. Upper Looper - Loose Tension Unbalanced: The looper threads are not at the edge of the fabric. Upper looper thread is visible on the back of the fabric and the looper threads are very loose. Correction: Make sure the thread is seated in the tension guides. If it is, tighten the upper looper thread (higher number). Lower Looper - Loose Tension Unbalanced: The looper thread does not lock on the edge of the fabric. Lower looper thread is visible on the face of the fabric. The looper threads are very loose. Correction: Make sure the thread is seated in the tension guides. If it is, tighten the lower looper thread (higher number). Left Needle - Loose Tension Unbalanced: The yellow needle forms loops on the underside of the fabric. The seam is not secure and the yellow thread may show in the seam line. Correction: Make sure the yellow thread is seated in the tension guide. If it is, tighten the left needle tension (higher number). Right Needle - Loose Tension Unbalanced: The green needle thread forms loops on the underside of the fabric. Correction: Make sure the green thread is seated in the tension guide. If it is, tighten the right needle tension (higher number). Right and Left Needles - Tight Tension Unbalanced: The green and yellow needle threads are pulled snugly, causing puckers in the fabric at the seam line. Correction: Make sure the threads are seated in the tension guides or have not double-wrapped around a threading guide. If they have, unwrap or loosen appropriate needle tension (lower number). 7


8 Micro Thread Control Fabric: Firm fabric, 6 x 6 Thread: 4 cones of serger thread (blue, red, green, yellow) Stitch: 4-thread overlock Divide the fabric into 4 equal sections along one side, finger-press the folds to form creases. Thread the serger for a 4 thread overlock stitch using thread colors to match the color-coded threading path on the serger. Adjust all thread tension settings as indicated below. Set the mtc lever to the maximum setting, serge on the first fold. Move the mtc lever to the normal setting, serge on the second fold. Move the mtc lever to the minimum setting, serge on the third fold. Mark the sample: mtc - maximum mtc - normal mtc - minimum Note: The mtc function is a fast and easy way to make a stitch formation look perfect without having to adjust multiple thread tension. Different fabrics and threads will affect the formation of the stitch so the mtc setting may vary from fabric to fabric. maximum normal minimum Upper Looper 3-5 Lower Looper 3-5 Left Needle 3-5 Right Needle 3-5 Stitch Length 2.5 Cutting Width 2-3 Differential Feed N before mtc adjustment after mtc adjustment 8

9 Stitch Length Fabric: Firm fabric, 6 x 6 Thread: 4 cones of serger thread (blue, red, green, yellow) Stitch: 4-thread overlock Fold fabric in half to 3 x 6. Using a fabric marker, divide the fabric into four equal sections along the folded edge. Thread the serger for a 4 thread overlock stitch using thread colors to match the color-coded threading path on the serger. Adjust all thread tension settings as indicated below. Adjust the stitch length to 4mm. Serge to the first mark along the folded edge, trimming the fold slightly. 4mm 3mm Adjust the stitch length to 3mm and serge to the second mark. Adjust the stitch length to 2mm and serge to the third mark. Adjust the stitch length to 1mm and serge to the end. 2mm Mark the stitch length settings on the fabric sample. Return stitch length to its normal setting, 2.5mm. 1mm Stitch length adjustments may be needed to accommodate thicker or thinner threads or different weights of fabric. General guidelines for stitch length settings: 1-1.5mm: rolled hems and decorative edges 2-2.5mm: seaming and general serging 3-4mm: certain techniques such as gathering and applying elastic Upper Looper 3-5 Lower Looper 3-5 Left Needle 3-5 Right Needle 3-5 Stitch Length varies Cutting Width 2-3 Differential Feed N 9

10 Cutting Width Fabric: Firm fabric, 6 x 6 Thread: 4 cones of serger thread (blue, red, green, yellow) Stitch: 4-thread overlock Fold the fabric in half to 3 x 6. Divide and mark the fabric into three equal sections along the folded edge. High (wide) Thread the serger for a 4 thread overlock stitch using thread colors to match the color-coded threading path on the serger. Adjust all thread tension settings as indicated below. Rotate the upper knife up. Adjust cutting width to the widest setting. Rotate the upper knife down into cutting position. Serge to the first mark on the fabric, stopping when the knife edge is on the mark. Mid Adjust cutting width to a mid-range setting and serge to the second mark. Adjust the cutting width to the lowest setting and serge to the end of the fabric. Mark the cutting width settings on the sample. Low (narrow) Rotate the upper knife up. Return the cutting width to its normal setting. Rotate the upper knife down into cutting position. Upper Looper 3-5 Lower Looper 3-5 Left Needle 3-5 Right Needle 3-5 Stitch Length 2.5 Cutting Width varies Differential Feed N 10

11 Differential Feed: Stretchy Fabrics Fabric: Knit ribbing, three pieces, 3 x 6 each (ballpoint may be used if needed) Thread: 4 cones of serger thread (blue, red, green, yellow) Stitch: 4-thread overlock Thread the serger for a 4 thread overlock stitch using thread colors to match the color-coded threading path on the serger. Adjust all thread tension settings as indicated below. With differential set at N, serge two of the ribbing pieces together along one 6 edge. If the fabric is stretchy enough you will have a wavy or stretched seam. Adjust the differential to 2.0. Serge the remaining ribbing to the other side of the first piece, trimming slightly. With differential at a higher setting, the wavy edge should be eliminated. Mark the differential settings on the fabric sample. Return the differential feed setting to N (normal). N (normal) 2mm Upper Looper 3-5 Lower Looper 3-5 Left Needle 3-5 Right Needle 3-5 Stitch Length 2.5 Cutting Width 2-3 Differential Feed N 11

12 Differential Feed: Soft Fabrics Fabric: Lightweight, soft, 4 x 6 Thread: 4 cones of serger thread (blue, red, green, yellow) Stitch: 4-thread overlock Thread the serger for a 4 thread overlock stitch using thread colors to match the color-coded threading path on the serger. Adjust all thread tension settings as indicated below. With differential set at N, serge on one 6 edge. If fabric is lightweight enough you will have a puckered edge. Adjust the differential to 0.7. Serge along the other 6 edge, trimming slightly. With a low differential setting, the puckered edge should be eliminated. Mark the differential settings on the fabric sample. Return the differential feed setting to N (normal). 0.7mm N (normal) Upper Looper 3-5 Lower Looper 3-5 Left Needle 3-5 Right Needle 3-5 Stitch Length 2.5 Cutting Width 2-3 Differential Feed varies 12

13 Differential Feed: Gathering Fabric: Lightweight fabric, 6 x 12 Thread: 4 cones of serger thread (blue, red, green, yellow) Stitch: 4-thread overlock Using a fabric marker divide the fabric into 3 equal sections along one 12 side. Thread the serger for a 4 thread overlock stitch using thread colors to match the color-coded threading path on the serger. Adjust all thread tension settings as indicated below. Turn the differential feed dial to 2. Serge to the first mark. Adjust stitch length to 4mm and serge to the second mark. Move the thread tension levers up to 8 to increase both needle thread tensions. Serge to the end of the fabric. Return the differential feed to N (normal) and the stitch length to 2.5 (normal). Move the thread tension levers to return tensions to normal (3-5). Upper Looper 3-5 Lower Looper 3-5 Left Needle 3-5 Right Needle 3-5 Stitch Length varies Cutting Width 2-3 Differential Feed varies 13


14 Securing Serged Seams Fabric: Firm fabric, 6 x 6 Thread: 4 cones of serger thread (blue, red, green, yellow) Stitch: 4-thread overlock Thread the serger for a 4 thread overlock stitch using thread colors to match the color-coded threading path on the serger. Adjust all thread tension settings as indicated below. Stitch a 2-3 thread chain without fabric. Fold fabric in half to 3 x 6 and place under the presser foot. Take 2-3 stitches on the fabric. Lower the needles into the fabric. Raise the presser foot and with your left hand gently pull the thread chain around the needles to the knife. Lower the presser foot and continue serging (cutting off the excess thread chain) until you are one stitch off the end of the fabric. Locate the Stitch Selection lever on the right side of the cloth plate; pull it toward you, releasing the thread chain from the stitch tongue. Raise the presser foot and carefully flip the fabric over so that The lower looper side of the previously serged seam will be overstitched. Place the fabric under the presser foot so that the first stitch will enter the fabric when you begin stitching. Slide the Stitch Selection lever toward the body of the serger. Serge for about 1, overstitching the previous stitching. Guide the fabric so as not to cut the previous stitching. Optional: Rotate upper knife up. Raise the toe of the presser foot and rotate the fabric 90 clockwise. Serge off the edge of the fabric. If the upper knife is up, rotate it down into the cutting position. Upper Looper 3-5 Lower Looper 3-5 Left Needle 3-5 Right Needle 3-5 Stitch Length 2.5 Cutting Width 2-3 Differential Feed N 14

15 Presser Foot Tape Guide Fabric: Two pieces cotton interlock fabric, 3 x 6 each and Narrow twill tape, 8 Thread: 4 cones of serger thread (blue, red, green, yellow) Stitch: 4-thread overlock Thread the serger for a 4 thread overlock stitch using thread colors to match the color-coded threading path on the serger. Adjust all thread tension settings as indicated below. Locate the tape guide on the presser foot. Using the small screwdriver from the accessory pouch, loosen the fixing screw and slide the tape guide all the way to the left. Snug the screw. Slip the twill tape or ribbon into the slot on the presser foot and position it under the foot, pulling it to the back. Lower the presser foot and lower the needles into the tape or ribbon. Loosen the fixing screw and adjust the tape guide to the width of the tape or ribbon. Retighten the screw. Place the fabric pieces right sides together. Slip the fabric under the foot and seam along the 6 side, catching the tape or ribbon in the serged edge. Remove the fabric from under the presser foot and examine the seam. It will not stretch; the tape or ribbon has stabilized the seam. Upper Looper 3-5 Lower Looper 3-5 Left Needle 3-5 Right Needle 3-5 fixing screw Stitch Length 2.5 Cutting Width 2-3 Differential Feed N 15

16 3-Thread Balanced Stitch Fabric: Firm fabric, 8 x 6 Thread: 3 cones of serger thread (red, blue, green for narrow and red, blue, yellow for wide) Stitch: 3-thread overlock Wide Balanced Stitch Using the small screwdriver and brush/needle insertion tool, remove the right needle. Snug the needle set screw after removing the needle. Thread the serger for a wide 3-thread overlock stitch using the left needle and thread colors to match the color-coded threading path on the serger. Adjust all thread tension settings for a balanced stitch as indicated below. Fold fabric in half to be 4 x 6. Serge along the folded edge of the fabric, trimming slightly to remove the fold. Narrow Balanced Stitch Using the small screwdriver and brush/needle insertion tool, loosen the right needle screw and insert the right needle. Hint: Place the point of the needle directly above the right needle space of the presser foot, then lift the needle up to place the shank in the correct hole. Tighten the right needle screw. Remove the left needle. Snug the needle set screw after removing the left needle. Thread the serger for a 3-thread narrow stitch using the right needle and thread colors to match the color-coded threading path on the serger. Adjust all thread tension settings for a balanced stitch as indicated below. Serge along the raw edges opposite the wide balanced stitch. Upper Looper 3-5 Lower Looper 3-5 Left Needle (for wide stitch) 3-5 Right Needle (for narrow stitch) 3-5 Stitch Length 2.5 Cutting Width 2-3 Differential Feed N 16

17 Inside Corner Fabric: Firm fabric, 6 x 6 Thread: 3 cones of serger thread (blue, red, green) Stitch: 3-thread overlock Using the small screwdriver and brush/needle insertion tool, remove the left needle. Snug the needle set screw after removing the needle. Thread the serger for a narrow 3-thread overlock stitch using thread colors to match the color-coded threading path on the serger. Adjust all thread tension settings for a balanced stitch as indicated below. Inside Corner This technique works well for continuous plackets on sleeves and back neck openings. Cut an inside corner into the fabric. Snip into the corner about ¼ (the width of the stitching). Serge until the knife reaches the end of the cut. Use the handwheel to lower the needle into the fabric. Lift the presser foot and straighten the corner towards you. Lower the presser foot; continue serging.. Upper Looper 3-5 Lower Looper 3-5 Left Needle N/A Right Needle 3-5 Stitch Length 2.5 Cutting Width 2-3 Differential Feed N 17

.")
18 Outside Corner Fabric: Firm fabric, 6 x 6 Thread: 3 cones of serger thread (blue, red, green) Stitch: 3-thread overlock Using the small screwdriver and brush/needle insertion tool, remove the left needle. Snug the needle set screw after removing the needle. Thread the serger for a narrow 3-thread overlock stitch using thread colors to match the color-coded threading path on the serger. Adjust all thread tension settings for a balanced stitch as indicated below. Outside Corner OPTION I Serge one edge of the fabric, stitching off the end of the fabric. Trim the thread tail. Continue serging around the square, crossing over previous stitching. Use a seam sealant on the untrimmed thread tails (or use a tapestry needle to weave the thread tail back through the stitching). When the seam sealant is dry, trim the thread tails. OPTION II Before serging, trim away the seam allowance (¼ ) for about 2 on each corner of the square. Beginning at one trimmed corner, serge (trimming very slightly as you sew) to the end of the fabric. Take one stitch off the end of the fabric. Locate the Stitch Selection lever on the stitch plate and pull it toward you. This will free the thread from the stitch finger. Lift the presser foot and carefully pivot the fabric 90 clockwise. Return the Stitch Selection lever to normal (away from you). Place the needle one stitch into the fabric and lower the presser foot. Continue serging until you are one stitch off the next trimmed corner untrimmed corner Upper Looper 3-5 Lower Looper 3-5 Left Needle N/A Right Needle 3-5 Stitch Length 2.5 Cutting Width 2-3 Differential Feed N 18

19 3-Thread Rolled Hem Fabric: Medium weight fabric, 4 x 6 Thread: 3 cones of serger thread (blue, red, green) Optional: Woolly Nylon thread for upper looper Stitch: 3-thread Rolled Hem Using the small screwdriver and brush/needle insertion tool, remove the left needle. Snug the needle set screw after removing the needle. Thread the serger for a narrow 3-thread overlock stitch using the right needle and thread colors to match the color-coded threading path on the serger. Adjust all thread tension settings for a rolled edge as indicated below. Pull the Stitch Selection lever toward you. Place the fabric under the presser foot and serge along one 6 edge. Return stitch length and thread tension levers to normal. Return the rolled hem lever to normal sewing position. Optional: Thread the serger for a 3-thread rolled edge (right needle) with Woolly Nylon in the upper looper. Adjust all thread tension settings as indicated below and serge the edge opposite of the previously stitched rolled edge. The Stitch Selection lever moves the stitch finger in and out of position. Push the lever forward for normal serging so the stitch can form over it, keeping the fabric flat (upper ill.). Pull the lever back so the fabric edge can roll as when stitching a rolled edge (lower ill.). Upper Looper 3-5 Lower Looper 7-9 Left Needle N/A Right Needle 3-5 Stitch Length Cutting Width 2-3 Differential Feed N 19


20 3-Thread Flatlock Stitch Fabric: Firm fabric, 6 x 6 Thread: 3 cones of serger thread (blue, red, yellow) Stitch: 3-thread Flatlock Using the small screwdriver and brush/needle insertion tool, remove the right needle. Snug the needle set screw after removing the needle. Thread serger for a wide 3-thread flatlock stitch. Adjust all thread tension settings as indicated below. Note: Sample was stitched with regular thread but a heavy thread such as YLI Jeans Stitch or Designer 6 can be used in the looper for a more decorative look. When working with heavy decorative threads, loosen the upper looper tension and lengthen the stitch length as needed for the desired look. Fold the fabric in half, wrong sides together, to 3 x 6. Optional: Attach the Right Seam Guide to the serger (700D and 800DL will require the Attachment Base). Move the Right Seam Guide halfway between the needle and the stitch finger. Place the fold under the presser foot. Guide the fabric halfway Between the left needle and the right edge of the stitch finger (or against the Right Seam Guide). Slowly serge the fabric. The looper threads will extend beyond the fabric on the right side of fold. Decorative Thread Tip: To avoid uneven stitches, tangled threads, hiccups, and other imperfections, always serge slowly when working with decorative threads. The needle side of the stitch is called a ladder stitch and can be used as the decorative side if desired. Gently pull the fabric flat. Return stitch length and thread tension levers to their normal settings. Optional: For a narrow flatlock stitch, reset the serger using the right needle 3-thread flatlock with Designer 6 thread in the upper looper Upper Looper 3-5 Lower Looper 7-9 Left Needle 1-2 Right Needle N/A Stitch Length 2.5 Cutting Width 3 Differential Feed N 20


21 2-Thread Rolled Hem Fabric: Medium weight fabric, 4 x 6 Thread: 2 cones of serger thread (red, green) Stitch: 2-thread Rolled Hem Accessory: Upper Looper Converter Using the small screwdriver and brush/needle insertion tool, remove the left needle. Snug the needle set screw after removing the needle. Attach the Upper Looper Converter to the upper looper. Note: This is an optional accessory for the 700D. Thread the serger for a 2-thread flatlock stitch using thread colors to match the color-coded threading path on the serger. Adjust all thread tension settings for a balanced stitch as indicated below. Pull the Stitch Selection lever toward you. Place the fabric under the presser foot and serge along one 6 edge, trimming about 1/8 from the raw edge. Return stitch length and thread tension levers to normal. Return the Stitch Selection lever to normal serging position. Upper Looper... Converter Lower Looper 3-5 Left Needle N/A Right Needle 3-5 Stitch Length Cutting Width Differential Feed N 21

22 2-Thread Flatlock Stitch Fabric: Firm fabric, 6 x 6 Thread: 2 cones of serger thread (red, yellow) Stitch: 2-thread Flatlock Accessory: Upper Looper Converter Using the small screwdriver and brush/needle insertion tool, remove the right needle. Snug the needle set screw after removing the needle. Attach the Upper Looper Converter to the upper looper. Note: This is an optional accessory for the 700D. Thread serger for a wide 2-thread flatlock stitch. Adjust all thread tension settings as indicated below. Note: Sample was stitched with regular thread but a heavy thread such as YLI Jeans Stitch or Designer 6 can be used in the looper for a more decorative look. When working with heavy decorative threads, loosen the upper looper tension and lengthen the stitch length as needed for the desired look. Fold the fabric in half to 3 x 6 and position it halfway between the left needle and the stitch finger. Optional: Attach the Right Seam Guide. Move the Right Seam Guide halfway between the needle and the stitch finger. Slowly serge the fabric. The looper threads will extend beyond the fabric on the right side of fold. Decorative Thread Tip: To avoid uneven stitches, tangled threads, hiccups, and other imperfections, always serge slowly when working with decorative threads. Note: Before the fabric is pulled to create the flatlock stitch, the threads form a 2-thread balanced stitch with the threads connecting at the edge of the fabric. This stitch is not strong enough for seaming but can be used as an edge finish for light to medium weight fabrics. Gently pull the fabric flat. Return stitch length and thread tension levers to normal. Optional: For a narrow flatlock stitch, reset the serger using the right needle only. 3-thread flatlock with Designer 6 thread in the upper looper The needle side of the stitch is called a ladder stitch and can be used as the decorative side if desired. Upper Looper... Converter Lower Looper 3-5 Left Needle 1-2 Right Needle N/A Stitch Length Cutting Width Differential Feed N 22

23 4-Thread Balanced Stitch 23

24 3-Thread Wide Balanced Stitch Narrow 3-thread Overlock Stitch The diagram above shows threading for a wide 3-thread balanced overlock stitch. To thread for a narrow 3-thread balanced overlock stitch, simply use the right needle instead of the left and follow the green threading path. 24


25 3-Thread Wide Flatlock Stitch Narrow 3-thread Flatlock Stitch The diagram above shows threading for a wide 3-thread flatlock stitch. To thread for a narrow 3-thread flatlock stitch, simply use the right needle instead of the left and follow the green threading path. 25

26 3-Thread Rolled Hem Pull Stitch Selection lever toward you. 26


27 2-Thread Flatlock Stitch 27

28 2-Thread Rolled Hem 28
Serging Ahead For all current BERNINA serger models
 2 Serging Ahead For all current BERNINA serger models 2011 BERNINA of America, Inc. Permission granted to copy and distribute in original form only. Content may not be altered or used in any other form
BERNINA. Overlocker Workbook 2
 Overlocker Plus For current BERNINA models 2016 BERNINA of America. Permission granted to copy and distribute in original form only. Content may not be altered or used in any other form or under any other
Basic Serger Use For all current BERNINA sergers except the 009DCC
 Basic Serger Use For all current BERNINA sergers except the 009DCC 2010 BERNINA of America, Inc. Permission granted to copy and distribute in original form only. Content may not be altered or used in any
INTRODUCTION THANK YOU FOR CHOOSING OUR OVERLOCK MACHINE FOR YOUR SAFETY BEFORE YOU USE - 1 -
 INTRODUCTION THANK YOU FOR CHOOSING OUR OVERLOCK MACHINE This overlock machine can stitch dependable seams on all kinds of fabric, both light and heavy, including cotton, wool, rayon, tricot, jersey, and
Serging Ahead For all current BERNINA serger models
 2 Serging Ahead For all current BERNINA serger models 2010 BERNINA of America, Inc. Permission granted to copy and distribute in original form only. Content may not be altered or used in any other form
Three-Thread Flatlock (Narrow and Wide)
") Three-Thread Flatlock (Narrow and Wide) Three-Thread Flatlock (Narrow) The Flatlock Stitch is used decoratively to achieve the look of applied trim on a garment, craft or home decorator projects. Special
Three-Thread Flatlock (Narrow and Wide) Three-Thread Flatlock (Narrow) The Flatlock Stitch is used decoratively to achieve the look of applied trim on a garment, craft or home decorator projects. Special
Getting to Know: A-LINE SERIES Model BL450A. Baby Lock Consumer Helpline:
 Getting to Know: A-LINE SERIES Model BL450A Baby Lock Consumer Helpline: 800-313-4110 www.babylock.com Model BL450A Introducing Lauren, the easy-to-use serger from the Baby Lock A-Line series of sewing
simply PERFECT seams More stitches, more features, more stunning techniques to inspire and enhance your creativity.
 simply PERFECT seams More stitches, more features, more stunning techniques to inspire and enhance your creativity. 1150MDC 800DL 700D 009DCC Exclusively from Bernina. Micro Thread Control (mtc) lets you
Cover Stitch Wide. Cover Stitch Looper Thread. Cover Stitch Wide page 1
 Cover Stitch Wide Cover Stitch Wide This professional Cover Hem stitch is a necessary requirement for today s sewing. The stitch is often seen in ready-to-wear garments. Two needles create parallel rows
Janome 204D Instruction Manual. MODEL 204D. 204D Owners Manual/ User Guide
 Janome 0D Instruction Manual Janome 0D serger Janome 0D Instruction Manual MODEL 0D 0D Owners Manual/ User Guide Janome 0D Instruction Manual IMPORTANT SAFETY INSTRUCTIONS Your sewing machine is designed
SAVE THESE INSTRUCTIONS
 INSTRUCTION BOOK IMPORTANT SAFETY INSTRUCTIONS Your sewing machine is designed and constructed only for HOUSEHOLD use. Read all Instructions before using this appliance. DANGER To reduce the risk of electric
Practicing Basic Machine Operation Sample #1
 Practicing Basic Machine Operation Sample #1 Listed below are various tasks required in basic sewing machine operation. Demonstrate your ability to perform each task by creating a sample. The samples that
Intro to the Sewing Machine
 Intro to the Sewing Machine 1. Bobbin Cover Opens to allow you to put the bobbin and bobbin case in the machine. 2. Stitch Plate Where the seam allowance guidelines are found. Each line is 1/8 apart, beginning
Overlocker Threading Overview
 BERNINA ebook Series JUST OVERLOCK IT! Overlocker Threading Overview BERNINA L 450 / L 460 Threading Written by: Jaime David, BERNINA Educator, Overlocker Specialist Threading Aids Threading Steps Machine
Specialty Techniques
 Specialty Techniques On your Huskylock By Husqvarna Viking... How and Where to Use Them VSM Sewing Inc. Printed in USA 2005 Sewing today is much easier, and much faster with your Husqvarna Viking Huskylock.
n/r Stitch selection dial Stitch finger setting Woven medium Cotton, chino, wool, satin, etc
 overview The settings shown in the table below are our recommendations based on normal conditions. The correct tension is set automatically when using the Selection Dial. It may be necessary to adjust
Four-Thread Safety Stitch
 Four-Thread Safety Stitch Four-Thread Safety Stitch This stitch is an alternative to the Five-Thread Safety Stitch. It offers the same type of Two-Thread Chainstitch. However the Three-Thread Overlock
INSTRUCTION MANUAL 624?
 INSTRUCTION MANUAL 624? 6142 604 IMPORTANT SAFETY INSTRUCTIONS When using an electrical appliance, basic safety precautions should always be followed, including the following: Read all instructions before
41P PFAFF HOBBY SERGER
 41P PFAFF HOBBY SERGER ow po On top of it. or damage to machine. threading and sewing. PERFORMANCE CHECKLIST 12 CHANGING NEEDLE 12 CARING FOR YOUR MACHINE 12 JOIN TWO PIECES OF FABRIC 12 DECORATIVE FLATLOCK
Overlocker Model. Air, Flow,Go! janome.co.uk
 Overlocker Model Air, Flow,Go! janome.co.uk The JANOME AirThread 2000D PROFESSIONAL unites ease-of-use with the specialised functionality of an advanced overlocker. It s our easiest to thread overlocker
TABLE OF CONTENTS NAME OF MAIN COMPONENTS. 4-5 SETTONG UP YOUR MACHINE 6-8. The position of thread pole 6 Cone holders 6.
 z Cl) c C-) -I 0 z z C I- E ẕ I CD D CD p C) C m 0 m I a) C-) Controlling sewing speed 7 The position of thread pole 6 Cone holders 6 Connecting the foot control 7 Spool caps 6 SETTONG UP YOUR MACHINE
3 nights to interpret my scribbles
 BERNINA L 460 L 450 L 220 14 appointments in one week 3 nights to interpret my scribbles 1,500 durable, flexible and beautiful stitches per minute 3 nights of takeout from my neighborhood deli 1 versatile
Stitch selection dial n/r Stitch inger setting. Stitch length S/c Setting for upper cutter, clutch lever and use of cutter cover S Cutting width
 Overview The settings shown in the table below are our recommendations based on normal conditions. The correct tension is set automatically when using the Selection Dial. It may be necessary to adjust
Serger Daygown. It's Sew Easy. By Kathy McMakin Martha Pullen Company
 Serger It's Sew Easy By Kathy McMakin 2014 Martha Pullen Company Serger It's Sew Easy By Kath y McMaki n Expand your serger skills while making this soft batiste daygown for that special baby. Constructed
e-reader Case materials and tools materials and tools step one
 materials and tools materials and tools Serger Outer fabric Lining fabric OESD Fuse & Fleece 1 spool of variegated thread 2 spools of serger thread Narrow ribbon or ribbon floss Clear quilters ruler Fabric
the needle, the user must take sufficient care to avoid injury and observe the sewing area continuously while sewing.
 / - nstruct0fl maflua 7 the needle, the user must take the light bulb is 15 watts. agent. by anyone but an authorized Pfaff D) The drive belt must never be adjusted B) When leaving the machine, chan C)
How to Make Gathers by Machine
 Published on Sew4Home How to Make Gathers by Machine Editor: Liz Johnson Thursday, 08 December 2016 1:00 We love to gather with friends and family to share good food and conversation. We enjoy gathering
Serger. Mid-Level
 Mid-Level Serger Your serging is about to receive a new level of critical Acclaim! The Baby Lock Acclaim features RevolutionAir Threading that threads the loopers with just the touch of a button and then
CAUTION- SAVE THESE INSTRUCTIONS This product is for household use, or equivalent.
 Never operate this sewing machine if it has a damaged cord or plug, if it is not working properly, if it has been dropped or damaged, dropped into water. Return this sewing machine to the nearest authorized
hobbylock 4752 Instruction Manual
 hobbylock 4752 Instruction Manual Parts of the hobbylock 4752 Right needle thread tension (green) Setting screw for presser foot pressure Telescoping thread guide Thread guides Left needle thread tension
To register your machine warranty and receive Baby Lock product updates and offers, go to If you have questions with
 To register your machine warranty and receive Baby Lock product updates and offers, go to www.babylock.com/profile. If you have questions with registration, visit your Authorized Baby Lock Retailer. CONTENTS
Brother PQ- Series Accessories
 Brother PQ- Series Accessories The PQ-series of high-speed straight stitch machines (1300, 1500 and 1500S) are designed to sew quickly and accurately with a wide variety of fabrics, even combinations of
MCS-1500 INSTRUCTION MANUAL. 3-Needle, 2/3/4-Thread Cover Stitch Sewing Machine IMPORTANT:
 -Needle, //-Thread Cover Stitch Sewing Machine MCS-100 INSTRUCTION MANUAL EN IMPORTANT: Read all safety regulations carefully and understand them before using your sewing machine. Retain this instruction
Sample Packet. Directions: Describe the functions of the following basic parts of a sewing machine.
 Sample Packet NAME: Directions: Describe the functions of the following basic parts of a sewing machine. SEWING MACHINE PARTS: Needle stitch plate: Feed dog system: Presser foot: Bobbin case: Spool pin:
The 787 Dreamstitcher Portable Serger
 The 787 Dreamstitcher Portable Serger INSTRUCTION MANUAL TABLE OF CONTENTS 1. KNOWING YOUR MACHINE Identification chart 2 Accessories 3 Setting up your machine 4 Preparation for threading 5-6 Lint tray,
Serger. Mid-Level
 Mid-Level Serger Can you imagine how easy serging would be if you didn't have to thread the machine? Look no further than the Imagine -- Baby Lock's most popular serger. This advanced home serger includes
CLOTHING I TEST #350 MULTIPLE-CHOICE IDENTIFY THE LETTER OF THE CHOICE THAT BEST COMPLETES THE STATEMENT OR ANSWERS THE QUESTION.
 CLOTHING I TEST #350 MULTIPLE-CHOICE IDENTIFY THE LETTER OF THE CHOICE THAT BEST COMPLETES THE STATEMENT OR ANSWERS THE QUESTION. 1. A ROTARY CUTTER: A. Can only be used on woven fabrics. B. Should only
O w n e r s M a n u a l
 Owner s Manual This household sewing machine is designed to comply with IEC/EN 60335-2-28 and UL1594 IMPORTANT SAFETY INSTRUCTIONS When using an electrical appliance, basic safety precautions should always
How to Make a Rolled Hem with Your Sewing Machine
 Published on Sew4Home How to Make a Rolled Hem with Your Sewing Machine Editor: Liz Johnson Tuesday, 20 January 2015 1:00 There's always a certain amount of hemming and hawing about having to hem. Just
Carry Sew Table and Hoop Bag Created by Joy Harvey
 www.bernina.com.au Carry Sew Table and Hoop Bag Created by Joy Harvey Materials List What to do with all those leftover cords, ribbon, braids, pearls and sequins? Your answer, foot #12C my favourite presser
MAIN PARTS
 MAIN PARTS 7 8 9 10 11 12 13 1 2 3 17 4 5 6 01 02 03 04 05 12 23 34 45 56 13 24 35 46 57 14 25 36 47 58 15 16 26 27 37 38 48 49 59 60 06 07 08 09 10 17 18 28 29 39 40 50 51 61 62 19 30 41 52 63 20 21 31
Crazy Patch Pillow. Supplies. Visit today! Projects Webinars Promotions. Created by Jeanne Delpit
 Crazy Patch Pillow Created by Jeanne Delpit This pretty patchwork pillow sampler includes instructions for a variety of embellishment techniques stitched on BERNINA 8 Series machines. Supplies Machine
4764 hobbylock Operating Manual
 hobbylock 4764 Operating Manual This household sewing machine is designed to comply with IEC/EN 60335228 and UL1594 IMPORTANT SAFETY INSTRUCTIONS When using an electrical appliance, basic safety precautions
BOBBINWORK BASICS. Bobbinwork is a technique that places heavy decorative YARNS AND THREADS SUITABLE FOR BOBBINWORK
 BOBBINWORK BASICS BY JILL DANKLEFSEN Bobbinwork is a technique that places heavy decorative threads on the surface of the fabric, sewn as machine-fed decorative stitches or as freemotion stitches. Typically,
Figure Out Your Feet!
 i s s u e 1 7 Figure Out Your Feet! By Yvonne Porcella These feel good" sewing projects give you opportunities to try a variety of specialty presser feet that make stitching easier and the results better.
Sports/Apparel 1 State Test Review
 Name: Period: Sports/Apparel 1 State Test Review Fil in the Blanks: Bags Clothing Fabrication Linens Men s Furnishings Designer Soft Goods Pattern drafting Home furnishings Textile Designer 1. are products
When using an electrical appliance, basic safety precautions should always be followed, including the following:
 Instruction book IMPORTANT SAFETY INSTRUCTIONS This appliance is not intended for use by persons (including children) with reduced physical, sensory or mental capabilities, or lack of experience and knowledge,
Special accessories for overlockers/sergers
 Special accessories for overlockers/sergers 75 76 A BERNINA 009DCC B BERNINA 700D BERNINA 800DL BERNINA 870D BERNINA 880DL C BERNINA 00D BERNINA 00DA BERNINA 0D D BERNINA 000DA BERNINA 200DA BERNINA 300DC
BEL0093 Sewing Machine
 4 BEL0093 Sewing Machine THE SCIENCE BEHIND SEWING BEL0093 Sewing Machine 5 4 8 10 9 21 11 12 1 2 14 19 13 23 7 6 5 21 3 17 18 22 15 6 BEL0093 Sewing Machine 16 22 Auto Low Foot Pedal Auto High THE SCIENCE
CAPSULE CLUB-TECHNIQUE BUILDER BERNINA Illusions Dress BY JAIME DAVID
 CAPSULE CLUB-TECHNIQUE BUILDER BERNINA Illusions Dress BY JAIME DAVID BERNINA of America bernina.com The BERNINA Illusions Dress is a pattern created by BERNINA International as part of the advertising
SECTION IV DIFFERENTIAL FEED
 SECTION IV DIFFERENTIAL FEED Differential feed allows you to sew many different types of fabrics eliminating puckering on lightweight woven fabrics and stretching on knits. When working on a serger without
SAVE THESE INSTRUCTIONS
 INSTRUCTION MANUAL IMPORTANT SAFETY INSTRUCTIONS This appliance is not intended for use by persons (including children) with reduced physical, sensory or mental capabilities, or lack of experience and
STARTED! Get. Let s. Americana Series AMERICAN DENIM Model SA1100 Use This Guide First. Simplicity Sewing Machine Education Helpline:
 Let s Get STARTED! Americana Series AMERICAN DENIM Model SA1100 Use This Guide First To help you get started using your new sewing machine, this booklet shows you, step-by-step, how to thread your machine
CLOTHING AND TEXTILES I (350)
") DESCRIPTION The first assessment in a series, Clothing and Textiles I introduces students to basic sewing and pressing equipment, textiles, and introductory level project construction techniques. Total
DESCRIPTION The first assessment in a series, Clothing and Textiles I introduces students to basic sewing and pressing equipment, textiles, and introductory level project construction techniques. Total
pattern BONUS Ruffled Halter By LiesL Gibson {from page 41}
 ruffled halter This adorable halter has a simple pull-on style that s easy and fun for summer, featuring a casing formed by the first ruffle for a clean, uncluttered finish. For other fun looks, try making
Name: Class: Monster Doll. Grading Rubric
 Name: Class: Monster Doll Grading Rubric Grade yourself on the skills listed below. (0 being the lowest, and 5 being the highest.) Once you have graded yourself in each area, pin your grading sheet to
INSTRUCTION MANUAL 2263
 INSTRUCTION MANUAL 2263 TABLE OF CONTENTS Congratulations on the purchase of your new SINGER sewing machine! May we recommend that before you start using your machine, you take time to discover the many
Operating Manual. Huskylock 901
 Operating Manual Huskylock 901 OVERLOCK MACHINE Record in space provided below the Serial No. of this appliance. The Serial No. is located rear of arm. Serial No. Model No. 901 Retain these numbers for
Clothing Construction I Samples Packet
 Clothing Construction I Samples Packet Name Objectives: 1. To identify how to use and care for the sewing machine and tools. (#1 & #2) 2. Demonstrate how to use a variety of stitches and presser feet.
BERNINA overlockers simply perfect sewing
 BERNINA overlockers simply perfect sewing The BERNINA overlocker range all products at a glance M Models Overlock / Coverstitch Machines Overlockers Coverstitch Machines Overlockers 2 Contents Page 02
INSTRUCTION BOOK BUPEFILDCK 634D. W H ITE Sewing machine company
 INSTRUCTION BOOK BUPEFILDCK 634D W H ITE Sewing machine company POLARIZED PLUG CAUTION To reduce the risk of electric shock, this appliance has a polarized plug (one blade is wider than the other). This
4-H Fabrics & Fashions
 OKLAHOMA COOPERATIVE EXTENSION SERVICE 4-H Fabrics & Fashions Setting Your Stitch Length 1. Stitch, as shown, using six inches to one inch. --------------------------------------------------------------------------------------------------------------------
Perfect Finish. Model ET-1
 Over 1,000 Stitch Functions Select from over 1,000 Stitch Functions. Fulfill your creative dreams with a large selection of decorative stitches, alphabet stitches, and construction stitches. Large Back-Lit
CV3440 & CV3550 CV3440 & CV3550. Coverstitch machines NEW
 CV3440 & CV3550 NEW Top cover stitches with CV3550 CV3440 & CV3550 Coverstitch machines The essential tools for a professional finish and awe-inspiring creations CV3440 4, 3 and 2 threads CV3550 5, 4,
8-Thread Serger. Top of the Line
 Top of the Line 8-Thread Serger The Triumph conquers serging in a way you never thought possible thanks to RevolutionAir threading. Thread the loopers with just the touch of a button and then thread the
A. Preparing the fabric (not shown):
:") INSERTING ZIPPERS - CENTER INSERTION The zipper can be snapped on to the right or to the left side of the needle so that you can sew close to the zipper. When sewing on the right side of the zipper, attach
INSERTING ZIPPERS - CENTER INSERTION The zipper can be snapped on to the right or to the left side of the needle so that you can sew close to the zipper. When sewing on the right side of the zipper, attach
TIPS & TROUBLESHOOTING
 Achieving good stitch quality 5450 North W Street Pensacola FL 32505 850-433-1414 www.martellinotions.com TIPS & TROUBLESHOOTING Understanding how your long arm machine makes a stitch will help you make
Article 1: Introduction to the Elna expressive 920
 Article 1: Introduction to the Elna expressive 920 Elna machines are known for their ease of use, and the Elna expressive 920 is no exception. A range of features are available at your fingertips to make
MACHINE SEW HOW TO POT HOLDER. Project
 GET TO KNOW YOUR ING BY TRYING OUT THE VARIOUS STITCHES AVAILABLE, THEN TURN YOUR STITCH SAMPLER INTO A USEFUL. CUSTOMIZE YOUR PROJECT BY CHOOSING YOUR OWN FABRIC AND MATCHING OR CONTRASTING THREAD COLOURS.
OPERATING INSTRUCTiON. fh EbEbyfl D
 71 OPERATING INSTRUCTiON fh EbEbyfl D F. Sewing problems and solutions 20 b. Thread tension adjustment (Normal hemming) 9 g. Roll hemming 12 h. Points to observe during sewing 13 b. Adjusting the stitch
CHAIR COVER AND PILLOW A. 1 Front. 2 Side. 3 Arm Front. 4 Skirt Front. 5 Back. 6 Pillow CUTTING LAYOUTS CHAIR COVER AND PILLOW A
 ## PATTERN PIECES 4069 McCALL'S CRAFTS CHAIR COVER AND PILLOW A 1 Front 2 Side CHAIR COVER C,D 7 Guide PAGE 1 of 6 3 Arm Front 4 Skirt Front 5 Back 6 Pillow CUTTING LAYOUTS Cut other pieces first, allowing
User s Guide. Prelude 350, 370 KEEPING THE WORLD SEWING
 User s Guide Prelude 350, 370 KEEPING THE WORLD SEWING This houshold sewing machine is designed to comply with IEC/EN 60335-2-28 and UL1594 IMPORTANT SAFETY INSTRUCTIONS When using an electrical appliance,
Simple Leggings Two girls. Same name. One mission. Teach the world to sew.
 Simple Simon and Company Simple Leggings Two girls. Same name. One mission. Teach the world to sew. Simple Leggings Sewing with knits is made easy with this simple leggings pattern. Once you are finished
Dolly s Darling Dungarees
 Dolly s Darling Dungarees All photos, text, and pattern pieces Dandelions n Dungarees 2013. All rights reserved. No part of this publication may be reproduced or transmitted in any form or by any means
Getting to Know: Model BL30A. A-Line Series. Baby Lock Consumer Helpline:
 Getting to Know: A-Line Series Model BL30A Baby Lock Consumer Helpline: 800-33-40 www.babylock.com Model BL30A Molly loves her DIY, individual style, and she always encourages you to add your own touch.
pô1e -/C INSTRUCTION MANUAL FOR SEWING MACHINE WHITE
 pô1e -/C -- INSTRUCTION MANUAL I FOR SEWING MACHINE WHITE Retain these numbers for future reference. Model No. Serial No. The Model No. is located on Rating Plate. The Serial No. is located on Bed Plate.
Company s Coming! Visit bernina.com: Projects Webinars Promotions. Supplies. Created by Susan Beck
 Company s Coming! Created by Susan Beck Add a fresh look to your guest room with these simple-to make pillows and a thoughtful bedside basket. Finished size: 12 x 12 Ruffled Ribbon Pillow Finished size:
ESPADRILLES Boots Instructions
 ESPADRILLES Boots Instructions SUPPLIES NEEDED: Espadrille Soles Espadrille Creative Yarn Espadrille Large Curved or Straight Needle Espadrille Needle Pullers Espadrille Yarn Wax Espadrille Glass Head
Measuring Tape Neck Strap Sewing Caddy
 Published on Sew4Home Measuring Tape Neck Strap Sewing Caddy Editor: Liz Johnson Wednesday, 31 May 2017 1:00 How many of you loop a tape measure around your neck while you re sewing? I m pretty sure there
Lesson 2 CREATING THE SKIRT: LACE SHAPING
 1 Extension 1 Extension Lesson 2 CREATING THE SKIRT: LACE SHAPING For this lesson we will be working with the skirt pieces one skirt front and two skirt backs and your lace insertion. Are you ready to
Margaret Moorehead s. Virtual Sewing Guild Video Series
 Margaret Moorehead s Virtual Sewing Guild Video Series Contents What You ll Learn... 2 Supplies You ll Need... 2 Equipment You ll Need... 2 Fabric Preparation... 3 Section 1 Machine Embroidery... 4 Section
Q-Zone Hoop-Frame. Assembly Instructions. Copyright July 11, 2018 Grace Company (Reproduction Prohibited) Version 1.8
 Version 1.8") Q-Zone Hoop-Frame Assembly Instructions Copyright July 11, 2018 Grace Company (Reproduction Prohibited) Version 1.8 Table of Contents Table of Contents... i Warranty... ii Parts List Box 1...iii Box 2...
Q-Zone Hoop-Frame Assembly Instructions Copyright July 11, 2018 Grace Company (Reproduction Prohibited) Version 1.8 Table of Contents Table of Contents... i Warranty... ii Parts List Box 1...iii Box 2...
View A. View B. Ciao Bella Size September 2012 Ellie Inspired, Laura Johnson
 View A View B Ciao Bella Size 1-12 September 2012 Ellie Inspired, Laura Johnson Quick Measure 1 2 3 4 5 6 Ciao Bella is written for wovens and stretch knits. View A has an optional overskirt of overlapping
8-Series Mastery 4 Smooth Operators
 8-Series Mastery 4 Smooth Operators Supplies General supplies used unless otherwise indicated Miscellaneous fabrics and batting Light weight tearaway stabilizer Size 90 Microtex Needle Variety of Cotton
Quick Reference Guide to BERNINA Presser Feet, Attachments, and Accessories
 Presser Feet: are Swiss-engineered for precision sewing of specific functions are one-piece metal feet, making them strong and durable are easy to change with one hand, requiring no special tools have
Accessories for JUKI household sewing machines
 Accessories Accessories for JUKI household sewing machines Household sewing machine -Needle lockstitch sewing machine Household sewing machine Manual BH Zipper For straight stitch and zigzag stitches (Decorate
HOW TO SEW FLEECE FABRIC
 1H HOW TO SEW FLEECE FABRIC http://localhost/techniques/how-to-sew-fleece-fabric Some tips to sew on a wonderful fabric. Step 1 Fleece fabrics are made of polyester or acrylic fibers which are water resistant.
Medical Play Doll Hospital Gown
 Medical Play Doll Hospital Gown Open Shoulder open shoulder gowns allow IV s to be placed in the arm of the doll. This gown is made primarily with the use of a serger. Please note: use white thread only
14HD854 ( THREAD HEAVY DUTY OVERLOCK MACHINE) Instruction Manual
 Instruction Manual") 14HD854 (2. 3. 4 THREAD HEAVY DUTY OVERLOCK MACHINE) Instruction Manual 14HD854 overlock machine.,, fabric overlock machine, overlock capabilities, overlock machine when SINGER Overlock Machine was tested
14HD854 (2. 3. 4 THREAD HEAVY DUTY OVERLOCK MACHINE) Instruction Manual 14HD854 overlock machine.,, fabric overlock machine, overlock capabilities, overlock machine when SINGER Overlock Machine was tested
HOW TO USE YOUR LONG SHUTTLE MANUAL SEWING MACHINE. 4çJ MODEL NO.768
 NO.768 MODEL 4çJ Ii SEWING MACHINE LONG SHUTTLE MANUAL HOW TO USE YOUR INDEX Zigzag Formation 18 Zigzag Sewing And Pattern Formation 17 Turning a Corner 14 Placement of Needle 4 Picking Up Bobbin Thread
Bobbin Holders 101. By Nancy Fiedler. Standard Bobbin Holder all Janome top loading bobbin machines.
 Bobbin Holders 101 By Nancy Fiedler Standard Bobbin Holder all Janome top loading bobbin machines. Usually this bobbin holder will have a small red triangle or red marking on the tension screw. It is always
Combined overlock and cover stitch machines
 M Combined overlock and cover stitch machines COMBINED OVERLOCK AND COVER STITCH MACHINE ACCESSORIES Ready to wear details and decorative accents are easily duplicable with Janome's combined overlock and
Out-Of-The-Box Basics: ID the Main Parts of a Sewing Machine
 Published on Sew4Home Out-Of-The-Box Basics: ID the Main Parts of a Sewing Machine Editor: Liz Johnson Tuesday, 27 September 2016 1:00 Sewing is an art. But it does rely on science and technology as well.
Quick Reference Guide to BERNINA Presser Feet, Attachments, and Accessories
 Presser Feet: are precision engineered for specific functions are Swiss-made for the highest quality are one-piece metal feet, making them strong and durable are easy to change with one hand, requiring
EMPISAL COMPLETE FREE ARM OVER LOCKER
 INSTRUCTION MANUAL your creative assistant MODEL: 760 EMPISAL COMPLETE FREE ARM OVER LOCKER - 0 - Safety instructions Like any other electrical device, a sewing machine can cause serious, even life-threatening
Home Sewing Machine Accessories
 Home Sewing Machine Accessories Feb. 2019 Edition Standard Presser Foot This Standard presser foot is used for sewing straight stitches and zigzag stitches. It can be used to sew lightweight to heavyweight
2. Mark an additional 1¾ to the longer side on one side only to add seam allowance and ease.
 Appliquéd Monogram Tablet Sleeve By Sue Hausmann Thanks to Karen Hinrichs for idea and instructions!! Recently I was having lunch with my friend Karen Hinrichs and pulled out my Ipad. She was horrified
SAVE THESE INSTRUCTIONS
 INSTRUCTION BOOK IMPORTANT SAFETY INSTRUCTIONS When using an electrical appliance, basic safety precautions should always be followed, including the followings: Read all instructions before using this
Basic Bearmaking Instructions
 Laying out the Pattern Basic Bearmaking Instructions We recommend that you read the instructions right through before commencing. This will help you to understand the steps you need to take. Copying your
Sewing Roll. Base Fabric. Base Fabric. Third Fabric. Second Fabric (Bottom Pockets) Pockets)
 Pockets)") You will need Brother Creative Sewing Pack (Free Motion Foot, Braiding Foot, Narrow Hem Foot, Piping Foot and Concealed Zipper Foot) Base fabric 1 x fat ¼ (50cm square) cut in half Second fabric 50cm x
You will need Brother Creative Sewing Pack (Free Motion Foot, Braiding Foot, Narrow Hem Foot, Piping Foot and Concealed Zipper Foot) Base fabric 1 x fat ¼ (50cm square) cut in half Second fabric 50cm x