Drawing Portraits
|
|
|
- Jayson Willis
- 6 years ago
- Views:
Transcription
1 Drawing Portraits

2 TOOLS AND TECHNIQUES You can draw a portrait using any of the popular media: pencil, charcoal, pastel, pen and ink, watercolour, felt-pen, etc. Each one of them, however, will produce different effects, not only due to the specific characteristics of the medium and the technique used, but also in relation to the characteristics of the surface on which it is drawn: smooth or rough-textured paper, card, white or coloured paper, etc. The drawings shown on these two pages demonstrate how different media effectively render the complex tonal values of the human face and body. Pencil (B and 2B) on rough-textured paper Pencil is the most widely used medium for any type of drawing and, in figures and portraits, it allows you to be spontaneous and is convenient to use. It can be used for very complex drawings or for small studies and quick reference sketches: for the latter very fine leads are suitable, while for the former you can use thicker and softer-grade graphites. Graphites (leads that are held in mechanical, clutch pencils) as well as pencils (wood-encased graphites) are graded according to their consistency: from 9H, the hardest, which traces thin and faint lines, to 6B, very soft, which traces thick and dark lines with ease.

3 Compressed charcoal on paper Charcoal is perhaps the ideal medium for portrait study as it is very easy to control when applying tones but also allows you to achieve fairly sharp detail. It should, however, be used 'broadly', concentrating on the overall rendering of the 'shapes': this exploits its greatest assets, as it is both versatile and evocative. You can use either compressed charcoal or willow charcoal but be careful, in either case, not to smudge the sheet. Charcoal strokes can be blended and smudged by gently rubbing with a finger, and tones can be softened by blotting with a soft eraser (kneadable putty eraser). The finished drawing should be protected by spraying with fixative. Monochromatic watercolour on medium-textured paper Watercolours, water-soluble inks, and water-diluted Indian ink are ideal for portrait study, although they are closer to painting than to drawing, as they are applied with a brush and require a tonal vision which is both concise and expressive. For quick studies you can use water-soluble graphites or colour pencils (to blend strokes easily, wipe them with a water-soaked brush) and it is advisable to use heavy card so that the moisture will not cause the surface to cockle and become irregular. Pen and ink, watercolour, white pastel on coloured paper 'Mixed' media involves using different materials to achieve a drawing with unusual effects. Although still 'graphic' materials, their more complex application requires good control and a good knowledge of the media themselves if we are to avoid muddled results of little aesthetic meaning. Mixed media are very effective on textured and coloured, or dark, supports.


4 Portrait study, oil on canvas, 30 x 40cm (12 x 16in). This portrait was not drawn from life but from the photograph on the left. Look carefully at the two images to find out to what extent the photographic information has been adhered to, highlighted or disregarded in the drawing.
 are indicated correctly and precisely.")
5 DRAWING THE HEAD PROPORTIONS When drawing the head it is necessary to make sure that the proportions, i.e. the relative dimensions between its various constituent elements (eyes, ears, nose, mouth - which we will examine one by one later on) are indicated correctly and precisely. Of course, heads vary greatly in size and in the combination of characteristics, but they can all be reduced to a proportional diagram which helps to simplify the shapes, to recognise their peculiar three-dimensional aspect, and also to position details correctly in relation to one another. When drawing a portrait pay close attention to the overall structure of the head and evaluate its main characteristics as it is mainly from these that a good likeness depends. Details alone, even if minutely reproduced, almost invariably result in a vague and unsatisfactory portrait, when placed in a general context which lacks accuracy. The diagrams shown here, if studied carefully, will provide you with the simple and essential elements of reference and proportion of a 'typical' head seen in frontal and lateral projections. Compare them with those of your model and assess whether they correspond or differ. The height of the face can be divided into three portions of equal size, which correspond to the height of the forehead (up to the hairline), that of the nose, and that of the lower part of the face. In addition, note that if you join the three points located above the bridge of the nose, on the chin and at the corner of the jaw (near the earlobe), you have an equilateral triangle. The same figure is obtained if you join together the outer corners of the eyes and the base of the- lower lip. The width of the eye viewed from the front is a useful reference for measuring the distance between the eyes (according to an old academic maxim 'between eye and eye there is an eye') and the width of the base of the nose level with the nostrils. Notice how, viewed from the top, the head's shape is an oval, broader at the back.
6 PERSPECTIVE Perspective is a graphic method which helps to represent spatial depth on a flat surface. Therefore, to be represented correctly, the head too needs to be drawn (like any other object) bearing in mind the rules of perspective. The diagrams shown below will be enough, I think, to remind you of some of the basic principles, such as the horizon line, the viewpoint and the vanishing points. If you imagine the head within a cube whose edges touch its most protruding points, you will find it easy to 'put in perspective', fairly correctly the details of the face. You can then conduct a more accurate study considering the 'geometrised' head represented by two ovoids and a cylinder (see diagrams on page 12).
7 CONSTRUCTIVE SKETCHES The head can be compared to the geometric shape of an ovoid and this, at the beginning at least, makes drawing it simpler, as far as proportions, as well as light and shadows are concerned. Notice how the two ovoids which represent the face and the skull can be superimposed. However, the roughly round shape of the head can also be divided into flat areas. As a whole, these 'surface planes', are useful for concisely shaping areas of light and shadow. Try drawing surface planes on to photographs which show heads in a variety of positions, and learn to recognize diagrams similar to the ones above. When you first start drawing the head, which is a very complex shape, you are likely to encounter great difficulties and won't know where to start from. A traditional and scholastic, but very useful, approach is the one mentioned on these pages and which is developed further in chapter 12 (see page 32). Bear in mind that in portraiture it is essential, first of all, to capture the overall individual characteristics of the model's head and then study the characteristics of the details and how they relate to one another.
8 Stage- 4 In these diagrams, limited to the front and side projections of a man's head, I have illustrated the various stages of construction. Stage 1 Outline on the page the area you expect the head to occupy: draw a simple oval shape. Stage 2 Indicate the proportions by way of four horizontal parallel lines more or less equidistant to suggest the three parts in which the face can be divided. Stage 3 Carefully work out the position of the eyes, nose, mouth and ears by measuring their relative distances. Stage 4 Thoroughly study how the elements of the head relate to one another, hinting at the 'planes', the hair, etc., coming close, little by little, to the natural shapes. Stage 5 Continue to elaborate assessing also the light effects, that is, applying the 'chiaroscuro'.

9 ANATOMY A basic knowledge of the anatomy of the head and adjoining areas (and, if possible, the hands, too) is useful to help fully comprehend the external shapes even if it is not, by itself, enough to guarantee the successful rendition of a drawing. THE BONES The shape of the skull determines by and large the external morphology of the head and can be divided into two parts: the brain case and the facial block, which comprises several bones tightly joined together to achieve a solid structure. The only mobile bone is the jaw. If you get the opportunity to observe a real skull or to buy a plastic one, practise drawing its main outline. Render it from different visual angles, as I have shown in these quick sketches, and apply the principles of perspective and structural simplification.

10 THE MUSCLES The muscles of the head are divided into two groups: the muscles of facial expression, responsible for physiognomic expressions; and the muscles of mastication, which move the jaw. They become stratified on the cranial bones whose external shape they follow pretty closely, as they are very thin. Also study the main neck muscles because, inevitably, they appear in nearly all portraits. TRAPEZIUS TRAPEZIUS Here I show the connection between the bone structure and the external morphology of the male head. Carefully examine the position of the ear, the eye and the lips. The thickness of the section between the bone surface and the external surface of the head is determined by the layer of muscle, the adipose tissue and the skin.

11 THE EYE Once you have examined the overall structure of the head, you need to analyse carefully the individual details of the face, i.e. the nose, mouth, eyes and ears. It makes sense to be able to recognise the basic morphological, i.e. 'constructive' characteristics of each one, as by following them and precisely reproducing individual variations you will obtain a very good likeness. The eye is, perhaps, the most expressive element and it is therefore essential to draw it in the correct position and to the exact shape. Notice that the white section of the eyeball (the sclera) is not pure white but actually changes colour due to the effect of its own shadow and the one cast by the eyelid. Be careful to draw both eyeballs (and therefore both pupils) looking in the same direction as the expressiveness of the eyes depends on this. The diagrams below should be sufficient to show the spherical structure of the eye, how the eyelids rest on it and, finally, the stages to go through to draw it correctly.

12 Practise drawing eyes in various positions and from different viewpoints, as shown by the examples on this page. The female eye usually has long and thick eyelashes, while eyebrows are well outlined and thin. The iris of a child looks very big compared to the eyelids. Elderly people show several deep wrinkles radiating from the corners of the eyes, the lower eyelids become 'baggy', and eyebrows become irregularly thick and bushy.
13 THE EAR The ear is supported mainly by thin cartilage arranged in circumvolutions. Although its morphological characteristics vary greatly, its overall shape recalls a seashell and is fairly similar in both sexes. Ears are often partly hidden by one's hair and their expressive character depends on their precise position on the sides of the head, as I have shown in the sketches below.
14 In an adult, the height of the ear corresponds, on average, to that of the nose; in a child it looks rather big in relation to the head; and in an elderly person it tends to lengthen because of the thinning and weakening of the cartilage tissue.
15 THE NOSE The nose is rather difficult to represent as it sticks out of the face and therefore its appearance varies depending on the viewpoint. Its pyramid-like shape is partly due to two small, close together bones and partly to cartilages, and this can be seen clearly on its dorsum. Observe the sketches shown on these two pages and practise drawing the nose in various positions, referring to photographs if it makes it easier to understand its structure. Notice that the dorsum moves away from the bridge to reach maximum projection at the tip and its sides slope towards the cheeks. The triangular base hosts the nostrils, oval-shaped and slightly converging towards the tip, and delimited by the alae of the nose. Try to work out the most important areas of light and shadow (the maximum amount of light is usually on the dorsum and the tip, while the most intense shadow is at the base, near the nostrils) and indicate just those, to avoid making the drawing too 'heavy'.


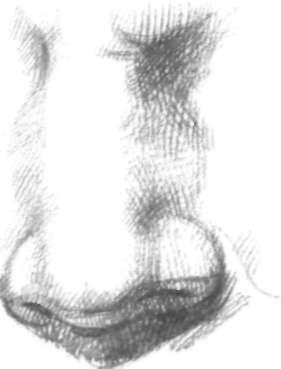
16
17 THE MOUTH After the eyes the mouth is the second most expressive element of the face. The pinkish colour of the lips is due to the tissue they are made of, transitional between the mucous membrane (found inside the mouth) and the skin. When drawing the lips make sure that, above all, you carefully draw the line which separates them - ensure that it lies on the semi-cylindrical surface of the jaw bones and follows the rules of perspective I have already mentioned. The simple sketches shown below indicate some of the basic characteristics of labial morphology. Notice, for instance, that the upper lip is usually thinner and more protruding than the lower.


 are often")
18 On this page I have drawn mouths in a range of smiling postures which typically feature in portraits. Note that the teeth are barely drawn, with little attention paid to minor details of little significance. The lips of elderly people (the two drawings at the bottom) are often thin, and furrowed by a number of vertical wrinkles.
 but rather principles relating to our visual perception, i.e. unity, contrast and balance.")


19 PORTRAIT COMPOSITION Composition involves arranging on the drawing surface the elements which make up the image we are set to represent. There are no firm rules (except, perhaps, the one concerning the 'golden section') but rather principles relating to our visual perception, i.e. unity, contrast and balance. Portrait composition dictates that we make some choices straight away: deciding whether to draw the full figure or just the head, and in this case, whether full-face, profile, three-quarter; deciding whether to place the model in some sort of setting or isolate them with a neutral 'background'; deciding the size of the drawing and whether it should be portrait- or landscape-style; and so on. You need to get used to doing lots of little sketches to evaluate these problems, as I suggest in the following pages. In the meantime look carefully at the sketches below, which use 'tricks of the trade' to direct you when you start, but don't allow yourself to be tied down by traditional and stereotyped formulas - do experiment with original and unusual compositions. 1 In a full face portrait you should not place the head right at the geometric centre of the page, but slightly higher, leaving more or less the same amount of space at the sides. Make sure, however, that the top of the head does not get too close to the edge of the page. 2 In a three-quarter portrait it's better to leave more room between the front of the face and the edge of the page, rather than at the back. 3 A profile portrait looks better if you leave lots of space in front of the face. Avoid, if possible, 'cutting' the head's back profile or making it fit with the edge of the page. 4 A bowed head can express a depressed mood A full-face portrait showing the subject in the foreground can radiate strength and self-confidence. 8 An image viewed from below can make the face look fierce and the attitude authoritarian. It is therefore not recommended for a portrait. 9 An unusual and evocative effect can be achieved by having the face take up the whole page.
20 When working from life it is always useful to study the model thoroughly by sketching the head in various positions and from different viewpoints. This allows you to evaluate the overall somatic aspect and choose the pose and attitude which most faithfully and effectively represent the physiognomic features and the 'character' of the subject.

21 To work in a more relaxed way you can, to start with, use photographs but drawing from life is definitely more effective. In addition, it enables you to explore new compositional routes, 'going around' the model to catch every little expressive nuance and to master the overall shape, which is so important to achieving a likeness. Render these studies by way of simple, 'clean' strokes, aiming for the overall structure of the head rather than chiaroscuro effects.


22 LIGHTING When drawing a portrait it is very important to consider the direction, quality and intensity of the light falling on the model as it is thanks to light and shadows that we get a sense of the shape and the plastic form of the face. Usually when drawing a portrait artificial light, which is easy to adjust and constant, is preferable to sunlight, which varies highly in intensity and direction. Good lighting must highlight as best as possible the physiognomiccharacteristics of the subject. Therefore avoid using a light source which is too intense and close. It is better to use slightly diffused lighting, which doesn't create dark shadows, especially under the nose, the lips and the eyes. The photographic examples on these pages are of a sculpture I moulded and show situations which are slightly unusual or extreme, but are useful to highlight the effects, both positive and negative, of different lighting on the face. The most suitable lighting for a portrait has the source slightly higher than the subject and midway between the front and the side. To make the light more diffused you can place a finely frosted glass in front of the source or use one of the well known photographic devices. Top lighting Is very effective but you have to be careful not to create excessively dark shadows under the eyebrows, the nose, and the chin. The surface-grazing light can exaggerate the reliefs and depressions of the skin. Side lighting Is not suitable for portraiture as it divides the face into two contrasting halves: one lit, one in shadow. Sometimes it can be useful to convey strong relief. Side/back lighting Should not be used for a portrait as it cancels most of the shape of the face. It can be used, however, when the head is in profile. Note, in this example, a device adopted in drawing - the dark part of the head is silhouetted against the light background and the light part against the dark background. Almost back lighting Also called 'effect lighting', is not used in portraiture as it makes the model's features hardly recognizable. The backlit image, however, can work for a portrait where the face is in profile.


23 Lighting from below Is very 'dramatic' and is hardly ever used in portraiture as it alters the likeness and distorts the characteristics of the face. Front lighting Is simple, but flattens the details of the face; it is very suitable, however, for 'linear' and decorative portraits. Angled lighting from above, midway between front and side: is the type of lighting most widely used in portraiture as it properly highlights the physiognomic characteristics and effectively conveys the plasticity of the face. These two photographs vary slightly in the inclination and distance of the subject in relation to the light source.
24 METHOD In this chapter, up to page 37, I illustrate the stages one has to go through to draw a portrait. The method indicated is rather scholastic but useful to those new to portrait drawing. Once familiar with the elements which are essential to characterise a face, it will be easier and more spontaneous to move gradually from the first sketch to a more complex drawing and find your own, more immediate and personal, way forward. My advice is to do some of these exercises using live models and photographs, and to try to understand how each stage helps you tackle and solve a specific problem and how you get to draw a head correctly, at least from a formal point of view. Use sheets of white paper at least 30 x 40cm (12x16in) in size and pencils of various grades, as I have indicated. Stage 1 Observing the model carefully, find the relation between maximum height and maximum width by locating the points of the face that protrude most, both horizontally and vertically. Sketch the oval shape and indicate, according to the rules of perspective, both the median line (curved in this three-quarter view), and the horizontal lines which divide the face into different parts. In this example I have drawn them level with the hairline, the eyebrows, the eyes, the base of the nose, and the rima (the line between the lips). Use a fairly hard pencil (H), which won't smudge the sheet, and draw the strokes smoothly and lightly.
25 Stage 2 Continue to refine your sketch and carefully position the details of the face, i.e. the eyes, the nose, the mouth and the ears. Note that the subdivision of the face into three sections is just indicative. Try to find in each individual the specific relative proportions and stick to them to achieve a likeness. This stage is very important as it lays the ground for the subsequent development of the drawing. Also try to recognize and lightly sketch the main anatomic structures (the subcutaneous bones, the surface muscles, etc). Here, for example, I have indicated the protruding cheekbones and front bone, the position of the orbicularis oris, masseter and sternocleidomastoid muscles. Again, draw light strokes with an H pencil or, if you prefer an HB.
26 Stage 3 At this stage it's better to concentrate on recognizing the 'surface planes', i.e. those areas which are, in a barely noticeable way, distinguished by the different effect of the light. Concisely outline the areas (both lit and in shadow) which can, as a whole, help you give a feeling of solid volumetric construction to the drawing. Be careful not to overdo the straight strokes to avoid a 'hard', angular shape. However, a certain 'dryness' can help to simplify the tonal planes in view of the subsequent stages. Use a medium-grade pencil, such as HB.

27 Stage 4 At this stage we tackle the problem of shadows, already acknowledged in the previous stage, and we show the larger, more intense and important ones. You will notice that the shadows on a face vary greatly in intensity and are extremely complex. For the simplified view needed at this stage, half close your eyes until you perceive just two tones on the model - that of the lit section of the face and that of the areas in shadow. Again use a HB pencil lightly and rather evenly.
. In addition, define the most significant details, for instance the eyes and the lips, enhancing or lightening the tonal values which define them.")
28 Stage 5 At this stage and, if necessary, in the next ones, proceed to fashion the surface shapes of the face, looking for the intermediate tones (which in the previous stage were left out and incorporated in the overall area of shadow). In addition, define the most significant details, for instance the eyes and the lips, enhancing or lightening the tonal values which define them. Again, use a HB pencil varying the intensity of the stroke by increasing or decreasing the pressure on the paper. H pencil can be used to indicate areas of very weak tone.
 to try to reproduce in a drawing all the tonal shades one finds in life.")
29 The drawing, now at an advanced stage, preserves traces of the previous stages. Do not erase them, rather 'soften them up', further perfecting the tones and blending them. It is impossible (and useless) to try to reproduce in a drawing all the tonal shades one finds in life. Therefore don't overdo the 'finishing touches' and the insignificant detail because a good drawing is always the result of careful selection and intelligent, sensitive simplification. Shadows can be intensified in places with a 2B pencil, which is rather soft.

30 The sketches above are reconstructions (done 'afterwards' for the purpose of demonstration) of some of the stages which I follow as a rule, by now almost instinctively, when I draw a portrait.
31 Portrait study: HB pencil (with some 2B added on) on medium-textured paper, 33 x 48cm (13 x Win).

;")
.")

32 Charcoal is suitable for portraiture because it allows you to quickly and effectively tonally draw the face. The method is slightly different from that followed with a pencil: with a few light strokes outline the head, then fill and blend with your fingers or a wad of cotton wool (stage 1); exercising more pressure on the charcoal, darken the areas of the face which appear in shadow and blend again (stage 2); then gradually try to find the different tones of chiaroscuro, darkening some areas, lightening others more exposed to the light (stages 3 and 4). To erase or lighten tones use a kneadable putty eraser, gently pressing it and rubbing lightly. Do not grade the shading excessively or you will 'weaken' the drawing and give it a photographic, affected look. Rather, pay attention to the big masses and the main features of the face.
.")
33 Portrait study: compressed sepia charcoal on medium-textured paper, 33 x 48cm (13 x Win).

34 PORTRAIT STUDIES In this section I have put together a series of portraits, some of which were done specially for this book, and others which were drawn previously. Almost all of them are studies for oil paintings or for more elaborate drawings and 1 chose them because the intermediate stages of implementation, more than the 'finished' works are the ones which show how to recognise and tackle the problems of composition, pose, anatomy and working technique. H, HB and 9B pencil on 30 x 40cm (12 x I6in) paper. The portrait in profile works well with young subjects, especially female. The hair contrasts with the features and creates interesting 'graphic' effects of composition. For the hair I used HB pencil, lightly blended with a finger, and added darker accents with a 9B, drawing some 'flat' strokes, that is, using the side of the point.


35 Compressed sepia charcoal on 30 x 45cm (12 x 18in) paper. To draw a smiling expression effectively, use photographs as, after a few moments, the face loses 'sparkle' and the features show the effect of an unnatural, extended, effort, instead of maintaining the cheerful and pleasant attitude which characterizes the subject. Notice how the contraction of the skin muscles causes little creases at the corners of the eyes and under the lower lids. The lips look wider and slightly apart and this may cause you to get the proportions wrong - make sure you carefully evaluate them on the model.

36 Self-portrait. HB and 2B pencil on paper, 33 x 48cm (13 x 19in). The one model you can study whenever you like and in any condition is the one you see when you look at yourself in the mirror. Practise drawing your mirror image and don't worry too much if, in the end, you won't be able to recognize yourself fully in that self-portrait. Posing is tiring and, after a short while, your usual expression will look 'drawn' and hard. You could, of course, use photographs, as with any other portrait, but if you draw from life the result is more gratifying. Above all try to get the relative proportions of the whole head and then insert the details. Glasses, if worn all the time (as in my case), become part of the physiognomy of the face and can significantly characterize it. Lenses can distort the size and shape of the eyes, enlarging them or making them smaller. Also bear in mind the shadows cast by the frame.

37 HB pencil on paper, 30 x 40cm (12 x 16in).
38 H pencil on 30 x 40 (12 x Win) paper. Children are difficult to portray because they are restless and don't like being watched and therefore turn cross and diffident. Use photography to help you and get your little model to concentrate by giving them an interesting game or letting them watch TV. The proportions of a child's head are different from an adult's (e.g. the face is lower in relation to the cranium), the hair is much finer and the eyes appear very big. Simple linear drawing, with just a hint of chiaroscuro, is perhaps the most suitable to express the gracefulness of a child's features, as well as a technical necessity considering that the drawing needs to be done quickly.
39 HB pencil on paper, 37 x 45cm (14 1/2 x 18in). This is a quick sketch in which I portrayed two people, mother and daughter, at the same time, concentrating only on the line and looking for a composition that was both spontaneous and unusual, arranged diagonally.

40 B pencil on paper, 34 x 48cm (13 x 19in).

41

42 Note, in this drawing, the morphology of the eye. typical of many Eastern peoples, where a fold of skin masks the upper eyelid and makes the eyes appear elongated. Study the physiognomic characteristics of different ethnic types and practise drawing as it can sometimes be difficult, at least to begin with, to get a good likeness.


43 Pencil on paper, 35 x 45cm (14 x I8in). It is sometimes worthwhile introducing elements which can make a portrait less 'formal', as for example the basket in this study. This has enabled me to catch the subject in a pose both informal and spontaneous, almost 'immediate'.
, and I partly neglected the chiaroscuro effects as I was")
44 The drawings on these two pages are studies which I drew from life for a carved portrait. I walked around the model observing his features from different viewpoints (you can see the profile on page 58), and I partly neglected the chiaroscuro effects as I was interested, most of all, in understanding the volumetric structure of the head.
45

46 Portrait. Charcoal on paper, 33 x 48cm (13 x 19in). To draw this study I used weak side lighting as it seemed particularly suited to highlighting the 'severe' character of the subject. The sketch shown on top indicates the basic lines drawn to find the proportions.
47 The profile can make a very effective portrait, especially where the elderly are concerned as their features are enhanced by the presence of big wrinkles and folds of skin. Notice, for instance, how they form around the lips (sometimes curved inwards when the teeth have regressed or fallen) and near the throat. Linear drawing, without chiaroscuro is suitable for these studies.
.")

48 This portrait study was drawn with HB graphite on card, 15 x 20cm (6 x 8in). I enhanced some shadow areas with water-diluted Indian ink applied with a round brush. Finally, I 'glazed' the whole surface in order to soften and even the tones.

49 Portrait, HB pencil on grey card, 14 x 18cm (5 1/2 x 7in).

50 Portrait, HB pencil on grey card, 13 1/2 x 18cm (5 x 7in).
Term 3 Grade 6 Visual Arts
 Term 3 Grade 6 Visual Arts Contents Self-Portrait... 2 What is a self-portrait?... 2 Layout and Medium... 2 Featured Artists... 3 Rembrandt van Rijn... 3 Vincent Willem van Gogh... 4 Drawing Faces... 4
Lesson #1 Secrets To Drawing Realistic Eyes
 Copyright DrawPeopleStepByStep.com All Rights Reserved Page 1 Copyright and Disclaimer Information: This ebook is protected by International Federal Copyright Laws and Treaties. No part of this publication
Complete Drawing and Painting Certificate Course
 Complete Drawing and Painting Certificate Course Title: Unit Four Portraiture Foundations Medium: Drawing in graphite and charcoal Level: Beginners Week: Two Course Code: Page 1 of 15 Week Two: General
Pastel Pencil Skintones
 Pastel pencils and portraiture go hand in hand; enabling the artist to achieve both detail and subtle blended effects. As a forgiving medium they allow you to take away or add colour and texture without
4 HUMAN FIGURE. Practical Guidelines (Secondary Level) Human Figure. Notes
 Human Figure. Notes") 4 HUMAN FIGURE AIM The study of Human figure concerns in capturing the different characters and emotional expressions. Both of these could be achieved with gestures and body languages. INTRODUCTION Human
4 HUMAN FIGURE AIM The study of Human figure concerns in capturing the different characters and emotional expressions. Both of these could be achieved with gestures and body languages. INTRODUCTION Human
Complete Drawing and Painting Certificate Course
 Complete Drawing and Painting Certificate Course Title: Unit Three Shading and Form Medium: Drawing in graphite pencil Level: Beginners Week: Two Course Code: Page 1 of 15 Week Two: General overview Last
Painting A Complete Portrait
 Week 6 So this is it, the final week of the course. We have learnt all the theory we need to know and we have painted all the individual parts of the face. Now it's time we put all our knowledge together
Create a Portrait. of JUMPIN JACK. Sketch Puppy Proportions. Outline a puppy s face, shade his eyes and nose, and add texture to his fur with hatching
 Level: Beginner Flesch-Kincaid Grade Level: 6.79 Flesch-Kincaid Reading Ease: 70.04 Drawspace Curriculum 6.2.A11-12 Pages and 41 Illustrations Create a Portrait of JUMPIN JACK Outline a puppy s face, shade
Extension material for Level 2 Design and Visual Communication Study Guide (page 33)
") Graphic media Extension material for Level 2 Design and Visual Communication Study Guide (page 33) ISBN 978-1-927194-15-7 For individual student use only. No other use permitted. ESA Publications (NZ)
Graphic media Extension material for Level 2 Design and Visual Communication Study Guide (page 33) ISBN 978-1-927194-15-7 For individual student use only. No other use permitted. ESA Publications (NZ)
Drawing Goats. Proceedings of the 28th Annual Goat Field Day, Langston University, April 27, 2013
 Drawing Goats Mr. Kenneth Williams Science Illustrator Science Graphics and Design Drawing goats or any other subject depends on accurate observation and correct proportional placement of shapes and lines.
CHAPTER SEVEN THE EYES
 CHAPTER SEVEN THE EYES Eyes are beautiful! They are my favorite things to draw. An entire drawing can be made around a single eye. In the drawings below, you can see the eye is just shapes. An eye looks
FRONTAL VIEW OF. Brenda Hoddinott
 FRONTAL VIEW OF Brenda Hoddinott P14 INTERMEDIATE: PEOPLE In this project, I show you some easy techniques for drawing frontal views of the three basic types of adult noses, in only three simple steps.
? What is covered in this module?
 MODULE 6 The Eye - Frontal View? What is covered in this module? It has been said that the eyes are the windows to the soul. Clearly, rendering the eye with accuracy is incredibly important in portrait
This project is recommended for artists from age 10 to adult, as well as home schooling, academic and recreational fine art educators.
 Brenda Hoddinott F-05 BEGINNER: HATCHING This project guides you through the process of setting up proportional guidelines, and using symmetry to draw the facial features and hair of a male anime character
Sketch technique. Introduction
 Sketch technique Introduction Although we all like to see and admire well crafted illustrations, as a professional designer you will find that these constitute a small percentage of the work you will produce.
IN PROFILE. Brenda Hoddinott. clumping them all into only three categories is very challenging.
 IN PROFILE Brenda Hoddinott P08 INTERMEDIATE: PEOPLE In this project, I show you some easy techniques for drawing the three basic types of adult noses in profile, by following only three simple steps.
Adult Facial Proportions
 Adult Facial Proportions Brenda Hoddinott P13 INTERMEDIATE: PEOPLE This article demonstrates a simple formula for rendering adult heads and faces proportionately correct. As we all know, adult faces are
Gradations. Blend and Burnish. Shade and Burnish a Vertical Gradation
 Level: Beginner Flesch-Kincaid Grade Level: 9.6 Flesch-Kincaid Reading Ease: 58.0 Drawspace Curriculum 1.2.A2-6 Pages and 10 Illustrations Blend and Burnish Gradations Create smoothly-rendered gradations
HOW TO DRAW A FACE. By Samantha Bell.
 HOW TO DRAW A FACE By Samantha Bell HOW TO DRAW A FACE To draw a face (or portrait), you will need: Pencils (2B is a good one to start with) Pink Pearl or Art Gum Eraser Kneaded Eraser Drawing Paper Copies
Complete Drawing and Painting Certificate Course
 Complete Drawing and Painting Certificate Course Title: Unit Three Shading and Form Medium: Drawing in graphite pencil Level: Beginners Week: Three Course Code: Page 1 of 12 Week Three: General overview
Celebrating with Whimsies
 Celebrating with Whimsies Hello gorgeous one! Technique wise we're going to create some Welcome to November. Can you believe the year is almost over? I can't believe how fast whimsy characters, yay! I
Draw Keiko, a Manga Baby
 Flesch-Kincaid Grade Level: 8.4 Flesch-Kincaid Reading Ease: 64.3 Drawspace Curriculum 2.1.A17-10 Pages and 19 Illustrations Levels: Beginner to Advanced Draw Keiko, a Manga Baby Sketch accurate proportions
HOW TO MAKE REALISTIC LINE DRAWINGS OF ANY FACE
 HOW TO MAKE REALISTIC LINE DRAWINGS OF ANY FACE Use This PROVEN TECHNIQUE That Has Helped Beginning and Experienced Artists Create an Accurate, Proportional Line Drawing of ANY Face, EVERY Time! By Jack
INTRODUCTION. Drawing the Complete Head. Having mastered the basic form of the head and learned how to draw the features,
 CONTENTS 3 Introduction 4 Getting Started 5 Equipment 6 Form and Proportion 8 Drawing the Eye: Front View 10 Drawing the Eye: Three-quarter View 11 Drawing the Eye: Side View 12 Drawing the Eye: Tilted
Elements Of Art Study Guide
 Elements Of Art Study Guide General Elements of Art- tools artists use to create artwork; Line, shape, color, texture, value, space, form Composition- the arrangement of elements of art to create a balanced
DRAWING FROM LINE TO LIFE Beginners Course
 WEEK 2 Remember last week when I asked you to draw blocks of tone with each pencil, and on the second line to draw as heavily as you could? The object of that exercise was make you produce the darkest
Art Glossary Studio Art Course
 Art Glossary Studio Art Course Abstract: not realistic, though often based on an actual subject. Accent: a distinctive feature, such as a color or shape, added to bring interest to a composition. Advertisement:
Welcome! Introductory Techniques to Portrait Drawing
 Welcome! Introductory Techniques to Portrait Drawing What to expect from this lesson If you ve always wanted to learn how to draw, and capture the likeness of a face, this lesson is for you. You don t
OF A DOG Brenda Hoddinott
 OF A DOG Brenda Hoddinott I-03 INTERMEDIATE: CARTOONS & CRITTERS This simple project, features an eye of Shadow the Dalmatian, and is drawn completely freehand. After sketching the outlines, you add different
Focus, as you work, on getting many gradations of dark and light in your piece to guarantee something that is super interesting to the eyes.
 Hello! My name is Effy Wild, and Kara has tasked me with creating a mixed media face with an emphasis on building a lot of value contrast through the use of lights and darks (and glazes) to create depth
FOUNDATIONS in Portrait Drawing Volume 1. Michael R. Britton
 FOUNDATIONS in Portrait Drawing Volume 1 Michael R. Britton FOUNDATIONS in Portrait Drawing Volume 1 Table of Contents Lesson 1: The Arabesque: A Dynamic Correspondence Page 3 Lesson 2: About Looking:
ello there wonderful friend! :)
") H ello there wonderful friend! :) Welcome to my lesson today. My name is Tamara Laporte and I run Willowing Arts Ltd where lots of wonderful art & personal development classes are run. I'm super excited
H ello there wonderful friend! :) Welcome to my lesson today. My name is Tamara Laporte and I run Willowing Arts Ltd where lots of wonderful art & personal development classes are run. I'm super excited
 http://web.archive.org/web/20080430082908/www.virtualportmeirion.com/howto/1pr... Step 1. Preparation Hello, welcome to the course. For your drawing to achieve a likeness to the original photo accuracy
UNIT 1 (of 5): Line (16 hours = 1 credit)
: Line (16 hours = 1 credit)") Art I A Elements of Art UNIT 1 (of 5): Line (16 hours = 1 credit) Independent Study 1. Students will be introduced to techniques meant to inspire creativity 2. Students will practice drawing skills in
Art I A Elements of Art UNIT 1 (of 5): Line (16 hours = 1 credit) Independent Study 1. Students will be introduced to techniques meant to inspire creativity 2. Students will practice drawing skills in
General Certificate of Education Ordinary Level 6010 Art June 2012 Principal Examiner Report for Teachers
 www.onlineexamhelp.com Paper 6010/01 Drawing and/or Painting from Still Life Key messages Candidates should make sure they consider the background to the arrangement to add depth and balance. In better
Introduction. Recall that your pretest was to draw a human face from your memory. You can compare them at the end of this unit.
 Introduction This unit will be worth 2 credits. You will have to have done the perspective for artists unit since this unit requires you to understand the concept of proportion. In faces there are certain
Drawing 101 2/4/2016. Basic Tools & Materials. Drawing Pencils. Drawing Pencils Erasers Blending Mediums Paper Other
 Basic Tools & Materials Drawing 101 Tips and Techniques Drawing Pencils Erasers Blending Mediums Paper Other Drawing Pencils H Pencils lead is firmer therefore your mark is lighter B Pencils Lead is softer
NATA TRIAL LESSON. SILICA Study Material Kit
 NATA TRIAL LESSON from SILICA Study Material Kit "This is a Trial. When you order the full kit for only Rs.3000/- you will get 10 Books + 10 Sample Papers & Solution Sets in Printed Hard Copy" In this
Chalice Arts UK Limited
 1 Chalice Arts UK Limited Drawing Portraits INSET By Stephen Bruce Stephen Bruce 2015 2 Drawing Faces Aim To provide an overview of how to teach the key points of drawing frontal portraits. Objectives
First Semester Exam Review If packet is 100% complete and turned in the day of the exam, you can earn 10pts extra credit on your exam grade.
 2D Art NAME: First Semester Exam Review If packet is 100% complete and turned in the day of the exam, you can earn 10pts extra credit on your exam grade. PART 1 Exam Review Unit 1 Drawing: Fill in the
3Insert the second rod no. 4
 Yamato: Step-by-step 37 The stern block and searchlight control towers a b c d e f Recommended tools and materials Wood glue Sandpaper (no. 800 grain) Metal file Putty Craft knife For metal: Super Glue
8 Pages 10 Illustrations
 NEWLY HATCHED DUCKLING Jeanette Jobson After hours of struggle, a tiny Pekin duckling breaks free of the shell that s been its home for 30 days and staggers into the world. Once the down starts to dry,
You will need 9x12 blue construction paper, SOFT LEAD pencil colors, an eraser, and a metric ruler.
 Here is a nice picture for a beginner to start using color. This is a copy of the black and white barn drawing so if you wish you can do that one first. Scroll down. You will need 9x12 blue construction
Shading and Form: How to render the illusion of 2 dimensional form on a flat page
 Summary of Shading and Form: How to render the illusion of 2 dimensional form on a flat page With Artist and Author Cindy Wider Page 1 of 31 Examples of work by Drawpj.com Course Graduates Note: many of
Color Pencil Techniques and Toned Drawing Practice Exercises
 Color Pencil Techniques and Toned Drawing Practice Exercises Objectives: Learn to create values in black, white, and grayscale Practice color pencil techniques Learn ways of mixing color Become familiar
(the Little Ham) DRAW KEVIN BACON. Sketch Piglet Proportions. Sketch a piglet and add shading to capture his spotted fur and three-dimensional forms
 DRAW KEVIN BACON. Sketch Piglet Proportions. Sketch a piglet and add shading to capture his spotted fur and three-dimensional forms") Level: Beginner to Intermediate Flesch-Kincaid Grade Level: 8.0 Flesch-Kincaid Reading Ease: 61.7 Drawspace Curriculum 6.2.A5-8 Pages and 12 Illustrations DRAW KEVIN BACON (the Little Ham) Sketch a piglet
Level: Beginner to Intermediate Flesch-Kincaid Grade Level: 8.0 Flesch-Kincaid Reading Ease: 61.7 Drawspace Curriculum 6.2.A5-8 Pages and 12 Illustrations DRAW KEVIN BACON (the Little Ham) Sketch a piglet
REALISTIC DRAWING WITH CHARCOAL with Kirsty Partridge
 REALISTIC DRAWING WITH CHARCOAL with Kirsty Partridge SUPPLY LIST Part 3- Drawing Animals with Charcoal Strathmore 300 Series Bristol Vellum Paper Lyra Rembrandt Charcoal Pencils 2B & H Lyra Rembrandt
Tonal Values -Training Your Eye
 Tonal Values -Training Your Eye Session Worksheet/Overview Introduction to Tonal Values -Video pg. 1 PastelAcademyOnline for education purposes only Lesson Plan An overview of the training You are not
MANCHESTER AND ORCHARD HEIGHTS ELEMENTARY TEXT FOR STUDENT DISPLAYS, 2012 FOCUS ON CONCEPTS AND STUDENT LEARNING TARGETS
 MANCHESTER AND ORCHARD HEIGHTS ELEMENTARY TEXT FOR STUDENT DISPLAYS, 2012 FOCUS ON CONCEPTS AND STUDENT LEARNING TARGETS ART BY SIDNEY GLEN IMA INTERMEDIATE MULTI-AGE CLASS: 4 TH AND 5 TH GRADES We completed
Year 7 Graphics. My Teacher is : Important Information
 Year 7 Graphics My Teacher is : Important Information > Good behaviour is an expectation > Bring correct equipment to your graphics lesson > Complete all homework set and hand in on time > Enter and leave
Learning Plan. My Story Portrait Inspired by the Art of Mary Cassatt. Schedule: , Grades K-5, one class period of approximately 60 min.
 Learning Plan My Story Portrait Inspired by the Art of Mary Cassatt Mary Cassatt was an expert in showing the relationships and the stories of the real people in her paintings. Look at the details. What
Transfer an Image to Drawing Paper
 Level: Beginner to Advanced Flesch-Kincaid Grade Level: 8.4 Flesch-Kincaid Reading Ease: 64.6 Drawspace Curriculum 1.2.A5 6 Pages and 4 Illustrations Transfer an Image to Drawing Paper A three-step process
Welcome Year 10. What do you know about the structure of your faces?! What are the proportion rules?
 Welcome Year 10 What do you know about the structure of your faces?! What are the proportion rules? Draw a labelled diagram of where you think features go 1 Project over year: Drawing & Experimentation
winter soul flakes with tamara laporte - How to create a light skinned lollipop girl with her whimsical friends -
 H ello fabulous creative friend! Welcome to Winter Soul Flakes, a wintery snowy sparkly class with me, Tam! :) Hi! In this class I will demonstrate how to create 3 wintery lollipop girls with their whimsical
DRAWING TUTORIALS ONLINE, INC. Portrait Drawing WITH MATTHEW ARCHAMBAULT
 DRAWING TUTORIALS ONLINE, INC. Portrait Drawing WITH MATTHEW ARCHAMBAULT This PDF booklet compliments the video tutorials associated with Portrait Drawing With Matthew Archambault. It contains all of the
The Drawing EZine. The Drawing EZine features ELEMENTS OF FACIAL EXPRESSION Part 1. Artacademy.com. November 2014
 The Drawing EZine Artacademy.com November 2014 The Drawing EZine features ELEMENTS OF FACIAL EXPRESSION Part 1 T the most difficult aspect of portrait drawing is the capturing of fleeting facial expressions
RENDERING (SHADING) IN REPRESENTATIONAL DRAWING
 IN REPRESENTATIONAL DRAWING") RENDERING (SHADING) IN REPRESENTATIONAL DRAWING computer graphics & design What is Rendering? Rendering is the application of tone and texture to create a three-dimensional appearance and/or to depict
RENDERING (SHADING) IN REPRESENTATIONAL DRAWING computer graphics & design What is Rendering? Rendering is the application of tone and texture to create a three-dimensional appearance and/or to depict
Learn How to Draw. Animals. Created exclusively for Craftsy by Antonella Avogadro
 Learn How to Draw Animals Created exclusively for Craftsy by Antonella Avogadro [Special Offer] You ve unlocked savings! Enjoy more in-depth, step-by-step guidance from expert artists with Craftsy s growing
ART 2 Summer Homework:
 ART 2 Summer Homework: Dear Art 2 Students who have taken Art 1 for high school credit in middle school. In order to ease the transition to high school and make sure you are prepared to be in an upper
COLOURED PENCIL DEMONSTRATION
 COLOURED PENCIL DEMONSTRATION Hare Today By Jane Lazenby In this step-by-step guide we re going to paint a hare in coloured pencil. As per usual with my coloured pencil demonstrations we re going to create
After Bouguereau: The Bohemian
 After Bouguereau: The Bohemian www.kingslan.com painting@kingslan.com The Bohemian Surface Portrait grade 20x24 portrait grade canvas. Transfer Information Transfer the design to the surface with gray
The Drawing EZine. The Drawing EZine features ELEMENTS OF FACIAL EXPRESSION Part 1. Artacademy.com
 The Drawing EZine Artacademy.com The Drawing EZine features ELEMENTS OF FACIAL EXPRESSION Part 1 T the most difficult aspect of portrait drawing is the capturing of fleeting facial expressions and their
The Difficult Lesson - After Bouguereau
 The Difficult Lesson - After Bouguereau www.kingslan.com Kingslan painting@kingslan.com & Gibilisco Publications 2009 William Bouguereau - The Difficult Lesson Surface Portrait grade 18 x 24 portrait grade
Shade a Basic Dog Eye
 Flesch-Kincaid Grade Level: 7.5 Flesch-Kincaid Reading Ease: 65.2-6 Pages and 16 Illustrations Shade a Basic Dog Eye Create a simple drawing of a dog s eye based on a detailed photo Resource: Module 3.1
Name: Period: THE ELEMENTS OF ART
 Name: Period: THE ELEMENTS OF ART Name: Period: An element of art that is used to define shape, contours, and outlines, also to suggest mass and volume. It may be a continuous mark made on a surface with
How to Draw with Erasers
 Level: Beginner Flesch-Kincaid Grade Level: 9.2 Flesch-Kincaid Reading Ease: 58.5 Drawspace Curriculum 1.2.R3-6 Pages and 9 Illustrations How to Draw with Erasers An introduction to beginner erasing techniques
Product design: Communicating your design proposals
 Product design: Communicating your design proposals In the world of business and industry design proposals can only be turned into saleable products if the designers communicate their proposals effectively.
Vocabulary Glossary Visual Arts K-4
 Vocabulary Glossary Visual Arts K-4 1. abstract- Artwork in which little or no attempt is made to represent images realistically and where objects are often simplified or distorted. 2. abstraction- The
Art 2D Mid-Term Review 2018
 Art 2D Mid-Term Review 2018 Definition: What is a Line? Definition: Line is the most basic design tool. A line has length, width, tone, and texture. It may divide space, define a form, describe contour,
Brenda Hoddinott 14 PAGES 43 ILLUSTRATIONS U-10 ADVANCED: FACES & FIGURES
 Brenda Hoddinott U-10 ADVANCED: FACES & FIGURES Your goal in this heavily illustrated project is to gain an understanding of how various aspects of contrast and key can enhance composition. The process
Pastel Academy Online Tone and How to Shade
 Pastel Academy Online Tone and How to Shade When we add shading to our line drawings we are entering a different phase. Shading takes us a massive leap towards painting. Now we are not just looking at
Drawing the Face WORKSHEET. Upper Palpebral Groove. Lacrimal Caruncle. Pupil. Iris Sclera. Helix Bridge. Tragus. Ala N ostril.
 Drawing the Face WORKSHEET Proportions of the Face - This refers to how large and small facial features and areas of the face are in relation to each other. There are basic rules that you can learn to
Line, Tone, Form, Colour, Pattern, Composition, Mood, Media.
 Writing about your work and the work of other artists is an important part of your GCSE. Use this guide to help you get used to the terminology. Don t be afraid to use your own thoughts and opinions. When
elements of design worksheet
 elements of design worksheet Line Line: An element of art that is used to define shape, contours, and outlines, also to suggest mass and volume. It may be a continuous mark made on a surface with a pointed
FACTFILE: GCSE ART AND DESIGN
 FACTFILE: GCSE ART AND DESIGN Drawing Techniques Aims This range of drawing exercises breaks drawing down into very simple approaches or steps. Each exercise is accessible to all students, regardless of
CQU: MMST11010 Illustration & Visualisation Week 9 Tutorial:
 CQU: MMST11010 Illustration & Visualisation Week 9 Tutorial: Intro This week we practice giving characters facial expression. Then we show how cartoon bodies can exaggerate motion and help to explain action
Copyright of Mont Marte International Pty Ltd ACN
 Traditional bouquet in Oils pick up these materials from any gold mont marte art centre Cmmd6076 Mont Marte double thick canvas 60 x 72cm bmhs0019 mont marte gallery series brush pack 6pce bmhs0024 mont
Content Area: Visual and Performing Arts Subject: Visual Art Course: Studio 2-D Design
 SHORE REGIONAL HIGH SCHOOL DISTRICT West Long Branch, New Jersey Content Area: Visual and Performing Arts Subject: Visual Art Course: Mr. Leonard Schnappauf, Superintendent/Principal Dr. Robert McGarry,
Holly Charcoal pencil on drawing paper 12 9 (30cm 23cm)
") Holly Charcoal pencil on drawing paper 12 9 (30cm 23cm) drawing portraits for the absolute beginner A Clear & Easy Guide to Successful Portrait Drawing Mark and Mary Willenbrink Contents Introduction Materials
Holly Charcoal pencil on drawing paper 12 9 (30cm 23cm) drawing portraits for the absolute beginner A Clear & Easy Guide to Successful Portrait Drawing Mark and Mary Willenbrink Contents Introduction Materials
Curriculum Map for Visual Arts (Group 6)
") Curriculum Map for Visual Arts (Group 6) Unit Title (Time frame) GEOMETRIC FORMS 3 4 weeks Standards IB Objectives Knowledge/Content Skills Assessments Key resources What are students expected to know
Curriculum Map for Visual Arts (Group 6) Unit Title (Time frame) GEOMETRIC FORMS 3 4 weeks Standards IB Objectives Knowledge/Content Skills Assessments Key resources What are students expected to know
Paint Neat Edges. on Zebra Stripes. Draw a Symmetrical Zebra Face
 Level: Intermediate Flesch-Kincaid Grade Level: 7.5 Flesch-Kincaid Reading Ease: 62.1 Drawspace Curriculum 8.2.A6-10 Pages and 33 Illustrations Paint Neat Edges on Zebra Stripes Outline the contours of
How to Create a Geometric, WPAP Vector Portrait in Adobe Illustrator
 How to Create a Geometric, WPAP Vector Portrait in Adobe Illustrator - Tuts+ Design & Illustration Tutorial Not e bo o k: Cre at e d: URL: Photoshop 3/11/2015 9:45 AM http://design.tutsplus.com/tutorials/how-to-create-a-geometric-wpap-vector-portrait-in-a
7 PAGES 15 ILLUSTRATIONS
 Drawing an Brenda Hoddinott K-02 INTERMEDIATE: PERSPECTIVE TWO You need to understand ellipses in order to correctly draw cylindrical or cone shapes objects, such as vases, ice cream cones, mugs, plates,
Draw Comic Book. action. Techniques for creating dynamic superhero poses and action LEE GARBETT. Press escape to return to normal view
 Draw Comic Book action Techniques for creating dynamic superhero poses and action LEE GARBETT Basic Tools From your imagination to thumbnails and roughs, through to your finished inked piece ready for
The Five Basic Portrait-Lighting Setups
 The Five Basic Portrait-Lighting Setups By Bill Hurter Published by Amherst Media Paramount. Loop. Rembrandt. Split. Rim. Bill Hurter provides light-by-light instructions and diagrams to show you how to
Cindy Wider Author of: Draw and Paint in Your Pyjamas!
 How to Draw with Cindy Wider Author of: Draw and Paint in Your Pyjamas! J08 INTERMEDIATE: SKILLS & SECRETS Medium: Charcoal on grey Mi Teintes paper In this lesson you will be taught four popular techniques
Term 3. Explanations of assignments
 Term 3 Explanations of assignments (If you are in class, you would get more detailed explanation with powerpoints, demonstrations, examples and other methods of learning.) Categories: Assignments are in
COPYRIGHT 2008 PAUL BURNETT - ALL RIGHTS RESERVED
 Detailed layout drawings, toned for proper modeling in two sizes. Packet contains anatomical drawings and facts to help you to achieve realistic tooling and coloring results. Twelve A WILDLIFE STUDY ROCKY
Brenda Hoddinott 9 PAGES 12 ILLUSTRATIONS G-04 BEGINNER: SHADING FORMS
 Brenda Hoddinott G-04 BEGINNER: SHADING FORMS In this project, you draw a three dimensional cartoon by using contour hatching to shade the four spheres that define the forms of the head, nose and eyes.
Cartoon Faces for Family Portrait
 Cartoon Faces for Family Portrait in Windows Paint Make nice cartoon portraits of the child and her/his family for a page of the book. Make one head & shoulders portrait for each family member. Then arrange
> photo morph. > curricular focus: This lesson emphasizes the effective blending of multiple images resources using the Clone tool and Healing Brush
 > objective(s): Students will seamlessly morph two photo sources into one image with all changes and integrations undetectable even when zoomed in > curricular focus: This lesson emphasizes the effective
The Drawing EZine. The Drawing Ezine. Artacademy.com. Understanding Planes - Achieving 3-Dimensionality in Your Portrait Drawing
 The Drawing EZine Artacademy.com The Drawing Ezine Understanding Planes - Achieving 3-Dimensionality in Your Portrait Drawing Convincing portrait drawing has six requisite elements: shape, proportion,
How to Draw Eyelashes
 How to Draw Eyelashes By Darlene Nguyen - November 30, 2016 Hey guys! Today, I m going to show you how to draw eyelashes and also how not to draw them. The format of this tutorial will be: examples with
75 points D. Homework 50 points E. Critiques 10 point F. Total: 150 points
 Art 202-Intermediate Drawing M: 5:50-10-pm-- 818 364 7735 CAC 1. Office CAI 221 or CAC 1: M, T, Th 4:45-5:45, W: 4:20-5:50, F. 2:10-3:10 Professor Barbara Kerwin: Barbara@barbarakerwin.com This is an intermediate
NID TRIAL LESSON. SILICA Study Material Kit
 NID TRIAL LESSON from SILICA Study Material Kit "This is a Trial. When you order the full kit for only Rs.4000/- you will get 10 Books + 10 Sample Papers & Solution Sets + 7/14/21 day study plan in Printed
Complete Drawing Certificate Course
 The Cindy Wider Method Complete Drawing Certificate Course Essential Art Supplies Introduction Here is a list of the essential art supplies that you need for this course. Please note that for the first
Building the Gothic Church
 Building the Gothic Church Mold #54 does not contain all of the blocks to build this church. You will need extra regular blocks (1/2" x 1/2" x 1") and square blocks (1/2" x 1/2" x 1/2"). These blocks can
FOUNDATIONS in Portrait Drawing Volume 2. Michael R. Britton
 FOUNDATIONS in Portrait Drawing Volume 2 Michael R. Britton FOUNDATIONS in Portrait Drawing Volume 2 Table of Contents Lesson 8: Drawing the Tilted Head Page 4 Lesson 9: Rendering Hair Page 8 Lesson 10:
XXXX - ILLUSTRATING FROM SKETCHES IN PHOTOSHOP 1 N/08/08
 INTRODUCTION TO GRAPHICS Illustrating from sketches in Photoshop Information Sheet No. XXXX Creating illustrations from existing photography is an excellent method to create bold and sharp works of art
White charcoal is made by charring the wood at a relatively low temperature for some time, then, near the end of the process, raising the kiln
 White charcoal is made by charring the wood at a relatively low temperature for some time, then, near the end of the process, raising the kiln temperature to about 1000 degree Celsius to make the wood