HOW TO MAKE REALISTIC LINE DRAWINGS OF ANY FACE
|
|
|
- Thomasina Hood
- 6 years ago
- Views:
Transcription

1 HOW TO MAKE REALISTIC LINE DRAWINGS OF ANY FACE Use This PROVEN TECHNIQUE That Has Helped Beginning and Experienced Artists Create an Accurate, Proportional Line Drawing of ANY Face, EVERY Time! By Jack Pearce


2 HOW TO MAKE REALISTIC LINE DRAWINGS OF ANY FACE By Jack Pearce Copyright 2017 by Let s Draw People All rights reserved. No part of this publication may be reproduced or transmitted in any form or by any means, electronic or mechanical, including photocopying, recording, or by any information storage and retrieval system. Published by: Let s Draw People 3053 West Craig Road Suite E # 202 North Las Vegas, NV 89032
3 Back to the Basics with Line Drawings Whether your goal is to make a familiar sketch of a face or to draw a very realistic portrait, we likely need to get back to the basics to achieve more satisfying results. It all begins with the initial line drawing! What is a line drawing? A line drawing is a drawing done primarily in lines, with little to no shading. A line drawing can consist of only a very basic outline of the subject, or it can have an incredible level of detail and even indicate the placement of shadows and highlights. A line drawing of a face is the first step for drawing a realistic pencil portrait. If you are trying to draw a detailed, realistic portrait, then it is absolutely crucial that you start with an accurate, realistic line drawing of the face. If your line drawing is faulty, the rest of the drawing can fall apart. Or, you may want to just draw a simpler face with lines, having correct proportions and facial features, without too much shading or effects of realism. A line drawing such as this can also be a pleasing, stand-alone final piece of artwork. So, HOW DO we create these more accurate, realistic line drawings of faces? Well, there are several approaches that artists use, but I want to share just one of those approaches with you. Whether you are a beginner or have a little more experience, this ONE method can DRASTICALLY IMPROVE your abilities more quickly and more effectively than all others! I was drawing regularly for 15 years before I first discovered this method, and using it IMMEDIATELY took my portrait drawing abilities to a whole new level! This method is none other than..the grid method! What Is the Grid Method? The grid method is nothing new, but it is incredibly easy. In fact, it is SO easy and works SO well that you may feel like you are cheating on your line drawing. I assure you, though, that this tried-and-true method is not cheating at art. It is something that has been around since ancient Egyptian times. Even masters such as Leonardo da Vinci, Vincent van Gogh, and Albrecht Durer of the Renaissance (just to name a few) employed this common-sense technique! The grid method will allow you to focus on drawing one small portion of your overall subject at a time. This is accomplished by placing a grid of equal-sized squares over a reference photograph while also placing an equal amount of grid squares onto your drawing paper. 1

4 A 1 B C D E F G H I J K L B x 8 photo (1/2 grid squares) 12 x 16 drawing (1 grid squares) The Grid Method allows you to focus your attention and sharpen your observational skills by drawing what you see one box at a time. You can also scale your drawings to be larger or smaller than the reference photo by changing the size of the grid squares on your drawing paper. Drawing a face with a grid also means you get facial proportions correct without guessing or using traditional guidelines sketched on an oval. Whether your reference photo is an original that you can physically hold or an image file on your computer, be sure it is a CLEAR image and LARGE enough for you to add the level of detail to your drawing that you desire. 2


5 Putting a Grid on a Photo For an original photo, you can copy a grid onto a transparent overlay. Use one of the grids at the end of this guide, or customize your own grid with the Table feature in Microsoft Word. Grid on a transparent overlay Microsoft Word: Make sure you select Exactly for the Row Height. Specify the same desired height and preferred width in inches for the Row and Column tabs. 3

6 A better option is to work from an image on your computer that has a grid put on it by you. This lets you work from the screen or even print the image out with grid lines in place! You can put a grid on your photographs in either Microsoft Word or Adobe Photoshop Elements. Microsoft Word: After inserting your table, insert a photo and set Wrap Text to Behind Text. Adobe Photoshop Elements: You can adjust the grid settings if you go to Edit > Preferences. Affiliate Disclaimer: The following clickable links will take you to webpages that describe affiliate products. This simply means if you choose to purchase any of the following products through the links on the webpages, then I will receive a small commission (at no extra cost to you). 4
. A mechanical pencil with graphite lead works better for making fine lines.")

7 Putting a Grid on Your Drawing Paper One way to do this is to lightly draw grid lines on your drawing paper with a ruler. Use very light, fine lines and a graphite pencil no darker than a 2B (with super light pressure). A mechanical pencil with graphite lead works better for making fine lines. Instead of a regular ruler, you may have better luck getting perpendicular grid lines by using a T-square ruler or a C-Thru (Westcott) plastic ruler. One disadvantage to this traditional way of making a grid is the fact that you will have to carefully erase all of the grid lines when your line drawing is complete. You can use a good ol fashion pink eraser for large areas. Investing in a kneaded eraser for tight spaces and a horse hair dusting brush for removing eraser debris will make life a whole lot easier for this task. A faster and more effective way of making a grid for your drawing paper is to use a light box and a grid printed on white paper. Again, feel free to use the grids provided in this guide. Simply tape a grid to the light box, and tape your drawing paper over the grid. Turn the light box on and Voila!... you have a grid on your drawing paper that you do not have to erase after you complete your line drawing! 5
8 The Grid Method in Action! Now that you are more familiar with the concept of the grid method, it is time to put it into action. Applying the grid method will allow you to draw ANY face you want, with as much detail or as little detail as you want. The more detail you add to your line drawing, the more realistic it will start to become. The following sections will show you how you can use a grid to draw any facial feature! Since the goal of this guide is to make realistic line drawings of any face, I will make use of lots of extra details while teaching some basic fundamentals. To keep these nothing more than line drawings, I will use a minimal amount of shading. Be sure to use the reference photos provided in each section and practice drawing the features on your own paper! Follow the steps and focus on one grid square at a time, drawing the necessary lines from that square before moving on to the next one. 6
 in the tear duct areas.")
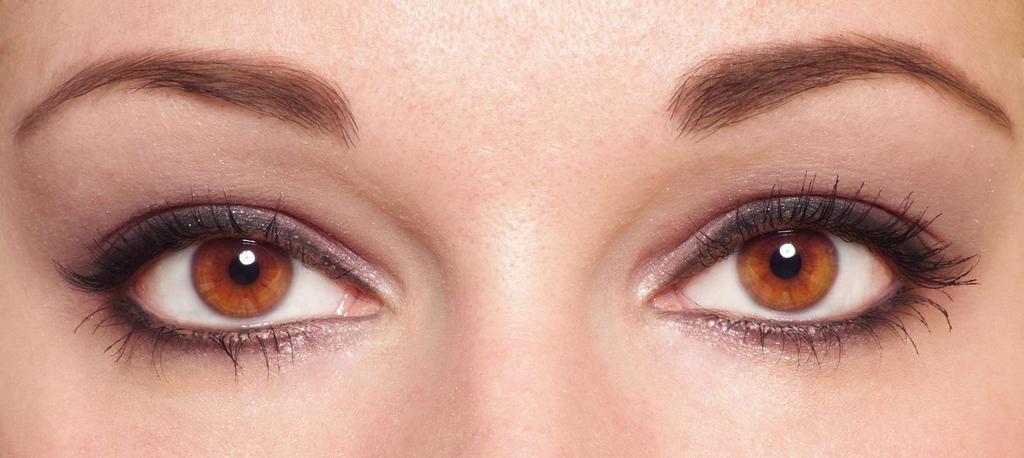
9 Drawing the Eyes Eyes that look directly ahead are typically almond-shaped and one eye-length apart. Use your grid lines to place the shapes properly. Include lines at the inner corners for the little pink nodules (called lacrimal caruncles ) in the tear duct areas. Draw a very thin line to represent the rim of each eyelid going all around the white part. Then sketch lines above and below each eye for the rest of the eyelids. Length of one eye 7


10 Very lightly, sketch in circles for the proper placement of the iris, pupil, and highlight(s) in each eye. The highlight usually overlaps both the iris and pupil. It is often circular, but can take on other shapes as well. For the most accurate circles, trace over your sketched irises and pupils with a circle template. Notice also the lines on the iris that radiate from the pupil. You can then color in the pupil dark black and shade the iris a tone that closely matches the subject s eye color. A circle template like this one will allow you to draw perfect circles of any size. It also has guidelines that help you properly center the pupil in the iris. 8
11 Draw lines that indicate the inner eye sockets, curving downward to form the bridge of the nose. Sketch a light outline for the eyebrows. Pay attention to the direction of hair growth when drawing in lines for the hairs of the eyebrows. Do the same with eyelashes. Try to match the length and shape of eyelash strands that you see in the reference photo. It could be helpful for you to erase gridlines on your paper where you plan on drawing a lot of little strands of hair. It will be much harder to erase the gridlines AFTER you draw the hair! Begin your eyelashes from the eyelid rim. 9


12 10
13 Drawing the Nose Study the bridge of your subject s nose. Lightly draw the lines that suggest your subject s bridge. Include any characteristic traits you notice, such as the shape of the bridge and how it connects with the space at the bottom of the forehead and between the eyes. Also include any wrinkles or other identifiable marks that branch out from the bridge and around the eyes. 11

14 Next, look at the ball of the nose. It is called a ball because there is a ball of cartilage under the skin at the tip. Visualizing this ball and drawing subtle lines to indicate it will help your nose look more realistic. Then draw the shape of the wings of the nose around the nostrils. These wings are also made of cartilage. Draw any apparent skin creases (like those noticeable during a smile) that branch out from the lower nose area. Notice how the outer edges of the lower nose line up roughly with the inner corners of the eyes. 12
15 Lastly, let the shape of the cartilage and skin of the nose form the shape of the nostrils. Don t just draw two black ovals on top of the skin and call them nostrils. Examine the shape of everything. For example, notice how the cartilage between the nostrils and on the outer sides has a wrap-around shape. Focus on drawing the cartilage and skin AROUND the nostrils rather than the nostrils themselves. This will give your nose drawings a more natural appearance than what you would have from the cartoonish look left by black circles on top of a nose shape. 13

16 14
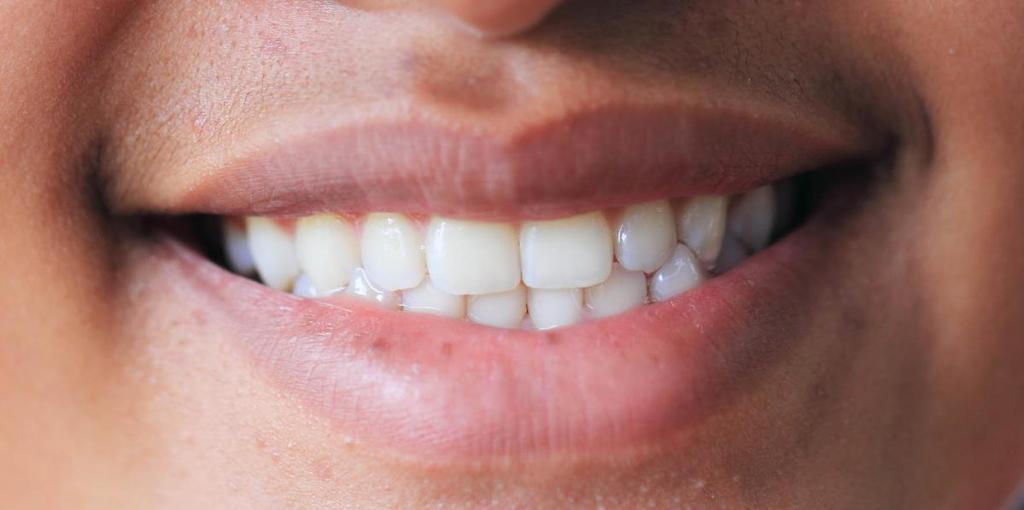
17 Drawing the Mouth Begin by drawing the top lip. Don t forget to draw the dip on the top part of the top lip, just beneath the nose. Sometimes there is a slightly visible highlighted trim around the upper and/or lower lip, as seen in this example. Including this will add a little more dimension to your drawing. 15
18 Draw the bottom lip, giving it the same level of natural appearance as you did for the top. Draw any vertical or horizontal lines that line the top and bottom lip. There is often a noticeable one in the center of the bottom lip. A highlight is almost always evident on the bottom lip, too. Don t forget to draw facial muscles around the chin and corners of the mouth that help convey the subject s expression. Draw dimples as well if they are present. 16
. Use your grid lines and other facial features for proper placement of each tooth.")
19 Placement If you are drawing someone with an open mouth, you will need to draw teeth. Follow these four tips for a closer representation of your subject. Pay careful attention to detail to draw each tooth as you see it in the reference photograph (flat vs. pointy, etc.). Use your grid lines and other facial features for proper placement of each tooth. Draw only the number of teeth visible. Note the distance between the gum line and the lip. 17

20 18
21 Drawing the Ears When I draw ears, I tend to start with the outline and work my way inward. Begin by drawing the outer shape of the ear. Include the earlobe and how it connects with the side of the head. This will be one of two ways. A free earlobe will hang loosely and loop back upward before connecting. An attached earlobe will connect before looping back up. 19
22 Draw the line that forms the outer rim (or helix) around the ear. Also draw some of the cartilage around the ear canal now. This consists of a bump of cartilage on the side of the face and another bump across from it, with a little dip between the two. Your grid lines will help you to space your shapes and lines properly. 20
23 Carefully study your reference photo and use your grid lines to draw the curves and folds that make up the visible inner workings of the outer ear (the antihelix). Once again, when I first learned to draw ears I found it helpful to begin with the outer helix and work my way inward. However, you can begin however you like. It s just a matter of preference. Add in any piercings, earrings, moles, or other characteristics. 21
24 22
25 Drawing the Hair Since we do not need to be as exact in our drawing of the hair as we have been with other facial features, you will notice that we do not have as many grid squares here. Begin by drawing an outline to capture the basic shape of your subject s hair. If you see a part in the hair, you can place that too. 23
26 Examine the direction of hair growth in the reference photo. Draw lines to represent hair growing in that same direction. It is helpful to begin drawing lines by placing your pencil in the same places hair grows from the scalp a part in the hair, the hairline, and so on. Draw your lines so they flow along the contours of the head and rest of the hair. Doing so will make the hair look more natural. Notice how the pencil lines replicate the appearance of hair growing out of the scalp. Let your pencil lines follow the directional growth of the subject s hair. 24


27 Depending on the level of detail you are striving to achieve, you can build up the hair by working in layers. Take a step back and look where one section of hair overlaps another. Draw over previously-drawn hair if needed. In addition, look for strands of hair that separate themselves from the overall mass. These strands are commonly visible along the outside edges, on clothing, and hanging over the forehead or face. Loose strands 25
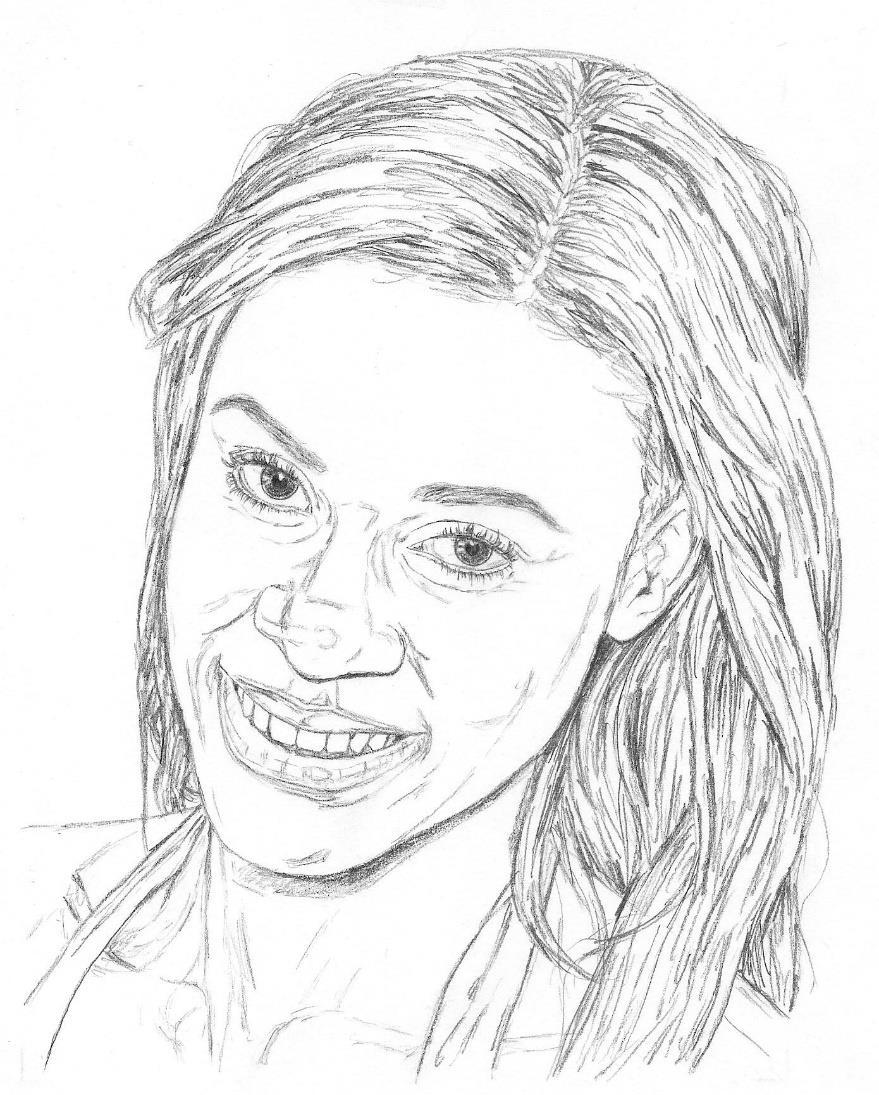
28 Drawing the Face Now is the time to take what we have learned about drawing the facial features and apply them to drawing a face. Generally, my preference is to draw the features in the center of the face first and work my way outward. Begin by properly placing and drawing the eyes and nose. 26

29 Next draw the mouth, ears, and surrounding face. Generally you will notice that the corners of the mouth fall directly below the center of the eyes. This is a good time to draw any left out wrinkles or other traits that sit around the eyes, nose, mouth, chin, cheekbones, or forehead. 27
30 Add the neck and shoulders, as well as the hair. Draw in any layers of hair that overlap the shoulders or face. Add in additional details until you get the level of realism you want. Then you will have a completed line drawing of a face! 28
31 29


32 When You Are Ready for Your Line Drawing to Be More Than Lines As you have seen, the act of drawing the face with nothing but lines is an excellent way for you to sharpen your skills when it comes to drawing and placing different facial features. After you practice drawing faces with only lines, you may be ready to add more dimension to your drawings. If so, there are several techniques artists use to add shading to their drawings. If you know from the onset of a drawing that your goal is to make a very realistic portrait with lots of shading, it might be a good idea to omit certain steps from your line drawing. For example, when I create realistic tone pencil portraits that involve a lot of blending, I save hairs of the eyebrows and eyelashes as some of the final steps of the entire drawing. It is much easier to get skin tones and details of the eyelids finalized before drawing in the little hairs that overlap these areas. This also applies to facial hair and sometimes the hair on the head. For more in-depth information on how to turn your line drawings into lifelike, realistic pencil portraits with shading as in the example above, I invite you to view some of the full-length video tutorials and courses I am developing at: The above is a link to more information about Let s Draw People Club, a special membership area of my website. You will find videos that explain the material I ve shared in this ebook in much greater depth. Plus, you will see multiple examples of my techniques to draw and shade realistic pencil portraits from photographs with incredible results! 30
33 The Bottom Line Every face is different and unique from others in its own special way. With that said, faces and facial features have common characteristics (as discussed in this guide) that are easily applied to any face, no matter who or what your subject is. If you can strike this balance between drawing common characteristics and unique physical traits, while using a grid to ensure proper placement and proportions, you can make a realistic line drawing of ANY face! As you saw, I laid out a step-by-step method of drawing each facial feature so you can get familiar with key details you should include to get more realistic line drawings. However, there is another common-sense method of drawing with a grid that you can use. You may choose to just focus on one grid square at a time, drawing everything in that grid square, before moving to the next grid square and repeating. If the process of grid drawing is new to you, give it a chance. I promise you will see immediate results for the better! If you use grids to draw but still have some difficulties, keep in mind that good grid drawing depends on three things: 1. using an accurate grid with perpendicular grid lines and squares of equal size 2. drawing accurate lines within each grid square 3. using more grid squares when necessary (for those hard-to-draw features) The number of grid squares to use for a drawing is up to you. If you are having difficulty drawing a particular part of the face, simply divide that area into more grid squares. With more practice and experience, you will be able to rely on fewer grid squares (or none at all) if you choose! Hopefully you have read options in this guide that will allow you to make more accurate grids and, hence, more realistic line drawings of faces. Remember to practice, practice, and practice some more to get better at any parts of your line drawings that leave you unsatisfied. You will soon see that you can draw whoever you want! Please remember to utilize the grids provided on the following pages as needed. Happy drawing! Jack Pearce LetsDrawPeople.com 31
34 One-Inch Grid Squares 32
35 Half-Inch Grid Squares 33
36 Quarter-Inch Grid Squares 34
HOW TO DRAW A FACE. By Samantha Bell.
 HOW TO DRAW A FACE By Samantha Bell HOW TO DRAW A FACE To draw a face (or portrait), you will need: Pencils (2B is a good one to start with) Pink Pearl or Art Gum Eraser Kneaded Eraser Drawing Paper Copies
Lesson #1 Secrets To Drawing Realistic Eyes
 Copyright DrawPeopleStepByStep.com All Rights Reserved Page 1 Copyright and Disclaimer Information: This ebook is protected by International Federal Copyright Laws and Treaties. No part of this publication
Create a Portrait. of JUMPIN JACK. Sketch Puppy Proportions. Outline a puppy s face, shade his eyes and nose, and add texture to his fur with hatching
 Level: Beginner Flesch-Kincaid Grade Level: 6.79 Flesch-Kincaid Reading Ease: 70.04 Drawspace Curriculum 6.2.A11-12 Pages and 41 Illustrations Create a Portrait of JUMPIN JACK Outline a puppy s face, shade
Painting A Complete Portrait
 Week 6 So this is it, the final week of the course. We have learnt all the theory we need to know and we have painted all the individual parts of the face. Now it's time we put all our knowledge together
This project is recommended for artists from age 10 to adult, as well as home schooling, academic and recreational fine art educators.
 Brenda Hoddinott F-05 BEGINNER: HATCHING This project guides you through the process of setting up proportional guidelines, and using symmetry to draw the facial features and hair of a male anime character
Term 3 Grade 6 Visual Arts
 Term 3 Grade 6 Visual Arts Contents Self-Portrait... 2 What is a self-portrait?... 2 Layout and Medium... 2 Featured Artists... 3 Rembrandt van Rijn... 3 Vincent Willem van Gogh... 4 Drawing Faces... 4
Complete Drawing and Painting Certificate Course
 Complete Drawing and Painting Certificate Course Title: Unit Four Portraiture Foundations Medium: Drawing in graphite and charcoal Level: Beginners Week: Two Course Code: Page 1 of 15 Week Two: General
Shade a Basic Dog Eye
 Flesch-Kincaid Grade Level: 7.5 Flesch-Kincaid Reading Ease: 65.2-6 Pages and 16 Illustrations Shade a Basic Dog Eye Create a simple drawing of a dog s eye based on a detailed photo Resource: Module 3.1
Draw Keiko, a Manga Baby
 Flesch-Kincaid Grade Level: 8.4 Flesch-Kincaid Reading Ease: 64.3 Drawspace Curriculum 2.1.A17-10 Pages and 19 Illustrations Levels: Beginner to Advanced Draw Keiko, a Manga Baby Sketch accurate proportions
How to Draw a Cartoon Girl
 How to Draw a Cartoon Girl Easy Fast Drawings of people are an integral part of most cartoons, comic books, and fine art. Yet, many artists find drawing people accurately to be a difficult task. Would
Drawing the Face WORKSHEET. Upper Palpebral Groove. Lacrimal Caruncle. Pupil. Iris Sclera. Helix Bridge. Tragus. Ala N ostril.
 Drawing the Face WORKSHEET Proportions of the Face - This refers to how large and small facial features and areas of the face are in relation to each other. There are basic rules that you can learn to
How to Draw Elsa from Frozen
 How to Draw Elsa from Frozen Easy Fast Since its release in 2013, Disney's feature film Frozen has become a beloved addition to the Disney princess movie collection. In the film, Elsa the Snow Queen shares
CHAPTER SEVEN THE EYES
 CHAPTER SEVEN THE EYES Eyes are beautiful! They are my favorite things to draw. An entire drawing can be made around a single eye. In the drawings below, you can see the eye is just shapes. An eye looks
Chalice Arts UK Limited
 1 Chalice Arts UK Limited Drawing Portraits INSET By Stephen Bruce Stephen Bruce 2015 2 Drawing Faces Aim To provide an overview of how to teach the key points of drawing frontal portraits. Objectives
Transfer an Image to Drawing Paper
 Level: Beginner to Advanced Flesch-Kincaid Grade Level: 8.4 Flesch-Kincaid Reading Ease: 64.6 Drawspace Curriculum 1.2.A5 6 Pages and 4 Illustrations Transfer an Image to Drawing Paper A three-step process
How to Draw Eyelashes
 How to Draw Eyelashes By Darlene Nguyen - November 30, 2016 Hey guys! Today, I m going to show you how to draw eyelashes and also how not to draw them. The format of this tutorial will be: examples with
Learn How to Draw. Animals. Created exclusively for Craftsy by Antonella Avogadro
 Learn How to Draw Animals Created exclusively for Craftsy by Antonella Avogadro [Special Offer] You ve unlocked savings! Enjoy more in-depth, step-by-step guidance from expert artists with Craftsy s growing
(the Little Ham) DRAW KEVIN BACON. Sketch Piglet Proportions. Sketch a piglet and add shading to capture his spotted fur and three-dimensional forms
 DRAW KEVIN BACON. Sketch Piglet Proportions. Sketch a piglet and add shading to capture his spotted fur and three-dimensional forms") Level: Beginner to Intermediate Flesch-Kincaid Grade Level: 8.0 Flesch-Kincaid Reading Ease: 61.7 Drawspace Curriculum 6.2.A5-8 Pages and 12 Illustrations DRAW KEVIN BACON (the Little Ham) Sketch a piglet
Level: Beginner to Intermediate Flesch-Kincaid Grade Level: 8.0 Flesch-Kincaid Reading Ease: 61.7 Drawspace Curriculum 6.2.A5-8 Pages and 12 Illustrations DRAW KEVIN BACON (the Little Ham) Sketch a piglet
A smaller drawing space in proportion to these sizes works just as well.
 Level: Beginner to Intermediate Flesch-Kincaid Grade Level: 7.2 Flesch-Kincaid Reading Ease: 62.6 Drawspace Curriculum 7.1.A6-8 Pages and 17 Illustrations Curly Camilla the SEAHORSE Outline a seahorse
Pastel Pencil Skintones
 Pastel pencils and portraiture go hand in hand; enabling the artist to achieve both detail and subtle blended effects. As a forgiving medium they allow you to take away or add colour and texture without
OF A DOG Brenda Hoddinott
 OF A DOG Brenda Hoddinott I-03 INTERMEDIATE: CARTOONS & CRITTERS This simple project, features an eye of Shadow the Dalmatian, and is drawn completely freehand. After sketching the outlines, you add different
> photo morph. > curricular focus: This lesson emphasizes the effective blending of multiple images resources using the Clone tool and Healing Brush
 > objective(s): Students will seamlessly morph two photo sources into one image with all changes and integrations undetectable even when zoomed in > curricular focus: This lesson emphasizes the effective
? What is covered in this module?
 MODULE 6 The Eye - Frontal View? What is covered in this module? It has been said that the eyes are the windows to the soul. Clearly, rendering the eye with accuracy is incredibly important in portrait
Adult Facial Proportions
 Adult Facial Proportions Brenda Hoddinott P13 INTERMEDIATE: PEOPLE This article demonstrates a simple formula for rendering adult heads and faces proportionately correct. As we all know, adult faces are
Drawing Goats. Proceedings of the 28th Annual Goat Field Day, Langston University, April 27, 2013
 Drawing Goats Mr. Kenneth Williams Science Illustrator Science Graphics and Design Drawing goats or any other subject depends on accurate observation and correct proportional placement of shapes and lines.
IN PROFILE. Brenda Hoddinott. clumping them all into only three categories is very challenging.
 IN PROFILE Brenda Hoddinott P08 INTERMEDIATE: PEOPLE In this project, I show you some easy techniques for drawing the three basic types of adult noses in profile, by following only three simple steps.
INTRODUCTION. Drawing the Complete Head. Having mastered the basic form of the head and learned how to draw the features,
 CONTENTS 3 Introduction 4 Getting Started 5 Equipment 6 Form and Proportion 8 Drawing the Eye: Front View 10 Drawing the Eye: Three-quarter View 11 Drawing the Eye: Side View 12 Drawing the Eye: Tilted
FRONTAL VIEW OF. Brenda Hoddinott
 FRONTAL VIEW OF Brenda Hoddinott P14 INTERMEDIATE: PEOPLE In this project, I show you some easy techniques for drawing frontal views of the three basic types of adult noses, in only three simple steps.
> 2: photo morph > objective(s): > curricular focus: > specifications: > instruction: see procedure on page 2
: > curricular focus: > specifications: > instruction: see procedure on page 2") > objective(s): Students will seamlessly morph two photo sources into one image with all changes and integrations undetectable even when zoomed in > curricular focus: This lesson emphasizes the effective
> objective(s): Students will seamlessly morph two photo sources into one image with all changes and integrations undetectable even when zoomed in > curricular focus: This lesson emphasizes the effective
How to Draw with a Grid
 Level: Beginner Flesch-Kincaid Grade Level: 8.3 Flesch-Kincaid Reading Ease: 67.5-6 Pages and 12 Illustrations How to Draw with a Grid Exploring the grid method to draw accurate outline drawings This resource
Cartoon Faces for Family Portrait
 Cartoon Faces for Family Portrait in Windows Paint Make nice cartoon portraits of the child and her/his family for a page of the book. Make one head & shoulders portrait for each family member. Then arrange
REALISTIC DRAWING WITH CHARCOAL with Kirsty Partridge
 REALISTIC DRAWING WITH CHARCOAL with Kirsty Partridge SUPPLY LIST Part 3- Drawing Animals with Charcoal Strathmore 300 Series Bristol Vellum Paper Lyra Rembrandt Charcoal Pencils 2B & H Lyra Rembrandt
HOW TO DRAW A REALISTIC HAND
 HOW TO DRAW A REALISTIC HAND We take an ordered approach to drawing a complete, realistic drawing of hand in this lesson. Materials: HB Graphite Pencil 4B Graphite Pencil Vinyl or Plastic Eraser Bristol
How to draw a Girl in the Manga Anime style
 How to draw a Girl in the Manga Anime style Materials List... The materials for this lesson can be found at a Gold or above Art Centre. Go to to find the one nearest to you. MPN0026 Mont Marte Drawing
8 Pages 10 Illustrations
 NEWLY HATCHED DUCKLING Jeanette Jobson After hours of struggle, a tiny Pekin duckling breaks free of the shell that s been its home for 30 days and staggers into the world. Once the down starts to dry,
Celebrating with Whimsies
 Celebrating with Whimsies Hello gorgeous one! Technique wise we're going to create some Welcome to November. Can you believe the year is almost over? I can't believe how fast whimsy characters, yay! I
Happy Fall Pup. by Barb Halvorson
 Happy Fall Pup by Barb Halvorson Happy Fall Pup By Barb Halvorson Oil paints have always been my preferred medium of choice and what I feel most proficient with. Recently, I started to design and paint
Use Shading to Create Forms
 Flesch-Kincaid Grade Level: 6.8 Flesch-Kincaid Reading Ease: 67.6 Drawspace Curriculum..A - 6 Pages and 0 Illustrations Use Shading to Create Forms Use value maps and graduated shading to turn a circle,
ASSIGNMENT THE HUMAN FIGURE
 ASSIGNMENT THE HUMAN FIGURE NOTES: Proportions- 1. comparative relation between things or magnitudes as to size, quantity, number, etc.; ratio. 2.proper relation between things or parts Gesture Extended
The Discount Airbrush Guide Series: Develop Basic Artistic Skills
 The Discount Airbrush Guide Series: Develop Basic Artistic Skills As an airbrush artist, some basic drawing and artistic skills can help you as you develop your talents. A lot of the basics that apply
Learning Plan. My Story Portrait Inspired by the Art of Mary Cassatt. Schedule: , Grades K-5, one class period of approximately 60 min.
 Learning Plan My Story Portrait Inspired by the Art of Mary Cassatt Mary Cassatt was an expert in showing the relationships and the stories of the real people in her paintings. Look at the details. What
STUDY STICK. Wood Spirit. Carving an. Yourself tocarve. Teach. Step-by-Step Instructional Guide $29.95 US
 Teach Yourself tocarve Step-by-Step Instructional Guide Carving an EYE A carved eye can make or break a carving. That s why I suggest that beginners carve their own study sticks. Not only are the sticks
Grade 5 Portraits of Emotions. Color
 Grade 5 Portraits of Emotions Color What do you see? Eva s Wave, Barry Johnson Artistic Focus: Color COLOR is the visible range of reflected light. Color has three properties: hue, value, and intensity
Graduate Fur on a Dust Bunny
 Flesch-Kincaid Grade Level: 7.5 Flesch-Kincaid Reading Ease: 71-6 Pages and 10 Illustrations Graduate Fur on a Dust Bunny Outline and add shading to a cartoon face and then add shading to its fur with
Page 1. Jumblenut. The Head. Design by Barbara Allen
 Page 1 Needle felting Needle felting is quite different from creating felt by shrinking wet wool. There s no water involved, it requires very little space and creates no mess at all. It s a craft that
COPYRIGHT 2008 PAUL BURNETT - ALL RIGHTS RESERVED
 Detailed layout drawings, toned for proper modeling in two sizes. Packet contains anatomical drawings and facts to help you to achieve realistic tooling and coloring results. Twelve A WILDLIFE STUDY ROCKY
Tracing a Vector Face From a Reference Photo - Envato Tuts+ Design & Illustration Tutorial
 Tracing a Vector Face From a Reference Photo - Envato Tuts+ Design & Illustration Tutorial A few times a each month we revisit some of our reader s favorite posts from throughout the history of Vectortuts+.
DRAWING TUTORIALS ONLINE, INC. Portrait Drawing WITH MATTHEW ARCHAMBAULT
 DRAWING TUTORIALS ONLINE, INC. Portrait Drawing WITH MATTHEW ARCHAMBAULT This PDF booklet compliments the video tutorials associated with Portrait Drawing With Matthew Archambault. It contains all of the
Paint Neat Edges. on Zebra Stripes. Draw a Symmetrical Zebra Face
 Level: Intermediate Flesch-Kincaid Grade Level: 7.5 Flesch-Kincaid Reading Ease: 62.1 Drawspace Curriculum 8.2.A6-10 Pages and 33 Illustrations Paint Neat Edges on Zebra Stripes Outline the contours of
Curve Fur Around Canine Forms
 Flesch-Kincaid Grade Level: 7.4 Flesch-Kincaid Reading Ease: 65.2-10 Pages and 23 Illustrations Curve Fur Around Canine Forms Use contour hatching to shade the realistic anatomical structures of a puppy
GENERAL NOTES: Page 1 of 9
 Laminating A Zia Into A Turning Blank by W. H. Kloepping, Jan. 2009 This describes how a zia (the New Mexico state symbol) can be laminated into a turning blank. Materials needed: Square Turning Block
Introduction. Recall that your pretest was to draw a human face from your memory. You can compare them at the end of this unit.
 Introduction This unit will be worth 2 credits. You will have to have done the perspective for artists unit since this unit requires you to understand the concept of proportion. In faces there are certain
Focus, as you work, on getting many gradations of dark and light in your piece to guarantee something that is super interesting to the eyes.
 Hello! My name is Effy Wild, and Kara has tasked me with creating a mixed media face with an emphasis on building a lot of value contrast through the use of lights and darks (and glazes) to create depth
Brenda Hoddinott 14 PAGES 43 ILLUSTRATIONS U-10 ADVANCED: FACES & FIGURES
 Brenda Hoddinott U-10 ADVANCED: FACES & FIGURES Your goal in this heavily illustrated project is to gain an understanding of how various aspects of contrast and key can enhance composition. The process
Term 3. Explanations of assignments
 Term 3 Explanations of assignments (If you are in class, you would get more detailed explanation with powerpoints, demonstrations, examples and other methods of learning.) Categories: Assignments are in
Supplies: paper, pencils (2H, HB, 2B, 4B, 6B, and 8B), sharpener, sandpaper block, vinyl and kneaded erasers. Figure 1
, sharpener, sandpaper block, vinyl and kneaded erasers. Figure 1") Level: Advanced Flesch-Kincaid Grade Level: 7.9 Flesch-Kincaid Reading Ease: 65.8 Drawspace Curriculum 6.3.A18-14 Pages and 23 Illustrations Sweet Katie the PITWEILER Use an unconventional approach to
Level: Advanced Flesch-Kincaid Grade Level: 7.9 Flesch-Kincaid Reading Ease: 65.8 Drawspace Curriculum 6.3.A18-14 Pages and 23 Illustrations Sweet Katie the PITWEILER Use an unconventional approach to
Complete Drawing and Painting Certificate Course
 Complete Drawing and Painting Certificate Course Title: Unit Three Shading and Form Medium: Drawing in graphite pencil Level: Beginners Week: Two Course Code: Page 1 of 15 Week Two: General overview Last
Brenda Hoddinott 9 PAGES 12 ILLUSTRATIONS G-04 BEGINNER: SHADING FORMS
 Brenda Hoddinott G-04 BEGINNER: SHADING FORMS In this project, you draw a three dimensional cartoon by using contour hatching to shade the four spheres that define the forms of the head, nose and eyes.
Assignment Project Due & Critique 3.18 Retouching Photo Due 3.4
 Portraits Assignment Project Due & Critique 3.18 Retouching Photo Due 3.4 For this project, you will be exploring the subject of portraits with three different objectives. 1. In the style of Arnold Newman:
 http://web.archive.org/web/20080430082908/www.virtualportmeirion.com/howto/1pr... Step 1. Preparation Hello, welcome to the course. For your drawing to achieve a likeness to the original photo accuracy
DRAWING ANIMALS WITH FUR
 DRAWING ANIMALS WITH FUR I love drawing animals, especially the furry ones. If you want to draw a furry animal, try sketching the squirrel below. What You ll Need: 2B Pencil Tortillons (for blending) Bristol
Holly Charcoal pencil on drawing paper 12 9 (30cm 23cm)
") Holly Charcoal pencil on drawing paper 12 9 (30cm 23cm) drawing portraits for the absolute beginner A Clear & Easy Guide to Successful Portrait Drawing Mark and Mary Willenbrink Contents Introduction Materials
Holly Charcoal pencil on drawing paper 12 9 (30cm 23cm) drawing portraits for the absolute beginner A Clear & Easy Guide to Successful Portrait Drawing Mark and Mary Willenbrink Contents Introduction Materials
The Drawing EZine. The Drawing EZine features ELEMENTS OF FACIAL EXPRESSION Part 1. Artacademy.com. November 2014
 The Drawing EZine Artacademy.com November 2014 The Drawing EZine features ELEMENTS OF FACIAL EXPRESSION Part 1 T the most difficult aspect of portrait drawing is the capturing of fleeting facial expressions
Isuppose everyone over the age of about
 Chapter Six Carving Father Christmas Isuppose everyone over the age of about eight or ten knows that the stories about all the different Santas are fantasy. Isn t it fun, though, to use your imagination
After Bouguereau: The Bohemian
 After Bouguereau: The Bohemian www.kingslan.com painting@kingslan.com The Bohemian Surface Portrait grade 20x24 portrait grade canvas. Transfer Information Transfer the design to the surface with gray
Bearly Grown Up by Barb Halvorsen
 Bearly Grown Up by Barb Halvorsen Bearly Grown Up By Barb Halvorsen Note from Barb: Oil Paints have always been my preferred medium of choice and what I feel most proficient with. However, thanks to Artists
ello there wonderful friend! :)
") H ello there wonderful friend! :) Welcome to my lesson today. My name is Tamara Laporte and I run Willowing Arts Ltd where lots of wonderful art & personal development classes are run. I'm super excited
H ello there wonderful friend! :) Welcome to my lesson today. My name is Tamara Laporte and I run Willowing Arts Ltd where lots of wonderful art & personal development classes are run. I'm super excited
Observational Drawing
 Observational Drawing In other words drawing what you see in front of you! Observational Drawing is observing a real object, studying the object very carefully and then replicating it precisely as it truly
Chalice Arts UK Limited
 1 Chalice Arts UK Limited Unit 2 Friendship Inspired by the Story of the Selfish Giant by Oscar Wilde by Stephen Bruce Stephen Bruce 2015 2 General Introduction This unit forms part of a scheme of work
COLORED PENCIL WITH MIXED MEDIA with Sarah Becktel
 COLORED PENCIL WITH MIXED MEDIA with Sarah Becktel SUPPLY LIST Lesson 4: Using Pen and Ink with Colored Pencil Strathmore 400 Series Toned Mixed Media Paper This paper comes in 3 colors: gray, tan, and
6 PAGES 21 ILLUSTRATIONS
 STUDY OF A (using the drawing techniques of Leonardo da Vinci) Brenda Hoddinott Z13 ADVANCED: DRAWING ON THE MASTERS In this project, you first sketch and outline a rosebud with contour lines that vary
Chetek-Weyerhaeuser High School/Middle School
 Chetek-Weyerhaeuser High School/Middle School Unit 1 Elements of Art Drawing I Units and s s 1. I can generate and apply multiple types of examples of each of the elements of art to produce a visual vocabulary
Suggested drawing supplies include good quality white drawing paper, various grades of pencils, kneaded and vinyl erasers, and a pencil sharpener.
 STUDY OF (Leonardo da Vinci) Brenda Hoddinott Z-09 ADVANCED: DRAWING ON THE MASTERS Your goal in this project is to duplicate drawing styles and techniques of the Renaissance. Drawings by Leonardo Da Vinci
You will need 9x12 blue construction paper, SOFT LEAD pencil colors, an eraser, and a metric ruler.
 Here is a nice picture for a beginner to start using color. This is a copy of the black and white barn drawing so if you wish you can do that one first. Scroll down. You will need 9x12 blue construction
XXXX - ILLUSTRATING FROM SKETCHES IN PHOTOSHOP 1 N/08/08
 INTRODUCTION TO GRAPHICS Illustrating from sketches in Photoshop Information Sheet No. XXXX Creating illustrations from existing photography is an excellent method to create bold and sharp works of art
EDUCATION SUPPLY ACTIVITY
 r EDUCATION SUPPLY ACTIVITY 2008 Canada: 30 Northland Road, Waterloo, Ontario, N2V Y USA: PO Box 3409 Anderson, SC 29624 No. 52095 Pour instructions en langue française, veuillez visitez notre site web:
Na'vi from Avatar Movie
 Na'vi from Avatar Movie Prep Open Photoshop. Go to Photoshop>Preferences>Performance. Where is says "History && Cache" Change the history states to "200". Chances are you will mess up A LOT and you want
Make Watercolor and Marker Style Portraits with Illustrator
 Make Watercolor and Marker Style Portraits with Illustrator Save Preview Resources Portrait by Lillian Bertram (Creative Commons Share Alike used here with permission) Step 1: Set up your Illustrator document
NATA TRIAL LESSON. SILICA Study Material Kit
 NATA TRIAL LESSON from SILICA Study Material Kit "This is a Trial. When you order the full kit for only Rs.3000/- you will get 10 Books + 10 Sample Papers & Solution Sets in Printed Hard Copy" In this
Foreword. If you have any questions about these tutorials, drop your mail to
 Foreword The main objective of these tutorials is to give you a kick start using Solidworks. The approach to write this tutorial is based on what is the most important knowledge you should know and what
How to Sketch a Lion using Graphite Pencils
 How to Sketch a Lion using Graphite Pencils Materials List... The materials for this lesson can be found at a Gold or above art centre. Go to to find the one nearest to you. MSB0053 Mont Marte Sketch Pad
WaterColors that. al vesselli.com. Painting Glass. Lesson 1. Contemporary Realism Techniques Using Watercolors
 WaterColors that POP! Contemporary Realism Techniques Using Watercolors Lesson 1 Painting Glass al vesselli.com WaterColors that BIntroduction. efore we even begin to talk about watercolors and how I use
How to Draw a Rose Flower
 How to Draw a Rose Flower Easy Fast Have you ever wanted to be able to draw a beautiful rose? This easy step-by-step drawing tutorial outlines the steps necessary to draw a cartoon style rose, complete
How to Create a Geometric, WPAP Vector Portrait in Adobe Illustrator
 How to Create a Geometric, WPAP Vector Portrait in Adobe Illustrator - Tuts+ Design & Illustration Tutorial Not e bo o k: Cre at e d: URL: Photoshop 3/11/2015 9:45 AM http://design.tutsplus.com/tutorials/how-to-create-a-geometric-wpap-vector-portrait-in-a
SUPPLIES. OTHER SUPPLIES Marking pen Masking tape Aleene s Stop Fraying Toothpick Basic sewing supplies (See Tools link at
 SUPPLIES 30 x 9 piece of 5/8 curly matted mohair 7 x 6 piece of wool felt or ultrasuede 8 mm black glass eyes (1 pair) 6-1 fiberboard discs (neck & front legs) 4-1 ¼ fiberboard discs (rear legs) 5 Cotterpins
Value in Line Grade 5 Lesson 2 (Art Connections, Level 5, pgs )
") Value in Line Grade 5 Lesson 2 (Art Connections, Level 5, pgs. 24-27) Big Idea Hatching and cross-hatching can create the illusion of highlights and shadows so that an object looks more naturalistic. Values
Value in Line Grade 5 Lesson 2 (Art Connections, Level 5, pgs. 24-27) Big Idea Hatching and cross-hatching can create the illusion of highlights and shadows so that an object looks more naturalistic. Values
SHEEP MANTEL CLOCK. by Kerry Trout
 SHEEP MANTEL CLOCK by Kerry Trout EXCLUSIVE Sheep Mantel Clock by Kerry Trout PALETTE DecoArt Americana Acrylics Antique Green #13147 Baby Blue #13042 Bleached Sand #13251 Blue Haze Light* Burnt Sienna
Lines in the World of Art
 ARTICLE-A-DAY Lines in the World of Art 6 Articles Check articles you have read: What Is a Line? 237 words Lines Follow Directions 245 words Shading with Lines 217 words Looking at Lines in an Architectural
Tech Savvy Senior Selfie
 Tech Savvy Senior Selfie Commercial Design II Teacher : Mrs. Stroud Due: 10/13/2017 Overview & Purpose Create a futuristic portrait of yourself in 2058 in an old fashioned style of bubble glass portraits
Adobe Photoshop cs. Advanced Retouching. Julieanne Kost
 Julieanne Kost www.adobe.com www.adobeevangelists.com Adobe Photoshop cs Advanced Retouching There are several essential tools and techniques for retouching images of people, and one underlying secret:
The Human Touch Student Art Show
 The Human Touch Student Art Show Sponsored by the Fresno Art Museum and Fresno County Office of Education K-12 teachers are invited to submit class sets of artwork inspired by The Human Touch, a touring
SEPTEMBER 2015/SKILLS SHEET
 COMPREHENSION QUIZ: The Art of Drawing Use the September 2015 issue of Scholastic Art to answer the questions. Fill in the circle next to the correct answer. 1. Although lines can be found in art of most
winter soul flakes with tamara laporte - How to create a light skinned lollipop girl with her whimsical friends -
 H ello fabulous creative friend! Welcome to Winter Soul Flakes, a wintery snowy sparkly class with me, Tam! :) Hi! In this class I will demonstrate how to create 3 wintery lollipop girls with their whimsical
INTERMEDIATE. Welcome to Drawing from Line to Life: Drawing Above the Mundane
 Level: Intermediate Flesch-Kincaid Grade Level: 9.9 Flesch-Kincaid Reading Ease: 57.6 Drawspace Curriculum 3.3.R1-6 Pages and 8 Illustrations Welcome to Drawing from Line to Life: INTERMEDIATE An introduction
Art of Ancient Times, Studio 1 5
 Art of Ancient Times, Studio 1 5 Creating a Clay Relief Sculpture and an In-the-Round Sculpture In this studio you will make a relief sculpture and an in-the-round sculpture inspired by those created by
Brenda Hoddinott. faint curved lines, in preparation for a more detailed contour drawing.
 Medieval Brenda Hoddinott F14 BEGINNER: HATCHING The design of the medieval spoon in this project is from my imagination. However, it is a reasonable representation of many used by peasants during the
Pixel Artist s Beginner Booklet
 Pixel Artist s Beginner Booklet Chpt. 3 Pixel Artist s Beginner Booklet Chpt. 3 FinalRedemption.com Copyright 2007 Alex Hanson-White, All rights reserved worldwide, including the right of reproduction
Sketch technique. Introduction
 Sketch technique Introduction Although we all like to see and admire well crafted illustrations, as a professional designer you will find that these constitute a small percentage of the work you will produce.
COLOURED PENCIL DEMONSTRATION
 COLOURED PENCIL DEMONSTRATION Hare Today By Jane Lazenby In this step-by-step guide we re going to paint a hare in coloured pencil. As per usual with my coloured pencil demonstrations we re going to create
The Drawing EZine. The Drawing EZine features ELEMENTS OF FACIAL EXPRESSION Part 1. Artacademy.com
 The Drawing EZine Artacademy.com The Drawing EZine features ELEMENTS OF FACIAL EXPRESSION Part 1 T the most difficult aspect of portrait drawing is the capturing of fleeting facial expressions and their