Jewelry Designs Easy Designs and Instructions for Making Your Own Handcrafted Jewelry
|
|
|
- Lauren Daniels
- 6 years ago
- Views:
Transcription
1 Jewelry Designs Easy Designs and Instructions for Making Your Own Handcrafted Jewelry By Lorri Ely Copyright Notice Copyright 2006 Lorri Ely, Smart Sisterz LLC Published by Lorri Ely, Smart Sisterz LLC. All rights reserved. Only customers who have purchased this book have the rights to view it. Purchase of this book does not grant resell rights. Please help support and protect the author s business by not sharing or duplicating this book illegally. No part of this publication may be transmitted or reproduced in any way without the prior express written permission of the author. Violations of this copyright will be enforced to the full extent of the law. These rules have been established to protect the rights and ownership of the author. Limits of Liability/Disclaimer of Warranty While all attempts have been made to verify information provided, the author assumes no responsibility for errors, omissions, or contrary interpretation of the subject matter herein. Any perceived slights of peoples or organizations are unintentional. The purchaser or reader of this publication assumes responsibility for the use of these materials and information. Results may vary and no guarantees of income are made. The contents of this book are not intended to provide legal advice. The author reserves the right to make changes and assumes no responsibility or liability whatsoever on behalf of any purchaser or reader of these materials. In no event shall Lorri Ely, Smart Sisterz LLC, agents or suppliers be liable for damages of any kind or character, including without limitation any compensatory, incidental, direct, indirect, special, punitive, or consequential damages, loss of use, loss of data, loss of income or profit, loss of or damage to property, claims of third parties, or other losses of any kind or character, even if Lorri Ely or Smart Sisterz LLC has been advised of the possibility of such damages or losses, arising out of or in connection with the use of the book or any web site with which it is linked. Lorri Ely is in no way responsible for the content or behavior of any linked websites, and has no liability whatsoever for claims or damages against any web site maintained by a third party. Copyright, Lorri Ely All rights reserved Page 1 of 307
2 Jewelry Designs Easy Designs and Instructions for Making Your Own Handcrafted Jewelry TABLE OF CONTENTS Copyright Notice... 1 Limits of Liability/Disclaimer of Warranty... 1 Introduction About Me... 4 Earrings Projects...5 Gold Fan Earrings Project... 6 Coin Pearl Earrings Gold Wire Fringe Earrings Red Filigree Earrings Diamond Shaped Pearl Earrings Dangling Chain Crystal Earrings Carnelian and Chain Earrings Chalcedony Earrings Opalite Earrings Red Crystal Earrings Moonstone Earrings Crystal Flower Earrings Geometric Bead Earrings Gold Bead and Tourmaline Earrings Tourmaline and Pearl Earrings Square Pearl Earrings Gold Chandelier Earrings Project Coral and Crystal Earrings Project Crystal Cubes Earrings Project Leaf Bead Earrings Project Swarovski Crystal Chandelier Earrings Project Link Chain Earrings Project Simple Pearl and Crystal Earrings Project Lampwork Bead and Wirework Earrings Project Lampwork Bead and Crystal Earrings Project Necklace Projects Sodalite Toggle Necklace Opalite Pendant Onyx Necklace Vintage Filigree Pendant Hill Tribe Silver Pendant Shell Bead Pendant Carnelian Nugget Pendant Metal Mesh Necklace Turquoise Jasper Pendant Pearl and Moonstone Necklace Pearl and Crystal Choker Copyright, Lorri Ely All rights reserved Page 2 of 307
3 Turquoise Heishi and Wood Bead Necklace Turquoise and Wood Pendant Lemon Quartz Lariat Link Chain Necklace Project Pearl and Crystal Necklace Project Lampwork Bead Necklace Project with Wire Wrap Bracelet Projects Garnet Pearl Bracelet Chalcedony Briolette Bracelet Coin Pearl Bracelet Stretch Bracelet Set Pearl and Shell Bracelet Red Crystal Filigree Bracelet Birthstone Mother's Bracelet Baby Charm Bracelet Breast Cancer Awareness Bracelet Turquoise and Crystal Bead Bracelet Red Crystal Bead Bracelet Yellow Turquoise Bracelet Blue Crystal Bracelet Tourmaline, Citrine and Crystal Bracelet Turquoise and Silver Bracelet Seed Pearl and Turquoise Bracelet Leather and Silver Bracelet with Turquoise Charms Garnet and Seed Bead Bracelet Pink Coral and Shell Bracelet with Swarovski Crystals Personalized Mothers Bracelet Garden Charm Bracelet Word Bead Charm Bracelet Pet Name Bracelet Pearl and Swarovski Crystal Bracelet Project Lampwork Bead Bracelet Project with Charm Link Chain and Bead Bracelet Project Copyright, Lorri Ely All rights reserved Page 3 of 307
4 Introduction About Me Hello, my name is Lorri Ely, and I love jewelry! Big and bold jewelry, delicate jewelry, fun jewelry, and sophisticated jewelry I love it all. Because of my passion for jewelry, I started making beaded jewelry as a hobby, and immediately realized how exciting it was to make my own jewelry to create a very personal form of self-expression. I learned how to make jewelry mostly through trial and error, studying jewelry designs that I liked, and trying to perfect the techniques. I also own a large assortment of jewelry making books collected over the years. My website, was created to offer a great way for anyone to learn the art of beaded jewelry making. But once you know how to make jewelry, how do you come up with ideas? Well, this book offers several jewelry design ideas that take advantage of many basic jewelry making techniques. Have fun and be creative! These designs are flexible and most can be easily modified with your own twist to make something entirely new use larger beads, silver or gold, a different color of bead, special beads you found at your bead store or whatever you want to try to mix things up and create your own fresh ideas. Whether you want to make jewelry to express your creative talents, make something unique to wear with a favorite outfit, or create some jewelry to give as a wonderful personal gift read on, because I m about to show you several ideas to make some great jewelry. Best regards, -Lorri Ely Copyright, Lorri Ely All rights reserved Page 4 of 307
5 Earrings Projects Copyright, Lorri Ely All rights reserved Page 5 of 307

6 Gold Fan Earrings Project About This Design Time: Approximately 30 minutes Level of Difficulty: Beginner - All Levels Cost: Varies, depending on materials selected. Approximately $15-20 as shown. Use some gold filled earring components, shown here in a fan shape, to craft some eyecatching earrings. I used chain and topaz Swarovski crystals to accent these gold danglies. Fun to wear! Copyright, Lorri Ely All rights reserved Page 6 of 307
 2 gold earring findings of choice - here I used a fan shaped component I found at my bead store--any component you like will do as")
7 Step 1 Gather your supplies 2 Swarovski crystal beads in your choice of colors, shapes and sizes. I used 8mm round topaz beads in my design. Add more crystals if you like! A length of gold-filled wire (thin gauge to fit through bead holes) 2 gold earring findings of choice - here I used a fan shaped component I found at my bead store--any component you like will do as long as it has a hole (for attaching). 2 earwires, french hooks, leverbacks or posts (your choice) Length of fine gold filled chain Step 2 Cut chain to length Decide how long you want your earrings to be. Cut six equal lengths of chain for the bottom "fringe" (3 chains on each earring), and two lengths for the top chain (1 per earring). TIP - You can add or remove chains to your own design until you are pleased with the overall design. You can also add smaller crystal beads to the bottom of each chain if you want more sparkle. Copyright, Lorri Ely All rights reserved Page 7 of 307

8 Step 3 String crystal beads onto headpins and attach component to chains Take a length of wire (a few inches) and make a wire loop. Attach the loop to the top chain, and make a closed wire loop. If you need help learning how to do wire loops, follow these step by step instructions. Slide the crystal bead on the wire, and at the bottom of the crystal, make a wire loop. Slide three lengths of chain, and your fan earring component onto the loop, then close the loop. Copyright, Lorri Ely All rights reserved Page 8 of 307


9 Copyright, Lorri Ely All rights reserved Page 9 of 307
10 Coin Pearl Earrings About This Design Time: Approximately minutes Level of Difficulty: Beginner - All Levels (some wire wrapping knowledge) Cost: Varies, depending on materials selected. Approximately $10-15 as shown. These are lovely and not too hard to make! This design features gorgeous copper coin pearls, accented with rich topaz Swarovski crystal beads and sterling silver accents--perfect for autumn wearing! Copyright, Lorri Ely All rights reserved Page 10 of 307
 Length of sterling silver half hard wire (24")
11 Step 1 Gather your supplies 2 Swarovski crystal beads in color of choice. 2 coin pearl beads in color of choice 2 Bali silver bead caps, in a size that fits your crystal beads 2 sterling silver headpins (about gauge) Length of sterling silver half hard wire (24 gauge) 2 earwires, french hooks, leverbacks or posts (your choice) I used sterling silver french hook ear wires in my design Copyright, Lorri Ely All rights reserved Page 11 of 307

12 Step 2 Wire wrap the beads and attach to earring component Slide each pearl onto a headpin, and make a closed wire loop at the top. If you need help learning to make a loop, follow these instructions. Now we need to wire wrap the crystal bead component with a closed loop at the top and bottom of the bead. Cut several inches of sterling silver wire. Make a round loop with your pliers, and attach this to the pearl bead loop you just completed. Close the loop. Slide the Bali silver bead cap onto the wire upside down, then the Swarovski crystal bead so it rests in the cup of the bead cap. Now make another loop on the top of the crystal bead. Before closing the loop, attach the wire to the earring component, then close the loop. Copyright, Lorri Ely All rights reserved Page 12 of 307
13 Gold Wire Fringe Earrings About This Design Time: Approximately 30 minutes - 1 hour Level of Difficulty: Beginner - All Levels (some wire wrapping) Cost: Varies, depending on materials selected. Approximately $10-25 as shown. Make some creative gold wire earrings that look great with everything! In this design, I wanted to show you how you can use basic wire wrapping to create your own earring finding components. So, using gold wire that I wrapped around a ball point pen, I created this wire loop component, to which I attached a nice fringe of beads. I dangled the whole thing from a delicate chain for movement and eye-catching swing. Copyright, Lorri Ely All rights reserved Page 13 of 307
 Step 2 Create the wire")

14 Step 1 Gather your supplies 14 Headpins of a gauge that will fit through your bead holes 14 small accent beads. I used gold and carnelian beads in my design. 1 length of gold filled wire, gauge half hard 1 length of gold filled small link chain 2 earwires, french hooks, leverbacks or posts (your choice) Step 2 Create the wire component forms Cut two equal lengths of wire. Mine is about 2 inches long (5cm). Find a round form to wrap the wire around to get the desired diameter. I used a fat ballpoint pen as my form. Place the wire so it is centered around the form, and wrap the ends of the wire up so they meet in the center. Copyright, Lorri Ely All rights reserved Page 14 of 307


15 Next, use your round nose pliers, and grab the ends of the wire about 1.4 inch from the tip, and roll the wire down towards the outer side of your earring form as follows. Repeat for all four loops. Here are your completed "findings", that you made yourself! If necessary, round them out using your fingers or the pen again to make them as uniform as possible. Copyright, Lorri Ely All rights reserved Page 15 of 307


16 Step 3 Cut your chain and attach it to your earring component forms. Decide how far down you want your earrings to hang, and cut two equal lengths of chain. TIP - Hang the chain on a headpin to see where to cut to get them exactly the same length. Attach the chain to either end of the round loops on your earring form. You may need to open the loops a bit with the pliers, then close them tightly so the chain doesn't slip off the loop. Hang the chains onto the bottom of your ear wire components. Copyright, Lorri Ely All rights reserved Page 16 of 307


17 Step 4 String beads on headpins String beads onto headpins. Using a basic loop technique, make a round loop at the top using your round nose pliers, and then attach the beads to your earring components. I placed four gold beads, a carnelian bead, and four gold beads evenly on the bottom of each earring component. Add as many beads as you like in your own design! Copyright, Lorri Ely All rights reserved Page 17 of 307

18 Copyright, Lorri Ely All rights reserved Page 18 of 307
19 Red Filigree Earrings About This Design Time: Approximately 15 minutes Level of Difficulty: Beginner - All Levels (some wire wrapping) Cost: Varies, depending on materials selected. Approximately $10-15 as shown. Look at these pretty red filigree earrings, and they are so easy to make! It's summertime and I want to spend more time outside than indoors making jewelry--but I always want new jewelry to wear, so what's a jewelry girl to do? Make up some earrings super fast by using cast components! Take some filigree components, attach a couple of beads and you're ready to wear your new earrings in less than half an hour! Copyright, Lorri Ely All rights reserved Page 19 of 307

20 Step 1 Gather your supplies 2 filigree earring findings (like chandelier components). I got my filigree findings here: Filigree Findings for Sale on ebay 6 Swarovski Crystal Beads. I used "Siam" red color. I used six 4mm bicone crystals. I purchased my beads at BestBuyBeads.com 6 Headpins 2 earwires, french hooks, leverbacks or posts (your choice) Step 2 String beads on headpins String beads onto headpins. Using a basic loop technique, make a round loop at the top using your round nose pliers, and then attach the beads to your earring components. Attach the components to the bottom of your ear wires or posts using your pliers. Copyright, Lorri Ely All rights reserved Page 20 of 307


21 That's it, your perfectly elegant earrings are ready to wear! Copyright, Lorri Ely All rights reserved Page 21 of 307
22 Diamond Shaped Pearl Earrings About This Design Time: Approximately 5-10 minutes Level of Difficulty: Beginner - All Levels Cost: Varies, depending on materials selected. Approximately $5-10 as shown. These diamond shaped pearl earrings go great with the matching pearl and shell bracelet project. These feature freshwater pearls, which are available in many unusual shaped, and decorative silver bead caps. Simple, easy, and pretty. Copyright, Lorri Ely All rights reserved Page 22 of 307
 Step 2 String beads on headpin String a seed daisy spacer, the pearl,")
23 Step 1 Gather your supplies 2 Headpins of a gauge that will fit through your bead holes 2 unusual shaped freshwater pearls (I used diamond shaped), such as coin, oval, square, diamond, etc. 2 decorative silver Bali bead caps 2 decorative Bali daisy spacers 2 earwires, french hooks, leverbacks or posts (your choice) Step 2 String beads on headpin String a seed daisy spacer, the pearl, and a bead cap onto each headpin. Copyright, Lorri Ely All rights reserved Page 23 of 307


24 Step 3 Attach to earring component with loop Using a basic loop technique, make a round loop at the top using your round nose pliers, and then attach the beads to your earring components. Copyright, Lorri Ely All rights reserved Page 24 of 307
25 Dangling Chain Crystal Earrings About This Design Time: Approximately minutes Level of Difficulty: Beginner - All Levels (some wire wrapping) Cost: Varies, depending on materials selected. Approximately $10 as shown. Here are some great dangling chain crystal earrings that are quite easy to make. Square cube and bi-cone Swarovski crystal beads are attached to two delicate silver chains to create a fun and swingy design that is really feminine. I used green but you can use any color crystals or mix up colors for more spice! Copyright, Lorri Ely All rights reserved Page 25 of 307
 10 Swarovski crystal beads (8-4mm cube and 2 bi-cone) in your choice of colors. I used peridot colored crystals in my design.")
 Step 2 Attach chain and first beads Cut your bulk sterling silver chain to the desired drop dangle length.")
26 Step 1 Gather your supplies 2 Headpins of a gauge that will fit through your bead holes Length of sterling silver half hard wire (24-26 gauge) Length of sterling silver link chain (depending on how long you want your earrings to hang) 10 Swarovski crystal beads (8-4mm cube and 2 bi-cone) in your choice of colors. I used peridot colored crystals in my design. I got my crystal beads at BestBuyBeads.com 2 earwires, french hooks, leverbacks or posts (your choice) Step 2 Attach chain and first beads Cut your bulk sterling silver chain to the desired drop dangle length. I made my longer chain about 2 inches long, and then used a shorter piece of chain for the second drop. Copyright, Lorri Ely All rights reserved Page 26 of 307
27 We're going to chain together three crystal beads on one chain, and a cube and bi-cone crystal on the other chain. Copyright, Lorri Ely All rights reserved Page 27 of 307

28 The bottom beads will be attached using a headpin, and the middle and top bead will be attached using the sterling silver wire using a wire wrap loop technique. To start with the bottom crystal bead, string a crystal bead onto a headpin and make a loop at the top using round nose pliers. If you need help learning how to do wire loops, follow these step by step instructions. Use a cube bead, then a bi-cone bead on the longer chain. Cut a few inches of silver wire. Use your round nose pliers to create a basic closed loop on the bottom, attaching this loop to the bead component you just finished. Before closing the loop on top, attach the loop to the bottom of the chain. Attach one cube bead to the shorter chain using a closed wire loop. Step 3 Attach the chain of crystal beads using wire loop technique Let's continue attaching the crystal beads on the shorter chain piece. You have already attached one crystal to the chain. Cut a few more inches of silver wire. Use your round nose pliers to create a basic loop. If you need help learning how to do wire loops, follow these step by step instructions. Attach the loop to the loop at the bottom of the first crystal bead, connecting the second bead to the first. Copyright, Lorri Ely All rights reserved Page 28 of 307
29 Copyright, Lorri Ely All rights reserved Page 29 of 307


30 That s it, your gorgeous earrings are ready to wear! Copyright, Lorri Ely All rights reserved Page 30 of 307

31 Carnelian and Chain Earrings About This Design Time: Approximately 30 minutes Level of Difficulty: Beginner - All Levels Cost: Varies, depending on materials selected. Approximately $10-15 as shown. These gorgeous carnelian and chain earrings are swingy and fun. Featuring bright deeporange natural carnelian gemstone beads, and delicate silver chain. Copyright, Lorri Ely All rights reserved Page 31 of 307
 2 earwires, french hooks, leverbacks or posts (your choice) Step 2 Attach chains Cut three lengths of")
32 Step 1 Gather your supplies 6 - faceted carnelian beads (I used rondelles). Carnelian Beads on ebay Several inches of bulk sterling silver chain. Bulk chain on ebay A length of sterling silver wire (thin gauge to fit through bead holes) 2 earwires, french hooks, leverbacks or posts (your choice) Step 2 Attach chains Cut three lengths of sterling silver chain for each earring. This will be the fringe that hangs at the bottom. Cut the chain as long as you like, and feel free to add more chains if you like to get the look you want. TIP: To cut all the chain the same length, slide the chain onto a headpin and let it hang down. You can then easily cut the bottom of each chain to the same length. Cut a length of silver wire for each earring. Make a wire loop on the end of the wire, and attach the chains, and close the loop. If you need help learning how to do wire loops, follow these step by step instructions. Copyright, Lorri Ely All rights reserved Page 32 of 307


33 Step 3 Add carnelian beads and attach to earrings Slide the three carnelian beads onto the wire, and make a loop. Slide the loop onto your earring component and close the loop. Copyright, Lorri Ely All rights reserved Page 33 of 307

34 Chalcedony Earrings About This Design Time: Approximately minutes Level of Difficulty: Beginner - All Levels Cost: Varies, depending on materials selected. Approximately $15-25 as shown. I wanted to showcase some perfect glowing aqua chalcedony beads. These blue chalcedony earrings feature some fantastic rare semi-precious gemstone beads, here in a faceted briolette shape. To bring out the color, I topped them with a cluster of genuine turquoise rounds and aqua crystals. Attached to sterling silver french hook earrings. Lovely and timeless, this design works great with any large/small bead combination, so use whatever bead combo you have on hand! Copyright, Lorri Ely All rights reserved Page 34 of 307
 2 earwires, french hooks, leverbacks or posts (your choice) I used")
35 Step 1 Gather your supplies 2 Aqua Blue Chalcedony Briolette Beads. 8 small aqua crystal beads 8 small turquoise round beads 16 Headpins Length of sterling silver half hard wire (thin - 26 gauge) 2 earwires, french hooks, leverbacks or posts (your choice) I used sterling silver french hook ear wires in my design Step 2 Wire wrap the briolette bead Cut several inches of sterling silver wire. Slide the chalcedony briolette bead into the center of the wire. Bend the ends of the wire up to meet in the middle at the top of the bead. Follow my instructions for wire wrapping a briolette to make a closed loop at the top with a stem. We will attach the other beads to this top of the wire stem so don't attach it to the earring component just yet. Copyright, Lorri Ely All rights reserved Page 35 of 307

36 Step 3 Slide beads on headpins make loops Next, you will attach four crystals and four turquoise round beads to the top of each earring (or more if you like!). Slide a crystal bead onto a headpin, create a loop, and then slide the loop on the top stem, using a closed loop. You'll use your round nose pliers to create the closed loop. If you need help learning to make a loop, follow these instructions. Repeat, alternating a crystal and turquoise bead until you have attached all of them to the stem. I attached 8 beads to each earring--you can do more or less to get the look you like. Copyright, Lorri Ely All rights reserved Page 36 of 307

37 Step 4 Close top loop and attach to earring components Now, we'll make a round loop at the top of the wire stem, not too far from the top of the other beads, and attach it to the earring component. Use your round nose piers to form a loop, slide it through the earring component, then wrap the wire back down around the stem a few times, creating a secure closed loop. Copyright, Lorri Ely All rights reserved Page 37 of 307
38 Opalite Earrings About This Design Time: Approximately minutes Level of Difficulty: Beginner - All Levels Cost: Varies, depending on materials selected. Approximately $8-10 as shown. These are very pretty opalite earrings. Opalite is a man-made stone that looks a lot like moonstone and opal as it has the same reflective blue-pink translucent quality. Moonstone is the birthstone for June, so this is a good project to make for a birthday gift. The glowing stone is quite lovely. Here I made some "raindrop" cascades using opalite beads and chain. Actually, this design works well with any longish shaped bead, so try it with other colors as well. Of course, you can use gold chain, but in this design I went with sterling silver, and attached them to french hook ear wires. Lovely and timeless, this design works great with any large/small bead combination, so use whatever bead combo you have on hand! You can also vary the design by attaching small beads or crystals to the bottom of the chain. Copyright, Lorri Ely All rights reserved Page 38 of 307
 Several inches of sterling silver half hard wire (22-26 gauge) 2 earwires, french hooks, leverbacks or posts (your choice) I used sterling silver french hook ear wires in my design")
39 Step 1 Gather your supplies 6 Opalite or Moonstone Beads (you can use any beads you like to alter this design) 6-10 inches of fine sterling silver link chain (length needed depends on how long you want them to be) Several inches of sterling silver half hard wire (22-26 gauge) 2 earwires, french hooks, leverbacks or posts (your choice) I used sterling silver french hook ear wires in my design Step 2 Cut and prepare the chain Cut four short, four medium, and four longer lengths of chain. Two of each length will go on either earring. I cut mine about about.5 inch..75 inch, and 1 inch, but decide how far down you want your earrings to hang and decide how long to cut your chain. TIP - I use this trick to cut all my chain the same length. Slide the chain onto a piece of wire or headpin and let it hang. Cut to desired length, and repeat, lining the next length of chain up next to the first one. For each earring, we will attach a short, medium, and long chain, and then a bead, and then the reverse (long, medium, short) chain to the bottom of each bead. This makes all the chains the same length when we are done. Copyright, Lorri Ely All rights reserved Page 39 of 307

40 Copyright, Lorri Ely All rights reserved Page 40 of 307

41 Step 3 Attach the beads to chain and earring component. Separate the loop on the earring component using pliers, and slide on the three chains in the same order on each earring (short, medium, long). Next we will attach the beads and lower part of the chains. Cut several inches of sterling silver wire. Make a wire loop, attaching the chain to the loop, then closing it. Slide an opalite bead onto the wire, then make a closing loop on the other side, attaching it to the chain. If you need help learning to make a loop, follow these instructions. You can also follow my instructions on making beaded chain to get help on how to do this technique. Note the pattern--short chain, bead, long chain. Medium chain, bead, medium chain, and finally long chain, bead, and short chain. Your earrings should have chains of the same length, but you can always cut chain on the bottom to get the desired look. Copyright, Lorri Ely All rights reserved Page 41 of 307

42 Red Crystal Earrings About This Design Time: Approximately minutes Level of Difficulty: Beginner - All Levels Cost: Varies, depending on materials selected. Approximately $8-10 as shown. Pretty red crystals are accented with charcoal gray pearls, and attached to several links of stainless steel chain. Simple and very pretty! Copyright, Lorri Ely All rights reserved Page 42 of 307
 2 head pins 2 earwires, french hooks, leverbacks or posts (your choice) I used sterling silver french hook ear wires in my design Step 2 Cut")
43 Step 1 Gather your supplies 2 large and 2 small glass or crystal red beads. 2 grey pearls 2 inches link chain (I used stainless steel) 2 head pins 2 earwires, french hooks, leverbacks or posts (your choice) I used sterling silver french hook ear wires in my design Step 2 Cut and prepare the chain Cut 2 matching lengths of link chain. I used 3 links in my design. Slide the chain onto the earring component to attach it. Separate the loop on the earring component using pliers, and then push the loop back closed, fastening the chains securely. Copyright, Lorri Ely All rights reserved Page 43 of 307

44 Step 3 Attach the beads Next we will attach the beads on the chain. Slide the beads onto your headpin, and make a round loop with your round nose pliers. Slide the loop onto the chain, then close the loop. If you need help learning to make a loop, follow these instructions. Copyright, Lorri Ely All rights reserved Page 44 of 307

45 Moonstone Earrings About This Design Time: Approximately minutes Level of Difficulty: Beginner - All Levels Cost: Varies, depending on materials selected. Approximately $10-15 as shown. I wanted to showcase some perfect glowing moonstone beads. Moonstone is a birthstone for June, so these would make a nice birthday gift. Moonstone has a nice opal-like quality, glowing and reflecting blue and pink light. These are made with smooth moonstone briolette teardrop beads, and accented with small white button pearls and opalite. Copyright, Lorri Ely All rights reserved Page 45 of 307
 2 earwires, french hooks, leverbacks or")
46 Step 1 Gather your supplies 2 Moonstone Briolette Beads. Moonstone briolette beads for sale on ebay 2 small pearls 2 opalite or other white accent beads Length of sterling silver half hard wire (thin - 26 gauge) 2 earwires, french hooks, leverbacks or posts (your choice) I used sterling silver french hook ear wires in my design Step 2 Wire wrap the briolette bead Cut several inches of sterling silver wire. Slide the moonstone briolette bead into the center of the wire. Bend the ends of the wire up to meet in the middle at the top of the bead. Follow my instructions for wire wrapping a briolette to make a closed loop at the top with a stem. We will attach the other beads to this top of the wire stem. Copyright, Lorri Ely All rights reserved Page 46 of 307

47 Step 3 Add remaining beads and attach to earring Slide the pearl and opalite bead onto the wire, then attach it to the earring component making a closed loop. Use your round nose piers to form a loop, slide it through the earring component, then wrap the wire back down around the stem a few times, creating a secure closed loop. If you need help learning to make a loop, follow these instructions. Copyright, Lorri Ely All rights reserved Page 47 of 307

48 Crystal Flower Earrings About This Design Time: Approximately minutes Level of Difficulty: Beginner - All Levels Cost: Varies, depending on materials selected. Approximately $10-15 as shown. I wanted to showcase the great new Swarovski crystal flower beads so I came up with a design that incorporates a front and back chain, and added a few small crystals to swing and dance on the chain. So pretty and fun to wear! Crystals come in every color, so pick what you like Want to make these earrings, or a variation for yourself? Let's get started! Copyright, Lorri Ely All rights reserved Page 48 of 307
 Length of sterling silver half hard wire (24 gauge) 2 earwires, french hooks, leverbacks")
49 Step 1 Gather your supplies 2 Swarovski crystal flower beads. Swarovski Crystal Daisy Flower Beads on ebay 6 Swarovski crystal 4mm bicone beads in coordinating colors. Swarovski Crystal Bicone Beads on ebay 6 Headpins Length of fine sterling silver cable chain (about 3 inches) Length of sterling silver half hard wire (24 gauge) 2 earwires, french hooks, leverbacks or posts (your choice) I used sterling silver french hook ear wires in my design Step 2 Wire wrap the crystal bead and attach to earring component A piece of chain will hang on the back and front sides of the crystal flower bead. First decide how long you want your front and back chains to be on your earrings. I made my back (longer) chain just over an inch or so, and the front chain about a half an inch or so. It really is up to you...and you can even attach three or more chains if you feel like it--it's your design so do what feels right to you. TIP - To easily cut both chains the same length without having to measure or count links, hang the first cut piece of chain on a headpin from the first link, then hang the next piece of chain from the headpin next to it, and you can easily see where to cut so the next piece of chain so the lengths will match. Now we need to wire wrap the top-drilled flower bead. Cut several inches of sterling silver wire, and cut a short and longer length of sterling silver chain. Slide a piece of chain, the bead, and the second piece of chain onto the wire. Bend the ends of the wire up to meet in the Copyright, Lorri Ely All rights reserved Page 49 of 307


50 middle at the top of the bead. Follow my instructions for wire wrapping a briolette to make a closed loop at the top, and attach this to your earring component. Copyright, Lorri Ely All rights reserved Page 50 of 307
.")


51 Step 3 Slide crystal beads on headpins and attach to chain Next, you will attach three crystals to each earring (or more if you like!). Slide a crystal bead onto a headpin, and attach the crystal to the chain using a closed loop. Use your round nose pliers to create a basic closed loop. If you need help learning to make a loop, follow these instructions. Attach the loop to the chain. I hung one bead on the bottom of the front and back chain, then hung a second bead a little higher up on the back chain. Copyright, Lorri Ely All rights reserved Page 51 of 307

52 Geometric Bead Earrings About This Design Time: Approximately minutes Level of Difficulty: Beginner - All Levels (with basic wire wrapping experience) Cost: Varies, depending on materials selected. Approximately $10-15 as shown. Geometric shapes are going strong as a jewelry fashion trend, and mixed metals are also in style. I found these great brushed metal beads in different shapes, and decided to make up a pair of very contemporary, mixed-metal earrings. Copyright, Lorri Ely All rights reserved Page 52 of 307
 and gold-filled wire (optional if you want to use different")
53 Step 1 Gather your supplies 6 geometric shaped brush metal beads. I used two round discs, two gold rounds, and two diagonal squares. Check your local bead store, or I also found lots of great brushed metal beads on ebay Length of sterling silver half hard wire (24 gauge) and gold-filled wire (optional if you want to use different colors of wire) 2 earwires, french hooks, leverbacks or posts (your choice) I used long sterling silver closed hook ear wires in my design Step 2 Wire wrap the beads and attach to earring components Decide what order you want your beads to hang in. Cut six lengths of wire. I used mixed silver and gold wire, but it is your choice. You will use a wire wrapping technique to chain the beads together with closed loops. Follow this technique to wire wrap chain to see how to make connecting loops on the top and bottom of each bead. Note - The lower bead in my design was a diagonal square, top-drilled (side to side holes) bead, so I also needed to use the technique for wire wrapping a briolette or top-drilled bead. If you also have a top-drilled bead. follow my instructions for wire wrapping a briolette to make a closed loop at the top. Chain each bead together with closed loops, and on the top loop, attach to your earring component. Copyright, Lorri Ely All rights reserved Page 53 of 307
54 Gold Bead and Tourmaline Earrings About This Design Time: Approximately minutes Level of Difficulty: Beginner - All Levels Cost: Varies, depending on materials selected. Approximately $15-25 as shown. After several years of predominantly silver jewelry designs, gold is making a comeback. So, I made up several new designs featuring gold to share with you here on the website. If you prefer, this simple design would work equally well in silver. These beautiful earrings are made of sparkling golden tourmaline beads on the top and bottom of a gorgeous stamped design, gold-filled bead. Copyright, Lorri Ely All rights reserved Page 54 of 307
. Or make your own eye pins using plain wire and just fold the ends up on the bottom.")
55 Step 1 Gather your supplies 2 medium sized gold focal beads. I used gold-filled beads in a stamped oval shape and design. I got my beads at Dava Bead and Trade, Portland Oregon. 2 Headpins of a fine gauge that will fit through your tourmaline beads holes (24-26 gauge). Or make your own eye pins using plain wire and just fold the ends up on the bottom. 4 small faceted tourmaline beads (or beads of choice, crystals would work as well) 2 earwires, french hooks, leverbacks or posts (your choice) I used 14KT GF leverbacks in my design Copyright, Lorri Ely All rights reserved Page 55 of 307
56 Step 2 String beads on headpins or wire and make loops I used wire to make my head pins. Fold the end of the wire up with round nose pliers in a small tight loop to hold the beads on the wire. Or, simply use a fine gauge headpin. Slide a tourmaline bead, a gold bead, and another tourmaline bead onto the headpin or wire. Use your round nose pliers to create a basic loop. If you need help, follow these instructions. Attach the loop to the loop at the bottom of the earring component. That's it! Copyright, Lorri Ely All rights reserved Page 56 of 307

57 Tourmaline and Pearl Earrings About This Design Time: Approximately minutes Level of Difficulty: Beginner - All Levels Cost: Varies, depending on materials selected. Approximately $15-25 as shown. Beautiful earrings of sparkling golden tourmaline beads, with diagonally-drilled, cream colored freshwater pearls on gold ear wires. Gorgeous, elegant, and sophisticated--need I say more? Copyright, Lorri Ely All rights reserved Page 57 of 307
.")
 Step 2 String pearl beads on headpins and make loops String a pearl onto each headpin and make a closed loop")
58 Step 1 Gather your supplies 2 Headpins of a fine gauge that will fit through your pearl bead holes (24-26 gauge) 2 square freshwater pearl beads (or beads of choice) 4 small faceted tourmaline beads (or beads of choice, crystals would work as well). 2 earwires, french hooks, leverbacks or posts (your choice) I used 14KT GF leverbacks in my design fine gold wire (24-26 gauge) for wire wrapping and attaching tourmaline beads (I used 24 gauge 14KT GF half hard wire) Step 2 String pearl beads on headpins and make loops String a pearl onto each headpin and make a closed loop at the top. Copyright, Lorri Ely All rights reserved Page 58 of 307

59 Step 3 Wire wrap tourmaline beads and attach to pearls and earring components We will make a "chain" attaching two tourmaline beads to the bottom pearl bead. Use your fine gold wire and form a closed loop, attaching the pearl bead. If you need instructions on how to wire wrap closed loops, click here. Slide a tourmaline bead onto the wire, and make a closed loop at the top. Repeat this to attach the second tourmaline bead, and attach to ear wires at the top. Copyright, Lorri Ely All rights reserved Page 59 of 307

60 Square Pearl Earrings About This Design Time: Approximately 5-10 minutes Level of Difficulty: Beginner - All Levels Cost: Varies, depending on materials selected. Approximately $5-10 as shown. These square pearl earrings are so simple and yet so perfect! Square freshwater pearls off-set with tiny turquoise colored seed beads on large-loop french hook ear wires. Copyright, Lorri Ely All rights reserved Page 60 of 307
 2 square shaped freshwater pearls 2 earwires, french hooks,")

61 Step 1 Gather your supplies 2 Headpins of a gauge that will fit through your bead holes 4 turquoise colored seed beads (or beads of choice) 2 square shaped freshwater pearls 2 earwires, french hooks, leverbacks or posts (your choice) Step 2 String beads on headpin String a seed bead, the pearl, and another seed bead onto each headpin. Copyright, Lorri Ely All rights reserved Page 61 of 307

62 Step 3 Attach to earring component with loop Using a basic loop technique, make a round loop at the top using your round nose pliers, and then attach the beads to your earring components. Copyright, Lorri Ely All rights reserved Page 62 of 307


63 Copyright, Lorri Ely All rights reserved Page 63 of 307
64 Gold Chandelier Earrings Project About This Design Time: Approximately 4-6 hours Level of Difficulty: Advanced (some experience with wire wrapping needed) Cost: Varies, depending on materials selected. Approximately $20-40 as shown. I happen to love chandelier earrings. There is no other piece of jewelry that is so dramatic and eye-catching as a big swingy pair of sparkling earrings. Wear these for a special night on the town when you really want to get attention! These chandeliers are "designer", 100% handcrafted from the wire hoop down to the bead fringe on the bottom. You've seen these earrings sold by famous jewelry designers for upwards of $200 per pair. There is no reason you can't make an equally special pair, using your own beads and creativity to create your one-of-a-kind design. I suggest you use some of your favorite beads on this design, simply because these earrings will take you ALL DAY (whew!) to make, and you want to be happy with the end result. You can certainly use a genuine 14KT gold earring component to finish these if you like, as these earrings are very special and meant to be treasured. Because gold is coming back into fashion, I used the onset of spring and summer as my inspiration and I made this pair in 14KT GF wire, with brick red and copper seed beeds, dark red Swarovski crystals, and yellow citrine beads. I'll be wearing these all summer long! Copyright, Lorri Ely All rights reserved Page 64 of 307
 10 red Swarovski bi-cone crystal beads in your choice of colors. I used burgundy crystals in my design. 16 faceted citrine beads. I used \"brick\" shaped beads.")
65 Step 1 Gather your supplies Coil of 14KT GF wire, dead soft, in a very fine gauge (24-26G) Coil of 14KT GF wire, half hard, in a thicker gauge (20-22G) Seed beeds (I used brick red and copper colored beads in my design) 10 red Swarovski bi-cone crystal beads in your choice of colors. I used burgundy crystals in my design. 16 faceted citrine beads. I used "brick" shaped beads. 2 earwires, french hooks, leverbacks or posts (your choice). Because these earrings are dangly and heavier than most, I went with 14KT posts so they would stay securely in place on the ears. 1 household bottle to use as a form in shaping your hoop Optional - 72 headpins to attach beaded fringe on bottom, or just use your gold wire to craft your own "pins" Copyright, Lorri Ely All rights reserved Page 65 of 307

66 Step 2 Prepare main hoop form First, a side note--these earrings take a lot of time and patience. If you don't have some basic wire wrapping experience, this project might be too challenging, so practice your basic loops and wire wrapping chain before attempting this project. Or, feel free to jump right in and try it--just be prepared to waste a little wire in your learning curve (and consider using silver instead of gold if this is your first try, it is less expensive). The first thing we need to do is create two perfect round hoops as the main body of the earrings ( to which we will wrap fine wire and attach our other beads). To create a round shape, use any household item as a form to wrap your wire around. I used a small aspirin bottle. Select a bottle that has the size of hoop you want for your pair of earrings. Wrap the heavier gauge gold wire tightly around the bottle. At the point where the wires cross, bend one end of wire up at a right angle to become the stem (you will attach this to the earring component) and the other end (tail) you will wire wrap around the stem. Wrap the tail around the stem a few times and cut off the excess with your flush cutters. Make both earrings at the same time at this step, so you can be sure they are exactly the same size. Copyright, Lorri Ely All rights reserved Page 66 of 307

67 Step 3 Wrap fine gold wire and attach seed beads to wire hoop form Cut a long length of thinnest gauge soft wire (at least 12 inches, you don't want to run out). We are going to start at the top of the hoop and begin wire wrapping the thin wire around the hoop form, attaching one seed bead to our hoop form with every other wrap. First, wrap the wire tightly at the top of one side (several revolutions) of the hoop to attach the wire to the hoop form. Next, thread a seed bead onto the wire, wrap around twice to hold the seed bead into place on the top outside of the hoop (hold it in place with your fingers while wrapping). Pull the wire tight, and "eyeball it" to determine how far apart you want your beads to be. This is totally a design decision--depending on how tightly you bunch the seed beads together, you can have more or less beads in your design. However--pay attention to the bottom third of the hoop because you must have an uneven number of loops to attach your beaded fringe. More on this in a second...read to the bottom of this step before beginning. So again, the steps are, attach one seed bead, wrap the wire through and around twice (while holding seed bead in place with fingers), and attach the next seed bead, wrap twice...and so on. Don't worry if you have to start over a couple of times with new wire--the goal is to get uniform wraps, spaced evenly so you have the same number of beads on each earring. I strongly suggest you make both earrings at the same time for this reason--you can get this part out of the way and you are more likely to wrap them the same way in one sitting. At the bottom third of the earring is where you will attach your beads. In order to do this you need to create loops, or spaces, between the thin wire and the wire form hoop. So, eyeball it Copyright, Lorri Ely All rights reserved Page 67 of 307

68 (or measure and mark it) and when you get to the lower third part of the form where you want to attach your drop beads, start threading two seed beads onto the wire, and make a larger loop with your fingers when wrapping, allowing a gap so you will be able to thread and attach your drop beads in a later step. The reason we are attaching two seed beads instead of one is we will attach the drop beads right in the center of the two seed beads. You need an UNEVEN number of drops for a symmetrical earring with one drop in the center. I ended up with nine loops on the bottom to attach my drop beads. Just keep an eye on the bead and loop spacing so your earring ends up uniform and looks the same on either side. One you get done with the nine drop hoops on the lower third of the earring, return to threading only one seed bead, and work your way back up the other side of the hoop form, to the top where you will wrap your wire tightly in several revolutions and cut off the end. This is the most challenging part of making this earring, so congratulations, you have that done! Now onto the fun...and...tedious part. Making all of the drop beads and fringe! At this point your hoop may have lost some of its round shape. No worries, just slide it back onto your bottle to reform it back into a round shape. You can do this as often as you need to until we get to the step where we attach the center inside cross wire and beads. Step 4 Create all of the drops and fringe beads Copyright, Lorri Ely All rights reserved Page 68 of 307
69 Now you'll want to create an assembly line and craft all of the drop beads and fringe for both earrings. While you could use head pins to attach all of the beaded fringe, to save money I just used my plain soft gold wire, which I fold over on the ends with round pliers and pinch loop tight to hold my seed beads in place. This is your choice, if you want to use headpins you will need three headpins per drop bead to attach three "fringe" sections to each one (72 headpins total). Make the bead drop wire forms Cut 24 lengths of gold wire (about 1.5 inches long), and create a closed loop on the bottom of each with round nose pliers. These will become the citrine and crystal bead drops, and at the bottom of each drop you will attach a beaded fringe. Don't attach the citrine and crystal beads yet as it is easier to attach all the fringe first, then attach the beads to the earrings. Make the fringe wires Cut 72, 1 inch lengths of gold wire (unless you are using head pins) and loop over and pinch the wire on the bottom to hold seed beads in place so they don't fall off. This is an inexpensive way to make your own "head pins". I actually like the look of the added gold wire at the bottom of each bead, but if you want a neater more finished appearance, use head pins instead. Make the beaded fringe Let's make the fringe. We will attach three beaded fringes to each bead drop. Using your seed beads, slide two beads onto the wire or headpin, then attach them to a bead drop form (bottom closed loop) using pliers. Do this again so you now have two, two-bead fringes attached to your bead drop. Slide three seed beads (use a different color on the bottom beed) onto the wire or headpin, and attach this one in the middle. This makes a seed bead fringe "spray" on the bottom of each beaded drop. Repeat this with all your wires until you have attached fringe to the bottom of all 24 bead drops. TIP - This part will take a long time, so make sure you are in a comfortable chair, with good lighting (and maybe turn on the TV or stereo). Remember to take breaks every hour to fight fatigue and rest your eyes. Assembly Line: Copyright, Lorri Ely All rights reserved Page 69 of 307

70 Copyright, Lorri Ely All rights reserved Page 70 of 307


71 Step 5 Attach center wire to hoop form Now we will create the center wire "cross bar" for the three drop beads in the center of our hoop. This is a good time to make sure your forms are still round, so slide them back over your bottle form and round them out again one last time. Cut a two inch length of your thicker gold wire. This is more wire than you need but you may need to adjust and make a few cuts, so give yourself the extra bit to save frustration. Make a round loop to hook the wire on the top side of the hoop form. Make a soft dip or rounded bend in the center of the wire using your fingers. You can make this rounded as much or as little as you want to. Line the other side up in the same place on the wire hoop form, and make another round loop to hook the wire on at that spot. Adjust the wire as needed to get the desired look, and repeat on the other earring. Cut off remaining wire ends and tuck in tightly. This part is just a little challenging to get "just right", but you'll be done with it in just a few minutes! Step 6 Attach beaded drops and finish the earrings! Now we are in the final stretch and the most satisfying part. Let's attach all the bead drops to our earrings. Slide one seed bead, one crystal or citrine bead, and one seed bead onto each wire. Attach the beads to the earrings (through the loops you created with the fine gold wire, making sure you go between the two seed beads) using closed wire loops to attach them so they don't fall off. Follow my pattern below to alternate citrine and crystal beads in the design. Top - Citrine, Crystal, Citrine Bottom - Citrine, Crystal, Citrine Citrine, Crystal, Citrine, Citrine, Crystal, Citrine Copyright, Lorri Ely All rights reserved Page 71 of 307
72 Finally, attach the final crystal bead at the top, and attach the earring to your earring component with a round loop, and your stunning chandeliers are completed and ready to wear. Copyright, Lorri Ely All rights reserved Page 72 of 307
73 Coral and Crystal Earrings Project About This Design Time: Approximately 30 minutes - 1 hour Level of Difficulty: Beginner - All Levels Cost: Varies, depending on materials selected. Approximately $10-15 as shown. Inspired by spring, I wanted to make some lovely pink branch coral earrings. Here, I created a simple wire loop and strung bugle beads with branch coral. Then, I accented the design using the popular Swarovski crystal cube beads. These are eye catching, unique, and fun to wear. You can use any color of bugle beads and crystals that you like. Copyright, Lorri Ely All rights reserved Page 73 of 307
 2 earwires, french hooks, leverbacks or posts (your choice).")
74 Step 1 Gather your supplies 2 Headpins 6 Bali daisy spacers 8 bugle beads (I used a reflective peachy-pink color in my design) 2 Swarovski crystal cube beads (8mm) in your choice of colors. I used Light Rose crystals in my design. 22 branch coral beads. A length of sterling silver wire (thin gauge to fit through bead holes) 2 earwires, french hooks, leverbacks or posts (your choice). Because these earrings are dangly, I went with posts so they would stay securely in place on the ears. Step 2 Prepare crystal drop bead Slide a daisy spacer and the crystal cube bead onto a headpin, and make a loop. Copyright, Lorri Ely All rights reserved Page 74 of 307

 4 bugle beads 2) 4 coral beads 3) Add the Swarovski crystal cube bead 4) 4 coral")
75 Step 3 Slide all beads onto silver wire. Slide the bead onto a length (several inches) of sterling silver wire. Make sure you have enough wire to work with on the ends, because you will need to make a top loop to attach to your earring. Add beads in this order: 1) 4 bugle beads 2) 4 coral beads 3) Add the Swarovski crystal cube bead 4) 4 coral beads 5) 4 bugle beads Copyright, Lorri Ely All rights reserved Page 75 of 307
76 Copyright, Lorri Ely All rights reserved Page 76 of 307


77 Step 4 Close the top of the wire loop together Pull the ends of the wire together so they cross, and hold the top as closely as possible to the beads with your pliers. Select one side of wire to be the "stem" and one side to use to wrap with. Bend the stem at a right angle with your chain nose pliers, and wrap the tail wire around the stem a couple of times, and cut off the tail end with flush cutters. This is very similar to the technique used to wrap a briolette bead, so if you need more instructions, click here. Copyright, Lorri Ely All rights reserved Page 77 of 307


78 Step 5 Add remaining beads and attach to earring component Add the remaining beads to the stem. Slide a Bali spacer, 4 coral beads, and another Bali spacer onto the wire. Make a loop with your round nose pliers, attach the loop through your earring component, then close the loop. That's it, now do the second earring the same way and your new gorgeous coral earrings are ready to wear! Copyright, Lorri Ely All rights reserved Page 78 of 307
79 3 Crystal Cubes Earrings Project About This Design Time: Approximately minutes Level of Difficulty: Beginner - All Levels Cost: Varies, depending on materials selected. Approximately $5-10 as shown. Here, the ever-popular Swarovski crystal cube beads are done up in a very simple design that is swingy, sparkling, and fun. Three crystal cube beads are attached using a basic wire wrap technique. You can make these as long or as short as you like by adding or subtracting beads, and for more interest mix and match the larger crystal cube beads with smaller ones to invent your very own design. Copyright, Lorri Ely All rights reserved Page 79 of 307
 2 earwires, french hooks, leverbacks or posts (your choice) Copyright, Lorri Ely All rights reserved Page 80 of 307 www.")
80 Step 1 Gather your supplies 2 Headpins of a gauge that will fit through your bead holes 6 Swarovski crystal beads (4mm cube) in your choice of colors. I used Emerald crystals in my design. A length of sterling silver wire (thin gauge to fit through bead holes) 2 earwires, french hooks, leverbacks or posts (your choice) Copyright, Lorri Ely All rights reserved Page 80 of 307

81 Step 2 String first crystal bead on headpin We're going to chain together three crystal beads. The bottom bead will be done on a headpin, and the middle and top bead will be attached using the sterling silver wire with loops. To start with the bottom crystal bead, string a crystal bead onto a headpin and make a loop at the top using round nose pliers. Step 3 Attach second crystal bead using wire loop technique Cut a few inches of silver wire. Use your round nose pliers to create a basic loop. If you need help learning how to do wire loops, follow these step by step instructions. Attach the loop to the loop at the bottom of the first crystal bead, connecting the second bead to the first. Copyright, Lorri Ely All rights reserved Page 81 of 307
82 Copyright, Lorri Ely All rights reserved Page 82 of 307

83 Step 4 Attach third crystal bead using wire loop technique Cut a few inches of silver wire. Use your round nose pliers to create a basic loop. Attach the new loop to the loop at the bottom of the second crystal bead, connecting the third bead to the second. At the top of the third crystal cube bead, make a loop and attach this end to your earring component. Copyright, Lorri Ely All rights reserved Page 83 of 307
84 Leaf Bead Earrings Project About This Design Time: Approximately minutes Level of Difficulty: Beginner - All Levels Cost: Varies, depending on materials selected. Approximately $5-10 as shown. This leaf bead earrings project is quick and simple--but so pretty! Leaf beads are very popular for all seasons, and they come in all different materials from gemstones to glass. Plus, they make great earring designs with the simple addition of a couple of crystals and some ear wires. Copyright, Lorri Ely All rights reserved Page 84 of 307
 2 earwires, french hooks, leverbacks or posts (your choice) Step 2 String beads on headpins String a leaf bead onto a headpin, followed by a crystal, a Bali")
85 Step 1 Gather your supplies 2 Headpins of a gauge that will fit through your bead holes 4 Swarovski crystal beads (bicone) in your choice of colors 2 Bali spacer beads (daisy spacers) 2 decorative leaf beads (your choice of color/material) 2 earwires, french hooks, leverbacks or posts (your choice) Step 2 String beads on headpins String a leaf bead onto a headpin, followed by a crystal, a Bali spacer bead, and another crystal. TIP - Vary the design if you like by adding or removing crystals to make them longer or shorter, or instead of using a headpin, use an eyepin instead (with loop at the bottom) and attach a dangling crystal underneath the leaf bead. Your crystals don't have to match the color of your leaf bead, just do what feels right and have fun! Copyright, Lorri Ely All rights reserved Page 85 of 307


86 Step 3 Make loop and attach to earring components Use your round nose pliers to create a basic loop. If you need help, follow these instructions. Attach the loop to the loop at the bottom of the earring component. That's it! Copyright, Lorri Ely All rights reserved Page 86 of 307

87 Swarovski Crystal Chandelier Earrings Project About This Design Time: Approximately 1-2 hours Level of Difficulty: All Levels (with Basic Wire Wrapping Knowledge) Cost: Varies, depending on materials selected. Approximately $15-25 as shown. These chandelier earrings are wonderfully fun, swingy and eye-catching, and chandelier style earrings are still going strong as a fashion statement. Make these in any colors you desire. I wanted to showcase some super fine aquamarine briolette stones, so I chose totally clear Swarovski crystal beads to complement but not compete for the delicate aqua of the gems. Copyright, Lorri Ely All rights reserved Page 87 of 307

88 Step 1 Gather your supplies 30 Swarovski cystal beads in the color of your choice. Here I am using clear crystal AB. 30 Headpins for attaching crystals Two briolette beads of your choice. Here I am using genuine Aquamarine briolettes Two chandelier earring components of your choice. Note, if you have less or more loops, you may need to change the number of crystals for this project. Two earring components of your choice. I am using leverbacks, but you can use french hooks or posts if you prefer. TIP: I use leverbacks on heavier or longer designs because they are more secure. If you use hooks, attach a rubber backer to them to keep from sliding forward out of ears! Sterling silver wire for wrapping loops on 4 sets of dangling crystals Copyright, Lorri Ely All rights reserved Page 88 of 307
89 Step 2 Prepare Crystal Dangle Components We will be attaching a single crystal bead to the bottom of each loop on the chandelier component, with the exception of four "drops" where we will attach two crystals, and the center drop where we will attach the briolette. I find it easier to prepare all my crystal danglies first, then attach them all with my pliers at the same time. Make a basic loop (if you aren't familiar with this technique, read How to Wire Wrap a Basic Loop). For four sets of these (per earring), attach one crystal dangle to the bottom of another one. You will need to create a wire loop on the top and bottom of one crystal, using sterling silver wire. Step 3 Make the Center Briolette Drop. Wire wrap the briolette bead, and attach it to a crystal that has been prepared with a loop on the top and bottom. Step 4 Attach the Crystals Use your flat nose pliers to assist in closing the loops as you attach all the crystals to the chandelier earring component. Step 5 Attach the completed chandelier to the earring component. That's it! Varations You can use any beads you like on these pre-made chandelier components, and it is hard to go wrong. I like crystals as they are eye-catching and work well with the swingy chandeliers. You can also vary the length of each drop. I attached crystals directly to the chandelier component, but you could make chains of 2-4 or even more crystals all linked together to get Copyright, Lorri Ely All rights reserved Page 89 of 307
90 earrings that are even longer and more dramatic. Experiment with your designs and see what you can come up with! Copyright, Lorri Ely All rights reserved Page 90 of 307
91 Link Chain Earrings Project About This Design Time: Approximately 1 hour Level of Difficulty: All Levels (with Basic Wire Wrapping Knowledge) Cost: Varies, depending on materials selected. Approximately $10-15 as shown. These earrings take advantage of the new larger link oval chain in sterling silver that is now available in bulk lengths from many popular jewelry suppliers. In this design, I have wirewrapped a turquoise briolette bead inside one of the wire links, to create a focal point in the earring drop. Accents of a tiger's eye briolette bead, and some heishi turquoise beads complete the design, along with a sterling silver hook earwires. Copyright, Lorri Ely All rights reserved Page 91 of 307

92 Step 1 Gather your supplies 4 links from oval sterling silver chain (because you have to cut through one link to get one solid link to work with, you will waste 2 links and use 2 links) Sterling silver wire for wrapping the briolette beads and attaching the earring to the earring component. I use gauge half-hard sterling silver wire, but use whatever wire you prefer as long as the wire diameter fits through your bead holes. Two briolette beads of your choice. Here I am using a genuine turquoise briolette, and a genuine tiger's eye briolette bead. Two small accent beads or crystals of your choice for the top and bottom of the pendant link. Here I am using turquoise heishi beads. Two earring components of your choice. I am using french hooks, but you can use leverbacks or posts if you prefer. Copyright, Lorri Ely All rights reserved Page 92 of 307
93 Step 2 Begin the Earring with Briolette Wrapped in Center Snip through a link in the oval chain so you can remove the solid link that you need to make the earring. Let's start by making the focal of the earring. Cut a short length of sterling silver wire, about 4 inches. TIP - If it is too long, you won't be able to wrap it inside and around the oval link. First, you'll want to eyeball where your briolette will sit inside the link. Place your briolette bead inside the link and determine where you will attach the bead to the link. Begin wrapping the wire around one side of the oval link. Wrap it using your flat nose pliers to pull the wire tight. Go around the link 2-3 times, and trim off the end, tucking in the rough end with your pliers. Copyright, Lorri Ely All rights reserved Page 93 of 307
, and begin wrapping the wire around the link, using your flat nose pliers to get leverage and pull the wire")
94 Step 3 Attach Briolette Bead to Link Slide your briolette bead into place in the center of the link. This next step will be a little more difficult to wrap because you have less room. Snip the wire so you have just enough to wrap it 2-3 times around the link (about an inch), and begin wrapping the wire around the link, using your flat nose pliers to get leverage and pull the wire so it is tight and the briolette bead is positioned where you want it. Cut off the end of the wire and tuck in the rough piece with your pliers. Step 4 Attach Next Briolette Bead to Bottom Next we will wire wrap the bottom briolette bead (use the How to Wire Wrap a Briolette Instructions if you are not familiar with this technique). Wire wrap the lower briolette bead. Before completing the loop at the top and attaching it to the bottom of the oval link, add an accent bead. I used a heishi bead as my accent. Copyright, Lorri Ely All rights reserved Page 94 of 307

95 Step 5 Attach to Earring Components Complete the loop on top of the briolette bead while attaching it to your earring component using your flat nose pliers. That's it! Copyright, Lorri Ely All rights reserved Page 95 of 307

96 Simple Pearl and Crystal Earrings Project About This Design Time: Approximately 15 minutes Level of Difficulty: All Levels (with Basic Wire Wrapping Knowledge) Cost: Varies, depending on materials selected. Approximately $5-10 as shown. These are simple, classic and elegant earrings that go with nearly anything. You can use any size, shape or color of pearl, as well as accent crystal bead on the bottom. Copyright, Lorri Ely All rights reserved Page 96 of 307
. Two head pins Two earring components of your choice. I am using french hooks, but you can use leverbacks or posts if you prefer.")
97 Step 1 Gather your supplies 2 Pearls. Here I am using medium sized, white freshwater potato pearls. Two small accent beads or crystals of your choice for the bottom of the pendant link. Two Bali daisy spacer beads (or any spacer of your choice). Two head pins Two earring components of your choice. I am using french hooks, but you can use leverbacks or posts if you prefer. Step 2 Thread Beads onto Head Pins Slide your beads onto head pins. Start with a crystal, then the spacer, then the pearl on top. Copyright, Lorri Ely All rights reserved Page 97 of 307


98 Step 3 Make Loops Make basic wire loops at the top of each earring. If you are not familiar with this technique, read How to Make a Basic Wire Wrap Loop for instructions. Copyright, Lorri Ely All rights reserved Page 98 of 307

99 Step 4 Attach to Earring Now, just attach your earring to the earring component, using your flat nose pliers to open and close the loop. That's it! Copyright, Lorri Ely All rights reserved Page 99 of 307

100 Lampwork Bead and Wirework Earrings Project About This Design Time: Approximately 30 minutes Level of Difficulty: All Levels (with Basic Wire Wrapping Knowledge) Cost: Varies, depending on materials selected. Approximately $15-20 as shown. These earrings are wonderfully fun, swingy and eye-catching. Make these using any lampwork glass bead and either silver or gold. I wanted to showcase some red and gold lapwork beads, so I chose to make this pair of earrings using 14kt gold-filled wire and components. Copyright, Lorri Ely All rights reserved Page 100 of 307

101 Step 1 Gather your supplies Two lampwork beads of your choice. Here I am using medium sized round red lampwork beads Two earring components of your choice. I am using leverbacks, but you can use french hooks or posts if you prefer. TIP: I use leverbacks on heavier or longer designs because they are more secure. If you use hooks, attach a rubber backer to them to keep from sliding forward out of ears! Gold-filled or Sterling silver wire for wrapping "wiggles" 2 headpins 2 daisy spacer beads Step 2 Create lampwork bead components Slide a daisy spacer and your lampwork glass beads onto a headpin, and make a basic loop. If you are not familiar with this technique, read How to Wire Wrap a Basic Loop. Copyright, Lorri Ely All rights reserved Page 101 of 307
102 Step 3 Make wire wiggle components Take a 5-6 inch length of your wire and straighten it with nylon jaw pliers. Make a wire wrapped loop on one end, and attach the lampwork bead component on that loop. Using your round nose pliers, begin to wrap the wire back and forth in a fun squiggle design. Make this as long, short, and wide as you like as a matter of design preference. My wiggles are about 1 inch long. At the other end, create a right angle bend with flat nose pliers, and create another wire wrapped loop. Squeeze the finished wiggle component gently with nylon jaw pliers to "harden" the wire a bit. While this isn't absolutely necessary, it makes the wire stiffer and stronger to hold the shape. Repeat this for the second earring piece. Step 4 Attach to earrings Now, use your flat nose pliers to attach the finished components to your earrings. That's it! Copyright, Lorri Ely All rights reserved Page 102 of 307

103 Lampwork Bead and Crystal Earrings Project About This Design Time: Approximately minutes Level of Difficulty: All Levels (with Basic Wire Wrapping Knowledge) Cost: Varies, depending on materials selected. Approximately $15-20 as shown. These earrings are wonderfully eye-catching. Make these using any lampwork glass bead and either silver or gold. I wanted to showcase some red and gold lapwork beads, so I chose to make this pair of earrings using 14kt gold-filled wire and components. Copyright, Lorri Ely All rights reserved Page 103 of 307

104 Step 1 Gather your supplies Two lampwork beads of your choice. Here I am using medium sized round red lampwork beads Two earring components of your choice. I am using leverbacks, but you can use french hooks or posts if you prefer. TIP: I use leverbacks on heavier or longer designs because they are more secure. If you use hooks, attach a rubber backer to them to keep from sliding forward out of ears! 2 headpins 2 daisy spacer beads 2 accent crystal beads Step 2 Create lampwork bead components Slide a crystal bead, then a daisy spacer and then your lampwork glass beads onto a headpin, and make a basic loop. If you are not familiar with this technique, read How to Wire Wrap a Basic Loop. Step 3 Attach to earrings Now, use your flat nose pliers to attach the finished components to your earrings. That's it! Copyright, Lorri Ely All rights reserved Page 104 of 307
105 Necklace Projects Copyright, Lorri Ely All rights reserved Page 105 of 307

106 Sodalite Toggle Necklace About This Design Time: Approximately minutes Level of Difficulty: All Levels (with Basic Wire Wrapping Knowledge) Cost: Varies, depending on materials selected. Approximately $20 as shown. This is quick to make and very pretty. Vary this design with any beads in any color, and with a nice toggle clasp and some dangly beads to be worn in front. Copyright, Lorri Ely All rights reserved Page 106 of 307

107 Step 1 Gather Supplies 1 strand of sodalite beads (or use any beads you like) 1 length of flexible beading wire, enough for your necklace plus several extra inches to work with 2 sterling silver crimp beads Optional - 2 crimp bead covers 1 toggle clasp of choice. 3 accent bead to attach to the toggle. I used a round Montana 8mm Swarovski crystal, a white pearl, and an opalite briolette bead as my accents. 2 decorative bead caps 3 headpins or wire to attach the accent beads Step 2 String the beads Tie a knot on one end of the wire, or place some tape over the end, and string all of your beads onto the wire. Check the length and overall design and make adjustments by adding, removing, or re-positioning beads until you are happy with the look of the necklace. String a beadcap, then the sodalite beads, then another beadcap. You can do this first on a bead design board if you prefer. Make sure you account for the added length of the clasp. TIP - You can start a necklace by attaching the clasp to one end first, However, if you are unclear about your final design or the finished length, it is best to simply tie a knot or place some tape over the end of the jewelry wire, string your beads, and once you are happy with the design and length, attach the clasps to the ends. This way, if you find you need to subtract Copyright, Lorri Ely All rights reserved Page 107 of 307


108 or add beads you can just remove the tape or knot and work from either end without having to cut off your clasp and start the whole thing over! Step 3 Crimp ends and attach the clasp Slide a crimp bead onto the wire, feed the wire through the clasp loop, then back through the crimp bead. Pull the wire snug, and crimp the bead closed. Follow the How to Use Crimp Beads instructions if you are not familiar with this technique. Repeat on other side, making sure you pull the wire tight to beads before crimping. TIP - Because this is a toggle clasp, you will want to leave a little "play" in the wire so the clasp is easy to put on, so leave a little room where the loop of wire attaches to the clasp. Cut off remaining tails of wire with flush cutters. TIP - As an option, try the new crimp bead covers to hide crimps for an even more finished look. Step 4 Attach the accent beads to the toggle Slide accent beads onto headpins, and make a closed wire loop, attaching them to the round part of your toggle clasp so they dangle freely. If you need help learning how to do wire loops, follow these step by step instructions. Copyright, Lorri Ely All rights reserved Page 108 of 307
109 Opalite Pendant About This Design Time: Approximately 1 hour Level of Difficulty: All Levels (with Basic Wire Wrapping Knowledge) Cost: Varies, depending on materials selected. Approximately $20 as shown. This delicate and pretty pendant features an opalite faceted focal bead with a dangling briolette, accented with sparkling clear crystals, hung on a pretty sterling chain. You could vary this design and use any colors for your focal bead and crystals. Copyright, Lorri Ely All rights reserved Page 109 of 307
. I used fine chain, about 16 inches. Bulk chain on ebay Length of sterling silver half hard wire (I used 24G) Clasp of choice.")
110 Step 1 Gather Supplies 1 faceted Opalite rectangle or other focal bead 1 faceted Opalite briolette bead 6 clear Swarovski crystals 2 small round accent beads Bulk Sterling Silver Chain (style of choice). I used fine chain, about 16 inches. Bulk chain on ebay Length of sterling silver half hard wire (I used 24G) Clasp of choice. I used a sterling silver lobster claw clasp and an extender chain for the connecting end. Step 2 Craft the pendant component We will use some sterling silver wire to create the pendant. We will start with the opalite briolette bead on the bottom. Cut a length of silver wire, several inches long. Slide the briolette bead onto the center of the wire, and fold the wire up on either side to meet in the middle. Bend the ends of the wire up to meet in the middle at the top of the bead. Follow my instructions for wire wrapping a briolette. At the top of the stem, slide on the rectangle opalite focal bead, and we will close the top with a round loop. Using round nose pliers make a round loop on the bottom of the wire. If you need help learning to make a loop, follow these instructions. Copyright, Lorri Ely All rights reserved Page 110 of 307
111 Step 3 Attach the pendant to the center wire. Now we will use another length of half-hard sterling silver wire to complete the pendant section of the pendant. Cut this wire about about 6 inches long. First, make a round wire loop on one end of the wire, and before closing the loop, attach it to one length of sterling silver chain (one side of your necklace). For example, if your necklace will be 16 inches long, cut two 8 inch lengths and attach one chain to either side of this pendant section. If you need help learning to make a loop, follow these instructions. On the center wire, slide three crystal beads on either side of the focal pendant you made in the last step. At the other end of the wire, make a closed wire loop, again attaching the second length of sterling silver chain to the loop prior to closing it. If you need help learning to make a loop, follow these instructions. Cut your length of chain to desired necklace length (remember the clasp will add additional length), and then slide your pendant onto the center of your chain. Copyright, Lorri Ely All rights reserved Page 111 of 307


112 Step 4 Attach clasp to chain ends We are ready to attach the clasp and extender chain, but first we will add the two small beads to either end of the chain using silver wire. Cut two more lengths of silver wire, about 4 inches long. On one end of the wire, make a round loop, and attach it to one end of the chain, and then close the loop so the wire is now securely attached to the chain. Slide a bead onto the wire, then make a round loop and attach the clasp component, and close the loop. Repeat on the other side of the necklace to attach the extender chain. That s it, your pretty necklace is ready to wear! Copyright, Lorri Ely All rights reserved Page 112 of 307

113 Onyx Necklace About This Design Time: Approximately 20 minutes Level of Difficulty: All Levels (with Basic Wire Wrapping Knowledge) Cost: Varies, depending on materials selected. Approximately $20-30 as shown. Sometimes all you need is a single strand of great beads and a fancy clasp to make a simple, elegant, yet stunning necklace design. This is quick to make and very pretty. Vary this design with any nice beads in any color, and with any fancy clasp which can be worn in the back, on the side, or in the front! Copyright, Lorri Ely All rights reserved Page 113 of 307

114 Step 1 Gather Supplies 1 strand of Onyx beads (I used faceted round in about 12mm, about a 16 inch strand) 1 length of flexible beading wire, enough for your necklace plus several extra inches to work with 2 sterling silver crimp beads Optional - 2 crimp bead covers 1 fancy clasp of choice. I used a fancy leaf sterling silver toggle clasp. Step 2 String the beads Tie a knot on one end of the wire, or place some tape over the end, and string all of your beads onto the wire. Check the length and overall design and make adjustments by adding, removing, or re-positioning beads until you are happy with the look of the necklace. You can do this first on a bead design board if you prefer. Make sure you account for the added length of the clasp. TIP - You can start a necklace by attaching the clasp to one end first, However, if you are unclear about your final design or the finished length, it is best to simply tie a knot or place some tape over the end of the jewelry wire, string your beads, and once you are happy with the design and length, attach the clasps to the ends. This way, if you find you need to subtract or add beads you can just remove the tape or knot and work from either end without having to cut off your clasp and start the whole thing over! Copyright, Lorri Ely All rights reserved Page 114 of 307

115 Step 3 Crimp ends and attach the clasp Slide a crimp bead onto the wire, feed the wire through the clasp loop, then back through the crimp bead. Pull the wire snug, and crimp the bead closed. Follow the How to Use Crimp Beads instructions if you are not familiar with this technique. Repeat on other side, making sure you pull the wire tight to beads before crimping. TIP - Because this is a toggle clasp, you will want to leave a little "play" in the wire so the clasp is easy to put on, so leave a little room where the loop of wire attaches to the clasp. Cut off remaining tails of wire with flush cutters. TIP - As an option, try the new crimp bead covers to hide crimps for an even more finished look. Copyright, Lorri Ely All rights reserved Page 115 of 307

116 Wear the fancy clasp on the front or side for more interest! Copyright, Lorri Ely All rights reserved Page 116 of 307
117 Vintage Filigree Pendant About This Design Time: Approximately minutes Level of Difficulty: Beginner - All Levels Cost: Varies, depending on materials selected. Approximately $15-20 as shown. The vintage look is still going strong! I wanted to take advantage of a great vintage- looking brass finding to make this vintage filigree pendant. I simply attached the finding to ribbon, attached a lemon quartz drop bead as an accent, and attached a clasp and in just minutes I had a fantastic piece of vintage-look jewelry! You can make your own pendant by re-using a real vintage or antique finding, repurposed into a new design, or there are many vintage looking findings available for sale in bead stores and on-line. Copyright, Lorri Ely All rights reserved Page 117 of 307

118 Step 1 Gather Supplies 1 or more strands of ribbon. I used light green and olive green ribbon 1 large vintage or vintage-look filigree finding - I used a brass vintage-look filigree component but you can use any filigree component you like. Note - I found my filigree finding at Picasso Beads bead store, but you can also purchase this finding at or you can find a great selection of filigree and vintage look findings online. 1 accent bead to use as a drop. I used a faceted lemon quartz bead. Swarovski crystals are also a good choice. 1 head pin 2 tab or crimp cord ends for attaching the ribbon. I used tab style fold-over crimp cord ends but any style that can pinch the ribbon tightly will work. You can also use clamshell bead tips as long as you can feed your ribbon through the holes. 1 Clasp of choice. I used a few inches of bulk chain and a brass lobster claw clasp 2 open Jump rings to attach clasp to cord ends Need Supplies? Check my Jewelry Supply pages to find what you need! Step 2 Attach the bead drop to the pendant Slide your accent bead onto a head pin, and attach it to the bottom center of your finding used a closed loop. Follow these instructions if you need help learning to make a loop. Copyright, Lorri Ely All rights reserved Page 118 of 307
119 Step 3 Attach the ribbon to pendant and attach the ribbon cord ends Cut the ribbon to desired length. I used two pieces of ribbon, 15 inches long (38 cm) so it would be a choker length. Slide the filigree pendant onto the ribbon and tie a simple overhand or square knot to secure it in the center. Insert ribbon ends into cord ends. NOTE - I started trying to make this design using clamshell bead tips, but I had too much trouble trying to feed two ribbons through the tiny holes. So, I switched to the fold-over crimp ends instead. If you need help learning how to work with ribbon, follow these instructions. Pinch the tab cord ends closed using your flat or chain nose pliers so it holds the ribbon tightly. Follow the instructions below for how to attach cord ends for the type of cord ends you have selected. How to Attach Tube Cord Ends How to Attach Tab Cord Ends How to Attach Spring Cord Ends Repeat, attaching the ribbon to ends on the other side of the necklace. Copyright, Lorri Ely All rights reserved Page 119 of 307
 on one side, and a lobster claw clasp on the other. You can use any style of clasp, or clasp with extender chain that you like.")
120 Step 4 Attach clasp Use your pliers and open jump rings to attach the cord ends to your choice of clasp. Open the jump ring, slide it onto your cord end, and onto your clasp, then close the jump ring. I used a length of bulk oval link chain (as an extender chain) on one side, and a lobster claw clasp on the other. You can use any style of clasp, or clasp with extender chain that you like. Follow these instructions for opening and closing jump rings. That's it, your new Vintage Filigree pendant is ready to wear! Copyright, Lorri Ely All rights reserved Page 120 of 307

121 Hill Tribe Silver Pendant About This Design Time: Approximately minutes Level of Difficulty: Beginner - All Levels Cost: Varies, depending on materials selected. Approximately $15-25 as shown. I wanted to make a super easy necklace to wear with casual summer fashions, so what better than a simple mix of leather cord and a gorgeous rose in this Hill Tribe Silver Pendant? Hill Tribe silver is made by the Karen Hill Tribe in Thailand and there are many wonderful pendant and drop designs available for use in your jewelry. Select a favorite focal piece of Hill Tribe silver to use as your pendant, string it on leather cord, attach a jewelry clasp of choice, and you have a super fast and easy pendant that will go great with nearly everything! Copyright, Lorri Ely All rights reserved Page 121 of 307

122 Step 1 Gather Supplies 1 or more strands of leather cord 1 Hill Tribe Silver Pendant - I used a rose pendant, which I purchased here: Hill Tribe Silver Rose Pendant 2 tab or cord ends for attaching the leather. I used round crimp style tube cord ends but any style that can pinch the leather will work. Cord Ends for Sale on ebay 1 Clasp of choice. I used a few inches of bulk chain and a silver hook style clasp 2 open Jump rings to attach clasp to cord ends Optional - jeweler's cement or glue Step 2 Attach the leather cord ends Cut the leather to desired length. I used two pieces of leather, 15 inches long (38 cm) so it would be a choker length. Slide the Hill Tribe pendant onto the leather cord. Insert leather into cord end on one side. Add a drop or two of jewelers cement or glue for added security. Pinch the cord ends closed using your flat or chain nose pliers so it holds the leather cord tightly. Follow the instructions below for how to attach cord ends for the type of cord ends you have selected. How to Attach Tube Cord Ends How to Attach Tab Cord Ends How to Attach Spring Cord Ends Copyright, Lorri Ely All rights reserved Page 122 of 307


123 Repeat, attaching the leather cord to ends on the other side of the necklace. If you have used glue, let it dry for a couple of minutes before proceeding so you don't make a mess on your hands or workspace. Squeeze the clasp tightly to press the leather inside the end. Copyright, Lorri Ely All rights reserved Page 123 of 307


124 Step 3 Attach clasp Use your pliers and open jump rings to attach the cord ends to your choice of clasp. Open the jump ring, slide it onto your cord end, and onto your clasp, then close the jump ring. I used a length of bulk oval link chain (as an extender chain) on one side, and a simple S-hook clasp on the other. You can use any style of clasp, or clasp with extender chain that you like. (Note - My hook clasp already had an open loop on one end so I didn't need to use a second jump ring, I simply attached the clasp directly to the cord end.) Follow these instructions for opening and closing jump rings. Copyright, Lorri Ely All rights reserved Page 124 of 307

125 Shell Bead Pendant About This Design Time: Approximately 2-3 hours Level of Difficulty: All Levels (with Basic Wire Wrapping Knowledge) Cost: Varies, depending on materials selected. Approximately $15-25 as shown. Organic designs are in! Make something fun for summer with this great shell bead pendant! This necklace features big bold shell donut beads, with a teardrop shell and pearls dancing inside, with mother of pearl round beads in a chain. An eye-catching design that is lightweight and so fun to wear! Copyright, Lorri Ely All rights reserved Page 125 of 307

126 Step 1 Gather Supplies 3 large Shell Donut beads, and 1 Teardrop Shell Bead. 1 strand of round mother of pearl beads. Length of sterling silver half hard wire (I used 24G) Clasp of choice. I used a sterling silver toggle clasp. A few inches of sterling link chain for attaching pearl drops 2 pearl beads. I used a teardrop shaped pearl, and a coin pearl. 2 head pins to attach pearls 2 open jump rings to attach chain Copyright, Lorri Ely All rights reserved Page 126 of 307

127 Step 2 Craft the shell pendant components We will use some sterling silver wire to create the pendant drop detail. Cut five lengths of silver wire, several inches long. Attach the wire to the hole in the shell bead with a large diameter round loop. If you need help learning to make a loop, follow these instructions. On the center round donut shell, you will attach two wires, so one can attach to either of the top two donut shell beads. Copyright, Lorri Ely All rights reserved Page 127 of 307
128 Step 3 Attach shell components to each other Using a closed wire wrap loop to make connected beaded chain, (see instructions), connect the shell components. Let's start on the bottom. Slide one bead on the wire, and then made a very large diameter loop (so that it fits onto the bottom of the shell donut), and close the wire loop. Next we will attach the center bottom donut shell to the top two shell donuts. Slide three mother of pearl beads onto each wire, and again make a very large diameter loop to attach each wire to each shell donut (so it fits and hangs easily on each shell), and close the wire loop. Copyright, Lorri Ely All rights reserved Page 128 of 307
129 Step 4 Attach pearl bead drops Next we will attach the pearl beads so they hang inside the two bottom shells. Cut two pieces of link chain of the proper length so each bead will hang in the center of the shell donut. I used a coin pearl in the center shell, and a teardrop shaped pearl in the bottom. Slide each pearl onto a headpin, and make a wire loop on the top of each pearl bead, using your round nose pliers. Attach each pearl to a piece of link chain with a closed wire loop. You will have two pieces of chain with a pearl at the bottom of each one. Next, let's attach the chain and pearl components to the shells. Open a jump ring, and attach the chain and pearl component to the wire loop at the top of each shell bead, then close the jump ring carefully with your pliers. Follow these instructions to become familiar with this technique. The chains should be hanging with pearls dangling in the center "frame" of each shell. If your beads are hanging too low and the chain is too long, just remove it from the jump ring, cut off a link or two, and put it back on. Copyright, Lorri Ely All rights reserved Page 129 of 307

130 Step 5 Make mother of pearl beaded chain and attach clasp Now we will begin making the mother of pearl beaded chain that goes around the top of the necklace. With each mother of pearl bead, slide it onto a short length of silver wire, and make closed loops, attaching each bead following my instructions for making beaded chain. Use a bead design board or ruler to determine the proper length of your necklace. When the necklace is the length you want it to be, attach the clasp components to the ends and close the loops. Copyright, Lorri Ely All rights reserved Page 130 of 307


131 Copyright, Lorri Ely All rights reserved Page 131 of 307

132 Carnelian Nugget Pendant About This Design Time: Approximately 2-3 hours Level of Difficulty: All Levels (with Basic Wire Wrapping Knowledge) Cost: Varies, depending on materials selected. Approximately $20-25 as shown. This is a great carnelian nugget pendant, made with a nice chunky faceted carnelian nugget bead, wrapped in fine sterling silver chain with a chain fringe on the bottom. Very contemporary, this sleek design will look great with everything. You can make this necklace style using any beads you like in any colors. Copyright, Lorri Ely All rights reserved Page 132 of 307
. I used fine chain, about 36 inches. Length of sterling silver half hard wire (I used 24G) Clasp of choice. I used a sterling silver toggle clasp.")
133 Step 1 Gather Supplies 1 Carnelian Nugget Bead, faceted. 8 Small Carnelian Beads (style of choice). I used 2 very small rondelle beads, and 6 larger faceted rondelle beads in my design. Bulk Sterling Silver Chain (style of choice). I used fine chain, about 36 inches. Length of sterling silver half hard wire (I used 24G) Clasp of choice. I used a sterling silver toggle clasp. Step 2 Craft the pendant component We will use some sterling silver wire and chain to create the pendant. I used 5 random lengths of chain for the "fringe" on the bottom of my bead, and wrapped my carnelian nugget bead in three chains. How many chains you use in your design is up to you. Cut a length of silver wire, several inches long. Using round nose pliers make a round loop on the bottom of the wire. This is where you will attach your chain fringe. If you need help learning to make a loop, follow these instructions. Cut your lengths of chain, and then slide your chain onto the loop (making fringe) then close the loop. Next, we will wrap three pieces of chain around the carnelian nugget. This part is a little tricky because you want the chain to fit tightly on the bead but not so tight you can't easily attach the chain. You will feed your wire through the ends of three pieces of chain, through the carnelian bead, then as you slide the wire out the top of the carnelian bead you will catch the three chain ends and feed the wire through the chain, thus attaching them to the bead (giving a wrapped appearance). TIP - Leave the chain longer than you need it on the top of the bead, and after you have attached the chain to the wire you can cut off the extra length using flush cutters. Copyright, Lorri Ely All rights reserved Page 133 of 307


134 Copyright, Lorri Ely All rights reserved Page 134 of 307


135 Step 3 Attach the pendant to the chain Now we will attach the pendant to the necklace chain. Decide how long you want your necklace to be, and how long you want each section of chain to be. Cut all the chain at once. For the next section the the necklace, I used three chains on each side, about 4 inches long. Cut your six lengths of chain to your desired length. Then, for the top part of the necklace, I used a single chain (about 4 inches long). Cut two more lengths of chain for the top part of the necklace. Let's attach the pendant to the necklace chain. Make a round loop on the top of your carnelian bead, and slide each of the six chains onto the loop, then close the loop. Spread the chain so you have three chains on either side of the necklace. Now, we'll attach the three carnelian beads in the center of the chain. You will repeat this for both sides of the necklace: Cut a length of silver wire, and make a round loop. Slide the three chains on the loop, and close the loop. Slide three carnelian beads onto the wire, then make a wire loop. Slide the last chain onto the loop, then close the loop. You will now have a pendant with three chains attached to either side, attached to a three-bead component, and a single chain. Step 4 Attach clasp We are ready to attach the toggle clasp. Cut two lengths of silver wire. Make a round loop, and attach it to the chain, and close the loop. Slide a bead onto the wire, then make a round loop and attach one half of the toggle clasp component, and close the loop. Repeat on the other side of the necklace to attach the other half of the toggle clasp. Copyright, Lorri Ely All rights reserved Page 135 of 307

136 Metal Mesh Necklace About This Design Time: Approximately 30 minutes Level of Difficulty: All Levels Cost: Varies, depending on materials selected. Approximately $15-20 as shown. I wanted to try the new metal mesh cord to make a mesh necklace. It's delicate, lacy, fun to work with--and the sky is the limit on your design possibilities. You can slide beads inside the tube, attach them to the outside with wire, or stretch and shape the mesh to meet your design objectives. This necklace features charcoal gray and tiny white seed pearls, along with crystals encased in a random and organic design. Copyright, Lorri Ely All rights reserved Page 136 of 307
137 Step 1 Gather Supplies Notes: Decide how long you want your handcrafted necklace to be. 1 Length of mesh. Allow extra length if you plan to stretch the mesh sideways beads of choice to go inside the mesh. I used gray and white freshwater pearls, and clear crystals. 2 Tab ends Clasp of choice. I Used a sterling silver lobster claw clasp with an extender chain. Length of sterling silver half hard wire to attach clasp Step 2 Thread beads onto or into mesh wire tube This is a design with lots of free reign for how you want the final piece to look. Experiment and see what effect you like. If you like my design, insert all of the beads on the inside of the tube in the order you want them. Stretch and pull the mesh (if desired) to flatten out some sections and hold beads in place in tight sections. If you want to place beads inside of the mesh as I have, you can use the tip of your round nose pliers or a pen cap to gently open and separate the end of the mesh tube. Once the end is separated, very gently work beads into the inside of the mesh tube. This is fairly easy with smooth pearls, but be careful as the mesh is delicate and if you have a scratchy bead (faceted) you might accidentally tear a hole and the beads could fall out (I learned this the hard way). Another option is to attach beads to the outside of the mesh using wire or head pins. Just hook the wire through the mesh and make a wire loop. Carefully attach wire being careful not to tear the mesh. Finally, you can cut the mesh tube open and try shaping it or wrapping it around wire forms. Copyright, Lorri Ely All rights reserved Page 137 of 307

138 Step 3 Attach the clasp Place the ends of the mesh into the tab end and press it down so it is snugly in place. Use the chain nose pliers to fold down the tabs to hold the mesh tightly and securely in place. Follow these instructions to learn this technique. Trim off any excess ends. Option - you can place a drop of glue or cement in prior to closing the tabs, for added security. Use a small length of silver wire, and create a round loop. Attach one end of the loop to the tab end. Slide a pearl or bead onto the stem, then make a round loop on the other side and attach that to the clasp. As an option, you could just attach the tab end to the clasp using a jump ring or split ring. Repeat on the second half of the clasp or extender chain. If you used an extender chain, I always attach one detail bead as a drop on the end of the chain. Copyright, Lorri Ely All rights reserved Page 138 of 307


139 Copyright, Lorri Ely All rights reserved Page 139 of 307


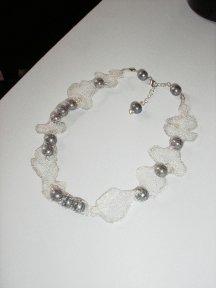
140 Copyright, Lorri Ely All rights reserved Page 140 of 307

141 Turquoise Jasper Pendant About This Design Time: Approximately 2-3 hours Level of Difficulty: All Levels (with Basic Wire Wrapping Knowledge) Cost: Varies, depending on materials selected. Approximately $25-35 as shown. I found some lovely large oval turquoise jasper stones, and I thought they would be great focal beads in a turquoise jasper pendant design. This necklace features the wire-wrapped chain technique, so it is a little time consuming to make, but in the end you will have a gorgeous and very unique pendant design you can be proud to wear, or give as a special gift. I made this with an extender chain so the necklace length will be adjustable from choker length to standard length necklace. Copyright, Lorri Ely All rights reserved Page 141 of 307

142 Step 1 Gather Supplies 1 large oval focal bead. I used turquoise jasper. You can buy the jasper stone that I used, here, or purchase a focal bead at your favorite bead store. 6 medium sized oval turquoise beads. Oval turquoise beads for sale on ebay 1 strand of small to medium sized turquoise beads. I used green turquoise, and 5 blue turquoise beads on the pendant drop. Turquoise bead strands for sale on ebay 3 aqua blue chalcedony briolette beads, or teardrop shaped beads of choice for the pendant drop. Blue Chalcedony Briolette Beads for sale on ebay Coil of sterling silver half-hard wire, fine gauge to fit through bead holes. I used 24G wire. A few inches of bulk link chain, or an extender chain. 1 lobster claw clasp. 3 head pins Step 2 Craft the pendant drop We will use some sterling silver wire to create the pendant drop detail. Cut a length of wire and slide it through the jasper bead, making a closed wire loop on either end of the bead. If you need help learning to make a loop, follow these instructions. Next, cut a length of wire (about 10 inches or 25 cm) and using round nose pliers, begin creating five loops in the center of this wire, forming one loop close together to the last loop, spacing each loop evenly along the wire. These loops will form the bottom part of the pendant where we will hang the drop beads. TIP - You will need to keep adjusting the tips of the round nose pliers on the wire as you wrap the wire around them. Once you have five loops, please the wire in the center of the focal oval bead, and using your fingers, shape the wire so that it wraps up the side of the bead, forming a curve shape that matches the bead shape and size as closely as possible. Take note or mark (with sharpie marker) where the wire crosses the loops on the side of the bead where we will attach the wire components together. Copyright, Lorri Ely All rights reserved Page 142 of 307
143 Now we'll attach this bottom wire component to the bead at the wire loops on either end of the bead. Make a round loop with your pliers at the point where the wire will attach to the bead. Note the angle--these loops attach on the side of the bead, so make sure you make the loop in the right direction so it will hang down. Use a simple open loop to attach the wire, so it hangs freely and easily below the focal bead. This is the hardest part of making this necklace, so don't be too frustrated if you need to try this more than once the first time you are learning the technique. If all else fails, you wasted a few inches of wire and you can start again. Now, let's attach the drop bead details. First, using a length of sterling wire, we will attach the chalcedony briolette beads. Cut several inches of sterling silver wire. Slide the chalcedony briolette bead into the center of the wire. Bend the ends of the wire up to meet in the middle at the top of the bead. Follow my instructions for wire wrapping a briolette to make a closed loop at the top with a stem. Slide a blue round turquoise bead onto the wire stem, and attach it to the bottom of our pendant wire loop using round nose pliers and a closed wire loop technique. If you need help learning to make a loop, follow these instructions. Alternate, attaching a briolette to the end loops, and center loop of the pendant. Now, let's attach the other turquoise beads. Slide each bead onto a headpin and attach it to the bottom of the pendant using a closed loop. That's it, your pendant detail is completed. Copyright, Lorri Ely All rights reserved Page 143 of 307
, connect the beads")

144 Step 3 Make beaded chain Using a closed wire wrap loop to make connected beaded chain, (see instructions), connect the beads together until you reach the desired necklace necklace length. Copyright, Lorri Ely All rights reserved Page 144 of 307

145 Step 4 Attach clasp, and extender chain Once your necklace is the desired length, you will attach the extender chain to one end, and the lobster claw clasp to the other. Just attach the components by sliding them onto the wire loop at one end of your bead, then make a closed wire loop. Add a turquoise drop bead detail to the end of the extender chain. Slide a bead onto a headpin, and attach the bead to the end of the extender chain with a wire loop. That's it, your new pendant is ready to wear! Copyright, Lorri Ely All rights reserved Page 145 of 307

146 Pearl and Moonstone Necklace About This Design Time: Approximately minutes Level of Difficulty: All Levels (with Basic Wire Wrapping Knowledge) Cost: Varies, depending on materials selected. Approximately $15-20 as shown. This pretty pearl and moonstone necklace is very simple to make. Opal-like moonstone has an inner glow and catches the light--reflecting blue and pink...so pretty, and what could be better than to pair this with shimmering pearls? I used tiny little button pearls and three briolette moonstone beads to create a very simple feminine design that can be worn comfortably with anything. From a summer wedding, to a casual bar-b-que with friends, this design works! Copyright, Lorri Ely All rights reserved Page 146 of 307
147 Step 1 Gather Supplies Notes: Decide how long you want your handcrafted necklace to be. I went for a choker length of about 15.5 inches (about 40cm). 3 moonstone briolette beads, smooth or faceted. Length of flexible jewelry wire (like Soft Flex or Beadalon), enough for length of necklace plus several inches to work with. Use a fine gauge to fit through pearl holes. 1 strand of small, freshwater button pearls, or pearls of choice. 2 crimp beads 1 toggle clasp of choice. I used a sterling silver clasp. Step 2 Thread beads onto wire Tie a knot on one end of the wire, or place some tape over the end, and string all of your beads onto the wire. Check the length and overall design and make adjustments by adding, removing, or re-positioning beads until you are happy with the look of the bracelet. You can do this first on a bead design board if you prefer or use a ruler. I strung my three moonstone briolette beads right in the center of my design, with one pearl separating each bead. Step 3 Attach the clasp Untie your knot or remove the tape. Slide a crimp bead onto the end of wire, and thread the wire through the loop on the clasp, and back through your crimp bead. Crimp the bead flat or use a crimping tool to close the crimp. Follow the How to Use Crimp Beads instructions if you are not familiar with this technique. TIP - For an even more finished look, cover your crimp beads with the new crimp bead covers! Copyright, Lorri Ely All rights reserved Page 147 of 307

148 Copyright, Lorri Ely All rights reserved Page 148 of 307
149 Pearl and Crystal Choker About This Design Time: Approximately 1-2 hours Level of Difficulty: All Levels Cost: Varies, depending on materials selected. Approximately $20-25 as shown. Simple, elegant, and sophisticated pearls are always right for special occasions. This design is perfect for bridal jewelry. Freshwater pearls come in every possible range of colors. Also, Swarovski makes glass pearls and they are a very nice alternative and come in very uniform shapes and sizes. This necklace is hand-knotted on silk thread. TIP - For wedding jewelry, make this necklace in colored pearls for matching the bridesmaids dresses. Match or contrast the silk thread for more interest. Copyright, Lorri Ely All rights reserved Page 149 of 307

150 Step 1 Gather Supplies Notes: Decide how long you want your handcrafted necklace to be. I went for a shorter choker length, but attached an extender chain so it can be worn up to 16 inches long. If you are making a custom choker as a gift, measure the neck and make the necklace an exact fit, or use an extender chain to ensure a good fit. This is especially important if you are trying to get a certain look to work with the neckline of a wedding gown. 1 strand of freshwater pearls in choice of colors. I used pinkish colored pearls in my design. Freshwater pearl beads 5 Swarovski crystals in clear crystal AB or choice of colors 1 2-inch length of extender chain. I used bulk sterling silver cable chain. 2 clamshell bead tips jewelry adhesive or hypo cement 1 card of fine silk thread. I used Griffin silk cord, pale pink, size 4. Silk Beading Cord 1 headpin for extender chain bead drop 1 clasp of choice. I used a sterling silver lobster claw clasp. Copyright, Lorri Ely All rights reserved Page 150 of 307

151 Step 2 Assemble extender chain Thread a pearl bead onto a headpin. Make a closed wire loop at the top, attaching it to one end of your extender chain. If you need help wire wrapping a loop, just follow these instructions. Step 3 Thread and knot beads onto cord You will be following my instructions for knotting cord and stringing beads. Start by removing all the cord from the card. Insert the needle through the hole of a clamshell bead tip, and knot one end with a regular overhand knot. Add some glue and cut off the end after it has thoroughly dried. TIP - If you are concerned that the knot is too small and it might pull through the hole, you can always knot a tiny seed bead into place as it will be covered with the clamshell tip once it is closed. Begin by stringing a pearl, and making a knot (be sure to pull the knot tight up against the pearl using either pliers, an awl, or any other pointy tool such as a headpin). Repeat until you reach the center of your design, where you will alternate a crystal, pearl, crystal for all five of your crystals. Use a ruler or a bead design board so you can tell where to start the crystal beads. Copyright, Lorri Ely All rights reserved Page 151 of 307


152 Step 4 Attach the clasp and extender chain Copyright, Lorri Ely All rights reserved Page 152 of 307

153 At the final end, string thread0 through the bottom of clamshell tip, and tie a knot. Use your tool to hold the knot in place while you snug the final bead up close against the clamshell bead tip. Add some cement to the knot for added security. Use your pliers to gently squeeze each clamshell closed around the knots. Use your pliers to gently close the hook on the end to attach your lobster clasp, and extender chain to either end of your choker. Don't just smash the hook end of the clamshell closed, but grasp the tip of the hook with your pliers and smoothly round it over and closed. Copyright, Lorri Ely All rights reserved Page 153 of 307

154 Copyright, Lorri Ely All rights reserved Page 154 of 307

155 Turquoise Heishi and Wood Bead Necklace About This Design Time: Approximately 1 hour Level of Difficulty: All Levels (with Basic Wire Wrapping Knowledge) Cost: Varies, depending on materials selected. Approximately $20-35 as shown. Wood and turquoise with gold are hot color combinations, and this necklace set is funky and fun...and easy to make. Finished with little gold "chiclet" bead details. Copyright, Lorri Ely All rights reserved Page 155 of 307

156 Step 1 Gather Supplies Notes: Decide how long you want your handcrafted necklace to be. I went for a standard 16 inch length with an extender chain. Strand of wood beads. Turquoise heishi beads. Turquoise colored seed beads of choice 5 Gold-tone square beads. 10 gold spacer beads Length of flexible gold jewelry wire (like Soft Flex or Beadalon), enough for length of necklace plus several inches to work with. 5 gold-filled headpins for attaching gold beads 1 clasp of choice. I used a 14KT GF lobster claw clasp. 2 gold crimp beads One 2 inch length of extender chain. I used bulk, gold-tone base metal cable chain. Medium sized gold spacer beads. I used round gold-tone spacers in a disc shape. Step 2 Assemble extender chain and gold beads Slide a seed bead and a gold bead on a headpin. Make a closed wire loop at the top and attach to the extender chain. If you need help wire wrapping a loop, just follow these instructions. Slide a gold square bead onto a headpin and make a closed wire loop. Make as many as you want in your design, I used four beads. Step 3 Thread beads onto wire Tie a knot on one end of the wire, or place some tape over the end, and string all of your beads onto the wire. Check the length and overall design and make adjustments by adding, Copyright, Lorri Ely All rights reserved Page 156 of 307
157 removing, or re-positioning beads until you are happy with the look of the bracelet. You can do this first on a bead design board if you prefer or use a ruler. To follow my design pattern, start with a few inches of seed beads, a few gold spacer beads, wood beads alternated with turquoise heishi beads. In the center of the necklace, attach your gold square beads--and then repeat the pattern in reverse up the other side of the necklace. I used 4 gold square beads in the center of the necklace but feel free to add or subtract beads to get the look you're after.. Step 4 Attach the clasp and extender chain Untie your knot or remove the tape. Slide a crimp bead onto the end of wire, and thread the wire through the loop on the clasp, and back through your crimp bead. Crimp the bead flat or use a crimping tool to close the crimp. Follow the How to Use Crimp Beads instructions if you are not familiar with this technique. Do the same thing on the other end to attach the extender chain. TIP - For an even more finished look, cover your crimp beads with the new crimp bead covers! Copyright, Lorri Ely All rights reserved Page 157 of 307

158 Turquoise and Wood Pendant About This Design Time: Approximately 1 hour Level of Difficulty: All Levels (with Basic Wire Wrapping Knowledge) Cost: Varies, depending on materials selected. Approximately $20-35 as shown. Wood and turquoise with gold are hot color combinations, and this necklace set is funky and fun...and easy to make. Want to learn how to make this necklace, or a variation of it for yourself? Let's get started! Copyright, Lorri Ely All rights reserved Page 158 of 307

159 Step 1 Gather Supplies Notes: Decide how long you want your handcrafted necklace to be. I went for a standard 16 inch length with an extender chain. 1 focal drop bead in aqua or turquoise color. I used a carved lacquer turquoise colored bead in my design. 6 large wooden beads. I used oval beads in my design. Seed beads of choice in a turquoise color. Length of flexible gold jewelry wire (like Soft Flex or Beadalon), enough for length of necklace plus several inches to work with. 2 gold-filled headpins for extender chain bead drop and pendant 1 clasp of choice. I used a 14KT GF lobster claw clasp. 2 gold crimp beads One 2 inch length of extender chain. I used bulk, gold-tone base metal cable chain. Medium sized gold spacer beads. I used round gold-tone spacers in a disc shape. Step 2 Assemble pendant and extender chain Thread a gold spacer bead, your focal pendant bead, and another gold spacer bead onto a long headpin. Make a closed wire loop at the top. If you need help wire wrapping a loop, just follow these instructions. Slide a seed bead and a gold spacer onto the other headpin, and make a closed wire loop attaching it to one end of your extender chain. Copyright, Lorri Ely All rights reserved Page 159 of 307

160 Step 3 Thread beads onto wire Tie a knot on one end of the wire, or place some tape over the end, and string all of your beads onto the wire. Check the length and overall design and make adjustments by adding, removing, or re-positioning beads until you are happy with the look of the bracelet. You can do this first on a bead design board if you prefer or use a ruler. To follow my design pattern, start with a few inches of seed beads, a few gold spacer beads, wood beads, gold spacers, and then the center focal bead--and then repeat the pattern in reverse up the other side of the necklace. I used 8 gold spacers in the center of the necklace, and attached the turquoise focal bead in the center between 4 beads. Step 4 Attach the clasp and extender chain Untie your knot or remove the tape. Slide a crimp bead onto the end of wire, and thread the wire through the loop on the clasp, and back through your crimp bead. Crimp the bead flat or use a crimping tool to close the crimp. Follow the How to Use Crimp Beads instructions if you are not familiar with this technique. Do the same thing on the other end to attach the extender chain. TIP - For an even more finished look, cover your crimp beads with the new crimp bead covers! Copyright, Lorri Ely All rights reserved Page 160 of 307
161 Lemon Quartz Lariat About This Design Time: Approximately 1-2 hours Level of Difficulty: All Levels (with Basic Wire Wrapping Knowledge) Cost: Varies, depending on materials selected. Approximately $50-60 as shown. Inspired by the geometric shapes, link chain, the return of gold, and some very find beads in my stash--i devised a very unique lariat necklace featuring a lemon quartz drop, a handcrafted wire toggle, pearls and citrine beads. Make your own variation using any pearls, gemstone beads, and a crystal or stone bead drop. Copyright, Lorri Ely All rights reserved Page 161 of 307
, so I have about 14 inches of oval link chain, and will make enough beaded chain to complete the remaining few inches. 1 focal drop bead.")
162 Step 1 Gather Supplies Notes: Decide how long you want your handcrafted necklace to be. I went for a standard 16 inch length (plus drop), so I have about 14 inches of oval link chain, and will make enough beaded chain to complete the remaining few inches. 1 focal drop bead. I used a large faceted lemon quartz teardrop bead, but any drop crystal or briolette shaped bead will work. Approximately inches of bulk gold link chain (I used base metal gold-toned chain, but 14KT gold-filled will work). The amount of chain you will use will depend on the finished length and how much beaded chain you incorporate into your own design. 6 gold-filled headpins, thin gauge to fit through bead holes in pearls and citrine beads 2 gold bead cap (for the top and bottom of the focal drop bead) 14 assorted pearl beads (or beads of choice) 2 faceted citrine beads (or beads of choice) 14KT Gold-filled wire in thin gauge to fit through pearl bead holes (about 24 gauge) and thicker gauge to make the toggle (about gauge) Step 2 Begin making the Pendant Drop Cut about 4 inches of your bulk gold chain. Let's start by making the focal pendant. Slide a bead cap, focal bead, and bead cap onto a long headpin. Make a closed wire loop, attaching the bead drop to the bottom of the chain. If you need help wire wrapping a loop, just follow these instructions. Copyright, Lorri Ely All rights reserved Page 162 of 307

163 TIP - If your focal bead is a top-drilled bead or briolette, follow these instructions. Next, using headpins, attach pearls and other beads randomly along the chain above the drop bead, with closed wire loops. I attached three pearls and two faceted citrine beads about every three links. Step 3 Make the toggle Cut a one inch length of cable chain. Decide how large you want the diameter of the toggle to be. It should easily fit over the focal bead, but not be so large that the beads might fall out of it. I made my toggle just a little larger than my focal drop bead. Wrap the wire around any round form such as a small bottle or hairbrush handle. Form a round shape in the wire, then bend one end of wire up at a right angle to create a stem, and wrap the "tail" piece of wire around the stem a few times. Using the stem, form a wire loop and attach the end to the one inch length of cable chain, then close the loop, wrapping the wire back around the stem. Cut off remaining wire and tuck in any rough ends with your flush cutters. Copyright, Lorri Ely All rights reserved Page 163 of 307

164 Step 4 Begin making and attaching beaded chain to cable chain I made my design asymmetrical, meaning I didn't use the exact number of pearls in the same placement on either side of my necklace. Your finished design is totally up to you. Using the technique to make beaded chain (click here for instructions), attach several pearl beads together and attach them to the length of cable chain with the toggle. Continue alternating cable chain and pearl chain until you have the necklace at the desired length, and attach the final end of the pearl chain to the beaded drop. Copyright, Lorri Ely All rights reserved Page 164 of 307

165 Copyright, Lorri Ely All rights reserved Page 165 of 307

166 Link Chain Necklace Project About This Design Time: Approximately 1-2 hours Level of Difficulty: All Levels (with Basic Wire Wrapping Knowledge) Cost: Varies, depending on materials selected. Approximately $20-30 as shown. This necklace takes advantage of the new larger link oval chain in sterling silver that is now available in bulk lengths from many popular jewelry suppliers. In this necklace project design, I have wire-wrapped a turquoise briolette bead inside one of the wire links, to create a focal point in the pendant drop. The link chain has been attached with flexible beading wire, and completed with glass crystal turquoise beads. Accents of a tiger's eye briolette bead, and some heishi turquoise beads complete the design, along with a decorative sterling silver clasp. Copyright, Lorri Ely All rights reserved Page 166 of 307

167 Step 1 Gather Supplies Notes: Decide how long you want your handcrafted necklace to be. I went for a standard 16 inch length, so I have about 8 inches of large oval link chain, and enough glass crystal beads to complete the remaining 8 inches on flexible beading wire (less the added length for your choice of clasp). Oval sterling silver chain (I am using about 8 inches) Enough beads of your choice to complete the remaining 8 inches. Here I am using glass crystal beads (turquoise colored). You could also use leather, suede or other corded material if you prefer. Flexible jewelry wire 4 crimp beads Sterling silver wire for wrapping the briolette beads and attaching the pendant to the bottom link. I use gauge half-hard sterling silver wire, but use whatever wire you prefer as long as the wire diameter fits through your bead holes. Two briolette beads of your choice. Here I am using a genuine turquoise briolette, and a genuine tiger's eye briolette bead. Two small accent beads or crystals of your choice for the top and bottom of the pendant link. Here I am using turquoise heishi beads. Two larger accent beads of your choice for the chain where it connects to the flexible wire. Here, I am using tan jasper beads. Clasp of your choice. Here, I am using a decorative sterling silver flower toggle clasp. You may use an extender chain and clasp if desired. Copyright, Lorri Ely All rights reserved Page 167 of 307
168 Step 2 Begin the Pendant with Briolette Wrapped in Center Let's start by making the focal pendant. Cut a short length of sterling silver wire, about 4 inches. TIP - If it is too long, you won't be able to wrap it inside and around the oval link. First, you'll want to eyeball where your briolette will sit inside the link. Place your briolette bead inside the link and determine where you will attach the bead to the link. Begin wrapping the wire around one side of the oval link. Wrap it using your flat nose pliers to pull the wire tight. Go around the link 2-3 times, and trim off the end, tucking in the rough end with your pliers. Copyright, Lorri Ely All rights reserved Page 168 of 307
, and begin wrapping the wire around the link, using your flat nose pliers to get leverage and pull the wire")
169 Step 3 Attach Briolette Bead to Link Slide your briolette bead into place in the center of the link. This next step will be a little more difficult to wrap because you have less room. Snip the wire so you have just enough to wrap it 2-3 times around the link (about an inch), and begin wrapping the wire around the link, using your flat nose pliers to get leverage and pull the wire so it is tight and the briolette bead is positioned where you want it. Cut off the end of the wire and tuck in the rough piece with your pliers. Step 4 Attach Next Briolette Bead to Bottom Next we will wire wrap the bottom briolette bead (use the How to Wire Wrap a Briolette Instructions if you are not familiar with this technique) Wire wrap the lower briolette bead. Before completing the loop at the top and attaching it to the bottom of the oval link, add an accent bead. Here, I have used a turquoise heishi bead as my accent. Complete the loop on top of the briolette bead while attaching it to your link chain. Step 5 Attach the Briolette Link Component to the Chain Now you will create a link and bead component, and attaching the link to the center link of your length of link chain. Using your wire, create a loop and attach it to the top of your link component (see the How to Wire Wrap a Basic Loop Instructions if you are not familiar with this technique). Add a center accent bead. In my example, I have used a turquoise heishi bead. Complete the second side of the loop, and this time, attach the entire briolette link component to the center link of your chain--measure your chain, or count the links. You should have an uneven Copyright, Lorri Ely All rights reserved Page 169 of 307
170 number and attach the pendant to the center. TIP - Pick up the chain in both hands and let it hang down, and the center link should become obvious. Copyright, Lorri Ely All rights reserved Page 170 of 307
171 Step 6 String the Rest of the Necklace with Beads Cut two lengths of flexible wire (one for each side), allowing a few extra inches to play with. Attach the flexible jewelry wire to either end of the link chain with a crimp bead (see How to Use Crimp Beads if you are not familiar with this technique). Now begin stringing your remaining beads on either side. Step 7 Attach your Clasp Once you have strung all remaining beads, check your necklace length. Make sure you allow room for the clasp, which will add some length. Add or remove beads to make sure you have the correct length. Next, attach each side of the clasp components, using crimp beads. That's it! More Ideas If you don't have briolette beads, you can easily vary this design by using 2-3 smaller beads inside the link frame. Or, try attaching a "spray" of tiny beads to the bottom of the link. Instead of glass or crystal beads, consider using leather cord for a more contemporary look. Copyright, Lorri Ely All rights reserved Page 171 of 307

172 Pearl and Crystal Necklace Project About This Design Time: Approximately 1-2 hours Level of Difficulty: All Levels (with Basic Wire Wrapping Knowledge) Cost: Varies, depending on materials selected. Approximately $25-35 as shown. This is a feminine necklace and the cascades of crystal beads really sparkle and catch the light. I have used an amazonite pear shaped briolette bead as a focal bead on the bottom, but you can use any bead you want in your design. Want to make this necklace, or a variation of it for yourself? Let's get started! Copyright, Lorri Ely All rights reserved Page 172 of 307

173 Step 1 Gather Supplies Notes: Decide how long you want your necklace to be. I went for a standard 16 inch length, (less the added length for your choice of clasp). Fine sterling silver chain Clasp of your choice. Here I am using extender chain with a lobster claw clasp in sterling silver 10 medium sized pearls of your choice 13 seed pearls 29 Swarovski crystals, or other tiny beads of your choice. 1 Focal Bead for the pendant. Here I am using a genuine amazonite flat- pear briolette. Sterling silver wire for wrapping the briolette beads and attaching the pendant to the chain. I use gauge half-hard sterling silver wire, but use whatever wire you prefer as long as the wire diameter fits through your bead holes. 50 silver head pins Copyright, Lorri Ely All rights reserved Page 173 of 307

174 Step 2 Begin Pendant Bead I am using a briolette bead. Wire wrap the briolette, attach a pearl to the top. If you aren't familiar with this technique, read How to Wire Wrap a Briolette for instructions. Copyright, Lorri Ely All rights reserved Page 174 of 307

175 Copyright, Lorri Ely All rights reserved Page 175 of 307

176 Step 3 Attach Pendant Attach the pendant to the center of your chain. Finish closing the wire wrap loop on the top of your pearl bead, and snip off end of wire. Step 4 Prepare all your dangly beads I have prepared all of my crystals and pearls with wire loops ahead of time, so they are ready to attach. Copyright, Lorri Ely All rights reserved Page 176 of 307
177 Copyright, Lorri Ely All rights reserved Page 177 of 307


178 Step 5 Attach crystals to pendant I attach four crystal dangly beads as accents to the top loop above the pearl bead. This creates a nice "spray" of crystals as an accent to the pearl bead. Copyright, Lorri Ely All rights reserved Page 178 of 307

179 Step 6 Attach remaining pearls Use a bead board or a ruler and determine the spacing of the pearls. You will place four pearls on either side of the center pearl pendant. Once you have determined the correct placement, attach your pearls to the chain. Copyright, Lorri Ely All rights reserved Page 179 of 307

180 Step 7 Attach remaining crystals and seed pearls Attach 3 crystals to the loop at the top of each pearl, and attach one seed pearl bead. This creates a nice "spray" at the top of each pearl. You can add or subtract pearls and crystals to get the effect you want. Copyright, Lorri Ely All rights reserved Page 180 of 307


181 Step 8 Attach the clasps Using wire, create a loop, place one seed pearl in the center, and create another loop. Attach the chain to one end, and the extender chain or one side of your clasp to the other. One the other side of the necklace, repeat this technique and attach the other side of your clasp. In my example, I have attached a lobster claw clasp to one end, and an extender chain to the other. Copyright, Lorri Ely All rights reserved Page 181 of 307


182 Copyright, Lorri Ely All rights reserved Page 182 of 307

183 Step 9 Finishing touch If you have used a piece of bulk extender chain as I have, you will want to attach a final detail for decoration. I have attached one more pearl with a crystal as a dangle off the end of my extender chain. That's it! Variations This design is highly adaptable. Use any focal bead you like in this pendant design. A lampwork or dichroic glass bead would make a nice focal point. Also, you don't need to use pearls. You can completely change the look and feel of this design simply by using different beads. Try coral and turquoise beads to get a more rustic look. Try a focal shell bead for a casual summer look. For a wedding design, find a wonderful center bead, perhaps a fine quality semi-precious gemstone (like blue topaz for "something blue"), and use white pearls and clear crystals. You could make matching bridesmaids necklaces and use crystals and pearls that match the color of their gowns. Copyright, Lorri Ely All rights reserved Page 183 of 307

184 Lampwork Bead Necklace Project with Wire Wrap About This Design Time: Approximately 1-2 hours Level of Difficulty: All Levels (with Basic Wire Wrapping Knowledge) Cost: Varies, depending on materials selected. Approximately $30-35 as shown. This is a fun necklace with carefree wire squiggles that are alternated with some bright lampwork glass beads. Copyright, Lorri Ely All rights reserved Page 184 of 307
 Clasp of your choice. Here I am using a 14KT gold filled toggle clasp About 12 medium sized glass beads of your choice.")
185 Step 1 Gather Supplies Notes: Decide how long you want your necklace to be. I went for a standard 16 inch length, (less the added length for your choice of clasp). Fine 14KT GF wire (I am using half hard 24 gauge) Clasp of your choice. Here I am using a 14KT gold filled toggle clasp About 12 medium sized glass beads of your choice. Here I am using 12mm lampwork glass beads and rectangle window glass beads 1 focal point charm bead. Here I am using a dichroic glass heart bead Copyright, Lorri Ely All rights reserved Page 185 of 307
186 Step 2 Begin creating wire wrap squiggles. Using round nose pliers, wrap the wire back and forth creating a random squiggle pattern as large or small as you wish for your design. Use a bead board or ruler to determine length of components so you can make sure your necklace will be the desired final length. Using a basic wire wrap loop (see instructions), connect the wire squiggle components to lamp work glass beads, alternating beads in your design. Copyright, Lorri Ely All rights reserved Page 186 of 307


187 Step 3 Connect the clasp and focal bead Connect one end of a glass bead to the toggle clasp components using wire and your pliers. Attach the focal bead using a basic wire wrap loop to the round portion of the toggle clasp so it slides and hangs freely. That's it! Copyright, Lorri Ely All rights reserved Page 187 of 307
188 Bracelet Projects Copyright, Lorri Ely All rights reserved Page 188 of 307

189 Garnet Pearl Bracelet About This Design Time: Approximately 30 minutes Level of Difficulty: Beginner - All Levels Cost: Varies, depending on materials selected. Approximately $15-20 as shown A very elegant and simple design featuring red garnet beads and tiny white seed pearls. Accented with a heart shape toggle clasp and round white pearl dangle bead. Pretty! Copyright, Lorri Ely All rights reserved Page 189 of 307

190 Step 1 Gather your supplies. Here's what you'll need. One strand of small freshwater pearls One strand of garnet beads in your choice of shape and size 2 crimp beads Length of flexible beading wire to fit the desired bracelet length, plus a couple extra inches to work with. Use fine gauge to fit through bead holes. 1 toggle clasp of choice (I used a fancy sterling silver heart). 1 accent bead (I used a white pearl) and a headpin to attach it Optional - 2 sterling silver beadcaps Copyright, Lorri Ely All rights reserved Page 190 of 307

191 Step 2 String beads on wire Tie a knot on one end of the wire, or place some tape over the end, and string all of your beads onto the wire. Check the length and overall design and make adjustments by adding, removing, or re-positioning beads until you are happy with the look of the bracelet. I alternated garnets with pearls, but you can do any design variation you like. If desired, add a decorative silver beadcap to either end. TIP - You can start a bracelet by attaching the clasp to one end first, However, if you are unclear about your final design or the finished bracelet length, it is best to simply tie a knot or place some tape over the end of the jewelry wire, string your beads, and once you are happy with the design and length, attach the clasps to the ends. This way, if you find you need to subtract or add beads you can just remove the tape or knot and work from either end without having to cut off your clasp and start the whole thing over! Step 3 Crimp ends and attach the clasp Slide a crimp bead onto the wire, feed the wire through the clasp loop, then back through the crimp bead. Pull the wire snug, and crimp the bead closed. Follow the How to Use Crimp Beads instructions if you are not familiar with this technique. Repeat on other side, making sure you pull the wire tight to beads before crimping. TIP - Because this is a toggle clasp, you will want to leave a little "play" in the wire so the clasp is easy to put on, so leave a little room where the loop of wire attaches to the clasp. Cut off remaining tails of wire with flush cutters. As an option, try the new crimp bead covers to hide crimps for an even more finished look. Copyright, Lorri Ely All rights reserved Page 191 of 307

192 Step 4 Attach the accent pearl bead Slide a pearl bead (or accent of your choice) onto a headpin and attach it to the toggle clasp, using a closed wire loop. If you need help learning how to do wire loops, follow these step by step instructions. Copyright, Lorri Ely All rights reserved Page 192 of 307

193 Chalcedony Briolette Bracelet About This Design Time: Approximately 30 minutes - 1 hour Level of Difficulty: Beginner - All Levels Cost: Varies, depending on materials selected. Approximately $20-30 as shown This beautiful bracelet uses smooth chalcedony gemstone beads in an unusual peach color, combined with ivory coin pearls and gold accents for a classic bracelet you are sure to love. Do this with any briolette beads you choose, and pearls or other accent beads in any color. Copyright, Lorri Ely All rights reserved Page 193 of 307
 beads (about 18-20) 2 gold-filled crimp beads Length of gold flexible beading wire to fit the desired bracelet length, plus a couple extra inches to work with.")
194 Step 1 Gather your supplies Enough briolette beads to fit your desired bracelet length (I used 18 beads) Enough coin pearl accent beads to fit your bracelet length (I used 7 pearls) Gold-filled daisy spacer (Bali) beads (about 18-20) 2 gold-filled crimp beads Length of gold flexible beading wire to fit the desired bracelet length, plus a couple extra inches to work with. 1 clasp of choice (I used a gold-filled toggle clasp) Copyright, Lorri Ely All rights reserved Page 194 of 307
195 Step 2 Next, let's string the beads! Tie a knot on one end of the wire, or place some tape over the end, and string all of your beads onto the wire. Check the length and overall design and make adjustments by adding, removing, or re-positioning beads until you are happy with the look of the bracelet. You can make any design that you like. I alternated pearls in-between clusters of three briolette beads, and I used daisy spacer beads in-between each group of beads for accents. Tip - if you want to add space at the ends to lengthen your design or to make the ends of the strand easier to slide into a toggle clasp (test this before closing crimps!), slide a couple of daisy spacers together in a row at either end of the bracelet. You can do this first on a bead design board if you prefer, but I always like to wrap a bracelet around my wrist just to check the look and fit. Make sure you account for the added length of the clasp. I spaced my beads to end up with a bracelet that was 7.5 inches long. TIP - You can start a bracelet by attaching the clasp to one end first, However, if you are unclear about your final design or the finished bracelet length, it is best to simply tie a knot or place some tape over the end of the jewelry wire, string your beads, and once you are happy with the design and length, attach the clasps to the ends. This way, if you find you need to subtract or add beads you can just remove the tape or knot and work from either end without having to cut off your clasp and start the whole thing over! Copyright, Lorri Ely All rights reserved Page 195 of 307


196 Step 3 Crimp ends and attach the clasp Slide a crimp bead onto the wire, feed the wire through the clasp loop, then back through the crimp bead. Pull the wire snug, and crimp the bead closed. Follow the How to Use Crimp Beads instructions if you are not familiar with this technique. Repeat on other side, making sure you pull the wire tight to beads before crimping. TIP - Because this is a toggle clasp, you will want to leave a little "play" in the wire so the clasp is easy to put on, so leave a little room where the loop of wire attaches to the clasp. Cut off remaining tails of wire with flush cutters. As an option, try the new crimp bead covers to hide crimps for an even more finished look. Copyright, Lorri Ely All rights reserved Page 196 of 307
197 Coin Pearl Bracelet About This Design Time: Approximately 30 minutes Level of Difficulty: Beginner - All Levels Cost: Varies, depending on materials selected. Approximately $15-20 as shown This beautiful bracelet uses coin pearls in a rich coppery color, paired with red poppy jasper beads and earth colored mixed jasper beads. Do this with any coin pearl beads you choose, and accent beads in any color. Copyright, Lorri Ely All rights reserved Page 197 of 307
 Length of flexible beading wire to fit the desired bracelet length, plus a couple extra inches to work with.")
198 Step 1 Gather your supplies 8 coin pearl beads Enough jasper beads to fit your desired bracelet length for two strands Silver daisy spacer (Bali) beads (about 18-20) 4 silver crimp beads (2 each strand) Length of flexible beading wire to fit the desired bracelet length, plus a couple extra inches to work with. 1 clasp of choice (I used a silver lobster claw clasp) 1 extender chain (or silver bulk link chain works fine, about 1 inch) 1 headpin Step 2 Next, let's string the beads! Tie a knot on one end of the wire, or place some tape over the end, and string all of your beads onto the wire. Check the length and overall design and make adjustments by adding, removing, or re-positioning beads until you are happy with the look of the bracelet. You can make any design that you like. I alternated pearls in-between jasper beads, and I used daisy spacer beads in-between each group of beads for accents. Tip - if you want to add space at the ends to lengthen your design or to make the ends of the strand easier to slide into a toggle clasp (test this before closing crimps!), slide a couple of daisy spacers together in a row at either end of the bracelet. You can do this first on a bead design board if you prefer, but I always like to wrap a bracelet around my wrist just to check the look and fit. Make sure you account for the added length of the clasp. I spaced my beads to end up with a bracelet that was 7.5 inches long. TIP - You can start a bracelet by attaching the clasp to one end first, However, if you are unclear about your final design or the finished bracelet length, it is best to simply tie a knot or place some tape over the end of the jewelry wire, string your beads, and once you are happy with the design and length, attach the clasps to the ends. This way, if you find you need to Copyright, Lorri Ely All rights reserved Page 198 of 307
199 subtract or add beads you can just remove the tape or knot and work from either end without having to cut off your clasp and start the whole thing over! Copyright, Lorri Ely All rights reserved Page 199 of 307

200 Step 3 Crimp ends and attach the clasp Slide a crimp bead onto the wire, feed the wire through the clasp loop, then back through the crimp bead. Pull the wire snug, and crimp the bead closed. Follow the How to Use Crimp Beads instructions if you are not familiar with this technique. Repeat on other side, making sure you pull the wire tight to beads before crimping. Do this for each bracelet strand. Attach the extender chain on the other end the same way. Let's add a dangling pearl to the extender chain. Slide a pearl onto the headpin, and use your round nose pliers to make a loop at the top. Slide this onto the last link of your extender chain, then close the loop. TIP - As an option, try the new crimp bead covers to hide crimps for an even more finished look. Copyright, Lorri Ely All rights reserved Page 200 of 307
201 Stretch Bracelet Set About This Design Time: Approximately 30 minutes - 1 hour Level of Difficulty: Beginner - All Levels Cost: Varies, depending on materials selected. Approximately $10-20 as shown Stretch bracelets are very popular because they are generally inexpensive and easy to make. Here I have combined earthy colors of beads in a great stretch bracelet set that features a Hill Tribe Silver leaf charm, tied with leather for a rustic feel. Copyright, Lorri Ely All rights reserved Page 201 of 307

202 Step 1 Gather your supplies. Here's what you'll need. Three strands of beads. I used earth tone colors, but any beads in complementary color schemes will work for your set. I mixed a few Swarovski crystals into one strand for a little sparkle. Stretch cord. Use a diameter that fits through your bead holes. I used Stretch Magic.5mm and ran two strands through each bead for added strength. Jewelry cement or glue (like G-S hypo cement) Optional - 3 crimp beads (1 for each strand of the bracelet if you prefer crimping to knotting the cord) 1 charm of choice. I used a Hill Tribe Silver leaf charm Here are some for sale: Double strand clasps on ebay 1 small piece of leather, suede or ribbon cord for tying the three bracelets together and attaching the charm Copyright, Lorri Ely All rights reserved Page 202 of 307
203 Step 2 String beads on elastic cord Cut several lengths of elastic cord, leaving several extra inches to make it easy to knot. If your cord is very fine, you might want to use two strands per bracelet to make it stronger. Decide how long your bracelet will be, and determine the placement of the beads in your design. You can use a bead board or ruler to check the length. I made my bracelet about 7 inches long to fit the wrist snugly. Tie a knot on one end of the elastic, or place some tape over the end, and string all of your beads onto the elastic cord. Check the length and overall design and make adjustments by adding, removing, or re-positioning beads until you are happy with the look of the bracelet. Step 3 Next, pull the cord so the elastic is taut (so it has some spring to it and the bracelet will fit snugly) and tie your knots. Follow my instructions on how to use elastic cord. Another option is to use a crimp bead instead of a knot. If you are tying knots, it helps to use a "third hand" tool as I have in this photo, to hold the cords tight while you are tying the knot and applying glue. Glue is not really optional! When knotting, you must use glue otherwise at some point your knot will likely come free and your bracelet will break. Apply a dab of glue to your knot (a headpin makes a handy tool) and hold it steady for at least 30 seconds so the glue can dry before proceeding. Generally it's a good idea to wait 24 hours to wear the bracelet to allow glue to completely dry. Copyright, Lorri Ely All rights reserved Page 203 of 307

204 Using a crimp bead in place of a knot: If you prefer the easy of a crimp bead to knotting, feed the cords through either side of the crimp bead in opposite directions like this. Pull the elastic taut, then use your crimping tool or pliers to crimp the bead. TIP - A drop of glue might not be a bad idea inside the crimp for added security, just be sure you clean it off your crimping pliers before it dries and gums things up. Copyright, Lorri Ely All rights reserved Page 204 of 307


205 Repeat for each bracelet. Make as many strands as you like, I made three bracelets in complementary colors. Copyright, Lorri Ely All rights reserved Page 205 of 307


206 Step 4 Attach the charm Slide your charm onto the leather cord. Tie the three bracelets together with a knot. Leather cord, suede, or ribbon works well for this purpose. Example - Suede lace tie with no charm Here it is with black leather cord and the Hill Tribe Silver leaf charm: Copyright, Lorri Ely All rights reserved Page 206 of 307

207 Pearl and Shell Bracelet About This Design Time: Approximately 30 minutes - 1 hour Level of Difficulty: Beginner - All Levels Cost: Varies, depending on materials selected. Approximately $20-30 as shown There are so many unique shapes and colors of freshwater pearl beads available for you to use in creating designs. I found these nice white diamond shaped freshwater pearls, and decided to pair them with double-hole shell beads to create this great double strand pearl and shell bracelet. This pearly design is a great choice for summer. Want to make this bracelet, or a variation for yourself? Let's get started! Copyright, Lorri Ely All rights reserved Page 207 of 307
.")
208 Step 1 Gather your supplies. Here's what you'll need. One strands of freshwater pearls. I used diamond shape pearls but any pearls will work. Five or six double hole beads or spacer bars. I used shell beads in this design, but you can substitute any bead or finding with two holes. 4 decorative silver bead caps Appx. 20 Bali daisy spacer beads (or other decorative spacer beads). Actual quantity will depend on your design. 4 crimp beads (2 for each strand of the bracelet ) Length of flexible beading wire to fit the desired bracelet length, plus a couple extra inches to work with. Use fine gauge to fit through bead holes. 1 double strand toggle clasp of choice Copyright, Lorri Ely All rights reserved Page 208 of 307

209 Step 2 String beads on wire Decide how long your bracelet will be, and determine the placement of the beads and spacers in your design. You can use a bead board or ruler to check the length, and don't forget to allow room for the clasp. Tie a knot on one end of the wire, or place some tape over the end, and string all of your beads onto the wire. Check the length and overall design and make adjustments by adding, removing, or re-positioning beads until you are happy with the look of the bracelet. End with bead caps on either end for a decorative touch. TIP - You can start a bracelet by attaching the clasp to one end first, However, if you are unclear about your final design or the finished bracelet length, it is best to simply tie a knot or place some tape over the end of the jewelry wire, string your beads, and once you are happy with the design and length, attach the clasps to the ends. This way, if you find you need to subtract or add beads you can just remove the tape or knot and work from either end without having to cut off your clasp and start the whole thing over! Copyright, Lorri Ely All rights reserved Page 209 of 307

210 Step 3 Crimp ends and attach the clasp Slide a crimp bead onto the wire, feed the wire through the clasp loop, then back through the crimp bead. Pull the wire snug, and crimp the bead closed. Follow the How to Use Crimp Beads instructions if you are not familiar with this technique. Repeat on other side, making sure you pull the wire tight to beads before crimping. TIP - Because this is a toggle clasp, you will want to leave a little "play" in the wire so the clasp is easy to put on, so leave a little room where the loop of wire attaches to the clasp. Cut off remaining tails of wire with flush cutters. As an option, try the new crimp bead covers to hide crimps for an even more finished look. Copyright, Lorri Ely All rights reserved Page 210 of 307
211 Red Crystal Filigree Bracelet About This Design Time: Approximately 30 minutes - 1 hour Level of Difficulty: Beginner - All Levels (some wire wrapping) Cost: Varies, depending on materials selected. Approximately $15-20 as shown Want to make a pretty red crystal filigree bracelet in a short amount of time? If you want to make quick and easy bracelet that still offers lots of detail, try using cast filigree components. Here I have attached three heart shaped silver plated filigree findings using red Swarovski crystal beads and a pretty toggle clasp. Using a simple wire wrapping technique to attach the crystals, this feminine bracelet was done in less than an hour. Note - Red crystals are a nice substitute for ruby, the July birthstone. Copyright, Lorri Ely All rights reserved Page 211 of 307

212 Step 1 Gather your supplies. Silver Filigree Components - quantity will depend on the size of the component and desired bracelet length. I used three large silver-plated filigree connector components in my design. I got my filigree findings here: Red Swarovski Crystal Beads. I used "Siam" red color crystals. I used four 8mm round crystals, and two 4mm bicone crystals in my design. Length of sterling silver half hard wire (24-26g) for attaching beads to filigree components. 1 headpin for attaching crystal bead charm 1 decorative double-strand silver toggle clasp. Copyright, Lorri Ely All rights reserved Page 212 of 307

213 Step 2 Determine overall design and bead placement Depending on the size of your filigree components, you may need to add or remove components and beads to make the bracelet the proper length. Lay out your design on a bead board or with a ruler to check spacing before beginning your design. Allow a gap for the wire wrapping in-between each bead. I decided to use two smaller crystals on the end of my bracelet because they fit through the toggle clasp easier on that end. Step 3 Attach beads and components together Cut several lengths of sterling silver half hard wire. Begin attaching the beads and filigree components together, forming a bracelet chain. Alternate beads and components, or mix it up creating your own unique design. If you like my pattern, my bracelet was crafted in this order: 1. 1 end of toggle clasp 2. 1 round red crystal 3. 1 filigree connector 4. 1 round red crystal 5. 1 filigree connector 6. 1 round red crystal 7. 1 filigree connector 8. 2 small red crystals 9. Other end of toggle clasp Copyright, Lorri Ely All rights reserved Page 213 of 307

214 TIP - Keep checking the overall length to make sure your design is working to keep within your desired bracelet length. Allow room for attaching the clasp. Once you reach the end sections, attach the clasp to either end of the bracelet chain using the same wire wrap technique. Follow these instructions on how to wire wrap chain Step 4 Attach charm bead I always like to add a little detail to my bracelets, and in this design we will attach one bead charm to the toggle clasp as a way to balance the color and complete the design with that added touch. Slide one or more red crystals onto a headpin and make a loop at the top with your round nose pliers. Loop this through the round end on the toggle clasp and close the loop. If you need help with this technique, click here to learn more. Copyright, Lorri Ely All rights reserved Page 214 of 307

215 Birthstone Mother's Bracelet About This Design Time: Approximately 30 minutes - 1 hour Level of Difficulty: Beginner - All Levels Cost: Varies, depending on materials selected. Approximately $15-20 as shown Mother's Bracelets are very popular designs, so I wanted to make a few options to share on the website. This simple birthstone mother's bracelet design offers single strand or multiple strand variations. Just pick the design you like the best, select birthstone colored crystal beads representing each child's birthstone, and in minutes you will have created a classic and simply gorgeous Mother's Bracelet. Copyright, Lorri Ely All rights reserved Page 215 of 307

216 Step 1 Gather your supplies. Here's what you'll need. One or more strands of freshwaters pearls, about 5-6mm or desired size. Quantity of pearls needed will depend on how many strands in your bracelet design Swarovski Crystals - one per child, representing their birthstone. I used 8mm round and 8mm cube shapes. Here is a birthstone chart. 2 crimp beads for each strand of the bracelet (2 for a single strand bracelet, 4 for a double strand bracelet, 6 for a triple strand bracelet) Length of flexible beading wire to fit the desired bracelet length, plus a couple extra inches to work with. Use fine gauge to fit through bead holes. 1 toggle clasp of choice (I used a fancy sterling silver heart). NOTE - If you are doing a multiple strand bracelet, you will want a larger clasp, or a multi-strand clasp so it lays and wears well on the wrist. Step 2 Determine your Mother's Bracelet design and string beads on wire This bracelet can be made in several design variations. Tie a knot on one end of the wire, or place some tape over the end, and string all of your beads onto the wire. Check the length and overall design and make adjustments by adding, removing, or re-positioning beads until you are happy with the look of the bracelet. TIP - You can start a bracelet by attaching the clasp to one end first, However, if you are unclear about your final design or the finished bracelet length, it is best to simply tie a knot or place some tape over the end of the jewelry wire, string your beads, and once you are happy with the design and length, attach the clasps to the ends. This way, if you find you need to subtract or add beads you can just remove the tape or knot and work from either end without having to cut off your clasp and start the whole thing over! Copyright, Lorri Ely All rights reserved Page 216 of 307


217 Here are some design variations you can try. Select the one you like best. Option 1 - Double or Triple strand with kid's birthstone beads strung in the exact center of the strand. Copyright, Lorri Ely All rights reserved Page 217 of 307
. Stagger the beads: Copyright, Lorri Ely All rights reserved Page 218 of 307 www.making-jewelry.")
218 Option 2 - Double or Triple strand with three kid's birthstone beads strung in an offset design, so they are not perfectly aligned in the center (Add or remove pearls from either end to get this look). Stagger the beads: Copyright, Lorri Ely All rights reserved Page 218 of 307

219 Option 3 - A single strand design with one or more kid's birthstone beads strung in the center of the bracelet. Each end crystal bead is offset with Bali silver spacers and separated by pearls for more interest. Step 3 Crimp ends and attach the clasp Slide a crimp bead onto the wire, feed the wire through the clasp loop, then back through the crimp bead. Pull the wire snug, and crimp the bead closed. Follow the How to Use Crimp Beads instructions if you are not familiar with this technique. Repeat on other side, making sure you pull the wire tight to beads before crimping. TIP - Because this is a toggle clasp, you will want to leave a little "play" in the wire so the clasp is easy to put on, so leave a little room where the loop of wire attaches to the clasp. Cut off remaining tails of wire with flush cutters. TIP - As an option, try the new crimp bead covers to hide crimps for an even more finished look. Copyright, Lorri Ely All rights reserved Page 219 of 307

220 Baby Charm Bracelet About This Design Time: Approximately 30 minutes - 1 hour Level of Difficulty: Beginner - All Levels Cost: Varies, depending on materials selected. Approximately $25-40 as shown What a perfect gift for the new Mom or Mom-to-Be! This baby charm bracelet features babythemed charms (baby buggy, angel, and teddy bear) and Swarovski crystal and pearl bead drops. Attached to sterling silver link chain so you can add more charms over the years as baby grows, or complete your design with additional beads as desired. Create an instant heirloom gift hat mom will treasure. Copyright, Lorri Ely All rights reserved Page 220 of 307
 Smaller clear crystal beads (quantity as desired) 6 - Round 8mm Swarovski Crystals in Light Rose (girl) or Aquamarine (boy), or any")

221 Step 1 Gather your supplies. You can buy the baby charms here, or purchase charms and supplies from your favorite bead store. Here's what you'll need. Freshwater pearl beads (quantity as desired) Smaller clear crystal beads (quantity as desired) 6 - Round 8mm Swarovski Crystals in Light Rose (girl) or Aquamarine (boy), or any color(s) you desire for your design 1-8mm cube Crystal drop One lobster claw clasp One length of bulk oval link chain, or a pre-made sterling silver charm bracelet 3 or more Baby charms. You can buy the baby charms here, or purchase supplies from your favorite bead store. Headpins - enough for each bead crystal and pearl drop Copyright, Lorri Ely All rights reserved Page 221 of 307

222 Step 2 Attach lobster clasp and cube drop on either end of bracelet. Note- If you are using a pre-made charm bracelet, skip this step. You will use your pliers to open the split jump ring and attach it to one end of the bracelet. Close the jump ring so the lobster clasp is securely fastened to the chain. Follow the instructions on how to properly open and close jump rings, here. Slide a cube crystal bead onto a headpin, and make a wire loop at the top. Use a closed wire loop to attach the cube crystal bead as a drop to the other end of the bracelet (makes an easy extender chain for adjustable length, with a nice crystal bead drop detail). If you need help with the looping technique, click here. Copyright, Lorri Ely All rights reserved Page 222 of 307

223 Step 3 Attach Baby Charms Attach each baby charm, evenly spaced along your bracelet, using your pliers to open the split ring and close it, securely fastening the charm to the link chain. TIP - Don't attach a charm too close to the cube bead on the very end, as this last inch or so of chain will function an extender chain so the length of the bracelet will be adjustable. You don't want the lobster clasp to close right on top of a charm, nor do you want the charm to be dangling below the extender chain. Use a bead design board, or fit it on your wrist to see what I mean. Step 4 Attach all remaining beads as "charms" Slide each remaining pearl and crystal bead onto a headpin and make a loop at the top with your round nose pliers. Use a bead design board or ruler to evenly space all of your beads and attach them along the length of the bracelet with closed loops. If you need help with this technique, click here. Copyright, Lorri Ely All rights reserved Page 223 of 307

224 Copyright, Lorri Ely All rights reserved Page 224 of 307
225 Breast Cancer Awareness Bracelet About This Design Time: Approximately 30 minutes - 1 hour Level of Difficulty: Beginner - All Levels Cost: Varies, depending on materials selected. Approximately $20-35 as shown Show your support and raise awareness for breast cancer. Make this gorgeous bracelet and wear it yourself or give it as a loving gift to someone close. You've seen these bracelets selling for upwards of $100, so why not make one yourself and save, or sell them at your next jewelry party? Features genuine sparkling Swarovski crystal beads and pearls, silver plated filigree beads, and a quality sterling silver clasp, ribbon, and heart charm. Copyright, Lorri Ely All rights reserved Page 225 of 307
 Swarovski crystal pearls, or freshwater pearls (quantity as desired for")
226 Step 1 Gather your supplies. You purchase charms and supplies from your favorite bead store. Here's what you'll need. 7 - Round 8mm Swarovski Crystals in Light Rose and Rose Smaller clear crystal spacer beads as accents (quantity as desired) Swarovski crystal pearls, or freshwater pearls (quantity as desired for proper length of bracelet), I used 10 beads in my design. I used 8 round 6mm filigree beads in silver plate. Decorative sterling silver or silver plated beads for accents Length of flexible beading wire like Soft Flex or Beadalon. Enough for length of bracelet plus a few extra inches to work with. 2 crimp beads 1 Awareness ribbon charm in sterling silver 1 Heart charm in sterling silver Optional - 2 crimp bead covers Copyright, Lorri Ely All rights reserved Page 226 of 307
227 Step 2 String beads on beading wire Tie a knot on one end of the wire, or place some tape over the end, and string all of your beads onto the wire. Check the length and overall design and make adjustments by adding, removing, or re-positioning beads until you are happy with the look of the bracelet. You can do this first on a bead design board if you prefer, but I always like to wrap a bracelet around my wrist just to check the look and fit. Make sure you account for the added length of the clasp. I spaced my beads to end up with a bracelet that was 7.5 inches long. TIP - You can start a bracelet by attaching the clasp to one end first, However, if you are unclear about your final design or the finished bracelet length, it is best to simply tie a knot or place some tape over the end of the jewelry wire, string your beads, and once you are happy with the design and length, attach the clasps to the ends. This way, if you find you need to subtract or add beads you can just remove the tape or knot and work from either end without having to cut off your clasp and start the whole thing over! If you like my design, string your beads in this order: 1 pearl bead 1 Light Rose crystal 1 silver filigree bead 2 pearls 1 crystal spacer 1 silver filigree bead 1 Rose crystal 1 silver filigree bead 1 crystal spacer 2 pearls 1 Light Rose crystal 1 silver filigree bead 1 Rose crystal (center of bracelet design) Repeat in reverse down other side Copyright, Lorri Ely All rights reserved Page 227 of 307

228 Copyright, Lorri Ely All rights reserved Page 228 of 307

229 Step 3 Crimp ends and attach the clasp Slide a crimp bead onto the wire, feed the wire through the clasp loop, then back through the crimp bead. Pull the wire snug, and crimp the bead closed. Follow the How to Use Crimp Beads instructions if you are not familiar with this technique. Repeat on other side, making sure you pull the wire tight to beads before crimping. TIP - Because this is a toggle clasp, you will want to leave a little "play" in the wire so the clasp is easy to put on, so leave a little room where the loop of wire attaches to the clasp. Cut off remaining tails of wire with flush cutters. As an option, try the new crimp bead covers to hide crimps for an even more finished look. Step 4 Attach charms You will use your pliers to open the split jump ring on the charms, and attach it to one loop of the round clasp. Close the jump ring so the charms are securely fastened. Follow the instructions on how to properly open and close jump rings, here. Copyright, Lorri Ely All rights reserved Page 229 of 307

230 Copyright, Lorri Ely All rights reserved Page 230 of 307
231 Turquoise and Crystal Bead Bracelet About This Design Time: Approximately 30 minutes - 1 hour Level of Difficulty: Beginner - All Levels (some wire wrapping) Cost: Varies, depending on materials selected. Approximately $20-35 as shown I have been really inspired by my recent American Southwest trip, to make jewelry in turquoise. This is a nice chunky turquoise and crystal bead bracelet that combines wire wrapping with a little easy beading wire with crimps. These big oval turquoise beads reminded me of Robin's eggs...so perfect for spring and summertime wearing. Features oval genuine turquoise beads, offset with gorgeous sparkling Swarovski crystal beads and finished with a sterling silver decorative clasp. Copyright, Lorri Ely All rights reserved Page 231 of 307
 6 Swarovski crystal 8mm round beads, in Aquamarine color (light aqua) Sterling silver wire, half hard")
232 Step 1 Gather your supplies. You can purchase turquoise beads and supplies from your favorite bead store. Here's what you'll need. 3 large oval turquoise beads 3 Swarovski crystal 8mm cube beads in Indicolite color (dark aqua) 6 Swarovski crystal 8mm round beads, in Aquamarine color (light aqua) Sterling silver wire, half hard in gauge that fits through bead holes (I used 24G) 2 short lengths of flexible beading wire like Soft Flex or Beadalon. Enough for 2 lengths of bracelet plus a few extra inches to work with. 4 crimp beads 1 headpin for attaching cube charm 1 decorative sterling silver toggle clasp Optional - 2 crimp bead covers Step 2 Wire wrap the turquoise and crystal cubes Use the "making a wire wrapped chain" technique and your sterling silver half-hard wire to attach a chain of beads together in this order: 1. 1 turquoise oval bead 2. 1 crystal cube bead 3. 1 turquoise oval bead 4. 1 crystal cube bead 5. 1 turquoise oval bead Copyright, Lorri Ely All rights reserved Page 232 of 307
233 Step 3 String round crystals, crimp ends and attach the clasp We will be attaching a length of flexible beading wire to either end of our beaded chain, stringing three round crystals on each side, and on each of the ends we will attach our clasp using crimp beads. First attach the beading wire to the one end of the beaded chain using a crimp bead. Next, slide three crystal beads onto the wire, then attach that end to one side of the clasp using a crimp bead. Repeat on the other side. Here are detailed instructions for how to do the crimps: Slide a crimp bead onto the wire, feed the wire through the clasp loop, then back through the crimp bead. Pull the wire snug, and crimp the bead closed. Follow the How to Use Crimp Beads instructions if you are not familiar with this technique. Repeat on other side, making sure you pull the wire tight to beads before crimping. TIP - Because this is a toggle clasp, you will want to leave a little "play" in the wire so the clasp is easy to put on, so leave a little room where the loop of wire attaches to the clasp. Cut off remaining tails of wire with flush cutters. As an option, try the new crimp bead covers to hide crimps for an even more finished look. Step 4 Attach cube charm bead I always like to add a little detail to my bracelets, and in this design we will attach one cube bead charm as a way to balance the color and complete the design with that added touch. Slide the last cube crystal onto a headpin and make a loop at the top with your round nose pliers. Loop this through the end loop on the toggle clasp and close the loop. If you need help with this technique, click here to learn more. Copyright, Lorri Ely All rights reserved Page 233 of 307

234 Red Crystal Bead Bracelet About This Design Time: Approximately 30 minutes - 1 hour Level of Difficulty: Beginner - All Levels (some wire wrapping) Cost: Varies, depending on materials selected. Approximately $15-20 as shown I found some inexpensive red glass "crystal" beads sold by the strand at my favorite bead shop. I got inspired to combine them in this red crystal bracelet with some diagonal charcoal colored shell bead. To mix things up and make this bracelet interesting, I used some stainless steel cable chain and a random triple-strand pattern. Wow! This one looks great on! (sometimes I decide to keep the jewelry I make...) Copyright, Lorri Ely All rights reserved Page 234 of 307
 Sterling silver or stainless")
235 Step 1 Gather your supplies. 2 strands red glass or crystal beads, both large and small sizes Several grey pearls or grey shell beads as accents (quantity depends on length needed in your design) Sterling silver or stainless steel bulk chain, several inches 6 split rings or open jump rings 2 short lengths of flexible beading wire like Soft Flex or Beadalon. Enough for 2 lengths of bracelet plus a few extra inches to work with crimp beads (depends on your design) 1 headpin for attaching cube charm 1 decorative double-strand or triple-strand sterling silver toggle clasp. Here are some for sale: Double strand clasps on ebay, and Triple strand clasps on ebay Optional - 2 crimp bead covers Copyright, Lorri Ely All rights reserved Page 235 of 307

236 Step 2 Determine overall design and bead placement Use a bead board or arrange three strands of beads on a bead mat or cloth until you are satisfied with your overall design. This design is fairly random and asymmetrical, but you can do whatever pleases you. I tried to mix it up so none of the strands were identical, but still looked good next to each other. Mix both small and large beads together for interest. I also decided to use a short length of cable chain at the end of each strand, and one right in the center of one of the strands for interest. The important thing is to make sure you get the same exact length on all three strands so the bracelet lays properly on the wrist and doesn't sag. I achieved this by adding different lengths of cable chain at the end of each strand...some have only a couple links, some have more. Step 3 String beads, crimp ends We will be attaching each strand of flexible beading wire to cable chain at the ends. We will attach the cable chains to the clasp with the split rings or jump rings. TIP - This is your last chance to check and make sure all of your strands are the same length, before closing crimps!. First attach the beading wire (each strand) to the one end of the cable chain using a crimp bead. Slide a crimp bead onto the wire, feed the wire through the chain loop, then back through the crimp bead. Pull the wire snug, and crimp the bead closed. Follow the How to Use Crimp Beads instructions if you are not familiar with this technique. Repeat on other side, making sure you pull the wire tight to beads before crimping. Cut off remaining tails of wire with flush cutters. Copyright, Lorri Ely All rights reserved Page 236 of 307

237 Step 4 Attach the Clasp Now, use your jump rings or split rings with pliers to attach each cable chain end (each strand) to the clasp. Because I was using a double clasp, I attached two strands to one loop, and then one strand to the other. You may use a triple strand clasp if you have one. If you are using jump rings, follow these instructions to properly attach them. If you are using split rings, follow these instructions to separate attach them. TIP - As an option, try the new crimp bead covers to hide crimps for an even more finished look. Step 5 Attach charm bead I always like to add a little detail to my bracelets, and in this design we will attach one bead charm to the toggle clasp as a way to balance the color and complete the design with that added touch. Slide one or more red crystals onto a headpin and make a loop at the top with your round nose pliers. Loop this through the end loop on the toggle clasp and close the loop. If you need help with this technique, click here to learn more. Copyright, Lorri Ely All rights reserved Page 237 of 307

238 Yellow Turquoise Bracelet About This Design Time: Approximately 30 minutes - 1 hour Level of Difficulty: Beginner - All Levels Cost: Varies, depending on materials selected. Approximately $20-30 as shown Want to make something big and bold in nice earthy colors? Inspired by the mossy green forests in Oregon, this beautiful yellow turquoise bracelet is rustic with it's gorgeous chunky yellow turquoise beads, set off with chartreuse oval jade beads, gold and green lampwork glass beads, and silver details. To complete the design and make this bracelet unique, it features a large dangle bead charm of smoky topaz, with three Swarovski crystal bead accents. Copyright, Lorri Ely All rights reserved Page 238 of 307
.")
239 Step 1 Gather your supplies Yellow turquoise beads (quantity will depend on size of beads). My beads were large nugget beads so I only needed four. Yellow-green accent beads (TIP - use a different size than your turquoise beads for a more interesting design. I used colored jade in my design. (quantity will depend on size of beads). Lampwork glass accent beads (quantity will depend on size of beads). Silver spacer beads. I used silver base metal rustic spacer beads. 1 smoky quartz (smoky topaz) nugget or briolette bead of choice. I used a large, smoky topaz freeform nugget bead. 3 Swarovski cyrstal bicones (I used Jonquil color). 3 headpins 1 closed (soldered) jumpring 2 crimp beads Length of flexible beading wire to fit the desired bracelet length, plus a couple extra inches to work with. 1 toggle clasp of choice (I used a rustic sterling silver toggle) Step 2 String beads on wire Tie a knot on one end of the wire, or place some tape over the end, and string all of your beads onto the wire. Check the length and overall design and make adjustments by adding, removing, or re-positioning beads until you are happy with the look of the bracelet. You can make any design that you like, which will largely depend on the beads you selected for your design. Try to alternate smaller beads with larger beads, and place silver spacer Copyright, Lorri Ely All rights reserved Page 239 of 307

240 beads in-between each bead for more sparkle and interest. My design used four large nugget beads, five jade beads, and eight lampwork spacer beads. You can do this first on a bead design board if you prefer, but I always like to wrap a bracelet around my wrist just to check the look and fit. Make sure you account for the added length of the clasp. I spaced my beads to end up with a bracelet that was 7.5 inches long. TIP - You can start a bracelet by attaching the clasp to one end first, However, if you are unclear about your final design or the finished bracelet length, it is best to simply tie a knot or place some tape over the end of the jewelry wire, string your beads, and once you are happy with the design and length, attach the clasps to the ends. This way, if you find you need to subtract or add beads you can just remove the tape or knot and work from either end without having to cut off your clasp and start the whole thing over! Step 3 Crimp ends and attach the clasp Slide a crimp bead onto the wire, feed the wire through the clasp loop, then back through the crimp bead. Pull the wire snug, and crimp the bead closed. Follow the How to Use Crimp Beads instructions if you are not familiar with this technique. Repeat on other side, making sure you pull the wire tight to beads before crimping. TIP - Because this is a toggle clasp, you will want to leave a little "play" in the wire so the clasp is easy to put on, so leave a little room where the loop of wire attaches to the clasp. Cut off remaining tails of wire with flush cutters. As an option, try the new crimp bead covers to hide crimps for an even more finished look. Copyright, Lorri Ely All rights reserved Page 240 of 307


241 Step 4 Let's, prepare the smoky quartz charm drop bead. Slide each crystal bead onto a headpin, and attach them with a closed wire loop to your soldered jumpring. Next, slide the smoky quartz bead onto a headpin, and make a large wire loop at the top. Before closing the loop, attach the jumpring with crystals, and attach the entire beaded charm to the round part of your toggle clasp so it slides freely. If you need help learning to make a loop, follow these instructions. If you are using a top-drilled quartz bead, wire wrap these as you would a briolette bead. Follow my instructions for wire wrapping a briolette to make a closed loop at the top. Copyright, Lorri Ely All rights reserved Page 241 of 307


242 That's it! Your gorgeous new yellow turquoise bracelet is ready to wear! Copyright, Lorri Ely All rights reserved Page 242 of 307
243 Blue Crystal Bracelet About This Design Time: Approximately 30 minutes - 1 hour Level of Difficulty: Beginner - All Levels Cost: Varies, depending on materials selected. Approximately $20-30 as shown This beautiful bracelet reminds me of cool water. This bracelet takes advantage of sparking Swarovski crystal beads in daisy flower and cube shape attached as "charms". Then, I mixed in three variations of inexpensive glass crystal beads, and added a nice toggle clasp. Copyright, Lorri Ely All rights reserved Page 243 of 307
. I select two strands (10mm blue, and 6mm aqua round faceted glass beads).")
244 Step 1 Gather your supplies 2 Swarovksi crystal cube beads (choice of size and color). I used 8mm sapphire. 3 Swarovski crystal daisy flower beads. 8 Swarovski crystal bicone beads (4mm). 10 headpins 2 crimp beads Two different sizes of blue colored glass crystal beads (enough for length of bracelet minus clasp). I select two strands (10mm blue, and 6mm aqua round faceted glass beads). TIP - If you buy a whole strand of each color, you'll save money and will have plenty of beads left over for more designs. Length of flexible beading wire to fit the desired bracelet length, plus a couple extra inches to work with. 1 toggle clasp of choice (I used a fancy sterling silver leaf) Copyright, Lorri Ely All rights reserved Page 244 of 307

245 Step 2 Make bead charms and string beads on wire We will prepare all the "charm" beads first, then string all the beads onto the wire First, prepare the three crystal flower beads. These are top-drilled beads, so you will need to wire wrap these as you would a briolette bead. Follow my instructions for wire wrapping a briolette to make a closed loop at the top. Once you have completed the closed loop on top, attach two small bicone crystal beads to the top loop of your flower bead, using headpins. Use your round nose pliers to create a basic closed loop. If you need help learning to make a loop, follow these instructions. This creates a daisy flower "charm" with two smaller crystals attached to it. Let's assemble the rest of our "charms". Slide a crystal cube bead onto a headpin, and make a closed loop at the top. Repeat for the other crystal cube bead so you have two cube charms. Slide a bicone crystal bead onto a headpin and make a closed loop at the top. Repeat for a second crystal bead so you have two bicone crystal charms. Slide a smaller glass crystal bead onto a headpin and make a closed loop at the top. Repeat for a second bead so you have two smaller glass bead charms. Slide a larger glass crystal bead onto a headpin and make a closed loop at the top. Repeat for a second bead so you have two larger glass bead charms. Copyright, Lorri Ely All rights reserved Page 245 of 307


246 (Note - in photo I had two extra large glass bead charms I ended up not using--you only need two) Next, let's string the beads! Tie a knot on one end of the wire, or place some tape over the end, and string all of your beads onto the wire. Check the length and overall design and make adjustments by adding, removing, or re-positioning beads until you are happy with the look of the bracelet. You can make any design that you like. Attach all of the bead charms in a spray cluster of several beads. If you like my design, follow this stringing pattern: Copyright, Lorri Ely All rights reserved Page 246 of 307
247 1) One small glass crystal bead 2) One larger glass crystal bead 3) One small glass crystal bead 4) Attach one daisy flower charm 5) One small glass crystal bead 6) One larger glass crystal bead 7) One small glass crystal bead 8) Attach a cluster of bead charms - attach a small then large glass crystal, a cube crystal, and the smaller crystal all in a row. When the bracelet beads are pulled tight, the beads will fan out into a spray cluster of beads. 9) One small glass crystal bead 10) One large glass crystal bead 11) One small glass crystal bead 12) Attach one daisy flower charm 13) One small glass crystal bead 14) One larger glass crystal bead 15) One small glass crystal bead 16) Attach a "spray" of bead charms - attach a small then large glass crystal, a cube crystal, and the smaller crystal all in a row. When the bracelet beads are pulled tight on the wire, the beads will fan out into a spray cluster of beads. 17) One small glass crystal bead 18) One large glass crystal bead 19) One small glass crystal bead 20) Attach one daisy flower charm 21) One small glass crystal bead 22) One larger glass crystal bead 23) One small glass crystal bead You can do this first on a bead design board if you prefer, but I always like to wrap a bracelet around my wrist just to check the look and fit. Make sure you account for the added length of the clasp. I spaced my beads to end up with a bracelet that was 7.5 inches long. TIP - You can start a bracelet by attaching the clasp to one end first, However, if you are unclear about your final design or the finished bracelet length, it is best to simply tie a knot or place some tape over the end of the jewelry wire, string your beads, and once you are happy with the design and length, attach the clasps to the ends. This way, if you find you need to subtract or add beads you can just remove the tape or knot and work from either end without having to cut off your clasp and start the whole thing over! Copyright, Lorri Ely All rights reserved Page 247 of 307

248 Step 3 Crimp ends and attach the clasp Slide a crimp bead onto the wire, feed the wire through the clasp loop, then back through the crimp bead. Pull the wire snug, and crimp the bead closed. Follow the How to Use Crimp Beads instructions if you are not familiar with this technique. Repeat on other side, making sure you pull the wire tight to beads before crimping. TIP - Because this is a toggle clasp, you will want to leave a little "play" in the wire so the clasp is easy to put on, so leave a little room where the loop of wire attaches to the clasp. Cut off remaining tails of wire with flush cutters. As an option, try the new crimp bead covers to hide crimps for an even more finished look. Copyright, Lorri Ely All rights reserved Page 248 of 307
.")
249 Tourmaline, Citrine and Crystal Bracelet About This Design Time: Approximately 30 minutes - 1 hour Level of Difficulty: Beginner - All Levels Cost: Varies, depending on materials selected. Approximately $40-50 as shown (depends on the quality of genuine tourmaline and citrine beads used). Every now and then I want to make something really special and I am inspired by some of the finer beads that are available. Tourmaline is my all time favorite because it comes in a wide range of colors from pink, to gold and greens, to black. When you want to make something very special, use genuine semi-precious stone beads. In this bracelet I am featuring sparkling faceted golden tourmaline beads, citrine briolette beads, and two Swarovski crystals as accents. Strung on gold wire with a 14KT gold-filled toggle clasp. Copyright, Lorri Ely All rights reserved Page 249 of 307
 3 small gold-filled bead caps (for accenting the crystals) 2 gold-filled crimp beads 1 gold-filled headpin Length of thin gold Soft Flex flexible beading wire (finest gauge) to fit")
250 Step 1 Gather your supplies Strand of faceted tourmaline rondelle beads (about 6 inches12 citrine briolette beads. 2 10mm round Swarovski crystal beads. (choice of color) 3 small gold-filled bead caps (for accenting the crystals) 2 gold-filled crimp beads 1 gold-filled headpin Length of thin gold Soft Flex flexible beading wire (finest gauge) to fit the desired bracelet length, plus a couple extra inches to work with. 1 14KT gold-filled toggle clasp (I used a simple 9mm round clasp) Step 2 String all beads on wire Tie a knot on one end of the wire, or place some tape over the end, and string all of your beads onto the wire. Check the length and overall design and make adjustments by adding, removing, or re-positioning beads until you are happy with the look of the bracelet. I spaced the crystal bead (with beadcaps) in the center, then evenly spaced the tourmaline and threebead citrine design along the length of the bracelet. You can do this first on a bead design board if you prefer, but I always like to wrap a bracelet around my wrist just to check the look and fit. Make sure you account for the added length of the clasp. I spaced my beads to end up with a bracelet that was 7 inches long. TIP - You can start a bracelet by attaching the clasp to one end first, However, if you are unclear about your final design or the finished bracelet length, it is best to simply tie a knot or place some tape over the end of the jewelry wire, string your beads, and once you are happy with the design and length, attach the clasps to the ends. This way, if you find you need to subtract or add beads you can just remove the tape or knot and work from either end without having to cut off your clasp and start the whole thing over! Copyright, Lorri Ely All rights reserved Page 250 of 307

251 Step 3 Crimp ends and attach the clasp Slide a crimp bead onto the wire, feed the wire through the clasp loop, then back through the crimp bead. Pull the wire snug, and crimp the bead closed. Follow the How to Use Crimp Beads instructions if you are not familiar with this technique. Repeat on other side, making sure you pull the wire tight to beads before crimping. TIP - Because this is a toggle clasp, you will want to leave a little "play" in the wire so the clasp is easy to put on, so leave a little room where the loop of wire attaches to the clasp. Cut off remaining tails of wire with flush cutters. Step 4 Attach crystal charm Slide the bead cap, and crystal onto a head pin. Make a round loop the top, attach to the round part of the toggle clasp so it hangs freely, and close the loop. Copyright, Lorri Ely All rights reserved Page 251 of 307

252 Copyright, Lorri Ely All rights reserved Page 252 of 307
253 Turquoise and Silver Bracelet About This Design Time: Approximately 1 hour Level of Difficulty: Beginner - All Levels Cost: Varies, depending on materials selected. Approximately $25-35 as shown (depends on the quality and quantity of genuine turquoise beads used). Perfect for summertime, or any time of the year. Inspired by a recent road trip through the Southwest, this bracelet features three gorgeous strands of bright turquoise beads mixed with silver accents, and seed beads. You will love this eye-catching bracelet and will get loads of compliments when you wear it. Copyright, Lorri Ely All rights reserved Page 253 of 307
.")
254 Step 1 Gather your supplies Seed beads in turquoise and aqua colors (or colors of your choice). I used plain turquoise seed beads, and a few hex glass beads in aqua and metallic blue-green colors. 3-strand clasp of your choice. For this bracelet I used a silver lobster claw clasp with extender chain. Miscellaneous turquoise beads (enough for three strands). I used round, chips, and briolette shapes in my design. Miscellaneous sterling silver beads. I used smooth round sterling silver beads, and I also used large diameter closed jump rings (soldered) as simple accents. 6 crimp beads 3 strands - length of flexible beading wire (like Beadalon or Soft Flex) to fit the desired bracelet length, plus a couple extra inches to work with. 3 sterling silver head pins to complete the bead charms Step 2 String all seed beads and turquoise beads on wire We will string three stands of flexible beading wires with beads. Tie a knot on one end of the wire, or place some tape over the end, and string all of your beads onto the wire. Check the length and overall design and make adjustments by adding, removing, or re-positioning beads until you are happy with the look of the bracelet. You can do this first on a bead design board if you prefer, but I always like to wrap a bracelet around my wrist just to check the look and fit. Make sure you account for the added length of the clasp and extender as it could add up to an inch or more to your bracelet. Copyright, Lorri Ely All rights reserved Page 254 of 307

255 Be creative and use your beads to come up with three different patterns, mixing sterling silver beads, turquoise beads, and seed beads. Lay your design on a bead board or beading cloth, and rework until you are happy with the effect. Make sure all three strands are exactly the same length and add or remove beads if necessary. TIP - You can start a bracelet by attaching the clasp to one end first, However, if you are unclear about your final design or the finished bracelet length, it is best to simply tie a knot or place some tape over the end of the jewelry wire, string your beads, and once you are happy with the design and length, attach the clasps to the ends. This way, if you find you need to subtract or add beads you can just remove the tape or knot and work from either end without having to cut off your clasp and start the whole thing over! Step 3 Crimp beads and attach clasp and extender chain Now we will use a crimp bead to close the ends of each wire and attach to the clasp piece on one end, and the extender chain on the other. We are working with multiple strands, so you can use a crimp bead for each strand. Untie your knot or remove the tape. Slide a crimp bead onto the end of wire, and thread the wire through the loop on the clasp, and back through your crimp bead. Crimp the bead flat or use a crimping tool to close the crimp. Follow the How to Use Crimp Beads instructions if you are not familiar with this technique. Do the same thing on the other end to attach the extender chain (if you are using one). TIP - For an even more finished look, cover your crimp beads with the new crimp bead covers! Copyright, Lorri Ely All rights reserved Page 255 of 307

256 Step 4 Attach charms to extender chain I used a pre-made extender chain clasp, and the chain on the extender was way too long for a bracelet so I clipped off the last few inches using flush cutters. Now, let's attach the charms to the other end of the chain. Use whatever beads you like to make three beaded charms. Slide the three bead charms onto headpins, and attach them to the last loop in your chain using round nose pliers to create a loop. Copyright, Lorri Ely All rights reserved Page 256 of 307
.")
257 Seed Pearl and Turquoise Bracelet About This Design Time: Approximately 30 minutes Level of Difficulty: Beginner - All Levels Cost: Varies, depending on materials selected. Approximately $15-20 as shown (depends on the quality and quantity of genuine turquoise beads used). This simple, sweet and fun bracelet features white seed pearls, with a square freshwater pearl and turquoise seed bead sliding "charm", and two blue turquoise beads next to the sterling silver toggle clasp. Copyright, Lorri Ely All rights reserved Page 257 of 307
 to fit the desired bracelet length, plus a couple extra inches to work with.")
258 Step 1 Gather your supplies Seed beads in turquoise color (or colors of your choice). 2 turquoise beads. 1 square pearl bead 3 crimp beads 1 length of flexible beading wire (like Beadalon or Soft Flex) to fit the desired bracelet length, plus a couple extra inches to work with. 1 sterling silver toggle clasp Step 2 String all pearls and turquoise beads on wire Tie a knot on one end of the wire, or place some tape over the end, and string all of your beads onto the wire. Check the length and overall design and make adjustments by adding, removing, or re-positioning beads until you are happy with the look of the bracelet. You can do this first on a bead design board if you prefer, but I always like to wrap a bracelet around my wrist just to check the look and fit. Make sure you account for the added length of the clasp. TIP - You can start a bracelet by attaching the clasp to one end first, However, if you are unclear about your final design or the finished bracelet length, it is best to simply tie a knot or place some tape over the end of the jewelry wire, string your beads, and once you are happy with the design and length, attach the clasps to the ends. This way, if you find you need to subtract or add beads you can just remove the tape or knot and work from either end without having to cut off your clasp and start the whole thing over! Copyright, Lorri Ely All rights reserved Page 258 of 307
259 Copyright, Lorri Ely All rights reserved Page 259 of 307


260 Step 3 Make and attach the turquoise and pearl sliding charm Slide seed beads onto a short length of flexible beading wire until you complete a circle with a diameter that won't fall off the end of the toggle clasp you have selected. Feed each end of the wire through a crimp bead from opposite directions. Pull the ends of each wire tight, closing the beads up to the crimp bead. Crimp the bead closed and you have a completed circle "slider" to attach the pearl bead to. Follow the How to Use Crimp Beads instructions if you are not familiar with this technique. Copyright, Lorri Ely All rights reserved Page 260 of 307


261 Cut off remaining tails of wire with flush cutters. Slide pearl onto a headpin and make a basic loop with round nose pliers. Attach the pearl bead to the seed bead loop, and slide the finished charm onto the pearl bracelet. Copyright, Lorri Ely All rights reserved Page 261 of 307


262 Step 4 Crimp beads and attach clasp Now we will use a crimp bead to close the ends of each wire and attach to the clasp. Untie your knot or remove the tape. Slide a crimp bead onto the end of wire, and thread the wire through the loop on the clasp, and back through your crimp bead. Crimp the bead flat or use a crimping tool to close the crimp. Follow the How to Use Crimp Beads instructions if you are not familiar with this technique. TIP - For an even more finished look, cover your crimp beads with the new crimp bead covers! That's it, your beautiful bracelet is ready to wear. Copyright, Lorri Ely All rights reserved Page 262 of 307

263 Leather and Silver Bracelet with Turquoise Charms About This Design Time: Approximately minutes Level of Difficulty: Beginner - All Levels Cost: Varies, depending on materials selected. Approximately $10-15 as shown. Perfect for summertime, or any time of the year. Inspired by a recent road trip through the Southwest, this bracelet features leather cording, knotted with sterling silver Bali beads, and dancing bright turquoise bead charms. Very simple and quick to make with a knotted loop closure. Copyright, Lorri Ely All rights reserved Page 263 of 307

264 Step 1 Gather your supplies 1 Strand of 1mm leather cord or waxed cord. 3 Bali sterling silver beads of choice with large enough bead hole to thread the leather cord through 6 turquoise beads of choice 6 Bali silver daisy spacer beads 6 sterling silver headpins Step 2 Knot the silver beads onto the cording and make loop closure Tie a knot close to the end of the cord, and slide one silver bead onto the cord. Tie another knot on either side of each bead to hold in place on the cord. Pull the knots very tight after you are happy with the length and placement of beads. You may optionally use a dot of jewelers cement to make sure the knot doesn't come loose later. Fold the cord back and create a loop on the other end of the bracelet. Make sure the bracelet is as long as it needs to be to fit your wrist, then make a simple overhand knot with the double looped cording. Adjust the knot to the correct position, then pull it tight. Copyright, Lorri Ely All rights reserved Page 264 of 307


265 Step 3 Make and attach turquoise bead charms Slide a Bali silver daisy spacer, then a turquoise bead onto a head pin. Attach them to the leather cording using round nose pliers to create a loop. Space them evenly, two per bracelet section between the knots. Feel free to add more charms if desired until you are happy with your bracelet design. Copyright, Lorri Ely All rights reserved Page 265 of 307

266 That s it, your pretty bracelet is ready to wear! Copyright, Lorri Ely All rights reserved Page 266 of 307

267 Garnet and Seed Bead Bracelet About This Design Time: Approximately 30 minutes - 1 hour Level of Difficulty: Beginner - All Levels Cost: Varies, depending on materials selected. Approximately $15-20 as shown. This richly colored, triple strand bracelet is very pretty, and best of all it is made with affordable glass seed beads mixed with real garnet chips and a "charm" of three beads--one yellow citrine, one golden pearl, and red jasper for an added designer's touch. I finished it with a 14KT gold-filled lobster clasp, which connects to a handmade "extender chain" of gold wire and three red jasper beads for accents. Copyright, Lorri Ely All rights reserved Page 267 of 307
 3 red jasper beads, or substitute any matching red beads of choice 1 gold pearl (or any \"charm bead\" of choice) 1 citrine bead (or any \"charm bead\" of")
268 Step 1 Gather your supplies Seed beads in dark red and copper (or colors of your choice) 1 clasp of your choice. For this bracelet I used a 14 KT gold filled lobster claw clasp. 1 strand of garnet chip beads (about 7 inches) 3 red jasper beads, or substitute any matching red beads of choice 1 gold pearl (or any "charm bead" of choice) 1 citrine bead (or any "charm bead" of choice) 6 crimp beads 3 strands - length of flexible beading wire (like Beadalon or Soft Flex) to fit the desired bracelet length, plus a couple extra inches to work with. Several inches of gold filled half hard wire, or optionally a gold extender chain 3 gold filled head pins to complete the bead charms Copyright, Lorri Ely All rights reserved Page 268 of 307
269 Step 2 String all seed beads and garnet chip beads on wire We will string three stands of flexible beading wires with beads. String two colors of seed beads on the first two strands, and garnet chip beads on the third strand. Tie a knot on one end of the wire, or place some tape over the end, and string all of your beads onto the wire. Check the length and overall design and make adjustments by adding, removing, or re-positioning beads until you are happy with the look of the bracelet. You can do this first on a bead design board if you prefer, but I always like to wrap a bracelet around my wrist just to check the look and fit. Make sure all three strands are exactly the same length and add or remove beads if necessary. TIP - You can start a bracelet by attaching the clasp to one end first, However, if you are unclear about your final design or the finished bracelet length, it is best to simply tie a knot or place some tape over the end of the jewelry wire, string your beads, and once you are happy with the design and length, attach the clasps to the ends. This way, if you find you need to subtract or add beads you can just remove the tape or knot and work from either end without having to cut off your clasp and start the whole thing over! Step 3 Make extender chain with charms at the end We will make our own extender chain using the gold wire. Make a large loop with round nose pliers, and close the loop with a couple of revolutions of wire. (See wire wrapping beaded chain instructions if you are not familiar with this technique), attach a red jasper bead, and make another large loop on the other side of the bead. Repeat this technique so you have two beads in your chain with large loops connecting them. Now, let's attach the charms to the other end of the chain. Slide the three bead charms (jasper, citrine and pearl) onto headpins, and attach them to the last loop in your chain using round nose pliers to create a loop. Copyright, Lorri Ely All rights reserved Page 269 of 307

270 Step 4 Crimp beads and attach clasp and extender chain Now we will use a crimp bead to close the ends of each wire and attach to the clasp on one end, and the extender chain on the other. We are working with multiple strands, so you can use a crimp bead for each strand. You may crimp multiple strands using one bead if there is enough room to allow all of the wires to double back through. Untie your knot or remove the tape. Slide a crimp bead onto the end of wire, and thread the wire through the loop on the clasp, and back through your crimp bead. Crimp the bead flat or use a crimping tool to close the crimp. Follow the How to Use Crimp Beads instructions if you are not familiar with this technique. Do the same thing on the other end to attach the extender chain (if you are using one). TIP - For an even more finished look, cover your crimp beads with the new crimp bead covers! Copyright, Lorri Ely All rights reserved Page 270 of 307

271 That s it, your pretty bracelet is ready to wear! Copyright, Lorri Ely All rights reserved Page 271 of 307

272 Pink Coral and Shell Bracelet with Swarovski Crystals About This Design Time: Approximately 30 minutes - 1 hour Level of Difficulty: Beginner - All Levels Cost: Varies, depending on materials selected. Approximately $25-35 as shown. Inspired by spring, I wanted to make something in beautiful coral beads that wouldn't break the bank. So, I came up with this design, and separated bunches of luscious pink branch coral beads with inexpensive bugle beads. The focal of the bracelet is an oblong luminous shell bead which is pink on one side, and white on the other. I offset that with two light rose Swarovski crystal beads, and of course added one more as a "dangly" on the extender chain as a finishing touch to this very pretty bracelet. Copyright, Lorri Ely All rights reserved Page 272 of 307
 and glass bugle beads to complete the desired bracelet length.")
273 Step 1 Gather your supplies 1 center focal bead. It can be anything you like. I used a pink/peachy colored mother of pearl shell bead in my design. 1 clasp of your choice. For this bracelet I used a sterling silver lobster claw clasp. Enough branch coral beads (real or plastic) and glass bugle beads to complete the desired bracelet length. Lay out on a bead board or ruler to check. Here, I used 24 coral beads, 14 bugle beads, 2 cherry quartz rondelle beads. 3 Swarovski Crystal Cube Beads in Light Rose (or any pink or peach color you like). (8mm) 2 crimp beads, and your crimping pliers A length of flexible beading wire (like Beadalon or Soft Flex) to fit the desired bracelet length, plus a couple extra inches to work with. Bulk sterling silver chain or an extender chain (only needed if you are using a lobster claw clasp) 2 Bali sterling silver bead caps (your choice of style) 5 Bali silver daisy spacers One sterling silver headpin Step 2 String beads on wire Tie a knot on one end of the wire, or place some tape over the end, and string all of your beads onto the wire. Check the length and overall design and make adjustments by adding, removing, or re-positioning beads until you are happy with the look of the bracelet. You can do this first on a bead design board if you prefer, but I always like to wrap a bracelet around my wrist just to check the look and fit. Copyright, Lorri Ely All rights reserved Page 273 of 307
 1 crystal cube bead 10) 1 Bali daisy spacer 11) 1 bugle bead 12) 1 Bali bead cap 13) Mother of pearl/shell focal bead 14) Repeat in reverse order TIP - You can start a bracelet by")
274 I strung my beads in this order: 1) 1 cherry quartz rondelle bead 2) 4 branch coral beads 3) 2 bugle beads 4) 4 branch coral beads 5) 2 bugle beads 6) 4 branch coral beads 7) 2 bugle beads 8) 1 Bali daisy spacer 9) 1 crystal cube bead 10) 1 Bali daisy spacer 11) 1 bugle bead 12) 1 Bali bead cap 13) Mother of pearl/shell focal bead 14) Repeat in reverse order TIP - You can start a bracelet by attaching the clasp to one end first, However, if you are unclear about your final design or the finished bracelet length, it is best to simply tie a knot or place some tape over the end of the jewelry wire, string your beads, and once you are happy with the design and length, attach the clasps to the ends. This way, if you find you need to subtract or add beads you can just remove the tape or knot and work from either end without having to cut off your clasp and start the whole thing over! Copyright, Lorri Ely All rights reserved Page 274 of 307

275 Step 3 Attach the bracelet clasp and extender chain Untie your knot or remove the tape. Slide a crimp bead onto the end of wire, and thread the wire through the loop on the clasp, and back through your crimp bead. Crimp the bead flat or use a crimping tool to close the crimp. Follow the How to Use Crimp Beads instructions if you are not familiar with this technique. Do the same thing on the other end to attach the extender chain (if you are using one). TIP - For an even more finished look, cover your crimp beads with the new crimp bead covers! Copyright, Lorri Ely All rights reserved Page 275 of 307


276 Step 4 Attach the Swarovski crystal bead charm to the clasp I always add a little detail by attaching a dangly bead to the end of the extender chain. It just looks so nice sparking on the wrist. Slide a Bali daisy spacer bead and a crystal onto a headpin, and attach it with a loop. Copyright, Lorri Ely All rights reserved Page 276 of 307
277 Personalized Mothers Bracelet About This Design Time: Approximately 30 minutes - 1 hour Level of Difficulty: Beginner - All Levels Cost: Varies, depending on materials selected. Approximately $20-30 as shown. This easy personalized mother's bracelet is a favorite project! You can make personalized name mothers bracelet, a grandmother's bracelet, baby bracelet, or a friend bracelet. Use one or more strands of beading wire to create more than one name. Attach a favorite charm to the clasp. The possibilities are endless with your imagination and some good beads. IDEA: Want to make a custom Baby name or Mommy Bracelet? Simply attach a baby booties charm instead of the leaf accent bead. Copyright, Lorri Ely All rights reserved Page 277 of 307
 to fit the desired bracelet length, plus a couple extra inches to work with.")
278 Step 1 Gather your supplies Letter Beads - Here I used square block sterling silver alphabet beads 1 clasp of your choice. For this bracelet I used a sterling silver toggle clasp. 2 crimp beads, and your crimping pliers A length of flexible beading wire (like Beadalon or Soft Flex) to fit the desired bracelet length, plus a couple extra inches to work with. Enough beads to complete the desired bracelet length. Because the length will vary depending on how many alphabet blocks are in your name, you may need to add or remove beads from the design. Here I used 6 Amazonite beads (12mm), 4 smooth silver round beads, 15 Bali beads (daisy spacers), and 13 Swarovski crystals (bicone). TIP - Lay out on a bead board or ruler to check your overall design and length using your own beads. Your choice of charm to attach to the toggle. Here, I used a glass leaf bead which I simply attached to the round toggle part of the clasp. You can attach baby booties or other charms to make this bracelet unique and special. 1 Headpin Copyright, Lorri Ely All rights reserved Page 278 of 307
279 Step 2 String beads on wire Tie a knot on one end of the wire, or place some tape over the end, and string all of your beads onto the wire. Alternate your bead sizes and shapes to make your design more interesting. Check the length and overall design and make adjustments by adding, removing, or re-positioning beads until you are happy with the look of the bracelet. You can do this first on a bead design board if you prefer, but I always like to wrap a bracelet around my wrist just to check the look and fit. If you like my pattern, follow this stringing order: 1. 2 Swarovski crystals 2. 1 Bali spacer 3. 1 smooth round silver bead 4. 1 Bali spacer 5. 1 Amazonite bead 6. 1 Bali spacer 7. 1 Swarovski crystal 8. 1 Bali spacer 9. 1 Amazonite bead Bali spacer smooth round silver bead Bali spacer Amazonite bead Bali spacer Swarovski crystal 16. First Alphabet Letter Bead Swarovski crystal 18. Next Alphabet Letter Bead (continue adding letters and crystals) 19. Repeat pattern in opposite direction after you have finished stringing Alphabet beads. TIP - You can start a bracelet by attaching the clasp to one end first, However, if you are unclear about your final design or the finished bracelet length, it is best to simply tie a knot or place some tape over the end of the jewelry wire, string your beads, and once you are happy with the design and length, attach the clasps to the ends. This way, if you find you need to subtract or add beads you can just remove the tape or knot and work from either end without having to cut off your clasp and start the whole thing over! This is especially important when working with name bracelets because not all names are the same length. Copyright, Lorri Ely All rights reserved Page 279 of 307

280 Copyright, Lorri Ely All rights reserved Page 280 of 307

281 Step 3 Attach the bracelet clasp Untie your knot or remove the tape. Slide a crimp bead onto the end of wire, and thread the wire through the loop on the clasp, and back through your crimp bead. Crimp the bead flat or use a crimping tool to close the crimp. Follow the How to Use Crimp Beads instructions if you are not familiar with this technique. TIP - For an even more finished look, cover your crimp beads with the new crimp bead covers! Step 4 Create and attach the charm Next we will make a little dangle charm from the leaf bead. Slide a leaf bead (or your choice of decorative bead) onto a headpin, then add a Bali spacer bead, then a crystal. Use your round nose pliers to create a loop. Attach the loop to the round part of the toggle clasp so that it slides and hangs freely. That's it! Copyright, Lorri Ely All rights reserved Page 281 of 307


282 Copyright, Lorri Ely All rights reserved Page 282 of 307


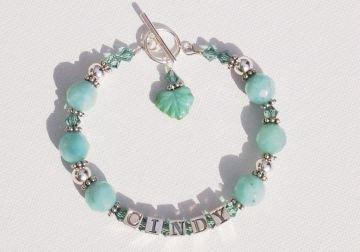
283 Copyright, Lorri Ely All rights reserved Page 283 of 307
284 Garden Charm Bracelet About This Design Time: Approximately 30 minutes - 1 hour Level of Difficulty: Beginner - All Levels Cost: Varies, depending on materials selected. Approximately $20-30 as shown. This easy garden charm bracelet can be made with any charms you like. Inspired by spring, I have selected a set of garden themed charms, and I had some nice leaf beads that I used with Swarovski crystal beads as accents. I used a pre-made charm link bracelet for this design which makes it super fast--just attach the charms and beads and you are done. Copyright, Lorri Ely All rights reserved Page 284 of 307

285 Step 1 Gather your supplies 1 (pre-made) charm link bracelet. You can buy these at bead stores or craft stores, or also in the jewelry section of department stores. If you like, make your own bracelet with bulk link chain and a clasp of choice. I bought my charm bracelet at Auntie's Beads. 1 set of 4 garden charms. For this design, I purchased an inexpensive set of garden themed charms at my local Michael's craft store. You can also buy one charm at a time from any jewelry supply or department store. 4 Jump rings (if your charm doesn't already have them attached) 5 Swarovski crystal bicone beads (6mm) 5 Leaf beads (other other beads of choice) 5 Headpins (or quantity to match beads) Copyright, Lorri Ely All rights reserved Page 285 of 307

286 Step 2 Prepare bead and charm components To save time, I prepare all my bead and charm components at the same time. I thread a leaf bead, then a Swarovski crystal bicone bead onto a headpin, and make a loop at the top with my round nose pliers. Using a basic wire wrap technique, I will attach each bead to the chain. Need help with this wire loop technique? Click here for instructions. Next, using a bead design board, or ruler (or just eyeball it!), I determine where to place each charm and bead on the links of the charm bracelet. My charm set did not come with jump rings attached, so I also attach one jump ring to each charm. If you don't know how to use jump rings, click here for instructions. You can also use split rings if you prefer, for added security. Copyright, Lorri Ely All rights reserved Page 286 of 307


287 Step 3 Attach beads and charms Now attach each charm by looping it through a link in the chain, and closing the jump ring using your chain nose pliers. Attach each bead, alternating beads and charms in your design. Feel free to add more beads until you are happy with your bracelet design. That's it! Copyright, Lorri Ely All rights reserved Page 287 of 307
288 Word Bead Charm Bracelet About This Design Time: Approximately 30 minutes - 1 hour Level of Difficulty: Beginner - All Levels Cost: Varies, depending on materials selected. Approximately $15-20 as shown. This fun bracelet is made with inexpensive plastic word beads that I found in the craft store in the scrap booking section! Look around because a lot of different materials can be used to make jewelry. I created a charm bracelet using bulk link chain and a lobster claw clasp. The design is accented with pink Swarovski crystals and yummy cherry quartz faceted rectangle beads. Wouldn't this make a fun Valentine's Bracelet? Find your own word beads and create something uniquely your own. Copyright, Lorri Ely All rights reserved Page 288 of 307
 1 lobster claw clasp 2 white pearls (or your choice of beads) Half hard jewelry wire to attach chain to clasp component 11 headpins Copyright, Lorri Ely All rights")
289 Step 1 Gather your supplies 1 length of bulk link chain (for desired bracelet length plus extender chain for drop 9 Swarovski crystal beads (your choice of colors and sizes) 5 cherry quartz beads (or your choice of accent beads) 1 lobster claw clasp 2 white pearls (or your choice of beads) Half hard jewelry wire to attach chain to clasp component 11 headpins Copyright, Lorri Ely All rights reserved Page 289 of 307

290 Step 2 Attach the lobster claw clasp. Use a basic wire wrap chain technique to attach the lobster clasp to the chain, placing one pearl and two crystal beads in-between. If you need help with the wire wrap technique, click here for more instructions. Step 3 Prepare bead and charm components To save time, I prepare all my bead and charm components at the same time. Slide a Swarovski crystal bead onto a headpin, followed by a word bead, and make a loop at the top with round nose pliers. Do the same for your cherry quartz accent beads Using a basic wire wrap technique, attach each word bead to the chain. Need help with this wire loop technique? Click here for instructions. Next, using a bead design board, or ruler (or just eyeball it!), I determine where to place each bead on the links of the charm bracelet. Copyright, Lorri Ely All rights reserved Page 290 of 307


291 Step 4 Attach the pearl drop to the extender chain. This bracelet was made with a little extra length to serve as an extender chain. This way, the wearer can fasten the bracelet to the right length to fit. I always attach a dangle bead for detail to the end of the chain. To learn more about extender chains, click here. Slide a crystal, pearl, and another crystal onto a headpin and attach it to the end of the bracelet chain on the last link. Use a basic wire loop technique. Click here for instructions. Copyright, Lorri Ely All rights reserved Page 291 of 307
292 Step 3 Attach beads and charms Now attach each charm by looping it through a link in the chain, and closing the jump ring using your chain nose pliers. Attach each bead, alternating beads and charms in your design. Feel free to add more beads until you are happy with your bracelet design. That's it! IDEA: Have fun with this bracelet by spelling out your own messages using word beads. Copyright, Lorri Ely All rights reserved Page 292 of 307
293 Pet Name Bracelet About This Design This pet name bracelet design is dedicated to the memory of "Snickers", my mom's beloved Maltese dog who passed away on 3/28/06. Snickers was pure white, so I used snowy white pearls in my bracelet design. Time: Approximately 30 minutes - 1 hour Level of Difficulty: Beginner - All Levels Cost: Varies, depending on materials selected. Approximately $35-40 as shown. This pet name bracelet is a wonderful gift for any animal lover in your life. Use alphabet beads to spell the pet's name, and select a pet charm or two (cat, dog, horse--whatever!). Use any beads and clasp that you like. In my design I used pearls and a decorative magnetic clasp, with a doggie bone and cross charms, and red gemstone briolette bead as an accent. Copyright, Lorri Ely All rights reserved Page 293 of 307
 snowy white pearls. Two Bali bead caps of choice. Here I used sterling silver baskets. Alphabet block beads.")
294 Step 1 Gather your supplies 1 length flexible jewelry wire such as Soft Flex or Beadalon (desired bracelet length, plus a few inches to work with.) Two crimp beads One clasp of choice. Here I used a decorative magnetic clasp. Beads of choice. Here I used large (12mm) snowy white pearls. Two Bali bead caps of choice. Here I used sterling silver baskets. Alphabet block beads. Here I used sterling silver letter beads. Enough small round beads to separate the alphabet block beads. Here I used five smaller white pearls. Charm(s) of choice. Here I used a doggie bone charm, a cross with heart charm, and to represent a heart full of love, I used a red gemstone flat pear-shaped briolette drop bead as an accent. If you plan to attach a briolette bead, you will need a piece of wire. Here I used small gauge sterling silver wire. Copyright, Lorri Ely All rights reserved Page 294 of 307
.")
295 Step 2 Slide beads onto jewelry wire Knot one end of your jewelry wire, or place a piece of tape on the end so the beads don't fall off. String your beads onto the wire. Use a bead design board or a ruler to make sure the bracelet is the right length (factor in the clasp!). You may need to add or remove beads depending on how many letters are in your name to get the proper length. Start with a bead cap (facing towards the beads), string your beads, then start the Alphabet beads. Place one smaller round bead in-between each of the alphabet block beads. Copyright, Lorri Ely All rights reserved Page 295 of 307

296 Step 3 Crimp beads to attach clasp, then attach charms Now you are ready to attach the clasp and charms. Slide one end of the wire through a crimp bead, around the loop on the clasp, then back through the crimp bead. Use crimping pliers to close the crimp, and then repeat on the other side. If you need instructions on how to crimp beads, click here. Using my silver wire, I wire wrap a loop on the top of the briolette bead (click here for instructions). I use a jump ring to attach both of my doggie charms and the briolette bead to the loop on one side of my clasp. That's it! Copyright, Lorri Ely All rights reserved Page 296 of 307
297 Pearl and Swarovski Crystal Bracelet Project About This Design Time: Approximately 1 hour Level of Difficulty: All Levels with Basic Wire Wrap Cost: Varies, depending on materials selected. Approximately $20-30 as shown. This classic bracelet uses bulk, sterling silver link chain, to which I have attached elegant white freshwater pearls, and Swarovski crystals for sparkle. It is finished with a tiny sterling silver heart charm dangle as an accent. Because I am using simple link chain, it can be closed anywhere along the length making the bracelet adjustable. To save time, you could also use a pre-made chain charm bracelet if you prefer. Use any color of pearls or crystal beads you like. Clear crystal beads with white pearls would make a great wedding jewelry design, or why not use birthstone colors for a special birthday gift? Step 1 Gather your supplies One length of bulk link chain, or a pre-made charm chain bracelet. I used about 8 inches, allowing the length to be adjustable, depending on where the clasp is attached. 7 Large White Freshwater Pearls (or use any "charm" beads you like--glass, crystal--whatever) 7 Swarovski crystal beads (or use any accent beads you like). Here I used green tourmaline colored beads. 7 Bali spacer beads (these are optional but add a nice touch and some sparkle) Copyright, Lorri Ely All rights reserved Page 297 of 307
 One charm of your choice. Here, I am using a small sterling silver heart charm.")
298 21 small seed pearls (or use crystals or other tiny beads to create each bead "spray") 28 head pins of a thin gauge (so they will fit through the holes in your pearls) One lobster claw clasp (not needed if you are using a pre-made charm bracelet) One charm of your choice. Here, I am using a small sterling silver heart charm. Step 2 Attach the clasp Cut the chain to the desired bracelet length, and using a basic wire wrap technique, attach the chain to the lobster claw clasp with one pearl bead in the center. Follow the wire wrap instructions if you are not familiar with this technique. TIP - If you are using bulk chain like I am, first determine the length you want your bracelet to be. For an exact fit, measure the wrist and cut to length. If you want the bracelet to have an adjustable length, add some extra to the length and cut the chain there. I left an extra inch and cut my chain about 8 inches long. Step 3 Make the pearl "charms" and attach them to the bracelet To save time, I make all my pearl "charms" ahead of time, using my chain and round nose pliers to make a basic wire wrap loop. Slide a crystal bead, then a Bali spacer bead, and then a freshwater pearl bead onto a headpin, and make a loop at the top so you can attach it to your bracelet. If you are not familiar with this wire loop technique, click here to learn more. Lay your pearls out along the chain and decide where you want to position them along the bracelet. Make sure they are evenly spaced along the length. Use a bead design board or a ruler if you like. Attach each pearl "charm" to the bracelet. Copyright, Lorri Ely All rights reserved Page 298 of 307


299 Copyright, Lorri Ely All rights reserved Page 299 of 307
300 Step 4 Attach the pearl "spray" beads to the bracelet For added interest and movement in a design, I often like to mix in a small "spray" of beads in-between larger beads. In this bracelet, we will attach three tiny seed pearls at the same point on the chain, creating a spray of beads. Slide each seed pearl onto a headpin and make a loop at the top with your pliers. Again, lay out the beads to make sure you have them positioned where you want in-between the larger pearl beads, and attach them to your bracelet chain. Copyright, Lorri Ely All rights reserved Page 300 of 307

301 Step 5 Attach the charm Using your pliers, open the jump ring on the charm and attach it to the other end of your bracelet. Close the loop so it is securely attached. That's it! Copyright, Lorri Ely All rights reserved Page 301 of 307

302 Lampwork Bead Bracelet Project with Charm About This Design Time: Approximately 30 minutes - 1 hour Level of Difficulty: Beginner - All Levels Cost: Varies, depending on materials selected. Approximately $25-35 as shown. This easy bracelet showcases some wonderful handmade lampwork beads in amber with red swirl designs on them. I used a dichroic glass heart charm bead as an accent on the toggle clasp to make this bracelet really special. You can use any color of metal you like, in this bracelet I used a 14KT gold filled toggle clasp because the yellow gold went with the amber beads better than silver. Want to make this bracelet, or a variation for yourself? Let's get started! Copyright, Lorri Ely All rights reserved Page 302 of 307
 to fit the desired bracelet length, plus a couple extra inches to work with.")
303 Step 1 Gather your supplies 1 clasp of your choice. For this bracelet I used a 14KT gold-filled toggle clasp. 2 crimp beads, and your crimping pliers A length of flexible beading wire (like Beadalon or Soft Flex) to fit the desired bracelet length, plus a couple extra inches to work with. Enough lampwork glass beads and other accent beads to complete the desired bracelet length. Lay out on a bead board or ruler to check. Here, I used seven (12mm) lampwork glass beads, four glass rectangular window beads, and 10 Swarovski crystal beads. Your choice of charm to attach to the toggle. Here, I used a glass heart bead which I simply attached to the round toggle part of the clasp. Copyright, Lorri Ely All rights reserved Page 303 of 307

304 Step 2 String beads on wire Tie a knot on one end of the wire, or place some tape over the end, and string all of your beads onto the wire. Alternate your bead sizes and shapes to make your design more interesting. Check the length and overall design and make adjustments by adding, removing, or re-positioning beads until you are happy with the look of the bracelet. You can do this first on a bead design board if you prefer, but I always like to wrap a bracelet around my wrist just to check the look and fit. TIP - You can start a bracelet by attaching the clasp to one end first, However, if you are unclear about your final design or the finished bracelet length, it is best to simply tie a knot or place some tape over the end of the jewelry wire, string your beads, and once you are happy with the design and length, attach the clasps to the ends. This way, if you find you need to subtract or add beads you can just remove the tape or knot and work from either end without having to cut off your clasp and start the whole thing over! Step 3 Attach the bracelet clasp Untie your knot or remove the tape. Slide a crimp bead onto the end of wire, and thread the wire through the loop on the clasp, and back through your crimp bead. Crimp the bead flat or use a crimping tool to close the crimp. Follow the How to Use Crimp Beads instructions if you are not familiar with this technique. TIP - For an even more finished look, cover your crimp beads with the new crimp bead covers! Step 4 Attach the charm to the clasp Now use your chain nose pliers to open the jump ring on the end of your charm. Slide the jump ring onto the loop of your toggle clasp, or if you are using another clasp like a lobster or spring ring, just attach this to the loop at the bottom of that clasp. Use your pliers to gently close the jump ring so it is securely fastened. That's it! Copyright, Lorri Ely All rights reserved Page 304 of 307

305 Link Chain and Bead Bracelet Project About This Design Time: Approximately 30 minutes Level of Difficulty: Beginner - All Levels Cost: Varies, depending on materials selected. Approximately $25 as shown. In this simple and contemporary design, I am using the new modern wide oval link chain. I have woven a strand of glass crystal beads through the links, and attached a decorative clasp. Step 1 Gather your supplies One length of wide oval link chain (desired bracelet length, minus clasp). Here I am using about 7 inches of chain. One decorative toggle clasp (or other clasp of your choice) One length of flexible jewelry wire (like Beadalon or Soft Flex). Allow enough wire for the finished length of bracelet plus a few inches. Two crimp beads Approximately 50 small beads, or enough beads to fit your bracelet length (about 7 inches of beads). Here I am using turquoise faceted glass crystal beads. Copyright, Lorri Ely All rights reserved Page 305 of 307
Chunky Wire-Wrap Bracelet
 ONLY AT BEADSHOP.COM TM Chunky Wire-Wrap Bracelet Skill Level: Intermediate Project Time: 3-4 hours Prerequisite: Wire Nirvana I, Earring Construction or basic wire-wrapping skills. Learn how to cluster
Advanced Tricks of the Trade by Janice Parsons
 ONLY AT BEADSHOP.COM TM Advanced Tricks of the Trade by Janice Parsons After teaching Tricks of the Trade for 10+ years, I realized I needed a challenge. I am ready to delve deeper into the world of color
Contents. Introduction...4. About the Author...95 BEGINNER PROJECTS GETTING STARTED INTERMEDIATE PROJECTS ADVANCED PROJECTS INSPIRATIONAL GALLERY...
 Contents Introduction...4 GETTING STARTED Wire Weaving Toolkit... 6 Materials... 8 Terminology... 10 Weaves... 10 Snake Weave... 10 Single Snake Weave... 10 Single Snake Weave with One Bead... 11 Double
Torrent by FusionBeads.com
 Torrent by FusionBeads.com Approximate finished length: 34 inches Beads and other products needed for one necklace: 8-4mm Indicolite Swarovski Crystal Bicone Bead - 5328 - (04BI1175) 6-4mm Light Turquoise
Required tools (see photos).
.") For Jewelry Making for Beginners at Arlington Community Education November, 2016 To students, in addition to required tools and materials, this document also describes some optional items that you might
For Jewelry Making for Beginners at Arlington Community Education November, 2016 To students, in addition to required tools and materials, this document also describes some optional items that you might
Decorative Briolettes
 ONLY AT BEADSHOP.COM TM Decorative Briolettes Skill Level: Intermediate Prerequisites: 1-2 beginner wire work classes, including Briolette Tutorial or equivalent experience. Plain briolette wraps are so
Contents. Fast & Easy. Moving On. Mastering Micro-Macramé. Specialty Knotting. Projects. Introduction 6. Getting Started 7. Acknowledgments 110
 Contents Introduction 6 Getting Started 7 Materials & Tools 8 Basic Knotting Techniques & Terms 10 Projects Fast & Easy Delicious Arm Candy Bracelets 21 Double Rainbow of Color Necklace 28 Curvy Mother-of-Pearl
FINISH 14 LINKS IN ONE EVENING. Pearls Wire. Grade A necklace no matter the. grade of your pearls. by Cynthia B. Wuller
 beginner wirework FINISH 4 LINKS IN ONE EVENING Pearls Wire and on Any Budget Make a Grade A necklace no matter the grade of your pearls. by Cynthia B. Wuller W hether you use economical materials or splurge
When I ve earned this badge, I ll know how to make different kinds of jewelry.
 Jeweler Junior GET MOVING! badge Want more sparkle in your life? Try making jewelry! It s easy and inexpensive to do. You can design necklaces, bracelets, or earrings for yourself or to give to other people.
Inspiration Box Instructions September 2018 by Jill Wiseman All rights reserved.
 Inspiration Box Instructions September 2018 by Jill Wiseman 2018. All rights reserved. What s In Your Box Size 11 seed beads Blue iris Czech faceted ovals Czech table cut beads some are rectangle, and
contents quick technique review 92 acknowledgments 95 about the author 95
 contents introduction 6 how to use this book 9 materials 12 tools 15 building blocks stacking and working in layers 16 how to design in stacks 16 how to fix and finish stacks 17 how to adorn stack centers
THE BELL WIRE & JEW ELRY MAKING TUTORIAL SERIES T73
 THE BELL WIRE & JEW ELRY MAKING TUTORIAL SERIES T73 COPYRIGHT Copyrights DIY Beading Club 2013 Published By DIY Beading Club INTRODUCTION This design is what I called The Bell. The pair of earrings also
Jewelry Making for Beginners: 11 Beginner Jewelry Projects
 Copyright 2013 by Prime Publishing LLC All rights reserved. No part of this book may be reproduced or transmitted in any form or by any means, electronic or mechanical, including photocopying, recording,
NEWSLETTER. Glass beads
 NEWSLETTER 48 Woodfield Boulevarde, Caringbah N.S.W. 2229 Australia Phone: 61 2 95318922 Fax: 61 2 95318944 Postal address: P.O. Box 2850 Taren Point N.S.W. 2229 Australia Website: craftythings.com.au
Wire Crochet looks complicated, but get ready! It s much easier than it looks!
 Wire Crochet looks complicated, but get ready! It s much easier than it looks! Step One: The first thing you need to do it gather up your supplies: One spool of 28 gauge wire, silver or another color.
Jewelry Basics 101. Basic Wire Loops For best results, use both chain-nose and round-nose pliers. Method 2 Bend then cut. Method 1 Cut then bend
 Jewelry Basics 101 #68-007-01 Basic Wire Loops For best results, use both chain-nose and round-nose pliers. Method 2 Bend then cut Use non-serrated chain-nose pliers to bend the wire just above the bead.
Special Report: Wire EXPOSED
 Special Report: Wire EXPOSED Part 1: Never Wonder Again: G.A.U.G.E., Temper and Shape By Christine Gierer Legal Stuff: Note: This report is copyrighted and may not be reprinted or resold. You can however
Wrapped Hoop Necklace. Wired Beautiful by Heidi Boyd
 Wrapped Hoop Necklace Wired Beautiful by Heidi Boyd Table of Contents Introduction {6} Tools and Materials {8} Techniques {10} Wrapped and hammered {22} Wrapped hoop necklace {24} Wired cuff {26} Caged
ascading Create the tiered appearance of chandelier crystals in this elegant set by Jennifer Jordan Park
 intermediate wire ascading carnelian Create the tiered appearance of chandelier crystals in this elegant set by Jennifer Jordan Park Jewelry designers are especially receptive to color, shape, and texture.
Copper Cone Earrings Sharilyn Miller
 By Sharilyn Miller Wubbers Jumbo Tapered Round Mandrel Pliers are perfect for creating a cool pair of copper-wire cone earrings! I used 12-gauge half-round wire to make the cones in this sample pair. Half-round
Copper Cone Earrings Sharilyn Miller
 By Sharilyn Miller Wubbers Jumbo Tapered Round Mandrel Pliers are perfect for creating a cool pair of copper-wire cone earrings! I used 12-gauge half-round wire to make the cones in this sample pair. Half-round
ROSY DANGLING EARRINGS WIRE & JEW ELRY MAKING TUTORIAL SERIES T164
 ROSY DANGLING EARRINGS WIRE & JEW ELRY MAKING TUTORIAL SERIES T164 COPYRIGHT Copyrights DIY Beading Club 2013 Published By DIY Beading Club INTRODUCTION Polish up your wirework skills! Learn to bead wrap
2013 LINDA ASPENSON BERGSTROM
 Tutorial: PRISMS AND WIRE Created by Linda Aspenson Bergtrom This particular prism is a former chandelier prism I found at an antique store. Any prisms or spears will work with this, you may need to scale
Introduction 6 Basics 7 Materials 8 Tools & workspace 12. Projects 16. Extra goodies. Pro tips 95 About the author 95
 Contents Kalmbach Books 21027 Crossroads Circle Waukesha, Wisconsin 53186 www.kalmbach.com/books 2012 Martine Callaghan All rights reserved. Except for brief excerpts for review, this book may not be reproduced
Twisted Crystals Necklace By Create Your Style with SWAROVSKI ELEMENTS Ambassador Laura Timmons of Vintage Moon Creations
 www.beadsbaublesandjewels.com 1411-4 Laura Timmons shows a unique crochet technique using wire and crystals. For More Information Visit: www.create-your-style.com Twisted Crystals Necklace By Create Your
Contents. Introduction Materials... 6 Tools... 8 Basics Knots Jewelry Techniques NECKLACES BRACELETS EARRINGS & MORE
 Contents Introduction... 5 Materials... 6 Tools... 8 Basics Knots... 10 Jewelry Techniques... 17 BRACELETS The Red Dragon...20 Sweet Pea Serenade...22 Shadow Lands...25 Moonlit Waters... 28 Eternally Yours...32
knobs CAN BE USED for so a nod to knobs
 knobs CAN BE USED for so much more Than drawers and doors. use them to embellish everything from Bottle tops to Table DÉcor! {CREATIVE INSPIRATIONS a nod to knobs free FROM HOBBY LOBBY } » boxed in These
CONTENTS. Introduction The Elegance of Sparkle. The Elegance of Color & Texture. Appendix From the Author... 95
 CONTENTS Introduction... 4 The Elegance of Sparkle Glass Donut Bracelet... 6 Ladder in Mail Bracelet... 8 Pearly Gates Bracelet... 12 Byzantine Star Pendant & Earrings...15 French Rope with Crystals Bracelet...
Product Group Article No. Amount Size Color Color Code. Beads pcs. 4 mm Fern Green 291. Beads pcs. 4 mm white Alabaster 281
 Irish Flag Pendant Necklace Beads 5328 27 pcs. 4 mm Fern Green 291 Beads 5328 27 pcs. 4 mm white Alabaster 281 Beads 5328 27 pcs. 4 mm Sun 248 Beads 5328 70 pcs. 4 mm Crystal 001 Beads 5328 30 pcs. 5 mm
Supplies. Crystal Mushroom Tutorial. * Molly Stanton
 Crystal Mushroom Tutorial * Molly Stanton Mushrooms and the Fair Folk have enjoyed a symbiotic relationship throughout mythology. Anyone who stepped into a fairy ring of mushrooms might just be transported
Free Wire and Bead Christmas Ornament Easy, and Inexpensive Copyright Lori Fellows 2012
 Easy, and Inexpensive Copyright Lori Fellows 2012 You may not copy/forward/share these instructions in any manner, digitally or otherwise. You may sell the ornaments you make with these directions, but
Wirewrapping Basics. So you want to play with wire? This class is designed to:
 Wirewrapping Basics So you want to play with wire? This class is designed to: Provide some basic instruction in wire working, including materials and safety Teach two basic wire wrapping techniques that
 +91-8071682353 Pyramid & Precious International http://www.pyramidandprecious.com/ Recognized as a reliable manufacturer, exporter, wholesaler and supplier, we offer a wide range of Stone Products. Owing
Once you ve mastered these circular bangles, expand your design vocabulary with other shapes. Gohaywirewithovals,squares,ortriangles!
 Haywire Bangles Once you ve mastered these circular bangles, expand your design vocabulary with other shapes. Go haywire with ovals, squares, or triangles! 42 what you will need 20- or 18-gauge half-hard
CREATE YOUR STYLE MINI PROJECTS 4 OF JULY
 CREATE YOUR STYLE TH MINI PROJECTS 4 OF JULY MINI PROJECT 4 TH OF JULY A TWIST ON 4 TH OF JULY Product Group Article No. Amount Size Color Color Code Beads 5000 140 pcs. 4 mm White Alabaster 281 Crystal
Learn Crochet: Part 1
 Mom s Crochet Patterns written by Sandy Marie Learn Crochet: Part 1 Includes: Beginner s Basics, Crochet Chain, Single Crochet and More. Plus the Single Crochet Potholder Pattern. Learn Crochet: Part 1
Halloween 2017 Design Projects
 Halloween 2017 Design Projects M I N I P R O J E C T S 1 / 14 C R E A T E - Y O U R - S T Y L E. C O M Firery Skull Drop Necklace Beads 5750 3 pcs 19mm Crystal Red Magma 001 REDM Beads 5328 6 pcs 3mm Jet
Chain Maille Flower Bracelet Tutorial
 Chain Maille Flower Bracelet Tutorial Created by XQ Designs www.handmade-jewelry-club.com, www.diylessons.org Please do not distribute, lend or copy. Do not mass produce. Copyrights 2010 XQ Designs This
The Secrets to Perfect Patterning*
 ONLY AT BEADSHOP.COM TM The Secrets to Perfect Patterning* Now you can be a designer in a day, not years! This is definitely a very fun part of beading creatively and it s super-easy to learn. Someone
Design Guide. It s The Pits TVWeekly, Inc.
 Design Guide & It s The Pits Host: Judi Watanabe 008 TVWeekly, Inc. Eat your fruit! Sometimes the most creative crafting ideas pop into our head when we least expect it. Judi was having lunch with a bunch
OPALITE GEM SCREW FIT PLUGS. (Sold as Pairs) Available Sizes: 8g, 6g, 4g, 2g, 0g, 00g
 Available Sizes: 8g, 6g, 4g, 2g, 0g, 00g") OPALITE GEM SCREW FIT PLUGS (Sold as Pairs) Available Sizes: 8g, 6g, 4g, 2g, 0g, 00g 2 SYNTHETIC OPAL SCREW FIT TUNNELS (Sold as Pairs) 3 OPALITE SCREW FIT PLUGS Resin coated to prevent opalite stones
OPALITE GEM SCREW FIT PLUGS (Sold as Pairs) Available Sizes: 8g, 6g, 4g, 2g, 0g, 00g 2 SYNTHETIC OPAL SCREW FIT TUNNELS (Sold as Pairs) 3 OPALITE SCREW FIT PLUGS Resin coated to prevent opalite stones
Poinsettia Loomed Ornament Deb Moffett-Hall
 Poinsettia Loomed Ornament Deb Moffett-Hall Rich, glowing reds and vibrant green against a velvet black background these poinsettia blooms are elegant and timeless. Repeat five times to circle the 2 5/8
Techniques: Right Angle Weave Tube Bead
 SIGN UP FOR OUR EMAIL NEWSLETTER > CUSTOMER SERVICE FAQ WISH LIST MY ACCOUNT VIEW CART LOG IN NEW PRODUCTS BEAD KITS INSPIRATION STAFF PICKS BEADING REFERENCE BEADING TECHNIQUES COLOR IDEAS 50% OFF KEYWORD
Jewelry Catalog
 Jewelry Catalog 11-12-16 Thank you for coming. We will start immediately following the coin sale & run straight through the catalog. We may combine certain lots throughout the sale. Please note, if we
Wanderlust Suitcase Vanity
 Wanderlust Suitcase Vanity If you re like me, you re always up for an adventure. When I saw some examples of DIY reclaimed suitcases, paired with the exciting new Wanderlust embroidery design collection,
CREATE YOUR STYLE MINI PROJECTS SUMMER FUN WITH FILIGREES
 CREATE YOUR STYLE MINI PROJECTS SUMMER FUN WITH FILIGREES LOUISE NECKLACE Beads 5040 2 pcs. 6mm Aquamarine 202 Beads 5328 96 pcs. 4mm Aquamarine 202 Beads 5328 34 pcs. 3mm Crystal 001 Pendants 6010 1 pc.
beadpunk d Incorporate a touch of steampunk into a necklace with eclectic appeal stepbystep
 Get beadpunk d BEAD EMBROIDERY / JEWELRY ASSEMBLY Incorporate a touch of steampunk into a necklace with eclectic appeal designed by Diane Hyde If you ve been intrigued by steampunk design, but think it
The Cradles Caress Pendant
 The Cradles Caress Pendant www.nicolehannajewelry.com NOTES MATERIALS & TOOLS: 1 Piece 8mm Round Bead 3 Pieces 29cm 20 Gauge Round Wire (Dead Soft) 1 Piece 450cm 28 Gauge Round Wire (Dead Soft) 1 Piece
Bangle Bracelet Wire wrapped links create a flexible bangle bracelet. by Connie Fox
 R R R R R R R R R R R R R R R R R R R R R R R projectstore Bangle Bracelet Wire wrapped links create a flexible bangle bracelet. by Connie Fox Photo of finished piece by Frank DeSantis; all other photos
Dainty Doorknocker Pendant
 Dainty Doorknocker Pendant www.nicolehannajewelry.com NOTES MATERIALS & TOOLS: 3 Pieces 30cm 22 Gauge Round Wire (Dead Soft) 1 Piece 400cm 28 Gauge Round Wire (Dead Soft) 1 Piece 8mm Round Bead (Large
Satellites Bracelet by Jill Wiseman
 Satellites Bracelet by Jill Wiseman 2017 Supply List Size 11 seed beads o Color A 10 grams o Color B 3 grams 3mm Swarovski pearls 92 3mm Swarovski bicones 32 Beading needle Size 10 Fireline 6lb, or beading
PEACOCK WIRE BANGLE WIRE & JEWELRY MAKING TUTORIAL SERIES T105
 PEACOCK WIRE BANGLE WIRE & JEWELRY MAKING TUTORIAL SERIES T105 COPYRIGHT Copyrights DIY Beading Club 2013 Published By DIY Beading Club INTRODUCTION Another exciting tutorial from XQDesigns using wirework
Crystal Wrap by FusionBeads.com
 Crystal Wrap by FusionBeads.com Approximate finished length: 2 inches Beads and other products needed for one pair of earrings: 2-3mm Hyacinth Swarovski Crystal Bicone Bead - 5328 - (03BI1103) 6-3mm Indicolite
Star Shaped Earrings, Jewellery Making Tutorial Practical Step By Step Guide On How To Make Handmade Jewellery With Twin Beads By Polina Einem
 Star Shaped Earrings, Jewellery Making Tutorial Practical Step By Step Guide On How To Make Handmade Jewellery With Twin Beads By Polina Einem If you are looking for the book by Polina Einem Star Shaped
Mountain Girl Bracelet
 Mountain Girl Bracelet by Regina Payne Supply List: 1 50-65mm Marquise Stone 2 12-16mm Cabochons or buttons 2 10-14mm Cabochons or buttons 6-8 DiscDuo beads 12 16 Tila Beads 26 32 Half Tila Beads 10 inches
CREATE YOUR STYLE MINI PROJECTS
 CREATE YOUR STYLE MINI PROJECTS St. Patrick s Day Irish Flag Pendant Necklace Color Color Code Fern Green 291 White Alabaster 281 Sun 248 70 pcs. 30 pcs. 5 mm 2 Silver headpins (9) Silver Lobster clasp
Sleek. accessories C A T A L O G
 Sleek accessories C A T A L O G Volume 2: February 2007 1 Necklace Set - 18" Silver Tone - Beaded Neck With Round Pendant With Lobster Claw Clasp Colors: Olive Green, Plum, White, Teal, Black Order# -
Wire Style 2: 45 New Jewelry Designs By Denise Peck
 Wire Style 2: 45 New Jewelry Designs By Denise Peck If you're new to making wire jewelry or just want to brush up on some techniques, Once you show off all of your new jewelry designs, your friends will
CREATE YOUR STYLE MINI PROJECTS. VALENTINE s day
 CREATE YOUR STYLE MINI PROJECTS VALENTINE s day FLOATINg BLUE HEART EARRINgs Pendants 6215 2 pcs. 18 mm Crystal Bermuda Blue 001 BBL Supplies: 2 Tierra Cast Beaded Heart Frame (#94-5637) 6 24 gauge silver
Many Thanks, Scott David Plumlee Copyright Scott David Plumlee, all rights reserved
 I challenge myself to create innovative chain designs by utilizing curiosity as a guide and creativity as a catalyst to find new solutions to the age-old question of how to combine silver and gemstones.
Nordic Snowflakes Loomed Ornament Deb Moffett-Hall
 Nordic Snowflakes Loomed Ornament Deb Moffett-Hall A classic knitting design style beautifully translated into sparkling glass beads. 3 different snowflakes circle the 2 5/8 glass ball Design Band: Miyuki
Seed Bead Chains: 11 Projects (Easy-Does-It) By Bead & Button Books
 By Bead & Button Books") Seed Bead Chains: 11 Projects (Easy-Does-It) By Bead & Button Books Do your round necklines tend to sit at your collarbone, or do they plunge? Easy. Birthstone. Jewelry. Exciting Projects. Personalized
Seed Bead Chains: 11 Projects (Easy-Does-It) By Bead & Button Books Do your round necklines tend to sit at your collarbone, or do they plunge? Easy. Birthstone. Jewelry. Exciting Projects. Personalized
Gold Wire Paper Clip Chain Wire Jewelry Making Pattern #103
 Gold Wire Paper Clip Chain Wire Jewelry Making Pattern #103 More Jewelry Making Patterns at http://wire-sculpture.com/patterns/ Supplies Needed * Approximately 4 feet of 21 gauge 14 karat gold filled square
Bang! Zoom! Off to the Moon!
 Bang! Zoom! Off to the Moon! by Christi Friesen Get ready for a blast from the past when you create this steampunk rocket ship pendant from polymer clay. In the late 1800 s people s imaginations were fired
2019 Spring MTGMS Class Descriptions
 NEW this quarter: Boho Silver Hoop Earrings Kit Fee $20 Come and make a pair of cute bohemian earrings with colorful crystals. They are fun to make and no experience is needed. Sterling silver wire and
Perennial Link.
 Perennial Link www.nicolehannajewelry.com NOTES MATERIALS & TOOLS: 1 Piece 8mm Round Bead 4 Pieces 27cm 20 Gauge Round Wire (Dead Soft) 1 Piece 550cm 28 Gauge Round Wire (Dead Soft) 1 Piece 15cm 20 Gauge
TRIANGULAR NECKLACE TUTORIAL
 TRIANGULAR NECKLACE TUTORIAL COPYRIGHT Copyrights DIY Jewelry Making 2016 Published By DIY Jewelry Making INTRODUCTION Learn to make this elegant sparkling triangular necklace. This project is based on
Beaded Pumpkins Tutorial with Sparkle by Monica
 with Sparkle by Monica You can make these lovely pumpkins out of several base beads such as wood, glass pearls, acrylic, ceramic and more. The primary concern is that the inner bead hole needs to be large
Mounting a Bead on a Pendant Strand
 Mounting a Bead on a Pendant Strand When people really stop to consider using the LED pendant strands, one of the first questions is usually "how do you keep it in the bead?" Here are the methods I ve
Introduction... 6 Projects. Lush loops necklace & bracelet Circular logic necklace & earrings... 19
 CONTENTS Introduction... Projects Beader s dozen necklace & earrings... 0 p.9 Lush loops necklace & bracelet... 5 Circular logic necklace & earrings... 9 Grasping at (colorful) straws necklace & bracelet...
Basic Lesson 2: Crochet Chain Stitch by Sandy Marie and Mom s Crochet
 Basic Lesson 2: Crochet Chain Stitch by Sandy Marie and Mom s Crochet The Chain Stitch is where most crochet projects begin. For that simple reason, learning how to make a nice even chain is very important.
Mixed Metal Heart Author: Patti Bullard Ph.D.
 Mixed Metal Heart Author: Patti Bullard Ph.D. Mixed Metal Heart Difficulty: Easy The beauty of mixed metals paired with a traditional heart shape is sure to bring joy to the jewelry maker as well as the
TECHNIQUE. Because of the flexibility of the woven paper elements, this necklace moves nicely when worn. BEGINNER PAPER/WOOD. facetjewelry.
 TECHNIQUE FCT-SR-09248-03 BEGINNER PAPER/WOOD Because of the flexibility of the woven paper elements, this necklace moves nicely when worn. 203 Kalmbach Publishing Co. This material may not be reproduced
Triangle Earrings. Another important step is to use split or jump rings on the hooks. They help the earrings dangle more freely.
 Triangle Earrings Description: The Triangle Earrings are based on the Celtic Triangle knot, which is an artistic design called the Triquetra. This Celtic symbol represents the Trinity as well as Body,
Laksmi Pendant. End Caps. Finishe d Size
 54 Laksmi Pendant Laksmi is the Hindu goddess of wealth, prosperity, light, wisdom, fortune, fertility, generosity, and courage; she s also the embodiment of beauty, grace, and charm. A carved ivory statuette
INTRODUCTION TO WEARABLES
 Table of Contents 6 7 8 About this series Getting setup Making a circuit Adding a switch Sewing on components Complete a wearable circuit Adding more LEDs Make detachable parts......6.7.8 About this series
Contents. Introduction...6 Basics Hour Projects. 2 Hour Projects. 3 Hour Projects. 4 Hour Projects
 Contents Introduction...6 Basics...8 Beading Tools and Materials...9 Beading Techniques... 12 1 Hour Projects Rhapsody Earrings... 16 Electric Slide Earrings...20 Arabesque Earrings...23 Flying Saucer
Making Beaded Spiders
 Beaded Christmas spider ornaments are a longstanding tradition on German Christmas trees. As a young child in the 60s, I was given such an ornament from a German family that lived across the street to
Carat weight.37 in 14K white gold $1,600 Diamond Necklace: Carat weight 1.02, 14K white gold $6,000
 Heartfelt Gifts Making Dreams Come True for 4 Decades Ruby Ring: Carat weight.85 in 18K white gold $2,495 Diamond Pendant: Carat weight.20 in 14K white gold $995 Diamond Pendant: 14K white gold $969 Diamond
Simple Metalworking Techniques and Making a Steel Butterfly bymattthegamer463 Favorite
 Simple Metalworking Techniques and Making a Steel Butterfly bymattthegamer463 Favorite Step 1: Materials and Tools Not too many materials that we need for this job. Materials: - 22 gauge steel sheet -
Out on the Town by FusionBeads.com
 Out on the Town by FusionBeads.com Approximate finished length: 8.5 inches Beads and other products needed for one bracelet: 62-4mm Graphite Swarovski Crystal Bicone Beads (04BI1502) 38-6mm Graphite Swarovski
INSTRUCTION PACKAGE XILION BEAD NECKLACE FANCY SQUARE
 INSTRUCTION PACKAGE XILION BEAD NECKLACE FANCY SQUARE INSTRUCTION PACKAGE XILION BEAD NECKLACE FANCY SQUARE Stringing Wiring SWAROVSKI ELEMENTS Article Product Group Article No. Amount Size Color Color
Techniques: Peyote Stitch Bezel
 SIGN UP FOR OUR EMAIL NEWSLETTER > CUSTOMER SERVICE FAQ WISH LIST MY ACCOUNT VIEW CART LOG IN NEW PRODUCTS BEAD KITS INSPIRATION STAFF PICKS BEADING REFERENCE BEADING TECHNIQUES COLOR IDEAS 50% OFF KEYWORD
Pangolin Point by FusionBeads.com
 Pangolin Point by FusionBeads.com Approximate finished length: 8.5 inches Beads and other products needed for one bracelet: 54 - Size 11 Nickel Plated Metal Round Seed Bead (SB1942) 40 - Size 8 Semi-Glazed
Pretty Petals by FusionBeads.com
 Pretty Petals by FusionBeads.com Approximate finished length: 23 inches Beads and other products needed for one necklace: 15 beads Size 11 Duracoat Opaque Dyed Medium Salmon Pink Japanese Seed Beads by
contents Introduction...4 BASICS How to Use This Book...6 Materials and Components...8 Tools Techniques... 13
 contents Introduction...4 BASICS How to Use This Book...6 Materials and Components...8 Tools... 10 Techniques... 13 PROJECTS Looped Earrings... 18 Looped Drop Earrings...20 Decadent Confection Bracelet...22
Dee s Place, LLC
 Dee s Place, LLC http://www.beadsbydee.com Doris Coghill 16451 Pueblo Blvd Jordan, MN 55352 Phone 952-492-2493 Fax 775-542-7155 dcoghill@frontiernet.net Available Kits Prices effective 7-1-04 Available
Peacock Necklace. Crystals with Gold Beadalon stringing wire.
 WWW.BEADSHOP.COM ONLY AT Peacock Necklace Crystals with Gold Beadalon stringing wire. Skill Level: Beginner Project time: 2-3 hours Light and airy, this understated necklace speaks of quiet sophistication.
Contents. Chapter 1: Scales. Chapter 2: Disks. Chapter 3: Washers
 Contents Introduction...4 Basics...5 Aluminum...5 Other Materials...8 Tools...9 Techniques...10 Three Simple Weaves...12 Terminology...13 Chapter 1: Scales Monkey Bells Bracelet...16 Four Leaf Clover Bracelet
Ring Toppers (Glass tops)
") Ring Toppers (Glass tops) Everything about Tools There are many ways to make ring toppers. The tools you can use are: Specially made tools RingDing mandrel Mandrel from World of glass Many other stores
Ring Toppers (Glass tops) Everything about Tools There are many ways to make ring toppers. The tools you can use are: Specially made tools RingDing mandrel Mandrel from World of glass Many other stores
Simple Sparkle Bracelet
 Simple Sparkle Bracelet 2007. All Rights Reserved. Supply list Approximately 38-50 Swarovski crystals (4mm bicones) your exact amount will depend on the length of your bracelet 3 grams Size 11 seed beads
Easy. Wire. Symmetry Made. Symmetry can be beautiful. leaf forms. matched pairs. Shape your. two at a time to make perfectly
 n asymmetrical pendant (3 in. [76 mm] long) punctuates the predominant symmetry of this necklace-andearring set. intermediate wirework by Lilian hen with ddie Kidd Shape your leaf forms two at a time to
Introduction...4. Basics...6. Chapter 1: The Weaves. Chapter 2: The Next Level. Gallery About the Author...111
 Introduction...4 Basics...6 About Wire...6 Other Materials... 11 Tools and Supplies... 13 Wire Techniques... 16 Chapter 1: The Weaves Over-Under Weave...26 Dagger Earrings...30 Freeform Toggle Clasp...32
BLUE OCEAN PENDANT BEADING & JEWELRY MAKING TUTORIAL SERIES T153
 BLUE OCEAN PENDANT BEADING & JEWELRY MAKING TUTORIAL SERIES T153 COPYRIGHT Copyrights DIY Beading Club 2013 Published By DIY Beading Club INTRODUCTION Learn how to make an elegant pendant with the Blue
May 19 th Watch and Jewelry Auction
 Lot Description 1 2 3 4 5 9 Vintage Watches 6 6 Vintage Men's Watches 7 Le Phare Watch 8 10 Vintage Watches 9 2 Vintage Pocketwatches 10 14 Vintage Ladies Watches 11 Pulsar Watch 12 Misc. Lot Watch Parts,
Oval Shaped Turquoise Earrings Jewelry Making Tutorial By XQ Designs. Wire Cage Wire & Jewelry Making Tutorial Series T72
 Contents My Sweet Heart Pendant Beading & Jewelry Making Tutorial By Sky Aldovino Day of the hearts is near so here's something to show how sweet your heart is - My Sweet Heart Pendant. 5 Features Oval
Products We Love: Clover Quick Yo-Yo Makers
 Published on Sew4Home Products We Love: Clover Quick Yo-Yo Makers Editor: Liz Johnson Friday, 10 February 2017 1:00 There s no research confirming a link between the classic yo-yo string toy and the fabric
Gemstone Color Guide
 Gemstone Color Guide red jasper turquoise tigerseye onyx carnelian royal blue malachite amethyst green quartz The statement jewelry in the Marrakech Collection is made with playful tassels, brightly colored
Witch Hat Pendant By Valorie Clifton
 Witch Hat Pendant By Valorie Clifton Ah, Halloween! It s always been one of my favorite holidays. The kids and I like to watch Halloween movies. We decorate the house and enjoy the cooler temperatures
Fee Fi Faux Fabulous
 Fee Fi Faux Fabulous Mimicking enamel and metal with polymer and mixed media A floral focal pendant project with Christi Friesen For this project you will need:. polymer clay I recommend Premo for this