FAIRBANKS~ MORSE 1938 RADIO RESTORATION Model # 5-C CALIFORNIA HISTORICAL RADIO SOCIETY International Radio Restoration Contest Entry
|
|
|
- Lindsey Holmes
- 6 years ago
- Views:
Transcription

1 FAIRBANKS~ MORSE 1938 RADIO RESTORATION Model # 5-C CALIFORNIA HISTORICAL RADIO SOCIETY International Radio Restoration Contest Entry March 15 th 2014 Restoration by : Cliff Farwell This was a radio that I purchased for parts only. It was in such poor condition and my objective was to obtain parts for another radio. After joining CHRS and learning more about these timeless treasures I decided to take this old radio and restore it to the best of my ability and enter your competition. I started with the mechanics as this radio was not in working condition. I have compiled some photos that I took during the restoration. I have noted next to each photo what I had done to bring this radio back to life. It was been a lot of work but I feel the end result speaks volumes. This is the initial condition of the cabinet and degraded dial cover. Note the shredded speaker cloth below my hand.

2 This is what the chassis looked like before restoration, with heavy corrosion.

3 This is the initial condition of the speaker found in the cabinet, obviously inoperable!


4 Here you see the shadow from the dial housing which has been removed along with the broken dial belt. A new belt was later installed. In this photo, the chassis is being stripped of old paint and rust. The old power transformer was found to have an open primary winding and removed.

5 The tuning capacitor was subsequently removed and cleaned, to be re-installed after the chassis was cleaned and repainted. New tuner grommets were installed.

6 The rusted dial face housing and the old dial belt were removed for repainting and replacement.

7 After bead blasting the dial face housing was repainted with a satin white paint as per original including mounting screws. The old rubber dial housing light grommets were replaced with new as shown in photo.
.")
8 The speaker was rusted with the cone torn out. The spider remained intact but later replaced with NOS (New Old Stock). Fortunately, the speaker voice coil and transformer were tested and found in good condition.


9 The speaker coil & transformer leads were wired tagged for future reference. I sand blasted the speaker frame at a local engine machine Shop. I then repainted the speaker frame prior to cone repair.


10 Speaker basket repainted. Transformer re-installed and speaker re-coned. A new spider was installed, sourced from NOS (New Old Stock).

11 Final step: Speaker gasket added to match original.


12 Painting, as with entire restoration was done by myself. An Awata spray gun was used to apply SEM etching primer and OMNI copper metallic matched paint. The new paint was color matched by a local auto body supply shop for the chassis finished coat. I replaced the original power transformer with a replacement from the Antique Radio Supplies. The power cord was replaced with a gold cloth covered cord with a reproduction Bakelite plug. The tube shields were bead blasted as well and coated with a 1200* ceramic coating for heat and rust resistance. This was matched to the original metallic look.


13 After the tube shields were coated they were placed back into position covering the designated tubes. False, dummy electrolytic filter capacitors cans were made for authentic appearance. They were stuffed with modern electrolytic capacitors. These housings are made of copper for grounding conductivity, and then wrapped with black insulating paper. Close size match; new power pransformer next to original

14 Damaged exposed wires were replaced with reproduction insulated cloth covered wires. (Sundial Antique Wire Co.) All electrical contacts were cleaned with electrical safe CRC solvent. The new power transformer was installed and tested with the rectifier 5Y3G tube removed. A 60 watt bulb was placed in series with the primary for initial testing. The old capacitors & electrolytics were all replaced with new ones. All resistors were checked and passed the manufacturer specifications.


15 All tubes were tested with a Hickok tube tester. I discovered that several tubes needed to be replaced. I am pointing to the rivets that I had to reproduce in order to secure the dial face. These were not salvageable or obtainable.

16 The old damaged dial face was replaced with a new reproduction made by Radio Graphics. The dial lights were rewired and the dial lights were replaced. The face was installed using machine screws and the heads were filed down as per old rivets to give a tight fit to the new dial face cover once the chassis was installed. I had also installed a new belt prior to the dial face being secured.


17 Before Replica The tube diagram decal for the Fairbanks Morse 5C was removed for the chassis restoration. The Replicas were made by Graphics Radio

18 There were several steps to re-facing the body of this radio. The veneers were broken and chipped in many areas. The inside of the unit had a wasp nest, mud and had water damage. I bleached the cabinet and stripped the inside and outside.

19 The cabinet needed to be resurfaced with new veneer and the under ply repaired. Both lower and right corners were severely damaged. The photos enclosed will show the process from beginning to end.

20 The lower corners were damaged on the face. The side panels required minimal veneer replacement. The missing pieces were blended in with new veneers. The front veneer had separated from the cabinet top as shown in the photo.

21 The interior of the cabinet had begun to separate.after the chassis was removed several wasp mud nests were revealed. A round slow speed wire brush was used to remove the wasp nests.

22 The cabinet base runners were secured and gluded and the old glides were removed and replaced with new glides. The cabinet side ply s were re-glued and clamped to the cabinet base. I then sanded and refinished the outside bottom of the cabinet.


23 The interior seams were re-gluded on all sides including all corner reinforcement blocks. I completed the interior by sanding and refinishing with a coat of stain.


24 The existing front top ply was then clamped and re-gluded. The veneer was so badly damaged that I decided to reface the cabinet. I choose a Fancy face crotch mahogany veneer that matched the original face pattern. After the underlayment and old veneer was repaired, I applied Tie Bond III glue to both cabinet face and veneer and secured with a hot wood iron.


25 The new veneer I used was from Sauers & Co. processed veneer. This was a Crotch Mahogany book mark matched. I have included an unfinished sample below.


26 Once the veneer was secured to the face the radio I began the slow and tedious process of cutting the dial face, grill and chassis holes. This was very time consuming. I used a Dremel hand router with cutting and sanding bits.


27 The photographs on this page show the progressive cutting of the veneer to the original radio face cut outs. There were several natural cracks in the veneer in which I filled and sanded. This took many steps to smooth out the surface.


28 I used a pine 1 x 4 as a jig guide for my Dremel router. The design grooves on the base and front of the cabinet face had to be hand cut with router to replicate the original design of the cabinet.


29 After routing the new grove lines into the new veneered face, and application of black lacquer to highlight. I applied a brown cordovan toner to the two parallel grill frames as per original color scheme.


30 The feet were glued and air gun nailed into position. Luckily I found the feet lying inside the cabinet.

.")
31 The cabinet was sanded with 320 grit Norton sand paper. An application of Mohawk grain filler was used to soften the pores of the wood prior to applying the lacquer finish. (Mohawk Lacquer). Toners were used to blend the cabinet face into the old existing veneer.


32 Upon completion of spraying several coats of sanding sealer and satin lacquer, each coat was hand sanded. This took approx. 8 coats. The final coat was rubbed out with rottenstone compound and light 3-1 oil. I found a chalk board eraser worker well. This helped give it a nice even finish.


33 The old grill cloth was totally destroyed. I constructed a new backer board, using the old one as a pattern and replaced the grill cloth.


34 The speaker grill cloth was attached to a thin plywood backer-board with spray adhesive. The ply was cut by hand and fit to the cabinet as per original. Staples secure it in place. I then secured the dial face cover after the brass escutcheon trim in place. Awaiting the chassis, the cabinet is finished. The speaker grill cloth installed, escutcheon tacked in place with brass nails.


35 Chassis now completed, speaker re-coned and tested. Cabinet is repaired and refinished.


36 Cabinet ready for chassis installation Cabinet complete, speaker is mounted and connected to the chassis circuit. Chassis is mounted with new grommets and bolted to the cabinet using original screw bolts. Decal has been replaced.

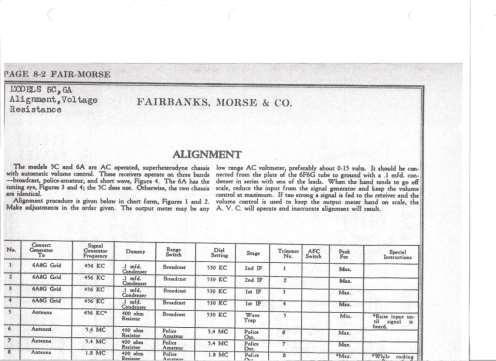
37 The missing knobs were found via the Antique Radio Forum and I purchased from a member. The knobs are backed with felt washer. Rosette screws were purchased from ANTIQUE RADIO SUPPLIES to secure the speaker as per original. I aligned the radio at KRE ( CHRS Headquarters), IFs at 456 KC as per the alignment instructions by the manufacturer. This information was found Via the RIDER publications volume VIII Page 8-2 Fair Morse Models 5C-6A

38 FINAL ASSEMBLY~ The Radio is completed!
39 RESTORATION : Dec 7 th 2013 REFERENCES & RESOURCES Rider Publications Hickock Tube Testers Antique Electronic Supplies U.S. Art Supply Rockler Wood Working Radio Graphics Radio Daze Antique Radio Forum-Barry McDonald Renovation Radio Sundial Antique Wire Supplies Just Radio s The Speaker Shop Mohawk Finishing Supplies Neds Auto Body Supplies Martinez Engine & Machine CHRS Workshop at KRE Decals by Radio Daze


40

41
Restoration of a Philco Model 89E Code 121 Cathedral Radio
 NZVRS Entry in SQCRA International Restoration Competition. Restoration of a Philco Model 89E Code 121 Cathedral Radio verything screamed at me don t do it, it s too far gone. However not one for shying
Restoration of a Canadian General Electric Model GE-66 SPARC Museum, Coquitlam, BC
 Restoration of a Canadian General Electric Model GE-66, Coquitlam, BC Quite often folks have a radio that means a lot to them for a variety of reasons, eg. they can remember it playing in their grandparents
Ziroli D-17 Beech Staggerwing
 Ziroli D-17 Beech Staggerwing Parts List Vacuform Parts: Miscellanous Pieces 1 Four Side Panels 1 3/16" Tube, 2" Long 2 Lower Dash - Back Dash 2 Felt, 12x24 3 Dash 3 Cordury 12x24 4 Dash Hood 4 Aluminum
Easy Jewelry Box. Easy Jewelry Box 1
 This easy to build dresser style jewelry box is designed to use standard board sizes you may already have on hand. Drawers are lined in felt and have felt covered bottoms to glide smoothly on the shelves
Plastic Welding Experiences
 Plastic Welding Experiences In the past I have advocated plastic solvent welding with ABS solvent to rejoin ABS plastic parts without repainting. Solvent is inexpensive but it does takes considerable time
You Just Brought an Old Radio Home: Now What Do You Do?
 You Just Brought an Old Radio Home: Now What Do You Do? Raymond Cady goldenageradiorestoration.com Whether you are just beginning to collect antique radios or you have been at it for a number of years,
Salter Industries Spiral Stair
 Salter Industries Spiral Stair The Leader in Spiral Staircases Continuous Sleeve Stair Installation Instructions TOOLS NEEDED: 1. Electric drill with hex chuck and Phillips bit 2. Drill bits 1/8", 1/4",
Repairing Sheet-Molded Compound (SMC) With Epoxy
 With Epoxy") Repairing Sheet-Molded Compound (SMC) With Epoxy 1. Properties: A. It does not dent. B. It does not rust C. Panels are formed using a flat sheet or compound that is heat molded in a press. 2. Preparation
Repairing Sheet-Molded Compound (SMC) With Epoxy 1. Properties: A. It does not dent. B. It does not rust C. Panels are formed using a flat sheet or compound that is heat molded in a press. 2. Preparation
WOOD WOOD
 12655 - WOOD 12655-1 Part One - General WOOD 1.0 All materials used in the finishing shall be of the highest grade of their respective kinds. Materials shall be evenly and smoothly applied by skilled mechanics.
CABINETMAKING. ELIGIBILITY Open to active SkillsUSA members enrolled in programs with cabinetmaking or millwork as the occupational objective.
 The following rules are for the state contest only. Students/Teams that qualify for the national contest need to adhere to the rules and guidelines for that national contest. The rules can be found in
Cabinetmaking & Millwork CIP Task Grid
 1 Secondary Task List 100 DEMONSTRATE PERSONAL SAFETY. 101 Demonstrate knowledge of general safety rules for working in the cabinetmaking lab. 102 Identify cabinetmaking lab tools and equipment. 103 State
Cabinetmaking & Millwork CIP Task Grid
 1 Secondary Task List 100 FOLLOW RULES FOR WORKING IN THE CABINETMAKING LAB. 101 Review and discuss school rules. 102 Review and demonstrate knowledge of cabinetmaking lab rules. 103 Complete all theory
AC50 Enclosure - Thin Edge
 AC50 Enclosure - Thin Edge 2 3/16??? 4 PL 11/16 1 7/8 Piping Groove 2 7/8 Top thickness = 18mm 6 7/16 All other pieces thick Corner Radii and joints =?? Bracing blocks for back = 5/8 square, 2 ea. Back
Contents. pages 20-24: Installing Edge sinks into. custom laminate countertops page 8: Installing Edge sinks into postform laminate countertops
 Contents pages 2-8: Installing Edge sinks into custom laminate countertops page 8: Installing Edge sinks into postform laminate countertops pages 9-14: Installing Acrylic sinks into custom laminate countertops
 America s leading woodworking authority To download these plans, you will need Adobe Reader installed on your computer. If you want to get a free copy, visit: http://adobe.com/ reader. Having trouble downloading
How to Install Decklids and Tailbases
 All decklids and tailbases are installed in the same general way. Follow these step by step instructions to hang them the way the pros do. 1. Open the shipping containor and check for any damage to the
Daimler Light
 Daimler Light 15 1936 By Andy Lockwood. The restoration of the Daimler dates back to the early 1980s. When we purchased the car its condition was sound with no welding work required, the cylinder head
PRO CYCTM PRO CYC, INC. SYSTEM 1.5 FS
 ASSEMBLY INSTRUCTIONS Congratulations on your decision to use the world s most advanced and user-friendly cyclorama system. We have taken a great deal of care to create and ship your cyc, so please take
Basic Wood Radio Cabinet Refinishing Part Two. By Eric Stenberg
 Basic Wood Radio Cabinet Refinishing Part Two By Eric Stenberg This is the second of two articles dealing with the refinishing of a vintage radio cabinet. In the first part we discussed preparing the set
Additional Parts List:
 THE TIME MACHINE Additional Parts List: In addition to the cast resin parts enclosed in this kit, there should also be a plastic bag containing the following items needed to complete your time machine
Omarshauntedtrail.com. Obtained from. Merlin's Wall Sconce.
 http://hauntershangout.com/home/wallsconce.asp Plaque Construction Merlin's Wall Sconce Warning: This project uses Electricity! Build at your own risk. Not for children to build. Ever been to a haunt and
Jewelry Cabinet. Materials: 5/8" brad nails 5-1" x 3" x 8' boards (or if not 2 1/2" wide. 1-4' x 8' sheet - 3/4" plywood. wood glue get 1x4's)
") 1 Jewelry Cabinet Materials: 1-4' x 8' sheet - 3/4" plywood 5/8" brad nails 5-1" x 3" x 8' boards (or if not 2 1/2" wide wood glue get 1x4's) sand paper 1-1" x 6" x 8' board wood filler 1/2 sheet - 3/16"
1 Jewelry Cabinet Materials: 1-4' x 8' sheet - 3/4" plywood 5/8" brad nails 5-1" x 3" x 8' boards (or if not 2 1/2" wide wood glue get 1x4's) sand paper 1-1" x 6" x 8' board wood filler 1/2 sheet - 3/16"
Nanton Grain Mill Assembly
 ( 1 ) Nanton Grain Mill Assembly Locate package for assembling storage building. These are cut from 1/8 masonite. Inspect and lightly sand edges where it will be bonded. Use white glue or CA glue to bond.
Router Table. Construction
 Router Table A router table is an invaluable tool. The problem, however, is that ready-built router tables are usually relatively expensive and too narrow for many projects. This router table provides
Classic Kitchen Island
 America s leading woodworking authority Step by Step construction instruction. A complete bill of materials. Classic Kitchen Island Exploded view and elevation drawings. How-to photos with instructive
Aerospace Speciality Products
 Specifications:! Length: 18.75"/47.6 cm! Diameter: 0.98"/24.9 mm! Weight: 1.5 oz/44 gm! Streamer Recovery! Recommended Engines:!! A8-3; B4-4; B6-4; C6-5! Skill Level: Beginner This is a model rocket kit
PRO CYC PRO CYC, INC. SYSTEM SUPER 1.5QS
 Assembly Instructions System Super 1.5QS Congratulations on your decision to use the world s most advanced and user-friendly cyclorama system. We have taken a great deal of care to create and ship your
SECTION PAINTS AND COATINGS. a. Section Submittal Procedures: Requirements for submittals.
 SECTION 09900 PART 1 GENERAL 1. SUMMARY: a. Section includes surface preparation and field application of paints and other coatings. 2. SUBMITTALS: a. Section 01330 - Submittal Procedures: Requirements
Project Skill Level: INTERMEDIATE Plywood Used: CANPLY EXTERIOR Good Two Sides (G2S) or precision sanded Aspen
 or precision sanded Aspen") Project Skill Level: INTERMEDIATE Plywood Used: CANPLY EXTERIOR Good Two Sides (G2S) or precision sanded Aspen MATERIALS LIST: (1) ¾" x 4 ft x 8 ft plywood panel (20) #8 x 2" Robertson or Phillips wood
Project Skill Level: INTERMEDIATE Plywood Used: CANPLY EXTERIOR Good Two Sides (G2S) or precision sanded Aspen MATERIALS LIST: (1) ¾" x 4 ft x 8 ft plywood panel (20) #8 x 2" Robertson or Phillips wood
Eco Office File Base. Materials and Tools: Free Plans to build an office file cabinet base
 Materials and Tools: Materials: 1 - Sheet 3/4 PureBond Hardwood Plywood (Available at the Home Depot) 1 - Sheet 1/4 PureBond Hardwood Plywood (Available at the Home Depot) 3-21 Drawer Slides, Euro Style
PRO CYC PRO CYC, INC. SYSTEM SUPER 3EZ
 ASSEMBLY INSTRUCTIONS SYSTEM SUPER 3 EZ Congratulations on your decision to use the world s most advanced and user-friendly cyclorama system. We have taken a great deal of care to create and ship your
ining Table Materials *Notes on Materials
 D ining Table We looked around for the perfect table for the dining room. Some were too big, some too small, and most were just too expensive. So we built this one, and we are happy with the result. It
Perkins Statewide Articulation Agreement. Documentation item: Secondary Competency Task List Coversheet
 Perkins Statewide Articulation Agreement Documentation item: Secondary Task List Coversheet The Secondary School agrees to: A. Implement the approved PDE Program(s) of Study. B. Provide assessment of student
DIY Farmhouse Cabinet
 DIY Farmhouse Cabinet Addicted2DIY.com *Before beginning this project, please read through all of the plans as well as the blog post associated with this project. Always use safety precautions whenever
Early Mustang & Cougar cowl repair
 Early Mustang & Cougar cowl repair Okay, I m no expert but Bob suggested that I describe my experiences in replacing a rusty cowl in my 68 Mustang fastback I thought the cowl was good when I bought this
PS 5077 cu. ft. Boxcar with EOC device. 1:29 scale resin craftsman kit. by Burl Rice
 PS 5077 cu. ft. Boxcar with EOC device 1:29 scale resin craftsman kit by Burl Rice www.burlrice.com Bill of materials (not included): Thick/medium viscosity CA PL adhesive, or Gorilla Glue Heavy Duty Construction
Computer Desk. Project designed by April Wilkerson
 Project designed by April Wilkerson Copyright WilkerDos.com 2018 Project plan Desk Page 2 of 16 Page 3 of 16 File cabinet Page 4 of 16 Metal base Page 5 of 16 Glue up Get started by gluing up boards for
Basic Wood Radio Cabinet Refinishing Part One. By Eric Stenberg
 Basic Wood Radio Cabinet Refinishing Part One By Eric Stenberg A great thing about a hobby involving antique radios is the many aspects that can hold your interest. To people on the outside we may be just
Building the Toothpick Audio CW Filter
 Building the Toothpick Audio CW Filter Introduction The toothpick is a simple variable bandpass audio filter designed to compliment the Splinter QRPp Trans-Receiver. The filter also contains an audio amplifier
ADULT. Adirondack / Muskoka Chair Plans
 ADULT Adirondack / Muskoka Chair Plans Materials List 3/4" x 9 1/2" (1.9cm x 24.1cm) redwood, cedar or pine boards. Six, 8' (2.44m) boards should make one chair depending on knots and layout. You can also
Materials. Special Tools and Techniques Chisel Long pipe clamps Miters Router with 1/2" rabbet cutter Rabbets Dadoes. Hardware
 D esk Our executive desk was built with specific needs in mind. We wanted a large desktop, large drawers, and a cubbyhole to house a rollaway hanging file cabinet. We are thrilled with our finished project.
Harriet Chair with Modifications
 Harriet Chair with Modifications This modification of the Harriet chair includes a slat back, padded seat, and is 2 inches wider than the original plan. The overall dimensions of the finished chair: 38
Chest of Drawers Plans
 Chest of Drawers Plans www.andrewharriswoodwork.com Page 1 of 15 Introduction This plan makes a chest of drawers that is 50 inches at the widest point, 19 inches deep and 40.75 inches high. I have tried
Storing, Handling, and Cleaning dekō Markerboards Storing Markerboards. Handling. Cleaning
 Storing, Handling, and Cleaning dekō Markerboards Storing Markerboards dekō markerboards must be stored inside, and stacked horizontally to avoid bowing. Do not store or transport dekō markerboards outdoors
An Inner Hive Cover. In the Beekeeper s Work Shop. Building a Bee Hive: The Inner Hive Cover. by Stephen E. Tilmann
 An Inner Hive Cover In the Beekeeper s Work Shop The project for this article is an inner hive cover. The inner cover sits on top of the topmost hive body (super) and underneath the telescoping top cover
Restoring a Bulle Clock. Restoration of Bulle Clock Serial Number 7894.
 Page 1 Restoration of Bulle Clock Serial Number 7894. Page 2 The full restoration of this Bulle with kind permission of the owner. This Bulle is of the tall A type movement and frame but in a four glass
2. Sanding the Modules Sand the entire surface of each cyc module with 60-grit sandpaper. This will provide for better paint adhesion.
 ASSEMBLY INSTRUCTIONS SYSTEM SUPER 2.5 EZ Congratulations on your decision to use the world s most advanced and user-friendly cyclorama system. We have taken a great deal of care to create and ship your
Kitchen Upper Cabinet: Single Door Cabinets from Scratch
 Kitchen Upper Cabinet: Single Door by Cabinets from Scratch Our Home from Scratch LLC Page 1 Disclaimer Our Home from Scratch LLC and its legal owners cannot be held responsible for any loss, damage, disappointment,
You Can Build a Bedside Table
 You Can Build a Bedside Table Jeff Branch WOODWORKING If you like making panels, you ll love this project. By JEFF BRANCH M y current home is a modest one. But it is a big improvement over our small starter
Agricultural Mechanics and Technology Power Tool Safety Rules
 Agricultural Mechanics and Technology Power Tool Safety Rules Name: BAND SAW Use: Cutting curves, circles and irregular shapes. 1. Use clean SHARP blades. 2. The teeth should always point DOWN. 3. Adjust
Beds may be put up or taken down quickly by use of a simple bolted connection at rails and uprights. MATERIALS LIST
 CANPLY This design has been made both functional and attractive by use of pattern cut-outs in head and foot uprights, which serve as ladders. Since most children love to climb, getting them to bed will
1930 s Radio Clock PROJECT TUTORIAL. Designed for CarveWright by Michael Tyler -
 PROJECT TUTORIAL Designed for CarveWright by Michael Tyler - www.carvebuddy.com This project reminds us of a time when early wood-cased tabletop radios were once a staple in just about every home. Complete
Drill Press Storage Cart
 Drill Press Storage Cart Richard Hicks on July 22, 2013 Drill Press Storage Cart Drill Press Storage Cart My Inspiration ShopNotes Issue 128 Changes Used casters instead of wheels Didn t build the drill
!! " # $ % & '! ( ) * +, -
 * +, -") !! " # $ % & '! ( ) * +, - North Pegasus This carton contains: (1) Instruction package. Response Curves North Creek Cabinet Handbook North Creek Wiring Guide (2) 6 oz. Rolls of Dacron stuffing. (1) Tube
!! " # $ % & '! ( ) * +, - North Pegasus This carton contains: (1) Instruction package. Response Curves North Creek Cabinet Handbook North Creek Wiring Guide (2) 6 oz. Rolls of Dacron stuffing. (1) Tube
FIBERGLASS DOOR SYSTEM Installation Instructions
 FIBERGLASS DOOR SYSTEM Installation Instructions Thank you and congratulations. You have just purchased a premier fiberglass entry door system. If you have purchased an unfinished door system, we recommend
Mudroom Unit. Page 1 of 25
 Mudroom Unit www.andrewharriswoodwork.com Page 1 of 25 Introduction This plan makes a unit which is 66 ¾ inches tall, 39 ½ inches wide and 18 ½ inches deep. It was custom made for some friends to fit the
Aluminum Clad Wood Window Field Mulling and Stacking Instructions
 Aluminum Clad Wood Window Field Mulling and Stacking Instructions Mulling Stacking Mulling and Stacking IMPORTANT: Please read before you begin. TABLE OF CONTENTS AND TOOL / MATERIAL REQUIREMENTS START
Restoration of Concert-Mandolinen-Zither Victoria
 Restoration of Concert-Mandolinen-Zither Victoria Completed by Ron Cook May 2016 For Shari Delgadillo Background Zithers, both chorded and fretted, were very common in Eastern Europe from the mid 1800s
PULLOUT SHELF ROCKLER BUILD IT WITH BUILD CUSTOMIZE
 BUILD Stock Item 12229 Drawer s, 2 1 2" x 48" 63420 Baltic Birch Ply, 1/4" x 24" x 30" 38742 Maple, 3/4" x 3" x 24" 45953 100# Zinc Over-Travel Drawer Slides - Centerline 757-20" 30254 #8 x 1 1 4" Square
2. Sanding the Modules Sand the entire surface of each cyc module with 60-grit sandpaper. This will provide for better paint adhesion.
 ASSEMBLY INSTRUCTIONS SYSTEM 4 BI (Built-In) Congratulations on your decision to use the world s most advanced and user-friendly cyclorama system. We have taken a great deal of care to create and ship
WOOD CHIPS. Northwest Indiana Woodworkers Association Volume 18, Issue 5 May President's Corner
 WOOD CHIPS Greetings Fellow Woodworkers, Northwest Indiana Woodworkers Association Volume 18, Issue 5 May 2014 President's Corner Last month members impressed us with their items made for the 2x4 Challenge.
Kitchen Base Cabinet: Single Drawer with Double Doors Cabinets from Scratch
 Kitchen Base Cabinet: Single Drawer with Double Doors by Cabinets from Scratch Our Home from Scratch LLC Page 1 Disclaimer Our Home from Scratch LLC and its legal owners cannot be held responsible for
6043 DESIGN AND TECHNOLOGY
 UNIVERSITY OF CAMBRIDGE INTERNATIONAL EXAMINATIONS GCE Ordinary Level MARK SCHEME for the October/November 2010 question paper for the guidance of teachers 6043 DESIGN AND TECHNOLOGY 6043/01 Paper 1, maximum
THE PODIUM MUSIC STAND
 THE PODIUM MUSIC STAND 1 Set Assembly Instructions Wooden Parts: a. 1 Column b. 2 Long Slide Pieces c. 2 Slide Spacers (1 long & 1 short) d. 4 Feet e. 2 Fork Pieces f. 1 Fork Spacer g. 2 Long Desk Frame
UNITED MOTORS SERVICE D IV ISIO N OF GENERAL M O TO RS C O R P O R A T IO N. General Offices - Detroit AUTO RADIO BULLETIN
 UNITED MOTORS SERVICE D IV ISIO N OF GENERAL M O TO RS C O R P O R A T IO N General Offices - Detroit AUTO RADIO BULLETIN Page 1 FIRST ISSUE SUBJECT: SERVICE INSTRUCTIONS - CHEVROLET TRUCK MODEL 987187
BUILDING A STORM DOOR
 BUILDING A STORM DOOR BY NEAL BARRETT Illustrations by George Retseck If you're in the market for a storm door, you probably know that there are many styles and models available. However, most of them
How to Build a Recessed Medicine Cabinet
 How to Build a Recessed Medicine Cabinet See post for install info http://www.hertoolbelt.com/recessed-medicine-cabinet/ Materials 6 Inset Cabinet Door Hinges 3 Latches 1 sheet Beadboard or 1/4 plywood
The Phoenix FockeWulf FW-190 Part 2
 The Phoenix FockeWulf FW-190 Part 2 (refinishing) By: Roy Vaillancourt Overview: This is part 2 of the continuing story of the resurrection, rebuilding and restoration of my latest Focke Wulf FW-190. In
Empire Dresser Plans
 1 Empire Dresser Plans Materials 1 sheet 3/4" plywood (cabinet grade 4' x 8') 1 sheet 5 mm (3/16") underlayment plywood 4'x 8', buy another 1/2 sheet if you want to put a back on the dresser. 1-2" x 4"
Sandpaper Product Guide. Premium Automotive Aftermarket Quality Complete Selection of Hand & Power Sanding Accessories Excellent Value
 Sandpaper Product Guide Premium Automotive Aftermarket Quality Complete Selection of Hand & Power Sanding Accessories Excellent Value Index Introduction to Abrasives Abrasive Components... 3 Sandpaper
Redwood strips are tacked to the templates, and edge-glued. Drive brads through into the templates before putting on fiberglass doth.
 1 Make the building form and attach templates to the crosspieces. Nail a strip down the center to hold the stems and templates in position. prototype canoe took about three weekends to build. She's broad
RENOVATING WOOD. 2 - Planning your work
 RENOVATING WOOD Renovating wood is not difficult, but it does require patience and application. Don't be tempted to work on fine or antique furniture - leave that to the experts! Always wear a face mask
Slide the stock rubber tank mount caps onto the ends of the CS-1 tank mount:
 RYCA CS-1 BODY PARTS INSTALLATION GUIDE [The CS-1 installation guides should be used as supplements to the videos found on our Youtube Channel. There is no strict order to the build process, but it is
A rtisans of the. alley. Conservation Documentary. Circa 1850 Jelley Cupboard
 A rtisans of the alley V Conservation Circa 1850 Jelley Cupboard Piece: Circa 1850 Cupboard Style: Country Material: Southern Yellow Pine Region of Origin: Shenandoah Valley Finish: Colored Shellac Condition
POS Perkins Statewide Articulation Agreement Documentation Coversheet
 POS Perkins Statewide Articulation Agreement Documentation Coversheet Student Name: Secondary School Name: Secondary School Address: CTE Program of Study: CIP # CIP Program Name Grade 9 1. CAREER AND TECHNICAL
Kitchen Upper Cabinet: Double Doors Cabinets from Scratch
 Kitchen Upper Cabinet: Double Doors by Cabinets from Scratch Our Home from Scratch LLC Page 1 Disclaimer Our Home from Scratch LLC and its legal owners cannot be held responsible for any loss, damage,
PRO CYC PRO CYC, INC. SYSTEM SUPER 1.5 EZ
 ASSEMBLY INSTRUCTIONS SYSTEM SUPER 1.5 EZ Congratulations on your decision to use the world s most advanced and user-friendly cyclorama system. We have taken a great deal of care to create and ship your
Assembly instructions
 Nerdy Gurdy Assembly instructions This manual describes how to assemble a Nerdy Gurdy. Go to http://www.nerdygurdy.nl for more info about these instruments. Jaap Brand The Netherlands January 2018 General
Building the Sawdust Regenerative Receiver
 Building the Sawdust Regenerative Receiver Introduction The Sawdust is a super regenerative receiver using the basic Armstrong design architecture. The receiver uses one toroidal transformer to provide
6043 DESIGN AND TECHNOLOGY
 www.onlineexamhelp.com www.onlineexamhelp.com CAMBRIDGE INTERNATIONAL EXAMINATIONS GCE Ordinary Level MARK SCHEME for the October/November 2013 series 6043 DESIGN AND TECHNOLOGY 6043/01 Paper 1, maximum
Installation Instructions
 Please read all instructions before installing products. STORAGE: Keep crates in the upright position. When unpacking, store panels flat in a clean dry place. BEFORE INSTALLATION: Check for damage that
Clock 35 - Toyland. Construction instructions for Clock 35
 This clock has been designed for children, it is a stand-alone unit and can be positioned on a shelf or cabinet out of the reach of very young hands who may be tempted to touch. The clock is shown in two
Modern Farmhouse Printer Cabinet. Addicted2DIY.com
 Modern Farmhouse Printer Cabinet Addicted2DIY.com Before beginning this project please read through all of the plans as well as the blog post associated with this project. Always use safety precautions
Installation Guide. Pionite Decorative Surfaces One Pionite Road, Auburn, Maine PIONITE ( )
") Installation Guide A Subsidiary of Panolam Surface Systems SMPBRO00-012 6/14 Pionite decorative laminates are designed for finished interior surfaces which require high impact, wear and stain resistance
Installation Guide A Subsidiary of Panolam Surface Systems SMPBRO00-012 6/14 Pionite decorative laminates are designed for finished interior surfaces which require high impact, wear and stain resistance
Refurbishing Your Lincoln Mark VII Dew Wipes
 By Rick One_Way Eckenrode Refurbishing Your Lincoln Mark VII Dew Wipes A common flaw among Lincoln Mark VII s can be found at the top of both doors. The dew wipes (rubber weatherstrip that rests against
Kitchen Base Cabinet: Multiple Drawers Cabinets from Scratch
 Kitchen Base Cabinet: Multiple Drawers by Cabinets from Scratch Our Home from Scratch LLC Page 1 Disclaimer Our Home from Scratch LLC and its legal owners cannot be held responsible for any loss, damage,
Display Case (for J&S)
") Display Case (for J&S) This is constructed of maple plywood with solid maple (soft maple) edge banding. It was made to fit between a door and a kitchen cabinet, and has an elegant circular taper between
Display Case (for J&S) This is constructed of maple plywood with solid maple (soft maple) edge banding. It was made to fit between a door and a kitchen cabinet, and has an elegant circular taper between
WOOD REPAIR TECHNIQUES
 Interior Accommodation / Basic Wood Repair WOOD REPAIR TECHNIQUES 2003-06 INTRODUCTION During the past year we have found a few new items from our various wood repair suppliers to make repairs. Although
Instructables Butcher Block Top
 Instructables Butcher Block Top Project Overview: This project requires basic woodworking skills and access to woodworking machines. Woodworking machines have sharp cutting edges and are NOT forgiving.
DOWNLOADABLE PROJECT PLANS FROM THE EDITORS OF WOOD MAGAZINE Whether it s
 DWNDBE JEC NS F HE EDIS F WD GZINE http://www.woodmagazine.com Whether it s butterflies or baseball cards, Irish lace or South merican stamps, this ten-drawer beauty has got your collection covered. Not
The frame sections of the china hutch are assembled with the aid of glue and spiral dowels. Dowel centers are recommended to
 60 CHINA HUNT 282 ARE YOU LOOKING for a showpiece china hutch to display your elegant chinaware, antique vase, or collectibles? Here's the perfect cabinet for you, with lots of transparent glass to show
Hope Chest. Yet it will be treasured for 100 years.
 Hope Chest Hope Chests have been one of the premiere woodworking gifts for hundreds of years. They were given to young women to use to store all then things they collected in preparation for marriage.
Blakes 7 DSV-1 Liberator
 Blakes 7 DSV-1 Liberator Model kit by Masterpiece Models: www.masterpiecemodels.com Pattern Maker: Alfred Wong Casting: J&S Technologies LLC Parts List Main body 3 Main body nose vanes 4 Main body detail
INSTALLATION INSTRUCTIONS MILLENNIUM DECKING Before Installing Millennium Decking, please read these instructions in their entirety.
 INSTALLATION INSTRUCTIONS MILLENNIUM DECKING Before Installing Millennium Decking, please read these instructions in their entirety. Safety PRE-INSTALLATION Compliance with all applicable local, state
RFS Class II Rocket Assembly Instructions
 RFS Class II Rocket Assembly Instructions Instructions by: Loc Precision Photos by: Great Lakes Space Port Sheboygan Education Foundation, Inc. Welcome and thank you for joining the Rockets for Schools
2.0 INSTALLATION PROCEDURE. 2.1 Open the Speaker Post. 2.2 Install the Speaker and Microphone Grills. Figure 2. SPP2 rear view
 Figure 2. SPP2 rear view 2.0 INSTALLATION PROCEDURE Figure 3. SPP2 rear view with rear panel removed For ease of assembly, locate a clean area where the speaker post can be laid down to be worked on without
Architectural detail manual Classic Wood Awning Windows
 PRODUCT SPECIFICATIONS EXTERIOR FINISH All exterior surfaces completely covered with factory-applied latex primer. Natural exterior (no primer) available as an option. AURALAST WOOD AuraLast wood is fundamentally
 ARIZ NA www.arizonamodels.com Lewis.30 cal MACHINE GUN KIT Assembly Directions- All Scales Reprinted with the permission of Air Age Publications Inc. Lewis Gun Arrangements use for option variations and
Sunhouse. Assembly Manual
 Sunhouse Assembly Manual Thank you for your purchase of this sunhouse. Sunhouse Assembly Manual This manual is designed to simplify the assembly process, however we recommend having an experienced carpenter
FABRICATING ARBOR. koroseal.com/arbor Arbor Veneered Components
 Arbor Veneered Components Arbor natural wood veneer can be applied to any substrate and is flexible enough to be formed around the tightest radii providing the ultimate wood finish. From vertical wall