Installation Instructions AMGC48 Atlas MODS 48 Adjustable Grill Cabinet
|
|
|
- Lee Willis
- 5 years ago
- Views:
Transcription


1 Installation Instructions AMGC48 Atlas MODS 48 Adjustable Grill Cabinet Completely adjustable for any built in grill up to 46 wide Adjustable under grill for doors or drawers Multi-function cabinet, can be used for any of the following: o Grills o Sinks o Side Burners o Storage appliances o Filler Cabinet o Beverage Centers/Ice Chests It is possible to have 3 small appliances in the counter top Counter supports can be added to provide more appliance options in a single cabinet US Patent # 8,511,293


2 Included with this Cabinet 5/16 Hex-Head Self-Tapping Screws: Two End Panels (Left & Right): Square Drive Self-Tapping Screws: Front Cabinet Panel: Small Washers, Bolts and Alan Wrench: Back Cabinet Panel:


")
 Tape Measure 3)")
 Square Drive Bit")
3 Large Bolts and Alan Wrench: Cabinet Floor: Grill/Counter and Door Supports: Permabase for Counter and Front: Vent: Tools You will Need: 1) Cordless Screwdriver/Drill 2) Tape Measure 3) Sharpie/Marker 4) 5/16 Socket 5) Square Drive Bit 6) 4-Inch Grinder w/diamond Bit 7) 4 Level


4 Step 1: Insert small Hex Head bolts with washers and thread halfway into nutserts located in each side panel (4 per panel). Step 2: Line up bolts from Step 1, with the mounting bracket on the back panel of the cabinet. Tighten with the Alan Wrench that came with the cabinet (4 bolts total).

.")


5 Step 3: Attach front panel to side panels and tighten Hex Head Bolts from Step 1, using the Alan Wrench from Step 2 (4 bolts total). Step 4: Consult manufacturer provided cut-out dimensions for the appliances that you will place in this cabinet. Measure and mark on the aluminum frame with a marker or a pencil. This will provide a guide for where to mount grill/counter and door/drawer supports. Measure twice, cut once!


6 Step 5: Mount grill/counter and door/drawer supports using the self-tapping 5/16 Hex Head Screws that were provided with your cabinet. For your convenience, we have provided a 5/16 bit that can be used with a cordless drill or screwdriver.


 cut Permabase for")
7 Step 6: Mount the telescoping counter support using the selftapping 5/16 Hex Head Screws that were provided with your cabinet. This piece connects the grill/counter supports. Step 7: Mark Permabase for grill/counter and door/drawer cutouts. Using a 4 Grinder (other cutting tools will work, but this is the most effective) cut Permabase for appliances. Follow instructions for cutting Permabase (included).


8 Step 8: Using the square drive self-tapping screws that were provided with your cabinet, attach the Permabase to the front and top of the cabinet frame. At this time, also attach the vent in a location that will not have obstructed airflow. Use the 4 Grinder to create the cutout. Step 9: Slide the pre-assembled cabinet floor through the bottom of the end panel.
 If you are connecting this cabinet to another Atlas MOD, use the Large Self-aligning Bolts with the Alan Wrench that were provided with the cabinet.")
9 Step 10: A) If you are only using one cabinet, at this time attach the Atlas MODS End Caps (AMEC) to each end using the square drive self-tapping screws. B) If you are connecting this cabinet to another Atlas MOD, use the Large Self-aligning Bolts with the Alan Wrench that were provided with the cabinet. Step 11: Using a 4 Level, check the slope of the cabinet and kitchen. If necessary, slice remaining Permabase in to 2 wide strips to use as shims. Step 12: You are now ready to apply your finish product to your Atlas MODS
, Tile, etc. We recommend a thickness of no more than 2.")
10 Frequently Asked Questions What can I use to finish my Atlas MODS? Any exterior finish is acceptable for the vertical surfaces, including Stone Veneer, Cultured Stone, Brick, Stucco (Synthetic recommended), Tile, etc. We recommend a thickness of no more than 2. Any exterior finish is also acceptable for the Atlas MODS countertop. Common choices include Granite, poured concrete, tile and marble, but this is not a comprehensive list. Remember, your Atlas MODS Outdoor environment is meant to reflect your taste and should be finished to enhance the overall aesthetic of your outdoor living space.
11 How do I calculate the amount finish materials I need? We have put together some simple calculations to help with this process. Vertical Veneer: Length x 3 Countertop: Length x 3 Countertop with Backsplash: Length x 4 Countertop with ModBar : Length x 5 Do I need an insulation jacket to surround the grill? Atlas MODS are made with aluminum and Permabase exterior cement board, neither of which are flammable. An insulation jacket is unnecessary. There is a gap between the bottom of my grill and the horizontal support beam. Is this normal? This is normal. Most built-in grills are designed to sit on top of the counter, this will raise the grill by the thickness of the countertop finish. If you would like to eliminate this gap, attach some of the excess permabase to the horizontal grill support beam. There is water inside of my kitchen, how do I stop this? It is natural for moisture to collect inside of an outdoor kitchen. Due to the aluminum construction and the low moisture retention of Permabase, moisture accumulation will not impact the quality of your kitchen. Where can I place my Atlas MODS? Mods can be placed on any solid surface. They must not be placed on grass, dirt or other soft bases. Depending upon the length of the island and the local climate, footers may be necessary. Consult a local contractor.

12 Can I put my Atlas MODS on a deck? Yes, provided it is well constructed. My Self-Aligning Bolts don t match up because my patio is very slanted, what do I do? In the case of a patio where a Step-Down is needed with a cabinet, use the 5/16 Self-Tapping Screws to connect one cabinet to another, then proceed with the self-aligning bolts. Your standard cabinet offering is very diverse, but I have a special design in mind. Can I still use Atlas MODS? Yes, and we ll provide you with a 3 Dimensional rendering and Custom Pricing for any outdoor living environment that cannot be built using our standard MODS. I have other questions, but I don t remember them right now. Call us when you remember!

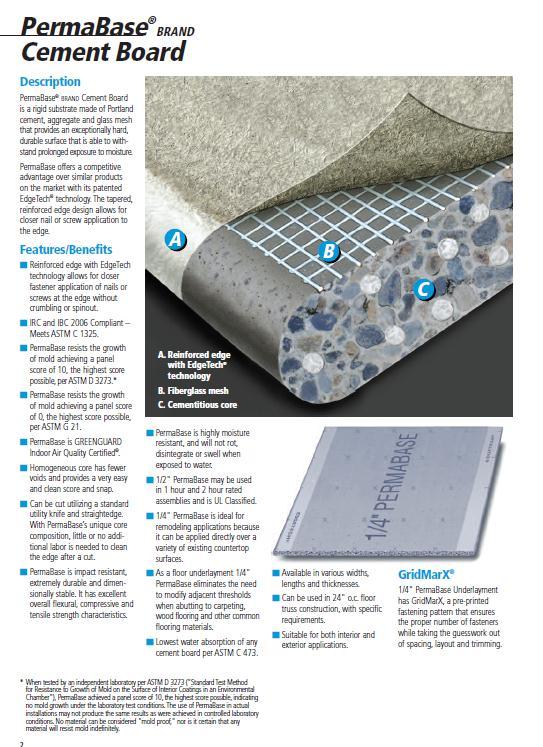
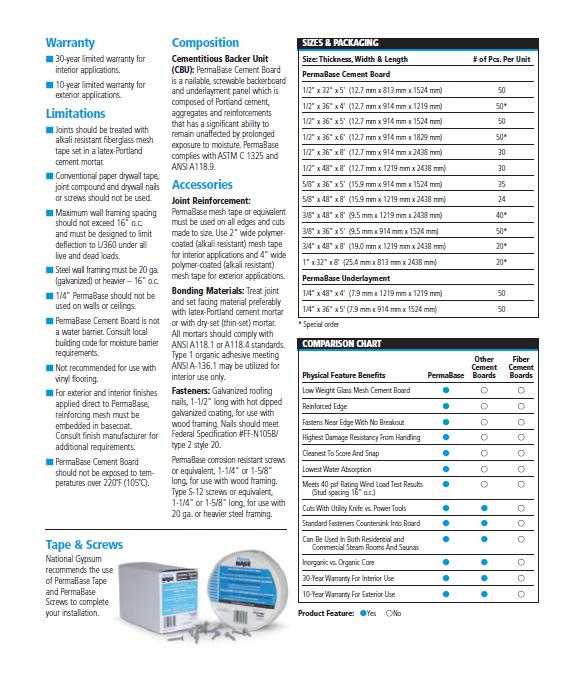
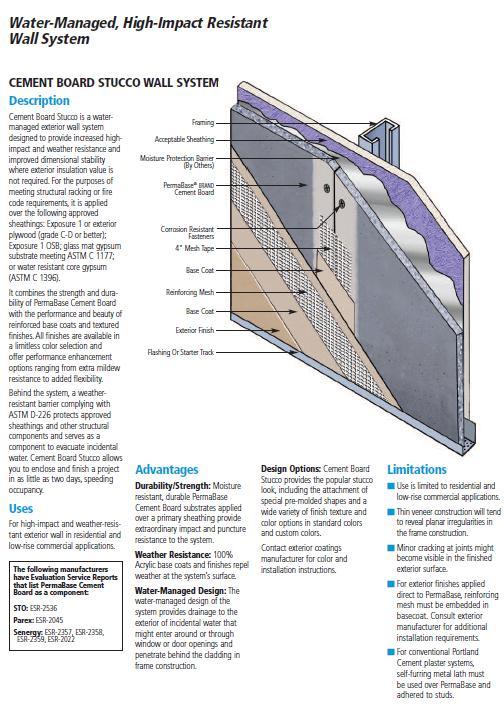
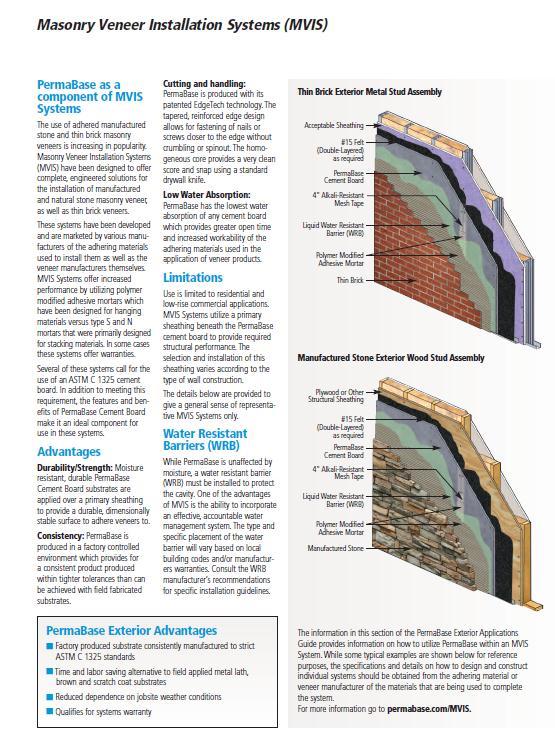
13 Permabase Info from National Gypsum Website
14
15
16
17
18
WK9 WORKTOP KIT Assembly Guide
 WK9 WORKTOP KIT Assembly Guide Tools and supplies needed for assembly: Cordless drill with #2 Phillips bit 5/16" drill bit #2 Phillips screwdriver Bubble level Sharp felt tip marker 3/8" and 7/16" wrenches
FRAMED CABINETRY INSTALLATION MANUAL
 FRAMED CABINETRY INSTALLATION MANUAL AN INDUSTRY GUIDE FOR PROFESSIONAL INSTALLATION RESULTS TO AVOID DAMAGE OR INJURY, READ IN ENTIRETY BEFORE STARTING MATERIAL & TOOL LIST FOR INSTALLATION Safety Glasses
DIY Outdoor Living. Module Assembly. DIY Done Right. General Instructions. Rapid Panel TM Outdoor Kitchen System.
 DIY Outdoor Living DIY Done Right Rapid Panel TM Outdoor Kitchen System General Instructions Module Assembly www.diyoutdoor.kitchen 2 Introduction: Know what you re constructing. When It comes to our Big
1531 Fort Add On **!!IMPORTANT-PLEASE READ!!**
 1531 Fort Add On **!!IMPORTANT-PLEASE READ!!** This Add-On kit will require you to deviate from the main instruction manual. Please follow the outline below so that you will know what steps to be aware
Installation Guide. Pionite Decorative Surfaces One Pionite Road, Auburn, Maine PIONITE ( )
") Installation Guide A Subsidiary of Panolam Surface Systems SMPBRO00-012 6/14 Pionite decorative laminates are designed for finished interior surfaces which require high impact, wear and stain resistance
Installation Guide A Subsidiary of Panolam Surface Systems SMPBRO00-012 6/14 Pionite decorative laminates are designed for finished interior surfaces which require high impact, wear and stain resistance
x2 1/4 (6mm) Floor Anchor
 Floor Anchor") INSTALLATION GUIDE Main Components x1 Rail x5 Wall Spacer x2 Anti-jump Block x2 Straight Strap x1 Right Stopper x1 Left Stopper x5 5/16 (8mm x 60mm) Carriage Bolt x5 5/16 (8mm x25mm) Anchor x5 5/16 (8mm
INSTALLATION GUIDE Main Components x1 Rail x5 Wall Spacer x2 Anti-jump Block x2 Straight Strap x1 Right Stopper x1 Left Stopper x5 5/16 (8mm x 60mm) Carriage Bolt x5 5/16 (8mm x25mm) Anchor x5 5/16 (8mm
Cabinet is 90% assembled, all you need to do is to attach the legs, lay the glass top on the cabinet, connect the faucet, drains & ptrap.
 Things you might need for the installation: vessel sink, plumber's putty(home depot), liquid nails(home depot), Bucket silicone caulk(home depot), Putty knife Plumber's putty Pipe wrench Channel-lock pliers
Synthesis TM Casework Collection Installation
 Synthesis TM Casework Collection Installation Note: Use the table of contents to find the install instruction for various units in the configuration. Applies to Models: Midmark 3 Casework Special Tools:
BARN DOOR HARDWARE KIT
 INSTALLATION GUIDE Main Components x1 Rail x5 Wall Spacer x2 Anti-jump Block x2 Bent Strap x1 Right Stopper x1 Left Stopper x5 5/16 (8mm x 60mm) Carriage Bolt x5 5/16 (8mm x25mm) Anchor x5 5/16 (8mm x
Installation Instructions
 For Medium (15-18.5K) + Heavy duty (-8.5K) Air Conditioner READ BEFORE INSTALLING UNIT To avoid risk of personal injury, property damage, or product damage due to the weight of this device and sharp edges
READ BEFORE INSTALLING UNIT INSTALLATION WARNINGS AND CAUTION
 edium + Heavy duty READ BEFORE INSTALLING UNIT INSTALLATION WARNINGS AND CAUTION Carefully read the installation manual before beginning. Pay attention to danger and safety notices. be exposed: Carefully
Installation Instructions
 For Medium (15-18.5K) + Heavy duty (22-28.5K) Air Conditioner READ BEFORE INSTALLING UNIT To avoid risk of personal injury, property damage, or product damage due to the weight of this device and sharp
Installation Instructions
 edium + Heavy duty READ BEFORE INSTALLING UNIT Preliminary instructions: 1. Check window opening size: the mounting parts furnished with this air conditioner are made to install in a wooden sill double-hung
WALL MOUNT LOCKER ASSEMBLY. 208 Chestnut St, Reading, PA (610)
") WALL MOUNT LOCKER ASSEMBLY 208 Chestnut St, Reading, PA 19602 (610)376-2666 Locker Assembly Wall Mount: locker Installation Introduction: Before beginning, check to ensure the floor is level, and the wall
WALL MOUNT LOCKER ASSEMBLY 208 Chestnut St, Reading, PA 19602 (610)376-2666 Locker Assembly Wall Mount: locker Installation Introduction: Before beginning, check to ensure the floor is level, and the wall
Installation Instructions For Heavy Duty (FAS Models) and Median (FAM Models) Air Conditioners
 and Median (FAM Models) Air Conditioners") Installation Instructions For Heavy Duty (FAS Models) and Median (FAM Models) Air Conditioners Please read ALL instructions before installing. Two people are recommended to install this product. If a new
Installation Instructions For Heavy Duty (FAS Models) and Median (FAM Models) Air Conditioners Please read ALL instructions before installing. Two people are recommended to install this product. If a new
INSTALLATION INSTRUCTIONS INS T A L L A TIO N INS T R U C TIO N S THE MAVERICK HANGER R H
 INS T A L L A TIO N INS T R U C TIO N S THE MAVERICK HANGER 10.6.2016 PARTS INSTALLATION SPECIFICATIONS AND TOOLS INSTRUCTIONS 2-1/4" 2-7/8 11-3/8" 1/4" 2-1/8 PARTS INSTALLATION AND INSTRUCTIONS TOOLS
KITCHEN INSTALLATION GUIDE
 KITCHEN INSTALLATION GUIDE The step-by-step guide to installing your new kitchen right The materials and tools you ll need This brochure is your guide to preparing and installing your new kitchen. Inside
Shetland Stalls Installation Instructions
 Shetland Stalls Installation Instructions RAMM Horse Fencing and Stalls 13150 Airport Hwy. Swanton, OH 43558-9615 1-800-434-8456 Rev. 1/9/18 Before you start Kit can accommodate up to 12 wide stall front
Safety First! Review the Safety Checklist before performing tasks in this chapter.
 Chapter 17. Cabinets 17.1 LAYING OUT KITCHEN CABINET UPPER UNITS 17.2 INSTALLING KITCHEN CABINET SUPPORT STRIPS 17.3 INSTALLING KITCHEN CABINET UPPER UNITS 17.4 INSTALLING RANGE HOOD 17.5 INSTALLING KITCHEN
KITCHEN INSTALLATION GUIDE
 KITCHEN INSTALLATION GUIDE The step-by-step guide to installing your new kitchen right This brochure is your guide to preparing and installing your new kitchen. Inside you ll find tips and ideas, clear
LPR System Installation instructions
 Toll LPR System Installation instructions 1 General Information The following installation instructions should be used as a guide for installing Folding Guard LPR System. Good common sense and appropriate
LOFT DOOR HANGER BARN DOORS & HARDWARE. Hardware Installation Instructions. Page
 LOFT DOOR HANGER Page 1 Specifications 2 7/16" 3/8" 1-1/2 1-3/4 Ø3 3 7/8" 11-1/16 Page 2 Parts and Tools Tools Needed Tape Measure Pencil Drill with 1/8, 1/4 and 3/8 bits, 1 spade bit and Phillips bit
Installation Instructions
 READ BEFORE INSTALLING UNIT INSTALLATION WARNINGS AND CAUTION Carefully read the installation manual before beginning. Follow each step as shown. Observe all local, state, and national electrical codes
GlideRite Retractable Cover System For HotSpring & Tiger River Spas (except Classic & pre-2000 Landmark Spas)
") List of Contents Quantity Description 12 #10 x 1 ½ Flat Head Phillips Screw (see pg. 2) 2 #10 x ½ Pan Head Phillips Screw (see pg. 2) 8 ¼ x 2 ½ Lag Bolt (see pg. 2) 7 ¼ 20 x 5 / 8 Hex Head Bolt (see pg.
List of Contents Quantity Description 12 #10 x 1 ½ Flat Head Phillips Screw (see pg. 2) 2 #10 x ½ Pan Head Phillips Screw (see pg. 2) 8 ¼ x 2 ½ Lag Bolt (see pg. 2) 7 ¼ 20 x 5 / 8 Hex Head Bolt (see pg.
Installation Manual For ToddPod Outdoor Shower Enclosures
 Installation Manual For ToddPod Outdoor Shower Enclosures Contact us at 888-545-9763 or email us at office@toddpod.com with any questions during the installation process. Our service team is available
Closet System Installation Manual
 Closet System Manual Thank you For choosing our Custom Closet Collection to fit all your needs Closets come fully assembled to make your project an enjoyable and satisfying experience. With quality Custom
INS T A L L A TIO N INS T R U C TIO N S HORSESHOE W/ BAR HANGER
 INS T A L L A TIO N INS T R U C TIO N S HORSESHOE W/ BAR HANGER 6-1/2" 5" 2-7/16" 3-7/16" Ø2-7/8" 4-7/8" 11" 2" 3/16" 1/2" HORSESHOE W/ BAR S P ECIFICATIONS PARTS AND TOOLS Tools Needed Tape Measure Pencil
Heavy-Duty Bypass Track System
 Heavy-Duty Bypass Track System Please Note: This track system must be installed with the screws going into a solid surface such as studs or a header. Due to the spacing of the holes on these Brackets,
Installing your new Bevella Top. L Shaped Countertop with Joints No Finished Ends (Fits Between Four Walls)
") Installing your new Bevella Top L Shaped Countertop with Joints No Finished Ends (Fits Between Four Walls) Bevella RTI Countertops are engineered and manufactured to the highest quality standards, built
Installing your new Bevella Top L Shaped Countertop with Joints No Finished Ends (Fits Between Four Walls) Bevella RTI Countertops are engineered and manufactured to the highest quality standards, built
VINYL CLASSIC FREESTANDING PERGOLA ASSEMBLY INSTRUCTIONS
 P a g e 1 VINYL CLASSIC FREESTANDING PERGOLA ASSEMBLY INSTRUCTIONS Shown: 8' x 12' Vinyl Classic Pergola with 12" Top and Main Runner Spacing The design of this pergola is based on all posts being installed
WAREHOUSE HANGER INSTALLATION INSTRUCTIONS R H INS T A L L A TIO N INS T R U C TIO N S
 INS T A L L A TIO N INS T R U C TIO N S WAREHOUSE HANGER NOTE: Due to the size and weight of the Warehouse Hanger it is recommended that this Hanger be installed on 3 4 or wider doors. 10.11.2016 2-3/16"
BUILDERS ONE Framed Cabinet. Installation Manual
 BUILDERS ONE Framed Cabinet Installation Manual 1 BEFORE YOU BEGIN: Check your cabinetry against your design plan to ensure that you have all required cabinetry moldings, fillers and accessories to complete
Installation Guidelines
 Page 1 Tools You ll Need 4 ft. Carpenter s level Chalk line (to mark U channel locations) Cordless drill/nut driver Caulking gun Chop saw with a metal cutting blade on it (required to make accurate and
INSTALLATION INSTRUCTIONS INS T A L L A TIO N INS T R U C TIO N S ROD IRON SCROLL HANGER R H
 INS T A L L A TIO N INS T R U C TIO N S ROD IRON SCROLL HANGER 10.5.2016 2-1- 3/16" 11/16" 8" 8 O 2-7/8 Ø2-7/8" 3-1/2 3-1/2" 12-9/16 12-9/16" PLEASE NOTE: These instructions are specific to a particular
Equilibrium. Conference Table. Installation Instruction. Revision B 11/07/16
 Equilibrium Conference Table Installation Instruction Revision B 11/07/16 Equilibrium End User Agreement Enwork Equilibrium table bases must be installed directly onto a four inch minimum thickness concrete
x2 1/4 (6mm) Floor Anchor
 Floor Anchor") Main Components x1 Rail x5 Wall Spacer x2 Anti-jump Block x2 Bent Strap x1 Right Stopper x1 Left Stopper x5 5/16 (8mm x 60mm) Carriage Bolt x5 5/16 (8mm x25mm) Anchor x5 5/16 (8mm x 90mm) Wall Screw x2
Main Components x1 Rail x5 Wall Spacer x2 Anti-jump Block x2 Bent Strap x1 Right Stopper x1 Left Stopper x5 5/16 (8mm x 60mm) Carriage Bolt x5 5/16 (8mm x25mm) Anchor x5 5/16 (8mm x 90mm) Wall Screw x2
Required Tools: Suggested Additional Tools: 1 Cordless Drill with Robertson Bits 1 Ratchet Wrench 1 7/16 or 11mm socket 1 7/16 or 11mm Gear Wrench
 Thank you for your recent purchase of a Cabinets by Hayley garage cabinet system. You are about to experience the best made cabinets that you can purchase. Cabinets by Hayley are designed for beauty and
PFW 6875 Installation Guide Installationsanleitung, Guía de Instalacíon, Guida de Installazione, Guide d Installation, Installatie gids
 Maximum Flat Panel Weight: 160 lb. / 72.57 kg. Included Components Wall Mount (Qty 1) Extension Brackets (Qty 2) Bracket (Qty 1 Pair) 5/16 Flat Washers (Qty 4) Universal Spacers (Qty 8) M5 Allen Driver
Frameless Fixed Panel Slider
 INSTALLATION INSTRUCTIONS Frameless Fixed Panel Slider QCI-5279 SINGLE ROLLER WITH ANTI-JUMP DOUBLE ROLLERS QCI5279 Rev Page Certified 08/09/6 Tools: To install your New Shower Enclosure, you may need
GlideRite Retractable Cover System For Hot Spot Spas (SE & SLX only)
") List of Contents Quantity Description 12 #10 x 1 ½ Flat Head Phillips Screw (see pg. 2) 2 #10 x ½ Pan Head Phillips Screw (see pg. 2) 8 ¼ x 2 ½ Lag Bolt (see pg. 2) 7 ¼ 20 x 5 / 8 Hex Head Bolt (see pg.
List of Contents Quantity Description 12 #10 x 1 ½ Flat Head Phillips Screw (see pg. 2) 2 #10 x ½ Pan Head Phillips Screw (see pg. 2) 8 ¼ x 2 ½ Lag Bolt (see pg. 2) 7 ¼ 20 x 5 / 8 Hex Head Bolt (see pg.
Household Appliances. Over-the-Range Microwave. Installation Instructions. For Models: HMV9302, HMV9305, HMV9306, HMV9307
 Over-the-Range Microwave Household Appliances Installation Instructions For Models: HMV9302, HMV9305, HMV9306, HMV9307 PLEASE READ ENTIRE INSTRUCTIONS BEFORE PROCEEDING IMPORTANT: Save these instructions
INGROUND COVER INSTALLATION GUIDE
 INGROUND COVER INSTALLATION GUIDE GENERAL INSTRUCTIONS Refer to Anchor Plan provided with cover. Cover must be laid out according to the plan to ensure proper installation. IMPORTANT: DO NOT DRAG COVER
INSTALLATION INSTRUCTIONS IMPERVIA SLIDING PATIO DOOR WITH FINS
 2008 Pella Corporation Part Number: 803V0101 INSTALLATION INSTRUCTIONS IMPERVIA SLIDING PATIO DOOR WITH FINS Installation Instructions for Typical Wood Frame Construction. These instructions were developed
Homestead Bar Cabinet IMPORTANT NOTE Carefully remove all the parts from the carton and put them individually on a soft cloth to prevent s
 88 5527 991 Homestead Bar Cabinet IMPRTANT NTE Carefully remove all the parts from the carton and put them individually on a soft cloth to prevent scratches or other damages occuring to the wood parts.
" BASE CABINET
 INSTALLATION GUIDE INSTALLATION GUIDE Before You Begin Installing Your Kitchen Cabinets 1. Read through installation guide to understand all steps and gather tools needed. 2. Verify that all of the hardware,
INSTALLATION INSTRUCTIONS
 INSTALLATION INSTRUCTIONS A CSW Industrials Company PJC Floor Pan Expansion Joint Covers The following instructions are very important. Read them carefully, and be sure you understand them completely before
Independent Containment System (ICS)
") Installing the Independent Containment System (ICS) Complete these instructions to install the Independent Containment System (ICS). Prerequisites This installation requires a team of at least two people.
Installing the Independent Containment System (ICS) Complete these instructions to install the Independent Containment System (ICS). Prerequisites This installation requires a team of at least two people.
Clearview Railing System Installation Instructions
 Clearview Railing System Installation Instructions Disclaimer: AGS Stainless, Inc. has its Clearview Railing Systems designed by a professional engineer to meet the requirements of the latest national
Preference Collection 5531 Accessory Console I NSTALLATION GUIDE
 Preference Collection 5531 Accessory Console I NSTALLATION GUIDE WARNING Failure to install the 5531 as described in this installation guide may cause the unit to collapse, resulting in serious injury
Qwik-Fence Installation Instructions
 Qwik-Fence Installation Instructions 1 Tools Required The following installation instructions should be used as a guide for installing Folding Guard Qwik-Fence Partitions. Good common sense and appropriate
OVER THE RANGE MICROWAVE OVEN INSTALLATION INSTRUCTIONS
 OVER THE RANGE MICROWAVE OVEN INSTALLATION INSTRUCTIONS Please read and save these installation instructions. MODEL NO.: DOTR12CWIV/DOTR12CBIV P/N: 3828W5U0202 YOUR SAFETY FIRST Read this entire manual
INSTALLATION GUIDE Locker With Top Shelf Transit Low Roof & Nissan NV Low Roof ( Aluminum )
") INSTALLATION GUIDE 7115 Locker With Top Shelf Transit Low Roof & Nissan NV Low Roof ( Aluminum ) QUICK START GUIDE Phase 1 - Assembly q 1.1 Setup... q 1.2 Locker w/ Top Shelf Assembly... 3-5 6-13 Phase
INSTALLATION GUIDE 7115 Locker With Top Shelf Transit Low Roof & Nissan NV Low Roof ( Aluminum ) QUICK START GUIDE Phase 1 - Assembly q 1.1 Setup... q 1.2 Locker w/ Top Shelf Assembly... 3-5 6-13 Phase
CXT PRO RAILING INSTALLATION INSTRUCTIONS For Installations Using Aluminum and Glass Balusters Sold Separately
 CXT PRO RAILING INSTALLATION INSTRUCTIONS For Installations Using Aluminum and Glass Balusters Sold Separately CCRR-0171 PFS AA-652 Drill/power screwdriver Assorted drill bits Hammer Miter or circular
Cabinetry Installation
 Cabinetry Installation Easy to follow step-by-step kitchen cabinet installation Hammer Pry bar Screwdriver Phillips Flathead Level TOOL AND MATERIAL LIST Tape measure Pencil Straight edge Drill 3/16" drill
Joiner Kit For Models N388, C450, E402B, E411T, E415H, E440T, E442B, E521T and E522B
 Joiner Kit For Models N388, C450, E402B, E411T, E415H, E440T, E442B, E521T and E522B KIT COMPONENTS Part Illustration Description Rear Bracket Front Lower Bracket Front Upper Bracket KIT APPLICATION This
INSTALLATION GUIDE MICROWAVE OVEN UPMC3084ST. MFL _00
 INSTALLATION GUIDE MICROWAVE OVEN UPMC3084ST MFL06208710_00 www.thesignaturekitchen.com YOUR SAFETY FIRST BEFORE YOU START Proper installation is the installer's responsibility! Proper installation by
Steel Solutions USA 602 E. Walnut Street Watseka, IL p: (888) f: (815)
 f: (815)") Steel Solutions USA 602 E. Walnut Street Watseka, IL 60970 p: (888) 875-5004 f: (815) 432-3364 sales@steelsolutionsusa.com Published February 2011 2011 Steel Solutions USA. All rights reserved. version
Steel Solutions USA 602 E. Walnut Street Watseka, IL 60970 p: (888) 875-5004 f: (815) 432-3364 sales@steelsolutionsusa.com Published February 2011 2011 Steel Solutions USA. All rights reserved. version
SwingSafe Swing-Away Mailbox Support Diagram
 SwingSafe Swing-Away Mailbox Support Diagram Wood Mounting Plates Top Arm (B) Muffler Clamps (A) Carriage Bolts and Nuts Bottom Arm 4-Foot U-Channel Post USPS Recommended 42-44 Height Ground Slope Hex
INSTALL INSTRUCTIONS WELCOME TO THE NEWAGE PERFORMANCE CABINETRY SERIES NEWAGE STEEL WELDED CABINETRY
 NEWAGE STEEL WELDED CABINETRY WELCOME TO THE NEWAGE PERFORMANCE CABINETRY SERIES ALL CABINETS MUST BE MOUNTED TO STUDS ON A SECURE WALL, AS PER THESE INSTRUCTIONS. FAILURE TO DO SO MAY RESULT IN SERIOUS
129 KITCHEN BASE CABINET 480
 129 KITCHEN BASE CABINET 480 There are two sorts of kitchen cabinets: base cabinets, which sit on the floor, and wall cabinets. Base cabinets provide both storage space and work surfaces. They often house
M10 x 75mm Sockethead Cap Screws. 5mm Fender Washer (12) Included - (8) Required. #10 x 2.5" PH Wood Screws. (30) Included - (24) Required
 Included - (8) Required. #10 x 2.5 PH Wood Screws. (30) Included - (24) Required") Door System Unit - Hardware Tools Included: (2) 2mm Allen Wrenches, (2) 3mm Allen Wrenches, (2) 4mm Allen Wrenches, (2) 6mm Allen Wrenches, and (1) 8mm T-Handle Allen Wrench Tools Required: Phillips Screwdriver,
Door System Unit - Hardware Tools Included: (2) 2mm Allen Wrenches, (2) 3mm Allen Wrenches, (2) 4mm Allen Wrenches, (2) 6mm Allen Wrenches, and (1) 8mm T-Handle Allen Wrench Tools Required: Phillips Screwdriver,
Safety First! Review the Safety Checklist before performing tasks in this chapter.
 Chapter 17. Cabinets 17.1 LAYING OUT KITCHEN CABINET UPPER UNITS 17.2 INSTALLING KITCHEN CABINET SUPPORT STRIPS 17.3 INSTALLING KITCHEN CABINET UPPER UNITS 17.4 INSTALLING RANGE HOOD 17.5 INSTALLING KITCHEN
Metro Series Sauna. installation instructions
 Metro Series Sauna installation instructions Please immediately check for any hidden damage that may have occurred in shipping. If any damage is found you must notify the delivering carrier within seven
Assembly Instructions
 10' and 12' Octagon Cedar Gazebo Assembly Instructions Toll Free: 866.768.8465 Hours: 9-5 Monday-Friday EST www.homeplacestructures.com Package ships as shown revised 06/20/09 Cedar Gazebo Assembly Instructions
BD101K / BD101K INSTALLATION GUIDE BARN DOOR HARDWARE TOP OF DOOR STRAP KIT
 Common Components x1 Right Stopper x1 Left Stopper x2 Top of Door Strap x2 Anti-jump Block x2 #8 (4.2mm x 25mm) Floor Screws x2 1/4 (6mm) Floor Anchor x1 Internal Floor-Mounted Door Guide BD850-BR/MB/SS
TRUE TECHNICAL SERVICE MANUAL - ALL MODELS. DOORS/DRAWERS/LIDS
 DOORS/DRAWERS/LIDS 55 56 NOTES DOORS/DRAWERS/LIDS Springs 97 TORSION SPRING REPLACEMENT GDM RADIUS FRONT - SWING DOOR INSTALLATION INSTRUCTIONS Tools Required (2) - 1 8" drift Punch (forged) Needle-Nose
ESA-100 Fixed Sidelite/Non Breakout
 /Non Breakout Exterior View Installation Instructions For use with ESA II Controller 1 Tools Required: Suggested Fasteners Required - (Not supplied) Screwdrivers Small Straight (FlatBlade) - for Terminal
Assembly Instructions Nevins Phone Booth
 Assembly Instructions Nevins Phone Booth Included Hardware Tools Required supplied by installer Drill & Bit Bolt A - (16) 1/4-20 x 1-1/2 hex head Bolt B - (20) 1/4-20 x 2-1/2 phillips head Screw 1 - (24)
ROOM FOLD SLIDING FOLDING INTERNAL DOORSET FITTING & FIXING GUIDELINES
 EDITION 7 ROOM FOLD SLIDING FOLDING INTERNAL DOORSET IMPORTANT You can only assemble these door configurations by using the frame provided. Your warranty will be invalid if other alternatives are used.
Office Partitions WARNING. Assembly Instructions. Customer Service A S S E M B LY HARDWARE H1 H2 H3 H4 H5 H8 H9 H10 H11 H12
 Customer Service 1-800-645-2986 Assembly Instructions WARNING In order to prevent structural failure, instability, t i p - o v e r, and/or serious injury, please follow i n s t ructions care f u l l y.
Balustrade Systems / Installation Instructions
 A. PARTS AND SUPPLIES NEEDED FOR INSTALLATION Hardware included for each 10 section of rail: 2 3 x 1-1/2 L-brackets 4 1-3/4 x 3/16 Blue hex-head screws for anchoring the L-brackets to the newel cap, column
GRANDIO G R E E N H O U S E S CONCRETE ANCHORING KIT FOR GRANDIO SUMMIT FLAT MOUNT BASE KITS CONCRETE ANCHORING KIT PARTS LIST FOR ALL SIZES
 GRANDIO G R E E N H O U S E S CONCRETE ANCHORING KIT FOR GRANDIO SUMMIT FLAT MOUNT BASE KITS CONCRETE ANCHORING KIT PARTS LIST FOR ALL SIZES GRAPHIC PART NAME 2X8 2X2 2X6 2X20 2X24 2X28 2X32 TAPCON 44
MALEKO WALL-MOUNT FAUCET INSTALLATION
 SKU(s): 934146 BEFORE YOU BEGIN We recommend consulting a professional if you are unfamiliar with installing bathroom fixtures and plumbing. Signature Hardware accepts no liability for any damage to the
FlexFrame - Storage Components and Skins
 FlexFrame - Storage Components and Skins 1/4 Square Drive Ball-Point Hex-Bit Socket 1/8 Short Hex, 1-1/2 Overall Length McMaster Part # 54075A44 Table of Contents Topic Page Storage Components 2 General
1/4 FRAMELESS DOOR WITH INLINE PANEL 1413A-1713A-1813A
 1/4 FRAMELESS DOOR WITH INLINE PANEL 1413A-1713A-1813A F AB GLASS AND MIRROR www.fabglassandmirror.com Call: +1 888-474-2221 Fax: (614)-334-4919 Office Timing: 8:30-18:00 EST info@fabglassandmirror.com
User Instructions Multiline Otter Scoreboard Caddy Assembly
 List of parts: User Instructions Multiline Otter Scoreboard Caddy Assembly Single Caddy Double Caddy 1 1 Base assembly with attached wheels 2 4 1 1 2 4 4 8 10 20 12 Uprights (60 or 74 aluminum extrusion)
IDR assembly instructions:
 IDR assembly instructions: Required Tools: 2 X 12mm Open End Wrench 14mm open end wrench #2 Phillips Head Screw Driver (Drill with adjustable torque clutch recommended) 8mm nut driver (Supplied in IDR-AK)
Grenite Installation Information.
 Grenite Installation Information. v2.0 Effective: 11/2014 Thank you for your investment in Grenite products. This information is provided to help you fabricate and install Grenite products in a beautiful,
How-to-Install. Laminate Countertops and Sheet Laminate. FREE brochure Reverso en español
 FREE brochure Reverso en español How-to-Install Laminate Countertops and Easy to install instructions provided inside Multiple colors available for unique design options Durable and easy to care for Accessory
Ripple Hanger ASSEMBLY INSTRUCTIONS
 Ripple Hanger ASSEMBLY INSTRUCTIONS RIPPLE HANGER Recommended Tools Drill with 1/8, 1/4, and 1/2 Drill Bits, 1-1/8 Forstner Bit or 1-1/8 Spade Bit, and Phillips Bit 9/16 and 5/8 Combination Wrench Socket
Double Beam Freestanding Pergola Installation Guide
 Double Beam Freestanding Pergola Installation Guide Patent Pending. Copyright 2011 USAVinyl, LLC - All Rights Reserved The information contained in these instructions are proprietary to USAVinyl, LLC and
INSTALLATION INSTRUCTIONS VENETIAN 84" SLIDING SHOWER DOOR SYSTEM (180º INSTALLATION)
") INSTALLATION INSTRUCTIONS VENETIAN 84" SLIDING SHOWER DO SYSTEM (180º INSTALLATION) 28539 Industry Drive, Valencia, CA 91355 Toll Free Phone: (877) 728-3874 Toll Free Fax: (888) 440-9567 Phone: (661) 775-1675
INSTALLATION INSTRUCTIONS VENETIAN 84" SLIDING SHOWER DO SYSTEM (180º INSTALLATION) 28539 Industry Drive, Valencia, CA 91355 Toll Free Phone: (877) 728-3874 Toll Free Fax: (888) 440-9567 Phone: (661) 775-1675
C PART LIST HARDWARE LIST. Kitchen Cart IMPORTANT NOTE
 88 9200 006C Kitchen Cart IMPORTANT NOTE Carefully remove all the parts from the carton and put them individually on a soft cloth to prevent scratches or other damages occuring to the parts. We have taken
10 Octagon Cedar Gazebo Assembly Instructions
 10 Octagon Cedar Gazebo Assembly Instructions Toll Free: 866.768.8465 Hours: 9-5 Monday-Friday EST www.homeplacestructures.com Package ships as shown revised 06/22/09 10 Cedar Gazebo Assembly Instructions
Assembly Instructions
 Unite Panel System Hinge Door July 2016 #12 x / slotted hex washer head bolt Figure 1 threshold bracket frame Detail F threshold bracket threshold bracket (installed) #12 x / slotted hex washer head bolt
Almost Heaven Saunas THE AUTHENTIC SAUNA EXPERIENCE. Patterson Sauna Installation & Owner s Manual
 Almost Heaven Saunas THE AUTHENTIC SAUNA EXPERIENCE Patterson Sauna Installation & Owner s Manual Read this entire manual through to the end before proceeding with the assembly. ELECTRICAL REQUIREMENTS
Wooden Frame Type Instruction Manual
 Wooden Frame TypeInstruction Manual Thank you for selecting our product. Before starting installation, please read this manual thoroughly to ensure correct installation. Please keep this manual at hand
Barnside Pantry IMPORTANT NOTE Carefully remove all the parts from the carton and put them individually on a soft cloth to prevent scratch
 88 5516 653 Barnside Pantry IMPORTANT NOTE Carefully remove all the parts from the carton and put them individually on a soft cloth to prevent scratches or other damage occurring to the parts. We have
INSTALLA- INSTALLATION. A guide to install a new IKEA kitchen
 A guide to install a new IKEA kitchen INSTALLA- INSTALLATION TION GUIDE GUIDE This guide provides you with tips and step-by-step instructions on how to install your kitchen on your own. Printed on: 06/2018
REVIEW ALL INSTRUCTIONS COMPLETELY BEFORE ATTEMPTING INSTALLATION
 INSTALLATION INSTRUCTIONS Service Doors, Counter Service Doors & Grilles REVIEW ALL INSTRUCTIONS COMPLETELY BEFORE ATTEMPTING INSTALLATION GENERAL NOTES: Instructions are intended for qualified door mechanics
Preference Collection 5580 Treatment Console INSTALLATION GUIDE
 Preference Collection 5580 Treatment Console INSTALLATION GUIDE 0 WARNING Failure to install the 5580 as described in this installation guide may cause the unit to collapse, resulting in serious injury
MAKO TM CASH DISPENSER
 MAKO TM CASH DISPENSER PEDESTAL INSTALLATION GUIDE VERSION 2.0 TDN 0702-000 2/99 CORPORATE HEADQUARTERS: RMA (RETURN MATERIAL AUTHORIZATION) RETURN ADDRESS: 522 E. Railroad Street 2405 B Street Long Beach,
I n s t a l l a t i o n S p e c i f i c a t i o n s
 13-27 I n s t a l l a t i o n S p e c i f i c a t i o n s f o r S o l i d P a n e l R e a d y ( o p ) a n d G l a s s F r a m e d P a n e l R e a d y ( o g ) PRESERVE THE MOMENT & INSTALL GUIDE 13 INSTALLATION
Assembly Instructions Nevins Phone Booth
 Assembly Instructions Nevins Phone Booth Included Hardware Tools Required supplied by installer Drill & Bit Socket Wrench Bolt A - (16) 1/4-20 x 1-1/2 hex head Bolt B - (20) 1/4-20 x 2-1/4 phillips head
WOOD COUNTERTOP INSTALLATION INSTRUCTIONS
 1209 Logan Circle, Atlanta, Georgia 30318 www.craft-art.com (404)352-5625 WOOD COUNTERTOP INSTALLATION INSTRUCTIONS Required Tools and Supplies Cordless Drill Belt Sander with 60 and 80 grit belts. Shur-form
Box Track INSTALLATION INSTRUCTIONS
 Box Track INSTALLATION INSTRUCTIONS BOX TRACK Recommended Tools Level Tape Measure Pencil Drill with 1/8, and 1/4, Drill Bits, Phillips Bit and Slotted Bit Socket Wrench with 9/16 Socket 9/16 and 5/8 Wrench
USER GUIDE & SERVICE MANUAL
 & SERVICE MANUAL RIGHT PRODUCT. RIGHT PLACE. RIGHT TEMPERATURE. SINCE 1962. Modular 3000 Series 3024BEV 24" Beverage Center Contents Intro Installation Integrated Panel Dimensions Integrated Grille / Plinth
Cabinet Planning Guide
 Cabinet Planning Guide After all the thinking, dreaming and planning, the time has come to get started. The following workbook will assist you with the information you need to start the process. Complete
Installation Instructions
 4 3 2 Installation Instructions Self Cleaning Radiant Electric Slide-In Range JSP46, JSP56, JS966 If you have questions, Call 800-GE-CARES or visit our website at: www.geappliances.com Skill Level: High
AUTOMATIC ADVANCE MANUAL
 AUTOMATIC ADVANCE MANUAL AVL Looms, Inc. 3851 Morrow Lane, Suite #9 Chico, CA 95928-8305 530 893-4915 530 893-1372 fax # info@avlusa.com www.avlusa.com Copyright 2009 TABLE OF CONTENTS Page # I. Parts.........................