I n s t a l l a t i o n S p e c i f i c a t i o n s
|
|
|
- Julian Melton
- 5 years ago
- Views:
Transcription
1 13-27 I n s t a l l a t i o n S p e c i f i c a t i o n s f o r S o l i d P a n e l R e a d y ( o p ) a n d G l a s s F r a m e d P a n e l R e a d y ( o g ) PRESERVE THE MOMENT & INSTALL GUIDE 13
2 INSTALLATION SPECIFICATIONS - SOLID (OP) AND GLASS FRAMED PANEL (OG) True s 24 inch units with Solid and Glass Framed Panels are designed to be inserted into a cabinet opening or free standing. Below are recommended dimensions for rough opening. TRUE S CABINETS ARE UL RATED FOR USE IN OUTDOOR SETTINGS. IN OUTDOOR LOCATIONS WHERE THE AMBIENT TEMPERATURE REGULARLY EXCEEDS 95 F, IT IS RECOMMENDED TO VENT THE REAR OF THE CUT OUT OPENING IN THE AREA SHOWN BELOW FOR OPTIMUM PERFORMANCE. THE RECOMMENDED CUT OUT SIZE IS 4" X 10". Rough Opening HEIGHT 34 1/2 " Rough Opening DEPTH 24" Rough Opening WIDTH 24" 23 7 / 8 " Front view of unit between cabinets 29 3 / 4 " 4 1 / 8 " 14 TRUE RESIDENTIAL


3 ALL REFRIGERATOR FREEZER TUR-24-R/L-OP-B TUR-24-R/L-OG-B TUR-24D-OP-B TUF-24-R/L-OP-B TUF-24D-OP-B BEVERAGE CENTER WINE CABINET TBC-24-R/L-OP-B TBC-24-R/L-OG-B TWC-24-R/L-OP-B TWC-24-R/L-OG-B BEVERAGE DISPENSER DUAL ZONE WINE CABINET TWC-24DZ-R/L-OP-B TWC-24DZ-R/L-OG-B TUR-24BD-R/L-OP-B TUR-24DD-R/L-OP-B & INSTALL GUIDE 15
4 23 7 /8" 3/4" 23 7 /8" 23 1 /8" 46 7 /8" 25 1 /4" 4 1 /8" 3 3 /4" 23 7 /8" 23 7 /8" 23 1 /8" 42 5 /8" 21" 4 1 /8" 3 3 /4" 23 7 /8" 23 7 /8" 23 1 /8" 11 7 /8" 10 1 /4" 50" 46 7 /8" 50" 25 1 /4" 4 1 /8" 3 3 /4" 24" SINGLE TAP UNIT ACCOMMODATES (1) SHORT 1/4 BARREL, (1) SLIM 1/4 BARREL, OR (1) 1/6 BARREL. 24" DUAL TAP UNIT ACCOMMODATES (2) 1/6 BARRELS OR (1) SLIM 1/4 BARREL AND (1) 1/6 BARREL. * INCLUDING 3/4" THICK PANEL (PROVIDED BY OTHERS) DIMENSIONS MAY VARY BY ± 1 / 8 " 16 TRUE RESIDENTIAL
5 INSTALLATION SPECIFICATIONS - SOLID (OP) AND GLASS FRAMED PANEL (OG) True s 15 inch units with Solid and Glass Framed Panels are designed to be inserted into a cabinet opening or free standing. Below are recommended dimensions for rough opening. TRUE S CABINETS ARE UL RATED FOR USE IN OUTDOOR SETTINGS. IN OUTDOOR LOCATIONS WHERE THE AMBIENT TEMPERATURE REGULARLY EXCEEDS 95 F, IT IS RECOMMENDED TO VENT THE REAR OF THE CUT OUT OPENING IN THE AREA SHOWN BELOW FOR OPTIMUM PERFORMANCE. THE RECOMMENDED CUT OUT SIZE IS 4" X 10". Rough Opening HEIGHT 34 1/2 " Rough Opening DEPTH 24" Rough Opening WIDTH 15" Front view of unit between cabinets & INSTALL GUIDE 17

6 ALL REFRIGERATOR TUR-15-R/L-OP-B TUR-15-R/L-OG-B WINE CABINET TWC-15-R/L-OP-B TWC-15-R/L-OG-B BEVERAGE DISPENSER TUR-15BD-R/L-OP-B 18 TRUE RESIDENTIAL
 SLIM 1/4 BARREL OR (1) 1/6 BARREL.")
7 14 7 /8" 23 7 /8" 37 7 /8" 16 1 /4" 4 1 /8" 3 3 /4" 14 7 /8" 23 7 /8" 23 1 /8" 7 1 /2" 50" 10 1 /4" 50" 37 7 /8" 16 1 /4" 4 1 /8" 3 3 /4" 15" SINGLE TAP UNIT ACCOMMODATES (1) SLIM 1/4 BARREL OR (1) 1/6 BARREL. * INCLUDING 3/4" THICK PANEL (PROVIDED BY OTHERS) DIMENSIONS MAY VARY BY ± 1 / 8 " & INSTALL GUIDE 19


8 CUSTOM PANEL INSTALLATION - SOLID DOOR REFRIGERATOR / FREEZER Overlay units can be fitted with custom panels to match adjacent cabinetry. Two specification options for panels sizes are given in these instructions for overlay units: Standard overlays and Integrated Panels. The standard overlay panel dimensions fully cover the provided appliance door. The integrated panel options extend above the door and conceal the hinge assembly to match full overlay cabinet doors. See pictures below for reference. STANDARD OVERLAY PANEL INTEGRATED OVERLAY PANEL 20 TRUE RESIDENTIAL
9 CUSTOM PANEL INSTALLATION - SOLID DOOR REFRIGERATOR / FREEZER STANDARD OVERLAY PANEL 23 5/8" 14 5/8" SOLID DOOR DOOR PANEL WIDTH 23 5/8 " 14 5/8 " DOOR PANEL HEIGHT 29 23/32 " 29 23/32 " DOOR PANEL DEPTH 3/4" max 3/4" max DOOR PANEL WEIGHT 10 lb. max 10 lb. max RAIL STYLE DIMENSION 2 min 2 min /32 1/8" " /32 1/8" " INTEGRATED OVERLAY PANEL 23 5/8" 14 5/8" SOLID DOOR DOOR PANEL WIDTH 23 5/8 " 14 5/8 " DOOR PANEL HEIGHT 30 1/8 " 30 1/8 " DOOR PANEL DEPTH 3/4" max 3/4" max DOOR PANEL WEIGHT 10 lb. max 10 lb. max RAIL STYLE DIMENSION 2 min 2" min 30 1/8" 30 1/8" 3/4" A B 23 5/8" B 14 5/8" 5/8" 9/16" DETAIL A SCALE 1 : 1 BACK BACK 1" DETAIL B SCALE 1 : 1 & INSTALL GUIDE 21
10 CUSTOM PANEL INSTALLATION - GLASS DOOR REFRIGERATOR STANDARD OVERLAY PANEL 23 5/8" 14 5/8" SOLID DOOR DOOR PANEL WIDTH 23 5/8 " 14 5/8 " DOOR PANEL HEIGHT 29 23/32 " 29 23/32 " DOOR PANEL DEPTH 3/4" max 3/4" max DOOR PANEL WEIGHT 10 lb. max 10 lb. max /32 1/8" " /32 1/8" " RAIL STYLE DIMENSION 2 min 2 min VIEWABLE AREA WIDTH 19 5/8 10 5/8 VIEWABLE AREA HEIGHT 25 23/ /32 INTEGRATED OVERLAY PANEL 23 5/8" 14 5/8" SOLID DOOR DOOR PANEL WIDTH 23 5/8 " 14 5/8 " DOOR PANEL HEIGHT 30 1/8 30 1/8 DOOR PANEL DEPTH 3/4" max 3/4" max DOOR PANEL WEIGHT 10 lb. max 10 lb. max RAIL STYLE DIMENSION 2 min 2 min 30 1/8" 30 1/8" VIEWABLE AREA WIDTH 19 5/8 10 5/8 VIEWABLE AREA HEIGHT 25 23/ /32 3/4" A B 23 5/8" B 14 5/8" 5/8" 9/16" DETAIL A SCALE 1 : 1 BACK BACK 1" DETAIL B SCALE 1 : 1 22 TRUE RESIDENTIAL
11 CUSTOM PANEL INSTALLATION - DRAWER REFRIGERATOR / FREEZER STANDARD OVERLAY PANEL DRAWER PANEL WIDTH 23 5/8 " DRAWER PANEL HEIGHT 14 11/16 " DRAWER PANEL DEPTH 3/4" max 23 5/8 " 23 5/8 " TOP DRAWER - REFRIGERATOR 14 11/16 TOP & BOTTOM DRAWER - FREEZER 14 11/16 SPEC SAME PANEL FOR TOP & BOTTOM FREEZER DRAWERS. FOR BOTTOM DRAWER ROTATE PANEL 180º. BOTTOM DRAWER - REFRIGERATOR 14 11/16 INTEGRATED OVERLAY PANEL DRAWER PANEL WIDTH 23 5/8 " TOP DRAWER PANEL HEIGHT 15 1/8 " BOTTOM DRAWER PANEL HEIGHT 14 11/16 DRAWER PANEL DEPTH 3/4" max 23 5/8 " 23 5/8 " TOP DRAWER - REFRIGERATOR 15 1/8 TOP DRAWER - REFRIGERATOR 15 1/8 BOTTOM DRAWER - REFRIGERATOR 14 11/16 BOTTOM DRAWER - REFRIGERATOR 14 11/16 NOTE: TOP DRAWER WILL EXTEND ABOVE PROVIDED APPLIANCE & INSTALL GUIDE 23


12 SOLID (OP) AND GLASS FRAMED PANEL (OG) INSTALLATION Required Tools: Phillips Screwdriver 3/8" Wrench 1/8" Drill Bit Ten (10) Screws #6 1 SEE PAGES FOR OVERLAY PANEL DIMENSIONS BEFORE INSTALLING. FOR EASY OVERLAY INSTALLATION REFRIGERATOR DOOR REMOVAL IS REQUIRED. NOTE: DO NOT INSTALL A SOLID PANEL ON A GLASS DOOR. THIS MAY CAUSE MOISTURE TO FORM BEHIND THE PANEL RESULTING IN DAMAGE. 1. Open front door and pull grill forward to remove. 2 Remove screws from top and bottom hinge 2. To remove door back out two bottom hinge screws with a 3/8" wrench. Secure door while removing screws. Remove two Phillips screws from the top hinge. Save all these screws for later reinstall Lay door on a safe solid surface. If retrofitting glass door model be careful not to damage glass. Lay cardboard or other safe material down before working on the door. Remove door gasket from the inside of the door frame. Place gasket to the side for later reinstall. 4. There are pre marked areas on the front of the door. Drill these pre marked holes with 1/8" drill bit. Make sure to go all the way through the door. NOTE: IF HANDLE IS BEING USED ON OVERLAY INSTALL IT BEFORE STEP 7 (SEE IMAGE A). FOR BEST INSTALLATION, SCREWS ATTACHING HANDLE SHOULD BE RECESSED It is recommended to clamp the door front on top of the overlay before drilling pilot holes and installing anchor screws. The clamp ensures the overlay panel and door stay aligned with each other while installing. Once panel is clamped in place, pilot holes may be drilled into the panel from the rear side of the door TRUE RESIDENTIAL


13 6. Once all holes are pre drilled use the appropriate specified screws to secure the overlay panel onto the front of the refrigerator door Reinstall all components in reverse order. Door gasket snaps back into place. Overlay panel and door stay aligned with each other while installing. 7 SOLID OVERLAY PANEL Reinstall screws on top and bottom hinge IMAGE A GLASS OVERLAY PANEL GASKET DOOR OVERLAY PANEL HANDLE & INSTALL GUIDE 25


14 DRAWER OVERLAY PANEL INSTALLATION Required Tools: Phillips Screwdriver 1/8" Drill Bit 1 SEE PAGE 21 FOR OVERLAY PANEL DIMENSIONS BEFORE INSTALLING. FOR EASY OVERLAY INSTALLATION, DRAWER REMOVAL IS REQUIRED. 1. Open the drawer and detach the front drawer panel by removing four #2 Phillips screws (two on each side). (See image 1). Save all these screws for later reinstallation Remove front drawer panel gasket. 3. Using a 1/8" drill bit, drill out the eight pilot holes (each drawer) from the front of the drawer panel. Drill completely through the panel Attach drawer handle to the front of the overlay panel. Attach handle before step 5. Front of drawer 5. Lay overlay panel face-down on a safe solid surface. Lay drawer panel face-down on top of the overlay panel. Align panels and secure with a clamp. Lay cardboard or other soft or safe material down before working on drawer front Secure overlay panel to drawer panel using appropriate size screws Reattach drawer gasket by pressing and snapping back into place in gasket channel. 8. Reattach drawer panel front to the drawer using four screws. 26 TRUE RESIDENTIAL


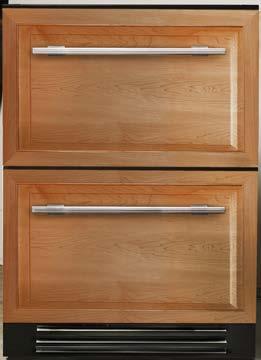
15 6 Back of drawer 7 8 DRAWER OVERLAY PANEL & INSTALL GUIDE 27
USER GUIDE & SERVICE MANUAL
 & SERVICE MANUAL RIGHT PRODUCT. RIGHT PLACE. RIGHT TEMPERATURE. SINCE 1962. Modular 3000 Series 3024BEV 24" Beverage Center Contents Intro Installation Integrated Panel Dimensions Integrated Grille / Plinth
USER GUIDE & SERVICE MANUAL
 & SERVICE MANUAL RIGHT PRODUCT. RIGHT PLACE. RIGHT TEMPERATURE. SINCE 1962. 2000 Series 2224ZWC 24" Dual Zone Wine Captain Contents Intro Installation Dimensions Integrated Grille / Plinth Dimensions Installation
USER GUIDE 3060ZWC. 60 cm Wine Cellar Model. Modular 3000 Series RIGHT PRODUCT. RIGHT PLACE. RIGHT TEMPERATURE. SINCE 1962.
 RIGHT PRODUCT. RIGHT PLACE. RIGHT TEMPERATURE. SINCE 1962. Modular 3000 Series 3060ZWC 60 cm Wine Cellar Model Contents Intro Installation Integrated Panel Dimensions Integrated Grille / Plinth Dimensions
USER GUIDE 3060ZWC. 60 cm Wine Cellar Model. Modular 3000 Series RIGHT PRODUCT. RIGHT PLACE. RIGHT TEMPERATURE. SINCE 1962.
 RIGHT PRODUCT. RIGHT PLACE. RIGHT TEMPERATURE. SINCE 1962. Modular 3000 Series 3060ZWC 60 cm Wine Cellar Model Contents Intro Installation Dimensions Integrated Grille / Plinth Dimensions Installation
SAFETY INSTALLATION & INTEGRATION OPERATING INSTRUCTIONS MAINTENANCE SERVICE RIGHT PRODUCT. RIGHT PLACE. RIGHT TEMPERATURE. SINCE 1962.
 RIGHT PRODUCT. RIGHT PLACE. RIGHT TEMPERATURE. SINCE 1962. 1000 Series 1224R 24" Solid Door Refrigerator Contents Intro Installation Integrated Panel Dimensions Integrated Panel Installation Grille / Plinth
SAFETY INSTALLATION & INTEGRATION OPERATING INSTRUCTIONS MAINTENANCE SERVICE RIGHT PRODUCT. RIGHT PLACE. RIGHT TEMPERATURE. SINCE 1962.
 RIGHT PRODUCT. RIGHT PLACE. RIGHT TEMPERATURE. SINCE 1962. 1000 Series 1215R 15" Solid Door Refrigerator Contents Intro Installation Integrated Panel Dimensions Integrated Panel Installation Grille / Plinth
Custom Wood Frame Overlay for Glass Doors Installation Instructions
 MARVEL CUSTOM WOOD FRAME OVERLAY FOR GLASS DOORS Custom Wood Frame Overlay for Glass Doors Installation Instructions Wine Cellars 6SWC 6SWCE 61WC 61WCM 66SWC (2 required) 66SWCE (2 required) Beverage Centers
A great addition to Sub-Zero's complete line of
 with Refrigeration Drawers Discreet lighting Full-view glass door (standard) Roller-assembly shelves UV-resistant glass Lighted electronic control panel Divider gasket Model 427R Lighted display shelf
Custom. Options Guide. and. Installation Instructions. GE Monogram 36" Built-In Refrigerators. Models: ZIS36NY ZISW36DY ZISB36DY
 GE Monogram 36" Built-In Refrigerators Custom Options Guide and Installation Instructions With Custom Panel Dimensions and Trim Kit Installation Instructions Monogram refrigerators offer a range of custom
Homestead Bar Cabinet IMPORTANT NOTE Carefully remove all the parts from the carton and put them individually on a soft cloth to prevent s
 88 5527 991 Homestead Bar Cabinet IMPRTANT NTE Carefully remove all the parts from the carton and put them individually on a soft cloth to prevent scratches or other damages occuring to the wood parts.
Overlay Installation Guide
 INSTALL GUIDE Overlay Installation Guide The Built-In Undercounter Leader Since 1962 U-LINE.COM 1 Overlay Model Coverage This guide covers the following models U-2115WCOL-00 U-2175WCCOL-00 U-2175BEVCOL-00
INSTRUCTION SHEET U19
 U19 All Refrigerator and All Freezer Trim Kit Installation Product Line: U19 All Refrigerator and All Freezer Models Parts Included in Kit TRIMKITEZ1 (Part# 297333500): Single Trim Kit Components Single
GE Monogram. Installation. Instructions. 27" Built-In Ovens. Models ZEK757WW ZEK757BW ZEK737WW ZEK737BW
 GE Monogram Installation Instructions 27" Models ZEK757WW ZEK757BW ZEK737WW ZEK737BW CAUTION WARNING Before you begin Read these instructions completely and carefully. IMPORTANT: Save these instructions
Full Overlay Door Panel Preparation and Installation Instructions for 2175, 2115, CLR2160 Models
 Full Overlay Door Panel Preparation and Installation Instructions for 2175, 2115, CLR2160 Models www.u-lineservice.com Phone (414) 354-0300 FAX (414) 354-7905 Service & Parts Tech Lines Phone (800) 779-2547
Overlay Door Panel Preparation and Installation Instructions
 DOOR PANEL INSTALLATION GUIDE Overlay Door Panel Preparation and Installation Instructions The Built-In Undercounter Leader Since 1962 U-LINE.COM Overlay Door Panel Door panel Preparation A Full overlay
W INE S TORAGE INSTALLATION INSTRUCTIONS
 W INE S TORAGE INSTALLATION INSTRUCTIONS SUB-ZERO WINE STORAGE The importance of the installation of the Sub-Zero Wine Storage unit cannot be overemphasized. Installation should be done by a qualified
Exponents Bench Cushion
 Exponents Bench Cushion Power Drill #2 Phillips Bit Bit Holder Page 1 of 2 939500640 Rev A 1. Place cushion on top of the bench, so the black Coalesse tag is in the right rear corner of the bench. 2. From
CW-Type Wall Mounted Cabinets Installation Instructions
 Instruction Sheet 860446194 Issue 2, March 2013 CW-Type Wall Mounted Cabinets Installation Instructions General CommScope wall mount cabinets are available in 24-inch (610mm), 36-inch (914mm) and 48-inch
MISCELLANEOUS CABINET REPAIRS
 MISCELLANEOUS CABINET REPAIRS 167 168 NOTES MISCELLANEOUS CABINET REPAIRS Cabinet Panel Repairs 175 SIDE PANEL REPLACEMENT - GDM SERIES INSTALLATION INSTRUCTIONS Tools Required 1/8" drill Rivet Tool Silicone
TRUE TECHNICAL SERVICE MANUAL - ALL MODELS. DOORS/DRAWERS/LIDS
 DOORS/DRAWERS/LIDS 55 56 NOTES DOORS/DRAWERS/LIDS Springs 97 TORSION SPRING REPLACEMENT GDM RADIUS FRONT - SWING DOOR INSTALLATION INSTRUCTIONS Tools Required (2) - 1 8" drift Punch (forged) Needle-Nose
INSTALLATION GUIDE MICROWAVE OVEN UPMC3084ST. MFL _00
 INSTALLATION GUIDE MICROWAVE OVEN UPMC3084ST MFL06208710_00 www.thesignaturekitchen.com YOUR SAFETY FIRST BEFORE YOU START Proper installation is the installer's responsibility! Proper installation by
Designed for Your Convenience
 Table of Contents Intro & Blum Drawer Box Adjustments Removing Drawer Alignment Dimensions Glide Adjustments Front Adjustments Hinge Adjustments Removing s Full Overlay Inset Concealed (CH) Inset Revealed
Vanity Installation Instructions
 Vanity Installation Instructions Segments of these instructions will relate to your vanity. Please read these instructions thoroughly and ensure the appropriate instructions are used during the installation
FRAMED CABINETRY INSTALLATION MANUAL
 FRAMED CABINETRY INSTALLATION MANUAL AN INDUSTRY GUIDE FOR PROFESSIONAL INSTALLATION RESULTS TO AVOID DAMAGE OR INJURY, READ IN ENTIRETY BEFORE STARTING MATERIAL & TOOL LIST FOR INSTALLATION Safety Glasses
Important Loading Information. Tools Required. Meridian Lateral Files Instructions
 Y Meridian Lateral Files Instructions! WARNING Failure to observe stated capacities below will result in unsafe usage conditions, causing possible product damage or personal injury. Important Loading Information
How To Measure Your Finished Opening
 3000 Series Bifold Doors How To Measure Your Finished Opening MEASURE FROM RIGHT TO LEFT 2 PLACES (WIDTH) MEASURE FROM TOP TO BOTTOM 2 PLACES (HEIGHT) Tools Required for Assembly: Tools Needed: Phillips
Preference Collection 5580 Treatment Console INSTALLATION GUIDE
 Preference Collection 5580 Treatment Console INSTALLATION GUIDE 0 WARNING Failure to install the 5580 as described in this installation guide may cause the unit to collapse, resulting in serious injury
2175R Refrigerator and 2175RF Refrigerator/Freezer
 Installation Guide 2175R Refrigerator and 2175RF Refrigerator/Freezer www.u-lineservice.com Phone (414) 354-0300 FAX (414) 354-7905 Service & Parts Tech Lines Phone (800) 779-2547 FAX (414) 354-5696 OnlineService@U-Line.com
COMPACT BLUMOTION. COMPACT BLUMOTION Face frame concealed hinges with integrated BLUMOTION.
 COMPACT BLUMOTION COMPACT BLUMOTION Face frame concealed hinges with integrated BLUMOTION www.blum.com/compact Innovative technology concentrated in a small space BLUMOTION inside Since the 1980s Blum
Cabinetry Installation
 Cabinetry Installation Easy to follow step-by-step kitchen cabinet installation Hammer Pry bar Screwdriver Phillips Flathead Level TOOL AND MATERIAL LIST Tape measure Pencil Straight edge Drill 3/16" drill
OVER THE RANGE MICROWAVE OVEN INSTALLATION INSTRUCTIONS
 OVER THE RANGE MICROWAVE OVEN INSTALLATION INSTRUCTIONS Please read and save these installation instructions. MODEL NO.: DOTR12CWIV/DOTR12CBIV P/N: 3828W5U0202 YOUR SAFETY FIRST Read this entire manual
Vanity Installation Instructions
 Vanity Installation Instructions Segments of these instructions will relate to your vanity. Please read these instructions thoroughly and ensure the appropriate instructions are used during the installation
JFI2089WTS Panel Dimension Guide 3/4 Overlay Panel Dimensions
 These dimensions are for the overlay panels. Dimensions are in inches. DESCR HEIGHT WIDTH THICKNESS 3/4 Overlay Panel Dimensions Upper Overlay Panels 1/4" 36 " 1/4" 17 7/8" 17 7/8 3/4" 16 17 7/8 3/4 15
Installation Guide. Mounting Kit for Mounting Philips Avalon CTS Cordless Fetal Transducer System on Wall, 2'' Post, Rail, or Slide-on Mounting Plate
 Installation Guide Mounting Kit for Mounting Philips Avalon CTS Cordless Fetal Transducer System on Wall, 2'' Post, Rail, or Slide-on Mounting Plate The purpose of this guide is to: 1. Describe mounting
Display-Top Apothecary Cabinet. Assembly Instructions. Page 1
 Display-Top Apothecary Cabinet Assembly Instructions Page 1 Display-Top Apothecary Cabinet Parts List Please check packaging for all parts and hardware before discarding. Unpack and lay parts on clean,
Pantry IMPORTANT NOTE Carefully remove all the parts from the carton and put them individually on a soft cloth to prevent scratches or oth
 88 5076 691 Pantry IMPORTANT NOTE Carefully remove all the parts from the carton and put them individually on a soft cloth to prevent scratches or other damages occurring to the parts. We have taken great
Mighty Mo GX Series Cabinet Installation Guide. OR Rev /11
 Mighty Mo GX Series Cabinet Installation Guide OR-71601787 Safety and Warning ATTENTION The exclamation point within an equilateral triangle is intended to alert the user to the presence of important operating
TANDEM plus BLUMOTION
 TANDEM plus BLUMOTION Premium Concealed Runners for Wood Drawers TANDEM plus BLUMOTION TANDEM plus BLUMOTION brings together all of the features, innovations and benefits that Blum has developed since
Media Storage Systems Fixed Media Cabinets
 Owner s Manual Media Storage Systems Fixed Media Cabinets Contents 1-Column Fixed Media Storage Cabinet Important User Information...........................2 Safety Precautions.................................3
EDGE2 DUAL MONITOR ARM
 EDGE2 DUAL MONITOR ARM EDGE2 Rev A 2/17 Model EDGE2-SLV Model EDGE2-BLK Model EDGE2-WHT ASSEMBLY AND ADJUSTMENT EDGE2 DUAL MONITOR ARM PARTS AND TOOLS PLEASE REVIEW these instructions before beginning
Preference Collection and Treatment Console INSTALLATION GUIDE
 Preference Collection 5580.69 and 5580.96 Treatment Console INSTALLATION GUIDE WARNING Failure to install the 5580 as described in this installation guide may cause the unit to collapse, resulting in serious
STOP. V00029AC Rev. 04 READ ALL OF THE FOLLOWING INSTRUCTIONS BEFORE REMOVING CABINET FROM SKID TOOL LIST. NET-ACCESS S-Type Network Cabinets
 Rev. 04 STOP READ ALL OF THE FOLLOWING INSTRUCTIONS BEFORE REMOVING CABINET FROM SKID NET-ACCESS S-Type Network Cabinets -Phillips screwdriver -Flatblade screwdriver -22mm socket wrench -15mm socket wrench
Closet System Installation Manual
 Closet System Manual Thank you For choosing our Custom Closet Collection to fit all your needs Closets come fully assembled to make your project an enjoyable and satisfying experience. With quality Custom
Household Appliances. Over-the-Range Microwave. Installation Instructions. For Models: HMV9302, HMV9305, HMV9306, HMV9307
 Over-the-Range Microwave Household Appliances Installation Instructions For Models: HMV9302, HMV9305, HMV9306, HMV9307 PLEASE READ ENTIRE INSTRUCTIONS BEFORE PROCEEDING IMPORTANT: Save these instructions
Installing the Exterior Cosmetics
 This chapter describes how to install the exterior cosmetics on the Cisco NCS 6000 LCC and includes the following topics: Overview of the Exterior Cosmetics, page Installing the Front Exterior Cosmetics,
INSTALLATION AND CUSTOMER CARE INFORMATION FOR SC FREESTANDING STERILIZATION CENTERS
 INSTALLATION AND CUSTOMER CARE INFORMATION FOR SC144-200 FREESTANDING STERILIZATION CENTERS General Information: Many Artizan Design Free-standing Sterilization Centers are custom designed and built to
Cabinet is 90% assembled, all you need to do is to attach the legs, lay the glass top on the cabinet, connect the faucet, drains & ptrap.
 Things you might need for the installation: vessel sink, plumber's putty(home depot), liquid nails(home depot), Bucket silicone caulk(home depot), Putty knife Plumber's putty Pipe wrench Channel-lock pliers
ZIC360NR GE Monogram 36" Built-In Bottom Freezer Refrigerator with Automatic Icemaker The Installation Space
 ZIC360N GE Monogram 36" Built-In Bottom Freezer efrigerator The Installation Space The finished cutout width must be 35-. 84- max 83- min Finished Opening 10" 3 6" The cutout depth must be 24" The refrigerator
Steel Solutions USA 602 E. Walnut Street Watseka, IL p: (888) f: (815)
 f: (815)") Steel Solutions USA 602 E. Walnut Street Watseka, IL 60970 p: (888) 875-5004 f: (815) 432-3364 sales@steelsolutionsusa.com Published February 2011 2011 Steel Solutions USA. All rights reserved. version
Steel Solutions USA 602 E. Walnut Street Watseka, IL 60970 p: (888) 875-5004 f: (815) 432-3364 sales@steelsolutionsusa.com Published February 2011 2011 Steel Solutions USA. All rights reserved. version
NEXUS SERIES CABINETS
 NEXUS SERIES CABINETS STANDARD BASE ASSEMBLY INSTRUCTIONS Also applies to: Galaxy Series, Nexus Series, Ridgeline Series, Statesman Series, and Waterford Series FOR YOUR INFORMATION: These assembly instructions
Nantucket Buffet
 88 5022 611 Nantucket Buffet IMPORTANT NOTE Carefully remove all the parts from the carton and put them individually on a soft cloth to prevent scratches or other damages occuring to the wood parts. We
Workbench Instructions for Assembly
 Workbench Instructions for Assembly FlexWorks is a trademark of Lista International Corporation. Making Workspace Work is a trademark of Lista International Corporation. Document Number: MD002A3 Print
Aluminum Railing Gate Kit
 BOM-34115787 Aluminum Railing Gate Kit INSTALLATION INSTRUCTIONS Read all instructions prior to installing product. Refer to manufacturers safety instructions when operating any tools. To register your
INSTALLATION AND CUSTOMER CARE INFORMATION FOR SC FREESTANDING STERILIZATION CENTERS
 INSTALLATION AND CUSTOMER CARE INFORMATION FOR SC120-200 FREESTANDING STERILIZATION CENTERS General Information: Many Artizan Design Free-standing Sterilization Centers are custom designed and built to
Fortress Fe Posts must always be secured to the deck framing. Fortress Fe Posts should never be attached to only the deck boards.
 Installation Instructions for FortressCable H-Series Stair Panels with Simplified Stair Bracket SSB-05 and Fe Posts It is the responsibility of the installer to meet all code and safety requirements, and
786 Kurka Jig Owners Manual
 7 Kurka Jig Owners Manual Please Read Carefully! 7 Parts List Parts listed in this box are shown in photos in the instructions. Part Description Quantity 7B Jig Plate Set, pieces..................... Six
Installation Instructions
 Installation Instructions This kit provides for the installation of a stainless steel unified grille panel. The panel will span the combined width of a side-by-side installation. THE INSTALLATION SPACE
Fig. 1 Fig. 2. Fig. 3 Fig. 4 TOOLS REQUIRED: *Phillips Screwdriver *Three Inch Putty Knife*Panel Removal Tool *10mm Nut Driver CONTENTS:
 *Phillips Screwdriver *Three Inch Putty Knife*Panel Removal Tool *10mm Nut Driver CONTENTS: 2EA. 6X9 TWO WAY SPEAKERS P/N 05030281AA 1EA. INSTRUCTIONS P/N RBI05LXREAR 300c and Charger 1. Remove the lower
Installation Instructions
 Installation Instructions This kit provides for the installation of a unified grille panel for a framed or overlay custom panel. The panel will span the combined width of a side by side installation. ZUG2
MOVENTO. The Evolution of Motion
 The Evolution of Motion is the latest advancement in concealed runner technology. It brings together all of the features, innovations and benefits that Blum has developed since first manufacturing drawer
TRUE TECHNICAL SERVICE MANUAL - ALL MODELS. DOORS/DRAWERS/LIDS
 DOORS/DRAWERS/LIDS 55 56 NOTES DOORS/DRAWERS/LIDS Swing s 73 74 NOTES INSTALLATION OF A GDM-SWING DOOR Phillips Head Screwdriver (2) - 1/8" Drift Punches (forged) Top Bracket NOTE: It may be necessary
INSTALLATION INSTRUCTIONS Medium Flat Panel Model MSP-SI1
 INSTALLATION INSTRUCTIONS Medium Flat Panel Model MSP-SI1 IMPORTANT! : The MSP-S11 Mount is designed for use with Sharp 45" LCD displays that have a 200mm x 200mm mounting pattern. IMPORTANT! : The mount
Installation. Instructions. Built-In Microwave/Convection and Microwave Ovens. Models ZMC1095 JEB1095 JEB1055
 Installation Instructions Built-In Microwave/Convection and Microwave Ovens Models ZMC1095 JEB1095 JEB1055 Before you begin Read these instructions completely and carefully. IMPORTANT: Save these instructions
Elementary Storage Cabinets
 Assembly Instructions Elementary Storage Cabinets ORFF Garage Small Instrument Cabinet (Cabinets Shown Fully Assembled) Poster Storage Cabinet CONTENTS Important User Information............................2
#11179 Wellington ARBOR
 #11179 Wellington ARBOR Assembly INSTRUCTIONS TOOLS NEEDED Tape Measure Variable Speed Drill with #2 Phillips Bit (recommended) or Phillips Screwdriver Hammer or Mallet ARBOR SIDE PANEL ASSEMBLY (Refer
GE Monogram. Installation. Instructions. Microwave Oven. Under Cabinet Installation. and. JX827 Series Built-In Kit. Models.
 GE Monogram Installation Instructions Under Cabinet Installation and JX827 Series Built-In Kit Models ZEM200 Series CAUTION WARNING Before you begin Read these instructions completely and carefully. IMPORTANT:
S6 User s Manual USER S MANUAL ver. 1.0
 S6 User s Manual SKEETER - 1U LOW PROFILE SOLUTION Table of Contents Tabletop Configuration 2 Tabletop Configuration Accessories 4 Slide Configuration 5 slide configuration accessories 7 rack Mount configuration
#916 CLASSIC 16 GUN CABINET ASSEMBLY INSTRUCTIONS
 Thank you for purchasing this quality product. A list of PARTS and INSTRUCTIONS is included to assist you. Unpack and identify all parts included on the Parts List and Hardware List. If parts are missing,
Planar FWMG-MXL INSTALLATION INSTRUCTIONS
 Planar FWMG-MXL INSTALLATION INSTRUCTIONS Fixed Wall Mount for Ultra Large Displays 50-98 weighing less than 300 lbs. Part Number: 955-0217-00 Planar, A Leyard 1195 NW Compton Drive Beaverton, OR 97006
INSTALLATION INSTRUCTIONS
 PARTS LIST ITEM PART DESCRIPTION QTY 73-A 503F 9MM 50G 5A 50E 505S 50H Connector Bracket Door Stops Support Bar Panel Glass Bracket Wall Mount Bracket Rollers Center Guide Recessed Finger Pull Fixed Panel
Cabinet Storage Products
 Assembly Instructions Storage Products (UltraStor, Acoustis, Adjustable Shelf, Cover Panels, Closure Panels) Wood Compartment Doors Full Wood Door Compartment Grille Doors Full Grille Door No Doors Contents
Wooden Frame Type Instruction Manual
 Wooden Frame TypeInstruction Manual Thank you for selecting our product. Before starting installation, please read this manual thoroughly to ensure correct installation. Please keep this manual at hand
Assembly Instructions
 1 27694 Trend Podium Assembly Instructions #27694 Trend Podium Part Drawing Description Qty Part Drawing Description Qty P-1 Base 1 EA Hardware List Screw M6x12mm 30 EA P-2 Right Side Panel 1 EA A2 Phil
WINE DISPENSING SYSTEM MODEL: DYWS4
 WINE DISPENSING SYSTEM MODEL: DYWS4 Trim Kit Part Number AWSTK24 INSTALLATION INSTRUCTIONS IMPORTANT: The wine dispensing utilizes a thermo-electric cooling system that can normally cool the bottle bay
INSTRUCTIONS FOR 1431 Door Closer with Hold Open Arms 1431 SERIES ADJUSTABLE FROM SIZE 1 THRU 6
 INSTRUCTIONS FOR Door Closer with Hold Open Arms SERIES ADJUSTABLE FROM SIZE THRU 6 FOR INSTALLATION ASSISTANCE CALL SARGENT AT -800-77-77 / www.sargentlock.com Installation Instructions based on Application
Allora ALCOVE ENCLOSURE INSTALLATION BEFORE INSTALLATION CHECK THAT YOUR ALLORA SHOWER ENCLOSURE SYSTEM IS UNDAMAGED
 Allora ALCOVE ENCLOSURE INSTALLATION BEFORE INSTALLATION CHECK THAT YOUR ALLORA SHOWER ENCLOSURE SYSTEM IS UNDAMAGED ALCOVE SHOWER Your shower can be installed to open Left hand or Right hand by rotating
BARN DOOR HARDWARE KIT
 INSTALLATION GUIDE Main Components x1 Rail x5 Wall Spacer x2 Anti-jump Block x2 Bent Strap x1 Right Stopper x1 Left Stopper x5 5/16 (8mm x 60mm) Carriage Bolt x5 5/16 (8mm x25mm) Anchor x5 5/16 (8mm x
A. Top Unit 1 Pc. For assembly see instructions in carton:
 88 5005 9441 Kitchen Island IMPRTANT NTE Carefully remove all the parts from the carton and put them individually on a soft cloth to prevent scratches or other damage occurring to the parts. We have taken
Version 1.0. Forbes Credenza File Cabinet.
 Version 1.0 Forbes Credenza File Cabinet www.fantasticfurniture.com.au Enjoy Your purchase from Australia s Best Value Furniture Store www.fantasticfurniture.com.au PAGE 2 Assembly checklist Read through
SLOANE GREY/MAHOGANY LEANING WINE BAR
 SLONE GREY/MHOGNY LENING WINE R SSEMLY HRDWRE 8 - wood dowels 10- small bolts 4 - large phillips bolts 4 - plates 1 - drawer sper 2 - large allen bolts MENDING HRDWRE 2 - connecting plates 4 - medium screws
Installation Instructions for Converting Hinging on Roll-In Refrigerators
 Installation Instructions for Converting Hinging on Roll-In Refrigerators Part number 161651 hinge conversion kit RH is for converting a right side hinged door and part number 161652 hinge conversion kit
Installation Instructions. Oakmont Folding Doors
 Before You Start For quick and easy installation of your Oakmont folding door, read these instructions thoroughly. A few minutes of prior planning will make the job easier and ensure years of trouble-free
Section 9: Finishing Touches - Other Decor Units
 Section 9: Finishing Touches - Other Decor Units Butler Sink Units Important: This unit is designed to be used with either This unit is always used between other units. Level the units. Fix together and
How to Install Custom Real Wood and Faux Wood Blinds
 Before you begin your installation: READ ALL INSTALLATION INSTRUCTIONS! Make sure that you have all tools and hardware needed for installation. Check the installation surface (wall, ceiling, or window
Installation And Care Instructions. Vertical Honeycomb Shades
 Installation And Care Instructions Vertical Honeycomb Shades Rev 5/2013 Table Of Contents Getting Started... 3 Parts Overview... 4 Materials Required... 5 Tools Required... 6 Outside Mount Installation...
Barnside Pantry IMPORTANT NOTE Carefully remove all the parts from the carton and put them individually on a soft cloth to prevent scratch
 88 5516 653 Barnside Pantry IMPORTANT NOTE Carefully remove all the parts from the carton and put them individually on a soft cloth to prevent scratches or other damage occurring to the parts. We have
Waste/recycle sets. Waste/recycle sets. Premium TANDEM and TANDEMBOX solutions for waste/recycle cabinets. blum.com
 Waste/recycle sets Waste/recycle sets Premium TANDEM and TANDEMBOX solutions for waste/recycle cabinets blum.com SERVO-DRIVE BLUMOTION Waste/recycle solutions for every kitchen Blum s new TANDEM and TANDEMBOX
Copyright Black Box Corporation. All rights reserved Park Drive Lawrence, PA Fax
 Copyright 2003. Black Box Corporation. All rights reserved. 1000 Park Drive Lawrence, PA 15055-1018 724-746-5500 Fax 724-746-0746 JULY 2003 RM3010A RM315-R2 RM323-R2 RM329 RM451 RM457 RM3020A RM316 RM324-R2
Utensil sets. 15" wide cabinets with 1-1/2" frames and 5/8" thick drawer sides. 21" wide cabinets with 1-1/2" frames and 5/8" thick drawer sides
 Utensil sets a 15" wide cabinets with 1-1/2" frames and 5/8" thick drawer sides 11-5/8" 6-1/8" 4-1/4" 18" Drawer length ZHI.457FI1A 21" Drawer length ZHI.533FI1A 21" wide cabinets with 1-1/2" frames and
DOLCE STIL NOVO. Tips & tricks for a perfect alignment Consigli e suggerimenti per un perfetto allineamento
 DOLCE STIL NOVO Tips & tricks for a perfect alignment Consigli e suggerimenti per un perfetto allineamento EN This installation manual is accompanied by a demonstration video that can be viewed at: www.youtube.com/user/smegspa
Expandable Bar Cabinet CF4001
 Expandable Bar Cabinet CF4001 Congratulations! You have purchased a stylish piece of Crosley Furniture. We strive to provide fine furniture products, built with quality materials and hand finished details.
INSTALLATION INSTRUCTIONS Small Flat Panel Height-Adjustable, Extended Pitch Swing Arm Wall Mount Model KWE-110
 INSTALLATION INSTRUCTIONS Small Flat Panel Height-Adjustable, Extended Pitch Swing Arm Wall Mount Model KWE-110 The KWE dual swing arm wall mount is designed to provide a broad range of viewing for Small
MANUAL e130. Wallstation
 MANUAL 07.29.13 e130 Wallstation The Enovate Medical e130 Wallstation was designed to set a new standard in quality. Enovate Medical s goal is to provide a wallstation that is ready for years of use,
Preference Collection 5531 Accessory Console I NSTALLATION GUIDE
 Preference Collection 5531 Accessory Console I NSTALLATION GUIDE WARNING Failure to install the 5531 as described in this installation guide may cause the unit to collapse, resulting in serious injury
ASSEMBLY AND ADJUSTMENT
 EDGE MONITOR ARM EDGE Rev A 2/17 Model EDGE-SLV Model EDGE-BLK Model EDGE-WHT ASSEMBLY AND ADJUSTMENT EDGE MONITOR ARM PARTS AND TOOLS PLEASE REVIEW these instructions before beginning the assembly and
Selekta Pro 2000 Fast assembly hinges for office and commercial furniture
 Fast assembly hinges for office and commercial furniture 99 The program opening angles 180 and 270 with pre-mounted pan-head screws with eccentric height adjustment ± 2 mm with eccentric overlay adjustment
XL-GC03 Sliding Door Lock Installation Manual PAT XL-GC06 Sliding Door Hanger Installation Manual XL-GC08 Sliding Door Lock Guide Installation Manual
 XL-GC0 Sliding Door Lock Installation Manual PAT XL-GC0 Sliding Door Hanger Installation Manual XL-GC0 Sliding Door Lock Guide Installation Manual Read all instructions carefully before installation. Before
How to fit an Internal Door
 How to fit an Internal Door How to fit an Internal Door The following instructions are for installing a internal door only. If you have any queries please contact Cheshire Mouldings technical helpline
Sentinel Series Cigar Humidor End Tables
 Sentinel Series Cigar Humidor End Tables Assembly Instructions Models: Sentinel 500, 1000 and 1500 Style: Traditional SENTINEL ASSEMBLY INSTRUCTIONS Congratulations! You have purchased a superior cigar
compile system INSTALLATION GUIDE Updated January 2019
 INSTALLATION GUIDE Updated January 09 compile system Table of Contents Panels 0 Quick Connect Clips 0 Lock Clips 0 Panel Trims 0 Privacy Glass 0 Post Base Covers 04 Electrical 04 Power Distribution Harness