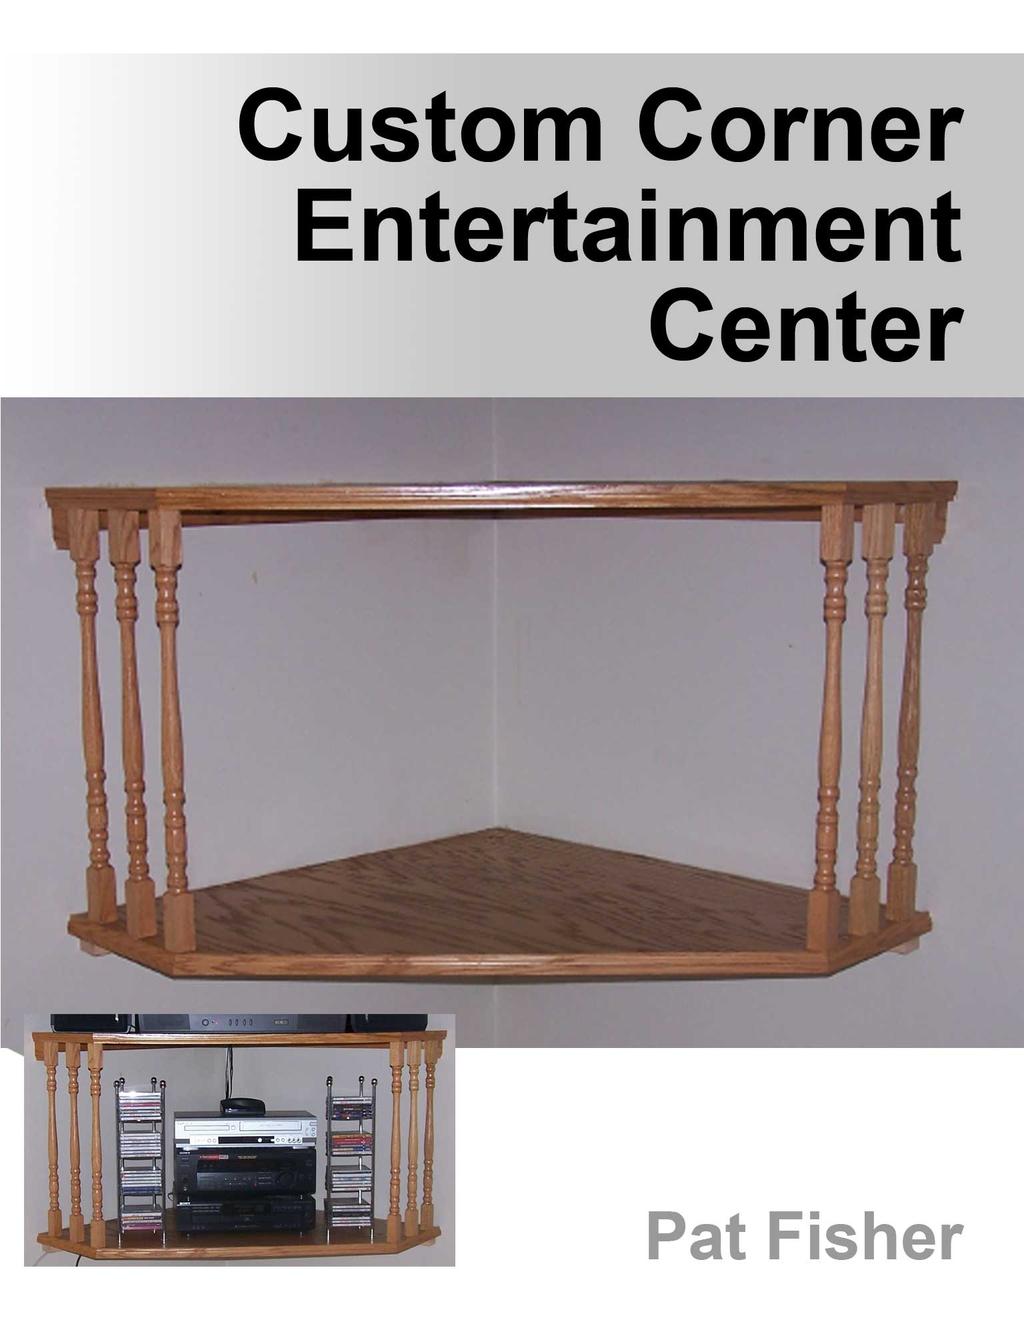
Corner Entertainment Center Plans
|
|
|
- Edgar Harmon
- 6 years ago
- Views:
Transcription
1
2 Table of Contents Introduction... 3 Let s discuss the tools needed... 3 Let s discuss the materials needed... 4 Let s build it... 4 Attaching the 2x2's... 7 Determine the shelf spacing... 9 Scribing the shelf to the wall...11 Installing balusters or spindles...11 Applying the trim piece...14 Finishing...15 Copyright Pat Fisher. 2
3 Introduction First I would like to explain that these plans may seem long but as you go you will find out that I explain everything right down to the detail so I hope anyone can understand the directions and build this simple beautiful corner unit. Let s discuss the tools needed Skil or circular saw (for cutting the plywood) Table saw ( for ripping the 2x4"s the long way in half; also I ripped the baseboard down) Miter saw ( for some of the finer finish cuts needed) Screw gun or drill ( for drilling holes and running in the screws) 2'or 4'level ( for keeping everything level) Stud finder ( critical for hitting all the studs in the wall with the 3" screws) Carpenter square Utility knife Tape measure Misc. drill bits ( 3/8" spade bit for counter sinking the screw heads, 1/8 or 9/64 drill bits for pre drilling everything) Other tools would be a bigger spade bit for making the holes for the cords and wires. Some sort of table or saw horses would make it a little more comfortable when building. Copyright Pat Fisher. 3
 6-1-1/4\"W x 34\"L size handrail balusters or spindles ( square or turned will work) 3-2x4x6 spf or pine ( I hand picked out 3 good knot free straight")
4 Let s discuss the materials needed 1-3/4 inch sheet of 4x8 plywood ( I used a 4x8 3/4" oak veneered plywood) 2-6 ft pieces of decorative trim being at least 1 inch wide to cover plywood ends (I used colonial baseboard ripped down to 1 inch wide) 6-1-1/4"W x 34"L size handrail balusters or spindles ( square or turned will work) 3-2x4x6 spf or pine ( I hand picked out 3 good knot free straight ones) 1- small box of 2" phillips head gold screws ( actually used 24-2" screws total) 1- small box of 3" phillips head zinc plated screws ( actual size screw 10x3"or 5x75mm, used 16 of these screws) Let s build it Lay the plywood down flat for measuring. Start at one corner and measure 36" down either side and make a small pencil mark at the 36" mark. Copyright Pat Fisher. 4

5 Using your carpenter square draw a line 11" up at a perfect right angle and stop. We will call this an 11" inside point. Now go back and repeat this at the same corner in the other direction. Copyright Pat Fisher. 5


6 Using your 4' level or some sort of straight edge connect the two 11" inside points. This piece is ready to be cut out. Note: If you are using a veneer type plywood take your utility knife and straight edge and make a knife cut on your pencil lines being sure to stay exactly on your lines thus scoring the wood to prevent chipping and splintering the edge as you cut. You do not need to make a deep cut with the knife the idea is to just score the wood. Copyright Pat Fisher. 6

7 Ok, familiarize your self with the skill saw and be sure the area is clear of clutter and the lighting is good. Always cut with the saw moving on the outside of the line. Do your best to cut next to the line but don't cut the line off. At this point it is nice to have an extra person helping and holding while you cut. With one shelf cut repeat this procedure on opposite side of plywood by placing the first piece down in the opposite corner and tracing. Note: keep the wood grains going in the same direction if desired. Don't forget to score with your utility knife before cutting. With the shelves cut the next step is to get the bracing ready. Take one 2x4 and square cut one end to have a nice clean cut end, measure 35" from the square cut end and cut again. (I used my miter saw for these cuts). Take this 35" 2x4 to your table saw and rip it the long way directly and perfectly in half into two 35" pieces, thus you end up with essentially 2-2x2's 35" long. Repeat this procedure so now you have 4 2x2's 35" long. Attaching the 2x2's In the corner where this unit will be attached and built you will need a tape measure to start. Copyright Pat Fisher. 7
8 Determine the height at which you would like your top shelf at or in my case the height of the TV. Measure down from this determined height about 3/4" and mark. Hold your level against the corner and draw a level line horizontally out from the corner approximately 34". Repeat this the other way out of the corner. Find the studs inside the wall with your stud finder and mark the studs right above your horizontal line, mark the edges of your studs on both sides so you are sure to be hitting the center of the studs with the screws each time. (Note: this is critical for the strength) Also be sure to use a pencil while doing this as pencil marks will wash off later if they are still visible. You should be able to find at least 2 studs in the wall within the 34" line from the corner. Now you have at least 4 studs marked on the wall, hold your 2x2 against the corner and up to your line and mark the studs on the first 2x2 for pre drilling. Now pre-drill your stud locations on the first 2x2 using maybe an 11/64 bit. Next take a 3/8 size spade bit and drill into your pre drilled holes a little so the screw heads are counter sunk. (Note: the depth to be counter sunk depends on the style of wood plugs you will be using, if you are just filling these screw head holes with wood filler just counter sink below the surface a little bit). Now hold your 2x2 back up on the line and using 3" screws attach the first 2x2 to the wall. For the second 2x2 to be attached you will need to shorten it the width of the first 2x2 so it ends up being 34" from the corner and this is easily done by putting this 2x2 in the corner right above or below the first one and scribing a line or tracing a line off the mounted 2x2 giving you exactly the length after cutting this off. After you have the length of this second 2x2 hold it flush against the first 2x2 and repeat this procedure. Copyright Pat Fisher. 8
9 Next, at an angle pre-drill a hole and countersink through the second 2x2 attached so as to catch the first 2x2 attached and catching the corner stud in the wall using a 3"screw. On the first 2x2 pre-drill and run another 3" screw catching the stud in the wall at the corner also. These 2x2's should be securely attached to the wall now and you are ready to move on. Note: this is critical and if there is any question about not hitting a stud repeat until you are sure. Determine the shelf spacing The space between your shelves can be customized to your liking. However there is a limit to the maximum and minimum due to the length and type of your balusters or spindles you use. I used the turned spindles or the round fancier ones although the square ones will work also and using the square ones you actually reduce the minimum space between the shelves all together. Note: consider the height of your TV as you may want to set your TV in between the shelves. I made my spacing at exactly 2' between the shelves. If you want the 2' spacing as I did hook your tape to the top 2x2 and measure down 24 and 3/4 of an inch make a pencil mark. Go back and follow the procedure for attaching your bottom 2x2's (see photo on next page). Copyright Pat Fisher. 9

10 After you have the bottom 2x2's attached I also put a cross member in for extra support under the bottom shelf. The way I did this is by taking a 2x2 cutting it 44" long and then cutting 46 degree angles on each side so it fits nicely between the 2x2's already installed and centered so the distance on each end is the same on the existing 2x2's. Copyright Pat Fisher. 10
11 Scribing the shelf to the wall Chances are when you put your shelf into the corner it will need to be scribed to fit nice and tight on both sides as no corner is perfect. The way you do this is to take your pre cut shelf and set it on your 2x2's and push it into the corner and tight against one side. Put your pencil against the wall where the self is away from the wall and draw a line down the shelf at the same time keeping your pencil against the wall drawing the contour of the wall on the shelf. If this space is bigger than the width of your pencil put a straight edge against the wall and draw the line next to your straight edge. Now transfer this line over as close to the edge so you are only cutting a very minimal off the edge to make this shelf tight on both sides. Don't forget to score this line before cutting. You should be able to trace this to the bottom shelf and repeat the cut. (Note keep in mind the direction of the wood grain if desirable). After the shelves are scribed to fit nice put a little bead of wood glue on top of your 2x2's and set the shelves back up and what I did was take my little finish gun and nailed the pieces to the 2x2's. Wipe off any excess glue. Then pre drill with the 1/8 bit and counter sink 4 holes above each 2x2 spacing evenly and run a 2" screw into each hole. You should have 8 screws in each shelf at this point. Installing balusters or spindles If you choose the turned or round spindles this means the spindle is rounded in the middle with square ends. You need to find the center of the rounded part of the spindle. (Note not the center of the entire spindle) Once you have the center of the rounded part. Note: keep in mind the distance between your shelves if you went more or less than 2'spacing. Copyright Pat Fisher. 11
12 Measure back 1' and cut off the end. Repeat for the other end and now the square parts of the spindle should be exactly the same on both ends with the spindle being exactly 2' long. My spindles have about 3 and 1/8th inches of square before the round part. This distance although will be different with the different styles and designs of turned spindles. Cut one and trial fit before tracing and cutting the rest to be sure they fit nice and tight. At this point the spindles are cut and ready. They will be attached between the shelves from the wall out to the 11" point as the pictures show. Start in front away from the wall. Apply some glue to both ends of the spindle and place the first spindle at the 45 degree corner and flush to the edge of the shelf. Line up the front corner perfectly with the shelf corner as shown and nail in being careful to keep your nail off to the side a bit as each spindle gets screwed from the top and bottom. Next with my shelf I measured back 2 3/4 of an inch and nailed in my second spindle and again 2 3/4 of an inch and nailed in my third spindle. The space left over to the wall is actually less now but again use your judgment on these spaces and repeat for the other side. Copyright Pat Fisher. 12

13 Being sure to apply glue to each spindle and wiping off excess glue. Now it s a matter of going back and pre drilling each spindle and running screws in at tops and bottoms of spindles drawing the shelf tightly together. Don't forget to counter sink each screw head again and pre drilling into each spindle also making it easier to run these screws in. Note: keep each spindle nice and flush with the edge of the shelf and adjust as needed after screwing to keep everything square. Copyright Pat Fisher. 13
14 Applying the trim piece This trim piece can be a decorative piece or just about anything as long as it s at least an inch wide to cover the unfinished edge of the plywood. At the miter saw take the trim piece and square cut one end then cut about a 12" piece straight off. At the shelf hold this piece in place starting at the wall on either end covering the unfinished part of the plywood out to the 11" point. Draw a line up the back of this trim piece at the 11" corner marking where to cut. Transfer this mark to the top of the trim piece. At the miter saw move the degrees from 0 to 23 degrees away from the wood. Before cutting move the blade down to the mark on the trim, the very back of the blade should not cut this line off. Adjust as necessary and cut. This piece when trial fitted on the shelf again will be slightly long. The idea is the angle back of the cut or back of the trim should be perfectly at the corner. Do not cut this angle again just slightly cut off the squared end or other end a little at a time until the piece is exactly where you want it. Now nail this piece to the plywood holding it up slightly above the plywood so you have a slight ridge on top all the way across. Now to cut the long piece across the front cut the angle at 22 1/2 degrees and trial fit before cutting the other end so you can adjust the degrees to end up with a nice mitered corner and just repeat this until you are done and happy with each miter. Take your time with this so you get nice tight joints. Keep in mind wood filler can hide small flaws. Copyright Pat Fisher. 14

15 Finishing If you did not stain and varnish ahead of time now is the time to do this. Do not wait a long time to do this as raw wood can sometimes shrink separating your miters. I usually choose to stain or paint after it is built. Don't be afraid to use some wood filler where necessary, after building this you will be looking at different trim work and will find out that nothing is absolutely perfect. Keep in mind the weight factor as this shelf will accommodate a lot of weight but everything has its limits and it may be necessary to add a cross member below the top shelf. Copyright Pat Fisher. 15
1 ¼-inch Pocket Screws Brad Nailer or Hammer 1 ¼-inch Brad Nails Clamps
 MATERIALS: TOOLS: (4) 2 x 6 x 8 Ft. Boards Tape Measure (2) 2 x 4 x 8 Ft. Boards Carpenter s Square (7) 1 x 4 x 8 Ft. Boards Pencil (2) 1 x 3 x 8 Ft. Boards Drill (1) Half Sheet of ¾-inch Thick Plywood
ining Table Materials *Notes on Materials
 D ining Table We looked around for the perfect table for the dining room. Some were too big, some too small, and most were just too expensive. So we built this one, and we are happy with the result. It
Materials and Tools: Printer s Triple Console Cabinet. Free Plans to build a Triple Console Cabinet
 Materials and Tools: Materials: 3 sets euro style bottom corner mount drawer slides, 16 length 3 sets inset hinges 24 cup style handles 8 2x2 @ 8 feet long 6 1x3 @ 8 feet long 6 1x2 @ 8 feet long 1 sheet
Sweet Pea Garden Bunk Bed Storage Stairs [1]
![Sweet Pea Garden Bunk Bed Storage Stairs [1]](/thumbs/90/101417444.jpg "Sweet Pea Garden Bunk Bed Storage Stairs [1]") [1] Submitted by Ana White [2] on Fri, 2012-09-28 13:32 Page 1 of 27 Page 2 of 27 [1] Happy Friday! If you missed us a little this week on the blog, thank you - I missed you too! I've been traveling to
[1] Submitted by Ana White [2] on Fri, 2012-09-28 13:32 Page 1 of 27 Page 2 of 27 [1] Happy Friday! If you missed us a little this week on the blog, thank you - I missed you too! I've been traveling to
Entryway Locker 17 ½ 25 ½
 Copyright 2015 Shanty-2-Chic.com T Entryway Locker his old world entryway locker is loaded with possibilities. Two adjustable shelves allow you to customize the storage to fit your needs. Even better,
How to Install Elite Bayside Beadboard
 How to Install Elite Bayside Beadboard Beadboard will give a room a warm and comfortable feeling. Its beauty lies in its simplicity. It is one of the easiest to install out of all wainscoting, regardless
Castle loft bed [1] Additional Photos. Castle loft bed Published on Ana White (http://www.ana-white.com)
![Castle loft bed [1] Additional Photos. Castle loft bed Published on Ana White (http://www.ana-white.com)](/thumbs/76/73086219.jpg "Castle loft bed [1] Additional Photos. Castle loft bed Published on Ana White (http://www.ana-white.com)") [1] Submitted by fsmumford [2] on Tue, 2011-10-18 21:51 [1] Additional Photos [3] [4] Page 1 of 31 [5] [6] [7] Summary: I stumbled upon Ana s blog about a year ago. Since, like many of you, I have become
[1] Submitted by fsmumford [2] on Tue, 2011-10-18 21:51 [1] Additional Photos [3] [4] Page 1 of 31 [5] [6] [7] Summary: I stumbled upon Ana s blog about a year ago. Since, like many of you, I have become
DIY Bedroom Entertainment Center
 DIY Bedroom Entertainment Center Free woodworking plans for building a bedroom entertainment center that also serves as a laundry sorter. Perfect for bedroom with limited wall space. Cost: ~$250 Difficulty:
Patrol Box Plans by David J. Yarusso Troop 609
 Patrol Box Plans by David J. Yarusso Troop 609 Materials List: 1. One 4 x8 sheet of ½ thick cabinet grade (birch or oak) or AC plywood. If using AC grade, use the A grade surface on the outside for a clean
HOW TO INSTALL ELITE PANELED WAINSCOTING Using X-Rails with Either Raised, Flat or Beaded Panels
 HOW TO INSTALL ELITE PANELED WAINSCOTING Using X-Rails with Either Raised, Flat or Beaded Panels 1. First, remove the cover plates from all electrical outlets. All baseboards should also be removed; the
Office Towers 83 ¼ 35 ½ 18 ¼
 Copyright 2015 Shanty-2-Chic.com T Office Towers his towering hutch will be admired for years to come. Inspired by rustic, high end furniture found in boutique showrooms it will impress all who see it...especially
(1) 2x4 Ft. Sheet of ¼-inch Plywood. 1 ¼-inch Wood Screws. 1 ¼-inch Brad Nails ¾-inch Brad Nails Wood Glue CUT LIST:
 2x4 Ft. Sheet of ¼-inch Plywood. 1 ¼-inch Wood Screws. 1 ¼-inch Brad Nails ¾-inch Brad Nails Wood Glue CUT LIST:") MATERIALS: (5) 1x3x8 Ft. Boards (3) 2x4x8 Ft. Boards (10) 1x4x8 Ft. Boards (1) 1x2x10 Ft. Board (1) 2x2x4 Ft. Board (2) 1x6x8 Ft. Boards (1) 4x8 Ft. Sheet of ¾-inch Plywood (1) 2x4 Ft. Sheet of ¼-inch
MATERIALS: (5) 1x3x8 Ft. Boards (3) 2x4x8 Ft. Boards (10) 1x4x8 Ft. Boards (1) 1x2x10 Ft. Board (1) 2x2x4 Ft. Board (2) 1x6x8 Ft. Boards (1) 4x8 Ft. Sheet of ¾-inch Plywood (1) 2x4 Ft. Sheet of ¼-inch
 America s leading woodworking authority To download these plans, you will need Adobe Reader installed on your computer. If you want to get a free copy, visit: http://adobe.com/ reader. Having trouble downloading
Code Description Qty. Material Dimensions A Long Inner 4 2 x 4 pine 34-1/2 long
 B utler s Chest Because it s designed to suit a variety of purposes, this butler s chest is a piece of furniture that absolutely anyone can appreciate. Used by itself, it can serve as an end table or can
MAGNUM BOARD INTERIOR INSTALLATION GUIDELINES
 TECHNICAL BULLETIN No.: 090509-1405 Subject: Issue Date: September 4, 2009 Issue No.: II MAGNUM BOARD INTERIOR INSTALLATION GUIDELINES 1. CUTTING MAGNUM BOARD You can easily cut Magnum Board with carbide
diy outdoor bar from diyhuntress.com
 diy outdoor bar from diyhuntress.com 2 DIMENSIONS & DISCLAIMER: Please double check the overall dimensions for your specific build before starting. Please wear appropriate safety gear when operating power
MATERIALS: TOOLS: CUT LIST:
 MATERIALS: (3) 4x4x8 Ft. Boards (8) 2x4x8 Ft. Boards 2 ½-inch Pocket Screws 2 ½-inch Wood Screws 1-inch Wood Screws (16) Figure 8 Tabletop Fasteners Wood Glue Wood Filler TOOLS: Tape Measure Pencil Carpenter
Materials. Special Tools and Techniques Chisel Long pipe clamps Miters Router with 1/2" rabbet cutter Rabbets Dadoes. Hardware
 D esk Our executive desk was built with specific needs in mind. We wanted a large desktop, large drawers, and a cubbyhole to house a rollaway hanging file cabinet. We are thrilled with our finished project.
Octagon Greenhouse Manual
 Tools Needed: -Cordless Drill (12V or higher) -#2 Square Drive Bit -Hammer -6 Step Ladder -Tape Measure -Utility knife w/ blade & hook blade -Speed Square -5/16 Wood Drill bit Little Cottage Co. PO Box
Phase Two. The Skirt, Play Area and Sub Table ( continued )
") Dry fit the skirt in place and make sure all is tight. Drill a countersink screw hole on the back of the skirt down where you will connect it to the bull nose. Make three holes on each board (ends and
Dry fit the skirt in place and make sure all is tight. Drill a countersink screw hole on the back of the skirt down where you will connect it to the bull nose. Make three holes on each board (ends and
Harriet Chair with Modifications
 Harriet Chair with Modifications This modification of the Harriet chair includes a slat back, padded seat, and is 2 inches wider than the original plan. The overall dimensions of the finished chair: 38
How To Create An Entertainment Unit
 How To Create An Entertainment Unit Materials required: 2 x Pine Panels - 1800mm x 450mm x 18mm 4 x Pine Panels - 310mm x 450mm x 18mm 1 x Pine Panels - 650mm x 450mm x 18mm 6 x Bun feet (your choice of
DIY Wine Storage Cabinet
 DIY Wine Storage Cabinet ADDICTED2DIY.COM *Before beginning this project, please read through all of the plans and the blog post. When building this project, be sure to measure your wood and cut to fit.
INCEPTIV INSTALLATION GUIDELINES
 3D WOOD WALL PANELS INCEPTIV INSTALLATION GUIDELINES We recommend you hire an experienced finish carpenter or floor installer to achieve quality results with all Duchateau Wall Coverings. The right tools
PROJECT PLANS ROLLING LAUNDRY SORTER
 R PROJECT PLANS ROLLING LAUNDRY SORTER Sorting laundry certainly doesn t rank high on anyone s list. So, anything that makes this task easier is welcome. If that functionality can be mixed with a bit of
INCEPTIV INSTALLATION GUIDELINES
 3D WOOD WALL PANELS INCEPTIV INSTALLATION GUIDELINES We recommend you hire an experienced finish carpenter or floor installer to achieve quality results with all Duchateau Wall Coverings. The right tools
Safety First! Review the Safety Checklist before performing tasks in this chapter.
 Chapter 17. Cabinets 17.1 LAYING OUT KITCHEN CABINET UPPER UNITS 17.2 INSTALLING KITCHEN CABINET SUPPORT STRIPS 17.3 INSTALLING KITCHEN CABINET UPPER UNITS 17.4 INSTALLING RANGE HOOD 17.5 INSTALLING KITCHEN
Eco Office File Base. Materials and Tools: Free Plans to build an office file cabinet base
 Materials and Tools: Materials: 1 - Sheet 3/4 PureBond Hardwood Plywood (Available at the Home Depot) 1 - Sheet 1/4 PureBond Hardwood Plywood (Available at the Home Depot) 3-21 Drawer Slides, Euro Style
Building the ArcadeCab Trackball/Single-Player Controller
 Building the ArcadeCab Trackball/Single-Player Controller Introduction This help document details the construction of the original ArcadeCab Ultra- Trackball controller. It is based on my construction
Bathroom Storage Unit. Wilkerdos.com
 Bathroom Storage Unit Wilkerdos.com Copyright 2015 Material List Quantity Item Notes 1 4 x 8 x 3/4 plywood Construction grade 1 2 x 4 x 1/2 plywood Construction grade 11" 7-1/2" Page 1 Some 1 1/4" brad
This book, or portions of it, may not be duplicated, resold, or redistributed in any way, without the expressed written consent of Stay Tooned, Inc.
 Copyright 2006 - Stay Tooned, Inc. All rights reserved worldwide. This book, or portions of it, may not be duplicated, resold, or redistributed in any way, without the expressed written consent of Stay
TM TM DOG HOUSE Age 9+
 TM TM DOG HOUSE Age 9+ Safety First! Use eye protection, always! Use ear protection with loud power tools Stay with kids while they work! Follow tool manufacturers safety guidelines This project is recommended
Project Plans Kreg Tool Company / BuildSomething. All Rights Reserved.
 BY Project Plans HARDWARE ORGANIZER How easy is it top keep screws, hardware, and other small items organized instead of in the way? Just cut six identically sized pieces of plywood, add a 1x2 cleat, and
Tool Tote Project. Tools:
 Tool Tote Project Name: Date: Description: This project consists of building a small tool tote that is useful in the shop or garden. General skills used to build this project include drawing, measuring,
PROJECT PLANS EXPANDABLE CRAFT CENTER
 R PROJECT PLANS EXPANDABLE CRAFT CENTER Whether you re working on craft projects, sewing, or pursuing another hobby, this craft center offers a great place to work. It features a large work surface that
Free Doghouse Plans Page 1 of 2
 Free Doghouse Plans Page 1 of 2 This doghouse is designed with the beginner in mind. It might even be a good project to involve the kids. The entire project requires only one sheet of plywood, two 2"x4"s
136 PLYWOOD DESK 522
 136 PLYWOOD DESK 522 Simple in design and inexpensive, this plywood desk is made from a single 4- x 8-foot panel. Plywood is available with many hardwood veneers; it can also be covered with plastic laminate,
(2) 4 x 8 Ft. Sheets of ¾-inch Purebond Plywood Tape Measure (2) 4 x 8 Ft. Sheets of ¼-inch Purebond Plywood Pencil (1) 1 x 8 x 8 Ft.
 4 x 8 Ft. Sheets of ¾-inch Purebond Plywood Tape Measure (2) 4 x 8 Ft. Sheets of ¼-inch Purebond Plywood Pencil (1) 1 x 8 x 8 Ft.") MATERIALS: TOOLS: (2) 4 x 8 Ft. Sheets of ¾-inch Purebond Plywood Tape Measure (2) 4 x 8 Ft. Sheets of ¼-inch Purebond Plywood Pencil (1) 1 x 8 x 8 Ft. Board Carpenter s Square (1) 1 x 6 x 8 Ft. Board
MATERIALS: TOOLS: (2) 4 x 8 Ft. Sheets of ¾-inch Purebond Plywood Tape Measure (2) 4 x 8 Ft. Sheets of ¼-inch Purebond Plywood Pencil (1) 1 x 8 x 8 Ft. Board Carpenter s Square (1) 1 x 6 x 8 Ft. Board
Project Skill Level: INTERMEDIATE Plywood Used: CANPLY EXTERIOR Good Two Sides (G2S) or precision sanded Aspen
 or precision sanded Aspen") Project Skill Level: INTERMEDIATE Plywood Used: CANPLY EXTERIOR Good Two Sides (G2S) or precision sanded Aspen MATERIALS LIST: (1) ¾" x 4 ft x 8 ft plywood panel (20) #8 x 2" Robertson or Phillips wood
Project Skill Level: INTERMEDIATE Plywood Used: CANPLY EXTERIOR Good Two Sides (G2S) or precision sanded Aspen MATERIALS LIST: (1) ¾" x 4 ft x 8 ft plywood panel (20) #8 x 2" Robertson or Phillips wood
The image above is intended to give you an idea of what the dovecote will look like when finished.
 Thank you for buying my book, I hope it is useful and enjoyable in your quest to building your own dovecote. This book will give you step-by step instructions on how to build your own dovecote also included
Easy Five Cube Tower Bookshelf. Copyrighted Material. Page 1
 Compare to: Land of Nod Cube Collection, 5 Cube Tower Bookshelf Skill Level: Beginner Easy Five Cube Tower Bookshelf This fully framed five cube tower can hold everything from towels to boots to books
Why are we giving this guidebook as a FREE download?
 Construction Guide Queen, Double & Twin Vertical 1 Note: This guide covers the construction steps for all 3 sizes of the vertical wall mount Easy DIY Murphy beds, Queen, Double and Twin. The construction
Chapter 16. Underlayment and Finish Stairs
 Chapter 16. Underlayment and Finish Stairs 16.1 INSTALLING UNDERLAYMENT & DRICORE 16.2 FINISHING STAIRS Tools needed by volunteers: Hammer Nail apron Tape measure Tools and equipment needed: Extension
rmoire Materials Hardware
 A rmoire No house ever has enough storage space, and I built this armoire to satisfy a couple of needs. Inside the armoire is a shelf large enough for the television. Under the shelf are six drawers that
PLANS BY TOM BURY MURPHY WORKTABLE TOTAL DIMENSIONS: FOLDED UP 30 X 48 X 0 FOLDED DOWN 30 X 58 X 84
 MURPHY WORKTABLE TOTAL DIMENSIONS: FOLDED UP 30 X 48 X 0 FOLDED DOWN 30 X 58 X 84 MATERIALS LIST: (2) 2 x8 x8 (3) 2 x4 x8 (1) 1 x2 x8 (1) 48 x96 3/4 plywood (2) 1-1/2 x30 continuous hinge (1) Left-side
Copyright 2010 Springbok Publishing All Rights Reserved- Page 1
 Copyright 2010 Springbok Publishing All Rights Reserved- www.woodensaddlerackplans.com Page 1 Legal Information All contents copyright 2010 by Springbok Publishing. All rights reserved. No part of this
Stair Parts Installation. Tricks
 Stair Parts Installation Tips & Tricks Introduction Your DIY staircase guide Welcome to the Stairpart home installation guide. Your stairway is both a functional and focal point in your home, so keeping
Pinewood Derby Display Case
 Pinewood Derby Display Case Optional Door Design by Neil Fern - Pack 187 Exterior Dimensions 23 ½ (H) X 10 ½ (W) X 3 ½ (D) Front Back OPTIONAL Door Finished Interior Dimensions 21 7/8 (H) X 9 (W) X 3 (D)
Australian Vintage Radio Society Inc.
 Australian Vintage Radio Society Inc. (Incorporated in Victoria A0050003S) P.O. Box 3099, Syndal L.P.O., Victoria, 3150, Australia. Cabinet assembly instructions for the AVRS 10 th Anniversary construction
Mudroom Unit. Page 1 of 25
 Mudroom Unit www.andrewharriswoodwork.com Page 1 of 25 Introduction This plan makes a unit which is 66 ¾ inches tall, 39 ½ inches wide and 18 ½ inches deep. It was custom made for some friends to fit the
135 ROLLTOP DESK 515
 135 ROLLTOP DESK 515 For the person who hates to clear off a desk, who wants to leave everything where it is overnight yet still have the clutter hidden, a rolltop desk is a godsend. The tambour hides
129 KITCHEN BASE CABINET 480
 129 KITCHEN BASE CABINET 480 There are two sorts of kitchen cabinets: base cabinets, which sit on the floor, and wall cabinets. Base cabinets provide both storage space and work surfaces. They often house
Entrance Cabinet Plans
 Entrance Cabinet Plans www.andrewharriswoodwork.com Page 1 of 19 Introduction I have tried to ensure all steps are covered in these plans but if you find any errors in the plans or have a question then
Display Case (for J&S)
") Display Case (for J&S) This is constructed of maple plywood with solid maple (soft maple) edge banding. It was made to fit between a door and a kitchen cabinet, and has an elegant circular taper between
Display Case (for J&S) This is constructed of maple plywood with solid maple (soft maple) edge banding. It was made to fit between a door and a kitchen cabinet, and has an elegant circular taper between
CUSTOM SHUTTERS IN-A-BOX
 CUSTOM SHUTTERS IN-A-BOX SHUTTER ASSEMBLE INSTRUCTIONS & INSTALLATION INSTRUCTIONS 1. Inspect the contents of your package. Do not discard the shutter packaging box until you have started painting your
Notification System Installation Guide
 Notification System Installation Guide NOTE: It is strongly recommend that you hire a licensed electrician to perform the installation of this product. Materials Provided 1. Directory Sign (1) a. Directory
Media Center Woodworking Plans Our Home from Scratch
 Media Center Woodworking Plans by Our Home from Scratch Our Home from Scratch LLC Page 1 Disclaimer Our Home from Scratch LLC and its legal owners cannot be held responsible for any loss, damage, injury
MATERIALS: TOOLS: CUT LIST:
 MATERIALS: TOOLS: (2) 2x2x8 Ft. Boards Tape Measure (2) 1x4x8 Ft. Boards Pencil (4) 1x2x8 Ft. Boards Carpenter s Square (1) 4x4 Ft. Sheet of ¾-Inch Plywood Drill with 5/16-inch Drill Bit (1) 1 ½-inch Thick
Important Note: Why this guidebook is FREE?
 Easy DIY Murphy Bed Construction Guide 1 Important Note: This guide is a FREE SAMPLE of our Complete Construction Guidebook. With the help of this guide you will get familiar with the construction steps
Empire Dresser Plans
 1 Empire Dresser Plans Materials 1 sheet 3/4" plywood (cabinet grade 4' x 8') 1 sheet 5 mm (3/16") underlayment plywood 4'x 8', buy another 1/2 sheet if you want to put a back on the dresser. 1-2" x 4"
Plans. Easy-to-Build Full-size Deluxe Murphy Bed Plan. For more plans, tools and hardware visit rockler.com
 Easy-to-Build Full-size Deluxe Murphy Bed Plan Build a full-size Deluxe Murphy Bed complete with decorative molding and matching side cabinets! Plans For more plans, tools and hardware visit rockler.com
Building Base Cabinets [1]
![Building Base Cabinets [1]](/thumbs/72/66582577.jpg "Building Base Cabinets [1]") [1] Submitted by Ana White [2] on Thu, 2013-11-14 15:07 [1] Seven sheets of PureBond plywood [3] and $200 in popular boards. Page 1 of 42 Yep, that's what it took to take this blank space... And turn it
[1] Submitted by Ana White [2] on Thu, 2013-11-14 15:07 [1] Seven sheets of PureBond plywood [3] and $200 in popular boards. Page 1 of 42 Yep, that's what it took to take this blank space... And turn it
Cedar 2-Drawer Desktop Storage Cube
 Cedar 2-Drawer Desktop Storage Cube 5 ½ Dimensions 5 ½ 5 ½ 2 2 1 7/8 4 ¼ 4 ½ Author s Notes: Build a Cedar 2-Drawer Desktop Storage Cube from just 1 cedar fence picket. No angles, special cuts or rips
Copyrighted Material Page 1
 Compare to: Pottery Barn Teen Storage Bed System Skill Level: Beginner Working with the rest of the components in the Storage Bed Collection, the Small Hutch fits on top of the Storage Headboard and will
A Day House. A View of One Way to Finish the Exterior of The Day House. Read these instructions all the way through before beginning this project.
 A Day House A View of One Way to Finish the Exterior of The Day House Read these instructions all the way through before beginning this project. General Comments For the purposes of this project, the standard
COMPLIMENTARY WOODWORKING PLAN
 COMPLIMENTARY WOODWORKING PLAN Bookcase This downloadable plan is copyrighted. Please do not share or redistribute this plan in any way. It has been created for Wilton Tools, a division of WMH Tool Group.
Trimming Windows. Get the jambs flush with the drywall, and the miters come easily THE PARTS AND PIECES OF WINDOW TRIM BY JIM BLODGETT
 Trimming Windows Get the jambs flush with the drywall, and the miters come easily BY JIM BLODGETT THE PARTS AND PIECES OF WINDOW TRIM Traditional window trim includes a stool, which most people think of
CABINET INSTALLATION INSTRUCTIONS
 CABINET INSTALLATION INSTRUCTIONS Please read these instructions through completely before beginning the installation. Thank you for choosing Plato Personalized Custom Cabinetry for your home. Your Plato
LAMINATE FLOORING INSTALLATION INSTRUCTIONS READ ALL INSTRUCTIONS BEFORE BEGINNING INSTALLATION.
 READ ALL INSTRUCTIONS BEFORE BEGINNING INSTALLATION. If your starting wall is uneven, refer to Fig 11 to prevent having to uninstall rows. Taking measurements to ensure you will not have too small a final
Timber projects. This section contains plans and instructions for three timber projects.
 Project Saw horse Timber projects This section contains plans and instructions for three timber projects. The projects are suggested for students to practise skills use tools from the course and make something
Once you ve made this project, let us know how it went. We d love to see it and brag about you, OK?
 Build It: Let It Snow(flake) wooditsreal.com/2017/12/18/build-a-snowflake/ HANDMADE HOLIDAY Here s a way to bring something extra to your winter decor: build a simple, yet stunning snowflake. Keeping with
Chapter 19. Interior Finish Work
 Chapter 19. Interior Finish Work 19.1 INSTALLING FLOOR TRIM 19.2 INSTALLING CLOSET SHELVES AND POLES 19.3 INSTALLING BATHROOM ACCESSORIES 19.4 HANGING MINI-BLINDS 19.5 INSTALLING APPLIANCES 19.6 INSTALLING
Thank you for purchasing these easel plans. I think you will find this to be a fun, easy to build project that will serve you for years to come.
 Construction Plans for The Basic Wooden Easel Updated August, 2002 Thank you for purchasing these easel plans. I think you will find this to be a fun, easy to build project that will serve you for years
irdhouse Table Special Tools and Techniques Materials and Supplies Hardware
 B irdhouse Table This whimsical table is one of our favorite projects, because it never fails to produce a smile on the faces of our backyard guests. Not only is it cheerful to behold but the glass top
About.com :
 http://woodworking.about.com/gi/dynamic/offsite.htm?sit...//www.popularwoodworking.com/features/fea.asp%3fid=1088 (1 of 8)1/28/2004 12:05:01 AM Modern Storage Tower The last thing I want to do when starting
" BASE CABINET
 INSTALLATION GUIDE INSTALLATION GUIDE Before You Begin Installing Your Kitchen Cabinets 1. Read through installation guide to understand all steps and gather tools needed. 2. Verify that all of the hardware,
Sturdy Work Bench [1]
![Sturdy Work Bench [1]](/thumbs/89/98107918.jpg "Sturdy Work Bench [1]") [1] Submitted by pericles49 [2] on Wed, 2011-03-30 12:53 Page 1 of 13 [1] Summary: I've built a few of Ana's projects so far, and a couple of my own as well. When I work on them, though, I've had to drag
[1] Submitted by pericles49 [2] on Wed, 2011-03-30 12:53 Page 1 of 13 [1] Summary: I've built a few of Ana's projects so far, and a couple of my own as well. When I work on them, though, I've had to drag
Kreg Tool Co. All Rights Reserved.
 Version 1 p. 1 Materials: Lumber: Qty: Board 2 2x2s 3 ft. long 2 1x2s 8 ft. long 2 1x3s 8 ft. long 6 1x6s 10 ft. long INSTRUCTIONS: Supplies: 1 1 / 4" Kreg Screws (coarse thread for softwoods, fine thread
Installation Instructions
 Important 1. Install product in environmentally controlled conditions. 2. Acclimate materials 24 hrs before installation. Maintain temperature controlled environment after installation. 3. Installers should
Closet Organizer from One Sheet of Plywood [1]
![Closet Organizer from One Sheet of Plywood [1]](/thumbs/75/71639922.jpg "Closet Organizer from One Sheet of Plywood [1]") [1] Submitted by Ana White [2] on Mon, 2013-03-25 11:42 [1] This closet is made from one sheet of plywood! Page 1 of 14 Wondering how to make a closet organizer system from one sheet of plywood? Check
[1] Submitted by Ana White [2] on Mon, 2013-03-25 11:42 [1] This closet is made from one sheet of plywood! Page 1 of 14 Wondering how to make a closet organizer system from one sheet of plywood? Check
Chapter 22 - Cabinets & Vanities
 Chapter 22 - Cabinets & Vanities Contents Chapter 22 - Cabinets & Vanities... 22-1 Timing & Prerequisites... 22-2 Cabinets... 22-3 Cabinet Layout... 22-3 Wall Cabinets... 22-4 Assemble the Wall Units...
SLATTEX (Textured Slatwall) INSTALLATION GUIDE
 INSTALLATION GUIDE") SLATTEX (Textured Slatwall) INSTALLATION GUIDE Preparing for the Installation: Here are some suggestions to help you to help you simplify the installation process and maximize the beauty of your 3D Textured
SLATTEX (Textured Slatwall) INSTALLATION GUIDE Preparing for the Installation: Here are some suggestions to help you to help you simplify the installation process and maximize the beauty of your 3D Textured
NEXUS SERIES CABINETS
 NEXUS SERIES CABINETS STANDARD BASE ASSEMBLY INSTRUCTIONS Also applies to: Galaxy Series, Nexus Series, Ridgeline Series, Statesman Series, and Waterford Series FOR YOUR INFORMATION: These assembly instructions
Good In Shed. So Hutch for So Little! A perky shed to conceal homely garbage cans and frustrate furry scavengers.
 Good In Shed So Hutch for So Little! A perky shed to conceal homely garbage cans and frustrate furry scavengers. Materials: Tools 2x4 pressure treated or cedar 5-8' pieces 1/2" Exterior grade plywood 1-4x8
Project 11355EZ: Wall Cabinet with Louvered Doors and Shelf
 Project 11355EZ: Wall Cabinet with Louvered Doors and Shelf This Early American style cabinet will look good in any room, although it seems particularly well suited for the kitchen or bathroom. To make
U. M. ARMY Texas Conference. Wheel Chair Ramp Manual
 U. M. ARMY Texas Conference Wheel Chair Ramp Manual June 2014 U. M. ARMY Texas Conference Building & Repair Tips Wheelchair Ramps Complete a site survey to determine the design and layout of the ramp.
x9 (+1 EXTRA) GSKY VERSA WALL - INTRO KIT PARTS LIST VK-0 TRIM KIT TRAY / HARDWARE KIT REQUIRED TOOL LIST (NOT INCLUDED)
 GSKY VERSA WALL - INTRO KIT PARTS LIST VK-0 TRIM KIT TRAY / HARDWARE KIT REQUIRED TOOL LIST (NOT INCLUDED)") TRIM KIT VERSA KIT BACKING 3'-4 7/8" VERSA KIT 7" CORDOVA PINE SIDE TRIM 7 /4" VERSA KIT 7" CORDOVA PINE TOP/BOTTOM TRIM 7 /4" VERSA KIT 4" BOTTOM EDGE TRIM 4" REQUIRED TOOL LIST (NOT INCLUDED) * UTILITY
TRIM KIT VERSA KIT BACKING 3'-4 7/8" VERSA KIT 7" CORDOVA PINE SIDE TRIM 7 /4" VERSA KIT 7" CORDOVA PINE TOP/BOTTOM TRIM 7 /4" VERSA KIT 4" BOTTOM EDGE TRIM 4" REQUIRED TOOL LIST (NOT INCLUDED) * UTILITY
BRACKET FIX SYSTEM FITTING INSTRUCTIONS
 Whether building a new staircase or replacing old banisters, the patented Bracket Fix stair balustrading system will enable you to complete the work quickly and easily. The Richard Burbidge patented Bracket
Safety First! Review the Safety Checklist before performing tasks in this chapter.
 Chapter 17. Cabinets 17.1 LAYING OUT KITCHEN CABINET UPPER UNITS 17.2 INSTALLING KITCHEN CABINET SUPPORT STRIPS 17.3 INSTALLING KITCHEN CABINET UPPER UNITS 17.4 INSTALLING RANGE HOOD 17.5 INSTALLING KITCHEN
How to Build a Recessed Medicine Cabinet
 How to Build a Recessed Medicine Cabinet See post for install info http://www.hertoolbelt.com/recessed-medicine-cabinet/ Materials 6 Inset Cabinet Door Hinges 3 Latches 1 sheet Beadboard or 1/4 plywood
Pivot-Door Downdraft Cabinet Plans
 Pivot-Door Downdraft Cabinet Plans Finished Cabinet Closed Open Exploded View Introduction This simple downdraft-style dust collection cabinet is a great way to keep your shop cleaner and keep your router
Jeff Branch WOODWORKING YOU CAN BUILD A. By adding subtle design elements, a traditional furniture style becomes decidedly modern.
 Jeff Branch WOODWORKING YOU CAN BUILD A By adding subtle design elements, a traditional furniture style becomes decidedly modern. Jeff Branch WOODWORKING Publisher: Jeff Branch Editor: Jeff Branch Art
Cabinetry Installation
 Cabinetry Installation Easy to follow step-by-step kitchen cabinet installation Hammer Pry bar Screwdriver Phillips Flathead Level TOOL AND MATERIAL LIST Tape measure Pencil Straight edge Drill 3/16" drill
Chapter 18. Interior Doors
 Chapter 18. Interior Doors 18.1 SWINGING DOORS 18.2 SLIDING DOORS 18.3 BIFOLD DOORS Tools needed by volunteers: Hammer Nail apron Tape measure Square Pencil Tools and equipment needed: Extension cords
Outdoor Cooler Cart. Outdoor Cooler Cart Construction Instructions
 Outdoor Cooler Cart Outdoor Cooler Cart Construction Instructions Make the Legs and Side Panels. Cut the eight long and short leg pieces to length. See Material List on next page.. Apply a bead of glue
Canadian Installation Guide
 Canadian Installation Guide Revised October 22, 2014 GenStone products are designed to provide a realistic look of stone or rock. Although installation of GenStone is much easier than traditional masonry
Hudson Dresser [1] Hudson Dresser Published on Ana White ( Submitted by dan-k [2] on Fri, :43 [1]
![Hudson Dresser [1] Hudson Dresser Published on Ana White ( Submitted by dan-k [2] on Fri, :43 [1]](/thumbs/90/102626096.jpg "Hudson Dresser [1] Hudson Dresser Published on Ana White ( Submitted by dan-k [2] on Fri, :43 [1]") [1] Submitted by dan-k [2] on Fri, 2011-03-11 11:43 [1] If you plan on staining this piece, it is recommended that you stain all of the drawer face materials before assembly for a more professional look.
[1] Submitted by dan-k [2] on Fri, 2011-03-11 11:43 [1] If you plan on staining this piece, it is recommended that you stain all of the drawer face materials before assembly for a more professional look.
Gambrel Barn with Overhang Manual
 Tools Needed: -Cordless Drill (12V or higher) -#2 Square Drive Bit -Hammer -6 Step Ladder -Tape Measure -Square utility knife w/ blade & hook blade -Speed Square Little Cottage Co. PO Box 455 Berlin, OH
Making a Massive Bookcase Step-by-Step
 Making a Massive Bookcase Step-by-Step Jeff Branch WOODWORKING The only thing challenging about this project is its huge size. By JFF BRANCH A t right is a rendering of my first woodworking project completed
COMPOSITE RAILING INSTALLATION
 COMPOSITE RAILING INSTALLATION Tools All you ll need is a hammer and screw gun, circular saw (carbidetipped blade with fewer than 20 teeth is recommended), level, tape measure, rasp and blue chalk line.