Starting Modela Player 4
|
|
|
- Brett Robertson
- 6 years ago
- Views:
Transcription

1 Tool Sensor Holder This tutorial will guide you through the various steps required of producing a single sided part using the MDX- 40 and Modela Player 4. The resulting part is a tool sensor holder that can be used to hold the sensor in a safe, accessible location.
 ABS Material Stock (min.")

 0.50(6.")
2 Materials Required: Double sided tape (Duck Brand Heavy Traffic Carpet Tape works great) ABS Material Stock (min..5 x x.5 ) Material Source: Flat End Mill (EMF-50-F-50) 0.5 Ball End Mill (EMB-5-3F-5) 0.50(6.35mm) Collet (ZC-3-635, Included with MDX-40) 0.5(3.75mm) Collet (ZC-3-375, Included with MDX-40)

3 Starting Modela Player 4 Start Modela Player 4. Either Click on the Desktop Shortcut or Start menu, Programs and Roland Modela Player 4. 3 Click on File, Open, and select the sensor.stl file or sensor.mpj file. Please note that you need to have Modela Player 4 Version.95 or higher to view the.mpj file. You can update to the latest version by going to and downloading the update under current products, 3D software. To view the part with shading, click on the shading button.

4 Machine Selection The proper machine and machine driver will have to be selected in Modela Player 4. Click on File and Select Machine to select the appropriate machine. Select MDX-40 under Model Name. 3 Select Roland MDX-40 under Printer Name to select the correct Machine Driver.


5 Add Tooling Click on Option and Add\Remove Tool to add tools and material information. Select New and type in Tool Name, Tool Type, Tool Material, and Flute Diameter for.50 Square Tool. Try to use a name that will easily identify the tool, for example.50 Square. Select Cutting Parameters to start adding cutting parameters for that tool. 3 Select ABS Material, click on Set Parameters, and Register to accept the cutting parameters. Repeat for other possible materials you may use in the future. Repeat steps and 3 for the.5 Ball End Mill


6 Model Set Up To check the dimensions and origin of the part, click on the Model button. Check the size of the part as well as the orientation of the part. The view in the orientation window is from the top. If you need to change the orientation of the part, you would select the different surface view below the orientation view 3 Click on the Origin tab and select the center of the part as the new origin. Click OK when finished.
7 Material Selection Select ABS from the pull down material selection.

8 Modeling Form Select Modeling Form. This will be the Margins around the part. You want the margin to be larger than the largest tool that you will be using. For this example change them to Click on the Depth tab. You will be cutting down to the bottom so leave this at the default setting.


9 Modeling Form 4 5 Slope will add a slight slope to the side of the material that you are cutting for extra tool clearance if necessary. We won t use this for this sample. Cutting Area will let you know the total area to cut, including part and margins. You need to make sure that your material stock is larger than the cutting area.
10 Adding Processes, Roughing Click on New Process to start adding processes. Select Roughing and then click on Next. 3 You are only cutting on the Top surface so select Top[+Z] and slick on Next.


11 Roughing Process 4 Select your tool, or 0.50 Square for this example. Click Next when finished. 5 Select Partial. You need to change the Start Height of the cutting area, or where the end mill will start to cut. To quickly find it, just follow the below method. (Material) (Part Height) = (Start Height) =.35 6 Select Contour Lines for the type of tool path.


12 Roughing Process 7 The cutting parameters will be displayed. 8 The Process name will be displayed and you can either process the tool path Now, or Later. 9 The roughing tool path displayed after processing.
13 Finish Process Next you will add the finishing process so click on New Process again. Select the finishing process. 3 You are milling from the Top.

14 Finish Process 4 Select the.5 Ball End Mill 5 Select Partial again. You want to cut a little deeper this time so select Extend Depth Limit. Change the End Height to You will be cutting below the bottom of part. 6 Again you are selecting Contour Lines for the Tool Path. It may take longer to mill than Scan Lines, but it yields better results.
15 Finish Process 7 Again use the default settings. 8 Process the finishing process right now. 9 Finishing Process tool paths.


16 Cutting Position Setup Click the Cutting Position setup to setup your material stock. Since you are using the X0.0 and Y0.0 as the center of the part, there is nothing to change here. 3 Click the Z-Direction tab. Enter how far deep the part is in the material stock. It will be the same as the start height that was performed during the roughing process. Follow the below method. (Material) (Part Height) = (Start Height) =.35


17 Simulation To view the processes simulation, select the roughing process. Select the Preview Cutting button which will open the Virtual Modela Software. 3 Vitual Modela will show you the process selected. You can also see approximately how long the process will take. When you close Virtual Modela, you do not have to save the changes.


18 Installing Tool, Material Select your /4 collet and /4 Square End Mill. 3 Install the collet and tool in the spindle. Place the 7mm tool in your left hand and over the spindle nut as shown. Place the 0mm tool in your right hand and over the collet. To tighten, pull the wrenches away from each other. Use the double sided tape to secure the material to the table.


19 Virtual Control Panel To load the Virtual Control Panel, click the Windows Start menu, Settings, and Printers and Faxes. Right click over the Roland MDX-40 and select Printing Preferences. You can open the Virtual Control Panel by clicking on OPERATION PANEL, or you can also Create a Shortcut onto your desktop. 3 You will use the Virtual Control Panel to move the machine in the X,Y, and Z direction. You will also use this to set the various origins.

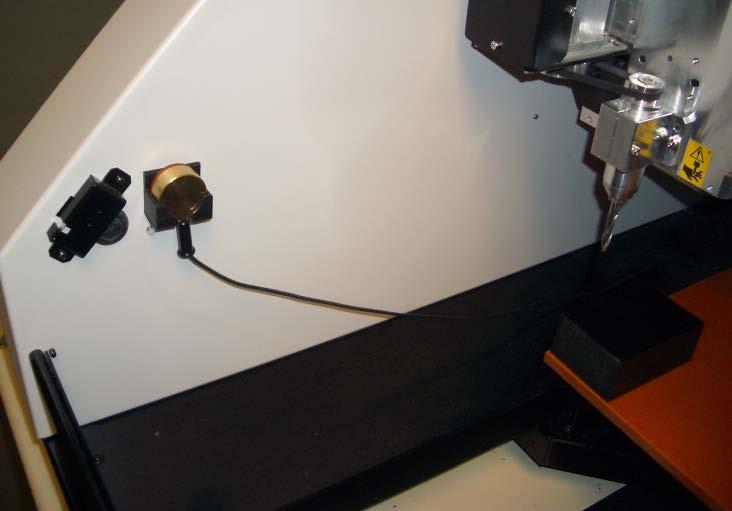
20 Z-Origin To set the tool Z-Origin on the top surface of the material, use the Tool Sensor and the place it over the material. Use the Virtual Control Panel to move the tool over the tool sensor. Select the Z-Axis Reference Point Settings and Click on the Start Detection button. The Tool will move down, touch the Tool Sensor 3 times, and the Z- Origin will be set after this. Remove Tool Sensor.


21 XY Origin To set the XY origin, use the virtual control panel to move the tool to the approximate center of the cutting area. The material stock needs to be larger than the cutting area specified under Modeling Form, Cutting Area. Also note that the origin used under Model, Origin, center is how you are locating the cutting area on the material. 3 Set the XY Origin by selecting the Reference Point Settings and selecting the XY Origin, and clicking on Set to set the XY origin. You will notice that the Virtual Control Panel will now display X 0.00 and Y 0.00.


22 Cutting! Click the Cut button to send the program to the machine. You will get Cut screen confirming the Machine Name and Printer Driver selected. Click ok. 3 Click Continue to start sending the program to the machine.

23 Cutting! 4 The software will prompt you to make a tool chance. DO NOT PRESS CONTINUE. 5 Change the tools using the 7mm and 0mm tools. Place the 7mm tool in your left hand and over the spindle nut as shown. Place the 0mm tool in your right hand and over the collet. To loosen, pull the wrenches towards each other. 6 Remove the /4 collet and /4 tool and install the /8 collet and /8 tool.

24 Cutting! 7 Tighten the tools by pulling the tools away from you. 8 Place the Tool Sensor over the material. Move the tool over the sensor. 9 Use the Virtual Control Panel to Start the Z-Origin detection process and set the Z-Origin at the top of the material for the new tool. Remove sensor before cutting.
25 Cutting! 0 Press Continue to cut remaining tool paths.

26 Finished Functional Part
Ladybird Project - Vacuum Mould
 - Vacuum Mould Prerequisite Mould drawn and saved as an STL file in SolidWorks Focus of the Lesson On completion of this exercise you will have: Opened an STL file Set Machining Constraints Set up Tools
SRP WORKSHOP NOVEMBER 2008
 SRP WORKSHOP NOVEMBER 2008 End Mill Knowledge End Mill Knowledge End Mill Materials High Speed Steel or HSS Provides decent wear resistance and costs less than carbide end mills Material is ductile and
Getting Started. Thank you very much for purchasing this product.
 Getting Started Thank you very much for purchasing this product. To ensure correct and safe usage with a full understanding of this product's performance, please be sure to read through this manual completely
HARVARD GSD BEGINNER S GUIDE TO ROLAND MDX 40-A prepared by Alexander Matthias Jacobson
 HARVARD GSD BEGINNER S GUIDE TO ROLAND MDX 40-A prepared by Alexander Matthias Jacobson Gund Hall s CNC Milling Equpiment ONSRUD 96C18 3-Axis (X 48, Y 96, Z 8 ) Vacuum hold-down Automatic tool change Automatic
Toothbrush Holder Project 2D Machining
 Toothbrush Holder Project 2D Machining Prerequisite Toothbrush Holder drawn and saved as a DXF file in SolidWorks Focus of the Lesson On completion of this exercise you will have: Used the Techsoft 2D
Conversational CAM Manual
 Legacy Woodworking Machinery CNC Turning & Milling Machines Conversational CAM Manual Legacy Woodworking Machinery 435 W. 1000 N. Springville, UT 84663 2 Content Conversational CAM Conversational CAM overview...
Fusion 360 Part Setup. Tutorial
 Fusion 360 Part Setup Tutorial Table of Contents MODEL SETUP CAM SETUP TOOL PATHS MODEL SETUP The purpose of this tutorial is to demonstrate start to finish, importing a machineable part to generating
Digital Media Tutorial Written By John Eberhart
 MadCAM MadCAM 5.0: Large 4.1: Large & Medium CNC Tool CNC Path Tool Path Generator Generator Digital Media Tutorial Written By John Eberhart MadCAM is a tool path generator that works inside Rhino. It
MadCAM 2.0: Drill Pattern Toolpath
 MadCAM 2.0: Drill Pattern Toolpath Digital Media Tutorial 2005-2006 MadCAM 2.0 can create a toolpath to drill holes directly into your material. The bit plunges in and out of the material without moving
Automatic Tool Changer (ATC) for the prolight A Supplement to the prolight 1000 User s Guide
 for the prolight A Supplement to the prolight 1000 User s Guide") Automatic Tool Changer (ATC) for the prolight 1000 A Supplement to the prolight 1000 User s Guide 1 1995 Light Machines Corporation All rights reserved. The information contained in this supplement (34-7221-0000)
Automatic Tool Changer (ATC) for the prolight 1000 A Supplement to the prolight 1000 User s Guide 1 1995 Light Machines Corporation All rights reserved. The information contained in this supplement (34-7221-0000)
CAMWorks How To Create CNC G-Code for CO2 Dragsters
 Creating the Left Side Smooth Finish Tool Path. This chapter will focus on the steps for creating the left side smooth finish tool path. The objective of this chapter is to create to an accurate and highly
Multiple Surface Cutting Guide MDX-650 &ZCL-650. Making a Sample Shoe Sole. December 2001
 Multiple Surface Cutting Guide MDX-650 &ZCL-650 Making a Sample Shoe Sole December 2001 1 Introduction This guide is the process of making a sample of shoe sole. Please refer the Users manual for the details
Flip for User Guide. Inches. When Reliability Matters
 Flip for User Guide Inches by When Reliability Matters Mastercam HSM Performance Pack Tutorial 1 Mastercam HSM Performance Pack Tutorial Tutorial I... 2 Getting started... 2 Tools used... 2 Roughing...
CNC Turning Training CNC MILLING / ROUTING TRAINING GUIDE. Page 1
 CNC Turning Training www.denford.co.uk Page 1 Table of contents Introduction... 3 Start the VR Turning Software... 3 Configure the software for the machine... 4 Load your CNC file... 5 Configure the tooling...
Instructions for making our TinyFABISB using ROLAND MODELA (MDX-50) milling machine
 milling machine") Instructions for making our TinyFABISB using ROLAND MODELA (MDX-50) milling machine FABLAB BRIGHTON 2018 1. Circuit design - creating RML files 2 2. Setting up MDX-50 Machine 5 Fix board 5 Setup machine
Instructions for making our TinyFABISB using ROLAND MODELA (MDX-50) milling machine FABLAB BRIGHTON 2018 1. Circuit design - creating RML files 2 2. Setting up MDX-50 Machine 5 Fix board 5 Setup machine
Machining Features/Regions
 R CAM / -A T C A S Typically, a -Axis job will start with a Horizontal Roughing opera on to remove excess stock material in prepara on for one or more finishing passes. Therefore the Horizontal Roughing
Computation & Construction Lab. Stinger CNC 3D Milling Workflow
 Computation & Construction Lab Stinger CNC 3D Milling Workflow 3D Single Sided Milling Guidelines - The following steps will guide the user on how to transfer digital work from a design software to setting
Engineering Data Rail Lifters
 Engineering Data Rail Lifters Bolt On Ready Stock Rails This product may be covered by one or more patents or patent applications. See http://www.standardlifters.com/patents.html for details. 12/13 - Rev.
Exercise 1. Milling a Part with the Lab-Volt CNC Mill EXERCISE OBJECTIVE
 Exercise 1 Milling a Part with the Lab-Volt CNC Mill EXERCISE OBJECTIVE When you have completed this exercise, you will be able to engrave text on square pieces of stock, using the Lab-Volt CNC Mill, model
Drawing Layouts Paper space & Model Space
 Drawing Layouts Paper space & Model Space Users of Bricscad will have seen the tabs at the bottom left of the drawings area labelled: Model, Layout1, Layout2 but may not know how to use them or what they
Finding Offsets for Multiple Spindles/Air Drills
 888-680-4466 ShopBotTools.com Finding Offsets for Multiple Spindles/Air Drills Copyright 2016 ShopBot Tools, Inc. page 1 Copyright 2016 ShopBot Tools, Inc. page 2 Introduction This document explains how
The All-in-one for the serious photographer
 The All-in-one for the serious photographer Epson Stylus Photo PX700W Print photos that exceed lab quality with Epson Claria Photographic Ink. Integrated wireless and Ethernet for shared printing and scanning.
MasterCAM for Dresser Valet
 MasterCAM for Dresser Valet Check to make sure the nethasp is working/turned on to network. Go to ALL APPs/Mastercam x8/nethasp After the computer reads the nethasp, these programs should show up. If not
Flip for User Guide. Metric. When Reliability Matters
 Flip for User Guide Metric by When Reliability Matters Mastercam HSM Performance Pack Tutorial 1 Mastercam HSM Performance Pack Tutorial Tutorial I... 2 Getting started... 2 Tools used... 2 Roughing...
Desktop 3D Scanning and Milling MDX-20/15
 MDX-20/15 o d e l i n g & S c a n n i n g Model: Model: MDX-20 Max operation area : 203.2 mm (X) x 152.4 mm (Y) x 60.5 mm (Z) Desktop 3D Scanning and Milling MDX-20/15 Seeing your ideas take shape has
Tables it will work with
 What does it do? The Self Centering Vise is used to clamp and hold items that are normally to difficult to hold with a standard table clamp or double-sided engraving tape. It can be used to hold notary
The ShopBot Indexer. Contents
 ShopBot Indexer Page -1- The ShopBot Indexer The ShopBot Indexer is basically a lathe with an extra level of precision built in you can precisely control the rotation of the headstock and also link it
CAMWorks How To Create CNC G-Code for CO2 Dragsters
 Objective: In this chapter we will show how to mill out the axle holes for this CO2 Dragster from the left side. VI.1. Open the previously created file: Dragster axle hole 001.sldprt. VI.2. Select the
CNC Router Tutorial Jeremy Krause
 CNC Router Tutorial Jeremy Krause Jeremy.Krause@utsa.edu Usage prerequisites: Any user must have completed the machine shop portion of the Mechanical Engineering Manufacturing course (undergraduate, sophomore
so you want to get to know Onsrud... Onsrud1 : machine set up
 so you want to get to know Onsrud... Onsrud1 : machine set up What does CNC mean? CNC: Computer Numerical Control The router is controlled by a computer, that tells the router where to go through a series
LinuxCNC Help for the Sherline Machine CNC System
 WEAR YOUR SAFETY GLASSES FORESIGHT IS BETTER THAN NO SIGHT READ INSTRUCTIONS BEFORE OPERATING LinuxCNC Help for the Sherline Machine CNC System LinuxCNC Help for Programming and Running 1. Here is a link
CNC Using the FlexiCam CNC and HMI Software. Guldbergsgade 29N, P0 E: T:
 CNC Using the FlexiCam CNC and HMI Software Guldbergsgade 29N, P0 E: makerlab@kea.dk T: +46 46 03 90 This grey box is the NC controller. Let s start by turning the red switch to the ON position, then press
MasterCAM for Sculpted Bench
 MasterCAM for Sculpted Bench Check to make sure the nethasp is working/turned on to network. Go to ALL APPs/Mastercam x8/nethasp After the computer reads the nethasp, these programs should show up. If
Activity Sketch Plane Cube
 Activity 1.5.4 Sketch Plane Cube Introduction Have you ever tried to explain to someone what you knew, and that person wanted you to tell him or her more? Here is your chance to do just that. You have
You can easily print images using the Capture NX print function. Here we will explain the process for printing
 Printing - Print Size Request How do you print images to fit on particular paper sizes. Response You can easily print images using the Capture NX print function. Here we will explain the process for printing
When the machine makes a movement based on the Absolute Coordinates or Machine Coordinates, instead of movements based on work offsets.
 Absolute Coordinates: Also known as Machine Coordinates. The coordinates of the spindle on the machine based on the home position of the static object (machine). See Machine Coordinates Absolute Move:
Roland MDX-540 Series SRP Milling Machine
 CybridSystems.com Crystal Lake IL. --- Phone: 224-565-5210 --- Fax: 815-477-8347 Roland MDX-540 Series SRP Milling Machine Creates accurate prototypes for complex snap-fits. Durable for production and
ShopBot Three-Axis Zero Plate
 Page 1 ShopBot Three-Axis Zero Plate Setup and Use Contents Intro...2 Getting Started...2 Zeroing to an Outside Corner... 3 Zeroing to an Inside Corner... 4 Using a Bit instead of a Dowel... 5 Using a
Assembly Guide for Printrbot - Simple Maker s Edition 1405
 Assembly Guide for Printrbot - Simple Maker s Edition 1405 Last update: March 2016 Please Note: be careful on the steps that are underlined 1 Contents Tools Needed:... 3 First step: Check components and
Rotary Fixture M/V/X CLASS LASER SYSTEMS. Installation and Operation Instructions
 Rotary Fixture M/V/X CLASS LASER SYSTEMS Installation and Operation Instructions 02/01/2000 Introduction The Rotary Fixture controls in the Printer Driver are used along with the optional Rotary Fixture
NOVA LABS CNC 101: SHOPSABRE OPERATION AND SAFETY
 NOVA LABS CNC 101: SHOPSABRE OPERATION AND SAFETY What is unique about our ShopSabre RC4 CNC? Creates large projects Computer operated from digital model or drawing Dimensions are accurate to +/- 0.004in
CNC Chucker Lathe P/N 6600, 6610, and 6620
 WEAR YOUR SAFETY GLASSES FORESIGHT IS BETTER THAN NO SIGHT READ INSTRUCTIONS BEFORE OPERATING PRODUCT DESCRIPTION 6600 CNC Chucker w/3c headstock, ball screws, high-torque stepper motors & PC w/4-axis
ENGI 7962 Mastercam Lab Mill 1
 ENGI 7962 Mastercam Lab Mill 1 Starting a Mastercam file: Once the SolidWorks models is complete (all sketches are Fully Defined), start up Mastercam and select File, Open, Files of Type, SolidWorks Files,
Performance. CNC Turning & Milling Machine. Conversational CAM 3.11 Instruction Manual
 Performance CNC Turning & Milling Machine Conversational CAM 3.11 Instruction Manual Legacy Woodworking Machinery 435 W. 1000 N. Springville, UT 84663 Performance Axis CNC Machine 2 Content Warranty and
Modeling Basic Mechanical Components #1 Tie-Wrap Clip
 Modeling Basic Mechanical Components #1 Tie-Wrap Clip This tutorial is about modeling simple and basic mechanical components with 3D Mechanical CAD programs, specifically one called Alibre Xpress, a freely
Installing the 3 Indexer: PRS Standard Tools
 888-680-4466 ShopBotTools.com Installing the 3 Indexer: PRS Standard Tools Copyright 2016 ShopBot Tools, Inc. page 1 Copyright 2016 ShopBot Tools, Inc. page 2 Table of Contents Route Cable into Box...5
1/31/2010 Google's Picture Perfect Picasa
 The Picasa software lets you organize, edit, and upload your photos in quick, easy steps. Download Picasa at http://picasa.google.com You'll be prompted to accept the terms of agreement. Click I Agree.
CNC PART 2 : STARTING 3D GSAPP FABRICATION LAB 2016
 CNC PART 2 : STARTING 3D GSAPP FABRICATION LAB 2016 this is a the second part of a student guide for skill-building and proficiency in the use of the CNC machines in the Fabrication Lab at Columbia GSAPP...upon
The CNC Tangent Die Cutter
 The CNC Tangent Die Cutter Instruction Book If you have any questions, please see a DM Staff Member Digital Media Tutorial Written By John Eberhart Using the CNC Tangent Die Cutter The CNC Tangent Die
CNC: The Machine. Sullivan Fabrication Studio Version 5.1 (beta)
") CNC: The Machine Sullivan Fabrication Studio Version 5.1 (beta) TABLE OF CONTENTS Initial Setup... About the Knowledge Base........... Techno CNC Router... Mounting Material... Install Router Bit... Set
CNC: The Machine Sullivan Fabrication Studio Version 5.1 (beta) TABLE OF CONTENTS Initial Setup... About the Knowledge Base........... Techno CNC Router... Mounting Material... Install Router Bit... Set
Resistance Apparatus EM-8812
 Instruction Manual with Experiment Guide and Teachers Notes 012-09573A Resistance Apparatus EM-8812 Resistance Apparatus Table of Contents Contents Introduction...........................................................
General Help. Last revised: Winter When I try to print something on the computer, it appears to work, but nothing comes out of the printer.
 General Help Last revised: Winter 2015 Problem Solution When I try to print something on the computer, it appears to work, but nothing comes out of the printer. See the next item. When I try to print something
Installing a 3 Indexer: Desktop Tools
 888-680-4466 ShopBotTools.com Installing a 3 Indexer: Desktop Tools built after October, 2012 Copyright 2016 ShopBot Tools, Inc. page 1 Copyright 2016 ShopBot Tools, Inc. page 2 Table of Contents Overview...5
CNC INTRO WALKTHROUGH GSAPP FABRICATION LAB, FALL 2017
 CNC INTRO WALKTHROUGH GSAPP FABRICATION LAB, FALL 2017 this is a student guide to the procedure of gaining access to the CNC router digital fabrication equipment in the Fabrication Lab at GSAPP. The guide
Omniverse Setup Instructions
 Omniverse Setup Instructions Hello Omni customer, Please follow the steps outlined below to get your Omni ready for Omniverse! Let us know if you have questions or issues at any time at support@virtuix.com.
END MILL RE-SHARPENER EMG-413
 END MILL RE-SHARPENER EMG-413 OPERATING INSTRUCTIONS -TABLE OF CONTENTS- A.SAFETY INSTRUCTIONS -------- 1 B.NAMES OF COMPONENTS ----- 2 C.OPERATIONS ------------------------ 3 D.REPLACING THE WHEEL --------
How to Calibrate a CNC Machine's Positioning System
 How to Calibrate a CNC Machine's Positioning System Guide to calibrating the Haas wireless intuitive probing system. Written By: Kim Payne 2018 gunnerautomotive.dozuki.com/ Page 1 of 20 INTRODUCTION Attention:
WELCOME TO BINGO CALLER
 WELCOME TO BINGO CALLER Dee Dee Software Design & Sales A Division Of Seocom Enterprises Unlimited LLC Bingo Caller was designed to be used at a computer screen resolution of at least 1024 x 768, along
Dozuki. Written By: Dozuki System. Guide to calibrating the Haas wireless intuitive probing system. How to Calibrate WIPS
 Dozuki How to Calibrate WIPS Guide to calibrating the Haas wireless intuitive probing system. Written By: Dozuki System 2017 www.dozuki.com Page 1 of 22 INTRODUCTION Getting Started On initial setup or
How To Measure Your Finished Opening
 3000 Series Bifold Doors How To Measure Your Finished Opening MEASURE FROM RIGHT TO LEFT 2 PLACES (WIDTH) MEASURE FROM TOP TO BOTTOM 2 PLACES (HEIGHT) Tools Required for Assembly: Tools Needed: Phillips
4. Set the parameters of the Material tab and Image Correction tab to match the image below.
 The following document outlines how to configure the Windows printer driver for the Roland MPX- 70 Photo Impact Printer as well as the Dr. Metaza2 Software program for optimal printing conditions. 1. Close
Printer Driver. This guide describes how to set up the Printer Driver for Windows 7.
 4-187-187-12 (1) Printer Driver Setup Guide This guide describes how to set up the Printer Driver for Windows 7. Before Using this Software Before using the printer driver, be sure to read the Readme file.
10 x 16 Cutting Board - Juice Groove in MasterCAM
 10 x 16 Cutting Board - Juice Groove in MasterCAM Check to make sure the nethasp is working/turned on to network. Go to ALL APPs/Mastercam x8/nethasp After the computer reads the nethasp, these programs
Learning Guide. ASR Automated Systems Research Inc. # Douglas Crescent, Langley, BC. V3A 4B6. Fax:
 Learning Guide ASR Automated Systems Research Inc. #1 20461 Douglas Crescent, Langley, BC. V3A 4B6 Toll free: 1-800-818-2051 e-mail: support@asrsoft.com Fax: 604-539-1334 www.asrsoft.com Copyright 1991-2013
CNC Machines Assembly Guide
 CNC Machines Assembly Guide Contents Warnings 3 General Safety 3 Emergency Stop Restart Procedure 3 Before you start 4 Matrix Micro CNC Kits & Machines Modules 4 Assembly Notes 5 Small and Large Retaining
minicad5 QuickStart Tutorial Stage: 4 Plot the Job
 minicad5 QuickStart Tutorial Stage: 4 Plot the Job Aim: Plot the job to both printer / plotter and DXF file. Figure 1 - The finished product Plotting and export to DXF We wish to produce a final paper
CNC Router. Cnc Course
 CNC Router A CNC Router is a computer numerically-controlled machine where the tool paths are controlled via computer. It can cut and mill various hard materials, such as wood, composites, aluminium, plastics,
Creo Extrude Tutorial 2: Cutting and Adding Material
 Creo Extrude Tutorial 2: Cutting and Adding Material 1. Open Creo Parametric 2. File > Open > extrudeturial (From Creo Extrude Tutorial 1) 3. Cutting Material a. Click Extrude Icon > Select the following
IENG 475 Computer-Controlled Manufacturing Systems 2/7/2017. Lab 03: Manual Milling and Turning Operations
 I. Purpose Lab 03: Manual Milling and Turning Operations A.) B.) C.) D.) Provide an overview of safety considerations for the CNC Mill Provide manual experience using the laboratory s CNC Mill Provide
Customized Foam for Tools
 Table of contents Make sure that you have the latest version before using this document. o o o o o o o Overview of services offered and steps to follow (p.3) 1. Service : Cutting of foam for tools 2. Service
Figure 1: NC EDM menu
 Click To See: How to Use Online Documents SURFCAM Online Documents 685)&$0Ã5HIHUHQFHÃ0DQXDO 6 :,5(('0 6.1 INTRODUCTION SURFCAM s Wire EDM mode is used to produce toolpaths for 2 Axis and 4 Axis EDM machines.
VisualCAM 2018 TURN Quick Start MecSoft Corporation
 2 Table of Contents About this Guide 4 1 About... the TURN Module 4 2 Using this... Guide 4 3 Useful... Tips 5 Getting Ready 7 1 Running... VisualCAM 2018 7 2 About... the VisualCAD Display 7 3 Launch...
Cube in a cube Fusion 360 tutorial
 Cube in a cube Fusion 360 tutorial n Before using these instructions, it is helpful to watch this video screencast of the CAD drawing actually being done in the software. Click to link to the video tutorial.
Carvey Quick Start & Resource Guide
 Carvey Quick Start & Resource Guide Carvey Manual and Guide Carvey FAQs: https://inventables.desk.com/customer/en/portal/topics/820856-carveyfaq/articles?b_id=9565 Carvey Manual: http://carvey-instructions.inventables.com
Tutorial 1 getting started with the CNCSimulator Pro
 CNCSimulator Blog Tutorial 1 getting started with the CNCSimulator Pro Made for Version 1.0.6.5 or later. The purpose of this tutorial is to learn the basic concepts of how to use the CNCSimulator Pro
Automated Double Aperture Accessory
 For the Cary 1, 3, 100, 300, 4, 5, 400, 500, 500i, 4000, 5000, 6000i, Deep UV Installation Category II Pollution Degree 2 Equipment Class I Table of Contents Introduction Theory Operation Installation
Creating Photo Borders With Photoshop Brushes
 Creating Photo Borders With Photoshop Brushes Written by Steve Patterson. In this Photoshop photo effects tutorial, we ll learn how to create interesting photo border effects using Photoshop s brushes.
VBXC CONFIGURATION AND PROCESS CONTROL MANUAL
 VBXC CONFIGURATION AND PROCESS CONTROL MANUAL SOFTWARE VERSION 2.4 DOCUMENT #D10008 REVISION: A OCTOBER 2018 All rights reserved. No patent liability is assumed with respect to the use of the information
FC3920K and FC5539K Automatic Foam Cutting CNC Machines
 FC3920K and FC5539K Automatic Foam Cutting CNC Machines Disclaimer You accept all risks and responsibilities for looses, damages costs and other consequences resulting directly or indirectly from using
Figure 1: NC Lathe menu
 Click To See: How to Use Online Documents SURFCAM Online Documents 685)&$0Ã5HIHUHQFHÃ0DQXDO 5 /$7+( 5.1 INTRODUCTION The lathe mode is used to perform operations on 2D geometry, turned on two axis lathes.
Mill OPERATING MANUAL
 Mill OPERATING MANUAL 2 P a g e 7/1/14 G0107 This manual covers the operation of the Mill Control using Mach 3. Formatting Overview: Menus, options, icons, fields, and text boxes on the screen will be
How to Transform your 3D Printer in a CNC MILLING MACHINE
 How to Transform your 3D Printer in a CNC MILLING MACHINE How to Transform your 3D Printer in a CNC milling machine We can finally presents you a tutorial on how to modify our 3D printer K8200 to transform
Straw support Fusion 360
 Straw support Fusion 360 Before using these instructions, watch the video screencast of the CAD drawing actually being done in the software. Click this link for video tutorial This design works on a variety
Brief Procedural Overview: Minitech CNC Mill
 Brief Procedural Overview: Minitech CNC Mill Last updated: July 2014 Chadd Armstrong Remcho Research Group Department of Chemistry Oregon State University Introduction : The process of designing and fabricating
Instruction Manual for the Software of ASSAN V2 Series Receiver
 Instruction Manual for the Software of ASSAN V2 Series Receiver I. Setup 1. Double click SETUP to enter the welcome interface and click Next. 2. Enter your name and company name and click Next. 3. Select
Using Siemens NX 11 Software. The connecting rod
 Using Siemens NX 11 Software The connecting rod Based on a Catia tutorial written by Loïc Stefanski. At the end of this manual, you should obtain the following part: 1 Introduction. Start NX 11 and open
Faculty Lecture Capture Guide
 Faculty Lecture Capture Guide If you have never used Panopto before, follow this first part. Log into your Blackboard Account and open the course you wish to capture: Open your Course Management Control
Quick Start Guide. Contents
 1 Quick Start Guide Contents Powering on the Machine Login/Password Entry Jaw Set Up High Security Cut by Code High Security Jaw Set Up Edge Cut Cut by Code Edge Cut Cut by Decode Cutter Replacement Tracer
MityCAM-B2521 EPIX XCAP User s Guide
 MityCAM-B2521 EPIX XCAP User s Guide (CT031 Revision 1) Page 1 of 13 60-000014 Contents 1 Installing Laptop Express Card... 3 2 Using the Camera in Single Camera Link mode (Laptop)... 3 3 Single Camera
HP DesignJet T520. Quick Start Guide. Copyright Notice
 HP DesignJet T520 Quick Start Guide Copyright Notice The copyright law of the United States (Title 17, U.S. Code) governs the making of copies or other reproductions of copyrighted material. The person
In this tutorial you will use Photo Story 3, a free software program from Microsoft, to create digital stories using text, graphics and music.
 In this tutorial you will use Photo Story 3, a free software program from Microsoft, to create digital stories using text, graphics and music. What you will learn: o System Requirements and Recommendations
SCITEX Dual Roll Kit. User s guide
 SCITEX Dual Roll Kit User s guide 2011 Hewlett-Packard Development Company, L.P. First edition Legal notices The information contained herein is subject to change without notice. The only warranties for
TS5-1600AMF MIMAKI ENGINEERING CO., LTD.
 TS5-1600AMF MIMAKI ENGINEERING CO., LTD. TKB Gotenyama Building, Kitashinagawa, Shinagawa-ku, Tokyo 141-0001, Japan Phone: +81-3-5420-8671 Fax: +81-3-5420-8687 URL: http: // www. mimaki. co. jp D201931-10
.00025" PER CLICK. As you turn the adjustment screw you should be able to feel a click. Each click will change the part diameter.00025".
 ULTRA PRECISION DIAMETER ADJUSTMENT.00025" PER CLICK The ultra precision diameter adjustment is extremely accurate, as well as, quick and easy to use. The adjustment mechanism is spring loaded to take
Quick Guide to Gift and Jewelry Engraving
 Quick Guide to Gift and Jewelry Engraving Engraving a Pewter Tankard (Cylindrical Metal Objects) Cylindrical Engraving of Metal Objects Tools required for Cylindrical Engraving *1. The optional 1/8 (c2
V-Solder. Instruction manual. BON-6002 V-Cut solder machine Solder diameter φ0.6~φ1.6. (User s Manual) Preparation in April 2014.
 Preparation in April 2014.") V-Solder BON-6002 V-Cut solder machine Solder diameter φ0.6~φ1.6 Instruction manual (User s Manual) Preparation in April 2014 The 6 nd edition JAPAN BONKOTE CO.,LTD. 1 Contents 1 Preface 1 2 Notes for
V-Solder BON-6002 V-Cut solder machine Solder diameter φ0.6~φ1.6 Instruction manual (User s Manual) Preparation in April 2014 The 6 nd edition JAPAN BONKOTE CO.,LTD. 1 Contents 1 Preface 1 2 Notes for
INSTALLATION INSTRUCTIONS FOR INSTALLING T-SERIES EXTRA HEAVY DUTY LEVER LOCKSET
 HIGH EDGE 2 1/4"(57mm) 03079400070 INSTALLATION INSTRUCTIONS FOR INSTALLING T-SERIES EXTRA HEAVY DUTY LEVER LOCKSET IMPORTANT: THIS LOCK IS NON-HANDED. LOCK IS FACTORY PACKED PREADJUSTED FOR 1³ ₄" (45mm)
Vectorworks Architect
 SAMPLE by Jonathan Pickup third edition written with version 2011 Vectorworks Architect Tutorial Manual Table of Contents Introduction... iii How to Use this Manual... iii New Ways of Drawing... iv Vectorworks
Table of Contents. Lesson 1 Getting Started
 NX Lesson 1 Getting Started Pre-reqs/Technical Skills Basic computer use Expectations Read lesson material Implement steps in software while reading through lesson material Complete quiz on Blackboard
Automatic Tool Changer ZAT-650 User's Manual
 Automatic Tool Changer ZAT-650 User's Manual Thank you very much for purchasing the product. To ensure correct and safe usage with a full understanding of this product's performance, please be sure to