Item #: BTLD46SP Assembly Instructions
|
|
|
- Rosanna Morton
- 5 years ago
- Views:
Transcription


1 Item #: BTLD46SP Assembly Instructions Revised 06/2012
2 Instruction Manual IMPORTANT INFORMATION READ BEFORE ASSEMBLING THIS PRODUCT Follow the information on the warning labels found on the bunk bed and on the packaging. Do not remove the warning labels from the bed. Use only a mattress with the dimensions in.l x in.w x 6 in.h on the upper bunk. The surface of the mattress must be at least 5 in. (127mm) below the upper edge of the guardrails. Mattress must not exceed the maximum thickness of 6 in. Always use the recommended size of mattress or mattress support, or both, to help prevent the likelihood of entrapment or falls. The use of a water or sleep flotation mattress is prohibited. Replacement parts, including additional guardrails, may be obtained from any of Walker Edison Furniture Company s dealers or by contacting us online at DO NOT use substitute parts. Contact the manufacturer or dealer for replacement parts. Always use guardrails on the upper bunk. If the bunk bed will by placed next to a wall, the guardrail running the full length of the bed should by placed against the wall to prevent entrapment between the bed and the wall. Periodically check that the guardrails, ladders and other components of the bed are in their proper position, free from damage and that all connectors are tight. Always use the ladder to access the upper bunk. DO NOT allow children under 6 years of age to use the upper bunk. DO NOT allow horseplay on or under the bed. Prohibit jumping on the bed. Prohibit more than one person on the upper bunk. The use of a night light may provide an added safety precaution for a child using the upper bunk. STRANGULATION HAZARD Never attach or hang items to any part of the bunk bed that are not designed for use with the bed; including but not limited to hooks, belts and jump ropes. Keep these instructions for future reference.
3 Parts List
4 Hardware List
5 Assembly Options Option A - Ladder Left To build this option follow Steps 1-8, Steps 10A-13A and Steps Skip Step 9 for this assembly option. Option B - Ladder Right To build this option follow Steps 1-8, Step 9, Steps 10B-13B and Steps
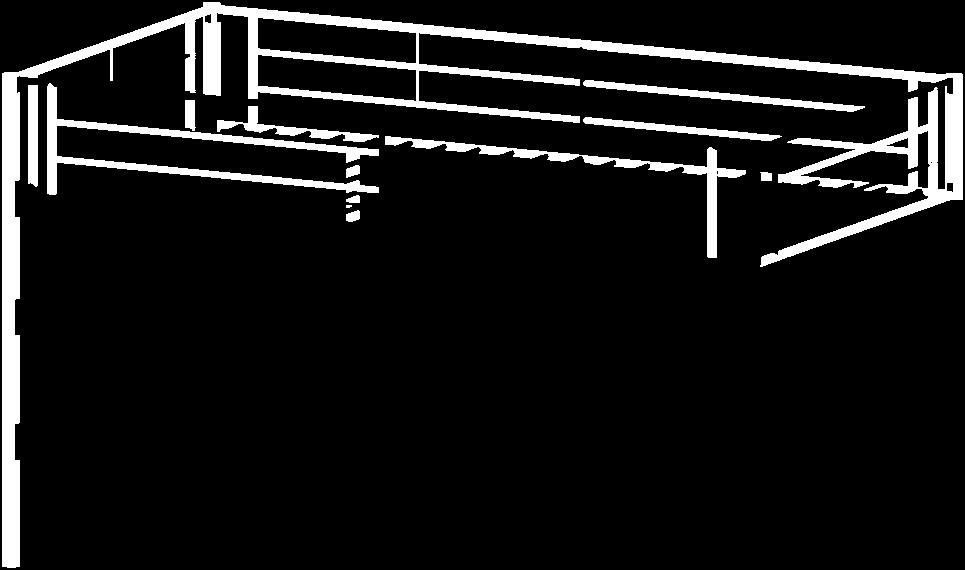
6 Attach guardrail (10) and shelf supports (8) to posts (1,4) using bolts (A). Tighten bolts (A) with wrench (G). Please note the position of all pre-drilled holes as shown above before attaching bed parts together. Attach second guardrail (10) posts (2,3) using bolts (A). Tighten bolts (A) with wrench (G). Please note the position of all pre-drilled holes as shown above before attaching bed parts together.
7 Attach crossbar (5) to post (1) and crossbar (6) to post (4) using bolts (A). Tighten bolts (A) with wrench (G). Please note the position of all pre-drilled holes as shown above before attaching bed parts together. Attach opposite end of crossbar (5) to post (2) and opposite end of crossbar (6) to post (3) using bolts (A). Tighten bolts (A) with wrench (G).
8 Roll mattress support slats (11) out along the bed frame and secure them to the bed frame using anchors (F) and bolts (A) where indicated above. Bolts (A) will screw directly into crossbars (5,6). Tighten bolts (A) with wrench (G). Attach guardrail (9) to posts (3,4) using bolts (A). Secure guardrail (9) to crossbar (6) using bolts (B). Tighten bolts (A,B) with wrench (G).
9 Attach second guardrail (9) to posts (1,2) using bolts (A). Secure guardrail (9) to crossbar (5) using bolts (B). Tighten bolts (A,B) with wrench (G). Attach shelf supports (12) to rails (7) using bolts (A). Tighten bolts (A) with wrench (G).
10 Attach ladder rungs (13) to post (1) using bolts (A). Tighten bolts (A) with wrench (G). Attach the shelf support assembly from Step 7 to ladder rungs (13) using bolts (B). Rail (7) will attach directly to ladder rungs (13). Tighten bolts (B) with wrench (G).
11 Secure rails (7) to crossbars (5,6) using bolts (A). Tighten bolts (A) with wrench (G). Attach shelves (14) to the bed frame using bolts (D). Four bolts (D) will be used to attach each shelf. Tighten bolts (D) with wrench (G).
12 Rotate bed frame so posts (3,4) are at the front and posts (1,2) are at the back.
13 Attach ladder rungs (13) to post (4) using bolts (A). Tighten bolts (A) with wrench (G). Attach the shelf support assembly from Step 7 to ladder rungs (13) using bolts (B). Rail (7) will attach directly to ladder rungs (13). Tighten bolts (B) with wrench (G).
14 Secure rails (7) to crossbars (5,6) using bolts (A). Tighten bolts (A) with wrench (G). Attach shelves (14) to the bed frame using bolts (D). Four bolts (D) will be used to attach each shelf. Tighten bolts (D) with wrench (G).
15 Attach desk support (18) to desk post (15) using bolt (A). Tighten bolt (A) with wrench (G). Attach desk crossbar (20) to desk post (15) using double-ended bolt (E). Please note the position of all pre-drilled holes as shown above before attaching desk parts together. Attach opposite end of desk support (18) to desk post (16) using bolt (A). Attach opposite end of desk crossbar (20) to desk post (16) using bolt (C). Tighten bolts (A,C) with wrench (G).
16 Attach desk support (19) to desk post (15) using bolt (A). Tighten bolt (A) with wrench (G). Attach desk crossbar (20) to desk post (15) using double-ended bolt (E). Please note the position of all pre-drilled holes as shown above before attaching desk parts together. Attach opposite end of desk support (19) to desk post (17) using bolt (A). Attach opposite end of desk crossbar (20) to desk post (17) using bolt (C). Tighten bolts (A,C) with wrench (G).
17 Screw wheels (24,25) into desk posts (15,16,17). Use wrench (H) to tighten the connection of wheels to posts. Attach desk crossbar (22) to desk post (16) using bolts (A). Tighten bolts (A) with wrench (G).
18 Attach desk crossbar (21) to desk support (18) using bolt (B). Attach desk crossbar (23) to desk post (16) using bolt (C). Tighten bolts (B,C) with wrench (G). Attach opposite end of desk crossbar (21) to desk support (19) using bolt (B). Attach opposite end of desk crossbar (22) to desk post (17) using bolts (A). Attach opposite end of desk crossbar (23) to desk post (17) using bolt (C). Tighten bolts (A,B,C) with wrench (G).
19 Attach desk top (26) to desk supports (18,19) using bolts (D). Tighten bolts (D) with wrench (G).
Item #: BTOLSP Assembly Instructions
 Item #: BTOLSP Assembly Instructions Revised 06/2012 Instruction Manual IMPORTANT INFORMATION READ BEFORE ASSEMBLING THIS PRODUCT Follow the information on the warning labels found on the bunk bed and
Item #: BTOD Assembly Instructions
 Item #: BTOD Assembly Instructions For our most current instructions, to request missing, lost or broken parts, or for any other Customer Service issues, please visit our website at www.walkeredison.com
(B1 - B3) ASSEMBLY INSTRUCTIONS COASTER FINE FURNITURE TWIN / TWIN BUNKBED
 ASSEMBLY INSTRUCTIONS COASTER FINE FURNITURE TWIN / TWIN BUNKBED") 460136 (B1 - B3) TWIN / TWIN BUNKBED COASTER FINE FURNITURE PAGE 1 OF 8 REVISION 0: 06/10/2010 REVISION 1: 07/03/2013 ITEM : 460136 (B1 - B3) ASSEMBLY TIPS: 1. Remove hardware from box and sort by size
460136 (B1 - B3) TWIN / TWIN BUNKBED COASTER FINE FURNITURE PAGE 1 OF 8 REVISION 0: 06/10/2010 REVISION 1: 07/03/2013 ITEM : 460136 (B1 - B3) ASSEMBLY TIPS: 1. Remove hardware from box and sort by size
Ginger Twin Full Bunk Bed
 N&D 0809 1. 2. 3. 4. 5. 6. 7. 8. 9. 10. 11. 12. 13. 14.! SAFETY WARNING Follow the information on the warnings appearing on the upper bunk end structure and on the carton. Do not remove warning label from
Barnwood Bunk Bed Assembly Instructions
 Barnwood Bunk Bed Assembly Instructions Parts needed: 1 1 2 1 8 4 10 1 10 16 1 - Tools Needed for Assembly: Cordless Drill with Phillips Head Ratchet w/9/16 socket 9/16 Wrench T-25 Bit Headboard Footboard
ASSEMBLY INSTRUCTIONS METAL & WOOD FUTON BUNK BED PAGE 1 OF 11
 METAL & WOOD FUTON BUNK BED PAGE 1 OF 11 ASSEMBLY TIPS : 1.Remove hardware from box and sort by size 2.Please check to see that all hardware and parts are present prior to start of assembly..please follow
Whalen Furniture Mfg. Inc. Factory No. 4 Page # 1
 ADULT ASSEMBLY REQUIRED DUE TO THE PRESENCE OF SMALL PARTS, SHARP POINTS, SHARP EDGES If you have any questions regarding assembly or if you are missing parts, do not return this item to Sam s Wholesale
BLYTHE BUNK BED TWIN OVER TWIN
 pottery barn kids BLYTHE BUNK BED TWIN OVER TWIN www.potterybarnkids.com Date: 2014-Sept.-25 Page 1 of 11 WARNING:. Failure to follow these warnings and assembly instructions could result in serious injury
Assembly Instructions - Low Loft Stairs
 ssembly Instructions - Low Loft Stairs Replacements Parts can be obtained from any uthorized olton Dealer www.boltonfurniture.biz Parts List NO. Drawing Description Qty. NO. Drawing Description Qty. 35mm
All Restoration Hardware bunk beds are designed to meet the highest safety standards and comply with all U.S. and Canadian Bunk Bed regulations.
 All Restoration Hardware bunk beds are designed to meet the highest safety standards and comply with all U.S. and Canadian Bunk Bed regulations. Page 1 of 13 Assembly Instructions Callum Storage Twin Bunk
Assembly Instruction
 Assembly nstruction TWN - FU BUNK BED TWN - FU BUNK BED HARDWARE ST NO 80mm Bolt 22 pcs 6 60mm Bolt 0 pcs 7 3 30mm Bolt 2 pcs 8 4 32mm Screw 6 pcs 9 5 Allen Key M4 NO 2 DRAWNG onimmixce (8(88(n DESCRPTON
WARNING: Failure to follow these warnings and assembly instructions could
 OXFORD BUNK BED TWIN OVER TWIN & FULL OVER FULL For Bunk Bed Twin Over Twin WARNING: Failure to follow these warnings and assembly instructions could result in serious injury or death. To help prevent
CATALINA STEP BED ASSEMBLY INSTRUCTIONS
 pottery barn kids CATALINA STEP BED ASSEMBLY INSTRUCTIONS www.potterybarnkids.com Date: 2013-Apr-26 Page 1 of 8 WARNING: Failure to follow these warnings and assembly instructions could result in serious
LAGUNA BUNK BED - FULL OVER FULL INSTRUCTIONS
 Made in Vietnam Distributed in the U.S.A. by: Restoration Hardware Baby & Child 11640 Harrel St. Suite B Mira Loma, CA 91752 www.rhbabyandchild.com All Restoration Hardware Bunk Beds are designed to meet
Bunk Bed Assembly Instructions
 1415-9 Bunk Bed Assembly Instructions -Use Only standard Twin size mattress (75 long x 39 wide)- -Maximum mattress thickness must not exceed 8 - -Surface of mattress must be at least 5 below the upper
AVA REGENCY BUNK BED TWIN OVER FULL
 pottery barn kids AVA REGENCY BUNK BED TWIN OVER FULL www.potterybarnkids.com Date: 2016-Feb.-18 Page 1 of 14 WARNING: Failure to follow these warnings and assembly instructions could result in serious
WARNING: Read all instructions before assembling this product. KEEP INSTRUCTIONS FOR FUTURE USE
 MARCELINE TWIN OVER TWIN BUNK BED INSTRUCTIONS Distributed in the U.S.A by: Restoration Hardware Baby & Child 11640 Harrel St. Suite B Mira Loma, California 91752 rhbabyandchild.com Distributed in Canada
All Restoration Hardware bunk beds are designed to meet the highest safety standards and comply with all U.S. and Canadian Bunk Bed regulations.
 baby&child RESTORATION HARDWARE All Restoration Hardware bunk beds are designed to meet the highest safety standards and comply with all U.S. and Canadian Bunk Bed regulations. Page 1 of 13 Assembly Instructions
BEADBOARD LOFT BED ASSEMBLY INSTRUCTIONS
 BEADBOARD LOFT BED ASSEMBLY INSTRCTIONS Date: 2013-Apr.-25 www.pbteen.com Page 1 of 10 ARNING: Failure to follow these warnings and assembly instructions could result in serious injury or death. To prevent
Assembly Sheet Café Loft - Mission or Cooley Style
 ssembly Sheet afé Loft - ission or ooley Style Replacement parts can be obtained from any olton Furniture authorized dealer. . Drawing Description ty.. Drawing Description ty. Footboards 2 80mm Hex olt
CATALINA BUNK BED TWIN OVER TWIN
 pottery barn kids ATALINA BUNK BED TWIN OVER TWIN ASSEMBLY INSTRUTIONS www.potterybarnkids.com Date: 2011 July-23 Page 1 of 8 WARNING: Failure to follow these warnings and assembly instructions could serious
All Restoration Hardware bunk beds are designed to meet the highest safety standards and comply with all U.S. and Canadian Bunk Bed regulations.
 All Restoration Hardware bunk beds are designed to meet the highest safety standards and comply with all U.S. and Canadian Bunk Bed regulations. Page 1 of 13 Assembly Instructions Callum Storage Twin Bunk
# 2204 PRINCETON STAIR BUNK SLATE - GREY
 SFETY WRS # 0 PRCETO STR UK SLTE - REY. Follow the information on the warnings appearing on the upper bunk end structure and on the carton. Do not remove warning label from bed.. lways use the recommended
Twin Twin Oak Bunk Bed Assembly Instructions
 Twin Twin Oak Bunk Bed Assembly Instructions -Use Only standard Twin size mattress (75 long x 39 wide)- -Maximum mattress thickness must not exceed 8 - -Surface of mattress must be at least 5 below the
Loft Bed Safety Warning
 Loft Bed Safety Warning * Follow the information on the warnings appearing on the upper bunk end structure and on the carton. Do not remove the warning label from bed. * Always use the recommended size
OWNER'S MANUAL. Bunk Bed NOTE: THIS INSTRUCTION BOOKLET CONTAINS IMPORTANT SAFETY INFORMATION PLEASE READ AND KEEP FOR FUTURE REFERENCE.
 OWNER'S MANUAL Bunk Bed Model No.: DASE3618P- PINE DASE3618W- WALNUT NOTE: THIS INSTRUCTION BOOKLET CONTAINS IMPORTANT SAFETY INFORMATION PLEASE READ AND KEEP FOR FUTURE REFERENCE. RECEIPT OF PURCHASE:
pottery barn kids OWEN LOFT BED Date: 2016-Jan.-23 Rev: Page 1 of 7
 pottery barn kids OWN LOFT D www.potterybarnkids.com Rev: Page 1 of 7 ! WRNNG: Failure to follow these warnings and assembly instructions could result in serious injury or death. To help prevent serious
SAFETY WARNINGS STAIRCASE LOFT BED SAFETY FIRST! Assembly Instructions Page 1 of 10
 Assembly Instructions Page 1 of 10 STAIRCASE LOFT BED SAFETY FIRST! All Bunkbeds were designed and manufactured with your child s safety as our top priority. Their unparalleled strength is a bi-product
Model No.: UPC CODE: Color
 DOREL ASIA BUNK BED Model No.: UPC CODE: Color WM3911-13 0-65857-15752-9 PINE WM3921-13 0-65857-15700-0 LIGHT CHERRY WM3921E2 0-65857-16529-6 MOCHA WM3921B-DC 0-65857-16887-7 BLACK WM3921W-DC-13 0-65857-16277-6
Discovery World Furniture
 STY IRST!!!!! 2114/2814 Mission Stair Stepper unk ed ll of Discovery s unkbeds were designed and manufactured with your child s safety as our top priority. Their unparalleled strength is a bi-product of
ATTENTION USE THIS MANUAL TO ASSEMBLE THE TWIN BUNK BED TWIN BUNKBED
 TWIN BUNKBED Model Number: UPC Code: Color: DL891-1 0-6585-196-1 Mocha Customer satisfaction is important to us at Dorel Asia. Our agents are available Monday to Friday 8am to 5pm (EST) to answer any question
OWNER'S MANUAL TWIN OVER FULL BUNK BED DATE OF PURCHASE: MODEL #: TG-BTC01E ESPRESSO TG-BTC01W WHITE
 OWNER'S MANUAL TWIN OVER FULL BUNK BED MODEL #: TG-BTC01E ESPRESSO TG-BTC01W WHITE NOTE: THIS INSTRUCTION BOOKLET CONTAINS IMPORTANT SAFETY INFORMATION. PLEASE READ AND KEEP FOR FUTURE REFERENCE. DATE
SAFETY FIRST!!!!! 2114/2814 Mission Stair Stepper Bunk Bed
 STY IRST!!!!! 2114/2814 Mission Stair Stepper unk ed ll of Discovery s unkbeds were designed and manufactured with your child s safety as our top priority. Their unparalleled strength is a bi-product of
ATTENTION USE THIS MANUAL TO ASSEMBLE THE TRIPLE BUNK BED TRIPLE BUNKBED
 TRIPLE BUNKBED Model Number: UPC Code: Color: DL891TBB 0-6585-182-2 Mocha Customer satisfaction is important to us at Dorel Asia. Our agents are available Monday to Friday 8am to 5pm (EST) to answer any
L A G U N A F U L L O V E R F U L L B U N K B E D I N S T R U C T I O N S
 ll Restoration ardware Bunk Beds are designed to meet the highest safety standards and comply with all U.S. and Canadian Bunk Beds regulations. WRNING: Read all instructions before assembling this product.
DO NOT RETURN PRODUCT TO THE STORE
 Model Number: UPC Code: Color: DL7519E 0-65857-17348-2 Espresso DL7519W 0-65857-17349-9 White Congratulations on your latest furniture purchase! Dorel Living furniture has been developed with quality,
Size of Mattress and Foundation. The length and width of the upper bunk mattress and foundation are as follows : Width 37 ½ - 38 ½
 Size of Mattress and oundation The length and width of the upper bunk mattress and foundation are as follows : Length 74-75 Width 37 ½ - 38 ½ Thickness 9 ½ max You must use only this size mattress. nsure
SAFETY FIRST!!!!! Stair Stepper Bunk Bed (Metal Slats)
") STY IRST!!!!! Stair Stepper unk ed (Metal Slats) ll of unk beds were designed and manufactured with your child s safety as our top priority. Their unparalleled strength is a bi-product of the safety design.
STY IRST!!!!! Stair Stepper unk ed (Metal Slats) ll of unk beds were designed and manufactured with your child s safety as our top priority. Their unparalleled strength is a bi-product of the safety design.
WILDING WALLBEDS BUNK BED INSTALLATION INSTRUCTIONS
 WILDING WALLBEDS BUNK BED INSTALLATION INSTRUCTIONS With Storage Headboard Installation Booklet 19 WARNING! ALL MURPHY/WALLBED SYSTEMS CONTAIN POWERFUL LIFTING COMPONENTS. FAILURE TO USE AND FOLLOW THESE
pottery barn kids TREEHOUSE BUNK Date: 2015-MAY-16 Page 1 of 8 Rev:
 pottery barn kids TEEHOUE BUNK www.potterybarnkids.com Date: 2015-MAY-16 Page 1 of 8 WANING: Failure to follow these warnings and assembly instructions could result in serious injury or death. To help
WILDING WALLBEDS BUNK BED INSTALLATION INSTRUCTIONS
 WILDING WALLBEDS BUNK BED INSTALLATION INSTRUCTIONS With Storage Headboard INSTRUCTION BOOKLET #19 WARNING! ALL MURPHY/WALLBED SYSTEMS CONTAIN POWERFUL LIFTING COMPONENTS. FAILURE TO USE AND FOLLOW THESE
SAFETY WARNINGS. RH23 Bed with Center Stretcher
 SAFETY WARNINGS RH23 Bed with Center Stretcher RH23 beds are designed for nine different configurations. For safety, beds should be only configured in one of these nine styles and are not to be assembled
Size of Mattress and Foundation. The length and width of the upper and lower bunk mattress and foundation are as follows : Width 37 ½ - 38 ½ 52-53
 Size of attress and oundation The length and width of the upper and lower bunk mattress and foundation are as follows : Size Twin ull Length 74-75 74-75 Width 37 ½ - 38 ½ 52-53 Thickness 9 ½ max 9 ½ max
carton. Do not remove warning label from bed. 9. Do not use substitute parts. Contact the manufacturer or dealer for replacement parts.
 Item No. 4090P, 5090P, 6090P, 7090P Assembly Instructions Page 1 of 10 STAIRCASE BED SAFETY WARNINGS SAFETY FIRST! All of NE kid s Bunkbeds were designed and manufactured with your child s safety as our
USE STRAIGHT ALLEN WRENCH (Bz) WITH AN ELECTRIC SCREWDRIVER TO TIGHTEN SCREWS - NOTE: DO NOT OVER TIGHTEN
 WITH AN ELECTRIC SCREWDRIVER TO TIGHTEN SCREWS - NOTE: DO NOT OVER TIGHTEN") ASSEMBLY INSTRUCTIONS (VK) MODEL NO. 836-944P1 Made in Vietnam Thank you for purchasing this Powell product. We want to make sure it is complete and to your satisfaction. Please check all packing material
ASSEMBLY INSTRUCTIONS (VK) MODEL NO. 836-944P1 Made in Vietnam Thank you for purchasing this Powell product. We want to make sure it is complete and to your satisfaction. Please check all packing material
FORT COLLECTION THE FORT LOFT BED
 FORT OLLETION PGE 1 4269, 4270, 4271 7030-00426 TE FORT LOFT ED MTERIL NEEDED REFER TO TE FORT LOFT ED INVENTORY EET INLUDED 1) 1- FORT LOFT FRME #4269 2) 1- FORT LOFT END #4270 3) 1- FORT LOFT ET #4271
BLUE ANT FURNITURE TITLE: FULL BUNKBED INSTRUCTIONS 10/10/09 DWG. NO. INSTR_888-FULL-BUNK SHEET 1 OF 9
 BLUE ANT FURNITURE TITLE: FULL BUNKBED INSTRUCTIONS 10/10/09 DWG. NO. INSTR_888-FULL-BUNK SHEET 1 OF 9 WARNING: Failure to follow these warnings and assembly instructions could result in serious injury.
THIS PRODUCT IS NOT INTENDED FOR INSTITUTIONAL OR COMMERCIAL USE. Style #: Lot: Date:
 Read all instructions before assembly and use. KEEP INSTRUCTIONS FOR FUTURE USE. ADULT ASSEMBL REQUIRED Due to the presence of small parts during assembly, keep out of reach of children until assembly
SOPHIE CABIN STATION - BED
 889951 SOPHIE CABIN STATION - BED ASSEMBLY INSTRUCTIONS. IMPORTANT - RETAIN FOR FUTURE REFERENCE - READ CAREFULLY.. Helpline If you have any problems with this product or require any replacement fittings
Low Loft Bed - Hide-a-Desk
 N O M I K I D S Low Loft ed - Hide-a-Desk ssembly Instructions Product Dimensions: L x 2 D x 2 H Please take a moment to read through the entire instruction booklet before assembly to familiarize yourself
DAYBED TODDLER BED DOREL ASIA. NEED HELP! Tel #: CALL US FOR ASSISTA MODEL NO: WM6239 ESPRESSO UPC CODE:
 DOREL ASIA DAYBED TODDLER BED MODEL NO: ESPRESSO UPC CODE: 0-65857-16279-0 NOTE: THIS INSTRUCTION BOOKLET CONTAINS IMPORTANT SAFETY INFORMATION. PLEASE READ AND KEEP FOR FUTURE REFERENCE. Lot number: (TAKEN
DAYBED TODDLER BED DOREL ASIA MODEL NO: WM6238 CHERRY UPC CODE: CHERRY NOTE: Lot number: Date of purchase: / /
 DOREL ASIA DAYBED TODDLER BED MODEL NO: CHERRY UPC CODE: 0-65857-16278-3 CHERRY NOTE: THIS INSTRUCTION BOOKLET CONTAINS IMPORTANT SAFETY INFORMATION. PLEASE READ AND KEEP FOR FUTURE REFERENCE. Lot number:
Samuel Bunk Bed. Assembly Instructions - Please keep for future reference 183/ / /7877
 Samuel unk ed - Please keep for future reference 8/8 /0 8/8 IMPORTANT NOTE: The top surface of the mattress should not come above this line. imensions Width - 98cm epth - 9.cm eight - 0cm IMPORTANT NOTE:
fisher-price.com Bulletin no:
 EN IMPORTANT! Please keep these instructions for future reference. Please read these instructions before assembly and use of this product. Adult assembly is required. Allen wrench (included) required for
G (2) Joint Connector Nuts
 Joint Connector Nuts") 1 Crib N Double Bed Converts to Toddler Bed or Full Size Headboard & Footboard 31001 Division of Foundations Worldwide, Inc. 7001 Wooster Pike, Medina, OH 44256 USA PH: 877.716.2757 (U.S. Only) or 330.722.5033
1 Crib N Double Bed Converts to Toddler Bed or Full Size Headboard & Footboard 31001 Division of Foundations Worldwide, Inc. 7001 Wooster Pike, Medina, OH 44256 USA PH: 877.716.2757 (U.S. Only) or 330.722.5033
Follow these steps to assemble your Hiddenbed 1 Construct the 3 main parts 2 Assemble them together 3 Add a mattress. YOUR HIDDENBED IS READY! 2
 Mounting Instructions Item No.: 271.97.300 Hiddenbed Furniture parts supplied by the customer Follow these steps to assemble your Hiddenbed 1 Construct the 3 main parts 2 Assemble them together 3 Add a
Sit N Sleep Bed 758/ /5401. Assembly Instructions - Please keep for future reference
 Sit N Sleep ed ssembly nstructions - Please keep for future reference 8/18 8/01 MPRTNT NT: The top surface of the mattress should not come above this line. imensions Width - 00cm epth - /1cm Height - 10.cm
MODEL# SLA001-3 "SLIDE & LOCK" A-FRAME POOL LADDER
 MODEL# SLA001-3 "SLIDE & LOCK" A-FRAME POOL LADDER IMPORTANT INSTRUCTIONS: : Read all instructions carefully & completely to become familiar with parts, assembly, safety and proper use of this product.
(28) 2 x 4 x 8 Ft. Boards Tape Measure (9) 2 x 6 x 8 Ft. Boards Pencil (6) 2 x 2 x 8 Ft. Boards Carpenter s Square (9) 1 x 3 x 8 Ft.
 2 x 4 x 8 Ft. Boards Tape Measure (9) 2 x 6 x 8 Ft. Boards Pencil (6) 2 x 2 x 8 Ft. Boards Carpenter s Square (9) 1 x 3 x 8 Ft.") MATERIALS: TOOLS: (28) 2 x 4 x 8 Ft. Boards Tape Measure (9) 2 x 6 x 8 Ft. Boards Pencil (6) 2 x 2 x 8 Ft. Boards Carpenter s Square (9) 1 x 3 x 8 Ft. Boards Drill 2 ½-inch Pocket Screws Circular Saw 2
MATERIALS: TOOLS: (28) 2 x 4 x 8 Ft. Boards Tape Measure (9) 2 x 6 x 8 Ft. Boards Pencil (6) 2 x 2 x 8 Ft. Boards Carpenter s Square (9) 1 x 3 x 8 Ft. Boards Drill 2 ½-inch Pocket Screws Circular Saw 2
Rack Furniture Suite 1, 2713 SE I Street, Bentonville, AR USA Customer Service:
 HRLESTON LOFT ED Thank you for choosing Rack Furniture. efore starting, we suggest reading through this instruction manual to ensure that you completely understand the assembly of this product. Rack Furniture
Instructions for Bed Assembly
 Instructions for Bed Assembly 1. Platform Ends (2) 2. Mattress Slats (11-12) 3. Platform Center 4. Platform Sides (2) 5. Safety Rails (2-8) 6. Corner Supports (smaller than pictured) 7. Long Cross Bar
Instructions for Bed Assembly
 Instructions for Bed Assembly 1. Platform Ends (2) 2. Mattress Slats (11-12) 3. Platform Center 4. Platform Sides (2) 5. Safety Rails (2-8) 6. Corner Supports (smaller than pictured) 7. Long Cross Bar
Mercer Crib (M6801)- Assembly and Operation Manual
- Assembly and Operation Manual") Mercer Crib (M6801)- Assembly and Operation Manual Congratulations on purchasing this product. This crib will provide many years of service if you adhere to the following guidelines for assembly, maintenance,
Mercer Crib (M6801)- Assembly and Operation Manual Congratulations on purchasing this product. This crib will provide many years of service if you adhere to the following guidelines for assembly, maintenance,
INSTALLATION OF THE TRACK FOR THE STRAIGHT SIDE STEEL LADDER
 ASSEMBLY OF THE 7180 STRAIGHT SIDE STEEL LADDER TOOLS REQUIRED FOR ASSEMBLY SAFETY GLASSES (2) 1 / 2 WRENCHES OR SOCKETS STEP LADDER OF APPROPRIATE HEIGHT (2) 7 / 16" WRENCHES OR SOCKETS HACKSAW FLAT HEAD
Napa 4 in1 Crib Assembly Instruction
 Napa 4 in1 Crib Assembly Instruction Important Information: Read all instructions BEFORE assembling crib. KEEP INSTRUTIONS FOR FUTURE USE. Page 1 CRIB WARNINGS! WARNING - R ruc bef r r b. KEEP INSTRUCTIONS
Addison Double Cot RECYCLED. Assembly and care instructions. Cot. Mattress and accessories not included. Double Bed - Optional Kit
 R Addison Double Cot Assembly and care instructions This cot can be assembled in a number of configurations Instructions for all configurations are included in this manual Cot Mattress and accessories
B 3/3 SLAT HEADBOARD - BLACK Pages: 10/ C 3/3 SLAT HEADBOARD - CHERRY M 3/3 SLAT HEADBOARD - MAPLE
 590-930B 3/3 PANEL HEADBOARD - BLACK 590-930C 3/3 PANEL HEADBOARD - CHERRY 590-930M 3/3 PANEL HEADBOARD - MAPLE 590-930W 3/3 PANEL HEADBOARD - WHITE W41 D3 H55 (104 x 8 x 140 cm) 2 Rail Heights. 590-932B
Version 1.1 BUSSY BUNK BED MK 2.
 Version. BUSSY BUNK BED MK 2 HELPFUL BUNK BED SAFETY TIPS Bunk beds should be checked periodically to ensure that the guardrail,ladder and other components are secure and in the correct position and all
O-Sullivan King 4 Poster Bed O-Sullivan Queen 4 Poster Bed Parts and Hardware List
 Parts and Hardware List A. Left Headboard Post 1 pc B. Right Headboard Post 1 pc C. Left Footboard Post 1 pc D. Right Footboard Post 1 pc E. Headboard Panel 1 pc F. Footboard Rail 1 pc. Spindles 4 pcs
 TM Series 418 www.leafurniture.com TM Spring Garden, by Lea Industries, will remind your child of running through a field on a warm and breezy spring day, picking flowers and discovering all the soft colors
With Discontinued. Page: Discontinued. Series Series 418
 TM Series 418 TM Series 418-930 3/3 Slat Headboard - White W42 D3 H52 (107 x 8 x 132 cm) Use with 932 Footboard. Bore for Frame - 2 Rail Heights. -930P 3/3 Slat Headboard - Pink W42 D3 H52 (107 x 8 x 132
Office Partitions WARNING. Assembly Instructions. Customer Service A S S E M B LY HARDWARE H1 H2 H3 H4 H5 H8 H9 H10 H11 H12
 Customer Service 1-800-645-2986 Assembly Instructions WARNING In order to prevent structural failure, instability, t i p - o v e r, and/or serious injury, please follow i n s t ructions care f u l l y.
Paddington Bunkbed L3932
 Thank you for shopping with GLTC, we hope you enjoy having this product in your home. www.gltc.co.uk Paddington Bunkbed L3932 We know assembling furniture, toys or accessories is not everyone s favourite
Hiddenbed ASSEMBLY INSTRUCTIONS. MODEL DOUBLE DECKER
 ASSEMBLY INSTRUCTIONS MODEL DOUBLE DECKER www.hiddenbed.com CONGRATULATIONS! YOU ARE A PROUD OWNER OF HIDDENBED The ultimate furniture that Doubles your Space Please read carefully the Assembly Instructions.
Convertible Crib and Changer (M661/662)
") Model No.: M661/662 PO #: Serial #: Convertible Crib and Changer (M661/662) THIS PRODUCT IS NOT INTENDED FOR INSTITUTIONAL OR COMMERCIAL USE. If you have any questions or missing parts, please contact
Model No.: M661/662 PO #: Serial #: Convertible Crib and Changer (M661/662) THIS PRODUCT IS NOT INTENDED FOR INSTITUTIONAL OR COMMERCIAL USE. If you have any questions or missing parts, please contact
Queen Wingback Bed King Wingback Bed
 Parts and Hardware List A. Side Rails with Attachment Hooks 2 pcs B. Foot Rail 1 pc C. Head Rail 1 pc D. Center Support Slat 1 pc E. Leg Supports 3 pcs F. Support Slats 4 pcs G. Flat Washers 8 pcs H. Lock
Kendall Crib (W5921)- Assembly and Operation Manual
- Assembly and Operation Manual") Kendall Crib (W5921)- Assembly and Operation Manual Congratulations on purchasing this product. This crib will provide many years of service if you adhere to the following guidelines for assembly, maintenance,
Kendall Crib (W5921)- Assembly and Operation Manual Congratulations on purchasing this product. This crib will provide many years of service if you adhere to the following guidelines for assembly, maintenance,
 For Wallbed models: KING SIZE INSTRUCTION BOOKLET #C1 Watch step by step installation instructions at: https://www.wallbedsbywilding.com/wallbed-installation-studio-series/ WARNING! ALL MURPHY/WALLBED
 INSTRUCTION BOOKLET #C0 Watch step by step installation instructions at: https://www.wallbedsbywilding.com/wallbed-installation-studio-series/ WARNING! ALL MURPHY/WALLBED SYSTEMS CONTAIN STORED ENERGY.
Shown below is the Loft Bed with a single safety rail, short desktop and the optional shelves and desktop.
 College Bed Lofts Assembly Instructions With Pre-Assembled Mattress Foundation & End Ladders Loft Bed - Bunk Bed - High Rise Platform Bed Updated: 4/28/14 Shown below is the Loft Bed with a single safety
Panel & Shelf Identification
 4 to 8 Aromatic Cedar Closet Model # 801 1 PLEASE READ INSTALLATION INSTRUCTIONS BEFORE ASSEMBLING Rev. C IF YOU ARE MISSING PARTS OR HAVE QUESTIONS PLEASE CONTACT: customerservice@cedargreen.net Tools
K-Emily Twin Nkl Canopy Bed K-Emily Twin Pink Canopy Bed K-Emily Purple Twin Canopy Bed
 Parts and Hardware List A. Headboard 1 pc B. Footboard 1 pc C. Side Rails 2 pcs D. Support Slats 3 pcs E. Leg Supports 3 pcs F. Long Canopy Rails 2 pcs G. Short Canopy Rails 2 pcs H. Long Posts 2 pcs I.
INSTRUCTION BOOKLET #34. For Wallbed models: KING SIZE SIERRA WITH STORAGE HEADBOARD
 For Wallbed models: KING SIZE SIERRA WITH STORAGE HEADBOARD INSTRUCTION BOOKLET #34 WARNING! ALL MURPHY/WALLBED SYSTEMS CONTAIN STORED ENERGY. FAILURE TO USE AND FOLLOW THESE INSTRUCTIONS DURING THE INSTALLATION
The Premier Loft Bed Assembly Instructions
 The Premier Loft Bed Assembly Instructions Wooden College Loft Bed Assembly Instructions (Click Here) For A Printer Friendly Version (Click Here) For Bookself Assembly Instruction (Click Here) For Desk
 INSTRUCTION BOOKLET #C10 Watch step by step installation instructions at: https://www.wallbedsbywilding.com/wallbed-installation-studio-series/ WARNING! ALL MURPHY/WALLBED SYSTEMS CONTAIN STORED ENERGY.
Paddington Midsleeper
 Thank you for shopping with LTC, we hope you enjoy having this product in your home. www.gltc.co.uk Paddington Midsleeper We know assembling furniture, toys or accessories is not everyone s favourite way
I Ledge. Groove. Safety rail holes. Groove. Slot III VII
 I Ledge IV V A C Groove Safety rail holes ) To assemble McKenzie Loft, attach head board A and footboard to loft side rails. The rails C D used on upper loft have four pre-drilled holes on the side of
Samuel 3FT Bunk Bed 183/ / /7877. Assembly Instructions - Please keep for future reference
 Samuel T Bunk Bed ssembly nstructions - Please keep for future reference / /0 / MPORTNT NOT: The top surface of the mattress should not come above this line. imensions Width - cm epth -.cm eight - 0cm
#916 CLASSIC 16 GUN CABINET ASSEMBLY INSTRUCTIONS
 Thank you for purchasing this quality product. A list of PARTS and INSTRUCTIONS is included to assist you. Unpack and identify all parts included on the Parts List and Hardware List. If parts are missing,
https://www.wallbedsbywilding.com/wallbed-installation-studio-series/
 For Wallbed models: KING SIZE INSTRUCTION BOOKLET #C1 Watch step by step installation instructions at: https://www.wallbedsbywilding.com/wallbed-installation-studio-series/ WARNING! ALL MURPHY/WALLBED
INSTRUCTION BOOKLET #C21. For Wallbed models: KING SIZE
 For Wallbed models: KING SIZE INSTRUCTION BOOKLET #C1 WARNING! ALL MURPHY/WALLBED SYSTEMS CONTAIN STORED ENERGY. FAILURE TO USE AND FOLLOW THESE INSTRUCTIONS DURING THE INSTALLATION PROCESS COULD RESULT
fold away petite Assembly Instructions
 fold away petite Assembly Instructions fold away Thank you for purchasing a Fold Away etite cabinet. If you have any questions regarding assembly please contact us on 0800 048 8606. petite CASTER (C2)
Coco Storage Bunk. Code: 3327 IMPORTANT-READ CAREFULLY-RETAIN FOR FUTURE REFERENCE. 3. Attach the Drawer Base. 4. Fit the Castors.
 3. ttach the Drawer ase. You need: 7 Screws for arcass (35mm) and a Screwdriver. Ensure the Drawer frame is square and carefully fit the Draw ase. The lip of the ase locates into the groove on the back
TODDLER BED DOREL ASIA. Model No: DA6572GR (Gray) DA6572E (Espresso) UPC CODE: (Gray) (Espresso) NOTE: Lot number:
 DA6572E (Espresso) UPC CODE: (Gray) (Espresso) NOTE: Lot number:") DOREL ASIA Model No: DA6572GR (Gray) DA6572E (Espresso) TODDLER BED UPC CODE: 0-65857-16594-4 (Gray) 0-65857-16595-1 (Espresso) NOTE: THIS INSTRUCTION BOOKLET CONTAINS IMPORTANT SAFETY INFORMATION. PLEASE
DOREL ASIA Model No: DA6572GR (Gray) DA6572E (Espresso) TODDLER BED UPC CODE: 0-65857-16594-4 (Gray) 0-65857-16595-1 (Espresso) NOTE: THIS INSTRUCTION BOOKLET CONTAINS IMPORTANT SAFETY INFORMATION. PLEASE
 Flat Panel TV Cart Instruction Manual SKU: STAND-TV02D Scan the QR code with your mobile device or follow the link for helpful videos and specifications related to this product. https://vivo-us.com/products/stand-tv02d
PRINCESS SINGLE BED WITH TRUNDLE
 PRINCESS SINGLE BED WITH TRUNDLE If you have any questions regarding assembly or if you are missing parts, do not return this item to Sam s Wholesale Club Please call our customer service number and have
Kirra Buffet Assembly Instructions
 Thank you for your purchase. lease follow the instructions below for correct assembly. C B dowel screw x x6 wedge x4 screw x4 bolt x locking nut x long screw x F screw slide x6 rail x N wheel x4 G slide
Boris toddler bed. Instruction manual. Important!
 Boris toddler bed Instruction manual Important! KEEP FOR FUTURE REFERENCE 1 Thank you for purchasing this Boris toddler bed. Please read the instructions and warnings carefully before use to ensure safe
WILDING WALLBEDS INSTALLATION INSTRUCTIONS Bed with storage headboard
 WILDING WALLBEDS INSTALLATION INSTRUCTIONS Bed with storage headboard INSTRUCTION BOOKLET #13 WARNING! ALL MURPHY/WALLBED SYSTEMS CONTAIN POWERFUL LIFTING COMPONENTS. FAILURE TO USE AND FOLLOW THESE INSTRUCTIONS
Instruction Guide 4A90L
 Instruction Guide 4A90L Kargo Master Rancho Cordova, CA 95742 800-343-7486 CustomerService@KargoMaster.com DATE: *PLEASE READ ALL INSTRUCTIONS AND WARNINGS PRIOR TO ASSEMBLING, INSTALLING, AND USING THIS