Instructions for Bed Assembly
|
|
|
- Solomon Grant
- 5 years ago
- Views:
Transcription
 6. Corner Supports (smaller than pictured) 7. Long Cross Bar 8. Frame Cross Bars (4) 9.")
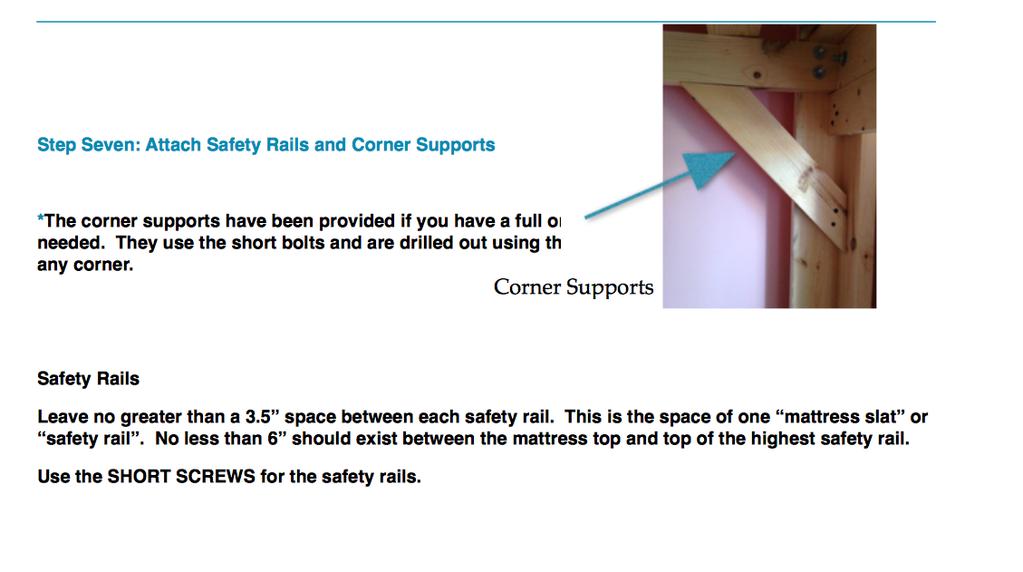
1 Instructions for Bed Assembly 1. Platform Ends (2) 2. Mattress Slats (11-12) 3. Platform Center 4. Platform Sides (2) 5. Safety Rails (2-8) 6. Corner Supports (smaller than pictured) 7. Long Cross Bar 8. Frame Cross Bars (4) 9. Ladder Support (not pictured) 10. Ladder 1


2 Step one: You ll build a pallet like platform. Use the LONG SCREWS The platform sides line up to the platform ends which are inside the two platform sides. Make sure you leave no gaps when fastening the screws. **Use the LONG SILVER SCREWS to fasten the Platform Center down the center of the platform. This is important as they have greater weight bearing properties. Step two: Fasten the 11 or 12 mattress slats onto the platform like pictured. Use the SMALL SCREWS Use a slat as a spacer in between the other slats. *Do not put a screw here on the inner hole on on each corner as a bolt will go there. 2
 and measure from the bottom of the leg to the top. Mark 30 and your clearance (for example 60 ) with a pencil on both sides.")

3 Step Three: Build the End Frames *Place the legs so the skinny side is facing the ground (with one hole) and the holes are located at the top or farthest away from you. *Take the Clearance you ordered (for example 60 ) and measure from the bottom of the leg to the top. Mark 30 and your clearance (for example 60 ) with a pencil on both sides. Leave no gaps here on all sides and use an angle square to check your angle. *Exhibit A *Place the frame cross boards BELOW the lines marked by your pencil. Leaving no gap between the side of the leg and the frame cross bar, fasten the three screws. Use the LONG SCREWS for this. Use an Angle Square to make sure they are at a 90 degree angle to the leg. Exhibit A: This measurement is 30. This is an arbitrary number to accommodate lofts with a desk. You can place this higher or lower if you need to accommodate a window or other structure. 3
4 Step Four: Carefully, using a two person team place the platform on the two end frames. This is best achieved leaning the frame closest to the wall at a slight angle while hoisting the platform to fit in the space between the legs and on top of the top frame cross bar attached to the legs. Top Frame Cross Bar Putting a slight angle outward at the bottom of the legs helps creat stability while hoisting the platform on top of the frames. (Picture does not show 4


5 Step Five: Drill Out Secondary Bolt holes to Attach Platform The Platform is held to the frames with frame bolts, washers and nuts. The holes for your selected clearance have been drilled. To accommodate variations on any height, it is necessary to drill through the platform with the provided 3/8 drill bit to fasten the bolts. (1) First drill the back side holes on the side away from the window while having a helper hold the side near the wall/window *Drilling these holes first and tightening these bolts first will make a sturdier build as it will draw the platform tighter to the leg frames before the side holes are drilled. (2) After you drill and tighten these bolts, drill the 2 side bolt holes per side on the side away from the wall. Tighten these. (3) While making sure the platform is flush and tight against the back of the bed (where the window is), drill the holes for the side of the bed (the side near the window). After the holes for 1,2, and 3 locations are drilled and bolted, carefully move the entire structure away from the wall to access the other bolt holes. Pressure will still need to be applied, holding the platform to the leg frame near the wall to make sure it does not separate in moving. Continue drilling and bolting all 14 holes for the platform to leg fastening. *What is most essential is there is no space between the platform and the inside of the leg where they meet, as this is more likely to create a sturdy build. 5

6 Step Five: Attach The Long Cross Bar The long cross bar should sit flush with the frame cross bars and is attached using the frame bolts, a washer and nut. Use the provided drill bit to create the opening for the bolt. If you ve ordered a desk, this serves as a support for the desk, and can be placed at any height you choose, to accommodate different heights and needs. 6
 -Ladder Support (for long side ladder only) USE THE LADDER SCREWS BAG")

7 Step Six: Assemble the Ladder The ladder should come in its own box and have the following pieces: -2 ladder stringers with step guides -Ladder top -3-6 steps -Ladder Spacer (for long side ladder only) -Ladder Support (for long side ladder only) USE THE LADDER SCREWS BAG - Silver screws are for the steps and are a higher weight bearing capacity. 2 Silver Screws per side per step, 4 per step. - 4 black screws are for the ladder top The ledges on the ladder sides are only a guide and not designed to hold weight without the ladder screws* 7

8 SIDE LADDER ATTACHMENT: To accommodate many various designs and configurations, you ll need to drill a hole to bolt the ladder to the bedframe. I recommend one frame bolt at the top, drilled into the leg and one near the bottom into the frame cross bar. To fix the ladder to the frame cross bar, use the ladder spacer to fill the space between the bed and the ladder and use the ladder bolt which is 5.5 long to attach there. Do not use ladder without bolting it to the bed frame. The LADDER SUPPORT is intended to provide support to the ladder on the side opposite the bed when there isn t the ability to lean the ladder against the wall to absorb the weight. Ladder support (not in picture) 8

9 Ladder Spacer 9
10 10


11 For Forward Facing Ladder:
Instructions for Bed Assembly
 Instructions for Bed Assembly 1. Platform Ends (2) 2. Mattress Slats (11-12) 3. Platform Center 4. Platform Sides (2) 5. Safety Rails (2-8) 6. Corner Supports (smaller than pictured) 7. Long Cross Bar
(28) 2 x 4 x 8 Ft. Boards Tape Measure (9) 2 x 6 x 8 Ft. Boards Pencil (6) 2 x 2 x 8 Ft. Boards Carpenter s Square (9) 1 x 3 x 8 Ft.
 2 x 4 x 8 Ft. Boards Tape Measure (9) 2 x 6 x 8 Ft. Boards Pencil (6) 2 x 2 x 8 Ft. Boards Carpenter s Square (9) 1 x 3 x 8 Ft.") MATERIALS: TOOLS: (28) 2 x 4 x 8 Ft. Boards Tape Measure (9) 2 x 6 x 8 Ft. Boards Pencil (6) 2 x 2 x 8 Ft. Boards Carpenter s Square (9) 1 x 3 x 8 Ft. Boards Drill 2 ½-inch Pocket Screws Circular Saw 2
MATERIALS: TOOLS: (28) 2 x 4 x 8 Ft. Boards Tape Measure (9) 2 x 6 x 8 Ft. Boards Pencil (6) 2 x 2 x 8 Ft. Boards Carpenter s Square (9) 1 x 3 x 8 Ft. Boards Drill 2 ½-inch Pocket Screws Circular Saw 2
Stag Hanger ASSEMBLY INSTRUCTIONS
 Stag Hanger ASSEMBLY INSTRUCTIONS STAG HANGER Recommended Tools Drill with 1/8, 1/4, and 3/8 Drill Bits, 1-1/8 Forstner Bit or 1-1/8 Spade Bit, and Phillips Bit 9/16 and 5/8 Combination Wrench Socket Wrench
PLANS BY KELLEY FARMHOUSE DESIGNS LOFTED DORM ROOM BED
 PLANS BY KELLEY FARMHOUSE DESIGNS LOFTED DORM ROOM BED DIMENSIONS: 82" X 70" X 45" DIFFICULTY LEVEL: INTERMEDIATE TOOLS REQUIRED ONE+ Circular Saw ONE+ AirStrike 16GA Finish Nailer ONE+ Impact Driver ONE+
Contour Hanger ASSEMBLY INSTRUCTIONS
 Contour Hanger ASSEMBLY INSTRUCTIONS CONTOUR HANGER Recommended Tools Drill with 1/8, 1/4, and 3/8 Drill Bits, 1-1/8 Forstner Bit or 1-1/8 Spade Bit, and Phillips Bit 9/16 and 5/8 Combination Wrench Socket
Industrial Hanger ASSEMBLY INSTRUCTIONS
 Industrial Hanger ASSEMBLY INSTRUCTIONS INDUSTRIAL HANGER Recommended Tools Drill with 1/8, 1/4, and 3/8 Drill Bits, 1-1/8 Forstner Bit or 1-1/8 Spade Bit, and Phillips Bit 9/16 and 5/8 Combination Wrench
Loft Hanger ASSEMBLY INSTRUCTIONS
 Loft Hanger ASSEMBLY INSTRUCTIONS LOFT HANGER Recommended Tools Drill with 1/8, 1/4, and 3/8 Drill Bits, 1-1/8 Forstner Bit or 1-1/8 Spade Bit, and Phillips Bit 9/16 and 5/8 Combination Wrench Socket Wrench
Assembly Instructions 10 X 10 Aluminum Roof Support
 Assembly Instructions 10 X 10 Aluminum Roof Support Aluminum Roof Support Bolt Package 16-5/16 X 2 ¼ SS Bolt 24-5/16 X 1 SS Bolt 40-5/16 SS Nylon Lock Nuts 16-5/16 SS Flat Washers 28-4 ½ Wood Screws 36-1
TWIG Hanger ASSEMBLY INSTRUCTIONS
 TWIG Hanger ASSEMBLY INSTRUCTIONS TWIG HANGER Recommended Tools Drill with 1/8, 1/4, and 3/8 Drill Bits, 1-1/8 Forstner Bit or 1-1/8 Spade Bit, and Phillips Bit 9/16 and 5/8 Combination Wrench Socket Wrench
Assembly Instructions Loft Bed - Bunk Bed - High Rise Platform Bed Updated: 12/7/17
 Assembly Instructions Loft Bed - Bunk Bed - High Rise Platform Bed Updated: 12/7/17 Bunk Bed High Rise Platform Bed Page 1 of 20 Notes & Tips Please read through the entire set of instructions first to
Pillar Hanger ASSEMBLY INSTRUCTIONS
 Pillar Hanger ASSEMBLY INSTRUCTIONS PILLAR HANGER Recommended Tools Drill with 1/8, 1/4, and 3/8 Drill Bits, 1-1/8 Forstner Bit or 1-1/8 Spade Bit, and Phillips Bit 9/16 and 5/8 Combination Wrench Socket
Rockwell 4-in-1 Sliding Door
 Rockwell 4-in-1 Sliding Door ASSEMBLY INSTRUCTIONS ROCKWELL 4-IN-1 SLIDING DOOR Recommended Tools Drill with Phillips Bit Socket Wrench with 7/16 Socket Rubber Mallet Adjustable Square ROCKWELL 4-IN-1
BLYTHE BUNK BED TWIN OVER TWIN
 pottery barn kids BLYTHE BUNK BED TWIN OVER TWIN www.potterybarnkids.com Date: 2014-Sept.-25 Page 1 of 11 WARNING:. Failure to follow these warnings and assembly instructions could result in serious injury
Kai Installation Instructions
 Kai Installation Instructions Before Beginning Installation Read through the entire instruction thoroughly A minimum of 2 people are required for this assembly These instructions reflect typical assemblies;
LOFT DOOR HANGER BARN DOORS & HARDWARE. Hardware Installation Instructions. Page
 LOFT DOOR HANGER Page 1 Specifications 2 7/16" 3/8" 1-1/2 1-3/4 Ø3 3 7/8" 11-1/16 Page 2 Parts and Tools Tools Needed Tape Measure Pencil Drill with 1/8, 1/4 and 3/8 bits, 1 spade bit and Phillips bit
Required Tools: Suggested Additional Tools: 1 Cordless Drill with Robertson Bits 1 Ratchet Wrench 1 7/16 or 11mm socket 1 7/16 or 11mm Gear Wrench
 Thank you for your recent purchase of a Cabinets by Hayley garage cabinet system. You are about to experience the best made cabinets that you can purchase. Cabinets by Hayley are designed for beauty and
Shown below is the Loft Bed with a single safety rail, short desktop and the optional shelves and desktop.
 College Bed Lofts Assembly Instructions With Pre-Assembled Mattress Foundation & End Ladders Loft Bed - Bunk Bed - High Rise Platform Bed Updated: 4/28/14 Shown below is the Loft Bed with a single safety
A MULTI-PURPOSE LOFT THAT CAN BE USED FOR SLEEPING, STORAGE, AND FREEING UP SPACE (Supports 200 lbs max) DIFFICULTY: 6/10
 DIFFICULTY: 6/10") A MULTI-PURPOSE LOFT THAT CAN BE USED FOR SLEEPING, STORAGE, AND FREEING UP SPACE (Supports 200 lbs max) DIFFICULTY: 6/10 CAUTION The instructions are only a guide, and should be followed by individuals
A MULTI-PURPOSE LOFT THAT CAN BE USED FOR SLEEPING, STORAGE, AND FREEING UP SPACE (Supports 200 lbs max) DIFFICULTY: 6/10 CAUTION The instructions are only a guide, and should be followed by individuals
Model #SH & CH SH Pine CH Naturaline
 Model #SH304-101 & CH304-101 Assembly Manual SH304-101 Pine CH304-101 Naturaline Component Parts A 2 ea. Angled Rail - 2 x 4 x 107-1/8" B 1 ea. Center Angled Rail - 2 x 4 x 107-1/8" C 9 ea. Rock Board
ROCKWELL 4-IN-1 DOOR. Two Panel Door. Half X Door. Z Combination Door. Double X Door
 ROCKWE 4-IN-1 DOOR Two Panel Door Half X Door Double X Door Z Combination Door Choose between four door styles with this Door Kit. Our versatile Rockwell Door Kit is very easy to assemble. All materials
Cellar Hanger ASSEMBLY INSTRUCTIONS
 Cellar Hanger ASSEMBLY INSTRUCTIONS CELLAR HANGER Recommended Tools Drill with 1/8 and 1/4 Drill Bits, 1-1/8 Forstner Bit or 1-1/8 Spade Bit, and Phillips Bit 9/16, 7/16, and 5/8 Combination Wrench Socket
COMPOSITE RAILING INSTALLATION
 COMPOSITE RAILING INSTALLATION Tools All you ll need is a hammer and screw gun, circular saw (carbidetipped blade with fewer than 20 teeth is recommended), level, tape measure, rasp and blue chalk line.
ROCKWELL. Two Panel Door. Half X Door. Double X Door. Z Combination Door
 ROCKWELL 4 in 1 DOOR Choose between four door styles with this Door Kit. Our versatile Rockwell Door Kit is very easy to assemble. All materials and hardware needed to assemble any of the four styles are
The Premier Loft Bed Assembly Instructions
 The Premier Loft Bed Assembly Instructions Wooden College Loft Bed Assembly Instructions (Click Here) For A Printer Friendly Version (Click Here) For Bookself Assembly Instruction (Click Here) For Desk
Spoked GARRICK HANGER
 Spoked GARRICK HANGER ASSEMBLY INSTRUCTIONS SPOKED GARRICK HANGER Recommended Tools Drill with 1/8 and 1/4 Drill Bits, 1-1/8 Forstner Bit or 1-1/8 Spade Bit, and Phillips Bit 9/16 and 5/8 Combination Wrench
Steel Frame Assembly
 Steel Frame Assembly The Alpha Steel Frame is adaptable as vertical or horizontal bed. Note: A leg connector rod extension bar is required for a horizontal bed. Hardware Card #3 is used for Steel Frame
Plans. Easy-to-Build Full-size Deluxe Murphy Bed Plan. For more plans, tools and hardware visit rockler.com
 Easy-to-Build Full-size Deluxe Murphy Bed Plan Build a full-size Deluxe Murphy Bed complete with decorative molding and matching side cabinets! Plans For more plans, tools and hardware visit rockler.com
Top Mount Ultra Modern Hanger
 Top Mount Ultra Modern Hanger ASSEMBLY INSTRUCTIONS TOP MOUNT ULTRA MODERN HANGER Recommended Tools Level Tape Measure Pencil Drill with 1/8, and 1/4, Drill Bits and Phillips Bit Socket Wrench with 9/16
High Rise Sit-Stand Desk Converter
 High Rise Sit-Stand Desk Converter Assembly Instructions for Model DC300 Patent Pending PRE-ASSEMBLY Please read all instructions before beginning assembly. We strongly recommend you watch the video at
LOWLINE SINGLE FOLD DOWN WALL BEDS
 ASSEMBLY INSTRUCTIONS LOWLINE SINGLE FOLD DOWN WALL BEDS Tools Required For Assembly No 2 & No 4 Phillips Head Screwdrivers No 2 Slot Head Screwdriver Hammer Electric Drill (Hammer Drill for Masonry) 6.5mm
Riverside. Windhaven Queen Storage Bed Assembly Instructions
 Queen Storage Bed Page 1 of 7 2 pcs. 4 pcs. 4 pcs. 4 pcs. 2 pcs. 5/0 Queen Storage Bed 50773 -- 5/0 Storage Footboard w/platform Note: The 50773 Storage Footboard can be used with the 50770 Panel Headboard
Assembly Instructions
 RoomScape Furniture System March 2013 - Bed Styles bed deck board bed deck board top cap top cap base glide middle side rail frame frame stacking device frame middle lower reinforcement side rail Single
INS T A L L A TIO N INS T R U C TIO N S HORSESHOE W/ BAR HANGER
 INS T A L L A TIO N INS T R U C TIO N S HORSESHOE W/ BAR HANGER 6-1/2" 5" 2-7/16" 3-7/16" Ø2-7/8" 4-7/8" 11" 2" 3/16" 1/2" HORSESHOE W/ BAR S P ECIFICATIONS PARTS AND TOOLS Tools Needed Tape Measure Pencil
Riverside. Oakmont Queen Storage Bed Assembly Instructions
 Queen Storage Bed Page 1 of 7 8 pcs. 8 pcs. 1 pc. 1 pc. 8 pcs. 8 pcs. 8 pcs. 8 pcs. 1 pc. 1 pc. 20270 --5/0 Sleigh Headboard 20274 --5/0-6/6 Bed Rails 20273 -- 5/0 Storage Footboard, Panels, Slats Queen
INSTALLATION INSTRUCTIONS INS T A L L A TIO N INS T R U C TIO N S THE MAVERICK HANGER R H
 INS T A L L A TIO N INS T R U C TIO N S THE MAVERICK HANGER 10.6.2016 PARTS INSTALLATION SPECIFICATIONS AND TOOLS INSTRUCTIONS 2-1/4" 2-7/8 11-3/8" 1/4" 2-1/8 PARTS INSTALLATION AND INSTRUCTIONS TOOLS
Installation Instructions - Model V4JSD 1
 Installation Instructions - Model V4JSD 1 Support Assemblies: Parts list: (Note see enclosed cut sheet for quantities and dimensional information) A vertical structural member (1 ½ x 1 ½ modular frame)
Baby Grande with Crank, Housing, and Side Rails Installation Instructions
 Baby Grande with Crank, Housing, and Side Rails Installation Instructions Tools Needed Hardware Provided (per shade) Hardware Needed Drill 3/8 Metal Drill Bit ¼ Masonry Drill Bit Measuring Tape Pencil
Castle Bed. Page 1 of 24
 Castle Bed www.andrewharriswoodwork.com Page 1 of 24 Introduction This plan makes a twin bed that is 91 inches long and 60 inches wide. I have tried to ensure all steps are covered in these plans but if
M10 x 75mm Sockethead Cap Screws. 5mm Fender Washer (12) Included - (8) Required. #10 x 2.5" PH Wood Screws. (30) Included - (24) Required
 Included - (8) Required. #10 x 2.5 PH Wood Screws. (30) Included - (24) Required") Door System Unit - Hardware Tools Included: (2) 2mm Allen Wrenches, (2) 3mm Allen Wrenches, (2) 4mm Allen Wrenches, (2) 6mm Allen Wrenches, and (1) 8mm T-Handle Allen Wrench Tools Required: Phillips Screwdriver,
Door System Unit - Hardware Tools Included: (2) 2mm Allen Wrenches, (2) 3mm Allen Wrenches, (2) 4mm Allen Wrenches, (2) 6mm Allen Wrenches, and (1) 8mm T-Handle Allen Wrench Tools Required: Phillips Screwdriver,
Wallbeds Northwest ENDURA CABINET PLANS AND INSTRUCTIONS
 Thank you for purchasing your Wall Bed from Wallbeds Northwest. If you have purchased a complete "Endura DIY Kit," then much of the work is already done for you. Please skip to assembly instructions. Note
Mounting Instructions Item No.: xxx
 Mounting Instructions Item No.: 271.92.xxx Wall-Beds 1 General Notes For vertical folding beds Successful and safe installation of Bed-Lift and construction of casework requires a professional skill level
Strata. urniture. Adriana Instructions. Parts in the Arm Box: Parts in the Body Box: Watch our assembly videos at
 1A Watch our assembly videos at www.strataf.com/videos Parts in the Arm Box: Arm - Outside View Arm - Inside View 1B Parts in the Body Box: Back Deck x 1 Seat Deck x 1 with the Feet attached Back Panel
INSTALLING YOUR NEW SPRING LIFT ARM KIT
 INSTALLING YOUR NEW SPRING LIFT ARM KIT 1. Measure the distance that the roof is to be raised. [If your lift system is completely non-functional, you will need to calculate or estimate this distance as
ASSEMBLY INSTRUCTIONS DIY WALL BED KIT QUEEN BI FOLD DOOR CABINET & MECHANISM. Tools Required For Assembly. 6.5mm Masonry Drill Bit
 ASSEMBLY INSTRUCTIONS DIY WALL BED KIT QUEEN BI FOLD DOOR CABINET & MECHANISM Tools Required For Assembly No 2 & No 4 Phillips Head Screwdrivers No 2 Slot Head Screwdriver Hammer Electric Drill (Hammer
MODEL# SLA001-3 "SLIDE & LOCK" A-FRAME POOL LADDER
 MODEL# SLA001-3 "SLIDE & LOCK" A-FRAME POOL LADDER IMPORTANT INSTRUCTIONS: : Read all instructions carefully & completely to become familiar with parts, assembly, safety and proper use of this product.
SINGLE TRACK BYPASS (patent pending) barn door hardware
 barn door hardware") SINGLE TRACK BYPASS (patent pending) barn door hardware Installation Manual What is included in your kit: Part number Part name Quantity 1 Inner door hanger 2 2 Outer door hanger 2 3 5/16 x 1.5 lag bolts
SINGLE TRACK BYPASS (patent pending) barn door hardware Installation Manual What is included in your kit: Part number Part name Quantity 1 Inner door hanger 2 2 Outer door hanger 2 3 5/16 x 1.5 lag bolts
BARN DOOR HARDWARE KIT
 INSTALLATION GUIDE Main Components x1 Rail x5 Wall Spacer x2 Anti-jump Block x2 Bent Strap x1 Right Stopper x1 Left Stopper x5 5/16 (8mm x 60mm) Carriage Bolt x5 5/16 (8mm x25mm) Anchor x5 5/16 (8mm x
GlideRite Retractable Cover System For HotSpring & Tiger River Spas (except Classic & pre-2000 Landmark Spas)
") List of Contents Quantity Description 12 #10 x 1 ½ Flat Head Phillips Screw (see pg. 2) 2 #10 x ½ Pan Head Phillips Screw (see pg. 2) 8 ¼ x 2 ½ Lag Bolt (see pg. 2) 7 ¼ 20 x 5 / 8 Hex Head Bolt (see pg.
List of Contents Quantity Description 12 #10 x 1 ½ Flat Head Phillips Screw (see pg. 2) 2 #10 x ½ Pan Head Phillips Screw (see pg. 2) 8 ¼ x 2 ½ Lag Bolt (see pg. 2) 7 ¼ 20 x 5 / 8 Hex Head Bolt (see pg.
Item #: BTLD46SP Assembly Instructions
 Item #: BTLD46SP Assembly Instructions Revised 06/2012 Instruction Manual IMPORTANT INFORMATION READ BEFORE ASSEMBLING THIS PRODUCT Follow the information on the warning labels found on the bunk bed and
Assembly Instructions
 10' and 12' Octagon Cedar Gazebo Assembly Instructions Toll Free: 866.768.8465 Hours: 9-5 Monday-Friday EST www.homeplacestructures.com Package ships as shown revised 06/20/09 Cedar Gazebo Assembly Instructions
Workbench Instructions for Assembly
 Workbench Instructions for Assembly Technical Electronic Workstations and Industrial Workbenches Includes: Cabinets Privacy Panels Stringers Bottom Shelves Table of Contents Tools Required for Assembly...
(Toll Free); 7am-7pm Pacific Time, Monday-Saturday. Assembly instructions for: MARISSA S ADVENTURE LOFTS
; 7am-7pm Pacific Time, Monday-Saturday. Assembly instructions for: MARISSA S ADVENTURE LOFTS") 866.332.2403 (Toll Free); 7am-7pm Pacific Time, Monday-Saturday Assembly instructions for: MARISSA S ADVENTURE LOFTS Thank you for purchasing Forever Redwood patio furniture. Forever Redwood is built by
866.332.2403 (Toll Free); 7am-7pm Pacific Time, Monday-Saturday Assembly instructions for: MARISSA S ADVENTURE LOFTS Thank you for purchasing Forever Redwood patio furniture. Forever Redwood is built by
Item #: BTOLSP Assembly Instructions
 Item #: BTOLSP Assembly Instructions Revised 06/2012 Instruction Manual IMPORTANT INFORMATION READ BEFORE ASSEMBLING THIS PRODUCT Follow the information on the warning labels found on the bunk bed and
INSTALLATION INSTRUCTIONS INS T A L L A TIO N INS T R U C TIO N S ROD IRON SCROLL HANGER R H
 INS T A L L A TIO N INS T R U C TIO N S ROD IRON SCROLL HANGER 10.5.2016 2-1- 3/16" 11/16" 8" 8 O 2-7/8 Ø2-7/8" 3-1/2 3-1/2" 12-9/16 12-9/16" PLEASE NOTE: These instructions are specific to a particular
WAREHOUSE HANGER INSTALLATION INSTRUCTIONS R H INS T A L L A TIO N INS T R U C TIO N S
 INS T A L L A TIO N INS T R U C TIO N S WAREHOUSE HANGER NOTE: Due to the size and weight of the Warehouse Hanger it is recommended that this Hanger be installed on 3 4 or wider doors. 10.11.2016 2-3/16"
Myra Bed Room King Storage Bed Assembly Instructions. Hardware and Parts packed with the Headboard. One Left & One Right H-C
 email: Headboard Panel info@riverside-furniture.com King Storage Bed Hardware and Parts packed with the Headboard Headboard Post Headboard Stretcher Page 1 of 7 H-A One Left & One Right H-C M5/16"-18 x
Ultra Fast Delivery SGL Toilet Cubicle Pack Fitting Instructions
 Ultra Fast Delivery SGL Toilet Cubicle Pack Fitting Instructions This instructional booklet should be read in full prior to undertaking any work. If in doubt please call Commercial Washrooms on 01202 650900,
MONKEY BARS OVERHEAD RACK INSTALLATION
 MONKEY BARS OVERHEAD RACK INSTALLATION Thank you for purchasing the New Monkey Bars Overhead storage rack. The most innovative overhead rack on the market WARNING THE PROPER INSTALLATION OF THIS STORAGE
8.5 Ton Assembly Instructions
 8.5 Ton Assembly Instructions Parts list for assembly. 6- Legs 2 1/2 Angle X 92 Long 6- Cone Supports 2 Angle X 60 Long 6-1 1/4 Angle X 27 1/4 Long. 12-1 1/4 Angles X 42 Long 6-1 Flat Straps 23 3/4 Long
O-Sullivan King 4 Poster Bed O-Sullivan Queen 4 Poster Bed Parts and Hardware List
 Parts and Hardware List A. Left Headboard Post 1 pc B. Right Headboard Post 1 pc C. Left Footboard Post 1 pc D. Right Footboard Post 1 pc E. Headboard Panel 1 pc F. Footboard Rail 1 pc. Spindles 4 pcs
Double Screen Door Installation Instructions
 Double Screen Door Installation Instructions (36) #8x1 tek screws (20) #8x1/2 tek screws Package Includes: (2) PCA Screen Doors (1) Astragal (1) Left Hand Z-bar (1) Right Hand Z-bar (1) Header Z-bar (2)
Bunk Bed Assembly Instructions
 1415-9 Bunk Bed Assembly Instructions -Use Only standard Twin size mattress (75 long x 39 wide)- -Maximum mattress thickness must not exceed 8 - -Surface of mattress must be at least 5 below the upper
S48-L12-SC AND G48-L12-GC STEEL PORTA-DOCK S82 SC 6 X 12 PLATFORM AND G82 GC 6 X 12 PLATFORM
 PAGE 1 OF 6 PORTA-DOCK, INC. S48-L12-SC AND G48-L12-GC STEEL PORTA-DOCK S82 SC 6 X 12 PLATFORM AND G82 GC 6 X 12 PLATFORM Thank you for purchasing our product! *Please read these instructions and follow
All Restoration Hardware bunk beds are designed to meet the highest safety standards and comply with all U.S. and Canadian Bunk Bed regulations.
 All Restoration Hardware bunk beds are designed to meet the highest safety standards and comply with all U.S. and Canadian Bunk Bed regulations. Page 1 of 13 Assembly Instructions Callum Storage Twin Bunk
SAFETY WARNINGS. RH23 Bed with Center Stretcher
 SAFETY WARNINGS RH23 Bed with Center Stretcher RH23 beds are designed for nine different configurations. For safety, beds should be only configured in one of these nine styles and are not to be assembled
GlideRite Retractable Cover System For Hot Spot Spas (SE & SLX only)
") List of Contents Quantity Description 12 #10 x 1 ½ Flat Head Phillips Screw (see pg. 2) 2 #10 x ½ Pan Head Phillips Screw (see pg. 2) 8 ¼ x 2 ½ Lag Bolt (see pg. 2) 7 ¼ 20 x 5 / 8 Hex Head Bolt (see pg.
List of Contents Quantity Description 12 #10 x 1 ½ Flat Head Phillips Screw (see pg. 2) 2 #10 x ½ Pan Head Phillips Screw (see pg. 2) 8 ¼ x 2 ½ Lag Bolt (see pg. 2) 7 ¼ 20 x 5 / 8 Hex Head Bolt (see pg.
Master Your Terrain (307) Extreme Duty ROCK RAILZ Jeep Cherokee. Installation Instructions
 Extreme Duty ROCK RAILZ Jeep Cherokee. Installation Instructions") Master Your Terrain (307) 775 9565 www.tntcustoms.com Extreme Duty ROCK RAILZ Jeep Cherokee Installation Instructions Congratulations for purchasing a TNT. Extreme Duty Rock RailZ for your Jeep Cherokee.
Master Your Terrain (307) 775 9565 www.tntcustoms.com Extreme Duty ROCK RAILZ Jeep Cherokee Installation Instructions Congratulations for purchasing a TNT. Extreme Duty Rock RailZ for your Jeep Cherokee.
K-Emily Twin Nkl Canopy Bed K-Emily Twin Pink Canopy Bed K-Emily Purple Twin Canopy Bed
 Parts and Hardware List A. Headboard 1 pc B. Footboard 1 pc C. Side Rails 2 pcs D. Support Slats 3 pcs E. Leg Supports 3 pcs F. Long Canopy Rails 2 pcs G. Short Canopy Rails 2 pcs H. Long Posts 2 pcs I.
INSTRUCTION BOOKLET #34. For Wallbed models: KING SIZE SIERRA WITH STORAGE HEADBOARD
 For Wallbed models: KING SIZE SIERRA WITH STORAGE HEADBOARD INSTRUCTION BOOKLET #34 WARNING! ALL MURPHY/WALLBED SYSTEMS CONTAIN STORED ENERGY. FAILURE TO USE AND FOLLOW THESE INSTRUCTIONS DURING THE INSTALLATION
Constable Oak Extension Dining Table
 Constable Oak Extension Dining Table Assembly Instructions - Please keep for future reference 176/0325 Dimensions Width - 160/ 200cm Depth - 90cm Height - 75cm Important - Please read these instructions
MAG-CONV Basic, 48, 48R & Midline Front Mount
 Parts Required: Tools Used: Mag Wheels Brakes Brake Rods Mounting Bracket Anti Tippers 7/16" Wrench Screw Driver Rubber Mallet 5/8 Wrench 5mm Allen Wrench Step Execution Figures 1 Remove front 5" total
ANA WHITE PLATFORM BED: RYOBI 2017 PROJECT #5 Page 1 of 15. Description:
 Page 1 of 15 Description: We built this platform bed with storage side for our pre-teen daughter s room, and she couldn t be happier. The bed is very comfortable, and the storage piece adds style and function.
Version 1.1 BUSSY BUNK BED MK 2.
 Version. BUSSY BUNK BED MK 2 HELPFUL BUNK BED SAFETY TIPS Bunk beds should be checked periodically to ensure that the guardrail,ladder and other components are secure and in the correct position and all
INSTALLATION INSTRUCTIONS VENETIAN 84" SLIDING SHOWER DOOR SYSTEM (180º INSTALLATION)
") INSTALLATION INSTRUCTIONS VENETIAN 84" SLIDING SHOWER DO SYSTEM (180º INSTALLATION) 28539 Industry Drive, Valencia, CA 91355 Toll Free Phone: (877) 728-3874 Toll Free Fax: (888) 440-9567 Phone: (661) 775-1675
INSTALLATION INSTRUCTIONS VENETIAN 84" SLIDING SHOWER DO SYSTEM (180º INSTALLATION) 28539 Industry Drive, Valencia, CA 91355 Toll Free Phone: (877) 728-3874 Toll Free Fax: (888) 440-9567 Phone: (661) 775-1675
Strata. urniture. Mission Rim Instructions. Parts in the Arm Box: Parts in the Body Box:
 1A Watch our assembly videos at www.strataf.com/videos.html Parts in the Arm Box: Arm - Outside View Arm - Inside View Corbels x 4 1B Parts in the Body Box: Back Deck x 1 Seat Deck x 1 with the Feet attached
This instruction manual is an in-depth look and explanation of how to assemble and install the Murphy Bed properly and efficiently.
 This instruction manual is an in-depth look and explanation of how to assemble and install the Murphy Bed properly and efficiently. Don t be put off by the size of the instruction manual as the large diagrams
SleepSafe II Hi Lo (Medium Bed)
") SleepSafe II Hi Lo (Medium Bed) Assembly Instructions 3135 Dillons Mill Road Callaway, VA 24067 Toll Free 866.852.2337 Fax 540.334.2100 www.sleepsafebed.com Thank you for purchasing the SleepSafe II Hi
SleepSafe II Hi Lo (Medium Bed) Assembly Instructions 3135 Dillons Mill Road Callaway, VA 24067 Toll Free 866.852.2337 Fax 540.334.2100 www.sleepsafebed.com Thank you for purchasing the SleepSafe II Hi
INSTALL LOAD BED TRACKS
 Universal LOAD BED TRAY & Load BArs TRBU001 / KRLBUNI1 INSTALL TIME: 2.5 Hours READ ME FIRST: Thank you for purchasing a Front Runner Slimline II Load Bed Rack or Load Bar Kit. Your Kit will contain the
CAUTION: Before opening the crate place it flat on its side (not up right as show in the photo) Hardware included for assembling your gazebo:
 Hardware included for assembling your gazebo:") Octagon Wood Gazebo Kit Contents Hardware included for assembling your gazebo: 5/16" Lag Bolts Use to fasten post to floor 2 1/2" screws Use to fasten joist together fasten posts to outside joist fasten
Octagon Wood Gazebo Kit Contents Hardware included for assembling your gazebo: 5/16" Lag Bolts Use to fasten post to floor 2 1/2" screws Use to fasten joist together fasten posts to outside joist fasten
Storage Stairs for the Playhouse Loft Bed [1]
![Storage Stairs for the Playhouse Loft Bed [1]](/thumbs/73/68614032.jpg "Storage Stairs for the Playhouse Loft Bed [1]") [1] Submitted by Ana White [2] on Wed, 2010-09-08 09:11 [1] Summary: Stairs for the playhouse loft bed. Featuring lift top storage, behaving much like a large hidden toybox. Give your child easy safe access
[1] Submitted by Ana White [2] on Wed, 2010-09-08 09:11 [1] Summary: Stairs for the playhouse loft bed. Featuring lift top storage, behaving much like a large hidden toybox. Give your child easy safe access
Twin Twin Oak Bunk Bed Assembly Instructions
 Twin Twin Oak Bunk Bed Assembly Instructions -Use Only standard Twin size mattress (75 long x 39 wide)- -Maximum mattress thickness must not exceed 8 - -Surface of mattress must be at least 5 below the
Please keep for future reference. Dimensions (5') Length cm. Width - 160cm Height cm
 Length cm. Width - 160cm Height cm") Sheridan Ottoman bed Assembly Instructions hygena Please keep for future reference 25/942 /659 56/4268 56/9 /7268 57/499 40/422 57/202 8/8846 Dimensions (4') Length - 202.5cm Width - 0cm Height - 84.5cm
Sheridan Ottoman bed Assembly Instructions hygena Please keep for future reference 25/942 /659 56/4268 56/9 /7268 57/499 40/422 57/202 8/8846 Dimensions (4') Length - 202.5cm Width - 0cm Height - 84.5cm
PORTABLE ADJUSTABLE BASKETBALL SYSTEM
 Instruction Manual PORTABLE ADJUSTABLE BASKETBALL SYSTEM P A R T S L I S T 5 1/2 and 8 safe play clearance Item Qty Description Item Qty Description A 1 Portable Base Assembly M 4 1/2 Lock Nut B 2 Front
Assembly Instructions for 12x16 Floating Dock
 Assembly Instructions for 12x16 Floating Dock www.rollingbarge.com Congratulations on the purchase of your Floating Dock kit. This kit includes all the aluminum frame parts, and all the fasteners. You
All Restoration Hardware bunk beds are designed to meet the highest safety standards and comply with all U.S. and Canadian Bunk Bed regulations.
 baby&child RESTORATION HARDWARE All Restoration Hardware bunk beds are designed to meet the highest safety standards and comply with all U.S. and Canadian Bunk Bed regulations. Page 1 of 13 Assembly Instructions
Follow these steps to assemble your Hiddenbed 1 Construct the 3 main parts 2 Assemble them together 3 Add a mattress. YOUR HIDDENBED IS READY! 2
 Mounting Instructions Item No.: 271.97.300 Hiddenbed Furniture parts supplied by the customer Follow these steps to assemble your Hiddenbed 1 Construct the 3 main parts 2 Assemble them together 3 Add a
Side Mount INSTRUCTION BOOKLET #C122 BED STYLE: PARK CITY
 Side Mount BED STYLE: PARK CITY INSTRUCTION BOOKLET #C1 WARNING! ALL MURPHY/WALLBED SYSTEMS CONTAIN STORED ENERGY. FAILURE TO USE AND FOLLOW THESE INSTRUCTIONS DURING THE INSTALLATION PROCESS COULD RESULT
Real Life Ninja Complete Starter Pack (14ft. Warped Wall) Assembly Instructions
 Assembly Instructions") MATERIALS: 3 - Main Sections (Only 2 Sections for 10 ) 8 3 deck screws for joining sections inside of 2 Rock Wall Panels (with pre-installed t-nuts. Top panel comes with ladder mounting block preinstalled.)
MATERIALS: 3 - Main Sections (Only 2 Sections for 10 ) 8 3 deck screws for joining sections inside of 2 Rock Wall Panels (with pre-installed t-nuts. Top panel comes with ladder mounting block preinstalled.)
Barnwood Bunk Bed Assembly Instructions
 Barnwood Bunk Bed Assembly Instructions Parts needed: 1 1 2 1 8 4 10 1 10 16 1 - Tools Needed for Assembly: Cordless Drill with Phillips Head Ratchet w/9/16 socket 9/16 Wrench T-25 Bit Headboard Footboard
PRINCESS SINGLE BED WITH TRUNDLE
 PRINCESS SINGLE BED WITH TRUNDLE If you have any questions regarding assembly or if you are missing parts, do not return this item to Sam s Wholesale Club Please call our customer service number and have
Phone #: (360) Online Tech Support: Web:
 Online Tech Support: Web:") Phone #: (360) 734-3482 Online Tech Support: tech-support@shopfox.biz Web: www.shopfox.biz Your new Model D2058A Super-Heavy Duty Mobile Base () is designed to give you a stable and mobile platform upon
Phone #: (360) 734-3482 Online Tech Support: tech-support@shopfox.biz Web: www.shopfox.biz Your new Model D2058A Super-Heavy Duty Mobile Base () is designed to give you a stable and mobile platform upon
ASSEMBLY INSTRUCTIONS YS480 PELLET COOKER - 24 YS640 PELLET COOKER - 32
 ASSEMBLY INSTRUCTIONS YS480 PELLET COOKER - 24 YS640 PELLET COOKER - 32 RECOMMENDED TOOLS NUT DRIVERS OR SOCKET WRENCH 5/16 SOCKET 3/8 SOCKET 7/16 WRENCH BOX CUTTER OR UTILITY KNIFE yodersmokers.com 2
L.L.Bean. Platform Bed
 L.L.Bean Platform Bed Thank you for purchasing our Platform Bed. Assembly of this product requires a Phillips head and a flat head screwdriver. We have found it helpful to have a second person present
woodworkersjournal.com MATERIAL LIST
 MATERIAL LIST T x W x L 1 Legs (2) 1 1 2" x 3 1 2" x 36 7 16" 2 End Uprights (2) 1 1 2" x 3 1 2" x 32 1 2" 3 Stringers (4) 1 1 2" x 3 1 2" x 42" 4 Top Cladding, Long (2) 3/4" x 7 1 4" x 65 3 4" 5 Side
Range height adjustable assembly
 Table of contents Digital handset operation 3 Height adjustable bench kit 4-5 Cable carrier 6 Ganging tray and ganging rail 7 Height adjustable return frame kit 8 Cable entry pole 9 24 and 30 d worksurfaces
DIY RUSTIC HALL TREE
 DIY RUSTIC HALL TREE *Before beginning this project, please read through all of the plans as well as the blog post associated with this project. Always use safety precautions whenever using power tools
METAL BLINDS. Deluxe GETTING STARTED OPTIONAL HARDWARE. A few simple tools are required: STANDARD HARDWARE
 METAL BLINDS Deluxe GETTING STARTED OPTIONAL HARDWARE A few simple tools are required: Steel Tape Measure Pencil Level Hold Down Brackets with Screws Extension Bracket Power Drill and Drill Bits Flathead
Assembly Instructions 10 X 10 Aluminum Frame Building
 Assembly Instructions 10 X 10 Aluminum Frame Building 27 97 9 8 47 36 74 52 10 10 X 10 Square Building W/ Dome Includes: The Steel Entry Door with a Dead Bolt Lock assembly and Aluminum Door Frame. Metal
All Restoration Hardware bunk beds are designed to meet the highest safety standards and comply with all U.S. and Canadian Bunk Bed regulations.
 All Restoration Hardware bunk beds are designed to meet the highest safety standards and comply with all U.S. and Canadian Bunk Bed regulations. Page 1 of 13 Assembly Instructions Callum Storage Twin Bunk
INSTRUCTIONS FOR ASSEMBLY 2355mm x 4665mm Workshop
 Manufacturer of Christie Glasshouses and Sheds INSTRUCTIONS FOR ASSEMBLY 2355mm x 4665mm Workshop 1 Thomas Burns Street, Dunedin Phone (03) 477 7909 www.allans.co.nz Congratulations on your purchase of