What s Inside MARCH PREZ SEZ Page 2. MARCH DEMO Page 3. AAW TIP Page 7. PEN WOOD OF THE MONTH Page 8. SHOW AND TELL Page 11.
|
|
|
- Sophia Matthews
- 5 years ago
- Views:
Transcription


1 What s Inside PREZ SEZ Page 2 MARCH DEMO Page 3 AAW TIP Page 7 MARCH 2017 PEN WOOD OF THE MONTH Page 8 SHOW AND TELL Page 11 GALLERY Page 15 FINISHING YOUR TURNINGS Page 17 Dennis Ciesielski and Barry Grill represented the CVWG at the Fiber Arts & Folk Life event at the Chippewa Valley Museum on Feb. 18th. There were a number of people who expressed an interest in our guild besides an interest in the turnings that were displayed. Dennis and Barry expressed that it was an enjoyable time.

2 PREZ SEZ Rich Thelen I m Back!! Five weeks in sunny Florida was fun and enjoyable but I am missing the Woodturners club. I went to Coffee and Chips today and it was filled with people. The lathes were turning from start to finish. People were making spindles and bowls. I saw a lot of nice projects. It was great to hangout with some members I haven t seen for a while. Somebody brought some great donuts and the coffee was wonderful again. Thanks to all who helped out. The Feed My People event Empty Bowls is over and they raised over $80,000 total. We were a significant part of that. Our drive for bowls started in October and we had a lot of donations. Paul Meske with 55 bowls and Joe Nycz with 38 bowls were among the notable leaders. John Layde did another great job of managing this event. He had lots of good helpers too. Good job to all who made bowls and helped out. While I was gone, Lyndall Anthony was our guest pro-demo guy and he put on a good show. I wish I had been there to see it. I heard about it from members and most were pleased with the material he presented. Thanks to Tom Leonard for becoming a member demonstrator showing how to make a pen from start to finish. We need more member demonstrators and it was good to see Tom step up. April will see Wayne Dubberke from the West Wisconsin Wood Carvers show us how to embellish our turnings with carving. He was here about 3 years ago and showed how to carve a platter. I found my interest in carving from that demo and haven t stopped trying to use carving wherever I can. Woodturning is a great hobby and the Guild is one way to help yourself to learn more about the hobby. Great demonstrations and hands-on learning with good mentors are a foundation of the club. It is good to have you on board.

3 March Demonstration Tom Leonard Tom presented everything, or at least most of what he knows about pen making in "Pen Turning A-Z". He started off with "It's more complicated than you think" accompanied by a list of all the details and items used in making pens: * Lathe * Turning tools * Blanks * Method to cut blanks * Pen kits * Drill bits * Method to drill blanks * Glue * Barrel trimmer/carbide cutter * Pen mandrel * Bushings * Sanding system * Method of finishing * Method of assembly Optionally a method to disassemble (mistakes or bad components happen!) Tom talked about blanks, there are a variety of materials and each material often has variation within it: * Wood o Domestic (walnut, maple, cherry, etc) o Exotics (Pink ivory, ebony, rosewood, etc) * Acrylic o Marbled patterns (two or more colours, like an artificial marble) o Castings (coffee beans suspended in acrylic, cholla cactus, etc) o True stone (powdered stone and dies suspended in an acrylic) * Antler * Aluminum o Mark Palma did one of these, use carbide tools * Seed pods o Banksia * Inlayed kits o can be acrylic or varieties of woods o acrylic: American flag * Clay There is also an amazingly wide variety of pen kits. Most people start with a simple slim-line kit. There's an opportunity for creativity even with this: Do you make the barrel straight or curved? Discard the band it comes with and use a contrasting wood? What material to use?

4 In general the thicker the pen the higher the cost, and the better the components the higher the cost. You can also spend more to get gimmicks, such as bolt action pens etc. You can spend less than 3 dollars on a pen kit, up to 40 dollars. Each pen kit requires bushings. Be careful here, because different kits require a bushing with a different diameter, some require bushings with a different diameter on either side, etc. Inexpensive bushings are made from soft metal, you can pay more for stainless steel bushings. The stainless steel bushings will last longer. Bushings cost 3-5 bucks or so. They don't last forever, as you sand them or accidentally trim them down with your tools they will no longer be the right diameter. Pen kits contain at least a tube, pen tip, pen cap, ballpoint pen refill, and a cartridge (mechanism for advancing or retracting the pen). They may also contain clips, bands, etc. They also usually come with instructions on what bushings are required, what size of drill to use, special notes about the turning process for that particular kit, as well as assembly instructions. Read these, even if you're sure you know everything, rather than end up throwing out an expensive pen kit. Your pen blank will have to be cut to length to match the length of tube your kit came with. There are a number of options here. Bandsaws work, but are less safe, you are potentially holding your fingers in close proximity to the bandsaw blade. A chop saw works, an old fashioned mitre saw and miter box also work and is fine for low production. There are also specialized miniature chop saws. For the most beautiful pens, if there's an upper and lower barrel mark the blanks before cutting so that they can be properly oriented during the entire process. This way the grain runs continuously through the pen. Once the blank is cut a hole needs to be drilled. For wood brad bits work best, and within this broad category there are more decisions to be made and money to be spent. There are parabolic drill bits which clear the wood from the hole better. Acrylics require a drill suited for plastics. If you're not sure what size drill is required for your tube you can estimate it by comparing the size of the tool to the shaft of the drill. Some drill bits are stepped, the end that drives is a different diameter than the cutting portion of the shaft. If you're sizing by comparison be aware of this. To drill the hole in the blank you can use a drill press, hand drill with a press adapter, or your lathe and a Jacob's chuck. There are pen blank drilling centers available that help with aligning the axis of the blank to the axis of the
 glue works.")

5 drill. Once the blank is drilled out the brass tube needs to be inserted and glued into the blank. For best adhesion roughen the surface of the brass tube with a coarse sand paper (120 grit or so). The best adhesion happens if the scratches are around the tube. There are a number of glues which can be used for gluing the tubes into the blanks. cyanoacrylate (CA or crazy glue) glue works. Gorilla glue works, but requires a bit of moisture to work properly. Tom spritzes the inside of the tube with water when he uses gorilla glue. You can also use a two part epoxy. If you do this then plug the tube with potato or Plasticine before gluing up. Removing the epoxy if it seeps into the brass tube is just short of impossible. For acrylics gorilla glue works best, use a q-tip to moisten the hole through the blank. For wood any of the glues work. If using CA glue let dry for at least 24 hours for maximum strength. If using gorilla glue spritz the inside of the blank with water. Mark Palma interjected her with his usual admonishment: Check the date codes on your glue! Old glue doesn't work as well, so only buy as much as you need. You have no idea how long the glue has been sitting on the shelf, so check the date codes. Once the brass tube has been glued into the blank, the barrel needs to be trimmed. There are cutters available that both trim the barrel and ream out any glue that managed to seep into the brass tube. As with everything, they are sized for particular tube sizes, so be aware of your pen kits requirements. You only want to trim until you barely touch the brass tube. If you shorten the tube beyond this your cartridge may not work correctly. Once your blank is drilled, the tube glued in, and it's trimmed to the proper length it needs to be set into the lathe. As with elsewhere in the pen making process you there is a lot of variety, with an accompanying variety in price. The cheapest option is a basic mandrel, which costs about 12 dollars. One end fits into the moriss taper of your lathe, while the tail stock fits into a detent at the opposite end of the mandrel. The drawback to this type is that the When placing your blank on the mandrel there need to be bushings of the Once the blank has been turned, it has to be sanded. The degree of sanding
. He applies a bit of CA to a rag and spins the lathe at about 400 rpm.")
6 depends on the material. With woods the final luster is actually the finish. For acrylics or metals the luster is due to polish. Tom sands wood to about 400 or so, or until he's happy. He uses meshes like arbanet. He then applies CA glue as the finish (the thinnest available). He applies a bit of CA to a rag and spins the lathe at about 400 rpm. It takes more than one coat, but it's important to be fully dry between coats. Tom uses an accelerator and applies about 4 coats. He then sands out to about 8000 grit, and applies 4 more coats and again sands to 8000 or so. For acrylics etc a polish isn't applied. The barrel is sanded with increasingly fine grits to 8000 to grit. Finally, we come to pen assembly. For that you need a press (you can build your own, or buy one, again there's a lot of variety and an opportunity to spend money). Make sure you read the instructions (yes, I mentioned this earlier, but it's important. You've now sunk time into crafting the barrel(s) in addition to the cost of the kit) If things went wrong, or if some of the components were faulty there are pen dis-assembly kits available.


7 AAW Tip of the Month Using Anti-Seize Lubricant I recently rough-turned a good quantity of wet cherry. Midway through the work, when changing my chuck jaws to a larger set, I found that the screws that secure the jaws were very difficult to loosen. Moisture from the wood contributes to the screws locking in place. Another cause is the tendency to over-tighten the screws. Now, every time I switch chuck jaws, I apply an antiseize lubricant to the screws to make it easier to back them out the next time. The jaw screws came with anti-seize compound on them from the manufacturer, but the lubricant needs to be replenished over time. The lubricant is commonly available at automotive supply stores. Chucks are not the only turning equipment that need anti-seize lubricant. The screws that secure carbide cutter inserts to a tool shaft can also be difficult to loosen. Leon Olson, Minnesota
 tall, 2-3 ft (.")
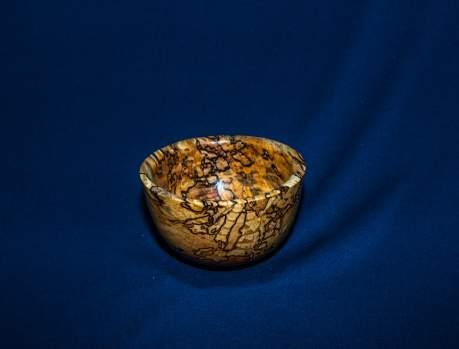
8 PEN WOOD OF THE MONTH Common Name(s): Tamarind, Spalted Tamarind Scientific Name: Tamarindus indica Distribution: Native to tropical Africa; widely planted throughout tropical regions worldwide Tree Size: ft (15-24 m) tall, 2-3 ft (.6-1 m) trunk diameter Color/Appearance: Heartwood is a deep reddish brown, sometimes with a purplish hue heartwood portions of Tamarind tend to be narrow and are usually only present in older and larger trees. The pale yellow sapwood is very wide and sharply demarcated from the heartwood. Spalting and other discoloration are very common in the sapwood, and the majority of the Tamarind available in the United States is spalted sapwood. Grain/Texture: Grain is wavy and interlocked with a medium uniform texture. Endgrain: Diffuse-porous; medium pores in no specific arrangement; solitary and radial multiples of 2-3; heartwood mineral/gum deposits occasionally present; growth rings distinct; rays faintly visible without lens; parenchyma vasicentric, aliform (lozenge), confluent, and banded (thin marginal bands). Rot Resistance: Heartwood is reported to be durable to very durable regarding decay resistance, and also resistant to insect attack. Sapwood is nondurable and prone to insect and fungal attack, as well as spalting. Workability: Because of its density and interlocked grain, Tamarind is generally considered difficult to work. Heartwood also has a pronounced blunting effect on cutting edges. Turns, glues, and finishes well the heartwood is able to take a high natural polish. Odor: No characteristic odor. A l l e r g i e s / Toxicity: Unspecified reports of toxicity have been reported for this wood


9 species. See the articles Wood Allergies and Toxicity and Wood Dust Safety for more information. Pricing/Availability: Even though older trees can attain large trunk diameters, wide boards are rare as the trunks tend to become hollow in the center. The deep reddish brown heartwood is almost never imported to the United States the sapwood is sold much more commonly under the label Spalted Tamarind. Expect prices to be high for an imported tropical hardwood. Sustainability: This wood species is not listed in the CITES Appendices or on the IUCN Red List of Threatened Species. Common Uses: Furniture, carvings, turned objects, and other small specialty wood items. Comments: Tamarind trees are best known for their fruit, not wood. Tamarind trees are widely planted throughout the tropics both for their fruit, and also as an ornamental. Related Species: None available. From the WoodDatabase Pen type is a Rollester. Pen blank was finished with 9 coats of Ca glue 4 with thin and 5 coats with Insta-Bond Pen finish from Craft supplies USA which is a medium Ca glue.


10 Tamarind (Tamarindus indica) is a leguminous tree in the family Fabaceae indigenous to tropical Africa. The genus Tamarindus is a monotypic taxon, having only a single species. The tamarind tree produces edible, pod-like fruit which is used extensively in cuisines around the world. Other uses include traditional medicine and metal polish. The wood can be used for woodworking. Because of the tamarind's many uses, cultivation has spread around the world in tropical and subtropical zones.


11 Jane Holme and Mark Palma discuss her lidded bowl which Mark mentored Jane Holme with her first bowl made with a lid Donna Maxwell with her first turned bowl John Layde with an unexpected blow out


12 Mark Palma with a Kaleidoscope pen. The blank was made with rice dyed with acrylic wood dyes and set into polyester resin Mark Palma with a Butternut case with inlace Mark Palma with two Birch bowls, one spalted and one not spalted


13 Barry Grill with dyed vases using his new technique Duane Walker with a natural edge bowl and a cup with a deer/elk head metal piece from a promotional liquor bottle being used as a stand for the cup


14 Tom Leonard comparing 2 small category pens a Credit Card pen and a Pocket/Purse pen Board of Director s Meeting March 1, 2017 Present: Duane Walker (acting President), Treasurer Keith Jones, Program Director Mark Palma, Secretary John De Ryckere, Newsletter Editor Tom Leonard, and Vice President Barry Grill Keith Jones: -Treasurer's Report: Members got to Members Only section on webpage. -AAW Insurance - Unanimous vote to pay (Keith Jones/Barry Grill) Members, 69 paid, 34 unpaid Mark Palma - UWEC Opportunity: Tabled until Rich Thelen's return - Bob Eberhardt - structured training classes after recovery from surgery - Heyde Center art show - None this year, they are renting it out for weddings instead - Chippewa Valley Art Council - Juried show, with fee, Mark has been asked to demonstrate John De Ryckere - Chainsaw Competition Learn to Turn: -- Scale back to two lathes, had difficulty filling all slots last year, also it was far too hectic -- New rules: Minimum age requirements, parents must be present -- New layout. Lathes to the side of the pen component table, no reason to walk past them unless you're at a lathe -- Signage - must be escorted past this point, safety glasses required etc -- Separate meet and greet tent, a couple members can sit in the shade and talk to guests, possibly sell pens etc for club funds.


15


16
17 Finishing your turnings By Fred Holder Finishing seems to be another one of those things that is special to the individual turner. Each of us seem to develop our own particular finish for our turnings. In the process of arriving at that finish, we may have tried nearly every commercially available finish on the market. What seems to work best for us may not work at all for the fellow down the street. I wish I could give you the magic finish that would eliminate all of your problems. I m afraid that I cannot do that, I can only give you some ideas based on the finishes that I ve used and what the results have been for me. When we talk about finishing a piece we are talking about a whole lot more than applying some lacquer from a spray can to the piece that you ve just turned. Before we get into this subject too far, I would like to establish what I consider finishing. The finishing of a turned piece involves two stages: (1) smoothing the work by scraping, sanding, burnishing with shavings, etc. and (2) sealing the smoothed surface with a product of some sort, usually a product containing oil or varnish or both. Wally Dickerman, who belongs to three of the clubs that I belong to, and who has been turning wood for 60 years, produces beautiful, thin-walled vessels that simply shine. Wally says the shine must be put on before the finishing medium or sealer is applied to the wood. He sands to 1200 or finer grits of sandpaper. Then he applies his finish. I understand that Wally may spend an entire day applying the finish to a piece he has turned, and that may be an understatement. Whatever he does it shows in the quality of the finished piece. Wally does what many of us do not do. He makes the wood as smooth as he possibly can before he begins to apply a finish to the wood. In reality, Wally finishes his wood with sandpaper and then seals in the finish. Personally, I m a bit lazy. I belong to the, I hate to sand club. I keep threatening to buy a sandblaster and start finishing my pieces with a sandblasted finish as do several of the well-known turners. Perhaps, they also belong to the I hate to sand club. For a long time, I started with about 100 or 120 grit paper and sanded down to 220 or 240 grit and then quit. (I ve moved on to 400 and sometimes 600 grits in the last couple of years.) I rubbed on some oil and let it go at that, and sometimes applied some wax over the oil. This finish never did shine. However, if the item is to be used, say as a salad bowl, it shouldn t shine. It should be treated with an oil that can be used occasionally to renew the finish by the owner. There are a number of different ideas here. Some turners recommend mineral oil. Others recommend cooking oils such as olive oil, peanut oil, etc. Some turners use linseed oil or Danish oil. I personally use peanut oil on many of my kitchen items. I ve also used a commercial mixture of nut oils called, Preserve, that I like very well. Preserve dries within
18 about 24 hours, whereas many of the other oils never really dry or they take several days to dry, which can be a pain. Any item finished with oil will need to be refreshed occasionally. You should advise your customer about the type of oil to use to refresh the piece after washing or simply after a good deal of time has gone past. Before we start applying oil, we need to finish the wood and prepare it for stage 2, application of the sealer. Making it Smooth I realize that quite a number of prominent turners these days are doing things different from making it smooth when they finish a turning. Some of them are sand blasting, stippling, grooving, etc., but for the most part, the average turner is making their work as smooth as they can. For most of us this means sanding with progressively finer sandpaper up to 240 to 600 grit and maybe a little burnishing with a hand full of shavings. Jim Hume, who belongs to some of the same clubs that I do, is an artist that creates beautiful pieces. I once ask Jim how fine of sandpaper he uses. He replied, I don t use sandpaper at all, it dulls the carving tools. Jim uses the lathe to make things round and then he finishes them by carving and hand scraping with cabinet scrapers or other means, but never uses sandpaper. It is not uncommon for him to spend 100 to 300 hours on one of his pieces. The end result shows. Again, most of us are going to use sandpaper. In his book, Turning Wood, Richard Raffan recommends sanding with hand held sandpaper from 120 grit down to 240 grit. He indicates that for most of the work that he does, work intended for use, that 240 grit is fine enough. I believe that most of the production turners; i.e., people who make a living from their turning, do not sand much below 240 grit. People aren t going to pay for pieces that you have put that extra time in to sand down to 600, 800, or 1200 grit on the general market. If you are selling in galleries, that may be a different thing, but I ve read many places that no woodturner makes a living off of his gallery sales. They are nice supplementary income, but the groceries and rent come from the production work, the salad bowls, the spurtles, the scoops, tops, and architectural pieces such as spindles, newel posts, etc. In one of his videos, Richard Raffan points out that you can sand an item in much less time with a rotary sander mounted in a drill motor that has replaceable disks with different levels of grit. I never did buy one of the kind that uses or Velcro Fastener type. My first one was a two-inch diameter unit with about a 3/4" foam backing. I ve worn out several of these and lots of sanding disks. I generally keep disks on hand from about 60 grit to 400 grit. These are available from a number of locations, but I ve found the disks from Klingspore s Sanding Catalog to be about the best available. I recently added one of Klingspore s one inch disk units and find it works much better on the inside of smaller bowls and on cleaning up the foot of a
19 bowl after you ve finish turned the foot or parted off from the waste block and are simply cleaning it up a bit without re-chucking to turn the foot. About a year ago, Vic Wood was here in Washington from Australia on a demonstration tour and I purchased one of his hand-held, self-powered rotary sanding units. This unit uses a three-inch disk and is powered by the rotation of the wood. You apply the disk to the rotating wood and it revolves with varying speeds depending upon the diameter, or perhaps I should say the surface speed,of the wood. This thing really gets up and whistles at times. For many things (outside of bowls, balls, spindle work, etc.) this system works great. It works well on the inside of larger bowls, say 10" and larger. I think this may be because a three-inch disk is too large for the inside of bowls under about 10". Anyway, the rotary sanding disk with interchangeable disk is an excellent way to go. It is quite a bit faster than hand-held sandpaper and, I believe, is less likely to leave scratches in the surface of your turning. Maybe you don t want to purchase a rotary sander unit; you would rather use flat sandpaper. Ok, here s what I do. I cut the paper into strips around 2-1/2 to 3 inches wide and fold the strips into 1/3rds. This technique, I picked up from Richard Raffan, but I believe most turners use the same idea. Paper folded this way simply works better, but it sometimes burns your fingers. I use a piece of foam rubber about 2" to 2-1/2" square as a backer between the sandpaper and my fingers. This keeps the heat away from my fingers and, I believe, does a better job on the surface of the bowl or other turned object. Others use a thin piece of soft leather as a cushion and heat insulator. This works pretty well, but I m partial to the foam. Ok, we ve selected a sanding technique--all of those described above will eventually get the wood smooth. Now what? Let s start sanding. Normally, I start sanding with the finest grit that will smooth the surface of the turning. Sometimes you start sanding and find that you can t get out all of the flaws with that grit of paper, then you go back to a coarser grit. If the wood has been exceptionally stubborn and the turned surface is not level; i.e., there are high and low areas caused by chatter, poor chisel technique, excessively heavy scraping, etc.; the sandpaper needs to be fairly coarse, 80 grit, 60 grit, or even 40 grit. You can do a lot of shaping with 40 grit sandpaper, but you can also put in some real deep and hard-to-remove scratches. If I can t sand clean quickly with 100 grit paper, I suspect that I need to go back to the turning tools if at all possible and I often do so. When turning with a skew, I generally try to start sanding with 240 grit paper to simply sand off the little ridges that I may have left with the tool. Often the surface left by a skew chisel is best burnished with a hand full of shavings and left as is. Use the piece of sandpaper of a particular grit until the surface is as smooth as that sandpaper is likely to make it and until all of the scratches made by a coarser grit have been removed. Then, move to the next finer grit. By having the sandpaper folded in thirds, you have three fresh surfaces to work with and the piece folded in
20 side has grit against the back of the out-fold and helps hold it in place. I generally like to start with 100 or 150 grit, move to about 180 grit, then 220 or 240 grit, then to 320 grit and finally to 400 grit. On some woods, I can start with 240 grit and then jump to 400 grit and then to 600 grit with excellent results. Woods such as Ironwood, Lignum vitae, Red Heart, Ziricote, Cocobolo, and other exotics or very hard woods can generally be sanded this way, starting with 240 and going to 600 grits. It really doesn t matter whether you are using hand held sandpaper or rotary sanding devices, the grit levels should be about the same. A handful of fine shavings held against the rotating surface will burnish an already smooth surface to simply make it shine. I ve also used 0000 grade steel wool to good advantage at this point. This will burnish the surface to a shine. The better the shine from sanding and polishing, the better the finished piece will look. Ok, you ve done all of the damage you can do with the sandpaper. We hope you haven t eliminated any of the details of the turning, rounded over any corners that should have remained sharp, or done any damage to the overall appearance of the piece. Remember, sanding is to make it smooth and make it look better, not to change its shape. Personally, I would rather leave it a bit rough than ruin the shape with heavy sanding. Now, it s time to seal the surface. Sealing the Surface Getting to this point varies greatly from turner to turner and going beyond here has an even greater variance. It seems that everyone has something different that he/she likes to use to seal the surface of their turnings. On the one side is a simple oil finish, applied, allowed to soak in, wiped off, and then burnished with a rag. Here, the variations are in the oil used as well as each turner s needs to try all of those nontoxic oils to come up with the one that works best for them. Oils like Tung Oil, for example, have a lot of other things in them: hardeners, varnishes, etc. I use peanut oil on many items I turn, especially if they are for use in the kitchen. I make wooden spatulas and always finish these with peanut oil, which is much cheaper than Preserve, but doesn t dry as quickly. I simply flood the surface and rub it in as much as possible. (Some production turners will have a tub of oil, such as mineral oil, and will throw the piece into the oil when it comes off of the lathe. They will let it soak for half and hour or more before wiping and lightly buffing.) I let it soak for a while and then wipe off the oil and buff it with a soft cloth. You can have a fairly shiny surface if your wood was shiny before you applied the oil. Sometimes, the oil will seem to raise the grain of the wood. When this happens, I like to cut it back with 400 or 600 grit wet/dry sandpaper with the sandpaper dipped in oil. When done sanding, wipe and buff. I also use this finish on my spinner tops. The oil brings the wood to life and is nontoxic in case the top goes into a mouth. Tops don t need a high gloss finish, because they are going to be used and abused. A gloss finish would look worse than an oiled finish in a very short time.
21 Wax Finishes I ve used a number of different waxes from straight beeswax that came from a friend who kept bees to auto paste wax. The best I ve used is a beeswax-based product called Clapham s Salad Bowl Finish. The Clapham family are Canadian bee keepers who looked for a use for their excess beeswax. They came up with a number of products, the two of most interest to woodturners or other woodworkers is their Clapham s Beeswax Polish, which I like to use as a sanding medium when I m approaching near finish sanding and I m planning to finish with wax. I apply the Clapham s Beeswax Polish and then sand. Do this the last two or three grits of sandpaper and you have an ultra smooth finish. Apply one more coat after all sanding and buff off. Then apply a coat of Clapham s Salad Bowl Finish and buff to a shine. This makes an excellent finish for salad bowls if you don t want to use oil and it will give you a much higher polish than you can ever get with just oil. These people also sell block beeswax if you wish to use pure beeswax for some purpose. French Polish In one of her videos, Bonnie Klein tells how to make up a mixture that provides a near French Polish when applied. I use this finish on all of my bottle stoppers and on small bowls. I haven t had real good luck using it on larger bowls. This finish is made up of shellac, alcohol, and linseed oil, equal parts of each. I use commercially mixed shellac, rubbing alcohol, and boiled linseed oil. Shake the bottle before applying. Apply enough to soak into the wood and then, with the lathe running, buff in the finish using the wet part of the rag. I then shift to a dry area on the rag and buff dry. I then use 400 or 600 grit wet/dry sandpaper or 0000 steel wool to lightly take off any whiskers. Then I apply the wet area of the rag again to essentially give the piece a French Polish. It works really well on small items like bottle stoppers and small bowls. The higher the polish of the wood before applying the finish, the higher the gloss after French Polishing. I read somewhere about one turner who sands his work to a high gloss and floods the surface with Red Label Hot Stuff CA Glue. He allows the glue to set naturally, no accelerator, and then sands with 400 or 600 grit or finer. Then he applies the French Polish to obtain a super high gloss finish that is impervious to water, alcohol, etc. That sounds like a rather expensive finish, but then it depends upon how much you are selling your work for or whether you are simply turning it for your own use. In either case this is a possible way to really get a fine finish. You must always remember when working with CA (super glue) that you can glue your fingers together or to something else including the workpiece or the lathe. Keep the special CA glue solvent handy, just in case. Varnish, Lacquer, and all of those Other Things I don t personally care for the painted on or sprayed on finishes, although I do occasionally use them. I ve used spray on clear Deft with some good results, but the fumes for this stuff makes it hard for my wife to breath and it stays with the piece for several days. I was always afraid that it might give a customer breathing prob

22 lems, too. We don t want any lawsuits! This caused it to be eliminated from my list of possibles. I ve used Durathane on a few pieces with some pretty fair results. The spray on kind works better for me than brush on stuff. I apply this stuff in a light coat, and sand it away with 600 grit sandpaper and 0000 steel wool the following day. Then another coat and repeat the sanding away. I do this for four or five applications over a week s time and leave the last coat as sprayed. Makes a very shiny bowl that looked like it had been dipped in clear plastic to me. But people stood in line to buy one of my pieces finished this way--a 10-inch natural edge bowl made of maple. It was sold at an art show this spring. At least six people wanted to buy it. Obviously, I priced it too low! Article printed with permission of More Woodturning Magazine Newsletter Support Program Minnesota Woodturners Association Hosts Mark St. Ledger MWA is hosting Mark St. Ledger who is a professional woodturning instructor. A full day of classes is being offered on Friday March 31 and April 2nd. Fee for either class is $105. Preregistration is required. There is an all day Demo Saturday April 1st. Demo fee is $25. This fee is waived if registered for either full day class. Pre-registration not required for Demo. All events will be held at: Houck Machine Company th Ave N Plymouth Mn Google Map Link: 9:30 start time for all events To register got to: Go to Calendar dropdown for more information on this class and class content or register. If you are unable to register online using PayPal, you can register by contacting rauge2003@gmail.com and sending a check. Class is filled by first come first served basis. To find out more about this class go to: Marks Website is: An AAW video of Mark giving a turning demo:

 working on a bowl; Mary")
 working on")
23 Coffee and Chips Saturday There was some serious turning amongst our lady members Jane Holme working on a Harry Potter type wand Priscilla Hoehn works on a spindle type project Donna Maxwell (foreground) working on a bowl; Mary Weider (background left) working on a small hollow bowl; and Bill and Colleen Zertler (background right) working on a bowl
24 COMING EVENTS Meetings are first Wednesday of the month at 7 pm. Social Hour from 6 pm to meeting time. Open House Coffee and Chips - is the second Saturday of the month from 8 am to 12 pm. Meeting Dates and Demonstrations April 5 Wayne Dubberke Embellish Your Turning with Carving May 3 Mark Palma A Fresh Look At Carbide tools June 7 John DeRyckere Natural Edge Bowl July 5 Jeff Fagan Chips and Tunes August 2 Ron Bartz Castable Acrylics September 6 Rick Bauer To Be Announced October 4 Mark Palma Embellishments November 1 Fred Steffens Musky Baits December 6 To Be Announced Open House-Coffee and Chips Dates April 8 May 13 June 10 July 8 August 12 September 9 October 14 November 11 December 9 Meetings and Coffee and Chips are held in the Eau Claire Insulation building at 2125 Starr Ave on the northeast side of Eau Claire, Wi.
25 Board of Directors for 2017 President Rich Thelen Vice President Barry Grill Treasurer Keith Jones Secretary John DeRyckere Program Director Mark Palma At Large Director Joe Nycz At Large Director Duane Walker CVWG Non Elective Officers Librarian Dennis Ciesielski Newsletter Editor Tom Leonard Web Master Jerry Engedal
Finishing your turnings By Fred Holder
 Finishing your turnings By Fred Holder Finishing seems to be another one of those things that is special to the individual turner. Each of us seem to develop our own particular finish for our turnings.
AUGUST Learn To Turn event at the U. S. Open Chainsaw Sculpture Championship kept 3 lathes very busy for many hours over 3 days IN THIS ISSUE
 AUGUST 2016 Learn To Turn event at the U. S. Open Chainsaw Sculpture Championship kept 3 lathes very busy for many hours over 3 days IN THIS ISSUE LEARN TO TURN PAGE 2 GALLERY PAGE 7 PREZ SEZ PAGE 4 SHOW
TURNING A PEN ORIGINAL BY MIKE RUDE REVISED BY GORDON PATNUDE - AUGUST 2015, OCTOBER 2016 EQUIPMENT AND SUPPLIES NEEDED
 TURNING A PEN ORIGINAL BY MIKE RUDE SEPT 2006 REVISED BY GORDON PATNUDE - AUGUST 2015, OCTOBER 2016 PHOTOGRAPHY BY JIM GOTT AUGUST 2015 EQUIPMENT AND SUPPLIES NEEDED A PEN TURNING TUTORIAL [this document]
By Larry Brown & Charles Webb
 By Larry Brown & Charles Webb Page 1 of 16 SAFETY: Wood turning can be Hazardous so you should take precautions to minimize the risk of an accident. I always wear safety glasses when turning. On large
Joe Nycz demonstrates technique for turning a small bowl and chucking types
 FEBRUARY 2016 Joe Nycz demonstrates technique for turning a small bowl and chucking types IN THIS ISSUE February Demonstration Page 2 Gallery Page 11 Turning a Tulip Page 4 Board Meeting Page 13 Show and
Legacy Slimline Touch Pen Kit
 Description: The model is considered one of the most basic pen kits and is a great starter kit for those new to pen turning. Many experienced pen turners use the kit to make elaborate and unusual pens
INSIDE THIS EDITION. Bowls for Feed My People. President s Notes and Meeting Minutes Page 2. Hyde Center Page 3. February Demo Between Centers
 Bowls for Feed My People INSIDE THIS EDITION President s Notes and Meeting Minutes Page 2 Hyde Center Page 3 February Demo Between Centers Page3 Regional Woodturning Events Page 4 President s Challenge
Legacy Magnet Pen Kit
 Description: The Magnet pen model is a variation of the Slimline pen and considered one of the most basic pen kits and is a great starter kit for those new to pen turning. Sometimes called the Refrigerator
DECEMBER New Officers Page 2. BOD Minutes Page 3. Cutting Pen Tubes Page 4. Show and Tell Page 8. Gallery Page 13.
 DECEMBER 2017 New Officers Page 2 BOD Minutes Page 3 Cutting Pen Tubes Page 4 Show and Tell Page 8 Gallery Page 13 Pen Wood Page 18 Rich Waller s demonstration of baseball bats included many ins and outs
Ron Bartz demonstrated a variety of turned handles that he uses to hold many types of metal objects from large files to hammers.
 FEBRUARY 2018 What s Inside PREZ SEZ Page 2 FEBRUARY DEMO Page 3 SHOW AND TELL / GALLERY Page 5 WOOD GRAIN FIGURES Page 12 PEN WOOD OF MONTH Page 16 MARCH DEMO BIO Page 22 Ron Bartz demonstrated a variety
Legacy Classic Twist Pencil Kit
 Legacy Pencil Kit Description: The pencil is great kit and has features to make it a step-up pen. It is slightly more difficult to make, but still very easy if you follow these instructions carefully.
Legacy Slimline Pencil Kit
 Description: The model is considered one of the most basic pen kits and is a great starter kit for those new to pen turning. Many experienced pen turners use the kit to make elaborate and unusual pens
Finishes and Finishing Techniques
 Finishes and Finishing Techniques TED 126 Spring 2007 Review pages 147-150, 284-294 Finishes and finishing techniques The finishing process to choose depends partly on the type of wood and the appearance
Legacy DaVinci Pen Kit
 Description: The DaVinci model is a single tube pen kit that uses a 3/8 tube and is a great starter kit for those new to pen turning. They are look similar to our Viceroy kit with a more intricate design.
Legacy Upgraded Junior Gentlemen s Pen Kit
 Description: The Upgraded Junior Gentlemen s model is a classic style pen which is easy to turn and uses a Roller Ball Refill which is highly desirable among pen enthusiasts The Upgraded Junior Gentlemen
ECHOES FROM THE BAT CAVE
 ECHOES FROM THE BAT CAVE Pen Turning Demo - Tom Szarek / Louis Harris Our very own Tom Szarek and Louis Harris demonstrated pen turning for the February meeting. Tom and Louis are coordinating a club service
Notes for Making Wood Rings With Stainless Steel Insert Centers
 Notes for Making Wood Rings With Stainless Steel Insert Centers Background These notes describe how to make a ring with a stainless steel (SS) insert and a wood exterior band. They also include information
Legacy Hex Pencil Kit
 Description: The Hex pencil is a step-up kit, with similar features to a Slimline Pro Pencil. It has a click mechanism instead of a twist. It uses an 3/8 tube and 2MM pencil lead. It has a heavier feel
Legacy Polaris Pen Kit
 Description: The Polaris model is a single tube pen kit that uses a 3/8 tube and is a great starter kit for those new to pen turning. They look similar to our Viceroy kit but the body tube is longer which
O nament. Birdhouse. Birdhouse Christmas ornaments have become very
 Birdhouse O nament Photo by Al Parrish Dale Nish, one of the principal architects of the turning revival, shares some turning techniques. Birdhouse Christmas ornaments have become very popular the last
Echos From the BAT. Cave. David Ellsworth. Baltimore Area Turners. Inside this issue: David Ellsworth 2 D&D Log Cradle 5 Other Stuff 6.
 Echos From the BAT Baltimore Area Turners Cave March, 2012 David Ellsworth Inside this issue: David Ellsworth 2 D&D Log Cradle 5 Other Stuff 6 2012 Officers: In March, BAT was graced with a visit by Grandmaster
wiping Varnish Wipe it on for a low-luster look or brush it on for a higher sheen
 wiping Varnish The only Finish You ll Ever Need Wipe it on for a low-luster look or brush it on for a higher sheen B Y M I C H A E L P E K O V I C H For me, the ideal finish for handmade furniture is a
Legacy Bullet Click Pen Kit
 Description: The Bullet Click pen is a step-up kit, with similar features to a Power Click Pen. It has a click mechanism instead of a twist. It uses an 8mm tube and a Parker style gel refill. It is popular
To Improve Your Woodturning
 To Improve Your Woodturning Things to make / buy / do before turning 1 Use measuring masking tape on tool rest 2 Outlet strip on lathe 3 Lighting - So many LED solutions! 4 Get taps to make lots of our
WOOD GOOD GOODWOOD.SX LUMBER PROFILE
 GOOD WOOD LUMBER PROFILE GOODWOOD.SX WHY GOOD WOOD? BEST SUITED FOR THE CARIBBEAN CLIMATE USED FOR GENERATIONS FOR THE CONSTRUCTION OF HOUSES, BOATS, FURNITURE, ETC. NATURAL RESISTANCE AGAINST TERMITES
Bullet Pen Casing. Contributed by: David Bell. This tutorial was downloaded from.
 Bullet Pen Casing Contributed by: David Bell This tutorial was downloaded from http://www.penturners.org The International Association of Penturners - 2014 This tutorial is designed around the bullet casing
Turning between centers - another way
 Turning between centers - another way There has been a fair amount of discussion of turning between centers and questions always pop up and it seems like we've never really sat down and discussed the process
March 2015 INSIDE THIS EDITION
 March 2015 Jim Jacobs gave his Taming of the Skew demonstration on Saturday March 7. There were 12 attendees for the introductory lecture period and all 12 went to the club s lathes to put the demonstration
I use turning a magic wand as the example but much of the same applies to other relatively long, thin spindles such as conductor's batons.
 HOW I TURN LONG, THIN SPINDLES John K Jordan jordanjk@gmail.com Turning long, thin spindles can be a challenge. The shaft can flex, chatter, and vibrate causing lots of problems and perhaps even breaking.
WOOD CHIPS. Northwest Indiana Woodworkers Association Volume 18, Issue 5 May President's Corner
 WOOD CHIPS Greetings Fellow Woodworkers, Northwest Indiana Woodworkers Association Volume 18, Issue 5 May 2014 President's Corner Last month members impressed us with their items made for the 2x4 Challenge.
TURNING A CANE PAGE 10 SHOW AND TELL
 JULY 2016 Club member Bob Eberhardt demonstrates the art and manufacture of knitting needles. By using various home made jigs he was able to speed up the process of making the estimated 15,000 knitting
Finger Lakes Woodturners A Chapter of The American Association of Woodturners
 Finger Lakes Woodturners A Chapter of The American Association of Woodturners Presidential Mumblings May 2017 The flowers are blooming, the birds are singing and the lathes are humming. This is a great
A candle stick addresses transferring and reproducing dimensions from a plan and breaking the project into steps.
 Activities Discussion These projects allow more skill development including making items to match a drawing, sizing projects to specific dimensions, and just trying fun stuff for the first time! A candle
Jimmy s 2 nd demonstration was what he called an African Drum style box made from Iroko with a cocobolo insert in the lid with inlaid sterling silver.
 Jimmy s 2 nd demonstration was what he called an African Drum style box made from Iroko with a cocobolo insert in the lid with inlaid sterling silver. He started by roughing out the block with a roughing
Fig2: The Sliding Glue Block from the back.
 Ornament Stand Introduction It was one of those forehead smacking moments. I was taking the #2 jaws off my Stronghold chuck, to put on my homemade wooden two jaw chuck set-up. For some reason instead of
Woodturning on Vacation When I was traveling out west, the Black Hills, Yellowstone, etc. I stopped by Sam Angelo's
 Woodturning on Vacation When I was traveling out west, the Black Hills, Yellowstone, etc. I stopped by Sam Angelo's shop in Worland, WY and had the privilege of meeting The Wyoming Woodturner. While, there,
Christmas Bell Ornament
 Christmas Bell Ornament This is an easy Christmas ornament idea I cabbaged from a friend and skilled turner, Curt Fuller, from Utah. I kind of adapted it to my style but I still got the idea from him.
THE PODIUM MUSIC STAND
 THE PODIUM MUSIC STAND 1 Set Assembly Instructions Wooden Parts: a. 1 Column b. 2 Long Slide Pieces c. 2 Slide Spacers (1 long & 1 short) d. 4 Feet e. 2 Fork Pieces f. 1 Fork Spacer g. 2 Long Desk Frame
Makin Shavins. Hard to comprehend. A Woodturning Newsletter
 1. O C T O B E R 2 0 1 6 Makin Shavins A Woodturning Newsletter Hard to comprehend. This is a piece from the recent SWAT show in WACO Texas. Just a piece from the gallery, which is free to enter and free
The Beall Wood Buff System modified and used by Eugen Schlaak
 The Beall Wood Buff System modified and used by Eugen Schlaak Many systems always existed for polishing properly sanded work produced on the wood turning lathe, but all components required to achieve good
*****Note***** Contains January 2018 Minutes February, Buckeye Woodworkers & Woodturners Newsletter February 2018
 Contains January 2018 Minutes February, 2018 NO MEMBERS OR VISITORS SHALL ENTER OR EXIT THE CAMP VIA THE CHRISTMAN ROAD EN- TRANCE. MEMBERS MUST ENTER AND EXIT FROM MT.PLEASANT ROAD. BUCKEYE WOODWORKERS
SEPTEMBER 2016 HYDE CENTER MEMBER PIECES
 SEPTEMBER 2016 HYDE CENTER MEMBER PIECES Bruce Lindholm Dennis Ciesielski Barry Grill Rich Thelen Mark Palma Fred Steffens IN THIS ISSUE PREZ SEZ PAGE 2 SHOW AND TELL PAGE 11 SEPTEMBER DEMO PAGE 3 GALLERY
Finishes for Turners Thomas Irven
 Finishes for Turners Thomas Irven - Below is a list of finishes I use most often and some of the various products upon which I use these finishes. This is, by no means, the only way to to use these various
Upcoming Events. Newsletter April 2014
 Newsletter April 2014 Table of Contents 1 Upcoming Events 1 President s Corner 4 Carbide Tool Demonstration 5 Show and Tell 6 Board of Directors Minutes 6 General Meeting Minutes 6 Classifieds 7 Miscellaneous
When: Saturday Sept. 16, Starts after a brief meeting that begins at 9:00 AM. Ends at noon (or later if necessary).
.") Hi to all, Labor Day 2017 is in the history books so summer is officially over. I don t know about y all, but my September and October calendar is full. This is going to be more of a short book than a
Hi to all, Labor Day 2017 is in the history books so summer is officially over. I don t know about y all, but my September and October calendar is full. This is going to be more of a short book than a
Preparing and Using Ground Pony Beads as a Replacement for Mineral Inlays
 Preparing and Using Ground Pony Beads as a Replacement for Mineral Inlays Background By Dave Mueller - The AggieTurner www.aggieturner.com After unsuccessfully trying to use minerals for enhancements and
Wood Turning Finishing Process. Compiled And Presented by Pete Marken For The 2018 Segmented Woodturners Symposium St Louis Missouri.
 Wood Turning Finishing Process Compiled And Presented by Pete Marken For The 2018 Segmented Woodturners Symposium St Louis Missouri. Why spend the time and effort to apply the best finish you can to a
Woodturning Fundamentals
 Woodturning Fundamentals 1 2 3 4 5 6 7 8 9 10 11 THE FINISHING SHOP One Turner s Guide to Finishing By Peter M. Smith There may be nearly as many ways to finish a turning as there are turners, since it
Turning Between Centers (Reissued 2015)
") Turning Between Centers (Reissued 2015) Contributed by: George Butcher A.K.A Texatdurango This tutorial was downloaded from http://www.penturners.org The International Association of Penturners - 2015
Turning Between Centers (Reissued 2015) Contributed by: George Butcher A.K.A Texatdurango This tutorial was downloaded from http://www.penturners.org The International Association of Penturners - 2015
Berea Hardwoods Survival Ballpoint Pen
 Berea Hardwoods Co., Inc. Pencil Instructions 18745 Sheldon Road Middleburg Heights, Ohio 44130 Toll Free 1-877-736-5487 Survival Ballpoint Pen (Berea #1602/x-xxx- x) Needed: Mandrel-A Bushing-61A Drills-
Between Turns. August Upcoming Dates. Michigan Association of Woodturners A chapter of the American Association of Woodturners
 Between Turns C O N T A C T U S : President: Tom Mogford 810-629-6176 Vice President: Bill Magee 734-981-6117 Michigan Association of Woodturners A chapter of the American Association of Woodturners V
LITTLE CRITTERS WITH CHARACTER
 LITTLE CRITTERS WITH CHARACTER Spindle Turning for FUN By Linda Ferber You will discover there are many design options that will give these critters personality. Make these in batches; I am sure you will
A Cartridge Pen Presented to the SWAT Symposium 2006 in Temple, Texas
 A Cartridge Pen Presented to the SWAT Symposium 2006 in Temple, Texas By Don Ward Thanks to Jay Pickens for teaching me how A picture of special tools used is at the end of the article. Improvised tools
Alligator Jaw Bone Pens
 Woodturning Design Project Alligator Jaw Bone Pens by Barry Gross of Arizona Silhouette While demonstrating at the Dallas-Fort Worth woodworking show this past March (2013), Don Ward introduced me to a
Makin Shavins October 1, 2015
 Makin Shavins With Capt. Eddie Castelin This edition of the monthly newsletter will cover some basic tips and hints associated with your woodturning and the tools you would normally use in your shop. I
Carved Feet Made Simple. Richard Morris
 Carved Feet Made Simple Richard Morris rlmorris3@aol.com www.richardmorrisart.com 812-989-9079 Photo 1 Leave 3/4 for the feet to be carved Photo 2 Reverse turn centering tool Would you like to add a little
The York Woodworkers Association
 The York Woodworkers Association Newsletter for February 4, 2019 Turning A Bowl From A Log Greetings all and welcome to the February 2019 club newsletter. If you have suggestions for improvements, please
West Tennessee Woodturners Newsletter
 West Tennessee Woodturners Newsletter April 2011 Volume 3 Issue 4 Inside this issue: Woodworking at local school 2 Kearns at MSWG 2 Upcoming Events 2 Additional Resources 2 Minutes from March Meeting 3
Curved Metal Segmenting
 Curved Metal Segmenting A Tutorial by: David Washburn A.K.A djwood1 This tutorial was downloaded from The International Association of Penturners Introduction As I continue to learn about pen turning,
Demonstration Bob Rosand October 20, 2007 by Bob Gunther
 Demonstration Bob Rosand October 20, 2007 by Bob Gunther Overview: Bob Rosand has been a woodturner for more than 25 years. He teaches, demonstrates and writes articles on many topics pertaining to woodturning.
MATERIALS & TOOLS REQUIRED INTRODUCTION. Before you start turning, read and understand this entire procedure.
 INTRODUCTION This set of instructions shows one method to turn mills.there are many other possible variations and techniques. NOTE: These instructions are specific to 'Chef Specialties' mechanism. For
VASE FLYING-WING A BARK-EDGED. Kevin Felderhoff. Wood selection. 36 American Woodturner August 2017
 A BARK-EDGED FLYING-WING VASE Kevin Felderhoff I enjoy turning endgrain pieces and have found that the most dramatic wood grain comes from logs or branches with irregular shapes far from round. The flying-wing
Turning Pendants with the Richard Joyner Eccentric Backer Plate
 Turning Pendants with the Richard Joyner Eccentric Backer Plate Vaughn McMillan August 2010 As the result of a great tool sharing effort by my friend Jonathan Shively at http://familywoodworking.org, I
Cape Cod Woodturners Minutes and News October 7, 2015
 Cape Cod Woodturners Minutes and News October 7, 2015 Vice president Jim Silva welcomed 23 members and guests to the meeting. End grain sealer, sandpaper, and CA glue is available from the club for purchase.
Wooden Faceplates. Tapping on the Lathe
 Wooden Faceplates There are lots of turning jobs where spending some time on set-up makes the turning go quicker and easier. Making Wooden Faceplates is one way to make set-ups and jigs for turning. As
Building the Bell Tower
 Building the Bell Tower Mold #55 does not contain all of the blocks to build this tower. You will need extra regular blocks (1/2" x 1/2" x 1") and square blocks (1/2" x 1/2" x 1/2"). These blocks can be
Making a snap lid box By Jeffrey A Lavine
 Making a snap lid box By Jeffrey A Lavine Some call them boxes, some call them lidded bowls, others call them vessels or containers but whatever you call them they are both enjoyable and a challenge to
Wood Lathe Safety Rules
 Wood Lathe Safety Rules A wood lathe is used to produce round objects like spindles and bowls. The work to be turned is usually mounted on the lathe between the headstock (drive) spindle and the tailstock.
OFFSET TURNINGS. By using an eccentric chuck, SHOPMADE CHUCK BUILD A FOR. David Mueller FEATURE. Build the chuck body
 FEATURE BUILD A SHOPMADE CHUCK FOR OFFSET TURNINGS David Mueller By using an eccentric chuck, you can add interest to turnings such as pendants and box lids. The workpiece is mounted out of alignment with
Hey, check out this tutorial on Window Casing Pens!
 Hey, check out this tutorial on Window Casing Pens! My good buddy Mr. Natural assumes that you already know the basics for making a casing pen so things like drilling and seating bullets won't be covered.
Newsletter August 2013
 Newsletter August 2013 Table of Contents Upcoming Events...1 President's Corner...2 Show and Tell...4 Monthly Demo...6 Board of Directors Minutes...8 General Meeting Minutes...10 Classified Ads... 11 Board
Basic Box Making by Alan Hewitt
 Whilst it is possible to make boxes in many different ways I will introduce you to my method of box making. I am indebted to many of the top wood-turners for their demonstrations of box making, and the
Turning a Christmas Angel
 Turning a Christmas Angel Introduction I was at work one day and a co-worker asked if I had ever turned an angel. I said no. She said I picked one up at craft fair while on vacation. Would you like to
How I Made My Aluminum Slim Line Pen
 - 1 - How I Made My Aluminum Slim Line Pen Written by Joe Agrella http://www.joespens.com - 2 - Getting Started First and formost remember safety. Remember that you will need eye protection and plenty
Shoulder Plane. dovetailed. fine tools. Make an heirloom tool and learn the secret to creating double dovetails in metal it s easier than you think.
 fine tools dovetailed Shoulder Plane Make an heirloom tool and learn the secret to creating double dovetails in metal it s easier than you think. I ve always been fascinated by old, metal hand planes.
ECHOES FROM THE BAT CAVE
 ECHOES FROM THE BAT CAVE Bowl From a Board - Joe Kramer March 2019 Joe Kramer, from Chesapeake Woodturners was our demonstrator for March. Joe presented his techniques for creating a bowl from a board,
Newsletter April 2012
 Newsletter April 2012 Contents Up Coming Events 1 Presidents Corner 2 Show and Tell 3,4 Monthly Demo 5 Secretary's Report 6,7,8 Classified Ads 9,10 Board Members 10 Mentors 11 Up Coming Events April 18
From "American Woodturner" the Journal of the American Association of Woodturners, April 2015, vol 30, no 2 - CUSTOM - TOOL HANDLES
 From "American Woodturner" the Journal of the American Association of Woodturners, April 2015, vol 30, no 2 - CUSTOM - TOOL HANDLES Carl Ford I have found most commercially available tool handles uncomfortable
Goblet. Two-Part. About a year ago, we were invited. Toast your woodturning skills By Bob Rosand
 Two-Part Goblet Toast your woodturning skills By Bob Rosand About a year ago, we were invited to attend the bat mitzvah of a friend s daughter. Unfortunately, we were unable to attend because of prior
Under the Bark Where the good stuff is, peel it back or use it as an accent.
 Under the Bark Where the good stuff is, peel it back or use it as an accent. Newsletter for June, 2015 Club officers for 2015 President: Vice President: Secretary: Treasurer: Susan McCoy Brian Malnar Kevin
Between Turns. May Stump The Pro... Upcoming Dates. Michigan Association of Woodturners A chapter of the American Association of Woodturners
 Between Turns C O N T A C T U S : President: Michigan Association of Woodturners A chapter of the American Association of Woodturners Tom Mogford 810-629-6176 Vice President: V O L U M E 2 2, I S S U E
Turning a CrushGrind shaft grinder without using glue
 Turning a CrushGrind shaft grinder without using glue A step-by-step approach to removing the apprehension 1 Chris West Content Introduction 3 Robert Sorby CrushGrind Recess Cutting Tool 4 Required tools
Turning Penguin and Chick Ornaments
 Turning Penguin and Chick Ornaments INTRODUCTION I was looking for a way to use turning, power carving and painting to make a Christmas Ornament. Penguins have become popularized by television, movies
Pen Turning 101 Turning a beautiful writing implement is as easy as
 Pen Turning 101 Turning a beautiful writing implement is as easy as 1-2-3. By Joe Hurst-Wajszczuk Getting started As the igure at right illustrates, pen turning boils down to turning a cylinder. The body,
Between Turns. September Upcoming Dates. Michigan Association of Woodturners A chapter of the American Association of Woodturners
 Between Turns C O N T A C T U S : President: Tom Mogford 810-629-6176 Vice President: Bill Magee 734-981-6117 Michigan Association of Woodturners A chapter of the American Association of Woodturners V
First Activity - Getting acquainted with the lathe
 First Activity - Getting acquainted with the lathe Goals and objectives: Set up for spindle turning Practice basic tool cuts o Roughing out o Smoothing o Beads & Coves o Parting & sizing Process: Mount
National Certificate in Woodturning
 National Certificate in Woodturning The National Association of Woodworkers offers the Certificate in Woodturning as a high quality, nation-wide, woodturner training programme. This programme was developed
*****Note***** Contains March 2018 Minutes April, Buckeye Woodworkers & Woodturners Newsletter April 2018
 Contains March 2018 Minutes April, 2018 NO MEMBERS OR VISITORS SHALL ENTER OR EXIT THE CAMP VIA THE CHRISTMAN ROAD EN- TRANCE. MEMBERS MUST ENTER AND EXIT FROM MT.PLEASANT ROAD. BUCKEYE WOODWORKERS AND
Making a Peppermill ( a boring activity) By Mike Lanahan
 By Mike Lanahan") Making a Peppermill ( a boring activity) By Mike Lanahan Ground Rules No need for note taking A Portable Document Format (pdf) copy of this presentation is available. Ask questions. It s your time. There
Making a Peppermill ( a boring activity) By Mike Lanahan Ground Rules No need for note taking A Portable Document Format (pdf) copy of this presentation is available. Ask questions. It s your time. There
HORNSBY DISTRICT WOODTURNERS INC. Established 1983
 HORNSBY DISTRICT WOODTURNERS INC. Established 1983 NEWSLETTER SEPTEMBER 2016 September started with John Ewart demonstrating at our first mid week (Thursday) demonstration, well attended and enjoyed by
Newsletter June Notices. Upcoming Events
 Newsletter June 2013 Table of Contents ...1 Upcoming Events...1 President's Corner...2 Show and Tell...3 Monthly Demo...4 Board of Directors Meeting Minutes...5 General Meeting Minutes...6
4-H Model Building. Monroe County. Grades 3-12
 4-H Model Building Monroe County Grades 3-12 PURPOSE Positive development of our young people through the stimulation of their personal interest and natural skills through the assembly, techniques of construction,
Building an Unfeathered Paddle with a Wood Shaft and Carbon Fiber Blades
 Building an Unfeathered Paddle with a Wood Shaft and Carbon Fiber Blades by Duane Strosaker Choosing the Wood Two 3/4" pieces of Sitka spruce laminated with epoxy for an unfeathered one-piece paddle. For
Denise M. DeRose Handled Clamshell Handbag
 Denise M. DeRose Handled Clamshell Handbag Materials: Wood 2 discs between 6 and 9 in diameter -- 4/4, 6/4 or 8/4 1 piece of thin hardwood ¼ inch thick and 4 x 10 Wood for waste blocks Supplies Small piece
Coloring Wood Using the Don Derry Method and Other Coloring Considerations By Joe Fleming
 My approach to coloring wood is based upon my belief that deliberately adding color is an exciting way for me to express my artistic thoughts. To think about color, however, really starts with the color
Block Sanding Primer Dos and Don ts Transcript
 Block Sanding Primer Dos and Don ts Transcript Hey, this is Donnie Smith. And welcome to this lesson on block sanding primer. In this lesson, we're going to give you some of the do's and some of the don
Clock 35 - Toyland. Construction instructions for Clock 35
 This clock has been designed for children, it is a stand-alone unit and can be positioned on a shelf or cabinet out of the reach of very young hands who may be tempted to touch. The clock is shown in two
JUNE What s Inside. PREZ SAYS Page 2. JUNE DEMO Page 3. SHOW AND TELL Page 9. PEN WOOD OF MONTH Page 16. TURNING BETWEEN CENTERS Page 20
 JUNE 2018 What s Inside PREZ SAYS Page 2 JUNE DEMO Page 3 SHOW AND TELL Page 9 PEN WOOD OF MONTH Page 16 TURNING BETWEEN CENTERS Page 20 GRAIN PATERNS - BURLS Page 22 Tom Leonard demonstrates closed end
March 2, 2018 Demo. Nick Agar. Turning a Lidded Bowl with Finial. Join us at the Bemis School of Art
 March 2018 March 2, 2018 Demo Nick Agar Turning a Lidded Bowl with Finial Join us at the Bemis School of Art PPW dues are $30/year. Dues are used for guest demonstrators, purchase and maintain club equipment,
ALAN CARTER STUDIO 5332 RIVERVIEW DR., LISLE, IL
 ALAN CARTER STUDIO 5332 RIVERVIEW DR., LISLE, IL 60532 630-971-0690 apcarter@sbcglobal.net www.alancarterstudio.com SPLITTING THE DIFFERENCE This is for all you slackers out there. Sometimes half measures