Turning Penguin and Chick Ornaments
|
|
|
- Della Hall
- 5 years ago
- Views:
Transcription
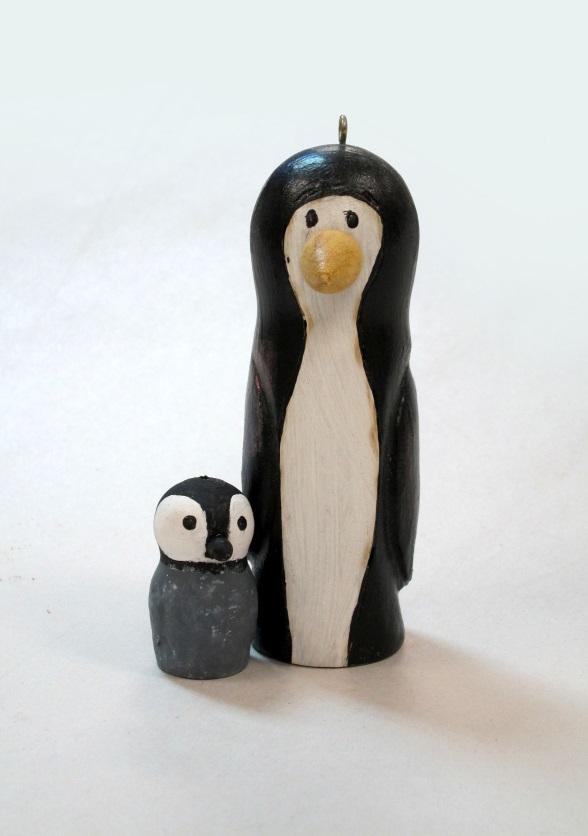
1 Turning Penguin and Chick Ornaments INTRODUCTION I was looking for a way to use turning, power carving and painting to make a Christmas Ornament. Penguins have become popularized by television, movies and children s books. I believe I can incorporate all three of my skills and design a turned penguin ornament. Design Consideration Since this is an ornament it needs to be light in weight. The shape and size and markings of the head give each ornament its different look. The contrasting white and black colors make visibility on a Christmas tree work well. There are at least 17 different species of penguins in nature. There is a lot of poetic license when it comes to recognizing a penguin. The ornament in this handout is my penguin ornament design. Turning the Penguin Body 1. First, place a 1 ½ x 1 ½ x 6 blank between centers and turn it to a cylinder. Then turn a tenon on one end for chucking (figure 1). 1
2 figure 1 figure 2 2. The next step is to chuck up the cylinder and turn a 2 ½ long flattened oval. To do this use a 3/8 spindle gouge. This will be the penguin s body.the flat end of the oval should be at the tail stock end. The diameter of this flattened end should be 1 ¼ (figure 2). 3. Next turn a shallow cove at the other end of the 2 ½ oval and another smaller oval. This second oval will be 1 ¼ in length. Now there is a large oval, a cove and a small oval. 4. Leave the small oval attached to the blank (figure 3). 2


3 figure 3 figure 4 Hollowing the Penguin Body 1. Hollow the body with the large oval from the tailstock end. To establish the depth for hollowing, place a drill chuck in the tailstock and drill a 7/8 hole with a Fostner bit into the oval to a depth approximately 3 from the bottom of the oval (figure 4). After drilling, hollow the large oval. I like to use the toe of a 1/4 round skew with the tool rest just above center and placed as close as possible without hitting the edge of the oval. I usually leave the wall thickness about 1/8. It is okay to be thicker at the opening when hollowing as this is an ornament and you want it to hang down (figure 5). 3

4 figure 5 figure 6 2. Next hollow the small oval. The small oval will be the penguin s head. Plugging the Bottom of the Penguin: In order to plug the hole in the bottom of the penguin two things will need to be done; one, there needs to be a lip for the plug to sit on, and there needs to be a plug to fit the hole. 1. First turn a small step on the edge of the hole about 1/8 deep and 1/16 wide. This 1/16 step will serve as a lip for the plug to sit on (figure 5). 2. Now sand the exterior of the ornament to 220 grit. 3. Once finished sanding, part the penguin s body off from the blank maintaining the curve of the oval head. 4. Hand sand the top of the penguin s head where it was parted off (figure 6). 4

5 5. Next, turn a thin plug to fit the hole in the bottom of the penguin s body approximately 1 in diameter by 1/8 thick (figure 7). figure 7 figure 8 6. Turn the lathe off and check to see if the plug will fit the hole at the bottom of the penguin. Once the plug fits to satisfaction, part it off and glue it in place with CA glue (figure 8). 5
 2.")
6 7. Now there is a penguin body that is 3 ¾ tall (figure 9). Turning the beak Figure 9 1. After the plug dries, drill a 1/8 hole about one fourth of the way up from the bottom of the small oval for the penguin s beak. ( See Paint Scheme on page 8.) 2. Place a 1/2 square 3 long piece of Chakta vega or Yellow Heart between centers and turn a cylinder with a tenon on one end (figure 10). 3. Now turn a small tenon about 1/8 in diameter and ¼ long (figure 11). 4. Next, turn a cone about 1/2 long by 1/2 diameter at the base/tenon end (figure 12). figure 10 figure 11 figure 12 6
7 This cone will be the penguin s beak. At the base of the cone I undercut to give the beak a close fit on the penguin s curved face. Before parting the beak off, check the fit on the penguin s drilled hole. If the beak tenon fits the 1/8 hole on the penguin s head, part it off from the blank (figure 13). I like to finish the beak with a quick spray of lacquer. Once the lacquered beak is dry set it aside. The beak should not be glued into place until the body has been painted. figure 13 Painting the Penguin 1. Next draw a line defining the black part of the penguin s body. This is done by drawing a line that divides the penguin s body into one third and two thirds vertical sections. Start the line at the base or foot area and draw up the body along the cove shaped neck and up and over the face back down to the feet. Try and draw the lines evenly apart on either side of the penguin s body. It is a good idea to practice this on some scrap. I like to wood burn the body line which makes it easier to paint. 7

8 2. Then, paint the entire penguin with white gesso. At this point you may decide to carve the flippers or wings. I carve the wings by penciling in the shape of the wings and using these lines for my carving. Once the carving is done gesso the carved areas. 3. After the gesso has dried, paint the black part of the body with acrylic paints. 4. Glue the beak into place with CA glue. Paint Scheme Painting the Penguin s Eyes 1. Now is the best time to place the eyes on the penguin. Hold the penguin body in your hand. Using a hard lead pencil draw two small circles about 1/4 above the beak and about 1/2 apart. These circle marks will be where you place the eyes. If the eyes are not where you want them erase them and draw the small circles where you want them. A fabric texturing pen will give the eyes a shiny appearance. I like to use the smallest tip black fabric texturing pen for the eyes. It is a good idea to practice painting small eyes before attempting to paint the penguin. Once the eyes have dried the penguin ornament is complete. 8
9 Turning a Penguin Chick Ornament If you would like to turn a chick for your penguin ornament the steps are essentially the same as the adult using a smaller blank and dimensions. The blank will be 1 X1 X4 of hardwood. You will need to use small blank of Ebony or turn a piece of hardwood that will be painted black to make the chick s beak. Turning the Penguin Chick Body 1. First, place a 1 x 1 x 4 blank between centers and turn it to a cylinder. Then from the tailstock end of the blank measure and mark 1 and 1 ¾. Next turn a tenon on one end for chucking (figure 1). figure 1 figure 2 The next step is to chuck up the cylinder and turn a 1 long oval. To do this use a 3/8 spindle gouge. This will be the penguin chick s body (figure 2).The flat end of the oval should be at the tail stock end. The diameter of this flattened end should be 3/4. 9
. 6. Leave the small oval attached to the blank (figure 3). Hollowing the Penguin Chick Body figure 3 figure 4 1.")
10 5. Next turn a shallow cove at the other end of the 1 oval and another smaller oval. This second oval will be 3/4 in length and 3/4 in diameter. Now there is a large oval, a cove and a small oval (see above drawing). 6. Leave the small oval attached to the blank (figure 3). Hollowing the Penguin Chick Body figure 3 figure 4 1. Hollow the body, the large oval, from the tailstock end. To accomplish this place a drill chuck in the tailstock and drill a 1/2 hole with a Forstner bit into the oval to a depth approximately 3/4 from the bottom. (figures 4). 10
.")
11 figure 5 figure 6 Plugging the Bottom of the Penguin Chick: In order to plug the hole in the bottom of the penguin two things will need to be done; one, there needs to be a lip for the plug to sit on, and there needs to be a plug to fit the hole. 1. First turn a small step on the edge of the hole about 1/8 deep and 1/16 wide. This 1/16 step will serve as a lip for the plug to sit on (figure 5). 2. Now sand the exterior of the chick ornament to 220 grit. 3. Once finished sanding, part the penguin chick s body off from the blank maintaining the curve of the oval head. 4. Hand sand the top of the chick s head where it was parted off (figure 6). 5. Next, turn a thin plug to fit the hole in the bottom of the penguin s body approximately 5/8 in diameter by 1/8 thick (figure 7). 11
. 7. Now you have a penguin chick body that is 1 3/4 tall.")
12 figure 7 figure 8 6. Turn the lathe off and check to see if the plug will fit the hole at the bottom of the penguin chick. Once the plug fits to satisfaction, part it off and glue it in place with CA glue (figure 8). 7. Now you have a penguin chick body that is 1 3/4 tall. Turning the beak for the chick The beak can be turned from a piece of hardwood and then painted black or a small Ebony blank can be used. The beak is very small in diameter and length. 1. After the plug dries, drill a 1/8 hole about one fourth of the way up from the bottom of the small oval for the penguin s beak. (See Paint Scheme on page 14.) 2. Place a 1/4 square 2 ½ long piece of ebony or any other hard wood between centers and turn a cylinder. The photos and drawings of the chick s beak are of a Yellowheart blank for visual effect. 3. Now turn a small tenon about 1/8 in diameter and ¼ long (figure 9). 4. Next, turn a cone about 1/8 long by 1/8 diameter at the base/tenon end (figure 10). 12
13 figure 9 figure 10 figure 11 Beak blank Chick s Beak Turned Beak This cone will be the penguin chick s beak. At the base of the cone I undercut to give the beak a close fit on the penguin s curved face. Before parting the beak off, check the fit on the penguin s drilled hole. If the beak tenon fits the 1/8 hole on the penguin chick s head, part it off from the blank (figure 11). I like to finish the beak with a quick spray of lacquer. Once the lacquered beak is dry set it aside. The beak should not be glued into place until the body has been painted. 13
 1-½ X ½ X 3 piece of Argentine Osage Orange or Chakte viga 1-1/4 X 1/4 X 3 piece of Ebony, Blackwood or hardwood that will be painted black 1-1 X 1 X 4 piece of wood scrap (maple, poplar etc.")
14 Penguin Chick Painting Scheme Wood needed for a Penguin ornament: 1-1 ½ X 1 ½ X 6 piece of wood scrap (maple, poplar etc.) 1-½ X ½ X 3 piece of Argentine Osage Orange or Chakte viga 1-1/4 X 1/4 X 3 piece of Ebony, Blackwood or hardwood that will be painted black 1-1 X 1 X 4 piece of wood scrap (maple, poplar etc.) Tools needed for turning: Roughing gouge 3/8 or 1/2 spindle gouge Parting tool ¼ Round skew or set of 1/4 hollowing tools Skew or 3/8 beading parting tool Chuck with #1 and #2 jaws Sandpaper up to 320 grit Calipers Drill chuck 1/8 drill bit 7/8 Forstner drill bit 1/2 Forstner drill bit Ruler Things needed for decorating: Pencil Small water base Paint brushes White gesso Acrylic paints Clear Gloss acrylic finish (Minwax Polycrylic or other brand) Thin CA glue 14


15 Gallery of Penguin Ornaments: 15
Turning a Christmas Angel
 Turning a Christmas Angel Introduction I was at work one day and a co-worker asked if I had ever turned an angel. I said no. She said I picked one up at craft fair while on vacation. Would you like to
A candle stick addresses transferring and reproducing dimensions from a plan and breaking the project into steps.
 Activities Discussion These projects allow more skill development including making items to match a drawing, sizing projects to specific dimensions, and just trying fun stuff for the first time! A candle
ALAN CARTER STUDIO 7 Cane Creek Circle, Fairview, NC
 ALAN CARTER STUDIO 7 Cane Creek Circle, Fairview, NC 28730 630-390-8821 apcarter@sbcglobal.net www.alancarterstudio.com TURNING SMALL GOBLETS As a follow up to my thin stem article, here s a how-to on
O nament. Birdhouse. Birdhouse Christmas ornaments have become very
 Birdhouse O nament Photo by Al Parrish Dale Nish, one of the principal architects of the turning revival, shares some turning techniques. Birdhouse Christmas ornaments have become very popular the last
Demonstration Bob Rosand October 20, 2007 by Bob Gunther
 Demonstration Bob Rosand October 20, 2007 by Bob Gunther Overview: Bob Rosand has been a woodturner for more than 25 years. He teaches, demonstrates and writes articles on many topics pertaining to woodturning.
MATERIALS & TOOLS REQUIRED INTRODUCTION. Before you start turning, read and understand this entire procedure.
 INTRODUCTION This set of instructions shows one method to turn mills.there are many other possible variations and techniques. NOTE: These instructions are specific to 'Chef Specialties' mechanism. For
Turning An Acorn Birdhouse
 Frank B. Penta Turning An Acorn Birdhouse Overview An acorn birdhouse makes an attractive table or Christmas tree ornament. It can be turned from oak or a variety of contrasting woods and enhanced by gluing
Denise M. DeRose Handled Clamshell Handbag
 Denise M. DeRose Handled Clamshell Handbag Materials: Wood 2 discs between 6 and 9 in diameter -- 4/4, 6/4 or 8/4 1 piece of thin hardwood ¼ inch thick and 4 x 10 Wood for waste blocks Supplies Small piece
How to Make a Hat Bending Jig
 How to Make a Hat Bending Jig MATERIALS One 2" x 8" x 11" long (Base Block) exact measurements are 7 ½" x 1 ½" x 11" (Pine is OK to use, I have used scrap Walnut for my benders) Four pieces of Oak 1" x
Boxes & Hollow Vessels
 Boxes & Hollow Vessels Course number 95744046 Mt. Diablo Adult Education A division of the Mt. Diablo Unified School District Serving Life Long Learning One Santa Barbara Road, Pleasant Hill, CA 94523
Making a snap lid box By Jeffrey A Lavine
 Making a snap lid box By Jeffrey A Lavine Some call them boxes, some call them lidded bowls, others call them vessels or containers but whatever you call them they are both enjoyable and a challenge to
Notes for Making Wood Rings With Stainless Steel Insert Centers
 Notes for Making Wood Rings With Stainless Steel Insert Centers Background These notes describe how to make a ring with a stainless steel (SS) insert and a wood exterior band. They also include information
The finished ornaments.
 Introduction I like to make different Christmas Ornaments every year to give to my relatives. This article describes the rnaments that I m making this year. The ornaments use a split turning of either
Fig2: The Sliding Glue Block from the back.
 Ornament Stand Introduction It was one of those forehead smacking moments. I was taking the #2 jaws off my Stronghold chuck, to put on my homemade wooden two jaw chuck set-up. For some reason instead of
OFFSET TURNINGS. By using an eccentric chuck, SHOPMADE CHUCK BUILD A FOR. David Mueller FEATURE. Build the chuck body
 FEATURE BUILD A SHOPMADE CHUCK FOR OFFSET TURNINGS David Mueller By using an eccentric chuck, you can add interest to turnings such as pendants and box lids. The workpiece is mounted out of alignment with
Domed Cove Box. Materials: Dry stable hardwood, straight grained with pronounced end grain, about 3+ square and 3+ long Sandpaper Finish of choice
 Domed Cove Box Michael G. Stafford I don t know who first turned a box where the sides were curved in to form a waist or as we like to say in woodturning, coved. I started gradually turning boxes with
My favorite turnings are TURNING A FIVE-SIDED BOX. Design brings regular polygons to life. Ted Rasmussen. Prepare the stock
 TURNING A FIVE-SIDED BOX Design brings regular polygons to life Ted Rasmussen Polygonal lidded boxes by Ted Rasmussen with five, seven, and nine sides; ambrosia maple with African blackwood finials. Largest
First Activity - Getting acquainted with the lathe
 First Activity - Getting acquainted with the lathe Goals and objectives: Set up for spindle turning Practice basic tool cuts o Roughing out o Smoothing o Beads & Coves o Parting & sizing Process: Mount
Making these amazing small toys. Eugen Schlaak
 Making these amazing small toys By Eugen Schlaak These are the most common tools and materials I use for producing TippyTops This of course is my suggestion and other variations are possible. 1) Wood Balls
Jimmy s 2 nd demonstration was what he called an African Drum style box made from Iroko with a cocobolo insert in the lid with inlaid sterling silver.
 Jimmy s 2 nd demonstration was what he called an African Drum style box made from Iroko with a cocobolo insert in the lid with inlaid sterling silver. He started by roughing out the block with a roughing
From "American Woodturner" the Journal of the American Association of Woodturners, April 2015, vol 30, no 2 - CUSTOM - TOOL HANDLES
 From "American Woodturner" the Journal of the American Association of Woodturners, April 2015, vol 30, no 2 - CUSTOM - TOOL HANDLES Carl Ford I have found most commercially available tool handles uncomfortable
First Activity - Getting acquainted with the lathe
 First Activity - Getting acquainted with the lathe Goals and objectives: Set up for spindle turning Practice basic tool cuts o Roughing out o Smoothing o Beads & Coves o Parting & sizing Process: Mount
Design Considerations
 Alan N. Leland Miniature Stool Design Considerations The seat of the stool is the most visible part of the stool therefore; using a figured wood will enhance the overall appeal of the finished stool. The
[Fig1: Cutting PVC pipe into 2-1/2 sections. The PVC is clamped to the miter gauge to keep the pipe from rotating into the blade]
![[Fig1: Cutting PVC pipe into 2-1/2 sections. The PVC is clamped to the miter gauge to keep the pipe from rotating into the blade]](/thumbs/81/83706824.jpg "[Fig1: Cutting PVC pipe into 2-1/2 sections. The PVC is clamped to the miter gauge to keep the pipe from rotating into the blade]") Inside/Outside Angel Ornament Introduction Inside/Outside turning is a technique where four square pieces of wood are held together temporarily and turned, then the pieces are rotated 180 and glued, then
Inside/Outside Angel Ornament Introduction Inside/Outside turning is a technique where four square pieces of wood are held together temporarily and turned, then the pieces are rotated 180 and glued, then
Cape Cod Woodturners Minutes and News October 7, 2015
 Cape Cod Woodturners Minutes and News October 7, 2015 Vice president Jim Silva welcomed 23 members and guests to the meeting. End grain sealer, sandpaper, and CA glue is available from the club for purchase.
WEST ISLAND WOODTURNERS
 WEST ISLAND WOODTURNERS March 25th 2014 DEMO Laminated Salt & Pepper Shakers 4130 Papineau Trois-Rivières, Qc G8Y 1P5 819 374-1404 www.davepott.com Cut blank on saw set at 2.1 wide X 2.1 high X 5.1
The Simple Birdhouse Ornament
 The Simple Birdhouse Ornament There are a number of techniques for constructing birdhouse Christmas ornaments and the resulting ornaments vary from simple to very ornate and complicated. It has been my
Face Once you've tapped the hole, cut the circles out on your band saw.
 Introduction An earlier article in More Woodturning on turning wine stoppers got me thinking about collet chucks. I wondered if I could make one entirely out of wood. I thought this would be just an exercise
1. Mount between centers round cut tenons on both ends (same diameter).
.") LONG NECK HOLLOWFORM Jim Terry Piedmont Triad Woodturners Association Turning this hollow form presents some interesting challenges in mounting and holding a turning. Both top and bottom are completely
LONG NECK HOLLOWFORM Jim Terry Piedmont Triad Woodturners Association Turning this hollow form presents some interesting challenges in mounting and holding a turning. Both top and bottom are completely
First Turning. Scoop Ornament
 Scoop Ornament Introduction Hollowing a Christmas Ornament isn't really all that hard or time consuming, but I find myself tying to figure out ways to avoid it anyway. Sometimes the way I pick to avoid
Malcolm Zander malcolmzander.com Ottawa, Ontario Canada
 Malcolm Zander mzander@magma.ca malcolmzander.com 613-226-5041 Ottawa, Ontario Canada I began turning in 2000. Obviously I have a lace fetish. This I blame on Binh Pho, whose seminar in Albany I attended
Main Photo: Completed Holly and Acrylic Warbling Whistles.
 Warbling Whistle Design Inspiration One of the variations I considered (but didn t complete) when designing the Whistling top (published in the August 2016 issue of More Woodturning) was to try and use
The following is the process of preparing the making the wedge ornament
 Wedge Christmas Ornament The following is the process of preparing the making the wedge ornament Setting up your saw to cut true 11.25 degree angles for a 16 piece to make a circle that will form the globe
MUSKY. The musky is a very dramatic fish. It will follow a. Power Carving a
 Power Carving a MUSKY Make a life-size version of this freshwater fish, or scale it down to fit your décor By Charles Weiss The musky is a very dramatic fish. It will follow a lure retrieved to the boat
Turning a Duck by Fred Holder
 Turning a Duck by Fred Holder Back in 2004, Guilo Marcolongo, a turner from Australia, demonstrated how to turn a Daffy Duck at the Utah Symposium. I decided to try one. Here s my process, with some photos
Cut two squares of 1/2 to 3/4 stock that are the exact size of your coaster blanks. Stacking Coasters
 Stacking Coasters Main: Maple and Corian nested stacking coasters. Introduction My wife asked for more coasters. We have a nice quartet of square glass ones I had gotten at the ACC Craft Fair years ago,
Two-Piece Hollow Form Turning Hollowing Without the Hassle
 Two-Piece Hollow Form Turning Hollowing Without the Hassle Finger Lakes Woodturners January 17, 2013 1 Hollow Turning Usually turning a closed or semi-closed form through a small opening Can be done using
Turning a CrushGrind shaft grinder without using glue
 Turning a CrushGrind shaft grinder without using glue A step-by-step approach to removing the apprehension 1 Chris West Content Introduction 3 Robert Sorby CrushGrind Recess Cutting Tool 4 Required tools
Shopsmith Woodworking Academy Notes
 Shopsmith Woodworking Academy Notes The Ins And Outs Of Using Woodturning Chisels We re often asked... What lathe chisels do I need to get started in wood turning and how is each used? Well, the answer
Basic Box Making by Alan Hewitt
 Whilst it is possible to make boxes in many different ways I will introduce you to my method of box making. I am indebted to many of the top wood-turners for their demonstrations of box making, and the
Wooden Faceplates. Tapping on the Lathe
 Wooden Faceplates There are lots of turning jobs where spending some time on set-up makes the turning go quicker and easier. Making Wooden Faceplates is one way to make set-ups and jigs for turning. As
Goals and objectives: Process: Set up for spindle turning Practice basic tool cuts o Roughing out o Smoothing o Beads & Coves o Parting & sizing
 First Activities Getting acquainted with the lathe Goals and objectives: Set up for spindle turning Practice basic tool cuts o Roughing out o Smoothing o Beads & Coves o Parting & sizing Process: Mount
Instructions for Turning Laminated Bracelets
 Instructions for Turning Laminated Bracelets 1. Start with Design 1. Make a paper template circle for the bracelet. Use this to check the fit on the person you are making the bracelet for. After checking
TURNING A NATURAL EDGE BOWL
 TURNING A NATURAL EDGE BOWL by Jim Burrowes Make sure your lathe is at the lowest speed setting.first, mount your blank between centers. Use the tool rest as a reference to align the top (bark side) so
Turning an End Grain Lidded Box
 Turning an End Grain Lidded Box by Michael Stafford Copyright 2006 All Rights Reserved 1 Turning an End Grain Lidded Box Turning an end grain lidded box differs from face grain bowl turning primarily in
Mark St. Leger CMW Demonstration: February 21, 2009 By Bob Gunther Photographs by Bob Cole, Bob Heltman
 Mark St. Leger CMW Demonstration: February 21, 2009 By Bob Gunther Photographs by Bob Cole, Bob Heltman Overview: Mark lives in the mountains of Southwest Virginia. His interest in woodturning began when
Place the box again into the chuck. Align with the tailstock, using the previously drilled hole to assure the box turns true.
 THREE WINGED VESSELS Part A Probably the hardest part of three winged bowls is getting a perfect cube. Once you have that mastered, the rest is fairly simple and straight forward. Mount opposite corners
Caution: Always use safety glasses or a full face shield when turning anything on a lathe.
 May 26, 2009 Making a 6 Peppermill Page 1 Acknowledgment is given to Jackie Johnson from Nashville, TN for providing the original instructions and method for this article. The design of this mill can be
Heirloom. Pat and Karen Miller
 TURNING AND DECORATING AN Heirloom Ornament Pat and Karen Miller Our local AAW chapter sells turned pieces at a holiday craft bazaar, which helps our treasury. Ornaments are always a big seller. They are
Introduction. Recess. Making the Recess
 Introduction A few weeks after last Christmas I got an idea for an ornament. That may seem to be backwards timing as before Christmas would have advantages. But Christmas is when I think about ornaments
ALAN CARTER STUDIO 5332 RIVERVIEW DR., LISLE, IL
 ALAN CARTER STUDIO 5332 RIVERVIEW DR., LISLE, IL 60532 630-971-0690 apcarter@sbcglobal.net www.alancarterstudio.com SPLITTING THE DIFFERENCE This is for all you slackers out there. Sometimes half measures
Michael Werner July 19, 2008 Demonstration By Bob Gunther Photographs by Tina Collison and Dave Vizard
 Michael Werner July 19, 2008 Demonstration By Bob Gunther Photographs by Tina Collison and Dave Vizard Overview: Michael Werner was born and grew up in Switzerland. Making things was a family tradition
30 FINE woodworking. Photo, this page: Michael Pekovich
 30 FINE woodworking Photo, this page: Michael Pekovich Arts & Crafts Bed White-oak bed is loaded with Stickley style and topped off with traditional inlay by Kevin Rodel This bed design is a close copy
Bowl Turning by Eugen Schlaak, Niagara Falls, Ontario Canada
 Bowl Turning by Eugen Schlaak, Niagara Falls, Ontario Canada The following article describes the production of simple open type bowls, which are easy to produce. Not much thinking, as far as design and
Zestful Turnings. America s leading woodworking authority. Step by Step construction instruction. A complete bill of materials.
 America s leading woodworking authority Zestful Turnings Step by Step construction instruction. A complete bill of materials. Exploded view and elevation drawings. How-to photos with instructive captions.
boxes lidded It s hard to top
 It s hard to top lidded boxes by Bob Rosand Ever since I started lathe work in the mid-70s, I have enjoyed turning lidded boxes. I based my first boxes on Dale Nish s creative and artistic woodturning
JUNIOR CERTIFICATE 2005 MATERIALS TECHNOLOGY (WOOD) MARKING SCHEME ORDINARY LEVEL SECTION A
 MARKING SCHEME ORDINARY LEVEL SECTION A") JUNIOR CERTIFICATE 2005 MATERIALS TECHNOLOGY (WOOD) MARKING SCHEME ORDINARY LEVEL SECTION A NOTE Please ensure that totals for each question are divided by two before entering marks on marking sheets.
JUNIOR CERTIFICATE 2005 MATERIALS TECHNOLOGY (WOOD) MARKING SCHEME ORDINARY LEVEL SECTION A NOTE Please ensure that totals for each question are divided by two before entering marks on marking sheets.
Christmas Bell Ornament
 Christmas Bell Ornament This is an easy Christmas ornament idea I cabbaged from a friend and skilled turner, Curt Fuller, from Utah. I kind of adapted it to my style but I still got the idea from him.
VASE FLYING-WING A BARK-EDGED. Kevin Felderhoff. Wood selection. 36 American Woodturner August 2017
 A BARK-EDGED FLYING-WING VASE Kevin Felderhoff I enjoy turning endgrain pieces and have found that the most dramatic wood grain comes from logs or branches with irregular shapes far from round. The flying-wing
Coat Rack. Materials: Directions:
 Coat Rack 2x2 wooden poplar (foundation of the rack) 3/4 inch diameter wood dowels (5-8 depending on how many arms you want) 1/4 inch dowel screw 1/4 inch drill bit Power drill Ruler Pencil Paint/spray
Learning Objectives To be able to state the different safety precautions associated with the lathe. To be able to identify and state the function of t
 Learning Objectives To be able to state the different safety precautions associated with the lathe. To be able to identify and state the function of the different parts of the lathe. To be able to identify
Chili Pepper Routed Bowl
 Chili Pepper Routed Bowl MLCS Items Needed: Chili Pepper Bowl and Tray Template #9189 Top Mounted Bearing Dish Cutter Router Bit #7817 1/2 Router Collet Extension and Wrenches #9465 3/16 Radius Round Over
HERTS & BEDS WOODTURNERS WOODBITS
 March 2018 Issue 142 2018 Competition Subjects Mar April May June July Aug Sept Oct Nov Dec 2 or more woods Decorated Easter egg Hollow form Platter Mallet Egg & Cup Round bottomed bowl Ball Candle holder
Goblet. Two-Part. About a year ago, we were invited. Toast your woodturning skills By Bob Rosand
 Two-Part Goblet Toast your woodturning skills By Bob Rosand About a year ago, we were invited to attend the bat mitzvah of a friend s daughter. Unfortunately, we were unable to attend because of prior
Turning Pendants with the Richard Joyner Eccentric Backer Plate
 Turning Pendants with the Richard Joyner Eccentric Backer Plate Vaughn McMillan August 2010 As the result of a great tool sharing effort by my friend Jonathan Shively at http://familywoodworking.org, I
Turning a Lidded Box
 Turning a Lidded Box Finger Lakes Woodturners February 18, 2016 1 Turning a Lidded Box Material & Approach Can use green or dry wood, but final turning must be done dry to achieve a good fit of the lid
CARVE A HUMMINGBIRD PIN/MAGNET By Donna LaChance Menke
 1 CARVE A HUMMINGBIRD PIN/MAGNET By Donna LaChance Menke These little hummers have been a favorite of my students for many years. It was the first pattern I developed and the first class I taught back
BOX TURNED. Wood&Resin. The unusual thing about this particular box. Dn Use these simple turning techniques to create a unique lidded box.
 Sponsored Content TURNED Wood&Resin BOX Dn Use these simple turning techniques to create a unique lidded box. By Carl Jacobson The unusual thing about this particular box is that it s turned from a hybrid
Tilt-Top Table Elegant project builds hand-tool and machine skills
 Tilt-Top Table Elegant project builds hand-tool and machine skills BY M A R I O R O D R I G U E Z As a woodworking instructor, I m always looking for interesting and challenging projects to present in
Thin Walled Turning and Surface Design Techniques
 Thin Walled Turning and Surface Design Techniques Mark Mazzo Finger Lakes WoodTurners November 18, 2010 11/18/2010 1 Thin-Walled Turning Why Thin? Not to show off turning prowess Facilitates later surface
George Hatfield Demonstrates for CMW April 10, 2010 By Bob Gunther Photographs by Tina Collison
 George Hatfield Demonstrates for CMW April 10, 2010 By Bob Gunther Photographs by Tina Collison Overview: George Hatfield is from Sidney, Australia. He entered the woodturning field as an apprentice and
Bangle Bracelet Instructions
 Bangle Bracelet Instructions (Using Penn State Bangle Bracelets) Tools & Equipment: Lathe, turning tools of choice, Band saw or scroll saw, Drill Press or 4 jaw lathe chuck with standard #2 jaws, mini
PEPPERMILL CONSTRUCTION
 PEPPERMILL CONSTRUCTION I ve been asked a several times to put together a review of how I turn peppermills. They are a great project, perfect for gifts and a lot of fun to make. They don't require especially
GENERAL NOTES: Page 1 of 9
 Laminating A Zia Into A Turning Blank by W. H. Kloepping, Jan. 2009 This describes how a zia (the New Mexico state symbol) can be laminated into a turning blank. Materials needed: Square Turning Block
Clay Foster Demonstration topics
 Clay Foster Demonstration topics Rotation #1: Low-tech surface enhancement An array of surface enhancement techniques that don t require a large investment in tools, materials, or skills will be presented.
Ice Cream Cone Pen Made with a European Kit by Bill Jacob
 Ice Cream Cone Pen Made with a European Kit by Bill Jacob Equipment needed: Lathe (no brainer) Drill press or equivalent Calipers Drill chuck with #1 or #2 MT Square Choose your colors of wood you desire.
Echos From the BAT. Cave. David Ellsworth. Baltimore Area Turners. Inside this issue: David Ellsworth 2 D&D Log Cradle 5 Other Stuff 6.
 Echos From the BAT Baltimore Area Turners Cave March, 2012 David Ellsworth Inside this issue: David Ellsworth 2 D&D Log Cradle 5 Other Stuff 6 2012 Officers: In March, BAT was graced with a visit by Grandmaster
Perhaps the best thing about. Three bowls slightly rearranged Twisted Possibilities
 Three bowls slightly rearranged Twisted Possibilities By Malcolm Tibbetts Lacewood Ribbon, 13 7½" Perhaps the best thing about segmented turning is the total lack of restrictions; there is no end to the
Legacy Slimline Pencil Kit
 Description: The model is considered one of the most basic pen kits and is a great starter kit for those new to pen turning. Many experienced pen turners use the kit to make elaborate and unusual pens
HORNSBY DISTRICT WOODTURNERS INC. Established 1983
 HORNSBY DISTRICT WOODTURNERS INC. Established 1983 NEWSLETTER SEPTEMBER 2016 September started with John Ewart demonstrating at our first mid week (Thursday) demonstration, well attended and enjoyed by
Fig01: The mounting plan drawn on the Backup Plate.
 Wine Rack Introduction Turning of eccentric rectangular objects with a Backup Plate is limited to largely two dimensional designs. But that doesn t mean the project has to stay that way. In this article
A Shaker Sewing Stand
 America s leading woodworking authority Step by Step construction instruction. A Shaker Sewing Stand A complete bill of materials. Exploded view and elevation drawings. How-to photos with instructive captions.
Turning a Five Sided Bowl
 Turning a Five Sided Bowl Cut and prepare the blank. This must be square and parallel to each side. The blank must also be small enough to fit the swing of your lathe, when turning off centre. First find
PART 11 HOW TO TURN AN ARC TYPE AND A CIRCULAR TYPE SPINDLE
 PART 11 HOW TO TURN AN ARC TYPE AND A CIRCULAR TYPE SPINDLE In the previous chapter, a conceptual model was described that helps one think about what to expect when turning a multi axis spindle. In a nut
Fig01: The pieces that will make up the turning blank.
 A customer (let's call her Stephanie) who bought one of my needle cases, asked me if I could make a holder for embroidery scissors that she could hang around her neck. Even sent me a couple of links with
FLAT TO FABULOUS Make a Bowl from a Single Flat Board - Or How to Eat Salad off of Scrap Wood
 FLAT TO FABULOUS Make a Bowl from a Single Flat Board - Or How to Eat Salad off of Scrap Wood Let s face it: Woodworkers are frugal people. In fact, if you are anything like me, you have a hard time throwing
WoodCentral's Tool Grinds Page
 WoodCentral's Tool Grinds Page Here are some photos of lathe tool grinds submitted by our Turning forum visitors. It is our suspicion that there are as many grinds as there are turners, and that a skilled
Turning a Natural Edge Bowl w/ Foot by Jim Silva
 Turning a Natural Edge Bowl w/ Foot by Jim Silva A natural edged bowl is a bowl in which one incorporates the natural contour of the tree's trunk into the piece to be turned. For our purposes here, natural
Fig01 Measuring the height of the banjo with a combination square.
 Shadow Sphere Jig Introduction I got the idea for the Shadow Sphere Jig from an attempt to make Inside/Outside Icicle Ornaments easier to turn. The way I was trying to do the ornaments during the inside
Kitchen Base Cabinet: Single Drawer with Double Doors Cabinets from Scratch
 Kitchen Base Cabinet: Single Drawer with Double Doors by Cabinets from Scratch Our Home from Scratch LLC Page 1 Disclaimer Our Home from Scratch LLC and its legal owners cannot be held responsible for
Turning Small Squarish Dished Platters Rev 2.1 5/5/2018
 Turning Small Squarish Dished Platters Rev 2.1 5/5/2018 John K Jordan jordanjk@gmail.com These are "small," perhaps about 7.5" to 10.5" across. They are "squarish," not quite square. I call them "dished
Therming. The lathe is an excellent tool for making. Beyond Round. Art Liestman. Methods of mounting
 Beyond Round Therming Flask, 2008, Quilted big leaf maple, 7¾" 4¼" 2⅛" (197mm 108mm 54mm) This flask was thermed on two sides, cut apart on the bandsaw, hollowed using a drillpress, and then reassembled.
Al & Gary's Illusionist Heart
 Al & Gary's Illusionist Heart Plans and Instructions by: Albert Herwig and Gary A. Emerich Al & Gary's Illusionist Heart As Al Would Say: It's a pendant Now it's a heart Our pictures are in there My children'
Odd Wobbler Instructions By: Don Geiger
 Odd Wobbler Instructions By: Don Geiger Stock Size Calculations and Reference Table When preparing stock material for turning an Odd Wobbler, you will need two pieces of dry wood that is about one inch
How to Make a 400 BC Greek Oenochoe Style Wine Pourer
 How to Make a 400 BC Greek Oenochoe Style Wine Pourer The purpose of the demonstration is to show how to make a hollow form wine pourer in the style of ancient Greek pottery. Live demonstration on the
Reprinted with permission. American Association of Woodturners
 Playing Fire with By Nick Cook My fascination with fire started in 1993 at the AAW symposium in Purchase, New York. I watched Australian Vic Wood burn the rim of a platter, and I was immediately hooked.
scissors for most veneer cuts) and then wrap it around the tube again to confirm the measurement.
 and then wrap it around the tube again to confirm the measurement.") Introduction scissors for most veneer cuts) and then wrap it around the tube again to confirm the measurement. I make Christmas Ornaments to give to friends and relatives every year. Last year I made clones
Introduction scissors for most veneer cuts) and then wrap it around the tube again to confirm the measurement. I make Christmas Ornaments to give to friends and relatives every year. Last year I made clones
Whisk. Introduction. Making
 Introduction Whisk I bought a Drill Wizard from One-Way a while back how could a jig-head like me resist? The Drill Wizard mounts in the tool rest banjo and holds a portable drill. It has linear bearings
Turning Acrylic Boxes
 Preparing the Molds/Mixing the Resin/Unmolding the Blanks Turning Acrylic Boxes Preparing the Molds 1. Prepare the Molds Use 2 PVC or ABS Pipe cut into 2 ½ sections. Flatten saw-marks off the bottom on
Woodturning Fundamentals American Association of Woodturners, January 2013
 Woodturning Fundamentals American Association of Woodturners, January 2013 Methods and Jigs for Reverse Turning Bowls By John Lucas There are many ways to hold bowls and hollow vessels so that you can