Replacement Parts List: Left Side Components (as if you were sitting on the bike) QTY Price each Part Numbers Descriptions
|
|
|
- Paul Mathews
- 5 years ago
- Views:
Transcription

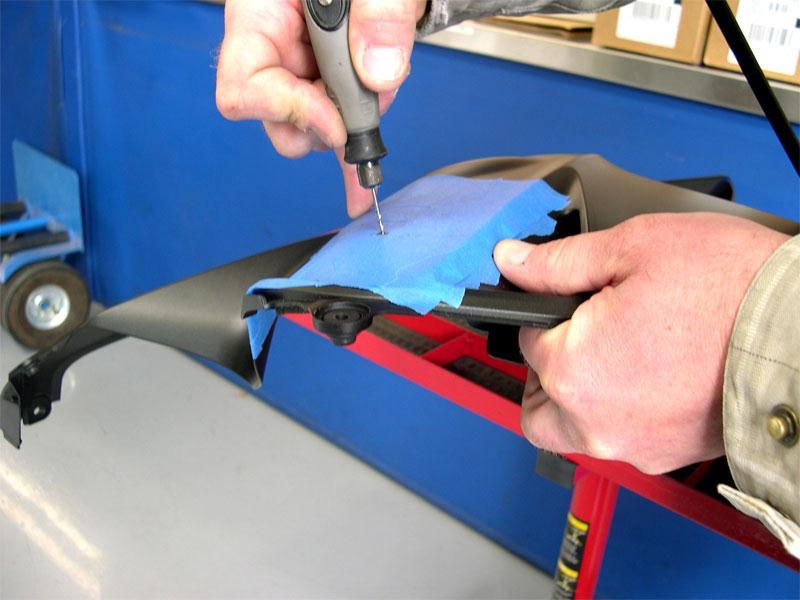
1 Honda CBR600RR (09-12) Frame Slider Installation Instructions Part Numbers: , , & MADE IN THE USA! Carefully read instructions in their entirety before the install Professional installation is recommended. Always use proper safety measures during the install of this product. Do not try to install this product without proper tools, recently calibrated torque wrench, correct torque specifications from factory service manual, safety goggles and gloves. The motorcycle must be in a fixed secure position before the install process begins. DO NOT remove both engine studs at the same time. Shogun is not responsible for any part of your motorcycle for any reason. Precisely measure location of cut and if in doubt at any point please call us before the install process has begun. Replacement Parts List: Left Side Components (as if you were sitting on the bike) QTY Price each Part Numbers Descriptions 1 $ FS L Black Left Side Puck 1 $ FS L White Left Side Puck 1 $ FS L Chrome Left Side Puck 1 $ HB-SH Socket Cap 12 X 1.25 X 90 Main Engine Stud Replacement Parts List: Right Side Components (as if you were sitting on the bike) 1 $ FS R Black Right Side Puck 1 $ FS R White Right Side Puck 1 $ FS R Chrome Right Side Puck 1 $ HB-SH Socket Cap 12 X 1.25 X 90 Main Engine Stud Frame Sliders: Left longer than right, bolts same left and right 12 X 1.25 X 90mm. Installation Steps apply to left and right hand side. 1. Some photos in this section are used for illustration examples only. It is up to you how you decide to cut your motorcycles bodywork to accept the frame slider there are many different ways customers go through this process. Shogun is not responsible for any part of your motorcycle for any reason. Precisely measure location of cut and if in doubt at any point please call us before the install process has begun. Professional installation is recommended. Always use proper safety measures during the install of this product. Do not try to install this product without proper tools, recently calibrated torque wrench, correct torque specifications from factory service manual, safety goggles and gloves. 2. Locating and cutting the body. This is a simple illustration of how most of us install the product here. It takes a bit longer but our end results have been more consistent with a better overall fit and finish. We start with (99-SPOT ) Shogun Spot tool. It s nothing special just a 12mm socket cap bolt with a 1.25 pitch that we cut the head off of and sharpen to a point. You can purchase the tool for $12.99 or go to your local hardware store and make your own. Keep in
 are fairly hard to find.")


2 mind Metric 10 or 12mm X 1.25 pitch bolts (most common sportbike engine studs) are fairly hard to find. Make sure you know the size and that the bolt you re buying is a 1.25 pitch bolt. With the body removed, thread in by hand your spot tool. Make sure you have the spot tool screwed in enough to clear the body on the inside. 3. Loosely mount your bodywork and adjust the spot tool out to lightly touch the inside of the body. Make sure you have at least 15mm of thread engagement, without that the spot tool will tend to sag down giving you a false location. With the body mounted in the correct location and softly tap or press with palm to leave a spot mark on the inside of the body. Be careful not to scratch or chip the body.

3

4 4. Remove the bodywork and double check location of spot mark the tool has created. 5. Body Prep. Use masking tape to completely mask off the area on the body where you will be working. We usually will tape off approximately 6 to 8 inches around the though hole area and any other edges that could get bumped or scratched while working. Tip: In some locations you may want to double up the thickness of the masking take to give extra protection.
5
.")

6 6. Using a small drill 1/8 inch or so drill a pilot hole in the body(see above photo). Remount bodywork and double check the hole location with the spot tool still inserted (arrow in picture below is pointing to spot tool). With pilot hole cut and on center, remove body panel to prep for cutting. 7. A pencil was then used to draw our diameter of desired shaped hole using a compass tool. A flexible hole template can also be used for the same purpose. Place the hole template on center of the pilot hole (or spot tool) and draw your desired diameter.


 9.")


7 8. For this application we used a step drill to open the hole big enough for a dremel tool with a sanding roll and opened up the hole little by little. MAKE SURE YOU WEAR PROTECTIVE GOGGLES AND GLOVES As you cut and open the hole to your scribe marks keep checking that the hole is lining up with your puck dimensions or the spot tool. If for some reason you cut too big and you want to close the gap around the puck we use windscreen trim or window seal with 3m adhesive. Trim the seal to fit the hole and get the seam to meet under the puck so it is less visible. (window seal usually found at most hardware stores) 9. Mount body then slider then torque down to OEM specs. Remember each side was done the same way. READ CAREFULLY Shogun cannot guarantee that they will protect your motorcycle from any extent of damage. Shogun frame sliders are really meant to help possibly save the frame from damage in the event of a crash. Because Shogun frame slider products have been successful in saving cases, bodywork, levers and so on in the past, customers just assume sometimes you can put the product on and no damage will happen. The fact is, some crashes result in little or no damage to the motorcycle and some bikes are destroyed. It s kind of like a bumper on a car sometimes it works sometimes it doesn t, it really depends on all the different forces applied during the incident. We ve seen bikes crash at 100 mph with little damage and some at 15 mph with major damage.
INSTALLATION INSTRUCTIONS Stillen Front Fascia P/N: KB NISSAN ALTIMA SEDAN
 Materials supplied: 1. (2pc) Front Fascia 2. 2 Double-sided Tape 3. (8) ¼-20 x ¾ Bolts 4. (10) ¼-20 Nuts 5. (20) Washers 6. (2) ¼-20 x 1 Bolts 7. (1) Mesh Grill Insert, Upper 8. (10) No.6 Screws 9. (10)
INSTALLATION INSTRUCTIONS
 INSTALLATION INSTRUCTIONS Accessory Application Publications No. BII 30914 UNDER SPOILER 2006 TL Issue Date SEP 2005 PARTS LIST Front under spoiler Template B Left bracket (Marked L) Left cover (Marked
PRODUCT: LOKI INSTALLATION INSTRUCTIONS. Product is covered by U.S. patents. For more information visit
 R INSTALLATION INSTRUCTIONS PRODUCT: LOKI CONFIGURATION: SINGLE DOOR MOUNT: GLASS MOUNT Product is covered by U.S. patents. For more information visit www.krownlab.com . TOOLS + MATERIALS REQUIRED TOOLS
INSTALLATION INSTRUCTIONS
 INSTALLATION INSTRUCTIONS Accessory Application Publications No. BII 25829 2004 MDX Issue Date SEP 2003 PARTS LIST Tailgate spoiler Right cover Left cover 2 Flat-head screws 2 Turn nuts TOOLS AND SUPPLIES
 INSTALLATION INSTRUCTIONS Accessory MOTORCYCLE BED P/N 08L26-SJC-100A Application 2011 RIDGELINE Publications No. AII 43440 Issue Date JUNE 2010 PARTS LIST Left tube 6 Hex bolts Right tube (with label)
19 to 39 TV WALL MOUNT - FULL MOTION
 19 to 39 TV WALL MOUNT - FULL MOTION RF-HTVMMAB For wood-stud and concrete wall installations Safety information and specifications...2 Tools needed...2 Package contents...3 Installation instructions...5
How to build a hockey stick bench
 How to build a hockey stick bench The hockey stick bench is a great piece of fully functional furniture that doesn t require a lot of sticks. Composite sticks are really strong, so even if you space them
TV WALL MOUNT ASSEMBLY GUIDE RF-TVMLPT01V2
 TV WALL MOUNT RF-TVMLPT01V2 For wood-stud and concrete wall installations Safety information and specifications...2 Tools needed...2 Package contents...3 Installation instructions...4 ASSEMBLY GUIDE Before
4 DOOR JK ROCK SLIDERS INSTALLATION
 SIGNATURE SERIES 4 DOOR JK ROCK SLIDERS INSTALLATION 1. To remove either the Jeep JK Wrangler Unlimited Rubicon rocker guards or Sahara running boards, use a 10mm wrench to remove the 3 pairs of nuts securing
Model 2740B High Security Safe Lock. Installation Instructions. Mounting Considerations:
 Model 2740B High Security Safe Lock Installation Instructions Mounting Considerations: The Sargent & Greenleaf 2740B safe lock is designed to use the same mounting screw locations as common S&G mechanical
Installation Instruction
 Tools Needed for Assembly Stud finder (for wood stud wall) Pencil Mark Electric drill Wood Stud Wall Installation Step 1. Locate the Wood Studs Installation Instruction Drill bit (for wood stud wall) Masonry
INSTALLATION INSTRUCTIONS
 PARTS LIST ITEM PART DESCRIPTION QTY 73-A 503F 9MM 50G 5A 50E 505S 50H Connector Bracket Door Stops Support Bar Panel Glass Bracket Wall Mount Bracket Rollers Center Guide Recessed Finger Pull Fixed Panel
1. TOOLS + MATERIALS REQUIRED
 R INSTALLATION INSTRUCTIONS PRODUCT: BALDUR + ODEN CONFIGURATION: BI-PARTING DOOR MOUNT: TOP MOUNT Product is covered by U.S. patents. For more information visit www.krownlab.com. TOOLS + MATERIALS REQUIRED
INSTALLATION INSTRUCTIONS
 INSTALLATION INSTRUCTIONS Accessory Application Publications No. AII 33173 UNDER 2007 ODYSSEY Issue Date JULY 2006 PART LIST Front under spoiler 5 Stepped bolts TOOLS AND SUPPLIES REQUIRED Phillips screwdriver
Whalen Furniture Mfg. Factory No. 5 Page # 1
 If you have any questions regarding assembly or if you are missing parts, do not return this item to Sam s Wholesale Club Please call our customer service number and have your instructions and parts list
FRONT BUMPER INSTALLATION INSTRUCTIONS Toyota 4Runner
 Aluminess Products Inc 9402 Wheatlands Ct. #A Santee, CA 92071 619-449-9930 FRONT BUMPER INSTALLATION INSTRUCTIONS 2003-2009 Toyota 4Runner Please read before beginning Stainless steel hardware may bind
 INSTALLATION INSTRUCTIONS Accessory MOTORCYCLE BED P/N 08L26-SJC-100A Application 2010 RIDGELINE Publications No. AII 42145 Issue Date AUG 2009 PARTS LIST Left tube 2 Washers 2 Well nuts Right tube (with
Hardware Provided: - Eight (#8 Size) screws - Eight 1/2 (13) x 4 Hex Bolts - One 1 spindle Hex nut/washer
 screws - Eight 1/2 (13) x 4 Hex Bolts - One 1 spindle Hex nut/washer") DESTROYER REAR BUMPER +TIRE CARRIER STEP 1 : GATHER YOUR TOOLS AND LAY OUT YOUR PARTS... Tools Required: - 16mm socket - 3/ 4 socket - 1 / 4 socket - ratchet - ratchet Extension - 3/4 wrench - tape measure
DESTROYER REAR BUMPER +TIRE CARRIER STEP 1 : GATHER YOUR TOOLS AND LAY OUT YOUR PARTS... Tools Required: - 16mm socket - 3/ 4 socket - 1 / 4 socket - ratchet - ratchet Extension - 3/4 wrench - tape measure
DX-TVMLPTB03. Low-Profile TV Wall Mount ASSEMBLY GUIDE. For either wood-stud or concrete wall installations
 ASSEMBLY GUIDE DX-TVMLPTB03 Low-Profile TV Wall Mount For either wood-stud or concrete wall installations Safety information and specifications...2 Tools needed...........................3 Package contents......................3
LOFT DOOR HANGER BARN DOORS & HARDWARE. Hardware Installation Instructions. Page
 LOFT DOOR HANGER Page 1 Specifications 2 7/16" 3/8" 1-1/2 1-3/4 Ø3 3 7/8" 11-1/16 Page 2 Parts and Tools Tools Needed Tape Measure Pencil Drill with 1/8, 1/4 and 3/8 bits, 1 spade bit and Phillips bit
You should have received the following contents in the package:
 Greetings, and thank you for purchasing a center stand for your V-Strom from Murphs! We strive to provide quality products at a fair price, and hope you agree we do it well. Whether you purchased a stand
INSTALLATION INSTRUCTIONS
 INSTALLATION INSTRUCTIONS R5 STEP BOARD APPLICATION: 2009-2017 Dodge Ram 1500 Quad / Crew Cab 2010-2017 Dodge Ram 2500/3500 Crew Cab PART NUMBER: 28-51040, 28-51045, 28-51050, 28-51055 ITEM QUANTITY DESCRIPTION
INSTALLATION INSTRUCTIONS
 INSTALLATION INSTRUCTIONS Accessory Application Publications No. AII 33380 SIDE S 2007 S2000 Issue Date AUG 2006 PARTS LIST Left upper side strake 2 Grommets 2 Butyl O-rings 2 Washer-screws, 6 x 20 mm
PROVEN WORLDWIDE SNORKEL FOR CHEVY COLORADO NEW PRODUCT
 AEV30272AC Last Updated: 10/09/18 PROVEN WORLDWIDE SNORKEL FOR CHEVY COLORADO NEW PRODUCT Please visit www.aev-conversions.com to view the most current installation guide for this product. This is a new
INSTALL INSTRUCTIONS
 Jeep JK Rocker Panel Armor Product : JK300,JK301 Applica on : 2007+ Jeep Wrangler JK ( 2 Door and 4 Door ) Page ( 1 of 6 ) I WARNING Read the instruc ons completely before beginning installa on. Before
ROCKWELL. Two Panel Door. Half X Door. Double X Door. Z Combination Door
 ROCKWELL 4 in 1 DOOR Choose between four door styles with this Door Kit. Our versatile Rockwell Door Kit is very easy to assemble. All materials and hardware needed to assemble any of the four styles are
TOYOTA CAMRY LIP SPOILER Preparation
 Preparation Part Number: PT29A-03070-XX Kit Contents 1 1 Lip Spoiler 2 1 Hardware Bag Hardware Bag Contents 1 2 M6 Nuts 2 2 M6 Bolts Additional Items Required For Installation 1 1 Installation Kit, P/N
Installation Instructions:
 NOTE: Carefully read entire instructions thoroughly before attempting to install this part. Parts Included: Qty 93-326EP009 Front Armor: Drvr 1 93-326EP010 Front Fender: Pass 1 90-6774m Hardware Pack:
PRODUCT: BALDUR + ODEN
 R INSTALLATION INSTRUCTIONS PRODUCT: BALDUR + ODEN CONFIGURATION: SINGLE DOOR MOUNT: GLASS MOUNT Product is covered by U.S. patents. For more information visit www.krownlab.com . TOOLS + MATERIALS REQUIRED
STYLE BAR & TONNEAU COVER INSTALLATION
 STYLE BAR & TONNEAU COVER INSTALLATION INSTALLATION MANUAL: 2005 to '09 Mustang P/N: 10-8002-C12071B Saleen Performance, Inc. 1225 East Maple Rd., MI 48083 800-888-8945 www.saleen.com 1 IF YOU ARE NOT
SS13R SAFARI R-SPEC SNORKEL Nissan GQ Patrol with 4.2L TD42 Diesel Engine and Horizontal Pre-Cleaner.
 SS13R SAFARI R-SPEC SNORKEL Nissan GQ Patrol with 4.2L TD42 Diesel Engine and Horizontal Pre-Cleaner. Parts List 01/04/2015 ITEM PART NO DESCRIPTION QTY 1 470-133-200R BODY - SNORKEL 1 2 000-135-800 3
Mount to the Wall INSTALLATION MANUAL
 Mount to the Wall 15 Locate the Wooden Studs This step applies to wooden stud wall installation only. Determine and mark the exact locations of two stud centers on the wall. Wooden studs should be spaced
SCION tc 2005 PEDESTAL SPOILER Preparation. Part Number: PT47A XX PT47A XX PT47A XX
 Preparation Part Number: PT47A-21052-XX PT47A-21062-XX PT47A-21082-XX Kit Contents Item # Quantity Reqd. Description 1 1 Painted Spoiler Assembly 2 1 LH Gas Strut 3 1 RH Gas Strut 4 1 Hardware Bag Hardware
Door Knocker Installation By Bill Shayler
 Door Knocker Installation By Bill Shayler Contents Door Knocker Installation. 3 What Is Needed.. 3 Common Installation Methods.. 3 Where to Install... 4 Surface Mount... 5 Through The Door Mount.. 7 YDK
Installation Guide. Pionite Decorative Surfaces One Pionite Road, Auburn, Maine PIONITE ( )
") Installation Guide A Subsidiary of Panolam Surface Systems SMPBRO00-012 6/14 Pionite decorative laminates are designed for finished interior surfaces which require high impact, wear and stain resistance
Installation Guide A Subsidiary of Panolam Surface Systems SMPBRO00-012 6/14 Pionite decorative laminates are designed for finished interior surfaces which require high impact, wear and stain resistance
Balustrade Systems / Installation Instructions
 A. PARTS AND SUPPLIES NEEDED FOR INSTALLATION Hardware included for each 10 section of rail: 2 3 x 1-1/2 L-brackets 4 1-3/4 x 3/16 Blue hex-head screws for anchoring the L-brackets to the newel cap, column
Quick Hook SS & LS Standard and Low Height Hooks for Side Mount Rails
 Quick Hook SS & LS Standard and Low Height Hooks for Side Mount Rails Installation Instructions Quick Hook SS & LS Instructions for Installing Standard and Low Height Hooks for Side Mount Rails Installation
Tilting & Swiveling Plasma/LCD Flat Panel Wall Mount Installation Guide Model: A380SM
 Tilting & Swiveling Plasma/LCD Flat Panel Wall Mount Installation Guide Model: A380SM Easy installation Built-in level for easy positioning Corrective leveling adjustments after installation Forward /
Introduction. Rocky Mountain Westy Swing Away Carrier Kit Installation Instructions
 Rocky Mountain Westy Swing Away Carrier Kit Installation Instructions Introduction Thank you for purchasing the Rocky Mountain Westy Swing Away Carrier Kit. We pride ourselves in the products we develop
Fig A 2. Using a 10mm Socket, remove the two bolts referenced in (Fig B). Save these bolts for reuse. Fig B ADDICTIVE DESERT DESIGNS.
. Save these bolts for reuse. Fig B ADDICTIVE DESERT DESIGNS.") Preparation: Disconnect the negative battery terminal. Park the vehicle on level ground and set the emergency brake. We recommend reading through the installation instructions in whole before performing
Preparation: Disconnect the negative battery terminal. Park the vehicle on level ground and set the emergency brake. We recommend reading through the installation instructions in whole before performing
Vir Stil Console Lavatory INSTALLATION INSTRUCTIONS
 THANK YOU FOR CHOOSING KALLISTA We appreciate your commitment to Kallista quality products. Please take a moment to review this manual before you install your Kallista product. If you encounter any installation
INSTALLATION INSTRUCTIONS CONTOURED LIGHT BAR APPLICATION: CHEVY EQUINOX/ GMC TERRAIN PART NUMBERS: ,
 INSTALLATION INSTRUCTIONS CONTOURED LIGHT BAR APPLICATION: 2010-2014 CHEVY EQUINOX/ GMC TERRAIN PART NUMBERS: 32-21020, 32-21025 ITEM QUANTITY DESCRIPTION TOOLS NEEDED 1 1 CONTOUR BAR TORQUE WRENCH 2 1
EmagiKit. Privacy Pod Plus. Quiet. Easy. Affordable. INSTRUCTIONS ASSEMBLY
 EmagiKit Privacy Pod Plus Quiet. Easy. Affordable. INSTRUCTIONS ASSEMBLY DIMENSIONS AND COMPONENTS 47 47 Ceiling Unit 2-B 2-L 2-R Glass Door Corner Trim Door Handle 90 Adjustable Height Work Surface 1-B
Quick Hook SB & LB Standard and Low Height Hooks for Bottom Mount Rails
 Quick Hook SB & LB Standard and Low Height Hooks for Bottom Mount Rails Installation Instructions Quick Hook SB & LB Instructions for Installing Standard and Low Height Hooks for Bottom Mount Rails Installation
INSTALLATION INSTRUCTIONS K9-C20-32 & K9-C CHEVROLET 4 DOOR TAHOE, GMC YUKON, SUBURBAN and YULON XL
 INSTALLATION INSTRUCTIONS K9-C20-32 & K9-C21-32 2007-2014 CHEVROLET 4 DOOR TAHOE, GMC YUKON, SUBURBAN and YULON XL TOOLS REQUIRED: Power drill Drill bit set Standard & metric socket sets Phillips screwdriver
4 DOOR JK ROCK SLIDERS INSTALLATION
 SIGNATURE SERIES 4 DOOR JK ROCK SLIDERS INSTALLATION 1. To remove either the Jeep JK Wrangler Unlimited Rubicon rocker guards or Sahara running boards, use a 10mm wrench to remove the 3 pairs of nuts securing
Hinge Mortising Jig. One of the make it or break it parts of building a. 6 ShopNotes No. 74
 Hinge Mortising Jig A Mortise for a Hinge. Quick, clean, and accurate that s the only way to describe the mortise you get with a trim router and this hinge mortising jig. One of the make it or break it
INS T A L L A TIO N INS T R U C TIO N S HORSESHOE W/ BAR HANGER
 INS T A L L A TIO N INS T R U C TIO N S HORSESHOE W/ BAR HANGER 6-1/2" 5" 2-7/16" 3-7/16" Ø2-7/8" 4-7/8" 11" 2" 3/16" 1/2" HORSESHOE W/ BAR S P ECIFICATIONS PARTS AND TOOLS Tools Needed Tape Measure Pencil
MINI Cooper Model 120SA Installation Instructions
 MINI Cooper Model 120SA Installation Instructions Please read these instructions completely before beginning the installation. Test fit all components (amplifier, etc.) before mounting. These instructions
Rugged Ridge Engine Transmission Skid Plate JK
 Installation Time: 1-2 Hours Tools Required: Rugged Ridge Engine Transmission Skid Plate 2012-2017 JK Sockets: 16mm, 17mm, 18mm deep well Socket Wrench Wrenches: 16mm, 18mm Torque Wrench Drill ½ Drill
IN 578. Tools Required. Torque Specification: 10mm Socket 7/16 Socket 1/2 Socket 1/2 Wrench 7/16 Wrench 1/8 Allen Wrench.
 Tools Required 2011-C Ford F250/F350 No Drilling into Vehicle is Required 10mm Socket 7/16 Socket 1/2 Socket 1/2 Wrench 7/16 Wrench 1/8 Allen Wrench FL277 x 1 Torque Specification: 1/4 Bolts - 6 Ft Lbs.
Installation Instructions: Bumper (Part # SB76850) XJ Jeep Cherokee XRC Rear Bumper
 XJ Jeep Cherokee XRC Rear Bumper") NOTE: Carefully read entire instructions thoroughly before attempting to install this part. Parts Included Qty 93-7789 XJ XRC 1 93-7807 Bumper Mount Bracket: Drvr 1 93-7811 Bumper Mount Bracket: Pass 1
NOTE: Carefully read entire instructions thoroughly before attempting to install this part. Parts Included Qty 93-7789 XJ XRC 1 93-7807 Bumper Mount Bracket: Drvr 1 93-7811 Bumper Mount Bracket: Pass 1
HONDA RIDGELINE (KIT #601) Installation Instructions (to be used in addition to owners manual)
 Installation Instructions (to be used in addition to owners manual)") HONDA RIDGELINE (KIT #601) Installation Instructions (to be used in addition to owners manual) IMPORTANT NOTE: Read before beginning installation. These instructions replace all of Step 1 of the instructions
HONDA RIDGELINE (KIT #601) Installation Instructions (to be used in addition to owners manual) IMPORTANT NOTE: Read before beginning installation. These instructions replace all of Step 1 of the instructions
Straight Stringer Installation Instructions
 Straight Stringer Installation Instructions Floor-to-Wall Installation F L I G H T P L A N Unpack: What s included? Your Stringer Tread Screws (8) per tread (1) Torque Wrench (1) Socket (for the brackets
ROCKWELL 4-IN-1 DOOR. Two Panel Door. Half X Door. Z Combination Door. Double X Door
 ROCKWE 4-IN-1 DOOR Two Panel Door Half X Door Double X Door Z Combination Door Choose between four door styles with this Door Kit. Our versatile Rockwell Door Kit is very easy to assemble. All materials
Tech Tip for February 2000 Installing a 124 Spider Convertible Top
 Page 1 of 6 Back to Tech Tips Click on the animation for order info. Tech Tip for February 2000 Installing a 124 Spider Convertible Top Updated from Ciao!News volume 3 number 1, Summer 1996 Like our other
ASSEMBLY & INSTALLATION INSTRUCTIONS
 ASSEMBLY & INSTALLATION INSTRUCTIONS VEHICLE MOUNT KIT 118 AND VEHICLE CENTER MEMBER 6050 TO FIT 2008 & LATER FORD F250-F550 4X4 Sno-Way, Down Pressure and EIS are registered trademarks of Sno-Way International,
Wooden Plane. Hardware Kit. 05P Blade packaged separately.
 Wooden Plane Hardware Kit Veritas Tools Inc. Ottawa ON K2H 1C2 Canada Ogdensburg NY 13669-2205 United States www.veritastools.com 05P40.45 W22356p@AEBHe Blade packaged separately. Introduction The following
Enclosed Partition Installation Instructions
 Nissan NV1500/2500/3500 High Roof Partition Kit Part #: DTC 1502-036 V1.0.08.06.18 IMPORTANT INSTALLATION STEPS ARE DENOTED USING A STOP SIGN. THESE STEPS MUST BE PERFORMED IN THE SPECIFIED ORDER TO ENSURE
INSTALLATION INSTRUCTIONS
 AUTOMOTIVE PRODUCTS, INSTALLATION INSTRUCTIONS ROCK SLIDERS APPLICATION: 2007-2017 Jeep Wrangler JK 2 Door PART NUMBER: 42-7005 ITEM QUANTITY DESCRIPTION TOOLS NEEDED 1,2 2 ROCK SLIDER ASSEMBLY, DRIVER
Please read these Installation Instructions in their entirety prior to installing or operating this equipment.
 2014-2017 Ram 2500 (All beds) Please read these in their entirety prior to installing or operating this equipment. This hitch is rated to 30,000 lbs. Gross Towing Weight and 7,500 lbs. Tongue Weight Bolt
JK Front Crusher Flares
 INSTALLATION INSTRUCTIONS INST-17-03-030_A JK Front Crusher Flares IMPORTANT: Thank you for purchasing this Poison Spyder product. Please read through this entire document before proceeding with installation.
LoD Offroad. Jeep JK 2 Door Sliders Installation Instructions
 LoD Offroad Jeep JK 2 Door Sliders Installation Instructions 1. To remove either the Jeep JK Wrangler Unlimited Rubicon rocker guards or Sahara running boards, use a 10mm wrench to remove the 3 pairs of
Assembly & Installation Instructions FOR VEHICLE MOUNT KIT USING VEHICLE CENTER MEMBER
 Assembly & Installation Instructions FOR VEHICLE MOUNT KIT 991002 USING VEHICLE CENTER MEMBER 9910092 TO FIT 99 - LATER Chevrolet 2500 Silverado 4x4 and 3500 Pickup 4x4 99 - LATER GM 2500 Sierra 4x4 and
Part # Ford Mustang Stalker Front Bumper
 Rev. 6/12 Page 1 Part # 3354 2010-2012 Ford Mustang Stalker Front Bumper Notice: Pre-fit before painting! Install new, unpainted parts according to these instructions! Then remove parts, paint them and
TABLE OF CONTENTS REQUIRED TOOLS
 TABLE OF CONTENTS SECTION SECTION TITLE PAGE NO. 1 2 3 4 5 Assembling Mounting Structure Installing Bicycle Supports Mounting Rack to Wall Adding Sections Customizing Rack Configuration REQUIRED TOOLS
SLIM TRIM MOULDING INSTALLATION METHODS
 Slim Trim as a reducer Use SlimTrack (Metal Track) for up to 4 mm floors. Up to 4 mm Floors 3/8 *If the flooring manufacturer suggests/permits the use of underlayments you may need to shim the track to
Ford F150 Front Bumper
 2009-2011 Ford F150 Front Bumper Warning! Read the instructions completely before beginning the installation. Before tightening bolts, drilling or cutting where required, check to make sure that there
How To Measure Your Finished Opening
 3000 Series Bifold Doors How To Measure Your Finished Opening MEASURE FROM RIGHT TO LEFT 2 PLACES (WIDTH) MEASURE FROM TOP TO BOTTOM 2 PLACES (HEIGHT) Tools Required for Assembly: Tools Needed: Phillips
INSTALLATION INSTRUCTIONS
 INSTALLATION INSTRUCTIONS SPORTSMAN WINCH MOUNT GRILLE GUARD APPLICATION: 2016-2018 Toyota Tacoma PART NUMBER: 40-93885, 45-93880, 46-23885 ITEM QUANTITY DESCRIPTION TOOLS NEEDED 1 1 WINCH TRAY 15MM SOCKET
AM500-U Installation Guide
 1321 S. State College Blvd., Fullerton, CA 92831 USA Included Components Maximum Flat Panel Weight: 500 lb. / 226.79 kg. Wall Mount Bracket (Qty 2) Cross Bar 5/16 Flat Washers (Qty 6) Universal Spacers
INSTALL INSTRUCTIONS KK & KK KWIK-KIT PRISONER TRANSPORT INSERT FORD and CHEVY VAN PRISONER TRANSPORT
 INSTALL INSTRUCTIONS KK-100-03 & KK-120-03 KWIK-KIT PRISONER TRANSPORT INSERT FORD and CHEVY VAN PRISONER TRANSPORT TOOLS REQUIRED: ¼ & 3/8 Ratcheting Wrenches ¼ & 3/8 Air Ratchets (recommended) 3/8 Impact
ASSEMBLY & INSTALLATION INSTRUCTIONS
 ASSEMBLY & INSTALLATION INSTRUCTIONS VEHICLE MOUNT KIT 99101312 TO FIT 2014 - LATER Honda Pioneer 700 Sno-Way, Down Pressure and EIS are registered trademarks of Sno-Way International, Inc. ProControl,
Tuscany 32" x 79" Open Bookcase
 Tuscany 32" x 79" Open Bookcase ADULT ASSEMBLY REQUIRED DUE TO THE PRESENCE OF SMALL PARTS, SHARP POINTS, SHARP EDGES If you have any questions regarding assembly or if you are missing parts, do not return
All Terrain Flares 09+ Ford F150
 Page 1/5 Components: 1. Front Flares (2) 2. Front Flare Inner Pieces (2) 3. Rear Flares (2) Tools required: - Utility knife - Electric Drill - 1/4 Drill Bit - #2 Phillips driver - Socket wrench Hardware
Land Rover Defender 90/110/ th Anniversary Style Front Cage Fitting Instructions
 Land Rover Defender 90/110/130 60 th Anniversary Style Front Cage Fitting Instructions Cambridge House Unwrap the roll cage and unpack the individual fitting kits. At this point it is recommended that
K9 KIT INSTALLATION INSTRUCTIONS CROWN VIC with Fire Suppression System Model KK-K9-F7-K-FS
 K9 KIT INSTALLATION INSTRUCTIONS 2005-2011 CROWN VIC with Fire Suppression System Model KK-K9-F7-K-FS TOOLS REQUIRED: Power Drill (Cordless preferable) Drill Bit Set Standard Wrench and Socket Set Metric
Assembly & Installation Instructions
 Assembly & Installation Instructions FOR SUBFRAME COMPONENTS PACKAGE 100760 TO FIT 1-2004 TOYOTA TACOMA 4x4 16-2002 TOYOTA 4 RUNNER 4x4 22 SERIES ONLY 2008 Sno-Way International 7101078B 1. THINK SAFETY,
WARNING. Failure to observe these instructions could lead to severe injury or death.
 INSTALLATION INSTRUCTIONS WINCH MOUNTING KIT Part Number: 80156, 80160 Application: 2008 Ford F150 Your safety, and the safety of others, is very important. To help you make informed decisions about safety,
General Features. Low Profile. The SMART BOXX stands only 1.5 off of the bed of your truck so cargo space is maximized
 General Features Low Profile. The SMART BOXX stands only 1.5 off of the bed of your truck so cargo space is maximized Two Sizes Short Box :74 L X 47 W X 7 T and Long Box 92 L X 47 W X 7 T All Aluminium
INSTALLATION INSTRUCTIONS FOR #101NS & #101QR FIXED BASE
 INSTALLATION INSTRUCTIONS FOR #101NS & #101QR FIXED BASE #165 Anchor Kit #160/161 Epoxy Kit #163 Super Bundy Plus NOTE: BITUMINOUS PRODUCTS CANNOT BE USED TO INSTALL #101 FIXED BASE Revised MAY 2010 IMPACT
GENUINE PARTS INSTALLATION INSTRUCTIONS
 GENUINE PARTS INSTALLATION INSTRUCTIONS DESCRIPTION: APPLICATION: PART NUMBER: Running Boards Kit Nissan Pathfinder/ Infiniti QX60 999T6 X5060 (Pathfinder Running Board Kit) 999T6 R5060 (Infiniti QX60
Sheet Metal Brake Plans for a 6' Sheet Metal Brake
 Sheet Metal Brake Plans for a 6' Sheet Metal Brake,1752'8&7,21 Thank you for purchasing the sheet metal brake plans. The plans include a complete list of material needed and easy to follow steps to build
Bolt-On/Rugged Fender Flares Toyota Tundra (14-ON) Important: Please read instructions entirely before installing this product.
 Important: Please read instructions entirely before installing this product.") Important: Please read instructions entirely before installing this product. Hardware Included QTY Hardware Included QTY Bolt Kit Included QTY Extrusion 28.0 ft Short Screw 18 Nuts 42 Alcohol Wipe 4 Long
Important: Please read instructions entirely before installing this product. Hardware Included QTY Hardware Included QTY Bolt Kit Included QTY Extrusion 28.0 ft Short Screw 18 Nuts 42 Alcohol Wipe 4 Long
Sliding Door Kit
 YOU MUST READ THIS DOCUMENT BEFORE YOU BEGIN TO ASSEMBLE THE DOOR KIT. Thank you for purchasing this GrowSpan door kit. When properly assembled and maintained, this product will provide years of reliable
Hatchback Wing Riser Kit
 Hatchback Wing Riser Kit 2015-06-11 Thank you for purchasing this PERRIN product for your car! Installation of this product should only be performed by persons experienced with installation of aftermarket
MGB V8 Roadster restoration project Report 136
 20 th May 2017. CARPET & TRIM FITTING continued I carried on with fitting the sill carpets first. The upstand that the door seal rubber fits to is just the height of the seal. Therefore, there is not a
Evertune ET001F and ET001T Router Template Instructions
 Evertune ET001F and ET001T Router Template Instructions 2011-05-05 All Templates: Every template has scribe lines for the guitar centerline and the scale length. Every template should be positioned so
BMW X5 OEM RUNNING BOARD PART#SBBW
 INSTALLATION INSTRUCTIONS 2014-2016 BMW X5 OEM RUNNING BOARD PART#SBBW-146-74 QTY HARDWARE 1 Driver Side OEM Running Board 1 Passenger Side OEM Running Board 8 Rivet Pin 1 Page Step 1: Verify all parts
PARTS INCLUDED IN FIXED STAIR CABLE RAIL KIT:
 175 SERIES FIXED STAIR CABLE RAIL - INSTALLATION INSTRUCTIONS PARTS INCLUDED IN FIXED STAIR CABLE RAIL KIT: FIXED STAIR TOP RAIL (1) A FIXED STAIR BOTTOM RAIL (1) B D UPPER SADDLE BRACKET (1) C BRACKET
INSTALLATION INSTRUCTIONS INS T A L L A TIO N INS T R U C TIO N S ROD IRON SCROLL HANGER R H
 INS T A L L A TIO N INS T R U C TIO N S ROD IRON SCROLL HANGER 10.5.2016 2-1- 3/16" 11/16" 8" 8 O 2-7/8 Ø2-7/8" 3-1/2 3-1/2" 12-9/16 12-9/16" PLEASE NOTE: These instructions are specific to a particular
WAREHOUSE HANGER INSTALLATION INSTRUCTIONS R H INS T A L L A TIO N INS T R U C TIO N S
 INS T A L L A TIO N INS T R U C TIO N S WAREHOUSE HANGER NOTE: Due to the size and weight of the Warehouse Hanger it is recommended that this Hanger be installed on 3 4 or wider doors. 10.11.2016 2-3/16"
General Prisoner Transport Install Instructions PT-2-INST
 General Prisoner Transport Install Instructions PT-2-INST 50 or 60 high x 80, 100 & 120 inch long / Double Compartment Inserts Also refer to PT-A-3XX instructions for vehicle specific mounting measurements
Standard Kit #1 (3-way switch)
") Standard Kit #1 (3-way switch) Please Read All Instructions Before Beginning. Tools you will need: Soldering Iron (35 watt preferably) Solder Wet Sponge Wire Clippers 3/8 Drill Bit 1/4 Drill Bit Variable
Standard Kit #1 (3-way switch) Please Read All Instructions Before Beginning. Tools you will need: Soldering Iron (35 watt preferably) Solder Wet Sponge Wire Clippers 3/8 Drill Bit 1/4 Drill Bit Variable
Rust Repair Patches Made Easy
 Rust Repair Patches Made Easy Automotive bodies have a common ailment, we all know as rust! This booklet provides you with complete and comprehensive information on how to repair rust permanently on any
Installation Instructions
 READ BEFORE INSTALLING UNIT For Slider Casement Air Conditioners To avoid risk of personal injury, property damage, or product damage due to the weight of this device and sharp edges that may be exposed:
Jeep. Cut-Out Fender Flares Set of 4. Included in Hardware Kit: Set Part # Rev-8 06/29/16 STEP 1 PRIOR TO INSTALLATION
 STEP 1 PRIOR TO INSTALLATION A) Bushwacker only approves installing the flares according to these written instructions with the hardware provided. WARNING: Failure to install according to these instructions
Sea Doo Spark Engine Access Kit
 Sea Doo Spark Engine Access Kit PART# - RS4-130-EAK APPLICATION(S): Sea Doo Spark. 2up & 3up Models. We strongly recommend the use of a service manual to familiarize yourself with the various components
ED1300/1300F SERIES CONCEALED VERTICAL ROD DEVICE INSTALLATION INSTRUCTIONS
 ED1300/1300F SERIES CONCEALED VERTICAL ROD DEVICE INSTALLATION INSTRUCTIONS Ver.2 1300 SERIES CONCEALED VERTICAL ROD DEVICE Top Strike Latch Screws Strike Screws Release Plunger Top Latch Plunger Screws
Rockwell 4-in-1 Sliding Door
 Rockwell 4-in-1 Sliding Door ASSEMBLY INSTRUCTIONS ROCKWELL 4-IN-1 SLIDING DOOR Recommended Tools Drill with Phillips Bit Socket Wrench with 7/16 Socket Rubber Mallet Adjustable Square ROCKWELL 4-IN-1