Cardboard Cup Regatta Plans and Directions
|
|
|
- Logan Chambers
- 5 years ago
- Views:
Transcription


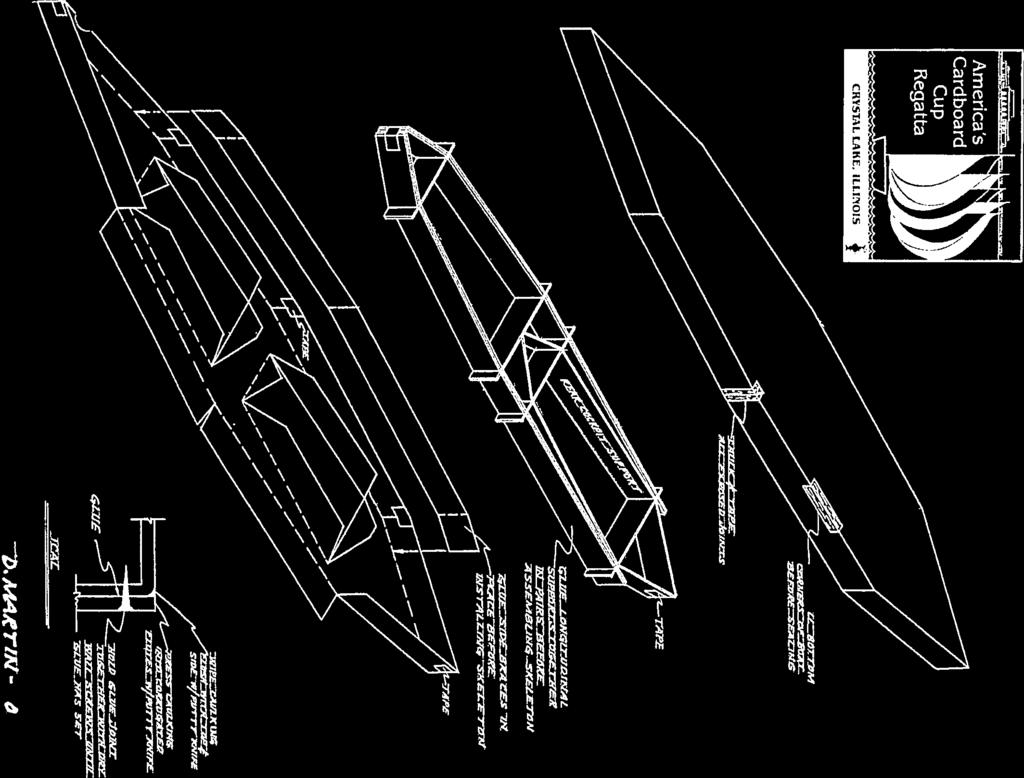
1 To help celebrate the upcoming Crystal Lake America s Cardboard Cup Regatta, we have asked a veteran of 18 races to submit a set of plans and directions to build an unsinkable and competitive cardboard boat. The attached 2 person boat plans were designed around the following parameters: 1. Easy to build 2. Strong 3. Lightweight 4. Durable 5. Stable 6. Fast 7. Propelled by either Kayak or canoe paddles This boat has been racing in one and two person configurations since 2001 and has experienced excellent results. No boat has failed to advance to the second round of heats. Chances are slim for this boat to win the America s Cardboard Cup, but a good crew could pilot her to the Final Five. A large scale PDF template is available upon request. 1. Pencils 2. 2 paint brush measuring tape long straight edge 5. Razor knife with retractable blade Tools Required Materials Required putty knife x16 framing square 8. #2 Phillips screw driver oz. caulking gun 1. 6 sheets of double strength cardboard 44 x 120 available from the Crystal Lake Park District Main Beach Garage after May 1 st. 2. White or yellow carpenter s glue 3. #6 x 1 ¼ Dry Wall Screw 4. 3 wide reinforced Kraft paper carton tape 5. Masking tape 6. Jet Dry water softening solution for dish washers oz. tubes of siliconized acrylic caulk or acrylic latex caulk plus silicone 8. Oil base wood sanding sealer for varnish 9. Oil base polyurethane varnish 10. Paint thinner for brush cleaning Step 1 The sheets of double strength cardboard provided by the Crystal Lake Park District are 88 x 120 and are difficult to move. This boat is designed around material 44 wide. When picking up the material be sure to bring a chalk line, tape measure and a razor knife. Cut each sheet 1
2 into two pieces measuring 44 x 120. Now fold in half to a 44 x 60 dimension. You now have a size readily moved to your boat construction site. In the building process cover the fold line with a piece of Kraft carton tape. Step 2 Build a work table. This is an elective. While this boat can be built on the floor, it is more easily done on a large table. This can be accomplished using 4 saw horses, 4 2 x4 s, 16 long and 2 sheets of ½ CDX plywood. Place the 2x4 s flat on the saw horses and then place the plywood end to end on the 2x4 s. Use dry wall screws to fasten the plywood to the 2x4 s. You now have a 4 x 16 level work table that can easily be disassembled for storage or the material used for other projects. Step 3 Cut 2 pieces of cardboard 72 x 44. Butt the factory cut end of one piece to the factory cut end of a piece 44 x 120 being sure the factory cut edges are lined up. Tape this joint together with a single piece of 3 Kraft tape. A scab will be installed to reinforce this joint on the boat bottom later in construction. Repeat to make a second large piece. When laying out the boat be sure these top and bottom joints are toward opposite ends of the boat per the drawings. Step 4 Layout Accuracy is critical to easy assembly. All initial measurements are made from factory cut ends or edges. All measurements are in inches. We are not using the metric system here. For the top and bottom layout measure 22 from the factory edge at each end and snap a chalk line to establish the boat s center line. Transfer the plans in full scale to the cardboard blanks. All dotted lines should be drawn as dotted lines. Step 5 Cutting All solid lines on the drawings are cut lines. Whether your cuts are made using a straight edge or done free hand, they must be straight and accurate. Use only fresh, sharp blades in your razor knife. Do not try to cut through the double strength cardboard with one swipe. Mark the identity and location on each piece as you cut it out. Step 6 Assembly Okay, the grunt work is over. Now the boat will begin to rapidly take shape. a. Take the rib marked rear-rear c pit with the slots pointed up and insert the rear cockpit supports with the slots down into the rib slots. Take the rib marked front-rear c pit with the slots pointed up and insert the rear cockpit supports into the rib s narrow slots. Fold the ends of the rear cockpit supports together and tape. b. Glue the longitudinal supports together in pairs. After the glue dries (approximately 15 minutes), mount onto the front cockpit ribs in a similar fashion to step 6-a. Fold front ends together and tape. Take this sub-assembly and mount to the rear cockpit sub-assembly as shown in the exploded view. This now completes the skeleton. c. Fold preparation/scoring Cardboard must be bruised along fold lines to facilitate bending. This can be done using a razor knife with the blade retracted and a straight edge. Hold the straight approximately 1/8 from the dotted (fold) line. Using the round pointed end of the razor knife handle apply pressure and draw the knife towards you. Do not be alarmed if you break the top paper surface of the cardboard. This will not harm the integrity of the boat. 2
3 Practice on scrap pieces until you discover how much pressure to apply to obtain a good fold. d. Boat top assembly To ease construction the boat top assembly is built upside down. Fold all boat flaps (sides and cockpits) a full 180. The flaps will partially return to their original position due to the Memory of the material. Raise flaps to the vertical position and tape joints on boat sides to form a cup or a box bottom. To temporarily hold sides in a vertical position, tape side joint to matching side joint with masking tape. Glue side braces in place being sure it laps over all vertical side joints. Hold together with dry wall screws until glue has set (15 minutes minimum). Remove dry wall screws and temporary masking tape. Drop the skeleton into the top cup and use the cockpit flaps to position it. If any rib is too long to drop freely to the bottom of the cup, trip its length until it will do so. Apply glue to cockpit flaps one at a time and fasten with dry wall screws to the skeleton. Do not remove these screws until just prior to installing cockpits. Set assembly aside. e. Score, fold and tape joints in the bottom cup in a similar fashion to the top cup. Glue the joint reinforcing scab in place per the drawing. Notch the skeleton to allow for the scab and to permit the inside of the bottom cup to come in complete contact with the skeleton. Place a heavy bead of caulking along all of the exposed edges of the skeleton. This will bond the boat bottom to the skeleton and greatly improve the rigidity of the entire assembly. Turn the bottom cup over (it now becomes a lid) and lower it onto the top assembly. Place 2 temporary screws in each flap to hold top and bottom together. Locate these screws ¾ from the boat top. Flip the entire assembly over. Remove screws. Apply glue to bottom flaps one at a time and anchor to boat top sides with dry wall screws ¾ from the top of the boat. Allow to dry for at least 8 hours before removing screws. f. Cockpit installation The floor of the front cockpit is uneven because of the joint reinforcing scab. Cut, fit and glue pieces of scrap material to make the floor flush and even. Score and fold the cockpits into box shapes. You will have to trim the cockpit sides flush with the boat top after installation. Push the cockpit box into the cockpit opening. It will probably be a tight fit. Now, after you have struggled to get it in place, remove it. Remove cockpit flap screws. Apply glue to sides and bottom of cockpit openings. Re-insert cockpit and fasten with dry wall screws ¾ from top of boat. Trim cockpit sides flush with the top of boat. Let glue dry at least 1 hour before removing screws. Step 7 Caulking Neatness counts here, not only for thoroughly sealing all joints, but to make it easier to tape those joints later. Let s get rid of those little screw holes first. Place a dab of caulking in each hole slightly larger than the amount required to fill it. Using your putty knife, press the caulking into the hole and wipe it flush with the cardboard surface with one stroke. As excess caulk builds up on the putty knife, wipe it off on some nearby seams. After you are done with the holes, lay a heavy bead of caulking on the corner joints. Only work 3 of joint at a time. Press caulking into any corrugated edge flutes and gaps between adjoining pieces of cardboard and wipe any excess off with your putty knife. Transfer any excess to a nearby un-caulked joint. 3
4 Don t forget the butt seams on the bottom and sides of the boat. Caulk all inside corners of the cockpits. Wipe in with a wet finger to provide a smooth round fillet. Step 8 Taping Kraft reinforced carton tape requires a special moistening solution to stick well. Ordinary tape water causes the tape edges to curl up as it dries. Commercial water additives are not readily available. A suitable substitute called Jet Dry can be located at your local grocery store near dishwasher soaps. Add ½ small bottle to a gallon of water. Test to see if this concentration works for you. Apply moisture to tape with a sponge. If you have access to a tape-dispensing machine, it will immensely shorten your taping time. Start by taping the bottom corners of the boat. While this bottom corner is not a joint, bending the cardboard stresses the paper fibers on an outside corner to such a degree, it is impossible to properly waterproof with any kind of sealer. Apply 2 layers of tape over butt joints lapping 1. Tape all interior corners of cockpits. Next, thoroughly tape bow and stern. Lastly, tape all outside corner joints with 2 pieces of tape lapping 1. Step 9 Waterproofing Inspect all un-taped surfaces of the boat for damage to the outer layer of paper. If any damage is found, patch with caulk and tape. Apply 2 coats of oil base wood sanding sealer for varnish. On a sunny day, both coats can be applied on the same day. Then apply 3 coats of oil base polyurethane varnish. Allow 24 hours of drying time between coats. Painted decorations can be added over this finish if desired. A clear finish has one distinct advantage over a painted boat. If, after a race, you discover a dark brown spot, it indicates your waterproofing has been breeched at this point. A leak discovered early is easy to repair on the spot. Just dry it off, touch up with caulking and cover with a piece of duct tape. This patch will last the remainder of race day and permanent repair can be made at your leisure. A leak in a fully painted boat will probably not be discovered until the boat starts to turn to mush. Be smart. Decorate only the top deck of your boat. Conclusion This set of plans and directions is intended to accomplish three things: 1. To give you exact dimensions to build a boat. 2. To expose you to a construction method to use in your own boat design. 3. To encourage you to participate in this event year after year. If we have done this, we consider our efforts to be a success! SEE YA AT THE RACE!! 4
5 Miscellaneous 1. This boat displaces 832 pounds 2. Maximum total crew weight = 400 pounds 3. Carry boat standing on edge 4. Never set boat directly on the ground 5. To use of kayak paddles should increase your speed but only if the crew members are well coordinated 6. Use a loose cushion i.e. soft Styrofoam at least 2 thick. Raising your body in the cockpit will give you a stronger stroke 7. Bring a patch kit consisting of caulk gun caulking putty knife razor knif duct tape 8. Water weighs 62 pounds per cubic foot 9. One cubic foot equals 1728 cubic inches 10. Cubic footage of boat hull x 62 pounds equals boat displacement in pounds 11. Safe crew load equals ½ of displacement 12. If your family will not fit in a 17 cockpit, adding 2 to the weight of this boat increases the displacement by 73 pounds 13. Each 1 added to the depth of this boat increases the displacement by 119 pounds 14. The combination of 2 extra width and 1 in extra depth increases the displacement by 203 pounds 15. If you choose option 12, 13 or 14 you will need a heck of a lot more cardboard 16. Arrive early to obtain good vehicle parking and boat parking 17. Vehicle parking is across the street from Main Beach 18. Boats enter the North gate at Main Beach 19. The least congested boat parking spots are South of the playground. It is also close to the starting line 20. Unless you have a really fast boat the best starting position is the left end. This will help you avoid congestion at the first buoy 21. Generally speaking, boats having a time of 2 minutes or less in the first heat will advance to the second round 22. Advancement is based solely on time 23. The course record set in 2003 by Ryan Stephens is 39 seconds 24. The boat was built by the author of these plans Thank you to Mr. Dave Martin for developing the Plans and Directions
6

7


8
Supplies required to build a cardboard boat. (SAMPLE BOAT)
") ! 1 Supplies required to build a cardboard boat. (SAMPLE BOAT) 1. A sharp cutting tool 2. 1 quart (or more) of contact cement - (Gallon size shown) 3. 2 tubes (or more) of construction adhesive (like Liquid
! 1 Supplies required to build a cardboard boat. (SAMPLE BOAT) 1. A sharp cutting tool 2. 1 quart (or more) of contact cement - (Gallon size shown) 3. 2 tubes (or more) of construction adhesive (like Liquid
Frameless Inline Door With Return QCI5263
 INSTALLATION INSTRUCTIONS Frameless Inline Door With Return QCI5263 WALL MOUNT HINGES FRAMELESS DOOR / PANEL / RETURN PANEL QCI5263 REV. 0 Page 1 Certified 06/17/2016 Parts List with wall mount hinges
Frameless Inline Door QCI5248
 INSTALLATION INSTRUCTIONS Frameless Inline Door QCI5248 FRAMELESS PANEL / DOOR / PANEL QCI5248 REV. 0 Page 1 Certified 06/16/2016 Parts List with glass to glass hinges *Quantities may vary. **Support Bar
FIXED SHOWER SCREEN For Wall Mount Hinges QCI5283
 FIXED SHOWER SCREEN For Wall Mount Hinges QCI5283 QCI5283 Page 1 Date Certified: 06/16/2016 Parts List with wall mount clamp ITEM NO. DESCRIPTION QTY. 1 FIXED GLASS PANEL 1 2 WALL MOUNT CLAMP 1 3 U-CHANNEL
Pocket Door Installation Instructions
 Installation Instructions Before getting started: Read instructions thoroughly. Be sure that you have the necessary tools and materials before starting the installation. Consult your local building code
Balustrade Systems / Installation Instructions
 A. PARTS AND SUPPLIES NEEDED FOR INSTALLATION Hardware included for each 10 section of rail: 2 3 x 1-1/2 L-brackets 4 1-3/4 x 3/16 Blue hex-head screws for anchoring the L-brackets to the newel cap, column
Frameless Bypass Slider
 INSTALLATION INSTRUCTIONS Frameless Bypass Slider QCI-5301 Heavy Glass Bypass Slider with Exposed Rollers QCI5301 Rev 0 Page 1 Certified 11/1/2016 Tools: To install your New Shower Enclosure, you may need
INSTALLATION INSTRUCTIONS 960 RODA GLASS TO GLASS HINGES ANGLED FRAMELESS PANEL / DOOR / PANEL CELESTA DRESDEN TRESOR
 INSTALLATION INSTRUCTIONS 960 RODA GLASS TO GLASS HINGES NEED INSTALLATION HELP? Call 1-800-45-BASCO (452-2726) Monday - Friday 8:00 A.M. - 4:30 P.M. Eastern Time ANGLED FRAMELESS PANEL / DOOR / PANEL
Installation Guide. Pionite Decorative Surfaces One Pionite Road, Auburn, Maine PIONITE ( )
") Installation Guide A Subsidiary of Panolam Surface Systems SMPBRO00-012 6/14 Pionite decorative laminates are designed for finished interior surfaces which require high impact, wear and stain resistance
Installation Guide A Subsidiary of Panolam Surface Systems SMPBRO00-012 6/14 Pionite decorative laminates are designed for finished interior surfaces which require high impact, wear and stain resistance
Installation Instructions
 www.marlite.com Effective Date 03/01/2018 ARTIZAN FRP, SYMMETRIX FRP, ENVUE FRP, STANDARD FRP Installation Instructions Statements expressed in this technical bulletin are recommendations for the application
Donaldson s Department Store
 Donaldson s Department Store Instructions for Assembly of Donaldson s Department Store Kit Contents: 80 each laser cut acrylic parts. 1 each sheet of canopy parts. 1 each sheet of AC roof unit parts. 1
The Park Hotel Instructions for Assembly of N Scale Kit
 The Park Hotel Instructions for Assembly of N Scale Kit Kit Contents: 198 ea. Laser Cut Acrylic Parts, 2 ea. Chimney Parts Sheets, 1 ea.2".040 styrene rod, 5 ea. Sidewalk Parts, 14 ea. Cast Resin Dormers,
Frameless Fixed Panel Slider
 INSTALLATION INSTRUCTIONS Frameless Fixed Panel Slider QCI-5279 SINGLE ROLLER WITH ANTI-JUMP DOUBLE ROLLERS QCI5279 Rev Page Certified 08/09/6 Tools: To install your New Shower Enclosure, you may need
The Park Hotel Instructions for Assembly
 The Park Hotel Instructions for Assembly Kit Contents: 280 ea. Laser Cut Acrylic Parts. 1 ea. 6" Plastic Coated Wire. 5 ea. Sidewalk Parts. 14 ea. Cast Resin Dormers. 12 ea. Window Glass Templates, 12
Frameless Inline Door QCI5254
 INSTALLATION INSTRUCTIONS Frameless Inline Door QCI5254 FRAMELESS DOOR / PANEL QCI5254 REV. 0 Page 1 Cer fied 06/16/2016 Parts List with wall mount hinges *Quanes may vary QCI5254 REV. 0 Page 2 Cer fied
The Rubley Building Instructions for Assembly of the N scale kit. v1.1
 The Rubley Building Instructions for Assembly of the N scale kit. v1.1 Kit Contents: 197 ea. laser cut 1/16" acrylic parts. 1ea. adhesive backed.020 styrene part. 10 ea..060 x 1" styrene alignment pins.
675 Quick N Stall Neo Angle Framed Hinge Shower Enclosure
 INSTALLATION INSTRUCTIONS 675 Quick N Stall Neo Angle Framed Hinge Shower Enclosure Call Technical Dept @ 1-800-452-2726 QCI1003 Page 1 of 9 Certified 10/01/09 INSTALLATION NOTES: Unpack your unit carefully
INSTALLATION INSTRUCTIONS 935 RODA GLASS TO GLASS HINGES FRAMELESS DOOR / PANEL CELESTA DRESDEN GEOLUX TRESOR VONSE
 INSTALLATION INSTRUCTIONS 935 RODA GLASS TO GLASS HINGES NEED INSTALLATION HELP? Call 1-800-45-BASCO (452-2726) Monday - Friday 8:00 A.M. - 4:30 P.M. Eastern Time FRAMELESS DOOR / PANEL CELESTA DRESDEN
PREMIUM CONCRETE COUNTERTOP MIX INSTALLATION INSTRUCTIONS
 PREMIUM CONCRETE COUNTERTOP MIX INSTALLATION INSTRUCTIONS High Strength Fast Setting Pourable Helpful Items: TCC Materials February 09 Version 2.0 Tools Required: Concrete mixer or ½ drill (600 RPM or
Big Oz. Rocket. User Guide V0313
 Big Oz Rocket User Guide 59824 V0313 Materials Included The Big Oz Rocket Kit should include the following materials. If something is missing, contact Customer Service at 800-358-4983. 20-ounce plastic
Cobra X Q Construction Tips Construction: Bel y pan
 Cobra X Q Construction Tips : The white plastic in this kit is high impact styrene. It can be painted with most types of coatings if light coats are applied this is necessary due to the thickness of the
CPB-1 Lightweight Folding Pram
 Lightweight Folding Pram An ultra-lightweight folding pram, only 15 pounds. Ideal for the lone fisherman or paddling enthusiast. Easy to make and fits in any vehicle when folded! See the hull and load
Instructables Butcher Block Top
 Instructables Butcher Block Top Project Overview: This project requires basic woodworking skills and access to woodworking machines. Woodworking machines have sharp cutting edges and are NOT forgiving.
FIXED PANEL SLIDER QCI5241
 INSTALLATION INSTRUCTIONS FIXED PANEL SLIDER QCI5241 FRAMELESS PANEL / DOOR / PANEL FRAMELESS DOOR / PANEL QCI5241 REV. 0 Page 1 Certified 06/16/2016 Parts List *Quantities may vary QCI5241 REV. 0 Page
Frameless Fixed Panel Slider QCI5279
 Frameless Fixed Panel Slider QCI5279 F AB GLASS AND MIRROR www.fabglassandmirror.com Call: +1 888-474-2221 Fax: (614)-334-4919 Office Timing: 8:30-18:00 EST info@fabglassandmirror.com Frameless Fixed Panel
Miniature Steam Models Wattle Steam Powered Launch
 Miniature Steam Pty Ltd Bringing the Highest Standards to Model Engineering Assembly Instructions Miniature Steam Models Wattle Steam Powered Launch Manufacturer: Miniature Steam Pty Ltd PO Box 16 Montrose
Installation Instructions
 Aspex Digitally Printed Wall Art PL PREMIUM HEAVY DUTY ADHESIVE ASPEX WALL ART DOUBLE SIDED FOAM TAPE Installation of Aspex Digitally Printed Wall Art with Foam Tape and PL Premium Adhesive. Maximum size
Repairs. Chapter 10 Repairs 10. 1
 10 Repairs Chapter 10 Repairs 10. 1 Repairs As an installer, you will probably be called upon to repair damage to a resilient floor. Here are some of the most common problems and the recommended repairs
FLEXITEEK INSTALLATION INSTRUCTIONS
 an Advanced Plastic Fabrications Company 99 marcus Blvd., 631.244.3620 631.231.4466fax FLEXITEEK INSTALLATION INSTRUCTIONS Before you begin, take your new Flexiteek deck out of the shipping package and
1/4 FRAMELESS DOOR WITH INLINE PANEL 1413A-1713A-1813A
 1/4 FRAMELESS DOOR WITH INLINE PANEL 1413A-1713A-1813A F AB GLASS AND MIRROR www.fabglassandmirror.com Call: +1 888-474-2221 Fax: (614)-334-4919 Office Timing: 8:30-18:00 EST info@fabglassandmirror.com
The Saint Paul Building
 The Saint Paul Building Instructions for Assembly of The Saint Paul Building. Kit Contents: 65 each laser cut acrylic parts. 1 each sheet of AC roof unit parts. 1 each sidewalk. 3 each Window Glass Templates,
Building the Gothic Church
 Building the Gothic Church Mold #54 does not contain all of the blocks to build this church. You will need extra regular blocks (1/2" x 1/2" x 1") and square blocks (1/2" x 1/2" x 1/2"). These blocks can
Sawn Baluster Sizing and Installation Guide
 Sawn Baluster Sizing and Installation Guide Welcome to the Durabrac sizing and installation guide for Sawn Balusters. This guide has been prepared to answer any questions you may have about our Sawn Balusters
3/8 FRAMELESS BYPASS SLIDING SHOWER ENCLOSURE
 INSTALLATION INSTRUCTIONS 3/8 FRAMELESS BYPASS SLIDING SHOWER ENCLOSURE QCI-5017 QCI5017 Rev. 3 Page 1 of 9 Certified 12/6/17 INSTALLATION NOTES: Unpack your unit carefully and inspect for freight damage.
Hotel Belvedere Instructions for Assembly of the HO scale kit. v1.1
 Hotel Belvedere Instructions for Assembly of the HO scale kit. v1.1 Kit Contents: 319 ea. laser cut.090" acrylic parts. 132 ea. laser cut.060" acrylic parts. 8 ea. window glass templates 8 ea. window glazing
Installation Instructions Palladium Square Edge Panels
 Please read all instructions before installing wall panels Important 1. Before installation: a. Acclimate Palladium Panels, Trim, adhesives and wall substrates to room temperature 24 hours before installation.
Building Instructions Diva cabin boat
 Building Instructions Diva cabin boat Order no. 3093/00 aero-naut Modellbau Stuttgarterstr. 18-22 D-72766 Reutlingen / Germany http://www.aero-naut.com 1 For pictured building instructions please see the
MUDGUN Drywall Finishing System
 Watch the demonstration video online at hydetools.com MUDGUN Drywall Finishing System Quick Start Guide Hyde Tools, Inc. / A Hyde Group Company / 800-872-4933 / custrelations@hydetools.com / hydetools.com
#11179 Wellington ARBOR
 #11179 Wellington ARBOR Assembly INSTRUCTIONS TOOLS NEEDED Tape Measure Variable Speed Drill with #2 Phillips Bit (recommended) or Phillips Screwdriver Hammer or Mallet ARBOR SIDE PANEL ASSEMBLY (Refer
Frameless Bypass Slider
 INSTALLATION INSTRUCTIONS Frameless Bypass Slider QCI-5301 3/8 or 1/4 Glass Bypass Slider with Exposed Rollers QCI5301 Rev 1 Page 1 Certified 6/5/2017 Tools: To install your New Shower Enclosure, you may
Stair Parts Installation. Tricks
 Stair Parts Installation Tips & Tricks Introduction Your DIY staircase guide Welcome to the Stairpart home installation guide. Your stairway is both a functional and focal point in your home, so keeping
Cockpit Kit. Full Depth - Builds Quickly - Light Weight READ THROUGH THIS INSTRUCTION MANUAL FIRST. IT CONTAINS IM- laser cut wood kit
 The Savage Light Sukhoi Su- 27 Cockpit Kit contains everything you need to build a full depth semi scale Su-27 cockpit, yet adds less than an ounce to your finished model s weight (not including pilot).
The Fyfe Building Instructions for Assembly of the N scale kit.
 The Fyfe Building Instructions for Assembly of the N scale kit. Kit Contents: 150 each laser cut 1/16" acrylic parts. 6 each 020 adhesive backed part 6 each column caps 2 each decorative canopy 1 each.125"
TM TM DOG HOUSE Age 9+
 TM TM DOG HOUSE Age 9+ Safety First! Use eye protection, always! Use ear protection with loud power tools Stay with kids while they work! Follow tool manufacturers safety guidelines This project is recommended
VERTICAL STILE ABOVE HORIZONTAL TRIM VERTICAL STILE BELOW COVE BASE ADHESIVE. 1" [25.4mm] BASE DETAIL
![VERTICAL STILE ABOVE HORIZONTAL TRIM VERTICAL STILE BELOW COVE BASE ADHESIVE. 1 [25.4mm] BASE DETAIL](/thumbs/87/96020661.jpg "VERTICAL STILE ABOVE HORIZONTAL TRIM VERTICAL STILE BELOW COVE BASE ADHESIVE. 1 [25.4mm] BASE DETAIL") Please Read All sheet will be provided in stock sizes for field cutting. All trims will be provided in 8-0 stock lengths for field cutting. CEILING TRIM 1" [25.4mm] Acrovyn Interiors vinyl acrylic wall
Please Read All sheet will be provided in stock sizes for field cutting. All trims will be provided in 8-0 stock lengths for field cutting. CEILING TRIM 1" [25.4mm] Acrovyn Interiors vinyl acrylic wall
Installation Instructions Palladium 3D Hi Impact Wall System, Partial Height with Color Matched Caulk Joints
 Please read all instructions before installing Palladium 3D Hi Impact Wall System.. Before installation: a. Acclimate rigid sheet, Palladium 3D boards, adhesives and wall substrates to room temperature
Dura-Lock Roof System
 DLR-14 Dura-Lock Roof System Assembly and Installation Instructions Read the instructions before starting the job. They explain the steps required to produce a finished product that will meet factory specifications.
TAPE & GLUE PROCESS Version: Jun. 2011
 FREE to print TAPE & GLUE PROCESS Version: Jun. 2011 The following small boat assembly process was developed out of the need for an easy, lightweight, cost effective and health friendly method of providing
The Midtown Apartment Building
 The Midtown Apartment Building Instructions for Assembly of The Midtown Apartment Building. Kit Contents: 70 each laser cut acrylic parts. 3 each sidewalk parts. 3each Window Glass Templates, 3 each Window
Flash Coving. Chapter 8 Flash Coving 8. 1
 8 Flash Coving Chapter 8 Flash Coving 8. 1 Flash Coving A. TOOLS In addition to the normal tools (knives, dividers, recess scribers, straightedges, rollers, trowels, etc.), other tools are also needed
Nanton Grain Mill Assembly
 ( 1 ) Nanton Grain Mill Assembly Locate package for assembling storage building. These are cut from 1/8 masonite. Inspect and lightly sand edges where it will be bonded. Use white glue or CA glue to bond.
Wall Panel Installation
 Wall Panel Installation Special care must be taken in handling of panels with grout lines, especially in cold weather. The indented grout lines are by necessity a little thinner than other areas of the
Installation Guide. Aspect Stone Peel & Stick Tile. proper surface preparation is essential for a successful project. Installations Methods
 Aspect Stone Peel & Stick Tile Installation Guide E proper surface preparation is essential for a successful project Failure to follow recommended surface preparation instructions may void the warranty.
The Ballistic Blaster Rocket Kit should contain the following items. If anything is missing, call Customer Service at
 Ballistic Blaster User Guide Materials Included The Ballistic Blaster Rocket Kit should contain the following items. If anything is missing, call Customer Service at 800-358-4983. Body tube, 6-1/2" long,
Installation Instructions
 Installation Instructions Follow these simple instructions to install your OneDayCab! IMPORTANT: Unpack and check shipment for damage. Verify color, size and parts before demolition. Installation of interiors
UNIT No FRAMELESS PIVOT SHOWER DOOR
 INSTALLATION INSTRUCTIONS UNIT No. 3600 FRAMELESS PIVOT SHOWER DOOR NEED INSTALLATION HELP? Call 1-800-45-BASCO (452-2726) Monday - Friday 8:00 A.M. - 4:30 P.M. Eastern Time QCI0020 Rev. 3 Page 1 of 8
BARRIER FREE SHOWER PAN INSTALLATION INSTRUCTIONS
 BARRIER FREE SHOWER PAN INSTALLATION INSTRUCTIONS 1. 2. 3. 4. 5. 6. READ ALL INSTRUCTIONS BEFORE INSTALLATION Avoid exposure to weather. Product carton is not waterproof. Carton exposed to rain or snow
935 RODA VINESSE NEED INSTALLATION HELP? DOUBLE ROLLERS FRAMELESS DOOR INSTALLATION INSTRUCTIONS QCI XX/XX/XXXX. Call BASCO ( )
") INSTALLATION INSTRUCTIONS 935 RODA DOUBLE ROLLERS FRAMELESS DOOR NEED INSTALLATION HELP? Call 1-800-45-BASCO (452-2726) Monday - Friday VINESSE QCI0286 1 XX/XX/XXXX 935 Roda Parts List With double rollers
INSTALLATION INSTRUCTIONS 935 RODA DOUBLE ROLLERS FRAMELESS DOOR NEED INSTALLATION HELP? Call 1-800-45-BASCO (452-2726) Monday - Friday VINESSE QCI0286 1 XX/XX/XXXX 935 Roda Parts List With double rollers
Parts List. Description. Installation Instructions
 Page 1 of 7 Parts List Aluminum Coping Hardware Kit 1 pkg Tek screws 1 tek screw nut driver 1 Snap strip removal tool 1 can Touch up spray paint 1 11/64 drill bit 8 pieces 1/8 Gray PVC 4 long 2 boxes Aluminum
Mach Wall Installation Instructions
 Mach Wall Installation Instructions Planning the Job Since Mach Wall is an innovative product that accomplishes 3 tasks at the same time (frame, insulate and drywall) and it replaces traditional framing,
AWNING / PATIO COVER INSTALLATION INSTRUCTIONS
 AWNING / PATIO COVER INSTALLATION INSTRUCTIONS Before You Begin Read the installation instructions thoroughly before beginning the installation procedure. Perspective In the Awning Instructions, Back means
Installation Instructions for Siding
 Smart-Shingle TM System "The new smart way to install cedar shingles." - This Old House Installation Instructions for Siding V3.2 INSTALLATION GUIDE MARKS Shingle-Strip 0 1 2 3 4 5 6 7 8 9 10 11 12 13
Installation Instructions Models: SESD180, DESD180, MESD180 1/4" Semi-Frameless Door and 3/8" In-Line Panel
 Models: SESD180, DESD180, MESD180 Scan this Barcode for Parts Bag BP.3143.NLT Thank you for purchasing this outstanding product! This booklet will help you install your units safely and successfully. IMPORTANT:
QCI0029 REV. 1 Page 1 of 11 Certified 07/06/05
 QCI0029 REV. 1 Page 1 of 11 Certified 07/06/05 MAINTENANCE: Two primary materials are used to manufacture your new Basco enclosure: tempered glass and anodized aluminum. To assure a long lasting finish
Plexidor Pet Door Wall Kit Instruction for All Sizes Plexidor : S, M, L, XL; BiteGuard KennelPlex TM 1113,1418, 1419 & 1825 and Plexidor Electronic LG
 Plexidor Pet Door Wall Kit Instruction for All Sizes Plexidor : S, M, L, XL; BiteGuard KennelPlex TM 1113,1418, 1419 & 1825 and Plexidor Electronic LG Congratulations on your purchase of the Plexidor Pet
FLEX 48 x 72 / 60 x 72
 FLEX 48 x 72 / 60 x 72 SHOWER DOOR INSTALLATION INSTRUCTIONS IMPORTANT DreamLine reserves the right to alter, modify or redesign products at any time without prior notice. For the latest up-to-date technical
Contents. pages 20-24: Installing Edge sinks into. custom laminate countertops page 8: Installing Edge sinks into postform laminate countertops
 Contents pages 2-8: Installing Edge sinks into custom laminate countertops page 8: Installing Edge sinks into postform laminate countertops pages 9-14: Installing Acrylic sinks into custom laminate countertops
Max Launch Abort System Prod. No *Kevlar is a registered trademark of Dupont
 Flying Model Parts List Max Launch Abort System Prod. No. 3014 A 11820 - Body Tube 3.5 Diam x 5.5" Long B 11824 - Orange Capsule Base Shoulder Ring C 16032 - Laser-cut Ring motor mount rear D 16033 - Laser-cut
The Severn Instructions for Assembly of the N scale kit.
 The Severn Instructions for Assembly of the N scale kit. Kit ontents: 172 each laser cut 1/16" acrylic parts 102 each adhesive backed styrene parts 1 each cast entryway 3 each cast balcony 4 each cast
Wall Installations. Chapter 16 Wall Installations 16. 1
 16 Wall Installations Chapter 16 Wall Installations 16. 1 Alterna Premium Groutable Tile Create decorative backsplashes, accent walls, or other focal points with any size Alterna 16" x 16", 8" x 16", 8"
Balustrade System Installation - Cambridge & Huntington
 A. PARTS AND SUPPLIES NEEDED FOR INSTALLATION Hardware included for each 10 section of rail: 2 3 x 1-1/2 L-brackets 4 1-3/4 x 3/16 Blue hex-head screws for anchoring the L-brackets to the newel cap, column
Chapter 23. Garage Construction
 Chapter 23. Garage Construction 23.1 ESTABLISHING CHALK LINES 23.2 MEASURING AND CUTTING WALL PLATES 23.3 MARKING WINDOW & DOOR LOCATIONS ON EXTERIOR WALL PLATES 23.4 MARKING STUDS ON EXTERIOR WALL PLATES
Building instructions ARTEMIS Sailing Canoe Day Five Version 1.0 Brian Pearson & Dr. Axel Schmid Day Five. Assembly of Planks and Frames
 Building instructions ARTEMIS Sailing Canoe Version 1.0 Brian Pearson & Dr. Axel Schmid 2016 Assembly of Planks and Frames Steps: Assembling hull plansk with wire Install frames Align and check keel rocker
tile redi redi DOOR Redi Redi Swing Slide g TM TM...Opening Doors to Stunning Showers! TM TM SERIES: CONFIGURATION: MOUNTING PACKAGE:
 redi DOOR INSTALLATION INSTRUCTIONS tile redi Redi Redi Swing Slide g TM TM...Opening Doors to Stunning Showers! TM TM SERIES: CONFIGURATION: MOUNTING PACKAGE: 3000 Door-Door Header, sliding doors RDQCI5301
Bates 1/8 scale B-26. Parts List. Instructions
 Bates 1/8 scale B-26 Vacuform Pieces Swivel Ball 1 Cockpit Floor 1 Ball 2 Cockpit Back Wall 2 Two Flanges 3 Dash 3 Seven 0-64 x 1/4 Bolts 4 Dash Hood 4 Seven 0-64 Nuts 5 Center Console 6 Pilot Seat Fire
Frameless Inline Door QCI5250
 INSTALLATION INSTRUCTIONS Frameless Inline Door QCI5250 FRAMELESS PANEL / DOOR / PANEL QCI0249 REV. 3 Page 1 Certified 10/12/12 Parts List with pivot hinges *Quantities may vary. QCI0249 REV. 3 Page 2
Chapter 1. Beam and Sill Plates
 Chapter 1. Beam and Sill Plates 1.1 ESTABLISHING SQUARE SILL PLATE CHALK LINES 1.2 INSTALLING TREATED SILL PLATES 1.3 INSTALLING LAMINATE BEAM Tools needed by volunteers: Hammer Nail apron Tape measure
SUGAR CREEK HOTEL PHOTO REAL BUILD KIT
 SUGAR CREEK HOTEL PHOTO REAL BUILD KIT by Innovative Hobby Supply INSTRUCTIONS FOR: Kit BK 6407 Sugar Creek Hotel Build Kit ~ S scale Free replacement parts are available simply by calling 866 712 4059.
Above are the offsets for the plywood panels.
 DinkyDink Plans Bottom Panel Half Station X Y X2 Y2 1 1/4 3/4 0 11 5/16 2 4 9/16 4 12 9/16 3 11 11/16 1/4 11 7/16 14 1/2 4 18 5/8 1/16 18 5/8 15 11/16 5 25 3/4 0 25 3/4 16 5/16 6 32 13/16 0 32 13/16 16
FRAMELESS DOOR / PANEL WITH WALL MOUNT HINGES QCI5274
 FRAMELESS DOOR / PANEL WITH WALL MOUNT HINGES QCI5274 QCI0274 QCI5274 REV. Rev. 1 0 Page Page 1 1 Date Certified: Certified 06/16/2016 10/01/10 Parts List with wall mount hinges ITEM NO. Part # DESCRIPTION
SGTalon s Enterprise-A Foamie Build Guide. SGTalon s. Enterprise. Enterprise--A. Assembly Instructions
 SGTalon s Enterprise SGTalon s Enterprise--A Enterprise Assembly Instructions Page 1 4-13-2013 SGTalon s Enterprise *******Recommended Hardware******** 2.6oz 250w Motor and Speed Control with 8x6 prop
HR175 Sash Replacement Kit Installation Instructions
 HR175 Sash Replacement Kit Installation Instructions IMPORTANT: Please read before you begin. Weather Shield HR175 Sash Replacement Kits Important: Thoroughly read and follow these instructions, failure
3Insert the second rod no. 4
 Yamato: Step-by-step 37 The stern block and searchlight control towers a b c d e f Recommended tools and materials Wood glue Sandpaper (no. 800 grain) Metal file Putty Craft knife For metal: Super Glue
How to make a template to mount your plaque to a surface
 How to make a template to mount your plaque to a surface A piece of heavy paper 3 4 wider than your plaque on all four sides (paper grocery bag works great too) Small amount of paint (latex dries the fastest)
HANDRAIL HEIGHT PER LOCAL CODE AUTHORITY
 WITH OPTIONAL S.S. S PLEASE READ PLEASE READ THESE INSTRUCTIONS THOROUGHLY PRIOR TO BEGINNING THE INSTALLATION! THIS INSTRUCTION SHEET IS INTENDED TO PROVIDE A SPECIFIC GUIDE TO FOLLOW FOR THE INSTALLATION
A-935 RODA WALL MOUNT HINGES
 INSTALLATION INSTRUCTIONS A-935 RODA WALL MOUNT HINGES NEED INSTALLATION HELP? Call 1-800-45-BASCO (452-2726) Monday - Friday 8:00 A.M. - 4:30 P.M. Eastern Time FRAMELESS DOOR / PANEL CELESTA QCI0274 REV.
1/4 FRAMELESS CONTINUOUS HINGE SHOWER ENCLOSURE 1400A-1700A-1800A
 1/4 FRAMELESS CONTINUOUS HINGE SHOWER ENCLOSURE 1400A-1700A-1800A F AB GLASS AND MIRROR www.fabglassandmirror.com Call: +1 888-474-2221 Fax: (614)-334-4919 Office Timing: 8:30-18:00 EST info@fabglassandmirror.com
176 S. New Holland Road Gordonville, PA Tel: Fax: Playhouse Loft
 176 S. New Holland Road Gordonville, PA 17529 Tel: 717-768-0066 Fax: 717-768-8569 A S S E M B LY M A N U A L Playhouse Loft Playhouse Loft revised 9/6/05 Assembly Manual Dear Customer, Thank you for your
INSTALLATION INSTRUCTIONS FRAMELESS CONTINUOUS HINGE SHOWER ENCLOSURE QCI5233
 INSTALLATION INSTRUCTIONS FRAMELESS CONTINUOUS HINGE SHOWER ENCLOSURE QCI5233 QCI5233 Rev 0 Page 1 Certified 06/20/2016 INSTALLATION NOTES: Unpack your unit carefully and inspect for freight damage. Lay
INSTALLATION INSTRUCTIONS. UNIT No. 160/760 THIN-LINE SHOWER ENCLOSURE
 INSTALLATION INSTRUCTIONS UNIT No. 160/760 THIN-LINE SHOWER ENCLOSURE QCI0011 Rev. 0 Page 1of 10 Certified 10/18/2006 MAINTENANCE: Two primary materials are used to manufacture your new Basco enclosure;
Flex Fence Instruction Manual
 The Safer Stronger Smarter Choice Flex Fence Instruction Manual Table of contents 2 3 4 4 5 5 6 7 8 10 10 11 11 12 13 13 15 18 18 19 20 22 Table of contents Supplies, tools and equipment Introduction Laying
After printing these plans, several pages will need to be taped together to form a larger plan. Below is a diagram of which pages need assembled.
 Watermill Building Plans For complete building instructions and instructional videos, please visit the main web site at www.hirstarts.com/watermill/watermill.html. Using these plans alone will not give
PAT installation of a Sun Dome over a in-ground
 PAT. 3766573 Installation of Sun Domes for in-ground pool GENERAL INSTRUCTIONS: STEP 1. Read thru the entire instructional materials before beginning any installation. You will find that the installation
INSTALLATION INSTRUCTIONS
 VESDURA VINYL PLANKS 3MM PVC GLUE DOWN - OAK COLLECTION Safety First CAUTION Asbestos Warning in existing floor. Do not sand, dry scrape, bead blast or mechanically pulverize existing resilient flooring.
FRAMED SLIDING DOOR FOR TUB OR SHOWER ENCLOSURE 6150A-7150A
 FRAMED SLIDING DOOR FOR TUB OR SHOWER ENCLOSURE 6150A-7150A F AB GLASS AND MIRROR www.fabglassandmirror.com Call: +1 888-474-2221 Fax: (614)-334-4919 Office Timing: 8:30-18:00 EST info@fabglassandmirror.com
10x10 Trellis Pergola
 0x0 Trellis Pergola ASSEMBLY GUIDE Ver.-007 Table of Contents PAGE 0x0 Trellis Pergola Introduction & Overview...................................................... Pergola Materials Overview..............................................................
QWALL 5.2 (2 Back Panels)
") QWALL 5. ( Back Panels) SHOWER ACRYLIC WALL INSTALLATION INSTRUCTIONS IMPORTANT DreamLine TM reserves the right to alter, modify or redesign products at any time without prior notice. For the latest up-to-date
QWALL 5. ( Back Panels) SHOWER ACRYLIC WALL INSTALLATION INSTRUCTIONS IMPORTANT DreamLine TM reserves the right to alter, modify or redesign products at any time without prior notice. For the latest up-to-date
Fidelity & Guaranty Building
 Fidelity & Guaranty Building Instructions for Assembly of the Fidelity & Guaranty Building Kit Contents: 69 each laser cut acrylic parts. 1 each sheet of AC roof unit parts. 1 each sidewalk base. 4 each
EXTREME LOAD no. TWO
 1602 - EXTREME LOAD no. TWO Kit Features: 22' 4 " x 14' x 3'-6 Oversize Load 49mm (1.9") actual height Bolt Head Details Welded Load Mounting Fins Painting Handles Tools Required: Hobby Knife Tweezers
NEXUS SERIES CABINETS
 NEXUS SERIES CABINETS STANDARD BASE ASSEMBLY INSTRUCTIONS Also applies to: Galaxy Series, Nexus Series, Ridgeline Series, Statesman Series, and Waterford Series FOR YOUR INFORMATION: These assembly instructions