A complete collection of information about installing a Dana Decals vinyl decal.
|
|
|
- Donald Caldwell
- 6 years ago
- Views:
Transcription
1 INSTRUCTIONS COMPLETE COLLECTION CONTENTS: Diagram of a Decal Detailed Transferring Tips Small Decal Installation A complete collection of information about installing a Dana Decals vinyl decal. Specialized installation instructions for each size and style of decal. (clarify the parts of a decal referenced in the further instructions) (referneced in the further instructions sheets) (for small decals or small pieces of larger designs) Medium Decal Installation (Hinge Method) (for small - medium sized decals) Medium Decal Installation (Tack Point Method) (for small - medium sized decals, no wider than your arm span) Large Decal Installation (Hinge Method) (for large/pattern decals, wider than your arm span) Large Decal Installation (Fold Over Method) (for large/pattern decals, wider than your arm span) Take Down Instructions (tips for taking down the decal with least damage/residue) INSTRUCTIONS PACK PRACTICE PRACTICE PRACTICE MAKES PERFECT! This packet includes 5 Individual installation instruction sheets After you are well versed in all the installation methods You will be able to choose the correct Installation method for your design. Please don t hesitate to contact us with any quandaries or stumping questions that might arise! info@danadecals.com
2
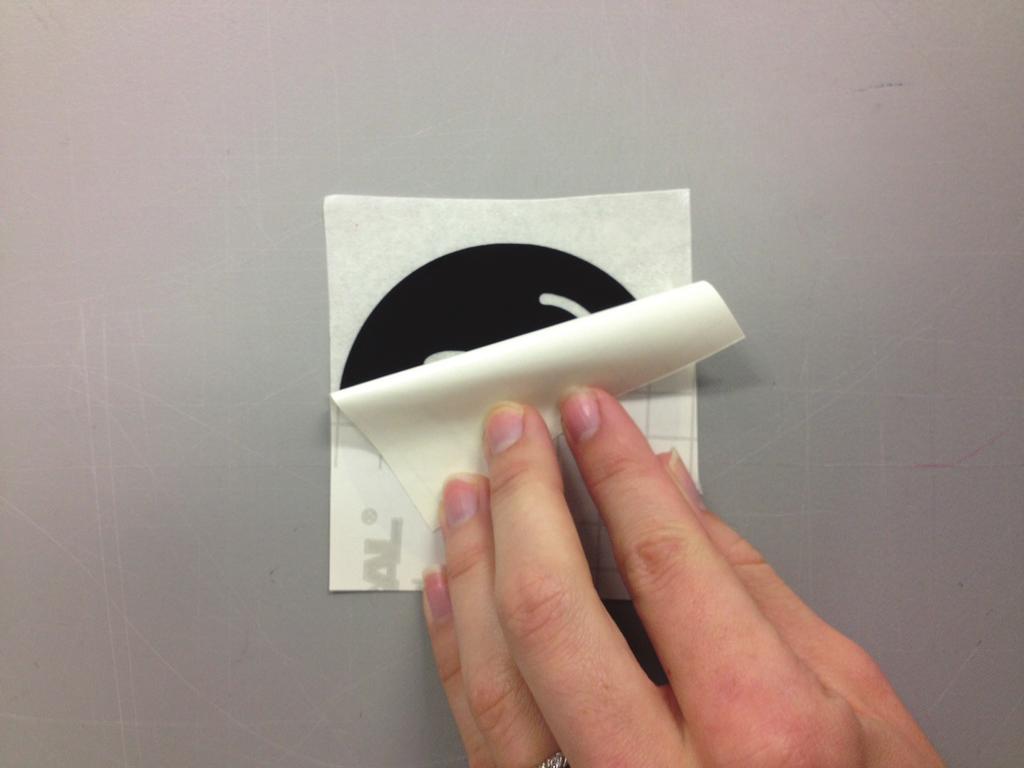
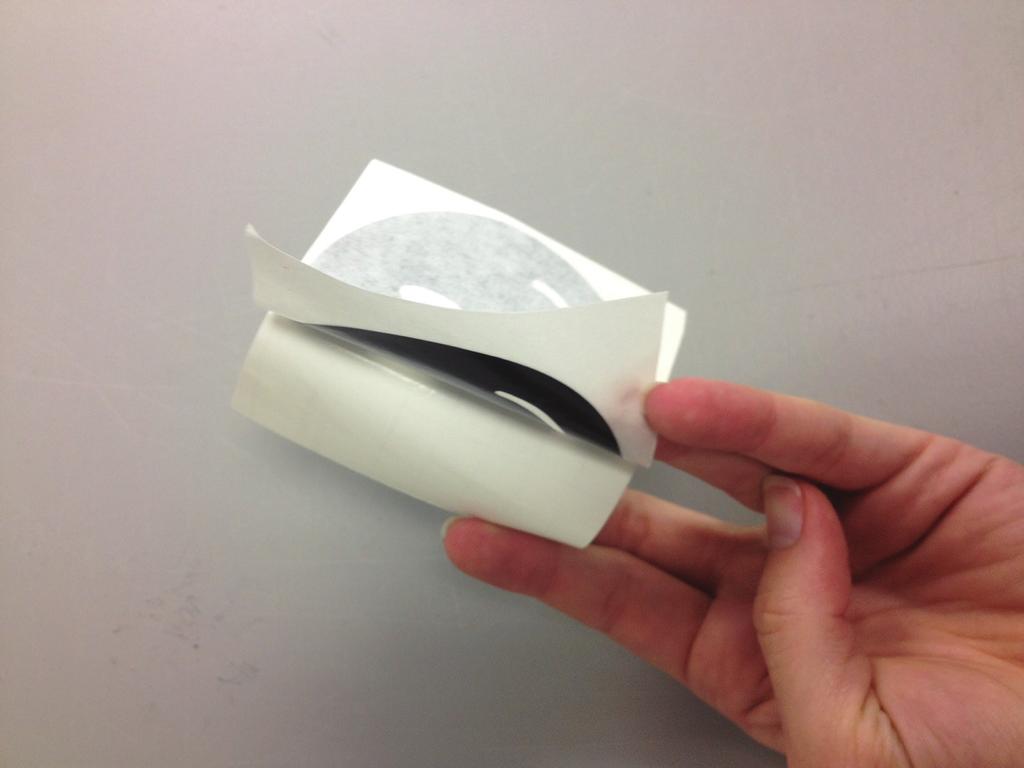
3 TRANSFER TIPS Here is a bit more detailed instruction on the transfer process. Especially helpful for that stubborn vinyl or those very detailed areas of teeny lines and tiny text! PEELING AWAY PAPER BACKER* FLIP METHOD During this step, the best way to peel the paper back off is to lay the decal face down, peel up the just a tiny corner of the paper backer and fold it back and use your fingers at the very edge of the paper backer where it meets the adhesive paper (careful not to touch the adhesive sheet with your fingers) and peel back the paper backer (almost rolling it back over itself) by pulling the paper back while pressing down. It will feel more like pulling/sliding the paper off towards you (almost the same motion as if a rolling pin was peeling away the paper - pressure down while rolling/peeling the paper back), NOT like picking up an edge and peeling it away like sticker. If for some reason the decal won t separate from the paper backer, you can use an exacto or other sharp tip to to help start the separation and then use the exacto tip or your fingernail to hold the vinyl down on the transfer paper while you continue to peel the paper backer away until you have pulled a large area of the paper away and the vinyl is sticking to the transfer paper on its own. Then complete the paper removal processes according to the instructions above. One the paper is clear of the vinyl design you can peel the remaining paper off by just peeling the paper up like a sticker. PEELING TRANSFER PAPER AWAY FROM VINYL ON THE WALL** * ** pressing against the wall as you peel/roll it back Carefully peel/pull off the transfer paper from the wall. The best way to do this is to start at one corner and roll it back over onto itself. Doing this keeps pressure against the decal while the transfer paper is being removed. Start with peeling up the just a tiny corner of the transfer paper and fold it back and use your fingers at the very edge of the paper and peel back the transfer paper by pulling the paper back while pressing down. It is the same peel with pressure at the edge of the paper as when you peeled the paper backer away. Keep pressure as close to the edge (the meeting line of the transfer paper and vinyl on the wall) as possible, this will keep the vinyl from peeling up off the wall with the transfer paper and creating wrinkles or bubbles. this method keeps the vinyl from getting stuck to the paper backer and ripping the decal as you try to peel the transfer paper (adhesive side) off the paper backer. this method keeps the vinyl from staying stuck to the transfer paper (adhesive side) as you peel the transfer paper away from the wall and will help avoid vinyl stretching or bubbling.
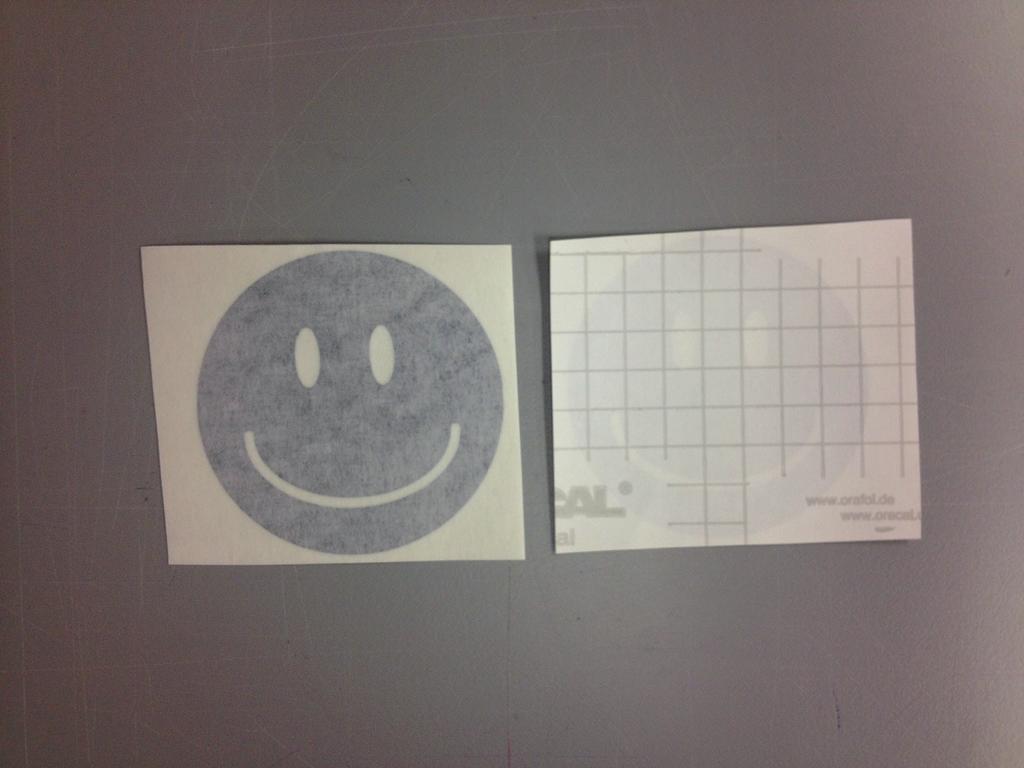
4 INVENTORY/IMAGE 1 2 SMALL D E C A L INSTALLATION INSTRUCTIONS WHAT YOU RECEIVED decal transfer paper paper backing inventory/overview sheet OPTIONAL HELPFUL TOOLS tape measure painters tape level scissors 1 2 Dana Decas Make sure the surface you want to place the decal on is clean and dry before applying. If your decal comes in sections or multiple pieces, make sure to separate them before placing them on the wall. Reference your inventory/image sheet to make sure you have all sections separated and to see how they will connect or layer to make your final decal image. Lay out each piece transfer paper side up (if needed trim your decal pattern into desired pieces) then smooth each piece out with an old plastic card (gift card, credit card) starting from the middle of the desgin - use the edge of the card and press it across the decal similar to filling a wall hold with putty, working out any wrinkles or small air bubbles. 3 4 Decide where you want your decal positioned. Use painter s tape to temporarily hold the decal in position so that you can see if you like the placement. sticky Once your decal is in the desired position on the wall, make two pencil marks near the edge of the transfer paper. Place painter s tape on the wall directly above each of the pencil marks. This will help you remember where to place the decal again. Turn the decal over so the paper backing (grid pattern) is facing you. Using the Flip Method carefully peel off th paper backing from the transfer paper and decal. (See TRANSFER TIPS) The decal should remain on the transfer paper. If it sticks to the paper backing, firmly press the paper backing and transfer paper together and repeat the process until the decal sticks to the transfer paper. Once the paper backing is completely removed, the adhesive on the decal and transfer paper will be exposed, so make sure they don t fold over or stick to anything.
5 5 6 Line up the pencil marks on the transfer paper with the tape you placed on the wall from Step #3. Carefully position the decal over the wall without completely sticking it down yet. Only adhere one small area, once the placement is correct, start applying the rest of decal by smoothing it on the wall** from the spot you adhered out. Once applied to the wall, press the transfer paperstarting from the center - against the wall. Press down and smooth out.** You can use your hand or a plastic card. Be sure to press firmly and swipe in smooth motions, to force any air out from behind the adhesive vinyl. ** if it is a larger area of vinyl use a credit card or similar item in the same manner as your hand, it simply adheres larger areas of vinyl more smoothly than your hand, by forcing all the air out as the vinyl applies. 7 Carefully peel off the transfer paper from the wall. (See TRANSFER TIPS) Begin peeling the transfer paper off the wall/decal by starting at one corner and peel it back over onto itself. Keep pressure against the decal at the seam on the vinyl and the transfer paper as you peel. Make sure the decal remains on the wall and is not removed by the transfer paper. If the decal is removed, xplace the transfer paper back on the wall and smooth it out again. 8 Repeat steps #3-#7 for any additional layers, referencing your inventory/overview sheet for placement. Once the transfer paper is completely off and only the decal remains on the wall, stand back and enjoy your new decal!
6 INVENTORY/IMAGE 1 2 MEDIUM D E C A L INSTALLATION INSTRUCTIONS WHAT YOU RECEIVED decal transfer paper paper backing inventory/overview sheet HELPFUL TOOLS tape measure painters tape level scissors old plastic card 1 2 Dana Decals First, clean and dry before the desired surface before applying*. If your decal come in sections or multiple pieces, make sure to separate them before placing them on the wall. Reference your inventory/image sheet. Lay out each piece transfer paper side up (if needed trim your decal pattern into desired pieces) then smooth each piece out with an old plastic card (gift card, credit card) starting from the middle of the desgin - use the edge of the card and press it accros the decal similar to filling a wall hold with putty, working out any wrinkles or small air bubbles. Decide where you want your decal positioned. Use painter s tape to temporarily hold the decal (still on the the transfer paper and paper backing) in position so that you can see if you like the placement. Then, take a long piece of tape and place it vertically or horizontally across the middle of the decal to divide it into two halves. This method is referred to as the hinge method. 3 4 Once your decal is in the desired position on the wall, choose one half of the decal to work with first and fold it over the other half that s taped to the wall. Carefully peel the transfer paper away from the paper backer (see TRANSFER TIPS),while holding the paper backer firm to the wall. All of the pieces of the decal should remain on the transfer paper. If it sticks to the paper backing, firmly press the paper backing and transfer paper together and repeat the process until the decal sticks to the transfer paper. The adhesive on the decal and transfer paper will then be exposed, so be careful not to let it fold over on itself and stick or leave exposed too long for dirt and dust. Once the paper backing is removed from the first half of the decal, you ll need to cut off the backing with scissors. Be careful not to cut the transfer paper or decal, and don t let them stick to anything yet. * See Notes on Installing Your Decal for details on how to clean your surface.
7 5 6 Holding this half of the decal perpendicular to the wall, smooth the transfer paper and decal with your hand** starting from the center where your hinge tape is and work you way to the end. Continue smoothing the transfer paper from the center to all the edges. This not only allows the adhesive to stick better, but it also removes any air bubbles and slack. Remove the hinge tape and any other painter s tape that s holding the rest of the decal in place. Carefully peel the transfer paper/vinyl up from the remaining half of the paper backer. While holding the adhesive side of the transfer paper/vinyl out of the way, remove the half of the paper backer from the wall. ** if it is a larger area of vinyl use a credit card or similar item in the same manner as your hand, it simply adheres larger areas of vinyl more smoothly than your hand, by forcing all the air out as the vinyl applies. 7 8 Repeat Step #5 for the other half of the decal. Carefully peel off the transfer paper from the wall. Begin rolling the transfer paper off the wall/decal by starting at one corner and roll it back over onto itself. Keep pressure against the decal while the transfer paper is being removed. (SEE TRANSFER TIPS!) Make sure the decal remains on the wall and is not removed by the transfer paper. If the decal is removed, place the transfer paper back on the wall and smooth it out again. 9 For the decals that come in sections, repeat the above process. You might want to overlap the decals a tiny amount to fit during the placement process. Trimming any extra paper will help with the overlapping. Once the transfer paper is completely off and only the decal remains on the wall, stand back and enjoy your new decal!
8 MEDIUM INSTALLATION INSTRUCTIONS METHOD WHAT YOU RECEIVED decal transfer paper paper backing inventory/overview sheet HELPFUL TOOLS tape measure painters tape level scissors old plastic card Best for Medium Size Decals - can be used for large decals, however Hinge Method and Fold Over Method are more strongly recommend, Tack Point Method is an alternative if the other methods do not see mt o work with your decal/space. 1 First, clean and dry before the desired surface before applying*. If your decal come in sections or multiple pieces, make sure to separate them before placing them on the wall. Reference your inventory/image sheet. Lay out each piece transfer paper side up (if needed trim your decal pattern into desired pieces) then smooth each piece out with an old plastic card (gift card, credit card) starting from the middle of the desgin - use the edge of the card and press it across the decal similar to filling a wall hold with putty, working out any wrinkles or small air bubbles. 2 Decide where you want your decal positioned. Use painter s tape to temporarily hold the decal (still on the the transfer paper and paper backing) in position so that you can see if you like the placement. Then, mark the edges of the transfer paper so you have a reference of where to place your decal when the adhesive is exposed. Then lay the decal face down on a clean surface. (transfer paper side down, paper backer side up (grid patterned side up) 3 Carefully peel the paper backer away from the decal/transfer paper using the flip method (see TRANSFER TIPS). Peel the entire paper backer off and set it aside. The adhesive on the decal and transfer paper will then be exposed, so be careful not to let it fold over on itself and stick or leave exposed too long for dirt and dust. Adhesive side up (facing you) 5 Each dot shows a Transfer paper Tack Point - where a very small area of the transfer paper is adhered to the wall with pressure from your hand. Hold the decal (adhesive side facing the wall) up to the wall - lining the design up with the marked lines you made earlier. Make transfer paper adhesive tack points by pressing small areas of the trasfner paper that is along one side of the edge of the decal. In the image, the black dots show where tack points were made. Be careful not to adhere any of the vinyl to the wall at this point, just let the decal/transfer paper hover against the wall - only adhere a few points of the transfer paper on the top edge of the overall piece. *For larger designs two sets of hands to install is helpful!*
9 6 Then smooth the transfer paper/vinyl to the wall. Use the same press down/swiping motion as used in Step 1 to smooth the decal. If your wall has a texture use your hand or a tennis ball to press and smooth extra hard against the transfer paper onto the wall to get the adhesive side of the vinyl into all the bumps and dips of the texture. A B C WRINKLE ISSUE (A) If a bulge/wrinkle forms in the transfer paper/vinyl while you are smoothing stop smoothing immediately. (B) Pull the area with the wrinkle completely away from the wall. Do this by starting at the transfer paper tack point and holding it away from the wall until the wrinkled portion is away from the wall. This often is a pull up and away from the wall motion. (the dotted line portion shows where the peeled off portion of the decal came from and will be laid back on) (C) Hold the peeled back portion of the decal taught close to the wall with one hand as you continue smoothing from the already flat installed portion out. 7 (SEE TRANSFER TIPS!) Then begin peeling the transfer paper off the wall/decal by starting at one corner and peel it back over onto itself. Keep pressure against the decal at the seam on the vinyl and the transfer paper as you peel. Make sure the decal remains on the wall and is not removed by the transfer paper. If the decal is removed, place the transfer paper back on the wall and smooth it out again. 8 REPEAT STEPS For the decals that come in sections, repeat the above process. You will want to overlap the decals a tiny amount to create a continuous vinyl surface, so there are no breaks in the design that show the wall color. (A) Trimming the decal to the edges of the transfer paper will help show the edges of the vinyl more clearly and help with overlapping. (B) Repeat the steps for installing a piece of vinyl. Continue this until the entire pattern is installed. Once th transfer paper is completely off and only the decal remains on the wall, stand back and enjoy your new decal!
10 INVENTORY/IMAGE 1 2 L ARGE INSTALLATION INSTRUCTIONS METHOD WHAT YOU RECEIVED decal transfer paper paper backing inventory/overview sheet HELPFUL TOOLS tape measure painters tape level scissors old plastic card 1 2 Dana Decas First, clean and dry before the desired surface before applying*. If your decal come in sections or multiple pieces, make sure to separate them before placing them on the wall. Reference your inventory/image sheet. Lay out each piece transfer paper side up (if needed trim your decal pattern into desired pieces) then smooth each piece out with an old plastic card (gift card, credit card) starting from the middle of the design - use the edge of the card and press it across the decal similar to filling a wall hold with putty, working out any wrinkles or small air bubbles. Decide where you want your decal positioned. Use painter s tape to temporarily hold the decal (still on the the transfer paper and paper backing) in position so that you can see if you like the placement. Then, take a long piece of tape and place it vertically or horizontally across the middle of the decal to divide it into two halves. This method is referred to as the hinge method. 3 Once your decal is in the desired position on the wall, choose one half of the decal to work with first and fold it over the other half that s taped to the wall. Carefully peel the transfer paper away from the paper backer (see TRANSFER TIPS if you are having trouble getting the vinyl to release from the backer) while holding the paper backer firm to the wall. All of the pieces of the decal should remain on the transfer paper. If it sticks to the paper backing, firmly press the paper backing and transfer paper together and repeat the process until the decal sticks to the transfer paper. The adhesive on the decal and transfer paper will then be exposed, so be careful not to let it fold over on itself and stick or leave exposed too long for dirt and dust. 4 Once the paper backing is removed from the first half of the decal, you ll need to cut off the backing with scissors. Be careful not to cut the transfer paper or decal, and don t let them stick to anything yet. * See Notes on Installing Your Decal for details on how to clean your surface.
11 5 Holding this half of the decal perpendicular to the wall, smooth the transfer paper and decal with your hand** starting from the center where your hinge tape is and work you way to the end. Continue smoothing the transfer paper from the center to all the edges. This not only allows the adhesive to stick better, but it also removes any air bubbles and slack. 6 Remove the hinge tape and any other painter s tape that s holding the rest of the decal in place. Carefully peel the transfer paper/vinyl up from the remaining half of the paper backer. While holding the adhesive side of the transfer paper/vinyl out of the way, remove the half of the paper backer from the wall. ** if it is a larger area of vinyl use a credit card or similar item in the same manner as your hand, it simply adheres larger areas of vinyl more smoothly than your hand, by forcing all the air out as the vinyl applies. 7 8 Repeat Step #5 for the other half of the decal. Carefully pick a corner of the transfer paper and peel a little off the wall. 9 Then begin peeling the transfer paper off the wall/decal by starting at one corner and peel it back over onto itself. Keep pressure against the decal at the seam on the vinyl and the transfer paper as you peel. (SEE TRANSFER TIPS!) Make sure the decal remains on the wall and is not removed by the transfer paper. If the decal is removed, place the transfer paper back on the wall and smooth it out again. 10 (A) Trimming the edges close to the vinyl allows you to see the line up more clearly! REPEAT STEPS For the decals that come in sections, repeat the above process. You will want to overlap the decals a tiny amount to create a continuous vinyl surface, so there are no breaks in the design that show the wall color. (A) Trimming the decal to the edges of the transfer paper will help show the edges of the vinyl more clearly and help with overlapping. (B) Repeat the steps for installing a piece of vinyl. Continue this until the entire pattern is installed. Once th transfer paper is completely off and only the decal remains on the wall, stand back and enjoy your new decal!
12 L ARGE INSTALLATION INSTRUCTIONS METHOD WHAT YOU RECEIVED Decal transfer paper paper backing inventory/overview sheet HELPFUL TOOLS tape measure painters tape level scissors old plastic card 1 First, clean and dry before the desired surface before applying*. If your decal come in sections or multiple pieces, make sure to separate them before placing them on the wall. Reference your inventory/image sheet. Lay out each piece transfer paper side up (if needed trim your decal pattern into desired pieces) then smooth each piece out with an old plastic card (gift card, credit card) starting from the middle of the design - use the edge of the card and press it across the decal similar to filling a wall hold with putty, working out any wrinkles or small air bubbles. 2 Decide where you want your decal positioned. Use painter s tape to temporarily hold the decal (still on the transfer paper and paper backing) in position so that you can see if you like the placement. Then, mark the edges of the transfer paper so you have a reference of where to place your decal when the adhesive is exposed. Then lay the decal face down on a clean surface. (transfer paper side down, paper backer side up (grid patterned side up) 3 Carefully peel the paper backer paper away from the decal/transfer paper using the flip method (see TRANSFER TIPS). Peel the entire paper backer off and lay it flat, pattern side up (grid pattern) in another clean area. The adhesive on the decal and transfer paper will then be exposed, so be careful not to let it fold over on itself and stick or leave exposed too long for dirt and dust. 4 Fold back the top 1/3 of the paper backer onto itself. (Patterned side to patterned side). Crease the fold firmly. Carefully pick up the paper backer, brush off any dust that might be on the non patterned side. This method is referred to as the fold over method. adhesive side of transfer paper is facing you adhesive side of vinyl is facing you folded portion of paper backer paper backer Bring the folded paper backer to the adhesive side of the decal that is still facing up. Line up the paper backer to fit back onto the adhesive side of the decal (while keeping the folded portion away from the adhesive side of the decal). Lightly press the paper backer back onto the decal - mostly pressing in areas that are just transfer paper, not vinyl. Do not press to firmly or you might have trouble getting the adhesive sides of the transfer paper and vinyl to release the paper backer again. 5 Line the decal (adhesive side facing the wall) up with the marks made earlier. Press the transfer paper onto the wall On the edges of the paper (each point the hand is pressing int he first image). This tacks the decal in place. Next, starting in the center of the design - using a plastic card or your hand - press the decal on the wall. Use the same press down/swiping motion as used in Step 1 to smooth the decal. If your wall has a texture use your hand or a tennis ball to press and smooth extra hard against the transfer paper onto the wall to get the adhesive side of the vinyl into all the bumps and dips of the texture.
13 6 Transfer paper Vinyl Paper Backer Continue pressing/smoothing the transfer paper/vinyl to the wall with your had or plastic card, while you slowly off peel the paper backer (the folded portion gives you a good tab to start with). WALL *SIDE VIEW* The peeling of the paper backer is a slow downward and away from the wall motion. The pressing/smoothing of the transfer paper to the wall is a downward motion. The side view shows the detailed motion, each section of paper backer you peel away then leaves the adhesive side of the vinyl and transfer paper exposed, which you then smooth onto the wall with firm pressure and downward strokes with your hand or plastic card. Be sure to start the press/smoothing of the transfer paper/vinyl from an area that is already firmly adhered to the wall. This means your first few swipes of your hand or plastic card will come from the area smoothed onto the wall from the step. 7 Continue the peeling of the paper backer combined with the press/smoothing of the transfer paper/vinyl in small Increments, working from side to side for each increment, making your way down the design. Do not install the entire design on one ed and then move to the other side (this tends to create wrinkles and crooked instillation). Work from top to bottom. (For large design it is recommended to have two installers). 8 After the paper backer is completely removed and the decal is adhered to the wall, do one final smoothing of the entire design, with your hand or plastic card to get any last air bubbles out and adhere the vinyl strongly to the wall before peeling the transfer paper away. 9 (SEE TRANSFER TIPS!) Then begin peeling the transfer paper off the wall/decal by starting at one corner and peel it back over onto itself. Keep pressure against the decal at the seam on the vinyl and the transfer paper as you peel. Make sure the decal remains on the wall and is not removed by the transfer paper. If the decal is removed, place the transfer paper back on the wall and smooth it out again. 10 For the decals that come in sections, repeat the above process. You will want to overlap the decals a tiny amount to create a continuous vinyl surface, so there are no breaks in the design that show the wall color. (A) Trimming the decal to the edges of the transfer paper will help show the edges of the vinyl more clearly and help with overlapping. (B) Repeat the Steps 3-9 for each piece. Stand back and enjoy your new decal!
14 DECAL TAKE-DOWN Time for a change? All done with the decal you have had up? Unfortunately our decals are a single use item, they will hold smoothly to the wall for years, but when you are ready to take them down they will not be able to be used again. Just because the decals can t be reused doesn t mean they are permanent on the wall, the steps to taking the decal off the wall are simple, here are tips on a great way to un-install your decal from the wall! 1 Peeling up an Edge To take the vinyl off the wall you will need to get an edge of the vinyl away from the wall. You can use your fingernail, and eaxcto blade, or any other tipped object that can get under the edge of the vinyl. This often works best at tips, or thinner areas of a design. Peel a piece large enough to hold with the tips of your fingers, to begin peeling the entire decal away from the wall. 2 Pull/Roll Vinyl Off Wall pressing against the wall as you peel/roll it back Peel slowly and firmly up and back. Much like the motion of peeling the transfer paper away. Keep you fingers close to the seam of the vinyl and wall. Peel slowly and firmly away from the wall, rolling the vinyl back onto itself. This slow roll technique minimizes the slight possibility of paint/wall damage from ripping the decal away too quickly or forcefully. Think of it like the OPPOSITE of ripping a band-aide off. 3 Clean Wall 4 Pick a New Decal! If there is any left over residue of adhesive, you can use any household cleaner that is safe for surfaces (409, Windex, etc) or if there is a stubborn adhesive area, you can use an adhesive remover such as as goo-gone. With your newly free space, have fun coming up with a new design decor!
Vinyl Installation Guide and Tips
 Vinyl Installation Guide and Tips Tools Needed: Squeegee; Grease Pencil (white or blue only!); 2" & 1/4" Masking Tape Prepare your surface and vinyl as outlined on back cover prior to employing this technique
Mirrorcraft Project Especially for Dogs
 Mirrorcraft Project Especially for Dogs DIY Customized Pet Mirror Make a mirror photo frame to Display your Pets Photo Irene Jacobs April 2007 Mirrorcraft is a fun craft to easily create you own customized
DASH KIT INSTALLATION
 ÿÿÿÿÿ ÿÿÿÿÿÿÿÿÿÿÿÿ ÿÿÿ ÿÿÿÿÿ ÿÿ ÿÿÿ ÿÿÿÿÿÿÿÿÿÿÿÿÿÿ ÿÿÿÿÿÿÿÿÿÿ ÿÿÿÿ ÿÿÿÿ ÿÿ ÿÿÿÿÿ ÿÿÿÿÿÿÿÿ PROUDLY MADE IN THE USA DASH KIT INSTALLATION These instructions are aimed at the do-it-yourself installer. Read
Application guidance for Printed Vinyl decals
 Paint Masks - Dry Rub Decals - Waterslides - Printed media Telephone: Website: email: +44(0)7872 181119 (mobile) http://www.flightlinegraphics.com sales@flightlinegraphics.com Application guidance for
Darin Pitts Phoenix Arcade: How To - Tron Control Panel Overlay October 31, 2011
 Step 1: Flattening the Artwork Tron artwork purchased from Phoenix Arcade will be shipped rolled. At least one week prior to application the artwork should be laid out on a flat surface in order for the
There are three primary units to this box: two three-sided trays (one made to fit over the other) and one case that wraps around the trays.
 and one case that wraps around the trays.") Instructions for Basic Drop-Spine Box by Sandra Liddell Reese There are three primary units to this box: two three-sided trays (one made to fit over the other) and one case that wraps around the trays.
Instructions for Basic Drop-Spine Box by Sandra Liddell Reese There are three primary units to this box: two three-sided trays (one made to fit over the other) and one case that wraps around the trays.
A How-To by FEATURED BY SWEET PAUL MAGAZINE DOTTED DOGWOOD. thussfarrell.com papertopetal.com marriedtocraft.com
 A How-To by FEATURED BY SWEET PAUL MAGAZINE DOTTED DOGWOOD thussfarrell.com papertopetal.com marriedtocraft.com 2 HOW-TO 1 2 3 4 3 HOW-TO MATERIALS: Single-ply crepe paper in pink and orchid. www.blumchen.com
APPLICATION OF JAC FILMS
 1. Important points For reliable results, JAC films are best applied to smooth, dry and clean surfaces (metal, glass, paintwork, plastic etc.). It is essential to ensure that the surface is free from dirt
Wallgard 1,3 product
 INSTALLATION INSTRUCTIONS Wallgard 1,3 product October 2015 GENERAL Application can be done to smooth, dry, clean, sound walls of concrete, plaster, hardboard, plywood and fibreboard. Board material must
Hocus Pocus. Pillow MAKE IT PERSONAL.
 Instructions by Donna Babylon for legs, shoes, optional buckles* and prairie points Teflon page 2 3 1 2 Cut out the newly drawn witch legs. Make sure you have both a left and right leg shape. These are
Instruction for applying the Logo Decals
 Instruction for applying the Logo Decals Supplied: *One set of N/C cut vinyl decals (one right and One left) (Note: packaged with the contoured wing tip plans) Items required to apply the decals (not supplied):
Cardboard Model Buildings
 Cardboard Model Buildings Get more model kits from http://www.modelbuildings.org PRINTING & ASSEMBLY TIPS: These OO designs can easily be resized by reducing the print percentage as follows: OO scale is
Generations Test Drive Multi Media Project
 Generations Test Drive Multi Media Project A Creative and Inspirational project that incorporates different decoration techniques including a print transfer, embroidery applique, monogramming, and rhinestones.
Big Oz. Rocket. User Guide V0313
 Big Oz Rocket User Guide 59824 V0313 Materials Included The Big Oz Rocket Kit should include the following materials. If something is missing, contact Customer Service at 800-358-4983. 20-ounce plastic
Building the Gothic Church
 Building the Gothic Church Mold #54 does not contain all of the blocks to build this church. You will need extra regular blocks (1/2" x 1/2" x 1") and square blocks (1/2" x 1/2" x 1/2"). These blocks can
Please read through the entire document before starting your installation process to better understand what is required.
 1 P a g e How s It Hanging? Step-by-Step Guide for Hanging your Wallpaper Walls Republic offers a richer and wider selection of designs, textures and colours than ever before found in the wallpaper world,
STACKED BOOKS PROJECT 2013
 STACKED BOOKS PROJECT 2013 Taught by Laura A. DeVincentis Inspired by Robin Messenheimer, Big Island, Hawaii (Robinscraftroom.com) Supplies and Measurements needed for this project: (6) Six pieces 6-1/2
Class #7 Fold out Photos
 Class #7 Fold out Photos In this class we re going to make a fun page that holds five photos on the one page. We ll be using the washi tape for this although if you don t have any you can use regular household
Wanderlust Suitcase Vanity
 Wanderlust Suitcase Vanity If you re like me, you re always up for an adventure. When I saw some examples of DIY reclaimed suitcases, paired with the exciting new Wanderlust embroidery design collection,
Daisies & Dots A Piece O Cake Pattern by Becky Goldsmith and Linda Jenkins featuring our Daisies & Dots fabric collection from Robert Kaufman.
 Daisies & Dots A Piece O Cake Pattern by Becky Goldsmith and Linda Jenkins featuring our Daisies & Dots fabric collection from Robert Kaufman. 2010 Piece O Cake Designs Finished size: 52 1/2" x 52 1/2"
Applying Fret Space Numbers and/or the Label Set to a Fretted Fingerboard
 Jixis TM Graphical Music Systems Applying Fret Space Numbers and/or the Label Set to a Fretted Fingerboard The Jixis system was designed so that you would not need to apply the Jixis labels directly to
The Extraordinaire Wine Gift Bag by Ellen Osten Designer and National Educator for Sulky of America
 by Ellen Osten Designer and National Educator for Sulky of America Original Design for Sulky of America Project Overview I hope you enjoy the easy way you can add embellishment, and the construction features.
SEWING MACHINE NEEDLE ORGANIZER
 How to makeyour own SEWING MACHINE NEEDLE ORGANIZER I recently designed myself an organiser to store packets of new needles, and partially used ones, in a way that easily showed what they were (as I always
Football Silhouettes Project Sheet 1 of 2: Classic Beads
 Project Sheet 1 of 2: Classic Beads This project as shown at left has 4 designs 2 in classic beads and 2 in mini beads. They are intended to be displayed together; however, you may choose to make only
Flying to Pieces Zipper Pouch
 Flying to Pieces Zipper Pouch (Large & Jumbo Size) These in- the- hoop zipper pouches are PERFECT for organizing all those small items! They would also make a great gift for that hard to buy for person
INSTALLATION INSTRUCTIONS
 DIRECT MOUNT INSTALLATION Ceilume Signature Ceiling Tiles can be installed directly to ceilings or walls using staples, finishing nails, adhesive or certain combinations of these. The installation method
The Useless Machine. DIY Soldering Edition. Instruction Guide v0004
 The Useless Machine DIY Soldering Edition Instruction Guide v0004 TM For the best outcome, follow each step in order. We recommend reading this guide entirely before you get started. Tools required: Soldering
How To Make A Simple Circuit & Switch
 How To Make A Simple Circuit & Switch Our video tutorial at www.artgonewild.com shows how to make a simple circuit & switch, which you can view at www.artgonewild.com. The sample card shown in the video
Turkey Football Panel
 Turkey Football Panel PROJECT TITLE: Turkey Football Turkey Football Panel A Stained Glass Project DESIGNED BY: Jeanne Baruth for Diamond Tech SKILL LEVEL: (Adult 1-5 1 being the easiest, 5 being difficult)
USER MANUAL. No heat. No electricity. No batteries. Laminator Label Maker Magnet Maker. Sticker Maker. Makes items up to 9 wide. * Use it. anywhere!
 MODEL 900 3 1 Use it anywhere! No heat. No electricity. No batteries. Makes items up to 9 wide. * Sticker Maker Laminator Label Maker Magnet Maker 2 * Adhesive cartridge 9 wide, all others 8.5 wide. USER
Laminated Fabric Tray
 Laminated Fabric Tray There are a few things one would assume you can t add embroidery to. Metal. Buildings. Cats. All these things are inadvisable to hoop. You might also think a hard plastic serving
DIY CROWN MARACAS DISNEY
 DIY CROWN MARACAS YOU WILL NEED: For the crowns: 3 clean tea tins (or hot cocoa tin, seasoning containers, etc. Anything cylindrical with a lid) Gold glitter paper or vinyl Various jewels & gems Filling:
Creating your own custom center caps Step by step procedure Bill Donaldson Time required 1 2 hours plus drying time.
 Creating your own custom center caps Step by step procedure Bill Donaldson Time required 1 2 hours plus drying time. This procedure will instruct you how to prepare your existing center caps and apply
Buy The Complete Version of This Book at Booklocker.com:
 The Ultimate Guide to Making Cheer/Dance Gear & Gifts The Ultimate Guide to Making Cheer/Dance Gear & Gifts Buy The Complete Version of This Book at Booklocker.com: http://www.booklocker.com/p/books/2442.html?s=pdf
INSTALLATION INSTRUCTIONS FRAMELESS CONTINUOUS HINGE SHOWER ENCLOSURE QCI5233
 INSTALLATION INSTRUCTIONS FRAMELESS CONTINUOUS HINGE SHOWER ENCLOSURE QCI5233 QCI5233 Rev 0 Page 1 Certified 06/20/2016 INSTALLATION NOTES: Unpack your unit carefully and inspect for freight damage. Lay
Dusty Harp Pickup for lever harps
 q P10 for 24 30 string harps q P20 for 32 40 string harps Dusty Harp Pickup for lever harps Installation Kit Contents and Diagram of Pickup A. Pickup Element B. Grommet C. Pickup Harness D. Jack E. F.
A How-To From CHRYSANTHEMUMS
 A How-To From DIPPED-Tip CHRYSANTHEMUMS How-to Materials Adding Color For personal use only / Copyright THUSSFARRELL, LLC. All rights reserved. 5 - Paper to Petal How-to How-to Materials Double-sided
How to Install EZ Snap Window & Skylight Shades
 How to Install EZ Snap Window & Skylight Shades Congratulations on your purchase of EZ Snap Shades You ve taken the first step in reducing your energy consumption, while blocking harmful UV rays, unwanted
Harmony Remote Repair
 Harmony Remote Repair harmonyremoterepair.com How to install your new Harmony One Front Cover/Touch Screen Important! Before you begin working on your Harmony One, you must discharge any static electricity
INSTALLATION INSTRUCTIONS FRAMELESS CONTINUOUS HINGE SHOWER ENCLOSURE QCI5232
 INSTALLATION INSTRUCTIONS FRAMELESS CONTINUOUS HINGE SHOWER ENCLOSURE QCI5232 QCI5232 Rev 0 Page 1 Certified 06/20/2016 INSTALLATION NOTES: Unpack your unit carefully and inspect for freight damage. Lay
Installation Instructions Stainless Steel Wall Panels
 Please read all instructions before installing wall panels. Always plan before you place! 1. Before installation: a. Acclimate Stain Steel Panels, Trim, adhesives and wall substrates to room temperature
CRAFT/JEWELLERY SUPPLIES
 Dress the wine for your next dinner party with this beautiful wine bag and set of 6 wine charms in their own little pouch. Any hostess would be thrilled to receive this set (along with a bottle of wine!).
1Use the metal file to smooth
 Yamato: Step-by-step 85 Parts of the bridge and the hull a b c d e f a Part of the bridge b Part of the bridge c Part of the bridge d Radar x 2 e Part of the bridge x 2 f Wire Recommended tools and materials
MAKE IT YOURS. Digital Photo Decoupage Art. How-2 instruction books for cool projects you can make your own.
 MAKE IT YOURS Digital Photo Decoupage Art How-2 instruction books for cool projects you can make your own. DIGITAL PHOTO DECOUPAGE ART WHAT YOU WILL NEED Computer / Internet Connection Digital photos you
So I m just going to line up my needle on the seam. And mine aren t perfect. And I don t die over it. I just do the best I can. And see you just keep
 Hi I m Jenny from the MSQC. I ve got a really fun project for you today. This is the zig zag runner. This is put together just using charm squares. You can use leftovers or a whole charm. You can make
How to Make a Template
 Page 1 of 10 How to Make a Template TOOL LIST: Template Material: Templates can be made of different materials but we prefer that you use our template material. We offer rolls that are 50ft x 52in and.007
Basic Scrapbook Cover
 A KoalaKat Designs TUTORIAL SKILL LEVEL: BEGINNER Basic Scrapbook Cover 2014 by Geneva Campitelli / Koalakat Designs All Rights Reserved www.koalakat.com This tutorial is about creating a basic chipboard
Paper Flowers. Easy and inexpensive fund raiser projects
 Paper Flowers Easy and inexpensive fund raiser projects Things Needed These items are all things that people have around the house. I used old buttons but any small object will do for a flower center.
Drop Spine Box. Tricia Morris. Design by: 2006 Craft TV Weekly, Inc.
 Drop Spine Box Design by: Tricia Morris 1 Think inside the box! In a marathon of gluing, folding and smoothing, Tricia shows how to make a Drop Spine Box. The steps are many, but the reward is great! So
OMA-Love Is In The Air Pillow (Partial ITH for 6x10 hoops)
") OMA-Love Is In The Air Pillow (Partial ITH for 6x10 hoops) This Valentine s Day pillow is made as a mostly in the hoop project. The background is quilted and the contrast strips and borders are applied
OMA-Love Is In The Air Pillow (Partial ITH for 6x10 hoops) This Valentine s Day pillow is made as a mostly in the hoop project. The background is quilted and the contrast strips and borders are applied
3D Pen Art with Grace Du Prez. Featuring 3Doodler Create+
 3D Pen Art with Grace Du Prez Featuring 3Doodler Create+ Resources 3D Pen: In this class, Grace uses the 3Doodler Create+, which is designed for ages 14+. 3Doodler also offers the 3Doodler Start for ages
Insulating Aluminium Windows
 Insulating Aluminium Windows The Problem Aluminium windows are great for low maintenance, but they re absolutely terrible for letting heat in and out, with the frames being very thermally conductive as
Eerie Halloween by Nunn Design
 Eerie Halloween by Nunn Design Approximate finished length: 20 inches Beads and other products needed for necklaces: 1 - Pewter Itsy Square Bezel Pendant with Flat Loop by Nunn Design - Antique Gold -
Basketball Coin Purse An in-the-hoop project
 Basketball Coin Purse An in-the-hoop project 2009 Peggy Severt, Pegboard Crafts pegboard1@yahoo.com or peggy@pegboardcrafts.com http://www.pegboardcrafts.com (419) 586-3135 Do not resize this design. The
P layful Cuties 2 - Nursery Rhymes Quilt
 P layful Cuties 2 - Finished Size: 40 ½" x 46 ½" (102.87cm x 118.11cm) Nursery Rhymes Quilt Fabrics Needed 3 Wishes Fabric Playful Cuties 2 Collection ¾ yd (68.58cm) Gray Dots (13876-Gray) for Piecing
Zippy Circles DesignWorks #21022DW / 15 Designs / 39 Files
 Note: Use s Software to edit CutWork, PaintWork and designs, including rescaling, rotating, and mirror imaging. 21022-01_DRAW Circle 1 Appliqué PaintWork Embroidery 4.71 X 4.71 in. 119.63 X 119.63 mm 21022-01_CR
Linda's Scallop Directions for Dear Jane Friends Copyright February
 Linda's Scallop Directions for Dear Jane Friends Copyright February 1999 email: linda@lindafranz.com Please Note: In February 1999, when I finished my Dear Jane Quilt, "In Time of Friendship," I put my
Design 2006 Shannon Lawrence Images Stampin Up! Design 2006 Shannon Lawrence Some images Stampin Up!
 Design and instructions 2006 Shannon Lawrence. All rights reserved. Printed images may be copyrighted by the manufacturer. You may share and reuse this document in full for personal use and nonprofit purposes
The Ballistic Blaster Rocket Kit should contain the following items. If anything is missing, call Customer Service at
 Ballistic Blaster User Guide Materials Included The Ballistic Blaster Rocket Kit should contain the following items. If anything is missing, call Customer Service at 800-358-4983. Body tube, 6-1/2" long,
Note. One - point Advice. To begin. Basic working method and markings. Fold along these lines. The printed surface should be
 Note To begin Basic working method and markings Tools and materials needed -Ruler - scissors - blade cutter or "Exacto-knife" - awl or other pointed tool (for making a folding crease) - felt pen - pin
Frameless Inline Door With Return QCI5263
 INSTALLATION INSTRUCTIONS Frameless Inline Door With Return QCI5263 WALL MOUNT HINGES FRAMELESS DOOR / PANEL / RETURN PANEL QCI5263 REV. 0 Page 1 Certified 06/17/2016 Parts List with wall mount hinges
INSTALLATION INSTRUCTIONS. Deluxe Continuous Hinge Inline Door & Panel Shower Enclosure QCI5230
 INSTALLATION INSTRUCTIONS Deluxe Continuous Hinge Inline Door & Panel Shower Enclosure QCI5230 QCI5230 Rev 0 6 shower new QCI5230 Rev 0 Page 2 Certified 06/20/2016 Parts List A. Curb (w/ weep holes) (1)
MUDGUN Drywall Finishing System
 Watch the demonstration video online at hydetools.com MUDGUN Drywall Finishing System Quick Start Guide Hyde Tools, Inc. / A Hyde Group Company / 800-872-4933 / custrelations@hydetools.com / hydetools.com
Flash Coving. Chapter 8 Flash Coving 8. 1
 8 Flash Coving Chapter 8 Flash Coving 8. 1 Flash Coving A. TOOLS In addition to the normal tools (knives, dividers, recess scribers, straightedges, rollers, trowels, etc.), other tools are also needed
School & Crayon Totes
 LeisureArtsLibrary.com Sewing #803361 School & Crayon Totes Basic Tote Design by Nancy Burdette 2 Variations by Paula Hagerman Approx Design Size: 12" x 13 3 /4" each Click Here to sign up for the FREE
4 Position the Suntile to the x tile s position and mark the felt around the square box flange. Then remove the Suntile
 4 Position the Suntile to the x tile s position and mark the felt around the square box flange. Then remove the Suntile 5 Using a sharp bladed knife, cut through the felt from corner to corner in an x
Insta-DE Series Soft- padded Dry- erase Whiteboard Projection Screen
 Insta-DE Series Soft- padded Dry- erase Whiteboard Projection Screen User s Guide Product Features Ø Award winning and GREENGUARD certified VersaWhite material. Ø 1.1 gain with 180 degree wide viewing
Embossing Starter Kit
 EN Embossing Starter Kit About the Embossing Starter Kit By using the embossing tools with the cutting machine, you can create embossing by pressing a pattern into the material* for either a recessed effect
Percy Pumpkin Head Light A KraftyBlok project.
 Percy Pumpkin Head Light A KraftyBlok project. DESIGNED BY: Jeanne Baruth for Diamond Tech SKILL LEVEL: (Adult 1-5: 1 being the easiest, 5 being most difficult) 3 TIME TO COMPLETE: 2 hours not including
You will need. Equipment
 1 KITE MOBILE Here s how to make a colourful kite to fly in your bedroom whatever the weather! You can use the kite tail to display favourite photos, postcards or trinkets. Just attach them with coloured
WELDING. Section nine 9.1 CORRECT TOOLS
 Section nine 9.1 CORRECT TOOLS WELDING Polyflor strongly recommends vinyl sheet and 608mm vinyl tile floorings are welded, this includes the internal and external joints when the vinyl sheet is site cove
PROJECT TITLE: Celtic Unity. PROJECT MAKER: Leanne Ballschmieter Quilted by: Emily Klein-Ballschmieter ISSUE: 28-05
 PROJECT TITLE: Celtic Unity PROJECT MAKER: Leanne Ballschmieter Quilted by: Emily Klein-Ballschmieter ISSUE: 28-05 PROJECT BLURB: Fascinated by the Celtic interlinked designs Leanne finally plucked up
Beginning Level (9-11 Years)
") OKLAHOMA COOPERATIVE EXTENSION SERVICE 4-H Fabrics & Fashions Construction Items Beginning Level (9-11 Years) Division of Agricultural Sciences and Natural Resources Oklahoma State University OKLAHOMA
OKLAHOMA COOPERATIVE EXTENSION SERVICE 4-H Fabrics & Fashions Construction Items Beginning Level (9-11 Years) Division of Agricultural Sciences and Natural Resources Oklahoma State University OKLAHOMA
Nanton Grain Mill Assembly
 ( 1 ) Nanton Grain Mill Assembly Locate package for assembling storage building. These are cut from 1/8 masonite. Inspect and lightly sand edges where it will be bonded. Use white glue or CA glue to bond.
Six FUN! projects for those who are new to sewing, returning to sewing or just want to sharpen basic skills.
 Six FUN! projects for those who are new to sewing, returning to sewing or just want to sharpen basic skills. 1. Clutter Control Bags 2. 3-Button Book Cover 3. Fabric Stash Pincushion 4. Pocket Tissue Case
A Total Overhaul and Playing Field Replacement on a Nishijin Model B
 A Total Overhaul and Playing Field Replacement on a Nishijin Model B Supplies: Simple Green to clean all the parts. White vinegar, Painter s tape, double sided sticky tape, Turtle Wax Chrome Polish on
Handmade Hard-Bound Scrapbook Cover
 Handmade Hard-Bound Scrapbook Cover Equipment Guilotine paper cutter Mod Podge roller applicator Mod Podge roller Paper folding knife The Cinch binding machine Scissors Iron Wire cutters Materials 15 inch
Stained Glass Mission-Style Frame A stained glass project
 Stained Glass Mission-Style Frame A stained glass project Stained Glass Mission-Style Frame A Stained Glass Project PROJECT TITLE: Stained Glass Mission-Style Frame SKILL LEVEL: (Adult 1-5: 1 being the
Spring Diaries Quilt ~ ~ ~ ~ ~ ~ ~ ~ ~ ~
 Spring Diaries Quilt ~ ~ ~ ~ ~ ~ ~ ~ ~ ~ This lovely quilt is perfect for any time of year in the spring and summer to echo the sunny seasons, or in autumn and winter to bring a welcome splash of warm
Read and understand the requirements of this procedure Assist students with installation as needed
 1. PROCEDURE OVERVIEW This procedure is to be used for installation of bonded strain gages on reinforcing bars. It includes necessary materials and a recommended practice for surface preparation, installation,
THE ONION IS USED IN ALMOST ALL CULTURES. READILY AVAILABLE THE YEAR
 38 K N I F E S K I L L S I L L U S T R AT E D CUTTING ONIONS THE ONION IS USED IN ALMOST ALL CULTURES. READILY AVAILABLE THE YEAR round, it is inexpensive and versatile. Even though it doesn t cost much,
Skull Coin Purse An in-the-hoop project
 Skull Coin Purse An in-the-hoop project 2009 Peggy Severt, Pegboard Crafts pegboard1@yahoo.com or peggy@pegboardcrafts.com http://www.pegboardcrafts.com (419) 586-3135 Do not resize this design. The zipper
Maritime Knots. Materials: Directions: Red jute twine Scissors
 Maritime Knots Red jute twine 1. Measure twine to gift box size (with a little extra). 2. Cut 6 equal lengths. 3. Separate into two sets of 3 strands. 4. Form each into a loop. 5. Arrange side-by-side.
The Love Quilt Project Lap Quilt Pattern. Finished Quilt Size Lap quilt, 54 x 54
 The Love Quilt Project Lap Quilt Pattern Finished Quilt Size Lap quilt, 54 x 54 1 The Love Quilt Lap Quilt Pattern Fabric Requirements: Quilting cottons are recommended. You may select the same fabrics
A Total Overhaul and Playing Field Replacement on a Nishijin Model B
 A Total Overhaul and Playing Field Replacement on a Nishijin Model B Supplies: Simple Green to clean all the parts. White vinegar, Painter s tape, Double sided sticky tape, Turtle Wax Chrome Polish on
Snowman Gift Card Case In-the-hoop project
 Snowman Gift Card Case In-the-hoop project 2008 Peggy Severt, Pegboard Crafts pegboard1@yahoo.com or peggy@pegboardcrafts.com http://www.pegboardcrafts.com (419) 586-3135 Do not resize these designs. The
Embroidered Lampshade
 Embroidered Lampshade Everything needs a little sprucing up now and then... I have these green lampshades in my bedroom that the previous owners left behind when we bought the house. The bedroom used to
Apparel Design & Production 2 Boxie Pouch Grading Sheet
 Apparel Design & Production 2 Boxie Pouch Grading Sheet Strand 4 Intermediate Construction Techniques Standard 3a - Apply interfacing Standard 7 Insert an exposed zipper Name Period 8-10- Sewing expert;
2016 Courtesy of Art Gallery Quilts LLC. All Rights Reserved.
 ST YL E NAME 2016 Courtesy of Art Gallery Quilts LLC. All Rights Reserved. CONSTRUCTION Sew all rights sides together with ¼"seam allowance. Arrange the triangles together in rows. QUILT DESIGNED BY AGF
Easyfix. Easyglaze. Superglaze. Filmglaze
 Easyfix Easyglaze Superglaze Filmglaze Magnetglaze Magnetglaze Pro TUBEWAY (SALES) LTD are proud to offer six effective secondary double glazing systems to the general public. Each system is available
GrafiWrap Vehicle Wrapping
 GrafiWrap Vehicle Wrapping What is GrafiWrap? GrafiWrap is the registered trade name for a combination of materials used in the wrapping of a vehicle. The GrafiWrap system is a sandwich made up of a cast
The Jan An In-the-Hoop Project
 The Jan An In-the-Hoop Project Shoulder purse with 2 zippered pockets. Optional quilting. 2009 Peggy Severt, Pegboard Crafts pegboard1@yahoo.com or peggy@pegboardcrafts.com http://www.pegboardcrafts.com
INSTALLATION INSTRUCTIONS Stillen Front Bumper Cover P/N KA CHEVY SILVERADO
 Materials supplied: 1. Front Bumper Cover 2. 14 Double-sided tape 3. (4) Screws Equipment needed: 1. Sandpaper/Schotchbrite 2. Adhesive Promoter (optional) INSTALLATION INSTRUCTIONS Stillen Front Bumper
featuring ABLOOM AGF STUDIO COLLECTION Arbor
 featuring ABLOOM COLLECTION BY Arbor FREE PATTERN AGF STUDIO Arbor QUILT DESIGNED BY AGF STUDIO FABRICS DESIGNED BY AGF STUDIO FUS-A-400 FLORET STAINS ABLOOM FUS-A-401 FASHION SCENT ABLOOM FUS-A-402 BOHEMIAN
The Allie An in-the-hoop project
 The Allie An in-the-hoop project A wallet/coin purse for the 5x7 hoop. The Allie has 3 credit card slots in the front section which features a large flap with a snap closure. You can carry coins or other
How to make a paper mache skull
 http://www.spookyblue.com/halloween/skulls/paper mache skull.htm How to make a paper mache skull Materials List Resin skull from Anatomical Chart Company What?! Spend $25 on a skull? Hear me out. A good
Aerospace Speciality Products
 Specifications:! Length: 18.75"/47.6 cm! Diameter: 0.98"/24.9 mm! Weight: 1.5 oz/44 gm! Streamer Recovery! Recommended Engines:!! A8-3; B4-4; B6-4; C6-5! Skill Level: Beginner This is a model rocket kit
FRAMED PANEL / DOOR / PANEL CONTINUOUS HINGE SHOWER ENCLOSURE INSTALLATION INSTRUCTIONS
 FRAMED / DOOR / CONTINUOUS HINGE SHOWER ENCLOSURE INSTALLATION INSTRUCTIONS QCI5229 Rev 0 6 INSTALLATION NOTES: Unpack your unit carefully and inspect for freight damage. Lay out and identify all parts
Pirate Skull. Quadrant 1. YOU WILL NEED: Pegboards: 4 large squares. Instructions
 YOU WILL NEED: Pegboards: 4 large squares Bead Colors: Hot Coral - 146 Red - 486 Rust - 250 Brown - 228 Prickly Pear - 264 Kiwi Lime - 522 Other: Scissors Clear tape Ironing paper Iron Tweezers Two red
UNIT 6 HAND CONSTRUCTION WITH STONEWARE
 Refer to requirements Unit 6 on page 2 Requirements: Basic Information: Hand Construction with Stoneware: (1) Stoneware is more or less vitreous depending on the temperature to which it is fired. (2) Hobbyist