Leica DMi8A Quick Guide
|
|
|
- Loreen McKinney
- 5 years ago
- Views:
Transcription


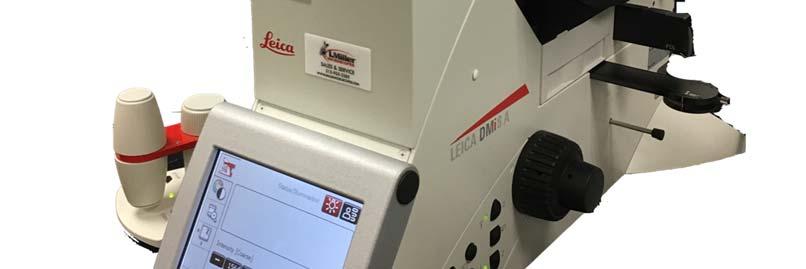

1 Leica DMi8A Quick Guide 1
2 Optical Microscope Quick Start Guide The following instructions are provided as a Quick Start Guide for powering up, running measurements, and shutting down Leica s DMi8A Inverted Optical Microscope. Warning: Although optical microscopy has no inherent danger to usage, only users who have received training by qualified department staff or faculty are permitted to use this equipment. Contact the DMSE for training information. Notice: Italicized words indicate external buttons in the real world. Bolded words indicate buttons within the computer system. Table of Contents Leica DMi8A Quick Guide... 1 Optical Microscope Quick Start Guide... 2 Instrument Information... 3 Preparing the Machine... 3 Physical Setup... 3 Computer Setup... 3 Computer Setup... Error! Bookmark not defined. Operating the Microscope... 4 Navigation... 4 Adjusting the Filtering Parameters... 4 Getting Results... 6 Taking Pictures... 7 Editing Pictures... Error! Bookmark not defined. Finishing Up... 8 Turning off the System... Error! Bookmark not defined. Before Leaving
 Turn on the optical microscope then turn on the computer a.")
 If you only see black or white on the live feed, adjust the light intensity to see your sample. a. Small knob on the left of the optical microscope Figure: The Icon for the Leica Application Suite program.")
3 Instrument Information Contrast Fields: Bright Field, Dark Field, Differential Interference Contrast, Polarizing-Contrast Magnification: 5X, 10X, 20X, 50X, 100X Focus Increments:.05 µm.1 µm,.7 µm, 1.5 µm, 5.0µ Stages: 150 mm x 200 mm Preparing the Machine Physical Setup 1) Turn on the optical microscope then turn on the computer a. The power switch is on the CTR advanced box 2) Wait a few moments for the DMi8A to self-align and go through its boot-up sequence Computer Setup 1) Double click on the LAS V4.7 computer icon a. The icon is the Leica Application Suite as to which the DMi8A connects to. 2) If you only see black or white on the live feed, adjust the light intensity to see your sample. a. Small knob on the left of the optical microscope Figure: The Icon for the Leica Application Suite program. This icon links to the software for Leica s Figure: The Main Menu for the Optical Microscope. Areas of interest have been marked with an arrow. 3
 Adjust the Zoom Levels on the microscope a. Available magnifications: 5x, 10x, 25x, 50x, 100x Figure: The available magnifications for the DMi8A.")

4 Operating the Microscope Navigation 1) Adjust the specimen to where you want to be using the X and Y controls a. Rotary Knobs: Top = X; Bottom = Y b. Can be done on computer w/ Mic2 c. Can be done w/ manual stage adjustment 2) Adjust the Zoom Levels on the microscope a. Available magnifications: 5x, 10x, 25x, 50x, 100x Figure: The available magnifications for the DMi8A. The selected magnification is highlighted orange. Adjusting the Filtering Parameters Depending on the properties of your sample and its environment, different combinations of camera controls and scanning fields may be more viable than others when looking for the highest photo resolution. In order to make your sample more visible and colored to the proper extent, take a look at the following variables: Figure: The X Y Z Controller for the microscope. The larger two knobs control the X Y axis (respectively), and the smaller knob controls the Z axis. Scanning Fields The different scanning fields reflect numerous forms of illumination techniques used within advanced microscopes. Incorrect illumination of the sample can lead for sophisticated microscopes to take blurry pictures even though they are more than well-equipped. Use the following table to determine which scanning field is best for your particular sample: Scanning Fields Advantages Disadvantages Bright Field Shows the specimen dark on a light background Allows for viewing specimens that are unstained, transparent, and have a high reflection index Has a low contrast index and typically needs to be stained for proper viewing 4


5 Dark Field Shows the specimens light on a dark background. DIC Highlights the otherwise invisible features of a sample Polarizing-Contrast Uses polarizing light to enhance images of birefringent materials Well suited for live and unstained samples with a low reflection index or close to its environment Very useful for observing unstained samples that need to be stained with the other scanning fields Allows for qualitative analysis of anisotropic specimen. Used primarily within optical mineralogy Must be very strongly illuminated which may cause damage to samples Enhanced light and shadow may slightly distort the appearance of the sample Very difficult to perform any quantitative analysis. Should only be use on very specific materials Figure: The list of Scanning Fields available for the microscope Figure: The list of exposure adjustments available. The color adjustment is alongside the bottom of the tab. Camera Controls Despite the importance of scanning fields for proper illumination of your sample, the camera parameters are equally consequential for getting the right tone and color balance within your picture. Any large perturbations can lead to washed out greys taking over your picture with no discernible sample features. Take a look at the following to determine which parameters are best for how you want your picture to appear: Camera Controls Increase Effect Decrease Effect Brightness Your sample will Your sample will appear Illumination of the sample appear lighter darker 5

6 Gain Signal Intensity on the detector Saturation Intensity of the color to white Gamma Factor between linear and non-linear light perception Color Actual color of the sample as recorded by the detector Brighter images with more noise Images will have more purer colors Harder to differentiate between brighter colors Closer to the sample s actual color Dimmer images with less noise Images will have more washed up colors Harder to differentiate between darker colors Closer to black and white Note: Not all camera controls will be available depending on the scanning field selected. Selecting the Easy Camera button within the tab provides less user-inputted options but a simpler experience. If you are having issues restoring the camera, press the Reset camera icon. Getting Results Figure: The Navigator tab with a few annotation options for image display resizing 6


7 After figuring out the best field and camera parameters for your live view, taking and annotating pictures is the next step for making your work more discernible to others. The Leica Application Suite has basic tools that can be useful for the analysis of the microstructures within your sample. With methods such as X-Y-Z stitching available, intricate and complex photos can be made. If need be, post-processing image correction along with any annotations can be applied to your image for any second thoughts on the way that the image s camera controls were captured. Taking and Saving Pictures 1) On the right side of the window, adjust your image size to your desired dimensions o This can be done with the Zoom In, Zoom Out, etc. icons 2) Select the Show Navigator tab. 3) In the Navigator tab, find and left click on your data folder. o If properly selected, you should see a red dot on the folder 4) Close out of the Navigator tab and press Acquire Image o Acquire Image is located on the lower left corner of the screen. 5) Name your file, select the type of image, and press Save. Figure: The Browse tab showing both the highlighted image, directory, and image data 7
 From here, you can change the following parameters of the photo: Brightness, Contrast, Gamma, Hue, Saturation, Intensity, Color, Black/White Levels. a.")
 This tab also allows for physical changes to the photo through: a.")
8 Editing Pictures 1) Within the Process tab, select the Enhance window. 2) From here, you can change the following parameters of the photo: Brightness, Contrast, Gamma, Hue, Saturation, Intensity, Color, Black/White Levels. a. For the majority of the variables, they are now represented as 1 s or 0 s to display where the original image was before correction. 3) This tab also allows for physical changes to the photo through: a. Orientation: Allows for flipping along the X Y axis or a degree based rotation Analyzing Pictures 1) At the top of the screen, select the Interactive window within the Analysis tab 2) Here, you will see an assortment of tools as listed: Selection Tool: Allows for the selection of any measurements on the image Distance Line Tool: Find the distance between two points on your surface Segment Line Tool: Find the distance between a multitude of points on your surface. Area Line Tool: Find the surface areas within a user defined geometry Angle Tool: Find the angle between different features on your sample Circle Tool: Creates a circle using two points to create an arc of variable length 8
9 Count Tool: Figure out how many of something there is on the sample Parallel Line Tool: Create parallel lines on your sample Cross Tool: Creates a cross on your sample Shape Tool: Creates a rectangle or a triangle on your sample. Note: Right clicking on the tool icon will reveal more options for data gathering. Such as showing either the diameter of a circle or its area= 3) Properties allows for the parameters of the tool annotations. They function very similarly to the settings within Annotating Pictures with a couple of additions. a. Display Labels: Allows for the displaying of elements such as units or numbers b. Label Offset: Determines how far away you want the label from the mark 4) Within the Automatic and Grain Expert windows, you can follow the computerprompted steps to automatically analyze your picture and generate a report based on your preferences for processing. 5) When completed setting up the operation, press on Run Measurement to begin the computer analysis and report generation. Example: Simple Automatic Processing in Phase Measurement 1) Select your Image to Measure a. In the menu, choose your photo then press Append 2) Adjust your threshold a. Using the color wheel, adjust the hue and the saturation of the colors until your phases are properly selected. Clicking and dragging on the curve adjusts the hue while clicking and moving on the curve adjusts the saturation. 3) Click on Run Measurement to get information on the phase distribution in your image. Finishing Up 9
10 Before Leaving 1) Reset all objective magnifications to their lowest value. 2) Make sure that all equipment is turned off a. Power off Sequence: Optical Microscope -> Computer 3) Clean up any and all messes created by the microscope to ensure a neat environment. Tips and Tricks Have curves in your path that you want to analyze? Hold the LMB on the mouse and move for a continuous path to see your total distance. Want to see two image parameters that aren t normally together? Click and hold on an empty space of the menu to pop it out of its location. Press X to return it. FAQ There s no image showing up on the live feed My guided stitching failed Apertures on Side 10
CAPTURING IMAGES ON THE HIGH-MAGNIFICATION MICROSCOPE
 University of Virginia ITC Academic Computing Health Sciences CAPTURING IMAGES ON THE HIGH-MAGNIFICATION MICROSCOPE Introduction The Olympus BH-2 microscope in ACHS s microscope lab has objectives from
Photoshop Elements Hints by Steve Miller
 2015 Elements 13 A brief tutorial for basic photo file processing To begin, click on the Elements 13 icon, click on Photo Editor in the first box that appears. We will not be discussing the Organizer portion
CHROMACAL User Guide (v 1.1) User Guide
 User Guide") CHROMACAL User Guide (v 1.1) User Guide User Guide Notice Hello and welcome to the User Guide for the Datacolor CHROMACAL Color Calibration System for Optical Microscopy, a cross-platform solution that
CHROMACAL User Guide (v 1.1) User Guide User Guide Notice Hello and welcome to the User Guide for the Datacolor CHROMACAL Color Calibration System for Optical Microscopy, a cross-platform solution that
Quick Guide for Zeiss 710 Laser Scanning Confocal MGH Cancer Center
 Quick Guide for Zeiss 710 Laser Scanning Confocal MGH Cancer Center For any questions or concerns, please contact: Linda Nieman lnieman@mgh.harvard.edu Office: (617) 643-9684 Cell: (512) 565-8076 Chenyue
Motic Live Imaging Module. Windows OS User Manual
 Motic Live Imaging Module Windows OS User Manual Motic Live Imaging Module Windows OS User Manual CONTENTS (Linked) Introduction 05 Menus, bars and tools 06 Title bar 06 Menu bar 06 Status bar 07 FPS 07
Tribometrics. Version 2.11
 Tribometrics Version 2.11 Table of Contents Tribometrics... 1 Version 2.11... 1 1. About This Document... 4 1.1. Conventions... 4 2. Introduction... 5 2.1. Software Features... 5 2.2. Tribometrics Overview...
Quick Guide for Zeiss 710 Laser Scanning Confocal MGH Cancer Center
 Quick Guide for Zeiss 710 Laser Scanning Confocal MGH Cancer Center For any questions or concerns, please contact: Linda Nieman lnieman@mgh.harvard.edu Office: (617) 643-9684 Cell: (512) 565-8076 Chenyue
MIF ZEISS LSM510 CONFOCAL USER PROTOCOL
 MIF ZEISS LSM510 CONFOCAL USER PROTOCOL START-UP Turn on the Mercury Bulb Power Supply (if needed). Power-on the Control Box. Turn on the computer. Open the LSM 510 software. Choose Scan New Images and
User Manual. Copyright 2010 Lumos. All rights reserved
 User Manual The contents of this document may not be copied nor duplicated in any form, in whole or in part, without prior written consent from Lumos. Lumos makes no warranties as to the accuracy of the
ISCapture User Guide. advanced CCD imaging. Opticstar
 advanced CCD imaging Opticstar I We always check the accuracy of the information in our promotional material. However, due to the continuous process of product development and improvement it is possible
Leica DMI 4000 tutorial
 Leica DMI 4000 tutorial Before using the Leica DMI 4000, You will need to put down your name on the reservation system = 1 Welcome to the Leica DMI4000 Microscope tutorial How to start up the system (p.3)
Characterization Microscope Nikon LV150
 Characterization Microscope Nikon LV150 Figure 1: Microscope Nikon LV150 Introduction This upright optical microscope is designed for investigating up to 150 mm (6 inch) semiconductor wafers but can also
DIC Imaging using Laser Scanning Microscopes (LSMs) on Axio Imager Stands
 on Axio Imager Stands") DIC Imaging using Laser Scanning Microscopes (LSMs) on Axio Imager Stands Differential Interference Contrast (DIC) imaging is a technique used to increase contrast in brightfield images. In confocal systems,
DIC Imaging using Laser Scanning Microscopes (LSMs) on Axio Imager Stands Differential Interference Contrast (DIC) imaging is a technique used to increase contrast in brightfield images. In confocal systems,
GXCapture 8.1 Instruction Manual
 GT Vision image acquisition, managing and processing software GXCapture 8.1 Instruction Manual Contents of the Instruction Manual GXC is the shortened name used for GXCapture Square brackets are used to
Visioneer OneTouch Scanner. Installation Guide FOR WINDOWS
 Visioneer OneTouch Scanner Installation Guide FOR WINDOWS TABLE OF CONTENTS i TABLE OF CONTENTS Getting Started with your new Scanner....................... 1 Step 1: Installing the Scanner Software.......................
Leica SP8 TCS Users Manual
 Leica SP8 TCS Users Manual Follow the procedure for start up and log on as posted in the lab. Please log on with your account only and do not share your password with anyone. We track and confirm usage
Horiba LabRAM ARAMIS Raman Spectrometer Revision /28/2016 Page 1 of 11. Horiba Jobin-Yvon LabRAM Aramis - Raman Spectrometer
 Page 1 of 11 Horiba Jobin-Yvon LabRAM Aramis - Raman Spectrometer The Aramis Raman system is a software selectable multi-wavelength Raman system with mapping capabilities with a 400mm monochromator and
Alibre Design Tutorial: Loft, Extrude, & Revolve Cut Loft-Tube-1
 Alibre Design Tutorial: Loft, Extrude, & Revolve Cut Loft-Tube-1 Part Tutorial Exercise 5: Loft-Tube-1 [Complete] In this Exercise, We will set System Parameters first, then part options. Then, in sketch
Contents STARTUP MICROSCOPE CONTROLS CAMERA CONTROLS SOFTWARE CONTROLS EXPOSURE AND CONTRAST MONOCHROME IMAGE HANDLING
 Operations Guide Contents STARTUP MICROSCOPE CONTROLS CAMERA CONTROLS SOFTWARE CONTROLS EXPOSURE AND CONTRAST MONOCHROME IMAGE HANDLING Nikon Eclipse 90i Operations Guide STARTUP Startup Powering Up Fluorescence
KEYENCE VKX LASER-SCANNING CONFOCAL MICROSCOPE Standard Operating Procedures (updated Oct 2017)
") KEYENCE VKX LASER-SCANNING CONFOCAL MICROSCOPE Standard Operating Procedures (updated Oct 2017) 1 Introduction You must be trained to operate the Laser-scanning confocal microscope (LSCM) independently.
KEYENCE VKX LASER-SCANNING CONFOCAL MICROSCOPE Standard Operating Procedures (updated Oct 2017) 1 Introduction You must be trained to operate the Laser-scanning confocal microscope (LSCM) independently.
Figure 1 The Raith 150 TWO
 RAITH 150 TWO SOP Figure 1 The Raith 150 TWO LOCATION: Raith 150 TWO room, Lithography area, NanoFab PRIMARY TRAINER: SECONDARY TRAINER: 1. OVERVIEW The Raith 150 TWO is an ultra high resolution, low voltage
Micro-Image Capture 8 Installation Instructions & User Guide
 Micro-Image Capture 8 Installation Instructions & User Guide Software installation: Micro-Image Capture Software 1. Load Micro-Image Capture software CD onto host PC. Auto Run should start driver/software
DIC Imaging using Laser Scanning Microscopes (LSM) on Inverted Stands
 on Inverted Stands") DIC Imaging using Laser Scanning Microscopes (LSM) on Inverted Stands Differential Interference Contrast (DIC) imaging is a technique used to increase contrast in brightfield images. In confocal systems,
DIC Imaging using Laser Scanning Microscopes (LSM) on Inverted Stands Differential Interference Contrast (DIC) imaging is a technique used to increase contrast in brightfield images. In confocal systems,
RENISHAW INVIA RAMAN SPECTROMETER
 STANDARD OPERATING PROCEDURE: RENISHAW INVIA RAMAN SPECTROMETER Purpose of this Instrument: The Renishaw invia Raman Spectrometer is an instrument used to analyze the Raman scattered light from samples
ScanGear CS-U 5.6. for CanoScan FB1210U Color Scanner. User s Guide
 ScanGear CS-U 5.6 for CanoScan FB1210U Color Scanner User s Guide Copyright Notice Copyright 2000 Canon Inc. This manual is copyrighted with all rights reserved. Under the copyright laws, this manual may
Photo/Image Controls
 Table of Contents Introduction... 2 Using Image Controls... 2 Using the Image Editor... 3 19 July 2017 TIP-2017-092 1 Introduction The Edge s photo controls now include image editing options. This document
OPERATION OF THE HITACHI S-450 SCANNING ELECTRON MICROSCOPE. by Doug Bray Department of Biological Sciences University of Lethbridge
 OPERATION OF THE HITACHI S-450 SCANNING ELECTRON MICROSCOPE by Doug Bray Department of Biological Sciences University of Lethbridge Revised September, 2000 Note: The terms in bold in this document represent
We recommend downloading the latest core installer for our software from our website. This can be found at:
 Dusk Getting Started Installing the Software We recommend downloading the latest core installer for our software from our website. This can be found at: https://www.atik-cameras.com/downloads/ Locate and
Scanning Procedure Using SilverFast Ai Software (6.6.1r2b) 1
 1") last modified 6.16.2015 Scanning Procedure Using SilverFast Ai Software (6.6.1r2b) 1 PREP In scanner notebook, fill out Incoming Checklist column on a Scanner Equipment Checklist sheet. Use flash drive
last modified 6.16.2015 Scanning Procedure Using SilverFast Ai Software (6.6.1r2b) 1 PREP In scanner notebook, fill out Incoming Checklist column on a Scanner Equipment Checklist sheet. Use flash drive
Optika ISview. Image acquisition and processing software. Instruction Manual
 Optika ISview Image acquisition and processing software Instruction Manual Key to the Instruction Manual IS is shortened name used for OptikaISview Square brackets are used to indicate items such as menu
Creo Revolve Tutorial
 Creo Revolve Tutorial Setup 1. Open Creo Parametric Note: Refer back to the Creo Extrude Tutorial for references and screen shots of the Creo layout 2. Set Working Directory a. From the Model Tree navigate
Point Spread Function Estimation Tool, Alpha Version. A Plugin for ImageJ
 Tutorial Point Spread Function Estimation Tool, Alpha Version A Plugin for ImageJ Benedikt Baumgartner Jo Helmuth jo.helmuth@inf.ethz.ch MOSAIC Lab, ETH Zurich www.mosaic.ethz.ch This tutorial explains
Using the Hitachi 3400-N VP-SEM
 Using the Hitachi 3400-N VP-SEM Opening the Chamber to Load Specimens (This may also be done later using the software) 1. Click the AIR button on the front of the machine: 2. Wait a few minutes until you
Training Guide for Leica SP8 Confocal/Multiphoton Microscope
 Training Guide for Leica SP8 Confocal/Multiphoton Microscope LAS AF v3.3 Optical Imaging & Vital Microscopy Core Baylor College of Medicine (2017) Power ON Routine 1 2 Turn ON power switch for epifluorescence
Nikon AZ100. Laser Scanning Macro Confocal Microscope. Jordan Briscoe Adam Fries Kyle Marchuk Kaitlin Corbin. May 2017.
 Nikon AZ100 Laser Scanning Macro Confocal Microscope Jordan Briscoe Adam Fries Kyle Marchuk Kaitlin Corbin May 2017 Contents 1 Introduction 2 2 Hardware - Startup 2 3 Software/Operation 4 3.1 Multidimensional
CHAPTER1: QUICK START...3 CAMERA INSTALLATION... 3 SOFTWARE AND DRIVER INSTALLATION... 3 START TCAPTURE...4 TCAPTURE PARAMETER SETTINGS... 5 CHAPTER2:
 Image acquisition, managing and processing software TCapture Instruction Manual Key to the Instruction Manual TC is shortened name used for TCapture. Help Refer to [Help] >> [About TCapture] menu for software
M a c i n t o s h. Canon Plug-in Module CS-U 3.9 for CanoScan D660U Color Image Scanner. User's Guide
 f o r M a c i n t o s h Canon Plug-in Module CS-U 3.9 for CanoScan D660U Color Image Scanner User's Guide How to Make Best Use of the Manuals When you open the box Printed Manual CanoScan D660U Getting
Simplified Instructions: Zeiss Brightfield Microscope S1000
 Contents General Microscope Set-Up Adjust Illumination Focus Condenser Open Software Image Capture Settings Shading & Color Corrections Image Capture & Viewing Scaling and Measurements Synopsis of Other
Adobe Photoshop. Levels
 How to correct color Once you ve opened an image in Photoshop, you may want to adjust color quality or light levels, convert it to black and white, or correct color or lens distortions. This can improve
PATHTRACE MANUAL. Revision A Software Version 5.4 MatDesigner
 PATHTRACE MANUAL Revision A Software Version 5.4 MatDesigner Wizard International, Inc., 4600 116th St. SW, PO Box 66, Mukilteo, WA 98275 888/855-3335 Fax: 425/551-4350 wizardint.com NOTES: B- MatDesigner
Operating Instructions for Zeiss LSM 510
 Operating Instructions for Zeiss LSM 510 Location: GNL 6.312q (BSL3) Questions? Contact: Maxim Ivannikov, maivanni@utmb.edu 1 Attend A Complementary Training Before Using The Microscope All future users
JEOL 6500 User Manual
 LOG IN to your session on the computer to the left of the microscope. Starting Conditions 1. Press Ctrl-Alt-Del and log on to the microscope computer. Click on JEOL PC SEM 6500 icon. Click yes if message
Operating Procedures for MICROCT1 Nikon XTH 225 ST
 Operating Procedures for MICROCT1 Nikon XTH 225 ST Ensuring System is Ready (go through to ensure all windows and tasks below have been completed either by you or someone else prior to mounting and scanning
SolidWorks Design & Technology
 SolidWorks Design & Technology Training Course at PHSG Ex 5. Lego man Working with part files 8mm At first glance the Lego man looks complicated but I hope you will see that if you approach a project one
User manual for Olympus SD-OSR spinning disk confocal microscope
 User manual for Olympus SD-OSR spinning disk confocal microscope Ved Prakash, PhD. Research imaging specialist Imaging & histology core University of Texas, Dallas ved.prakash@utdallas.edu Once you open
Training Guide for Carl Zeiss AxioZoom V16 Stereo Microscope
 Training Guide for Carl Zeiss AxioZoom V16 Stereo Microscope ZEN 2012 Optical Imaging & Vital Microscopy Core Baylor College of Medicine (2017) Power ON Routine 1 2 If you require fluorescence imaging,
A Basic Guide to Photoshop Adjustment Layers
 A Basic Guide to Photoshop Adjustment Layers Photoshop has a Panel named Adjustments, based on the Adjustment Layers of previous versions. These adjustments can be used for non-destructive editing, can
A Basic Guide to Photoshop CS Adjustment Layers
 A Basic Guide to Photoshop CS Adjustment Layers Alvaro Guzman Photoshop CS4 has a new Panel named Adjustments, based on the Adjustment Layers of previous versions. These adjustments can be used for non-destructive
Introduction to Autodesk Inventor for F1 in Schools (Australian Version)
") Introduction to Autodesk Inventor for F1 in Schools (Australian Version) F1 in Schools race car In this course you will be introduced to Autodesk Inventor, which is the centerpiece of Autodesk s Digital
Introduction to Autodesk Inventor for F1 in Schools (Australian Version) F1 in Schools race car In this course you will be introduced to Autodesk Inventor, which is the centerpiece of Autodesk s Digital
Diploma in Photoshop
 Diploma in Photoshop Adjustment Layers An adjustment layer applies colour and tonal adjustments to your image without permanently changing pixel values. The colour and tonal adjustments are stored in the
ScanGear CS-U 5.3 for CanoScan FB630U/FB636U Color Image Scanner User s Guide
 ScanGear CS-U 5.3 for CanoScan FB630U/FB636U Color Image Scanner User s Guide Copyright Notice 1999 Canon Inc. This manual is copyrighted with all rights reserved. Under the copyright laws, this manual
LEICA TCS SP5 AOBS TANDEM USER MANUAL
 LEICA TCS SP5 AOBS TANDEM USER MANUAL STARTING THE SYSTEM...2 THE LAS AF SOFTWARE...3 THE «ACQUIRE» MENU...5 CHOOSE AND CREATE A SETTING...6 THE CONTROL PANEL...8 THE DMI6000B MICROSCOPE...10 ACQUIRE ONE
Planmeca Romexis. quick guide. Viewer EN _2
 Planmeca Romexis Viewer quick guide EN 10029550_2 TABLE OF CONTENTS 1 START-UP OF PLANMECA ROMEXIS VIEWER...1 1.1 Selecting the interface language... 1 1.2 Selecting images...1 1.3 Starting the Planmeca
LSM 710 Confocal Microscope Standard Operation Protocol
 LSM 710 Confocal Microscope Standard Operation Protocol Basic Operation Turning on the system 1. Switch on Main power switch 2. Switch on System / PC power button 3. Switch on Components power button 4.
Things to check before start-up.
 Byeong Cha Page 1 11/24/2009 Manual for Leica SP2 Confocal Microscope Enter you name, the date, the time, and the account number in the user log book. Things to check before start-up. Make sure that your
Cell Biology and Bioimaging Core
 Cell Biology and Bioimaging Core Leica TCS SP5 Operating Instructions Starting up the instrument 1. First, log in the log book located on the confocal desk. Include your name, your lab s PI, an account
Operating Checklist for using the Laser Scanning Confocal Microscope. Leica TCS SP5.
 Smith College August 2010 Operating Checklist for using the Laser Scanning Confocal Microscope Leica TCS SP5. CONTENT, page no. Startup, 1 Initial set-up, 1 Software, 2 Microscope Specimen observation
ScanGear CS-U 5.8. for CanoScan D660U Color Scanner. User s Guide
 ScanGear CS-U 5.8 for CanoScan D660U Color Scanner User s Guide Copyright Notice Copyright 2000 Canon Inc. This manual is copyrighted with all rights reserved. Under the copyright laws, this manual may
ScanGear CS-U 6.0. for CanoScan D646U Color Scanner. User s Guide
 ScanGear CS-U 6.0 for CanoScan D646U Color Scanner User s Guide Copyright Notice Copyright 2000 Canon Inc. This manual is copyrighted with all rights reserved. Under the copyright laws, this manual may
Indian Institute of technology Madras Presents NPTEL NATIONAL PROGRAMME ON TECHNOLOGY ENHANCED LEARNING
 Indian Institute of technology Madras Presents NPTEL NATIONAL PROGRAMME ON TECHNOLOGY ENHANCED LEARNING Lecture - 5 Materials Characterization Fundamentals of Optical microscopy Dr. S. Sankaran Associate
Digital Portable Overhead Document Camera LV-1010
 Digital Portable Overhead Document Camera LV-1010 Instruction Manual 1 Content I Product Introduction 1.1 Product appearance..3 1.2 Main functions and features of the product.3 1.3 Production specifications.4
Workflow for Betterlight Imaging
 Workflow for Betterlight Imaging [1] Startup Check that camera lens shutter is fully open Check lens is set to F stop 11 (change by manually adjusting lens aperture ring) Check Infrared (IR) Absorbing
Guidance on Using Scanning Software: Part 5. Epson Scan
 Guidance on Using Scanning Software: Part 5. Epson Scan Version of 4/29/2012 Epson Scan comes with Epson scanners and has simple manual adjustments, but requires vigilance to control the default settings
Check that the pneumatic hose is disconnected!!!! (unless your using the BSE detector, of course)
") JEOL 7000F BASIC OPERATING INSTRUCTIONS-Ver.-2.0 Note: This is minimal operation checklist and does not replace the other reference manuals. Read the manual for Specimen Exchange (JEOL 7000 Specimen Exchange
JEOL 7000F BASIC OPERATING INSTRUCTIONS-Ver.-2.0 Note: This is minimal operation checklist and does not replace the other reference manuals. Read the manual for Specimen Exchange (JEOL 7000 Specimen Exchange
R I T. Title: Wyko RST Plus. Semiconductor & Microsystems Fabrication Laboratory Revision: A Rev Date: 05/23/06 1 SCOPE 2 REFERENCE DOCUMENTS
 Approved by: Process Engineer / / / / Equipment Engineer 1 SCOPE The purpose of this document is to detail the use of the Wyko RST Plus. All users are expected to have read and understood this document.
Select your Image in Bridge. Make sure you are opening the RAW version of your image file!
 CO 3403: Photographic Communication Steps for Non-Destructive Image Adjustments in Photoshop Use the application Bridge to preview your images and open your files with Camera Raw Review the information
Cutting out in GIMP. Navigation click to go to a section
 Cutting out in GIMP Navigation click to go to a section Before you start Cutting out an element Using several elements Using backgrounds with cut out elements Adjusting the colour of elements Creating
Quick Guide. LSM 5 MP, LSM 510 and LSM 510 META. Laser Scanning Microscopes. We make it visible. M i c r o s c o p y f r o m C a r l Z e i s s
 LSM 5 MP, LSM 510 and LSM 510 META M i c r o s c o p y f r o m C a r l Z e i s s Quick Guide Laser Scanning Microscopes LSM Software ZEN 2007 August 2007 We make it visible. Contents Page Contents... 1
Operation Guide for the Leica SP2 Confocal Microscope Bio-Imaging Facility Hunter College October 2009
 Operation Guide for the Leica SP2 Confocal Microscope Bio-Imaging Facility Hunter College October 2009 Introduction of Fluoresence Confocal Microscopy The first confocal microscope was invented by Princeton
Bringing Answers to the Surface
 3D Bringing Answers to the Surface 1 Expanding the Boundaries of Laser Microscopy Measurements and images you can count on. Every time. LEXT OLS4100 Widely used in quality control, research, and development
Extending the Dynamic Range of Film
 Written by Jonathan Sachs Copyright 1999-2003 Digital Light & Color Introduction Limited dynamic range is a common problem, especially with today s fine-grained slide films. When photographing contrasty
MEASUREMENT CAMERA USER GUIDE
 How to use your Aven camera s imaging and measurement tools Part 1 of this guide identifies software icons for on-screen functions, camera settings and measurement tools. Part 2 provides step-by-step operating
3.4 COLOR CORRECTION
 3.4 COLOR CORRECTION After you have arranged and edited your video and audio clips to your sequence, you are ready for color correction. Color correction is a step in the process of film editing that can
Installation & User Manual Micro-Image Capture 7
 Installation & User Manual Micro-Image Capture 7 Ver1.2016 Product Warranty Quality Assurance Every Micro-Image Capture system passes quality assurance tests including focus, resolution quality and mechanical
JEOL 6700 User Manual 05/18/2009
 JEOL 6700 User Manual 05/18/2009 LOG IN to your session on the computer to the right of the microscope. Starting Conditions 1. Click the button and read the Penning Gauge to ensure that the microscope
LSM 780 Confocal Microscope Standard Operation Protocol
 LSM 780 Confocal Microscope Standard Operation Protocol Basic Operation Turning on the system 1. Sign on log sheet according to Actual start time 2. Check Compressed Air supply for the air table 3. Switch
Olympus LEXT OLS 4000 Confocal Laser Microscope
 Olympus LEXT OLS 4000 Confocal Laser Microscope The Olympus LEXT OLS4000 is a confocal microscope capable of taking high-resolution 3D images. The magnification (Optical and Digital) of this microscope
Basic Tutorials Series: Import A Photograph. RenoWorks Support Team Document #HWPRO0003
 Basic Tutorials Series: Import A Photograph RenoWorks Support Team Document #HWPRO0003 Import A Photograph 2 1 Import Your Own Photograph The Photo Import Wizard The Photo Import Wizard is the first tool
Title: Leica SP5 Confocal User Manual
 Title: Leica SP5 Confocal User Manual Date of first issue: 23/10/2015 Date of review: Version: Admin For assistance or to report an issue Office: CG07 or 05 Email: Igmm-imaginghelpdesk@igmm.ed.ac.uk Website:
Quick Start for Autodesk Inventor
 Quick Start for Autodesk Inventor Autodesk Inventor Professional is a 3D mechanical design tool with powerful solid modeling capabilities and an intuitive interface. In this lesson, you use a typical workflow
Microscopy from Carl Zeiss
 Microscopy from Carl Zeiss Contents Page Contents... 1 Introduction... 1 Starting the System... 2 Introduction to ZEN Efficient Navigation... 5 Setting up the microscope... 10 Configuring the beam path
USING LEICA AS LASER MICRODISSECTION (LMD6000) MICROSCOPE Written By Jungim Hur
 MICROSCOPE Written By Jungim Hur") USING LEICA AS LASER MICRODISSECTION (LMD6000) MICROSCOPE Written By Jungim Hur Digital Video Camera Eyepieces Laser module Laser safety UV shield Specimen holder Smart move control LEICA CTR6500 electronics
USING LEICA AS LASER MICRODISSECTION (LMD6000) MICROSCOPE Written By Jungim Hur Digital Video Camera Eyepieces Laser module Laser safety UV shield Specimen holder Smart move control LEICA CTR6500 electronics
Picture Style Editor Ver Instruction Manual
 ENGLISH Picture Style File Creating Software Picture Style Editor Ver. 1.15 Instruction Manual Content of this Instruction Manual PSE stands for Picture Style Editor. indicates the selection procedure
Renishaw InVia Raman microscope
 Laser Spectroscopy Labs Renishaw InVia Raman microscope Operation instructions 1. Turn On the power switch, system power switch is located towards the back of the system on the right hand side. Wait ~10
MC3 Motion Control System Shutter Stream Quickstart
 MC3 Motion Control System Shutter Stream Quickstart Revised 7/6/2016 Carousel USA 6370 N. Irwindale Rd. Irwindale, CA 91702 www.carousel-usa.com Proprietary Information Carousel USA has proprietary rights
Managing images with NewZapp
 Managing images with NewZapp This guide is for anyone using the NewZapp Fixed editor as opposed to the Drag and Drop editor. The Image Manager is where images are uploaded and stored in your NewZapp account
Proudly serving laboratories worldwide since 1979 SPECIFICATIONS
 www.ietltd.com Proudly serving laboratories worldwide since 1979 SPECIFICATIONS Scan RDI Specifications System Components Main analytical console Laser Module CRT Printer Data Manager Motorized stage (option)
Contents Technical background II. RUMBA technical specifications III. Hardware connection IV. Set-up of the instrument Laboratory set-up
 RUMBA User Manual Contents I. Technical background... 3 II. RUMBA technical specifications... 3 III. Hardware connection... 3 IV. Set-up of the instrument... 4 1. Laboratory set-up... 4 2. In-vivo set-up...
REALGRAIN 2 USER'S GUIDE PLUG-IN BY IMAGENOMIC
 REALGRAIN 2 PLUG-IN USER'S GUIDE BY IMAGENOMIC 2013 Realgrain 2 Plug-in User's Guide Realgrain 2 Plug-in User's Guide Updated July 12, 2013 Contact Imagenomic at http://www.imagenomic.com/contact Copyright
ScanPotter. Reference Manual
 ScanPotter Reference Manual Copyright 2014 by Microtek International, Inc. All rights reserved. Trademarks Microtek, ScanMaker, ArtixScan, ScanWizard, ScanPotter and ColoRescue are trademarks or registered
Zeiss LSM 880 Protocol
 Zeiss LSM 880 Protocol 1) System Startup Please note put sign-up policy. You must inform the facility at least 24 hours beforehand if you can t come; otherwise, you will receive a charge for unused time.
Using the Microscope for a NANSLO Remote Web-based Science Lab Activity
 Using the Microscope for a NANSLO Remote Web-based Science Lab Activity MICROSCOPE RWSL LAB INTERFACE INSTRUCTIONS The Remote Web-based Science Lab (RWSL) microscope is a high quality digital microscope
STEM Spectrum Imaging Tutorial
 STEM Spectrum Imaging Tutorial Gatan, Inc. 5933 Coronado Lane, Pleasanton, CA 94588 Tel: (925) 463-0200 Fax: (925) 463-0204 April 2001 Contents 1 Introduction 1.1 What is Spectrum Imaging? 2 Hardware 3
ToupSky Cameras Quick-guide
 ToupSky Cameras Quick-guide ToupSky is a capture and processing software offered by Touptek, the original manufacturer of the Toupcamera series. These are video cameras that offer live image capture for
Leica TCS SP8 Quick Start Guide
 Leica TCS SP8 Quick Start Guide Leica TCS SP8 System Overview Start-Up Procedure 1. Turn on the CTR Control Box, EL6000 fluorescent light source for the microscope stand. 2. Turn on the Scanner Power
User Guide for TWAIN / DirectX interface for GRYPHAX USB 3.0 cameras
 User Guide for TWAIN / DirectX interface for GRYPHAX USB 3.0 cameras The TWAIN & DirectX driver for PROGRES GRYPHAX USB 3.0 cameras enables user to operate with TWAIN and DirectX supported 3 rd party software
Photoshop Exercise 2 Developing X
 Photoshop Exercise 2 Developing X X-ray Vision: In this exercise, you will learn to take original photographs and combine them, using special effects. The objective is to create a portrait of someone holding
Leica SPEII confocal microscope. Short Manual
 Leica SPEII confocal microscope Short Manual Switching ON sequence: 1. Turn on the Workstation under the bench (top, far right). 2. Turn on the Supply Unit - Laser box (big green switch first and then
Zeiss AxioImager.Z2 Brightfield Protocol
 Zeiss AxioImager.Z2 Brightfield Protocol 1) System Startup Please note put sign-up policy. You must inform the facility at least 24 hours beforehand if you can t come; otherwise, you will receive a charge
AxioVision 4.5 Brightfield Image Capture Procedure
 AxioVision 4.5 Brightfield Image Capture Procedure 1. STARTING-UP PROCEDURE: Remove blue dust cover and place on shelf under microscope. Turn on the halogen lamp by pushing the switch at the back right