Optika ISview. Image acquisition and processing software. Instruction Manual
|
|
|
- Owen Goodman
- 5 years ago
- Views:
Transcription

1 Optika ISview Image acquisition and processing software Instruction Manual

2 Key to the Instruction Manual IS is shortened name used for OptikaISview Square brackets are used to indicate items such as menu names, button names and window names that appear on the computer screen. >> indicates the selection procedure from the menu. Example: [Capture] >> [Main Control] >> [FlatFielding] : Marks tips for using the software. : Marks information that should be read before use. : Marks additional useful information.
3 Help Refer to [Help] >> [About OptikaISview] menu for software information and technical support. Provide the following information when it is required to obtain the technical support: 1 Camera model and S/N (serial number); 2 Software version number; 3 Description of the problem. Screenshots of the problem would be useful. MAIN FEATURES OF IS...4 SYSTEM REQUIREMENTS...4 CHAPTER1: GETTING STARTED...5 CHAPTER2: IMAGE ACQUISITION...11 CHAPTER3: IMAGE MANAGEMENT...54 CHAPTER4: IMAGE PROCESSING...56
4 Main Features of IS Advanced camera control Acquisition of still images and video. Available image types: JPEG, BMP, TIFF and RAW. Fluorescence imaging settings Live image measurements Image management Extend depth of focus (Focus Stacking) Image Stitching Fluorescence combination function for still images High dynamic range (HDR) function Still image measurements System requirements OS CPU Memory USB ports Windows XP/ Vista/ 7/ 8 (32 & 64bit) Intel processor (Core2 Duo or higher is recommended) 2GB or More is recommended USB2.0 Hi-Speed port
5 Chapter1: Getting Started This chapter explains preparatory steps and basic OptikaISview (hereinafter, IS ) operations. What You Need To use the OPTIKA camera, you need to install the camera driver and OptikaISview application software: 1. Find the OptikaISview Setup.exe file from the CD, double-click on it to start the installation and hit Next. 2. The installer package selects the C:\Program Files\ as the default file destination. 3. After the installation is finished, the IS shortcut will be created on the desktop. Driver installation: 1. Double-click on the driver Optika Camera Driver Setup.exe to start

6 the installation. 2. Follow the steps to finish the installation. 4. After the installation is finished, please go to the Device Manager to check if the driver was installed properly. When the driver is installed correctly, there is no yellow mark with the camera under the Imaging Device in Device Manager. Please see the picture below:
7
![[Capture]](/docs-images/90/103916088/images/8-0.jpg "window-typical")
8 [Capture] window-typical appearance
9 [Browse] window-typical appearance
![[Image]](/docs-images/90/103916088/images/10-0.jpg "window-typical")
10 [Image] window-typical appearance

11 Chapter2: Image Acquisition Adjust camera parameter settings to get proper live image; live image measurement and save still pictures and videos.. Start IS with the camera attached to a PC, the live image begins automatically. If IS is run first before the camera is connected, click to


12 start the preview. IS supports multiple camera functions (Only for H series or later). Stopping the current preview enables the selection of cameras connected to the system via the dropdown menu. Basic Control Provide basic camera settings:
13 After setting the brightness live images, it is recommended to apply White Balance to correct the live image color. To get better white balance effects, please follow the following steps:
14 1. Move the sample to the blank area; 2. Unselect [Color Enhancement] (It is unselected by default in [Color Control] panel); 3. Push [White Balance]; 4. Move the sample back. Or you can follow the [WB Wizard] to get better white balance result.
![Taking Still Images and Videos In the [File format] dropdown menu, 4 file formats are](/docs-images/90/103916088/images/15-0.jpg "available: JPEG, BMP, TIFF and RAW.")
15 Taking Still Images and Videos In the [File format] dropdown menu, 4 file formats are available: JPEG, BMP, TIFF and RAW. Raw image file contains minimally processed data from the camera. It
16 needs to be read in imaging software, for example, Photoshop, ImagJ etc. If the image is in the color camera raw file format, color information only can be seen after decoding the Bayer matrix In [Use File Save Dialog] mode, a pop up file save configure window will appear when the [Capture] or [Video] button is pushed. Enter the desired file name and directory path at this pop-up window. [Use File Save Config], allows the file save name to be pre-set, format, image quantity, capturing interval time and the file save
17 directory. Upon executing [Capture] or [Video], IS will save files as set. Capturing and Saving Individual Images Enter preferred name in the [File Name] field. If do not key in anything, IS is used by default. Select [Use Time-stamped] to name the image by the capture time automatically. The time-stamp file name will be in the form of MMDDHHmmSS. Here MM indicates the month; DD indicates the day; HH indicates the hour; mm indicates the minutes; and SS indicates the seconds. Click [Capture] to take one image with the pre-set file name. Capturing and Saving a set of Images Click [Continuous Shooting] checkbox, the software will automatically save a set of images after a single [Capture] is
![executed. Click [Config] to set continuous capturing image numbers and the interval time. This set of image file names follows the same format as set for individual image capturing.](/docs-images/90/103916088/images/18-0.jpg "If [File Name] is used, image names will be in the form X, X-1, X-2 (where X is the character/s you entered or IS by default). Video recording Click [Video] /, start/ stop video recording.")
18 executed. Click [Config] to set continuous capturing image numbers and the interval time. This set of image file names follows the same format as set for individual image capturing. If [File Name] is used, image names will be in the form X, X-1, X-2 (where X is the character/s you entered or IS by default). Video recording Click [Video] /, start/ stop video recording. Click [Rec Config] to get video recording configure window.
![It provides [Manual] and [Auto] modes to stop the recording. In [Manual] mode, you need to click on [Video] button to start and stop the recording.](/docs-images/90/103916088/images/19-0.jpg "In [Auto] mode, pre-set the number of frames or the time for videos and click on [Video], IS will stop the recording automatically after pre-set number of frames are saved or pre-set time is up.")
19 It provides [Manual] and [Auto] modes to stop the recording. In [Manual] mode, you need to click on [Video] button to start and stop the recording. In [Auto] mode, pre-set the number of frames or the time for videos and click on [Video], IS will stop the recording automatically after pre-set number of frames are saved or pre-set time is up. [Rec Config]>>[Codec] will also list all the available video compressors in PC.
20 The video taken without compression will be very large size. IS will automatically search the installed video compressors on the PC. File Save Destination Click [Browse...] to change file save destination. The default path is the software installation folder. Usually it is C:\Program Files\OptikaISview\. This default destination might NOT be allowed storing files if the user is not logged in as Administrator in Windows Vista, 7 or later. Image may not save

21 if the default path is used. We recommend either to change the file saving path or release this folder Write authority for other user accounts. Exposure Control Change the Exposure time and Gain to adjust the image brightness. Select frame speed to get different live image frame rate. Set 8-bit or 16- bit data width for captured images.
![Auto Exposure Check [Auto Exposure] checkbox, software start to adjust the exposure time automatically to get proper brightness of live images.](/docs-images/90/103916088/images/22-0.jpg "Auto exposure target value: Set the reference exposure time for auto exposure adjustment. It helps the auto exposure to find the proper exposure time faster.")
22 Auto Exposure Check [Auto Exposure] checkbox, software start to adjust the exposure time automatically to get proper brightness of live images. Auto exposure target value: Set the reference exposure time for auto exposure adjustment. It helps the auto exposure to find the proper exposure time faster. For example, if the imaging target is quite bright, a lower target value is set it will indicate a shorter exposure time to the software. Lock: will stop the auto exposure calculation. While auto exposure is working, it will keep on calculating the image brightness to get proper exposure time. During this, if you already see a good live image for you, you can push to lock it.

23 Manual Exposure Adjust the exposure time manually. Two ways to change the exposure time: Key in the exposure time in the edit box directly, then click to confirm it. Pull the slide bar to change the exposure time. [Extend] is used to get longer exposure time. This function is ONLY available for CCD cameras. For other cameras especially the CMOS
24 camera, the maximum exposure time is shorter than 1 second, then [Extend] will be gray out. [Update] appears after [Extend] is selected. Click on to stop the previous exposure time and restart the new one immediately. For long exposure applications, we strongly recommend that [Update] is used to start a new setting. This will help to get the new exposed image earlier. If the exposure time is less than 2-3 seconds, it is not necessary to use it.
25 Gain, Frame Speed & Data Width

26 Color Control Is used for adjusting image color, gamma, contrast and saturations. Flat Fielding Function Flat fielding function is used to correct the uneven background brightness. Click on [FlatFielding] to start the flat fielding parameter calculation and apply it to the live images.
27 When the check boxis unchecked, the calculated flat fielding parameter is NOT applied to the live images. To get better flat fielding result, Move the sample to a blank area first, apply the flat fielding, then move back the sample. When the lighting is changed, re-do the [FlatFielding] to correct the uneven brightness or when using a different objective.
28

29 Fluorescence Settings Included in our software are useful parameter settings for fluorescence or low light imaging. It helps to get better images easier and faster. Black Level Black level function defines the brightness level at the darkest part of the image. In low light imaging, it can help to see more details in the dark area.
30 In low light application, it usually needs quite a long exposure time to get proper images. If you set a long exposure time at the beginning, you might need quite a long time to find your target and get a proper image (wait for finishing a long exposure to get a new frame image, adjust, wait...). When searching for the imaging target at the beginning, we recommend to set a shorter exposure time, but make larger Gain and Black level first. After you find the target, then reduce the Gain and Black level, and increase the exposure time. This will aid in a better image acquisition.
![Levels Live image histogram. To adjust the live image levels automatically: select [Auto] check box. Adjust image levels manually: Pull the little triangles to adjust the live image levels.](/docs-images/90/103916088/images/31-0.jpg "Move the white triangle towards left, it is able to reveal some information in dark area. If move the black triangle towards right, it will reveal bright area information.")
31 Levels Live image histogram. To adjust the live image levels automatically: select [Auto] check box. Adjust image levels manually: Pull the little triangles to adjust the live image levels. Move the white triangle towards left, it is able to reveal some information in dark area. If move the black triangle towards right, it will reveal bright area information. You can also key in the image levels directly
32 After adjusting the levels, click to confirm the setting. If you need to go back to the original image, click to restore the image. Capture Mode Three capture modes are specially developed for fluorescence imaging.

33 Parameter Group Save parameter sets for different applications. The saved parameters include exposure time, gain, frame speed, data width, gamma, contrast, saturation, color enhancement status, monochrome, RGB gain and black level. It allows users to save 20 set parameters (available in Ver 3.6 or later). Save parameter function: Enter a name for current parameter settings, click to save it. Load parameter function: Click to open drop-down menu, click on preferred parameter name and then push to make selected parameters take effect on the live image.
![Live Image Measurement Click on [Measure] at the top of the IS to get the measurement tools Show Scale Line Calibrate On/off the scale line on the picture Create Calibration file Calibrate Table](/docs-images/90/103916088/images/34-0.jpg "Available calibration file list. Allow to add, edit and delete calibration file. Decimal Set measurement precision.")
34 Live Image Measurement Click on [Measure] at the top of the IS to get the measurement tools Show Scale Line Calibrate On/off the scale line on the picture Create Calibration file Calibrate Table Available calibration file list. Allow to add, edit and delete calibration file. Decimal Set measurement precision. Allowed decimal range is from 0 to 7 Measurement List List all the measurement data Layer Create multiple layers to apply measurements and save layer information Delete All Delete all the measurements and layers / UnLock/Lock Unlock/lock the measurement operation. Allow to do same measurement continually when LOCKED.
35 Select Line Parallel Perpendicular Rectangle 2-points Circle 3-points Circle Diameter Circle Concentric Circle Polygon Arc Angle Point Annotate Delete Cross-ruler It is locked by DEFAULT. Select to change measurement or the measurement data position Measure the length Measure the distance of parallel. Allow to do multiple parallels distance measurement. Double clicking to end parallel measurement. Measure the perpendicular length. Allow to do multiple perpendiculars length measurement. Double clicking to end perpendicular measurement. Measure rectangle height, width, area and perimeter. Use center point and point on the circle to draw a circle. Give the radius, area and perimeter of circle Use 3 points on the circle to draw a circle. Give the radius, area and perimeter of circle Draw a circle according to the diameter. Give the radius, area and perimeter of circle Use center point and radius to draw concentric circles. Give concentric circles radius, area and perimeter. Allow to do multiple concentric circles measurement. Double clicking to end concentric circles measurement Measure polygon area and perimeter. Measure a curve angle, radius and length. Measure the angle Counter. Count the quantity. Add remarks on the images. Delete previous measurement. Select it then click on the measurement to delete the measurement. On or off cross-ruler on the images. The unit of the ruler depends on the applied calibration file.

36 Edit Scale Line Double click on the scale to get its properties and make changes to it. Edit scale character


37 Edit the frame of the scale Edit scale line length and name
38 Create Calibration File To measure the samples real size, the corresponding calibration file needs to be created first. 1. Take pictures of the calibration slide in all the required working objectives and resolution (if a reducing lens is also used in your application, it also requires you to take the calibration slide picture with the reduce lens attached). If ONLY ONE objective and ONE resolution is used in the application, one calibration slide picture is enough. The calibration slide picture MUST be taken with exactly the same lens or microscope settings as the target image taken. 2. Click to start to create calibration file.
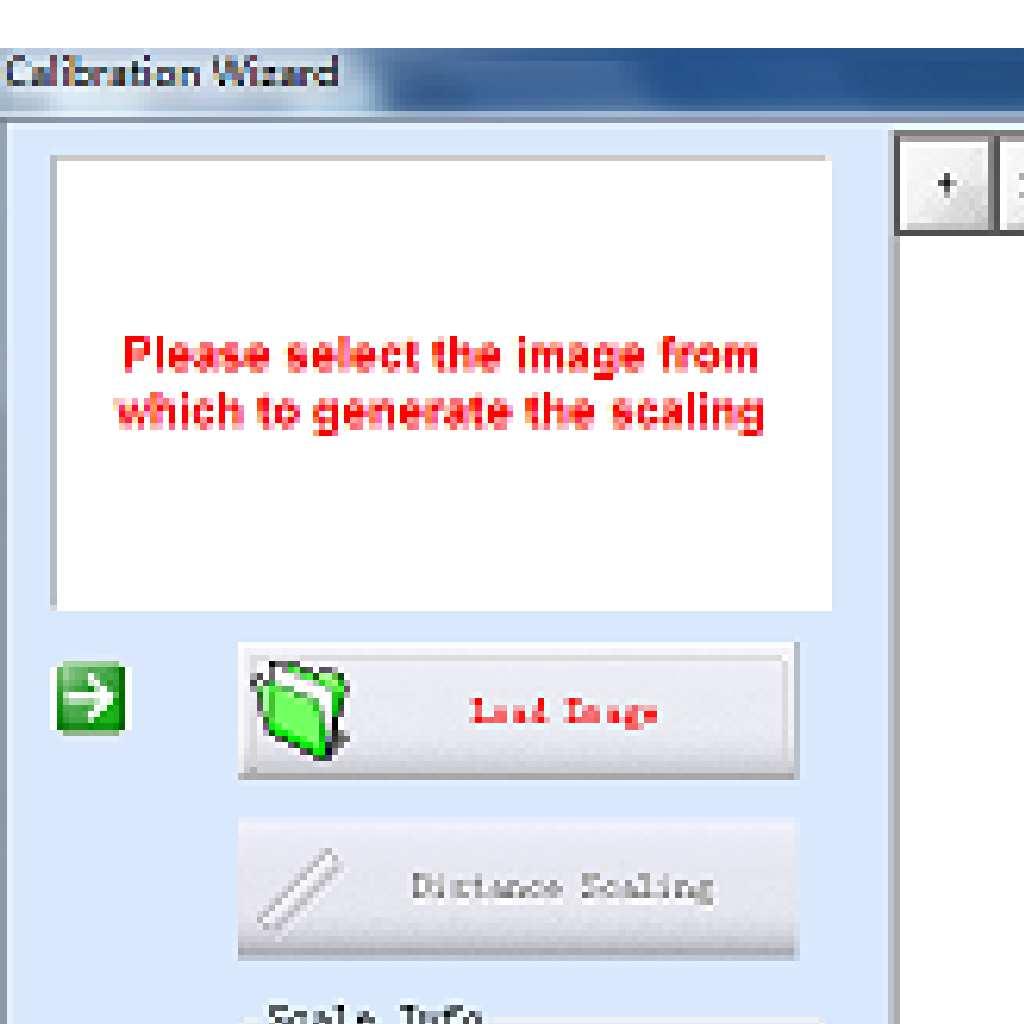
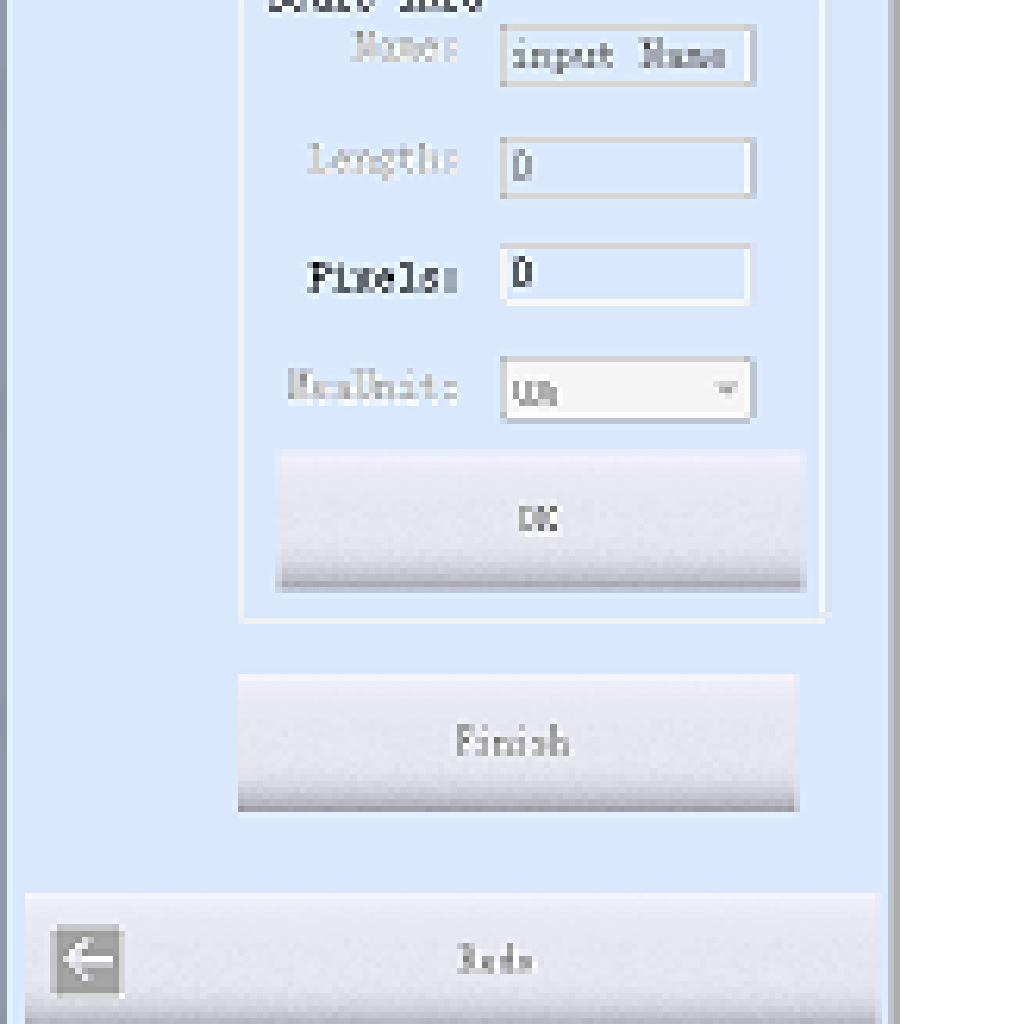

39


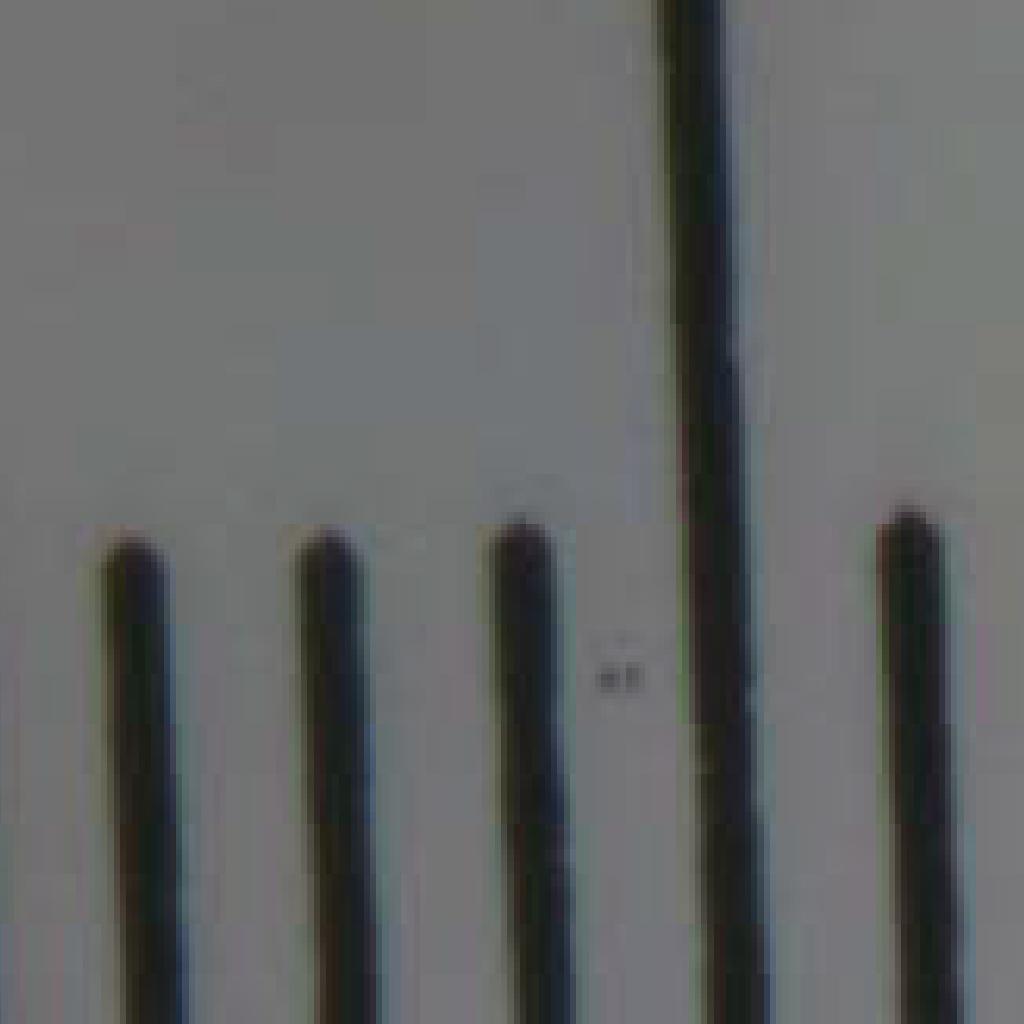

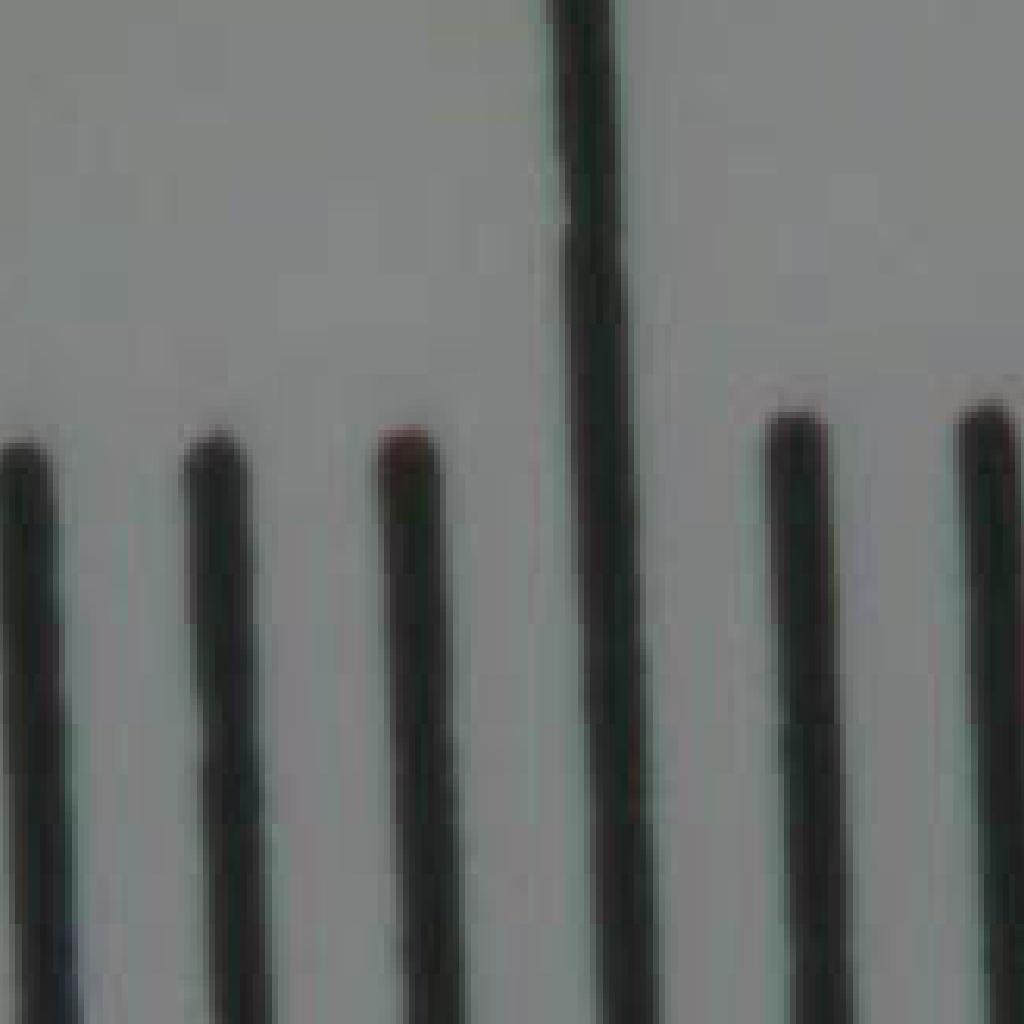


40 Using longer length as the reference length will give more accurate measurement results. For example, using 10 scale units as reference length will give more accurate result than using 1 scale unit.


41 If you need more than one calibration file, using objective+reducing lens(if it is used)+resolution as the name of the calibration file is recommended. This can help to prevent using the wrong file to do the calibration.

42 When keying in the length, please pay more attention to the calibration scale unit and the Measure Unit used here. For example, the calibration scale unit is 0.1mm; the Measure Unit is selected as µm; and the reference length is 10 scale units, so the length should be 10 x 0.1mm x 1000 = 1000 µm. 6. Click [OK] to confirm the calibration. The new calibration file named 10X is created in the [Calibrate Table].
![Calibration Table Click [Calibrate Table] to open the calibration table. Select the correct calibration file for current image measurement.](/docs-images/90/103916088/images/43-0.jpg "Using the WRONG calibration file will make the measurement result innacurate.")
43 Calibration Table Click [Calibrate Table] to open the calibration table. Select the correct calibration file for current image measurement. Using the WRONG calibration file will make the measurement result innacurate. Please make sure the calibration file is correctly corresponding

44 to the current image. Hence, it is useful to name the calibration file with the capturing settings or objective name. Measurement List All the measurement data is listed in the [Measurement List]. The software allows you to export all the measurement data to TXT or Excel file.
![Measurement IS allows you to do line, parallel, perpendicular, rectangle, circle, polygon, arc and angle measurement. The [Count] function allows you to manually count the objects.](/docs-images/90/103916088/images/45-0.jpg "And the [Annotate] function offers to add comments on the images. Double click on the measure data to get the measurement configure window.")
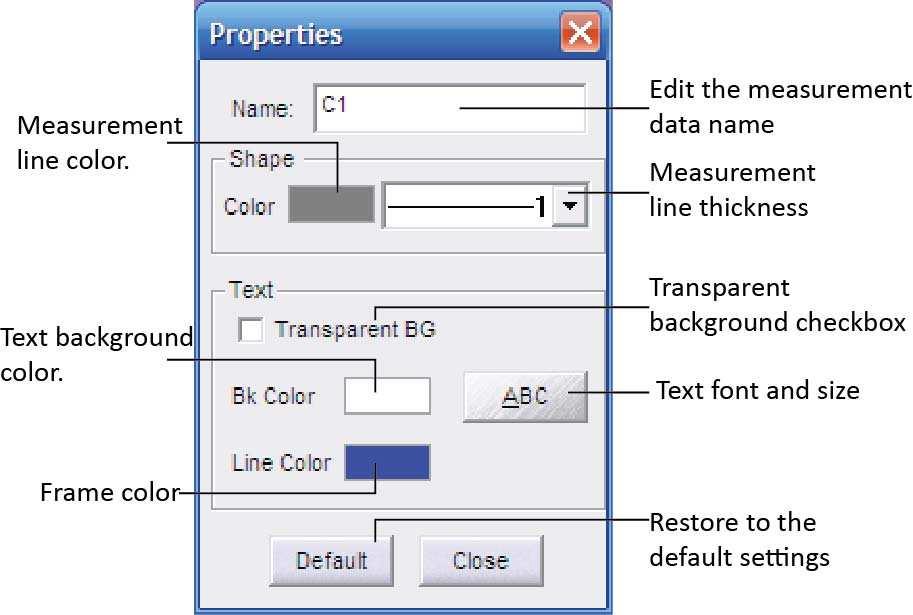
45 Measurement IS allows you to do line, parallel, perpendicular, rectangle, circle, polygon, arc and angle measurement. The [Count] function allows you to manually count the objects. And the [Annotate] function offers to add comments on the images. Double click on the measure data to get the measurement configure window. It allows you to change the measured data name, color, thickness, background color and the character font.
46
![Annotate Select [Annotate] and click on the image area which you prefer to add a remark.](/docs-images/90/103916088/images/47-0.jpg "It allows you to edit the comment, change the background color and on/off the annotate")
47 Annotate Select [Annotate] and click on the image area which you prefer to add a remark. It allows you to edit the comment, change the background color and on/off the annotate arrow.

48 Ruler Click on to show or cancel the cross-line on the images. The displayed ruler unit is determined by the selected calibration file. Double-click on the ruler to get the ruler property and change the ruler color. The default color is BLACK.

49 Layer Create multiple layers for loads of measurements. The layer function makes adding a large number of measurements on the processed image review simple and easy. If you have already applied some measurements on the image, the [Layer] function automatically creates Background and Layer01 for the current image. Click [New] to create a new layer. Allow to key in the preferred name for

![Checked [Cur] means the corresponding layer is displayed currently. Select different [Cur] to switch between different layers.](/docs-images/90/103916088/images/50-1.jpg "In the [Visible] column, the selected check box means all the measurements in the corresponding layers also display on the current")
50 the new layer. It uses Layer02, Layer03... etc as the layer name by default. Now loads of measurements can be applied on different layers. It allows you to choose any layers to view. Checked [Cur] means the corresponding layer is displayed currently. Select different [Cur] to switch between different layers. In the [Visible] column, the selected check box means all the measurements in the corresponding layers also display on the current layer. Uncheck the check box, and the corresponding measurement will be invisible in the current layer

![Then click [Save] to save the current layer information in the text file.](/docs-images/90/103916088/images/51-1.jpg "The layer information will be saved as LayerInfo.")
51 The layer information is saved in a text file. Click [Browse] to choose the text file saving directory and enter file name. Then click [Save] to save the current layer information in the text file. The layer information will be saved as LayerInfo.txt in Disk D by default Click [Browse] to find the existed layer information text file. Click
52 [Load] to load the layer information to the current image. Live image shortcut On the right hand side of the live image window, some shortcuts are provided to process the live image quickly.
![Chapter3: Image management View images in [Browse] panel, it displays the image File name, capturing time, color depth (bit), picture resolution and](/docs-images/90/103916088/images/53-0.jpg "image size. It also allows you to add comments to any individual image. When you view this image next time in the IS, it will show the image comment.")
53 Chapter3: Image management View images in [Browse] panel, it displays the image File name, capturing time, color depth (bit), picture resolution and image size. It also allows you to add comments to any individual image. When you view this image next time in the IS, it will show the image comment.
54 Image Management and Processing Shortcuts IS provides some quick functions on the right hand side of the software in Browse or Image mode.

55 Chapter4: Image Processing In this section, IS provides advanced image processing functions and also allows you to do the measurement on the still images.

56 Image Processing Provide basic captured image processing functions and allows functions such as extended Depth of Focus and image stitching.
57 After clicking [Apply], all the settings are applied to the image. Then you can NOT revert to the original image.
![Level Push [Levels] to get the image histogram. It allows you to adjust the image levels. The level adjustment is the same as live image level adjustment.](/docs-images/90/103916088/images/58-0.jpg "Get more detail in [Capture]-->> [Fluorescence]. Extend depth of focus Push [Extend DoF] to get below dialog.")
58 Level Push [Levels] to get the image histogram. It allows you to adjust the image levels. The level adjustment is the same as live image level adjustment. Get more detail in [Capture]-->> [Fluorescence]. Extend depth of focus Push [Extend DoF] to get below dialog. Select the corresponding images and apply the function.
.")
59 Browse the image folder which you are going to do the stacking. All the images in the folder will be listed on the left hand side. Click on one image, the image will be hightlighted in BLUE. Click [Add] to add the highlighted image to the right hand side (the selected source images for stacking). [Add all] button allows to add all the same size images in the left hand side to the right as stacking source images by just one click. Click [Fusion] to stack all the selected source images and get an image with an extended depth of field.
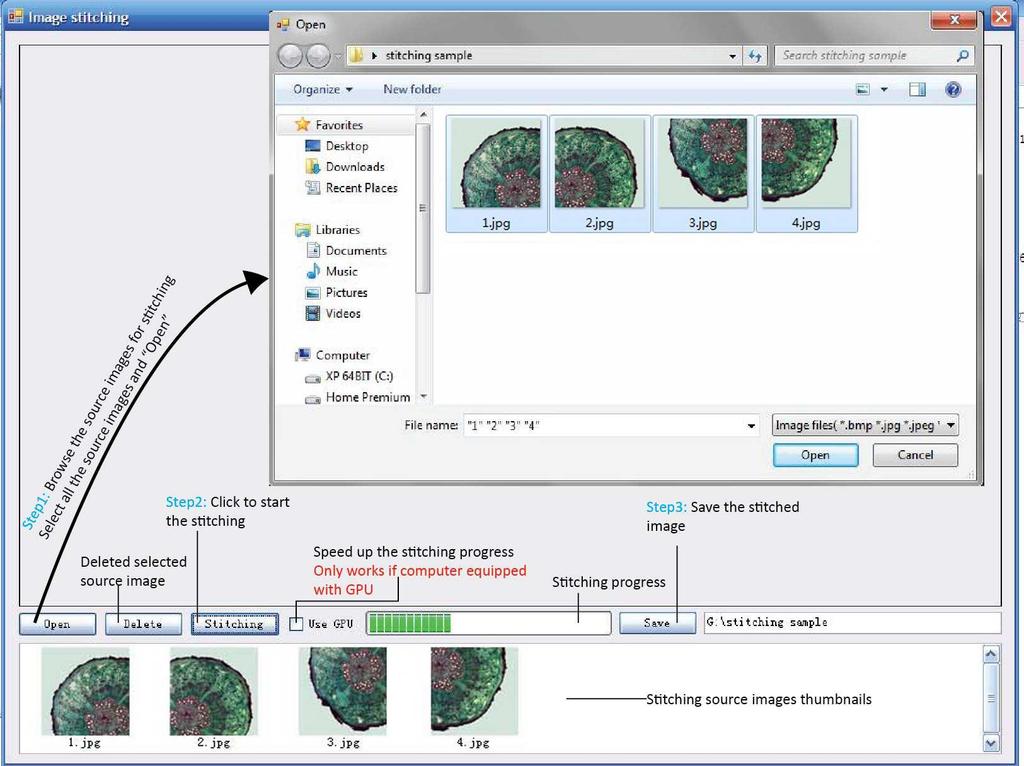
60 When selecting a wrong image as stacking source, just click on it and then click [Delete] to remove it. [Delete all] will remove all the selected images. Image stitching Click on to get the image stitching configuration. It combines multiple images with overlapping fields of view to produce a large panorama or high-resolution image. 1) Click [Open] browse the stitching source images. Select all the source images and open them. 2) Click [Stitching] to start stitching all the source images. 3) Click [Save] to save the stitched image in the same directory as the source images with the name of date and time stamped. Select [Use GPU] checkbox to speed up the stitching progress. This function only works if the computer is equipped with GPU.
61

62 Sample images :
![Measure Click on [Measure] at the top of the IS to get the measurement tools. Then select the corresponding tools to measure the still images (get more details in [Capture]>>[Live Measurement]).](/docs-images/90/103916088/images/63-0.jpg "Label The label text will be displayed on the lower right corner of the image. The date and time will be displayed on the top right corner of the image.")
63 Measure Click on [Measure] at the top of the IS to get the measurement tools. Then select the corresponding tools to measure the still images (get more details in [Capture]>>[Live Measurement]). Label The label text will be displayed on the lower right corner of the image. The date and time will be displayed on the top right corner of the image. After clicking [Save], the image with the label will be saved as image file name+ _bak. For example, the original image file name is IS.jpg,

64 then this image with a label will be saved as IS_bak.jpg. So the original image is still kept. HDR Image High Dynamic Range (HDR) image is used to get greater dynamic range of an image. Take pictures for one same scene with different exposure time and load them in the software. In the drop-down menu, select corresponding images for [Exposure Low], [Exposure High] and [Exposure Suitable]. Push [HDR] button to combine different exposed images into one. The generated HDR image will be named as hdr_image.
65 If the different exposed images are not loaded in the OptikaISview yet, the shortcut on the right hand side of the OptikaISview allows you to browse any image simply.

66 Fluorescence This function is used to assign fluorescence images with different colors and combine them together into one image. Step 1: Open the images which are used for combination in IS, then click on [Start] to start the fluorescence combination.
67 Step 2: Click on image thumbnails to add corresponding images. The image position indicator shows the added images position. Maximum 4 frame images are allowed to add for fluorescence combination. Step 3: Click on one added image indicator to start applying color for it. Click on one image indicator to select it (The selected one will be in dark color, unselected ones will be gray white). Assign color for selected image. Two ways provided for color assignment: a. Click on the preferred color or slide to choose it. b. Assign the color according to the dyestuff in the dropdown menu of [Dye Type].
![Click on [Apply Color] button to](/docs-images/90/103916088/images/68-0.jpg "add selected color on the image.")
68 Click on [Apply Color] button to add selected color on the image.
![Step 4: Click on [Apply All] to combine all the colored images. Optimize checkbox is recommended to select during the combination.](/docs-images/90/103916088/images/69-0.jpg "It will optimize image background to get a better image. But without optimization, the created image keep all the original information.")
69 Step 4: Click on [Apply All] to combine all the colored images. Optimize checkbox is recommended to select during the combination. It will optimize image background to get a better image. But without optimization, the created image keep all the original information. No extra processing is applied to the image data.
![After get the combined fluorescence image, [Sharp] function in [Image Processing] can help to get sharper images and see more image details.](/docs-images/90/103916088/images/70-2.jpg "If add wrong image or wrong color to selected image, just click on the tiny cross beside each indicator to delete it.")
70 After get the combined fluorescence image, [Sharp] function in [Image Processing] can help to get sharper images and see more image details. If add wrong image or wrong color to selected image, just click on the tiny cross beside each indicator to delete it. If want to cancel current combination, just click on [Close All] to cancel the combination. Original images:

71 Combined image:
GXCapture 8.1 Instruction Manual
 GT Vision image acquisition, managing and processing software GXCapture 8.1 Instruction Manual Contents of the Instruction Manual GXC is the shortened name used for GXCapture Square brackets are used to
CHAPTER1: QUICK START...3 CAMERA INSTALLATION... 3 SOFTWARE AND DRIVER INSTALLATION... 3 START TCAPTURE...4 TCAPTURE PARAMETER SETTINGS... 5 CHAPTER2:
 Image acquisition, managing and processing software TCapture Instruction Manual Key to the Instruction Manual TC is shortened name used for TCapture. Help Refer to [Help] >> [About TCapture] menu for software
ISCapture Instruction Manual
 Image acquisition, managing and processing software ISCapture Instruction Manual Key to the Instruction Manual ISisshortenednameusedforISCapture Squarebracketsareusedtoindicateitemssuchasmenu names, button
ISCapture User Guide. advanced CCD imaging. Opticstar
 advanced CCD imaging Opticstar I We always check the accuracy of the information in our promotional material. However, due to the continuous process of product development and improvement it is possible
User Guide of ISCapture
 User Guide of ISCapture For Windows2000/XP/Vista(32bit/64bit)/Win7(32bit/64bit) Xintu Photonics Co., Ltd. Version: 2.6 I All the users of Xintu please kindly note that the information and references in
User Manual. 3 MegaPixel CMOS Color Camera for Light Microscopy SC30
 User Manual 3 MegaPixel CMOS Color Camera for Light Microscopy SC30 Any copyrights relating to this manual shall belong to Olympus Soft Imaging Solutions GmbH. We at Olymnpus Soft Imaging Solutions GmbH
Picture Style Editor Ver Instruction Manual
 ENGLISH Picture Style File Creating Software Picture Style Editor Ver. 1.15 Instruction Manual Content of this Instruction Manual PSE stands for Picture Style Editor. indicates the selection procedure
Contents STARTUP MICROSCOPE CONTROLS CAMERA CONTROLS SOFTWARE CONTROLS EXPOSURE AND CONTRAST MONOCHROME IMAGE HANDLING
 Operations Guide Contents STARTUP MICROSCOPE CONTROLS CAMERA CONTROLS SOFTWARE CONTROLS EXPOSURE AND CONTRAST MONOCHROME IMAGE HANDLING Nikon Eclipse 90i Operations Guide STARTUP Startup Powering Up Fluorescence
Picture Style Editor Ver Instruction Manual
 ENGLISH Picture Style File Creating Software Picture Style Editor Ver. 1.12 Instruction Manual Content of this Instruction Manual PSE is used for Picture Style Editor. In this manual, the windows used
Digital Portable Overhead Document Camera LV-1010
 Digital Portable Overhead Document Camera LV-1010 Instruction Manual 1 Content I Product Introduction 1.1 Product appearance..3 1.2 Main functions and features of the product.3 1.3 Production specifications.4
Picture Style Editor Ver Instruction Manual
 ENGLISH Picture Style File Creating Software Picture Style Editor Ver. 1.18 Instruction Manual Content of this Instruction Manual PSE stands for Picture Style Editor. In this manual, the windows used in
ARTRAY Camera / Converter Viewer Software. ART-VIEWER v1370. Manual
 ARTRAY Camera / Converter Viewer Software ART-VIEWER v1370 Manual Table of Contents TABLE OF CONTENTS... 2 1. SUMMARY... 4 2. INSTRUCTIONS FOR CAMERAS... 5 2.1. USB2.0 CAMERA ARTCNVIIDEVICE DRIVER INSTALLATION...
User Manual. Copyright 2010 Lumos. All rights reserved
 User Manual The contents of this document may not be copied nor duplicated in any form, in whole or in part, without prior written consent from Lumos. Lumos makes no warranties as to the accuracy of the
[Mallincam HD-10 User Manual] MALLINCAM HD-10. HD-10 User Manual. [Version 1.0] Michael Burns Rock Mallin
![[Mallincam HD-10 User Manual] MALLINCAM HD-10. HD-10 User Manual. [Version 1.0] Michael Burns Rock Mallin](/thumbs/90/103499737.jpg "[Mallincam HD-10 User Manual] MALLINCAM HD-10. HD-10 User Manual. [Version 1.0] Michael Burns Rock Mallin") MALLINCAM HD-10 Revision Sheet [Version 1.0] Michael Burns Rock Mallin [Mallincam HD-10 User Manual] This document will quickly introduce you to the wonders of the MallinCam HD-10 Camera. We will include
MALLINCAM HD-10 Revision Sheet [Version 1.0] Michael Burns Rock Mallin [Mallincam HD-10 User Manual] This document will quickly introduce you to the wonders of the MallinCam HD-10 Camera. We will include
Motic Live Imaging Module. Windows OS User Manual
 Motic Live Imaging Module Windows OS User Manual Motic Live Imaging Module Windows OS User Manual CONTENTS (Linked) Introduction 05 Menus, bars and tools 06 Title bar 06 Menu bar 06 Status bar 07 FPS 07
ImagesPlus Basic Interface Operation
 ImagesPlus Basic Interface Operation The basic interface operation menu options are located on the File, View, Open Images, Open Operators, and Help main menus. File Menu New The New command creates a
ID Photo Processor. Batch photo processing. User Guide
 ID Photo Processor Batch photo processing User Guide 2015 Akond company 197342, Russia, St.-Petersburg, Serdobolskaya, 65a Phone/fax: +7(812)384-6430 Cell: +7(921)757-8319 e-mail: info@akond.net http://www.akond.net
CHROMACAL User Guide (v 1.1) User Guide
 User Guide") CHROMACAL User Guide (v 1.1) User Guide User Guide Notice Hello and welcome to the User Guide for the Datacolor CHROMACAL Color Calibration System for Optical Microscopy, a cross-platform solution that
CHROMACAL User Guide (v 1.1) User Guide User Guide Notice Hello and welcome to the User Guide for the Datacolor CHROMACAL Color Calibration System for Optical Microscopy, a cross-platform solution that
Windows INSTRUCTION MANUAL
 Windows E INSTRUCTION MANUAL Contents About This Manual... 3 Main Features and Structure... 4 Operation Flow... 5 System Requirements... 8 Supported Image Formats... 8 1 Installing the Software... 1-1
DigiScope II v3 TM Aperture Scope User s Manual
 DigiScope II v3 TM Aperture Scope User s Manual Welcome Thank you for choosing DigiScope II v3 TM Aperture scope! The DigiScope II v3 TM Aperture Scope is an exciting new device to Capture and record the
Welcome 1. Precaution
 Table of Contents EN Precaution....2 Preparation.. 4 Standard accessories....4 Parts Names & Functions...5 Computer System requirements.... 6 Technical Specifications 7 Install the software.. 7 Start Microscope.8
The ideal K-12 science microscope solution. User Guide. for use with the Nova5000
 The ideal K-12 science microscope solution User Guide for use with the Nova5000 NovaScope User Guide Information in this document is subject to change without notice. 2009 Fourier Systems Ltd. All rights
Capture V2.0 Software Instruction Manual
 Capture V2.0 Software Instruction Manual Contents General Introduction 3 1. Starting Interface 4 2. Windows 5-2.1 Status Bar 5-2.2 Control Bar 5-2.3 Preview Window 6-2.4 Data Bar 6-2.5 Image Bar 7 3. Capture
Operating Manual. (Version 3.5)
") Operating Manual (Version 3.5) Thank you for purchasing this PENTAX Digital Camera. This is the manual for PENTAX PHOTO Browser 3 and PENTAX PHOTO Laboratory 3 software for your Windows PC or Macintosh
Operating Manual (Version 3.5) Thank you for purchasing this PENTAX Digital Camera. This is the manual for PENTAX PHOTO Browser 3 and PENTAX PHOTO Laboratory 3 software for your Windows PC or Macintosh
Operating Manual. (Version 3.10)
") Operating Manual (Version 3.10) Thank you for purchasing this PENTAX Digital Camera. This is the manual for PENTAX PHOTO Browser 3 and PENTAX PHOTO Laboratory 3 software for your Windows PC or Macintosh
Operating Manual (Version 3.10) Thank you for purchasing this PENTAX Digital Camera. This is the manual for PENTAX PHOTO Browser 3 and PENTAX PHOTO Laboratory 3 software for your Windows PC or Macintosh
Sentech USB Camera User Manual. Sentech USB Camera Viewing Software StCamSWare
 Sentech USB Camera User Manual Sentech USB Camera Viewing Software StCamSWare Safety Precautions CAUTION CAUTION RISK OF RISK ELECTRIC OF ELECTRIC SHOCK SHOCK RISK DO OF NOT ELECTRIC DO OPEN NOT SHOCK
Copyright Notice. Trademarks
 Copyright Notice All rights reserved. No part of this publication may be reproduced, stored in a retrieval system, or transmitted in any form or by any means, electronic, mechanical, photocopying, recording,
User Guide for TWAIN / DirectX interface for GRYPHAX USB 3.0 cameras
 User Guide for TWAIN / DirectX interface for GRYPHAX USB 3.0 cameras The TWAIN & DirectX driver for PROGRES GRYPHAX USB 3.0 cameras enables user to operate with TWAIN and DirectX supported 3 rd party software
HDR Darkroom 2 User Manual
 HDR Darkroom 2 User Manual Everimaging Ltd. 1 / 22 www.everimaging.com Cotent: 1. Introduction... 3 1.1 A Brief Introduction to HDR Photography... 3 1.2 Introduction to HDR Darkroom 2... 5 2. HDR Darkroom
Scanning Setup Guide for TWAIN Datasource
 Scanning Setup Guide for TWAIN Datasource Starting the Scan Validation Tool... 2 The Scan Validation Tool dialog box... 3 Using the TWAIN Datasource... 4 How do I begin?... 5 Selecting Image settings...
Fein. High Sensitivity Microscope Camera with Advanced Software 3DCxM20-20 Megapixels
 Fein High Sensitivity Microscope Camera with Advanced Software 3DCxM20-20 Megapixels 3DCxM20 Camera Features High Sensitivity Camera This microscopy camera was designed with high sensitivity and ultra
The screen pictures shown in this manual may differ depending on the type of computer or camera used.
 Operating Manual Thank you for purchasing the PENTAX Digital Camera. This is the manual for PENTAX PHOTO Browser 3 and PENTAX PHOTO Laboratory 3 software for your Windows PC or Macintosh for enjoying images
Brightness and Contrast Control Reference Guide
 innovation Series Scanners Brightness and Contrast Control Reference Guide A-61506 Part No. 9E3722 CAT No. 137 0337 Using the Brightness and Contrast Control This Reference Guide provides information and
KoPa Scanner. User's Manual A99. Ver 1.0. SHENZHEN OSTEC OPTO-ELECTRONIC TECHNOLOGY CO.,LTD.
 KoPa Scanner A99 User's Manual Ver 1.0 SHENZHEN OSTEC OPTO-ELECTRONIC TECHNOLOGY CO.,LTD. http://www.ostec.com.cn Content Chapter 1 Start... 1 1.1 Safety Warnings and Precautions... 1 1.2 Installation
Veterinary Digital X-Ray System Quick Start Guide
 1 Veterinary Digital X-Ray System Quick Start Guide 2 SOPIX² X-Ray Sensors Quick Start Guide ***PERFORM THIS STEP BEFORE PLUGGING IN THE SENSOR*** Step 1 Load the CD: If you have already plugged in the
Brightfield Microscopy and Image Acquisition on Spotcam1. by Ryan Taylor/Nancy Kleene Last modified 10/02/05 by Birgit Ehmer
 Brightfield Microscopy and Image Acquisition on Spotcam1 by Ryan Taylor/Nancy Kleene Last modified 10/02/05 by Birgit Ehmer Log onto the computer. Enter your username and password to log onto the server.
1 ImageBrowser Software User Guide 5.1
 1 ImageBrowser Software User Guide 5.1 Table of Contents (1/2) Chapter 1 What is ImageBrowser? Chapter 2 What Can ImageBrowser Do?... 5 Guide to the ImageBrowser Windows... 6 Downloading and Printing Images
SCD-0017 Firegrab Documentation
 SCD-0017 Firegrab Documentation Release XI Tordivel AS January 04, 2017 Contents 1 User Guide 3 2 Fire-I Camera Properties 9 3 Raw Color Mode 13 4 Examples 15 5 Release notes 17 i ii SCD-0017 Firegrab
Photomatix Pro 3.1 User Manual
 Introduction Photomatix Pro 3.1 User Manual Photomatix Pro User Manual Introduction Table of Contents Section 1: Taking photos for HDR... 1 1.1 Camera set up... 1 1.2 Selecting the exposures... 3 1.3 Taking
Lab 2 Assignment Part 2: (Due two weeks following the fluorescence lab) (10 points)
 (10 points)") Lab 2 Assignment Part 2: (Due two weeks following the fluorescence lab) (10 points) Each individual should prepare one set of corresponding phase contrast and fluorescent images and an accompanying figure
Lab 2 Assignment Part 2: (Due two weeks following the fluorescence lab) (10 points) Each individual should prepare one set of corresponding phase contrast and fluorescent images and an accompanying figure
inphoto ID SLR Automatic ID photography With Canon SLR camera User Guide
 inphoto ID SLR Automatic ID photography With Canon SLR camera User Guide 2014 Akond company Phone/fax: +7(812)384-6430 Cell: +7(921)757-8319 e-mail: info@akond.net akondsales@gmail.com http://www.akond.net
Operating Manual (Version 3.6)
") e_kb464_pc_84percent.book Page 1 Monday, September 29, 2008 2:00 PM Operating Manual (Version 3.6) e_kb464_pc_84percent.book Page 2 Monday, September 29, 2008 2:00 PM Thank you for purchasing this PENTAX
e_kb464_pc_84percent.book Page 1 Monday, September 29, 2008 2:00 PM Operating Manual (Version 3.6) e_kb464_pc_84percent.book Page 2 Monday, September 29, 2008 2:00 PM Thank you for purchasing this PENTAX
MY ASTROPHOTOGRAPHY WORKFLOW Scott J. Davis June 21, 2012
 Table of Contents Image Acquisition Types 2 Image Acquisition Exposure 3 Image Acquisition Some Extra Notes 4 Stacking Setup 5 Stacking 7 Preparing for Post Processing 8 Preparing your Photoshop File 9
SCANNING IMAGES - USER S GUIDE. Scanning Images with Epson Smart Panel and PhotoShop [for Epson 1670 scanners]
![SCANNING IMAGES - USER S GUIDE. Scanning Images with Epson Smart Panel and PhotoShop [for Epson 1670 scanners]](/thumbs/89/98942649.jpg "SCANNING IMAGES - USER S GUIDE. Scanning Images with Epson Smart Panel and PhotoShop [for Epson 1670 scanners]") University of Arizona Information Commons Training 1 SCANNING IMAGES - USER S GUIDE Scanning Images with Epson Smart Panel and PhotoShop [for Epson 1670 scanners] p.2 Introduction and Overview Differences
University of Arizona Information Commons Training 1 SCANNING IMAGES - USER S GUIDE Scanning Images with Epson Smart Panel and PhotoShop [for Epson 1670 scanners] p.2 Introduction and Overview Differences
GlassSpection User Guide
 i GlassSpection User Guide GlassSpection User Guide v1.1a January2011 ii Support: Support for GlassSpection is available from Pyramid Imaging. Send any questions or test images you want us to evaluate
DIGITAL-MICROSCOPY CAMERA SOLUTIONS USB 3.0
 DIGITAL-MICROSCOPY CAMERA SOLUTIONS USB 3.0 PixeLINK for Microscopy Applications PixeLINK will work with you to choose and integrate the optimal USB 3.0 camera for your microscopy project. Ideal for use
Photoshop Elements Hints by Steve Miller
 2015 Elements 13 A brief tutorial for basic photo file processing To begin, click on the Elements 13 icon, click on Photo Editor in the first box that appears. We will not be discussing the Organizer portion
inphoto ID PS Automatic ID photography With Canon PowerShot camera User Guide
 inphoto ID PS Automatic ID photography With Canon PowerShot camera User Guide 2018 Akond company Phone/fax: +7(812)384-6430 Cell: +7(921)757-8319 e-mail: info@akond.net akondsales@gmail.com http://www.akond.net
Adobe Photoshop CC 2018 Tutorial
 Adobe Photoshop CC 2018 Tutorial GETTING STARTED Adobe Photoshop CC 2018 is a popular image editing software that provides a work environment consistent with Adobe Illustrator, Adobe InDesign, Adobe Photoshop,
How to combine images in Photoshop
 How to combine images in Photoshop In Photoshop, you can use multiple layers to combine images, but there are two other ways to create a single image from mulitple images. Create a panoramic image with
Tribometrics. Version 2.11
 Tribometrics Version 2.11 Table of Contents Tribometrics... 1 Version 2.11... 1 1. About This Document... 4 1.1. Conventions... 4 2. Introduction... 5 2.1. Software Features... 5 2.2. Tribometrics Overview...
Digital Imaging - Photoshop
 Digital Imaging - Photoshop A digital image is a computer representation of a photograph. It is composed of a grid of tiny squares called pixels (picture elements). Each pixel has a position on the grid
ScanGear CS-U 5.6. for CanoScan FB1210U Color Scanner. User s Guide
 ScanGear CS-U 5.6 for CanoScan FB1210U Color Scanner User s Guide Copyright Notice Copyright 2000 Canon Inc. This manual is copyrighted with all rights reserved. Under the copyright laws, this manual may
Progeny Imaging Veterinary
 Progeny Imaging Veterinary User Guide V1.14 and higher 00-02-1605 Rev. K1 ECN: ECO052875 Revision Date: 5/17/2017 Contents 1. About This Manual... 6 How to Use this Guide... 6 Text Conventions... 6 Getting
Progeny Imaging. User Guide V x and Higher. Part Number: ECN: P1808 REV. F
 Progeny Imaging User Guide V. 1.6.0.x and Higher Part Number: 00-02-1598 ECN: P1808 REV. F Contents 1 About This Manual... 5 How to Use this Guide... 5 Text Conventions... 5 Getting Assistance... 6 2 Overview...
Mighty Scope 5M. Instruction Manual. aveninc.com
 Mighty Scope 5M Instruction Manual aveninc.com Contents Features 2 Specifications 2 Contents 2 PC System Requirements 3 Driver Installation Procedure 3 Getting Started 3 Software Installation (PC) 4 Mighty
Foreword. Welcome to the MallinCam Universe!
 Foreword Welcome to the MallinCam Universe! The new MallinCam Universe represents years of research and design to develop a color astronomical CCD camera that is capable of live constant refresh to provide
Guidance on Using Scanning Software: Part 5. Epson Scan
 Guidance on Using Scanning Software: Part 5. Epson Scan Version of 4/29/2012 Epson Scan comes with Epson scanners and has simple manual adjustments, but requires vigilance to control the default settings
Digital Microscope. User Manual
 Digital Microscope User Manual Features The digital microscope provides 10~200X adjustable magnification range. The build-in high-performance white LED can illuminate the object without using any auxiliary
MEASUREMENT CAMERA USER GUIDE
 How to use your Aven camera s imaging and measurement tools Part 1 of this guide identifies software icons for on-screen functions, camera settings and measurement tools. Part 2 provides step-by-step operating
Training Guide for Carl Zeiss AxioZoom V16 Stereo Microscope
 Training Guide for Carl Zeiss AxioZoom V16 Stereo Microscope ZEN 2012 Optical Imaging & Vital Microscopy Core Baylor College of Medicine (2017) Power ON Routine 1 2 If you require fluorescence imaging,
USB Color Camera User Manual. Sentech USB Camera Viewing Software StCamSWare (ver.0.0.8)
") USB Color Camera User Manual Sentech USB Camera Viewing Software Quick Start Reference Guide Installation of Software 1. Uninstall any previous version of StCamSWare software before installing the latest
USB Color Camera User Manual Sentech USB Camera Viewing Software Quick Start Reference Guide Installation of Software 1. Uninstall any previous version of StCamSWare software before installing the latest
Digital Design and Communication Teaching (DiDACT) University of Sheffield Department of Landscape. Adobe Photoshop CS5 INTRODUCTION WORKSHOPS
 University of Sheffield Department of Landscape. Adobe Photoshop CS5 INTRODUCTION WORKSHOPS") Adobe INTRODUCTION WORKSHOPS WORKSHOP 1 - what is Photoshop + what does it do? Outcomes: What is Photoshop? Opening, importing and creating images. Basic knowledge of Photoshop tools. Examples of work.
Adobe INTRODUCTION WORKSHOPS WORKSHOP 1 - what is Photoshop + what does it do? Outcomes: What is Photoshop? Opening, importing and creating images. Basic knowledge of Photoshop tools. Examples of work.
Batch Processing Converting images in a folder to JPEG
 Batch Processing Converting images in a folder to JPEG Request I would like to convert multiple RAW images (NEF files) to JPEG images all at once Response You can use a Batch Process to convert all RAW
PC System Requirement For Dual Microscope
 REV.F The 200X digital microscope provides a 10~200X adjustable magnification range, and the 500X microscope provides 500X magnification. The built-in high-performance LEDs can illuminate an object without
S100 Webcam. User s Manual
 S100 Webcam User s Manual Kodak and the Kodak trade dress are trademarks of Eastman Kodak Company used under license. 2009 Sakar International, Inc. All rights reserved. WINDOWS and the WINDOWS logo are
Nikon View DX for Macintosh
 Contents Browser Software for Nikon D1 Digital Cameras Nikon View DX for Macintosh Reference Manual Overview Setting up the Camera as a Drive Mounting the Camera Camera Drive Settings Unmounting the Camera
Real-color High Sensitivity Scientific Camera
 Real-color High Sensitivity Scientific Camera For the first time with true color The Best Choice for Both Brightfield and Fluorescence Imaging Hi-SPEED CERTIFIED 6.5μm x 6.5μm pixel scmos color sensor
Zeiss Axiovert 135 Fluorescence Microscope Quick Guide / Operations Manual (v. 1.0 February 09)
") University of Chicago Integrated Light Microscopy Core Dr. Vytas Bindokas, Director http://digital.bsd.uchicago.edu By: Christine Labno, Assistant Director Room: AB-129 Phone: 4-9040 Zeiss Axiovert 135
University of Chicago Integrated Light Microscopy Core Dr. Vytas Bindokas, Director http://digital.bsd.uchicago.edu By: Christine Labno, Assistant Director Room: AB-129 Phone: 4-9040 Zeiss Axiovert 135
DP2-BSW. User s Manual APPLICATION SOFTWARE
 User s Manual DP2-BSW APPLICATION SOFTWARE This user's manual describes the OLYMPUS DP2-BSW application software to be used with an OLYMPUS Microscope Digital Camera. To ensure safety, obtain optimum performance
COLOR EXAMPLES BEFORE YOU BEGIN. Tone-curve corrections. Before installing the DiMAGE Scan Utility. Digital ROC - Reconstruction Of Color
 E SOFTWARE MANUAL COLOR EXAMPLES Tone-curve corrections By selecting individual color channels on the tone curve, adjustments to the overall color of an image can be made. In this example, the image is
μscope Microscopy Software
 μscope Microscopy Software Pixelink μscope Essentials (ES) Software is an easy-to-use robust image capture tool optimized for productivity. Pixelink μscope Standard (SE) Software had added features, making
2012 Monitored Rehab Systems E1201 Manual Kneelax. Installation and user manual
 2012 Monitored Rehab Systems E1201 Manual Kneelax Installation and user manual Table of contents CHAPTER 1 Installation Manual... 3 1.1 Install Kneelax USB driver... 3 1.2 Detect COM-port... 6 1.3 Software
Real-color High Sensitivity Scientific Camera. For the first time with true color ISO9001
 Real-color High Sensitivity Scientific Camera For the first time with true color ISO9001 The Best Choice for Both Brightfield and Fluorescence Imaging Hi-SPEED CERTIFIED 6.5μm x 6.5μm pixel scmos color
High Dynamic Range (HDR) photography is a combination of a specialized image capture technique and image processing.
 photography is a combination of a specialized image capture technique and image processing.") Introduction High Dynamic Range (HDR) photography is a combination of a specialized image capture technique and image processing. Photomatix Pro's HDR imaging processes combine several Low Dynamic Range
Introduction High Dynamic Range (HDR) photography is a combination of a specialized image capture technique and image processing. Photomatix Pro's HDR imaging processes combine several Low Dynamic Range
By Washan Najat Nawi
 By Washan Najat Nawi how to get started how to use the interface how to modify images with basic editing skills Adobe Photoshop: is a popular image-editing software. Two general usage of Photoshop Creating
User Guide of Tsview 7
 Operation Manual of TSView User Guide of Tsview 7 Xintu Photonics Co., Ltd. Version: 7 Operation Manual of TSView All the users of Xintu please kindly note that the information and references contained
Image Processing Tutorial Basic Concepts
 Image Processing Tutorial Basic Concepts CCDWare Publishing http://www.ccdware.com 2005 CCDWare Publishing Table of Contents Introduction... 3 Starting CCDStack... 4 Creating Calibration Frames... 5 Create
inphoto ID Canon camera control software Automatic ID photography User Guide
 inphoto ID Canon camera control software Automatic ID photography User Guide 2008 Akond company 197342, Russia, St.-Petersburg, Serdobolskaya, 65A Phone/fax: +7(812)600-6918 Cell: +7(921)757-8319 e-mail:
Applying mathematics to digital image processing using a spreadsheet
 Jeff Waldock Applying mathematics to digital image processing using a spreadsheet Jeff Waldock Department of Engineering and Mathematics Sheffield Hallam University j.waldock@shu.ac.uk Introduction When
FUJITSU TWAIN 32 Scanner Driver
 P3PC-1472-09ENZ0 FUJITSU TWAIN 32 Scanner Driver Scanner Utility for Microsoft Windows Version 9.19 User's Guide For Use with Microsoft Windows 2000, Windows XP, Windows Server 2003, Windows Server 2008
Photo One Digital Photo Shoots and Edits
 Photo One Digital Photo Shoots and Edits You will submit photo shoots, unedited and you will submit selected edited images. The shoots will be explained first and the edits will be explained later on this
Image Editing and Measurement Software. User Manual
 Digital Viewer II TM Digital Microscope Image Editing and Measurement Software User Manual Version: 2.1.1.2 1 DIGITAL VIEWER II TM DIGITAL MICROSCOPE... 1 IMAGE EDITING AND MEASUREMENT SOFTWARE... 1 USER
Exploring Photoshop Tutorial
 Exploring Photoshop Tutorial Objective: In this tutorial we will create a poster composed of three distinct elements: a Bokeh, an image and title text. The Bokeh is an effect which is sometimes seen in
User Manual Veterinary
 Veterinary Acquisition and diagnostic software Doc No.: Rev 1.0.1 Aug 2013 Part No.: CR-FPM-04-022-EN-S 3DISC, FireCR, Quantor and the 3D Cube are trademarks of 3D Imaging & Simulations Corp, South Korea,
AF Area Mode. Face Priority
 Chapter 4: The Shooting Menu 71 AF Area Mode This next option on the second screen of the Shooting menu gives you several options for controlling how the autofocus frame is set up when the camera is in
Leica DMi8A Quick Guide
 Leica DMi8A Quick Guide 1 Optical Microscope Quick Start Guide The following instructions are provided as a Quick Start Guide for powering up, running measurements, and shutting down Leica s DMi8A Inverted
ImageBrowser EX User Guide
 ImageBrowser EX User Guide ImageBrowser EX CameraWindow CEL-SS4RA0 Basic Advanced Manual Conventions and Navigation Conventions in This Manual Manual Navigation Supported Operating Environm System Requirem
2014 by Microtek International, Inc. All rights reserved.
 2014 by Microtek International, Inc. All rights reserved. Microtek and ScanWizard are trademarks of Microtek International, Inc. Windows is a registered trademark of Microsoft Corporation. All other products
EVOS M5000 Imaging System
 EVOS M5000 Imaging System Pub. No. MAN0017765 Doc. Part No. 710209 Rev. A.0 This document is intended as a benchtop reference for the users of the EVOS M5000 Imaging System (Cat. No. AMF5000). For detailed
INSTRUCTION MANUAL MM-A209
 E INSTRUCTION MANUAL 9222-7300-11 MM-A209 2 BEFORE YOU BEGIN Before installing the DiMAGE Viewer software, read the data-transfer section in the camera manual. This section details how to connect the camera
Companion Processing Software for SIGMA Digital Cameras. Version 4.1 For Macintosh
 SIGMA Photo Pro User Guide Companion Processing Software for SIGMA Digital Cameras Version 4.1 For Macintosh I M P O R T A N T : Please Read Before You Start Thank you very much for purchasing this SIGMA
FUJITSU TWAIN 32 Scanner Driver
 P3PC-1242-02ENC2 FUJITSU TWAIN 32 Scanner Driver Scanner Utility for Microsoft Windows Version 9.17 User's Guide For Use with Microsoft Windows 98, Windows Me, Windows 2000 and Windows XP (* For Windows
4.5.1 Mirroring Gain/Offset Registers GPIO CMV Snapshot Control... 14
 Thank you for choosing the MityCAM-C8000 from Critical Link. The MityCAM-C8000 MityViewer Quick Start Guide will guide you through the software installation process and the steps to acquire your first
Contents Chapter One- Introduction
 Contents Chapter One- Introduction... 1 1.1 Applications supported... 1 1.2 Hardware... 1 1.2.1 Specifications... 1 1.2.2 System Components... 2 1.2.2.1 Darkroom... 2 1.2.2.2 UV transilluminator... 1.2.2.
It makes sense to read this section first if new to Silkypix... How to Handle SILKYPIX Perfectly Silkypix Pro PDF Contents Page Index
 It makes sense to read this section first if new to Silkypix... How to Handle SILKYPIX Perfectly...145 Silkypix Pro PDF Contents Page Index 0. 0.Overview and Introduction...9 0.1. Section Names...9 0.1.1.
Software Starter Guide
 D I G I T A L C A M E R A Software Starter Guide For Use with the Canon Digital Camera Solution Disk Version 2.0 To Download Images to a Computer for Windows for Macintosh Install the Software p. 7 p.
Apple Photos Quick Start Guide
 Apple Photos Quick Start Guide Photos is Apple s replacement for iphoto. It is a photograph organizational tool that allows users to view and make basic changes to photos, create slideshows, albums, photo
Adobe Photoshop CS5 Tutorial
 Adobe Photoshop CS5 Tutorial GETTING STARTED Adobe Photoshop CS5 is a popular image editing software that provides a work environment consistent with Adobe Illustrator, Adobe InDesign, Adobe Photoshop
Copyright EUKON Digital, Inc All rights reserved. EKPrint Studio. Apparel Printing Software. User Manual
 EKPrint Studio Apparel Printing Software User Manual 6.0 www.eukondigital.com Copyright EUKON Digital, Inc. 2010-2012. All rights reserved. Page 1 1. Overview... 4 2. Installation... 4 2. 1 EKPrint Studio