How to Make Faux Porcelain Pendants with Rubber Stamps & Gel Du Soleil
|
|
|
- Crystal Mitchell
- 5 years ago
- Views:
Transcription

1 We look forward to bringing you exclusive innovations and distinctive products this year and beyond


2 SUPPLIES NEEDED: Crystal Clay Gel du Soleil Nunn Design Findings UV Lamp Rubber Stamps Ink OTHER SUPPLIES NEEDED: Wet wipes Toothpicks or headpins Timer Business cards or card stock Q-Tip


 Roll the thoroughly mixed Epoxy Clay-Crystal Clay between your palms until it forms a smooth round ball.")
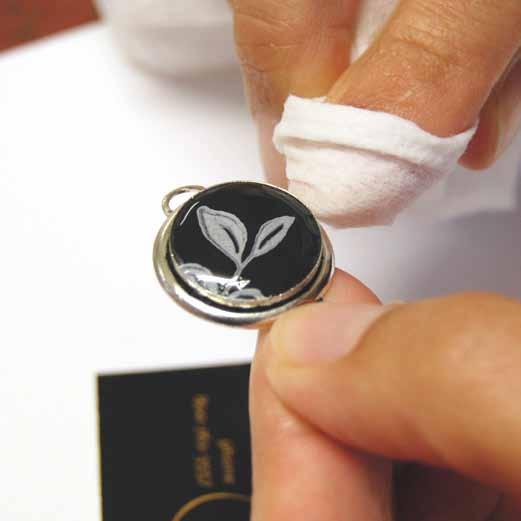
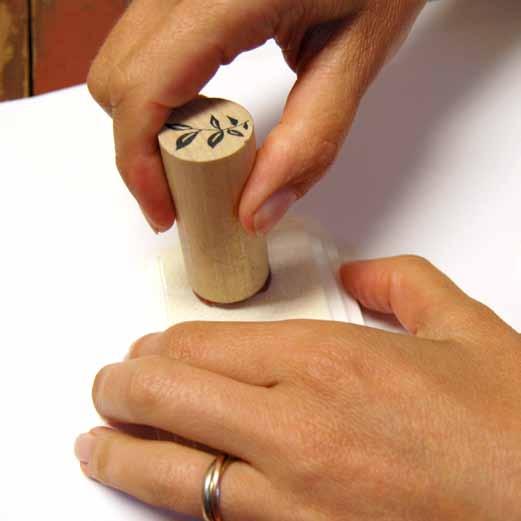
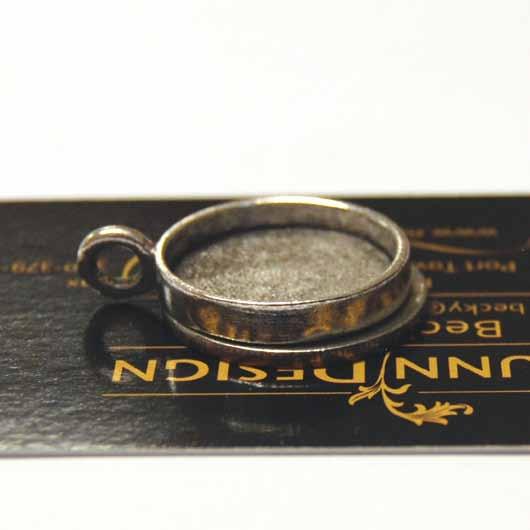
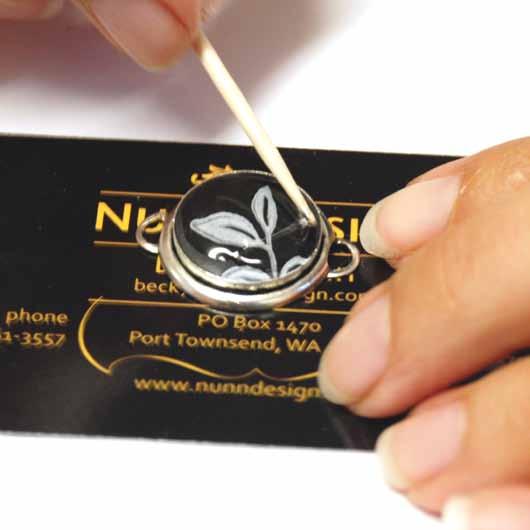
3 Add the Crystal Clay into Bezel Step 1: FFollow the manufacturer s instructions for the handling and mixing of the Epoxy Clay-Crystal Clay. For mixing the Epoxy Clay-Crystal Clay, it is best to wear your gloves. Depending on the size of your bezel, pinch off enough clay to create two equal sized balls of Part A and Part B and blend together fully until the clay is no longer marbled and uniform in color. You have approximately minutes of working time before the clay starts to harden, so take your time. Once the clay is thoroughly mixed, remove your gloves to make it easier to work with the clay. Step 2: (Images 2-3) Roll the thoroughly mixed Epoxy Clay-Crystal Clay between your palms until it forms a smooth round ball. Press the ball into your bezel and create an even smooth surface by patting down the clay with your fingers. You will want to have your clay flush even to the edge of the bezel. If you put too much clay in the bezel, the uv resin when applied will overflow and you will have clean up to do. If you do have too much clay, pinch off your excess and pat down your Epoxy Clay-Crystal Clay until clay is even with the rim and continue to pat until you have a smooth surface. Tip: Make sure your clay is flushed to your side edges and there are not any gaps between your Epoxy Clay-Crystal Clay and the bezel. In order for the Gel du Soleil to cure, ALL of the Gel must be exposed to UV light. If we have some seeping into the crevices, the piece will not cure. Step 3: (Image 4) Using a wet-wipe, clean up any excess Epoxy Clay-Crystal Clay that might have been left on the jewelry finding. The Epoxy Clay-Crystal Clay hardens like cement, so cleaning it up now and being tidy as you go makes the process easier and the results so much nicer. Apply the Rubber Stamp Step 4: (Images 5-7) Ensure that your inkpad is nicely inked so that you have an even coverage on your rubber stamp. I like to test my impression by stamping onto a sheet of white paper prior to actually stamping on the Epoxy Clay-Crystal Clay. Once you are all inked up, place your rubberstamp upright over your epoxy filled bezel. Press down gently into the clay, creating a stamped image. If you don t like how your image looks stamped on the Epoxy Clay-Crystal Clay, you can pinch off the stamped surface and add some additional clay to bring up your surface to be even with the side edge of your bezel and stamp again until you have it just the way you like it. 3
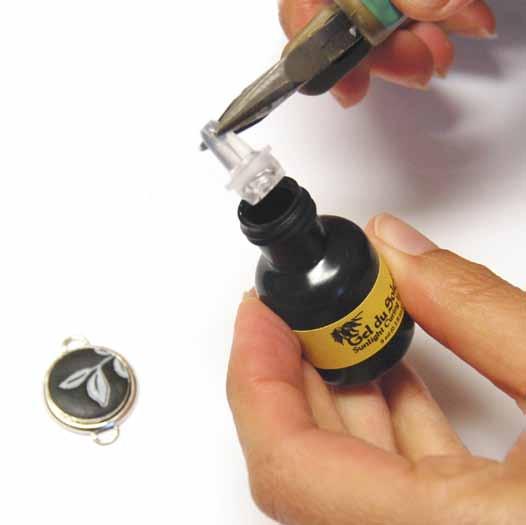
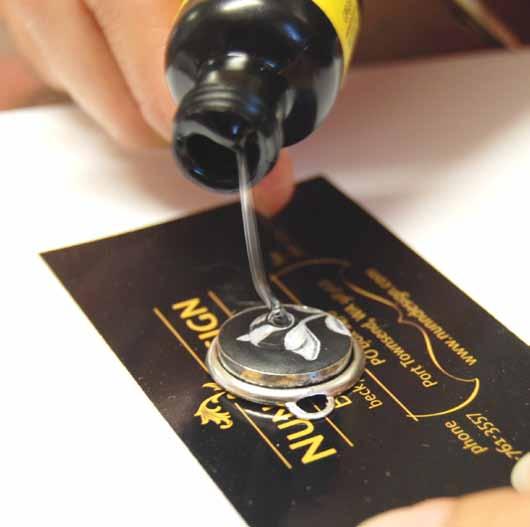
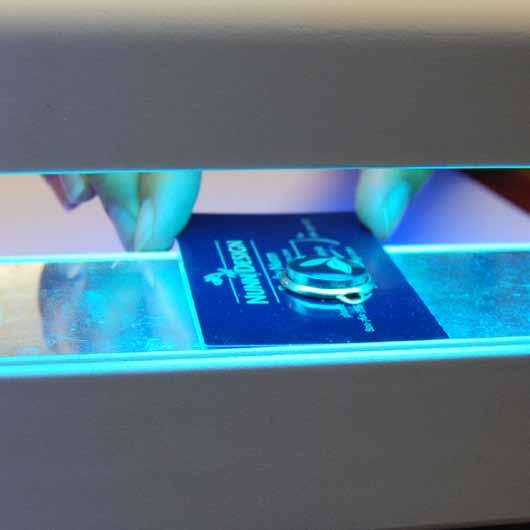
4 Step 5: (Image 8) Allow the Epoxy Clay-Crystal Clay to dry for at least 12 hours, well that is what I (Becky Nunn) did, but the staff of Nunn Design, on our Art Days, pour the UV resin onto the uncured epoxy clay all day long. Both turned out just fine so use your best judgment! Tip: (Image 9) It is always a good idea to remove excess ink from your rubberstamps prior to storing them. Applying the Gel du Soleil UV Resin Step 6: (Image 10) If your bezel has a bail, you will want to place a quarter underneath the bezel, allowing the surface to be level. Place your bezel onto a business card or a piece of card stock. This will aid you in transferring the bezel into the UV lamp once it is filled with Gel du Soleil. Step 7: (Image 11) Pop the nozzle off of your bottle of Gel du Soleil with a pair of needle nose pliers (if using the 5/16 oz bottle). Removing the nozzle will make is easier to pour the Gel du Soleil and limit excess bubbles in the resin. Tip: I like to place my top from the Gel du Soleil onto a piece of plastic so it won t get the oily resin all over my work surface. Step 8: (Images 12-13) Pour a very small drop of Gel du Soleil onto the surface of the Epoxy Clay-Crystal Clay. It is always best to under pour your resin and to continue adding to it, then to over pour and have to clean it up. Use a toothpick to move the Gel du Soleil around the surface, making a nice even coat. You will also keep a look out for any bubbles that you might have in your resin. If you do have a bubble, you can move it around with your toothpick and hope that it naturally pops. But if it is a stubborn cuss, you can light a match and put it over (not touching) the surface of the resin. The heat will make the air expand and the bubble will pop. If you want to have a higher dome on your piece, add an addition drip of the Gel du Soleil. When you are finished pouring the Gel du Soleil into the bezel, place the nozzle back onto the bottle and screw on the top. Tip: If you do over pour your Gel du Soleil (hey, it happens!), use a Q-Tip to remove the over spill. Step 9: (Image 14) If you have any excess Gel du Soleil on the bezel edges, use your wet wipe and Q-Tip to remove it. Once you expose the Gel du Soleil to the UV light, it will start to cure instantaneously, so make sure that you have all excess Gel du Soleil off of the sides. Step 10: (Image 15) Turn on the UV Lamp and transfer your business card with the bezel laying on the top, into the UV light. Make sure that your business card is level so that the Gel du Soleil will cure in a nice even dome and not all squished to one side or the other. Allow the piece to cure for 20 minutes. TIP: To allow multiple pieces in the UV light tray at the same time, you can remove the business card just minutes after you have placed the bezel in the UV light. 4
5 Step 11: (Image 16) When your time is up, remove your bezel and inspect the Gel s surface. If you had some gaps on the edge, you can add more resin and cure again. If you have any dust, you can sand down the surface with fine grit sand paper. The surface will be frosted from the sanding, but once you pour on the Gel again, it will be clear. Step 12: (Images 17-18) And there you have it. You might be interested in watching our video too! We have a lot to offer and would love for you to stay connected! Take a moment to cruise through our blog! --> Follow Nunn Design on Pinterest! --> Please Like us on Facebook. --> 5
How to Make Faux Porcelain Pendants with Transfer Sheets & Gel Du Soleil
 How to Make Faux Porcelain Pendants with Transfer Sheets & Gel Du Soleil We look forward to bringing you exclusive innovations and distinctive products this year and beyond. www.nunndesign.com www.nunndesign.com
Buy & Try Hollow Form Tassel Tutorial. We look forward to bringing you exclusive innovations and distinctive products this year and beyond.
 We look forward to bringing you exclusive innovations and distinctive products this year and beyond. 1 SUPPLIES NEEDED: Crystal Clay Paper Bead Hollow Form 2.5 Ball Chain 2.5 Faceted Bead Chain 2.5 Rhinestone
Eerie Halloween by Nunn Design
 Eerie Halloween by Nunn Design Approximate finished length: 20 inches Beads and other products needed for necklaces: 1 - Pewter Itsy Square Bezel Pendant with Flat Loop by Nunn Design - Antique Gold -
How to Instructions Double-Sided Resin Butterfly Pendant
 How to Instructions Double-Sided Resin Butterfly Pendant We look forward to bringing you exclusive innovations and distinctive products this year and beyond. www.nunndesign.com www.nunndesign.com 1 How
Resin Tree Drop Earrings We look forward to bringing you exclusive innovations and distinctive products this year and beyond.
 Resin Tree Drop Earrings We look forward to bringing you exclusive innovations and distinctive products this year and beyond. www.nunndesign.com www.nunndesign.com 1 SUPPLIES NEEDED: PE9217-2 Pewter Drop
Freehand Back-Filling: Polymer Clay and Resin Tutorial
 Page 1 of 9 Eugena Topina, 2016 Freehand Back-Filling: Polymer Clay and Resin Tutorial This tutorial is offered for your personal use only. Please do not distribute. Back-filling is a simple and very versatile
PROJECT BEGINNER/INTERMEDIATE METAL/RESIN
 PROJECT BEGINNER/INTERMEDIATE METAL/RESIN FCT-CR-091816_05 A photograph taken by the Hubble Space Telescope inspired the design of this 13 4 x 1½-in. (44 x 38 mm) pendant. 2009 Kalmbach Publishing Co.
SILICONE CAULK MOLD MAKING TUTORIALS
 SILICONE CAULK MOLD MAKING TUTORIALS SILICONE CAULK MOLD MAKING TUTORIAL Method #1 Pro s: Fast, cheap in comparison to other mold systems, effective when procedures are followed, these molds can be used
TOOLS & SUPPLIES (Included in ProTops Tool Kit)
") TOOLS & SUPPLIES (Included in ProTops Tool Kit) Clean Paint/Mixing Sticks Graduated Mixing Buckets Standard Mixing Cups Nylon Paint Brush Propane Torch 3M Masking Gun Masking Film & Painter s Tape Disposable
TOOLS & SUPPLIES (Included in ProTops Tool Kit) Clean Paint/Mixing Sticks Graduated Mixing Buckets Standard Mixing Cups Nylon Paint Brush Propane Torch 3M Masking Gun Masking Film & Painter s Tape Disposable
SURFACE CASTING METHOD: For Molds & Core Boxes. Presented by: Hapco Inc.
 SURFACE CASTING METHOD: For Molds & Core Boxes Presented by: Hapco Inc. RAPIDFIL Detailed Specifications STEP 1 SPACER LAYER Apply a layer of ¼ foam to create a uniform ¼ thickness around the pattern.
50 TIPS TO HELP YOU BE BETTER WITH RESIN. By Katherine Swift
 50 TIPS TO HELP YOU BE BETTER WITH RESIN By Katherine Swift 2016 Resin Obsession, LLC, all rights reserved Gainesville, FL 32606 www.resinobsession.com May not be shared in any form without permission
Tabletop Epoxy Resin Instruction Guide
 Table Top Epoxy Full Instructional Guide WARNING! You should read through ALL of these instructions BEFORE starting. These instructions are intended for Bar Tops, Table Tops, Artwork and Countertop applications.
Tips & Tricks using Part 24
 Tips & Tricks using Part 24 Finishing the River Sections... 2 Making Tentacles... 4 Making Fish... 6 Adding the Water... 8 Making the Plank Bridge... 13 Making Crystal Piles... 15 Finishing Various Accessories...
E3 UV-30 Resist Film Instructions
 E3 UV-30 Resist Film Instructions For more information or to view instructions in color, visit www.sherrihaab.com Sherri Haab Designs 2016 Supplies needed: Metal plate to etch (copper, brass or silver)
Instructions for Making Repairs to 3M 8681HS Blade Tapes Installed on Enstrom Helicopter Blades.
 REPORT NO: TITLE: Instructions for Making Repairs to 3M 8681HS Blade Tapes Installed on Enstrom Helicopter Blades. MODEL NO: All PREPAIRED BY: P.B. dupont CHECKED BY: APPROVED BY: 1. SCOPE This specification
One Piece Fiberglass Mold Construction
 One Piece Fiberglass Mold Construction (This is just a SAMPLE of the Main Manual) Simple Fiberglass Molds Can Be Used For Making Duplicate Parts For Many Applications Including Hobby & Automotive. This
Pre-Paint>Wings>Fit ailerons. Objectives of this task: Materials and equipment required: Size the ailerons and pre-mould strips
 Pre-Paint>Wings>Fit ailerons Objectives of this task: In this task the ailerons and the pre-mould strips will be sized and trimmed, then flocked onto the wings and glassed in place, and the next day the
With Deb Wood E X P L O R E
 Resin Eyes With Deb Wood Excerpt from A Face to Remember Learn to make resin eyes from 2 part resin. S y m m e t r y E X P L O R E D e t a i l P a i n t i n g Sculpture A n a t o m y C o r r e c t P r
mixed media jewelry 5 free found object, steampunk, and resin jewelry ideas presented by cloth paper scissors
 mixed media jewelry 5 free found object, steampunk, and resin jewelry ideas presented by cloth paper scissors 1 3 5 2 4 1 2 3 a look at: resins mold making with resin and clay Jen Cushman mix and match
The Essential Guide to Embossing.
 The Essential Guide to Embossing How to WOW! This guide will run you through a whole host of Embossing Techniques from the basic Stamp, Sprinkle, Tap, Heat, WOW! to the more complex and beautiful effects
How To Make A Two Part Mold And Cast Crystal Clear Medieval Knight Action Figures.
 http://wwwinstructablescom/id/how-to-make-a-two-part-mold-and-cast-crystal-clear/ How To Make A Two Part Mold And Cast Crystal Clear Medieval Knight Action Figures by ComposiMold on March 6, 2015 Table
Assembly instructions for the Simple Marble Machine
 Assembly instructions for the Simple Marble Machine Page number 1 Parts layout Page number 2 Please note: All the assembly can be done with PVA glue. Don't apply it from the bottle or tube but put a blob
Open Lentil with Floating Pearl
 INTERMEDIATE Open Lentil with Floating Pearl A hollow bead with a hidden copper wire makes a pearl appear to levitate. by Pam East FCT-CRON0316_ART113 Pearls are a snap to set, and they add an undeniable
HINTS & TIPS. Page 1. November 5, 2014 Mixed Media by Pébéo - Hints and Tips Version 1.2 GENERAL:
 Page 1 HINTS & TIPS GENERAL: Mixed Media by Pébéo paints may be used on Pébéo Liquid Art Panels, wood, artist grade composite wood surfaces (mdf and masonite), canvas, canvas panel, metal, glass, plastic,
Embedding Techniques
 Biological Control Info Page Embedding Techniques Used to Preserve Biocontrol Agents and Invasive Plant Material into Crystal Clear Resin 2000 Forest Practices Branch Biocontrol Development Program Table
Starry Night by Christi Friesen
 Starry Night by Christi Friesen As you may know, glitters and powders are a wonderful way to add additional color, texture and shading to your polymer clay creations. But there are other tricks you can
VICINITY WHITEBOARD PAINT. Installation Guidelines
 VICINITY WHITEBOARD PAINT Installation Guidelines Components Installation Kit Preparation Whiteboard Paint Aerated Stir Stick Drop Sheet Universal Undercoat Base Activator Cutting-In Roller Filling-In
How to make climbing grips. By,
 How to make climbing grips By, Items needed: * Items may be needed depending on your preference. - Carving Foam - Level Table - Cardboard - Pen - Ruler - Straight Edge - Box cutter - Hot melt glue gun
Japanese Quartet. With. Nikolina Otržan
 Japanese Quartet With Nikolina Otržan List of tools and materials for this class: - Clean & Flat Surface - Pasta Machine - Round Kemper Cutters - A Rigid Blade - A Ruler - A Pen - A Needle Tool - Coarse
380 Swimming Pool Paint
 Issued 21 st April 2010 PRODUCT DATA SHEET UNPAINTED CEMENT 380 Swimming Pool Paint SURFACE PREPARATION New cement or render should be allowed to cure for at least 21-28 days before any preparation is
Windshield Repair Instruction Manual
 Windshield Repair Instruction Manual 1 of 9 Table of Contents 1. Know the benefits of WSR... 3 2. Types of breaks... 3 3. Repair limitations... 3 4. Equipment introduction... 3 5. Safety... 4 6. Preparation
COMPOSITES LAB MANUAL
 COMPOSITES LAB MANUAL Version 1 Lab 3: Surface Preparation, Wet Layup, and Vacuum Bagging The original version of this manual was a one student senior design project written by Katherine White, the Composite
Read and understand the requirements of this procedure Assist students with installation as needed
 1. PROCEDURE OVERVIEW This procedure is to be used for installation of bonded strain gages on reinforcing bars. It includes necessary materials and a recommended practice for surface preparation, installation,
MAKE IT YOURS. Digital Photo Decoupage Art. How-2 instruction books for cool projects you can make your own.
 MAKE IT YOURS Digital Photo Decoupage Art How-2 instruction books for cool projects you can make your own. DIGITAL PHOTO DECOUPAGE ART WHAT YOU WILL NEED Computer / Internet Connection Digital photos you
Deluxe Tube & Tubeless Motorcycle Tire Repair Kit Instructions
 Deluxe Tube & Tubeless Motorcycle Tire Repair Kit Instructions Instructions for Tubeless Tire With the combination of Stop & Go plus your motorcycle's tool kit you have everything necessary to repair a
Personalize. Metal Clay and Resin. Making your own molds is one way to. Make your own texture molds, use your own photo.
 intermediate metal clay/resin Personalize CAPTURE A MOMENT Metal Clay and Resin Make your own texture molds, use your own photo. by Elaine D. Luther FCT-CR-050718-02 Making your own molds is one way to
HOW TO SELECT & USE A ROLLER
 HOW TO SELECT & USE A ROLLER www.paintaids.co.nz 1 select the right roller The two most important things for a great paint finish are: a good quality paint, and the right roller sleeve to match the paint
SANDCASTING. by Joyce Clarin
 SANDCASTING by Joyce Clarin Supplies Deeply veined leaf Hosta, rhubarb, burdock, elephant ear, castor bean, cabbage, squash, hollyhock, etc Quikcrete Vinyl Patch Sturdy box (or plastic tray) at least 2
Piper Cherokee /3 scale. Construction Manual
 Piper Cherokee 140 1/3 scale Construction Manual STAB CONSTRUCTION 1. Remove foam cores from cradle and place on flat surface. Inspect pieces before you epoxy halves together making sure leading and trailing
Cardboard Model Buildings
 Cardboard Model Buildings Get more model kits from http://www.modelbuildings.org PRINTING & ASSEMBLY TIPS: These OO designs can easily be resized by reducing the print percentage as follows: OO scale is
L20500 REPAIR APPENDIX
 L20500 REPAIR APPENDIX Airglas, Inc. created this repair guidance to assist repair technicians in evaluating and repairing the L20500 skis, used on the UH-60 skis. WES LANDES (FOUNDER OF AIRGLAS, INC.
How to use a Touch Up Bottle & Brush
 How to use a Touch Up Bottle & Brush Tech Tips General Definitions Base Color (Basecoat): A color coat requiring a clear coat. Base Color provides color and appearance, while the clear coat provides gloss
10. Wing prep and subassembly
 Date Section Objective: Construct and fabricate the sub-assemblies of the wing panel. Required Parts: Wing left 11gal PN104-300, Wing right 1gal PN104-400, Wing left 15 gal option PN104-322, Wing right
PREMIUM CONCRETE COUNTERTOP MIX INSTALLATION INSTRUCTIONS
 PREMIUM CONCRETE COUNTERTOP MIX INSTALLATION INSTRUCTIONS High Strength Fast Setting Pourable Helpful Items: TCC Materials February 09 Version 2.0 Tools Required: Concrete mixer or ½ drill (600 RPM or
Anti-Graffiti OVERVIEW OUR PRODUCT VS. CONVENTIONAL CLEANERS.
 Technical Application Sheet Version:2.01 Edition:01/8/2015 Anti-Graffiti Anti-Graffiti OVERVIEW OUR PRODUCT VS. CONVENTIONAL CLEANERS Anti-Graffiti is a Sol-Gel based, chemical nanotechnology 2 component
Metal clay. Skill Set. Whether you want to learn how to bezel-set a cabochon, Step Up Your. earring project.
 PROJECT INTERMEDIATE METAL CLAY Step Up Your Metal clay Skill Set Improve your craft à la carte in this technique-packed earring project. by Deb Fitz FCT-CRON0216_ART48 Whether you want to learn how to
Silver Bumblebee. This little bumblebee in silver and gold is as relevant as he is. Sculpt a pendant from silver clay and wire
 Materials Metal Clay by Mitsubishi Materials PMC Flex Aura Gold paste Silver paste or slip 20 awg fine silver wire (20awg) Teflon sheet Nonstick spray Small paintbrush Jewelry pliers Wire cutters Roundnose
THE DIPPING TECHNIQUE
 THE DIPPING TECHNIQUE An Alternative Finishing Technique By B. L. Herm Ely INTRODUCTION: A good finish should excite the senses. When touched with the finger tips, the finish should feel silky smooth.
1Take the keel (3) and
 and") 1 The hull and the bridge 1Take the keel (3) and apply PVA wood glue in the second slot from the left: a toothpick may make it easier. Take care: the left end is the one that has a projection. THE HULL
1 The hull and the bridge 1Take the keel (3) and apply PVA wood glue in the second slot from the left: a toothpick may make it easier. Take care: the left end is the one that has a projection. THE HULL
Tips & Tricks using Part 17
 Tips & Tricks using Part 17 Making a Secret Door Using Mold #96...1 Using Cotton Swabs For Antiquing...4 Planning Dungeon Waterways...5 Pouring and Texturing Water...6 Making Water for Fountains...11 Tips
How to Install Decklids and Tailbases
 All decklids and tailbases are installed in the same general way. Follow these step by step instructions to hang them the way the pros do. 1. Open the shipping containor and check for any damage to the
Gluing windows with SABA Glasstack 760
 Info sheet 208 Gluing windows with SABA Glasstack 760 Version 2008-05-08 EN, replaces all prior versions Page 2 of 9 Info sheet 208 Gluing windows with SABA Glasstack 760, version 2008-05-08 EN 1. Introduction
Collaborative Weaving
 Autumn Anderson - Fall 2013 Student Teaching Pittsburgh Conroy Art Centers Ages: 5-21! Art Centers are created so that the students can move around the classroom and go to various stations that appeal
Colori. Part I Geometry
 Colori Part I Geometry 1 2 Determine the size of your cane. TOOLS & MATERIALS FOR BUILDING A CANE: - photocopy paper - ruler - pen or a black marker - color markers (optional) - pasta machine - clay of
Figure 1 Photograph of a strain gage on a helical wire
 1. PROCEDURE OVERVIEW This procedure is to be used for installation of bonded strain gages on prestressing strand. It includes necessary materials and a recommend practice for surface preparation, installation,
Step by Step Wing Bagging
 Step by Step Wing Bagging By Evan Shaw 073 589 9339 evanevshaw@gmail.com Preparing the Leading Edge 1. Cut cores. (Cutting of wing cores is covered in another article elsewhere) 2. Sand the LE to a nice
SINGLE TURN INLAY JIM BRANDT
 SINGLE TURN INLAY JIM BRANDT 1 SINGLE TURN INLAY Single turn bands have proven difficult for some to master. Most people assume that the inlaid band is a separate thread of a different color, however,
Wax Resist. Judi Watanabe. Design by: 2007 Craft TV Weekly, Inc.
 Wax Resist Design by: Judi Watanabe 1 Wax on, wax off! Judi is resisting her paper crafting projects with wax! She protects photos and inked items with a little wax and then she gets creative. Judi rubs
Sketchpaint. Ideal for turning any smooth surface into a whiteboard. Ready to use in 5 days
 Sketchpaint Ideal for turning any smooth surface into a whiteboard SketchPaint - A whiteboard straight out of a tin! White Gloss or Transparent Finish Simple application Tin size available: 3m² or 6m²
Bang! Zoom! Off to the Moon!
 Bang! Zoom! Off to the Moon! by Christi Friesen Get ready for a blast from the past when you create this steampunk rocket ship pendant from polymer clay. In the late 1800 s people s imaginations were fired
shine to by Jana Roberts Benzon
 intermediate/ advanced polymer clay Taking a shine to polymer clay Give polymer clay a glossy surface with sandpaper and a quick buffing. FCT-CRON0216_ART30 The featured pendant s intricate cane pattern
Openwork. Pendant. Bezel-Set Cabochon. with Free Form. open spaces and a bezel-set stone. Frame a dimensional design accented with.
 ADVANCED Openwork Pendant with Free Form Bezel-Set Cabochon FCT-CRON0316_ART105 Frame a dimensional design accented with open spaces and a bezel-set stone. by Deb Fitz To create the focal point of my pendant,
Linda Hartung shows her signature technique for creating twisted strands of crystal yarn.
 www.beadsbaublesandjewels.com 1507-3 Linda Hartung shows her signature technique for creating twisted strands of crystal yarn. For more information visit: www.eksuccessbrands.com/createyourstylewithswarovskielements
5. Carefully remove the printer from the lower boxed foam support and place it on a solid, level base where it will be used
 PROJET 1200 QUICKSTART GUIDE Before you get started you will need: Lint-free paper towels A pair of nitrile gloves Saftety glasses OPENING YOUR PROJET 1200 NOTE: Make sure you save all of your packaging
The galaxy nightlight glass will sit over the LED candle, which will shine through to make all the comets and stars and planets pulse with color.
 The galaxy nightlight glass will sit over the LED candle, which will shine through to make all the comets and stars and planets pulse with color. 2 10 9 8 7 6 5 4 3 2 Blast Off! Let s begin! MAKING PLANETS
Magnetpaint & Sketchpaint
 Magnetpaint & Sketchpaint Turn any smooth surface into a magnetically receptive whiteboard MagnetPaint is an exciting product that allows you to paint your own magnetic surface on any flat area. SketchPaint
Amazing Clear Cast 80D Clear Epoxy
 Technical Data Sheet Amazing Clear Cast 80D Clear Epoxy Product Description: Alumilite's Amazing Clear Cast is a clear casting and coating system that cures to a rigid, durable, clear plastic. Use Amazing
Bedtime for Bondo MERA Training
 Bedtime for Bondo 2002 MERA Training Section 1: Making the Plug/Model This section will show the process of building a plug/model for a plaster mold.this will represent what the final fiberglass part
C Paint. Product Information Sheets
 T A T G O E C Paint Product Information Sheets Cottage Paint- 8oz jar Available in many pre-tinted colors -see chart. Used for painting furniture and cabinetry. Water based Clay paint that is easily distressed
Covering with Quarter Mil Mylar: One Way To Do It.
 Covering with Quarter Mil Mylar: One Way To Do It. By Derek McGuckin Fall 2007 Revised Feb. 2008 I do not consider myself an expert on covering with mylar. I am comfortable with how I do it and the results
to Precious From Plumbing PROJECT INTERMEDIATE METALS facetjewelry.com FCT-MW
 PROJECT INTERMEDIATE METALS From Plumbing to Precious FCT-MW-061217-07 2013 Kalmbach Publishing Co. This material may not be reproduced in any form without permission from the publisher. facetjewelry.com
Basic Instructions. Preparing the Moulds
 Preparing the Moulds Basic Instructions 1. Make sure the moulds are clean and free of plaster residue (see our CARE & CLEANING instructions for more information). 2. Rinse the moulds in warm water and
Serendipity. Earrings. Solder one-of-a-kind water-cast components into. truly organic jewelry. FORMED BY CHANCE, ASSEMBLED BY DESIGN.
 intermediate metal Serendipity FORMED BY CHANCE, ASSEMBLED BY DESIGN Earrings Solder one-of-a-kind water-cast components into truly organic jewelry. by Addie Kidd FCT-MWON06_ART84 009 Kalmbach Publishing
*Before starting, please read entire manual *Changes can be made in order for this manual to work for you. 3 x 6 I-Beam
 *Before starting, please read entire manual *Changes can be made in order for this manual to work for you 3 x 6 I-Beam Follow all applicable sections of the attached Manufacturing Plan. Objectives: Understand
Colorfil INSTRUCTIONS
 Colorfil INSTRUCTIONS SUPPLIES REQUIRED: HOT AIR GUN DENATURED ALCOHOL CLEAN WHITE RAG NYLON BRISTLE SCRUB BRUSH (tooth brush) ORBITAL SANDER ORBITAL ABRASIVES SPRAY BOTTLE WITH WATER OPTIONAL: SCALES
DESCRIPTION/APPLICATION HK RESEARCH GEL COATS DESCRIPTION
 Product Data 908 LENOIR ROAD POST OFFICE BOX 1809 HICKORY, NORTH CAROLINA 28603-1809 TELEPHONE (828) 328-1721 TOLL FREE (800) 334-5975 FAX (828) 328-4572 DESCRIPTION/APPLICATION HK RESEARCH GEL COATS DESCRIPTION
RFS Class II Rocket Assembly Instructions
 RFS Class II Rocket Assembly Instructions Instructions by: Loc Precision Photos by: Great Lakes Space Port Sheboygan Education Foundation, Inc. Welcome and thank you for joining the Rockets for Schools
IMPORTANT: This product cannot perform its intended function if not properly installed.
 www.emseal.com HORIZONTAL COLORSEAL INSTALL DATA - HORIZONTAL COLORSEAL FEBRUARY 2015, PAGE 1 OF 3 INSTALLD AT DO NOT OPEN ANY PACKAGES or install this material until all members of your crew have read
Trim areas that may have overlapped and heat again if necessary.
 Wings Supplies: *28-gauge wire *Fantasy Film *Bond Grrrip Glue * Ranger Adirondack Alcohol Inks: Stream Wild Plum Butterscotch *Ranger Adirondack Alcohol Blending Solution *Glass Glitter extra fine *Micro
Paint and Decals. Adequate ventilation is required when working in a confined area with paint and paint-related chemicals.
 Service Guide Paint Repair Paint and Decals Utilimaster recommends that a professional body shop do all paint repairs. The service technician should read this entire procedure before working on the vehicle.
FLEXITEEK INSTALLATION INSTRUCTIONS
 an Advanced Plastic Fabrications Company 99 marcus Blvd., 631.244.3620 631.231.4466fax FLEXITEEK INSTALLATION INSTRUCTIONS Before you begin, take your new Flexiteek deck out of the shipping package and
Stone art jewellery. Stone art jewellery
 You can find more creative tips at www.staedtler.com Stone art jewellery Dragonflies, butterflies and bumble bees they can be found buzzing around lakes in the summer. But as soon as you manage to catch
LOAD BEARING COLLARS - ABYC H-27 RATED
 LOAD BEARING COLLARS - ABYC H-27 RATED PRODUCT TRUDESIGN Load Bearing Collars are designed for use with TRUDESIGN Skin Fittings and Ball Valves. Available in three sizes; Small (for ½, ¾ or 1 assemblies)
Building the Gothic Church
 Building the Gothic Church Mold #54 does not contain all of the blocks to build this church. You will need extra regular blocks (1/2" x 1/2" x 1") and square blocks (1/2" x 1/2" x 1/2"). These blocks can
Fee Fi Faux Fabulous
 Fee Fi Faux Fabulous Mimicking enamel and metal with polymer and mixed media A floral focal pendant project with Christi Friesen For this project you will need:. polymer clay I recommend Premo for this
INSTRUCTIONS ASSEMBLY SAFETY USE
 INSTRUCTIONS ASSEMBLY SAFETY USE Congratulations on purchasing your Extreme Tumbler. Tumbling is the best way to polish gem stones, clean and polish jewelry and brass casings for ammo reloading. To start
14401 NE Keil Road, Aurora, Oregon, USA PHONE FAX
 VAN S AIRCRAFT, INC. 14401 NE Keil Road, Aurora, Oregon, USA 97002 PHONE 503-678-6545 FAX 503-678-6560 www.vansaircraft.com info@vansaircraft.com FF-1207 Cooling Shroud Modification 11-19-10 Background:
Materials: Preparing your materials: Use your towel to protect your work surface. Layout one length of bubblewrap, bubbles facing up.
 These instructions show the layout and techniques for making flat circular art pieces. Follow these basic steps used to create a strong, even, wool felt surface. This is the base or canvas, open to embellishment
!!!!!!!! "#$%&'!(#&)*!(#+,! A polymer and mixed media bangle project with Christi Friesen
*!(#+,! A polymer and mixed media bangle project with Christi Friesen") !!!!!!!! "#$%&'!(#&)*!(#+,! A polymer and mixed media bangle project with Christi Friesen For this project you will need:. polymer clay I recommend Premo for this project! A great clay for sculpting: (I
!!!!!!!! "#$%&'!(#&)*!(#+,! A polymer and mixed media bangle project with Christi Friesen For this project you will need:. polymer clay I recommend Premo for this project! A great clay for sculpting: (I
CARBORUNDUM MEZZOTYPE dark field & reductive techniques
 CARBORUNDUM MEZZOTYPE dark field & reductive techniques with Akua Carborundum Gel, a platemaking medium July 2017 AKUA CARBORUNDUM GEL The Akua Carborundum Gel for platemaking is used to create collagraph
Sculpting. This page shows you how to sculpt basic pieces so you can make molds and casts of them for your projects.
 Sculpting This page shows you how to sculpt basic pieces so you can make molds and casts of them for your projects. A basic rule Don't sculpt it if you can borrow it. I'm talking about basic stuff that
2K Liquid Metal Paint Technical Data Sheet
 2K Liquid Metal Paint Technical Data Sheet DESCRIPTION Metal Veneers is a specially formulated liquid metal paint that s easy to use for even the most discombobulated novice paint user. Our carefully guarded
Polymer Composites Incorporated
 Rod Ham s Project, A Lesson In Synergy The following is an excerpt from correspondence that I had with Mr. Rod Ham who contacted me and inquired about the use of our MAX CLR-HP-HP for a project he had
Tools and Tips: ( 1 )
") Tools and Tips: As you build instructions will show in my many picture manual how to assemble. You can use your own methods as you desire, my results are very good. A smooth, flat work surface is very
Tools and Tips: As you build instructions will show in my many picture manual how to assemble. You can use your own methods as you desire, my results are very good. A smooth, flat work surface is very
SLAT/RUSH/CANE ROCKING CHAIR ASSEMBLY INSTRUCTIONS
 SLAT/RUSH/CANE ROCKING CHAIR ASSEMBLY INSTRUCTIONS COMPLETE INSTRUCTIONS FOR THE FOLLOWING ROCKERS Ashton 700 Bradley 200/1200 Cross Creek 300 Collegiate 200SC Cumberland 250/1250 Highland Rim 7 Kensington
Get the benefits of oil with the ease of latex
 One of the most rewarding home improvement projects is putting a fresh coat of paint on your kitchen cabinets. A new color brightens up your kitchen, and can give it a complete updated look. But at the
UNPACK & ASSEMBLY. Done! CAUTION! THE MILL WILL BE VERY HEAVY - GET ASSISTANCE Pepe Tools.
 PARTS DIAGRAM T Bar Height adjustment Wooden hand grip Height adjustment gears Frame Height adjustment screws Top roller End Gears cover Handle Brass Bushes (Each side) Bottom roller 4:1 Gearbox Mounting
MoonRay D/S Quick Start Guide
 MoonRay D/S Quick Start Guide Hello! Thank you for choosing MoonRay, and welcome to the cutting edge of desktop 3D printing! This guide is going to go over the basics of getting your MoonRay up and running.
Fortress Fe Posts must always be secured to the deck framing. Fortress Fe Posts should never be attached to only the deck boards.
 Installation Instructions for FortressCable H-Series Stair Panels with Simplified Stair Bracket SSB-05 and Fe Posts It is the responsibility of the installer to meet all code and safety requirements, and
Aerospace Speciality Products
 Specifications:! Length: 18.75"/47.6 cm! Diameter: 0.98"/24.9 mm! Weight: 1.5 oz/44 gm! Streamer Recovery! Recommended Engines:!! A8-3; B4-4; B6-4; C6-5! Skill Level: Beginner This is a model rocket kit