L20500 REPAIR APPENDIX
|
|
|
- Lucinda Cox
- 5 years ago
- Views:
Transcription

1 L20500 REPAIR APPENDIX Airglas, Inc. created this repair guidance to assist repair technicians in evaluating and repairing the L20500 skis, used on the UH-60 skis. WES LANDES (FOUNDER OF AIRGLAS, INC. ) L20500 Ski Repair Limits Manual DATE: 16 Apr 13 1
2 2
3 3
4 BOTTOM REPAIR ZONES 4
5 5
6 6
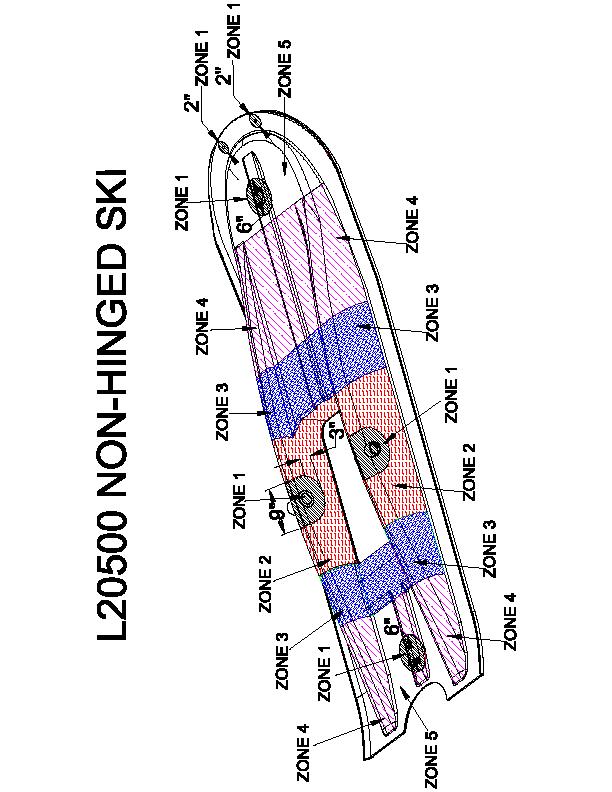
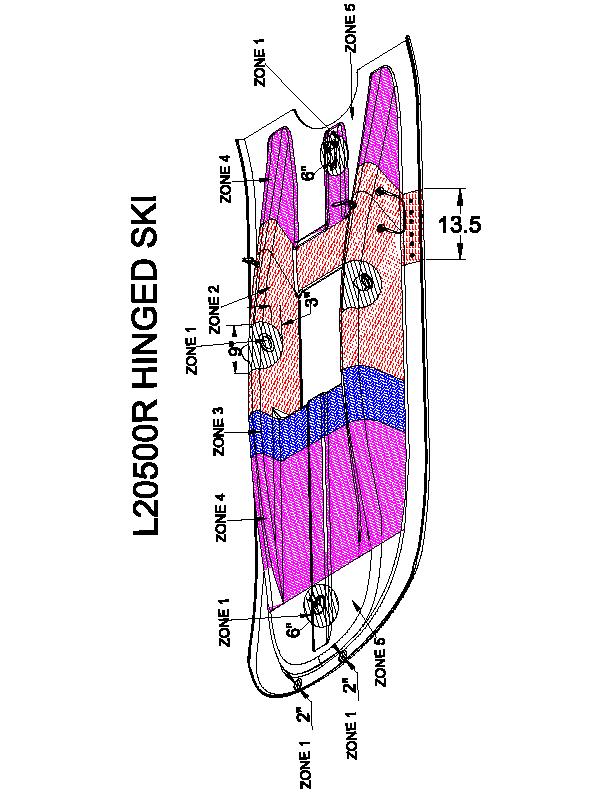
7 BOTTOM REPAIR ZONES L20500 SKI ZONE REPAIR LIMITS Zone 1- Zone 1 areas are critical stress areas. These areas include the area immediately surrounding bushing, and attachment areas for cables and spring cylinders. This mandates that the repairs to these areas are extremely limited. (See drawing for clarification.) Repair: None, unless approved by Airglas, Inc. Note: Airglas will typically only approve repairs involving replacement of ski bushings. In order for Airglas to give approval to replace bushings, unit must have training and an appropriate fixture for aligning bushings. ZONE 2- Zone 2 areas are highly stressed areas. Repairs to this area are very limited. This area includes the tunnel section of the ski, adjacent to wheel well. (See drawing for clarification.) Repair Limitation: Repairs depths are limited to one layer of mat/roving only, involving less than 25% of the area of each tunnel vertical & horizontal cross section in this zone. See drawing for detail. The scarf method is to be used. See scarf method repair instructions. ZONE 3- Zone 3 areas are stressed areas. Repairs to these areas are limited. This area includes the tunnel section of the ski, forward and aft of wheel well. (See drawing for clarification.) Repair Limitation: Repairs depths are limited to the first two layers of mat/roving, involving less than 25% of each tunnel vertical & horizontal cross section for this zone. See drawing for detail. The scarf method is to be used. See scarf method repair instructions. ZONE 4-7
8 Zone 4 areas are less stressed areas. Repairs to these areas are less limited. This area includes the tunnel section of the ski, forward and aft of wheel well. (See drawing for clarification.) Repair Limitation: Repairs are limited to the first two layers of mat/roving, involving less than 40% of each tunnel vertical & horizontal cross section. See drawing for detail. The scarf method is to be used. See scarf method repair instructions. ZONE 5- Zone 5 areas are lightly stressed areas. Repairs to these areas are less limited. This area includes the perimeter of the ski. (See drawing for clarification.) Repair Limitation: Repairs can affect both bottom and top of ski. In which all layers of mat/roving are affected. Limit repairs to less than 30% of this area. Individual damaged areas are limited to 6 in length or width. Individual repairs should be separated by at least: 12 for when it involves all fiberglass layers, both top & bottom plys. 8 when it only involves all plys on either top or bottom, but not both. 6 when it only involves limited plys of both top and bottom, in the same location. 3 between for all other repairs. Note: The purpose of this limit is to ensure adequate strength at the perimeter of the ski, after repairs. See drawing for detail. The scarf method is to be used. See scarf method repair instructions NOTE: BOTTOM DAMAGE IN SHADED AREAS IS LIMITED TO ONE LAYER OF MAT ROVING. BOTTOM REPAIRS OUTSIDE SHADED AREAS ARE TREATED AS ZONE 5 REPAIR ARE 8

9 MAXIMUM REPAIR LIMIT DETERMINATION EXAMPLE: 9
10 Bottom Abrasion Repair If the bottom surface sustains excessive wear; it may be sanded down with a 36 grit belt or disc sander and then recoated with epoxy or abrasion resistant gel coat. Once the epoxy or abrasion resistant gel coat is cured, the surface should be re-sanded with 80 grit paper using an orbiting sander. 1. Remove the runners or hardware in the area of abrasion from the ski. If only a chip in bottom coating, without a runner or hardware in area, complete steps 2-6 & Inspect ski for damage to fiberglass material on bottom. The bottom typically has a layer of heavy mat that is applied over the structural roving s. Abrasions only affecting the heavy mat are negligible. Make repairs to the ski as necessary when abrasive affects the roving. See repair limit criteria for damage to bottom repairs, when damage affects the roving s. 3. Clean surface of affected area with Acetone, prior to sanding surface. Sanding and grinding can cause contaminates to be driven further down into the ski fiberglass fibers. 4. Sand abraded area with a 36 grit sander. Use care to prevent grinding into roving s. 5. Apply bottom coating using brush, roller, and spray. Allow area to completely dry. Note: Epoxy and abrasion resistant gel coat formulas change over time. Older models used an epoxy based coat, which had black colorant mixed in. Newer skis bottoms use a special blend of black high abrasion gel-coat. Contact: Airglas, Inc. for current information on how to get needed material. 6. Once bottom coat is dry, lightly scuff sand it with 80 grit sandpaper. 7. Position runner or hardware in the same location as it cam from step Align the rivet/runner holes with an awl, drift punch or #9 drill bit. 9. Clamp the runner to the ski with enough clamps to maintain correct positioning. 10. Install SSB6-8 stainless rivets (Available from Airglas, Inc.) using an appropriate rivet puller (Air Pneudraulic Type) 11. Grind rivet stems flush with the surface of the runner. 10
11 12. Apply SKI SWIFT PAINT (23T3-90/K1G), using precautions used for standard polyurethane coatings. ALLOW TO DRY FOR 24 HOURS. 13. Inspect replacement rivet/runner & hardware installation and return ski to service. Edge Laminate Repair 1. Completely clean separated area with MEK, or Acetone. If possible, use thin blade to open separation to allow for a thorough cleaning of area. 2. Apply resin to separated area, attempt to force resin into separation. Apply a separator material (PVA, Teflon cloth, Nylon, etc.) to over affected area. 3. Use light clamping pressure to close separation area. Consider using open cell foam and large area pressure plate to disperse the pressure. Avoid using excessive clamping force, because it will squeeze out all resin. Do an immediate clean up of resin in the area. 4. Allow the resin to cure completely. Remove any resin that has spilled onto unaffected surfaces. Touch-up area needed with top coat. Airglas recommends that you use flat black Krylon Fusion, because it adheres very well to the fiberglass resins. It s available at most hardware suppliers. NOTE: For internal types of separations, contact Airglas, Inc. for possible solutions. SCARF METHOD REPAIRS TO L20500 Skis 1. Inspect area and determine that probable length. Note: It may be necessary to sand area of damage to exactly determine severity of damage (Length & Depth) 2. Remove any runner or hardware in area of crack. 3. Clean area of crack with Acetone, prior to sanding. This reduces the chances of embedding oils and grease into fibers in the unaffected areas. 4. Sand area of crack using a rotary sander with a grit sander. Use a 12 to 1 ratio for removing crack (Example: If damage is.100 deep x.100 length, then the minimum radius would be 1.2 ). The sanding area is typically circular, or oval. The radius is also affected by the size of damage. If length of the damage is 1 long, 11
12 then the minimum radius would be (1 divided by 2)+ 1.2 = 1.7 radius. Remove damage in repair area up to limit. 5. After all damage has been removed, determine the size of repair pieces needed. The first layer should be.5 larger than the smallest radius of the removed area. Airglas uses a mat/roving combination for all layers. Cut both mat/roving layers the same size. 6. Do a final clean of repair area. 7. Apply first layer of mat & roving. Wet out with resin, then roll using fiberglass roller. The fiberglass roller assists in breaking down fiber to accept resin. It also forces excess resin to the surface. 8. Apply second layer of mat & roving. Roll out material completely, before applying more resin. This prevents applying too much resin to glass in repair. 12

13 9. Apply final layer of mat & roving to repair area. Roll out material completely, before applying more resin. Wet out as needed. 10. Add final mat to top of repair to provide material to allow for a smoother surface finish when cured. 11. Allow repair to completely cure. When cured sand area to smooth the repair. 13
14 NOTE: AIRGLAS uses A.75oz. Mat and a 24oz Roving for every layer of the layup. For repair materials contact Airglas, Inc. to purchase a repair kit. 14
15 ELEVATOR BOLT REPAIR PROCEDURE 15
16 16

17 17
18 18
19 L Tail Ski Runner Replacement Procedure PARTS BREAKDOWN FOR RUNNERS 6 4 MS21044N4 NUT 5 4 AN L WASHER 4 2 AN R14 SCREW 3 2 AN R12 SCREW 2 16 SSB6-6 RIVET L RUNNER, TAIL SKI QTY CODE IDENT NO. Re NO. PART NUMBER DESCRIPTION STOCK SIZE MATERIAL MATERIAL SPEC. WEIGHT- LBS FINISH ZONE 19
20 L Tail Ski Runner Replacement Procedure (Cont.) Removal Steps: Step 1. Remove screws (Items 3 & 4) Step 2. Drill rivet heads out using a 3/16 drill bit. NOTE: DO NOT DRILL ALL THE WAY THRU RIVET. Step 3. Use a 3/16 Punch to remove heads of rivets. Step 4. Punch remaining rivet thru hole. NOTE: Remaining portion of rivets will remain inside ski. Step 5. Discard old runner Installation Steps: Step 6. Align runner to bottom of ski. Use clecos in rivet holes and screws on the ends of runner. Ensure all holes align in ski. Step 7. Install all fasteners wet with sealant. Fasteners are shot wet to prevent water or fuel intrusion into the cavity of the ski. Sealant like MIL-S or MIL-S-8802 B2 would work well. Step 8. Install rivets with an appropriate pneumatic riveter. Step 9. After all fasteners are installed, fill cavities in runner with sealant (injection seal). Step 10. Allow sealant to fully cure before use. 20
10. Wing prep and subassembly
 Date Section Objective: Construct and fabricate the sub-assemblies of the wing panel. Required Parts: Wing left 11gal PN104-300, Wing right 1gal PN104-400, Wing left 15 gal option PN104-322, Wing right
EXPRESS ASSEMBLY MANUAL SECTION 3 F5-RG/FT WING ASSEMBLY. Procedure 3.155A WING CLOSE-OUT PROCEDURES
 Procedure 3.155A WING CLOSE-OUT PROCEDURES In this procedure The lower wing skin will be bonded to the upper wing For this procedure, the following parts will be required: Part Number Description Qty 111-11-060-01
4. Instrument Panel Support
 Instrument Panel installation for serial numbers 52 to current Section Objective: Installation of the instrument panel pod. Installation of all the accessories including; vents gas strut supports, engine
CIRRUS AIRPLANE MAINTENANCE MANUAL
 MAIN FRAME 1. DESCRIPTION This section describes those structural components which make up the main frame including vertical stabilizer, firewall, bulkheads, spar cover, and roll cage. A. Firewall The
REVISION LIST CHAPTER 25: AFT WINDOWS. The following list of revisions will allow you to update the Legacy construction manual chapter listed above.
 REVISION LIST CHAPTER 25: The following list of revisions will allow you to update the Legacy construction manual chapter listed above. Under the Action column, R&R directs you to remove and replace the
This section describes those structural components which make up the main frame including bulkheads, spar cover, and roll cage.
 CIRRUS AIRPLANE MAINTENANCE MANUAL Main Frame CHAPTER 53-10: MAIN FRAME GENERAL 53-10: MAIN FRAME 1. General This section describes those structural components which make up the main frame including bulkheads,
Prior to servicing the vehicle, refer to Knowledge Center for the most up to date version of your shop manual.
 December 4, 2013 Subject:SPARK - Fixing Scratches and Repairing the Hull No. 2014-7 Prior to servicing the vehicle, refer to Knowledge Center for the most up to date version of your shop manual. MODEL
Deck Repair Grady White Runabout
 Deck Repair Grady White Runabout An older Grady White runabout with pedestal mounted captains chairs had suffered a structural failure at one of the pedestal bases. The deck in this area was cored. Inadequate
Mallet Painting equipment Pop rivet gun
 RotorWay International Page A Body Check, Paint, and Interior Liners Procedures covered in this section: Assemble body apart from airframe and check overall fit; remove tail boom; fit and install eyebrow
SERVICE LETTER SL REV B
 SERVICE LETTER SL34 65-17510 REV B NOTES: 1. For all illustrations in this service letter refer to Drawing 65-17510-SUPP. 2. Aerocet recommends one of two methods to accomplish the replacement of hinges:
Body Repair. Collision Repair. Specification. Fastener Specifications Fastener Specifications. Blind Rivet. Flow Drill Screw (FDS) Torque FDS
 Torque FDS") Body Repair Collision Repair Specifications Fastener Specifications Fastener Specifications Application Specification Metric English Cross-Car Brace Mounting Bolts 25 Y 18 lb ft Windshield Frame Mounting
Body Repair Collision Repair Specifications Fastener Specifications Fastener Specifications Application Specification Metric English Cross-Car Brace Mounting Bolts 25 Y 18 lb ft Windshield Frame Mounting
SUBJECT: HORIZONTAL STABILIZER SUPPORTS ALL, INSTALLATION OF.
 TECHNICAL BULLETIN 206L-00-203 25 August 2000 Revision B, 27 October 2014 MODEL AFFECTED: 206L, 206L-1, 206L-3 and 206L-4 SUBJECT: HORIZONTAL STABILIZER SUPPORTS 206-023-131-ALL, INSTALLATION OF. HELICOPTERS
Bandit MK I & II & e-bandit I-PASR0049
 Bandit MK I & II & e-bandit I-PASR0049 Part I (for new model installation) INSTALLATION: Main Gear Mount Reinforcement Kits PA-SR-0049 Notice: The extended use of the Bandit ARF s (both Turbine and Electric
Chapter # 002 : Creating Threaded Metal Anchoring Points in Fiberglass Foam Structures
 Chapter # 002 : Creating Threaded Metal Anchoring Points in Fiberglass Foam Structures The following is a method of creating permanent, threaded, metal anchor point in a foam & fiberglass structure. The
Piper Cherokee /3 scale. Construction Manual
 Piper Cherokee 140 1/3 scale Construction Manual STAB CONSTRUCTION 1. Remove foam cores from cradle and place on flat surface. Inspect pieces before you epoxy halves together making sure leading and trailing
Pre-Paint>Fuselage>Empennage>Fit elevator. Objectives of this task: Materials required: Prepare the horizontal stabiliser and the elevator
 Pre-Paint>Fuselage>Empennage>Fit elevator Objectives of this task: To fit the elevator to the horizontal stabiliser, to fit the trim tabs to the elevator and the end caps to the elevator and the horizontal
Pre-Paint>Wings>Fit ailerons. Objectives of this task: Materials and equipment required: Size the ailerons and pre-mould strips
 Pre-Paint>Wings>Fit ailerons Objectives of this task: In this task the ailerons and the pre-mould strips will be sized and trimmed, then flocked onto the wings and glassed in place, and the next day the
12. Wings, Flaps, Ailerons and Struts
 12. Wings, Flaps, Ailerons and Struts Fit Aileron Hinges Reference: Drawing 20270K2 Photo 12.1 Parts Required: 2007092 Aileron LS 200809N Aileron RS 2001394 Hinge 3/16 A1 (4) 2001694 Hinge Pin (4) PH0059N
BRUSH APPLICATION INSTRUCTIONS
 QUALITY MARINE EQUIPMENT SINCE 1981 Antifouling Paint For Metal Under The Waterline BRUSH APPLICATION INSTRUCTIONS www.antifoulingpaint.net TABLE OF CONTENTS Humidity & Drying Metal Surfaces... 1 Coverage
After the canopy hinge is square with the firewall and the nut plates are installed you can set up the hinge mounts. Start by clamping a 1/16 tongue
 Written by: Sean Cole September 19, 2008 When fitting the stiffener use 3/32 clecos to hold it in place, it makes a smaller hole and is easier to work with. Only use the amount needed to hold the stiffener
FABRICATION & INSTALLATION MANUAL
 FABRICATION & INSTALLATION MANUAL INTRODUCTION PROForms and PROPlate Structural Shapes, PROGrid Molded Grating and PROGrate Pultruded Grating are designed to provide superior mechanical properties and
Bedtime for Bondo MERA Training
 Bedtime for Bondo 2002 MERA Training Section 1: Making the Plug/Model This section will show the process of building a plug/model for a plaster mold.this will represent what the final fiberglass part
Quality Marine Equipment Since Antifouling Paint For Metal Under The Waterline ROLLER. Application Instructions.
 Quality Marine Equipment Since 1981 Antifouling Paint For Metal Under The Waterline ROLLER Application Instructions www.antifoulingpaint.net THANK YOU! Thank you for selecting Velox Plus Antifouling Paint
CIRRUS AIRPLANE MAINTENANCE MANUAL MODELS SR22 AND SR22T CHAPTER 56-30: DOOR GENERAL. Door 56-30: DOOR. 1. General
 CIRRUS AIRPLANE MAINTENANCE MANUAL Door CHAPTER 56-30: DOOR GENERAL 56-30: DOOR 1. General The cabin door windows are manufactured of acrylic and adhesive bonded to the door structure. Replacement is accomplished
FIXED PANEL SLIDER QCI5241
 INSTALLATION INSTRUCTIONS FIXED PANEL SLIDER QCI5241 FRAMELESS PANEL / DOOR / PANEL FRAMELESS DOOR / PANEL QCI5241 REV. 0 Page 1 Certified 06/16/2016 Parts List *Quantities may vary QCI5241 REV. 0 Page
Making your Rudder Cassette
 Making your Rudder Cassette A list of the stuff you ll need The row of materials below is laid out in the order of application. The foam blank shown on the right is available from Bob at www.flyingfoam.com
8 Ft Wide Enclosure Assembly Guide
 www.rmfiberglass.com 8 Ft Wide Enclosure Assembly Guide RM Products Ltd 1-800-363-0867 www.rmfiberglass.com Table of Contents 1. Parts and Tools List page 3 2. Hardware page 4 3. Maintenance page 5 4.
12-16 Ft Wide Enclosure Assembly Guide
 www.rmfiberglass.com 12-16 Ft Wide Enclosure Assembly Guide RM Products Ltd 1-800-363-0867 www.rmfiberglass.com Handling and Storage 2 P a g e Handling and Storage: 3 P a g e Before You Begin Contact RM
Quality Marine Equipment Since Antifouling Paint For Metal Under The Waterline SPRAY. Application Instructions.
 Quality Marine Equipment Since 1981 Antifouling Paint For Metal Under The Waterline SPRAY Application Instructions www.antifoulingpaint.net Thank you for selecting Velox Plus Antifouling Paint to protect
WORK METHODS FOR THE RENOVAID WOOD RENOVATION SYSTEM
 WORK METHODS FOR THE RENOVAID WOOD RENOVATION SYSTEM Durable maintenance of exteri joinery of all sts with the RENOVAID system can be subdivided into the following parts: V.(Vokomen) = Prevention of Wood
Sheet Metal Tools. by:prem Mahendranathan
 Sheet Metal Tools by: SHEET METAL TOOL KIT SHEET METAL TOOLS Rivet Gun 3/32, 1/8, 5/32, 3/16",Cupped Set Mini Bucking Bar Footed Heel-Toe Bucking Bar Air Tool Oil Mechanics Tool Bag High-Speed Air Drill
APPLICATION NOTE - SR001. Cold Weather Application
 APPLICATION NOTE - SR001 Cold Weather Application Silent Running is best applied with the ambient, material and substrate temperature in the range of 65-85 degrees F. Lower temperatures will result in
Slide the stock rubber tank mount caps onto the ends of the CS-1 tank mount:
 RYCA CS-1 BODY PARTS INSTALLATION GUIDE [The CS-1 installation guides should be used as supplements to the videos found on our Youtube Channel. There is no strict order to the build process, but it is
TUBULAR FRONT END KIT INSTALLATION INSTRUCTIONS MUSTANG
 TUBULAR FRONT END KIT INSTALLATION INSTRUCTIONS 1979 2004 MUSTANG Pre-Installation Notes & Recommendations: Before disassembly, remove anything within the engine bay that can be removed; this will give
176 S. New Holland Road Gordonville, PA Tel: Fax: Castle Loft
 176 S. New Holland Road Gordonville, PA 17529 Tel: 717-768-0066 Fax: 717-768-8569 A S S E M B LY M A N U A L Castle Loft Castle Loft Assembly Manual revised 08/31/05 Dear Customer, Thank you for your purchase
INSTRUCTIONS FOR AIRFLEX 36WCBEP/36WCSEP WEAR PLATE REPLACEMENT USING GASKET SEALING TAPE
 INSTRUCTIONS FOR AIRFLEX 36WCBEP/36WCSEP WEAR PLATE REPLACEMENT USING GASKET SEALING TAPE The material included in this kit is to be used for WC styles of brakes that are designed or upgraded to the EP
How to Build an Advanced Composite Clipboard
 How to Build an Advanced Composite Clipboard Tools and Equipment Measuring Tape Black Sharpie Silver Sharpie Rivet Puller Tile Saw or Hacksaw Drill and Drill Bits (5/32) Scissors Utility Knife Straight
Balustrade Systems / Installation Instructions
 A. PARTS AND SUPPLIES NEEDED FOR INSTALLATION Hardware included for each 10 section of rail: 2 3 x 1-1/2 L-brackets 4 1-3/4 x 3/16 Blue hex-head screws for anchoring the L-brackets to the newel cap, column
COMPOSITES LAB MANUAL
 COMPOSITES LAB MANUAL Version 1 Lab 3: Surface Preparation, Wet Layup, and Vacuum Bagging The original version of this manual was a one student senior design project written by Katherine White, the Composite
Installation Guide. for E-Series/Eagle Clad Hinged Inswing French Door
 Installation Guide for E-Series/Eagle Clad Hinged Inswing French Door Thank you for choosing Andersen. Instructions are for typical, new wood-framed wall construction with weather protection in place.
2. Sanding the Modules Sand the entire surface of each cyc module with 60-grit sandpaper. This will provide for better paint adhesion.
 ASSEMBLY INSTRUCTIONS SYSTEM SUPER 2.5 EZ Congratulations on your decision to use the world s most advanced and user-friendly cyclorama system. We have taken a great deal of care to create and ship your
PRO CYC PRO CYC, INC. SYSTEM SUPER 1.5 EZ
 ASSEMBLY INSTRUCTIONS SYSTEM SUPER 1.5 EZ Congratulations on your decision to use the world s most advanced and user-friendly cyclorama system. We have taken a great deal of care to create and ship your
Quick Set Dovetail Jig
 Quick Set Dovetail Jig FOR HELP OR ADVISE ON THIS PRODUCT PLEASE CALL OUR CUSTOMER SERVICE HELP LINE : 01509 500359 THE MANUFACTURER RESERVES THE RIGHT TO ALTER THE DESIGN OR SPECIFICATION TO THIS PRODUCT
Contents. pages 20-24: Installing Edge sinks into. custom laminate countertops page 8: Installing Edge sinks into postform laminate countertops
 Contents pages 2-8: Installing Edge sinks into custom laminate countertops page 8: Installing Edge sinks into postform laminate countertops pages 9-14: Installing Acrylic sinks into custom laminate countertops
RangerWare Fiberglass Door System Installation Instructions P/N
 Page 1 of 9 RangerWare Fiberglass Door System Installation Instructions P/N 2878016 ORDER OF INSTALLATION Note: To assure proper order, read all Accessory Installation Instructions before beginning. 1.
Fitting Fiberglass arches to MK 1 Escort
 Fitting Fiberglass arches to MK 1 Escort This is a fairly big job and not for the faint hearted. I got a mate who has done some glass work before, to help me. The method of fixture is varied. You could
INSTALLATION GUIDE VERSION 11/14
 INSTALLATION GUIDE VERSION 11/14 In this guide we will demonstrate effective techniques and methods for installing EDGE stainless steel sinks seamlessly in both laminate and solid surface. These techniques
DIY RUSTIC HALL TREE
 DIY RUSTIC HALL TREE *Before beginning this project, please read through all of the plans as well as the blog post associated with this project. Always use safety precautions whenever using power tools
Repairing Sheet-Molded Compound (SMC) With Epoxy
 With Epoxy") Repairing Sheet-Molded Compound (SMC) With Epoxy 1. Properties: A. It does not dent. B. It does not rust C. Panels are formed using a flat sheet or compound that is heat molded in a press. 2. Preparation
Repairing Sheet-Molded Compound (SMC) With Epoxy 1. Properties: A. It does not dent. B. It does not rust C. Panels are formed using a flat sheet or compound that is heat molded in a press. 2. Preparation
8 x 10 Sandwich Panel
 *Before starting, please read entire manual *Changes can be made in order for this manual to work for you 8 x 10 Sandwich Panel Follow all applicable sections of the attached Manufacturing Plan. Objectives:
PLEASE READ INSTRUCTIONS THOROUGHLY BEFORE PROCEEDING
 Part No. 8870 -or Part No. 9100-9110 Front Fender Flares Flat Panel Design 07-09 Jeep JK, 2/4 Dr. PLEASE READ INSTRUCTIONS THOROUGHLY BEFORE PROCEEDING We have provided complete instructions and specific
Fortress Fe Posts must always be secured to the deck framing. Fortress Fe Posts should never be attached to only the deck boards.
 Installation Instructions for Fortress Horizontal Cable Panel System with UB-05 Brackets and Fe Posts It is the responsibility of the installer to meet all code and safety requirements, and to obtain all
Agricultural Mechanics and Technology Power Tool Safety Rules
 Agricultural Mechanics and Technology Power Tool Safety Rules Name: BAND SAW Use: Cutting curves, circles and irregular shapes. 1. Use clean SHARP blades. 2. The teeth should always point DOWN. 3. Adjust
Super Closeout Deals
 Super Closeout Deals Fastronix dealers as well as the general public are welcome to purchase items from our Super Closeout Deals page. You will find a wide assortment of products PRICED TO MOVE! If you
MAGNUM BOARD INTERIOR INSTALLATION GUIDELINES
 TECHNICAL BULLETIN No.: 090509-1405 Subject: Issue Date: September 4, 2009 Issue No.: II MAGNUM BOARD INTERIOR INSTALLATION GUIDELINES 1. CUTTING MAGNUM BOARD You can easily cut Magnum Board with carbide
Glass Cloth (supplied pre cut) Fibre Flock
 Fibre Flock") Fitting Horizontal stabiliser:- Reference: Parts required: Drawing Photos Upper & Lower Fuselage Assy Horizontal Stabiliser Material required; LC 3600 LC 3600 AF 244 Resin Hardener Glass Cloth (supplied
Fitting Horizontal stabiliser:- Reference: Parts required: Drawing Photos Upper & Lower Fuselage Assy Horizontal Stabiliser Material required; LC 3600 LC 3600 AF 244 Resin Hardener Glass Cloth (supplied
THE PODIUM MUSIC STAND
 THE PODIUM MUSIC STAND 1 Set Assembly Instructions Wooden Parts: a. 1 Column b. 2 Long Slide Pieces c. 2 Slide Spacers (1 long & 1 short) d. 4 Feet e. 2 Fork Pieces f. 1 Fork Spacer g. 2 Long Desk Frame
Part # Ford Mustang Stalker Front Bumper
 Rev. 6/12 Page 1 Part # 3354 2010-2012 Ford Mustang Stalker Front Bumper Notice: Pre-fit before painting! Install new, unpainted parts according to these instructions! Then remove parts, paint them and
ANCHOR PLATE ATTACHMENT STEEL STUD FRAMING OR FURRING CONSTRUCTION WITH ACCESS FROM PANEL SIDE ONLY
 ANCHOR PLATE ATTACHMENT STEEL STUD FRAMING OR FURRING CONSTRUCTION WITH ACCESS FROM PANEL SIDE ONLY INSTALLATION MATERIALS No. 8 Phillips Head Tek Screws Glazier's horseshoe shaped shims 1/16 inch, 1/8
PROJECT PLANS WOODEN GIFT BOX
 PROJECT PLANS WOODEN GIFT BOX Make the gifts you give even more special by presenting them in this one-of-a-kind gift box. In fact, the box may be valued more than whatever it contains. The box is sized
PRO CYCTM PRO CYC, INC. SYSTEM 1.5 FS
 ASSEMBLY INSTRUCTIONS Congratulations on your decision to use the world s most advanced and user-friendly cyclorama system. We have taken a great deal of care to create and ship your cyc, so please take
LuxCore Installation Instructions
 LuxCore Installation Instructions ATTENTION: LuxCore PANELS MUST BE ACCLIMATIZED FOR 24 HOURS BEFORE INSTALLATION PLEASE READ ALL INSTRUCTIONS PRIOR TO INSTALLATION The guidelines provided herein have
PLANISHING HAMMER STAND OWNER S MANUAL
 PLANISHING HAMMER STAND OWNER S MANUAL WARNING: Read carefully and understand all INSTRUCTIONS before operating. Failure to follow the safety rules and other basic safety precautions may result in serious
Finishes and Finishing Techniques
 Finishes and Finishing Techniques TED 126 Spring 2007 Review pages 147-150, 284-294 Finishes and finishing techniques The finishing process to choose depends partly on the type of wood and the appearance
12, 14 & 16 Wide Enclosure Assembly Guide
 www.rmfiberglass.com 12, 14 & 16 Wide Enclosure Assembly Guide RM Products Ltd 1-800-363-0867 www.rmfiberglass.com Table of Contents 1. Handling and Storage page 3 to 5 2. Parts and Tools List page 7 3.
CUSTOM SHUTTERS IN-A-BOX
 CUSTOM SHUTTERS IN-A-BOX SHUTTER ASSEMBLE INSTRUCTIONS & INSTALLATION INSTRUCTIONS 1. Inspect the contents of your package. Do not discard the shutter packaging box until you have started painting your
Liner Replacement (Stainless Steel Internal Components)
") Page 1 of 15 WARNING The stainless steel edges, especially around the propeller cylinder, are very sharp. Use extreme caution when working in and around the front housing. WARNING Be sure to disconnect
Page 1 of 15 WARNING The stainless steel edges, especially around the propeller cylinder, are very sharp. Use extreme caution when working in and around the front housing. WARNING Be sure to disconnect
Robert Bosch GmbH. Lounge light fixture
 Lounge light fixture Nice and relaxing Lounge light fixture Light has an important effect on mood. This cool light fixture is perfect for creating a cosy lounge atmosphere. 1 Introduction This cool light
TECHNICAL BULLETIN BELT FINISHING WITH MICRO-MESH
 TECHNICAL BULLETIN BELT FINISHING WITH MICRO-MESH MICRO-MESH finishing belts provide desired surface qualities and economic benefits to many types of finishing operations, and are available in a range
How to build a Javelin Skiff
 How to build a Javelin Skiff This is not your grandfather s plywood boat! The Javelin involves a high-tech type construction, called composite. The hull can be constructed with foam or plywood; these materials
Fortress Fe Posts must always be secured to the deck framing. Fortress Fe Posts should never be attached to only the deck boards.
 Installation Instructions for FortressCable H-Series Stair Panels with Simplified Stair Bracket SSB-05 and Fe Posts It is the responsibility of the installer to meet all code and safety requirements, and
Frameless Fixed Panel Slider QCI5279
 Frameless Fixed Panel Slider QCI5279 F AB GLASS AND MIRROR www.fabglassandmirror.com Call: +1 888-474-2221 Fax: (614)-334-4919 Office Timing: 8:30-18:00 EST info@fabglassandmirror.com Frameless Fixed Panel
ASSEMBLY AND OPERATING INSTRUCTIONS FOR MODELS SD1200 AND SD2000
 ASSEMBLY AND OPERATING INSTRUCTIONS FOR MODELS SD1200 AND SD2000 WARNING: The watercraft ramp you have purchased has certain hazards associated with it s use. Never stand behind a watercraft while it is
PRO CYC PRO CYC, INC. SYSTEM SUPER 3EZ
 ASSEMBLY INSTRUCTIONS SYSTEM SUPER 3 EZ Congratulations on your decision to use the world s most advanced and user-friendly cyclorama system. We have taken a great deal of care to create and ship your
SUPER PRO GUN & SUPER PRO GUN II
 MAGNUM VENUS PRODUCTS Maintenance & Repair Manual Part No. M6707-1-1 Revision 04.14.01 Maintenance & Repair Corporate HQ & Mfg. Phone: (727) 573-2955 Fax: (727) 571-3636 Email: info@magind.com Web: www.magind.com
FRAMELESS DOOR / PANEL WITH WALL MOUNT HINGES QCI5274
 FRAMELESS DOOR / PANEL WITH WALL MOUNT HINGES QCI5274 QCI0274 QCI5274 REV. Rev. 1 0 Page Page 1 1 Date Certified: Certified 06/16/2016 10/01/10 Parts List with wall mount hinges ITEM NO. Part # DESCRIPTION
Frameless Inline Door With Return QCI5263
 INSTALLATION INSTRUCTIONS Frameless Inline Door With Return QCI5263 WALL MOUNT HINGES FRAMELESS DOOR / PANEL / RETURN PANEL QCI5263 REV. 0 Page 1 Certified 06/17/2016 Parts List with wall mount hinges
Read guide from beginning to end before starting installation. Read all warnings and cautions during unit installation.
 Installation Guide for E-Series/Eagle High-Performance Mullion Windows with LVL Reinforcement and Installed Using Type B Clips Thank you for choosing Andersen. Instructions are for typical, new wood-framed
Frameless Inline Door QCI5254
 INSTALLATION INSTRUCTIONS Frameless Inline Door QCI5254 FRAMELESS DOOR / PANEL QCI5254 REV. 0 Page 1 Cer fied 06/16/2016 Parts List with wall mount hinges *Quanes may vary QCI5254 REV. 0 Page 2 Cer fied
2. Sanding the Modules Sand the entire surface of each cyc module with 60-grit sandpaper. This will provide for better paint adhesion.
 ASSEMBLY INSTRUCTIONS SYSTEM 4 BI (Built-In) Congratulations on your decision to use the world s most advanced and user-friendly cyclorama system. We have taken a great deal of care to create and ship
Sandpaper Product Guide. Premium Automotive Aftermarket Quality Complete Selection of Hand & Power Sanding Accessories Excellent Value
 Sandpaper Product Guide Premium Automotive Aftermarket Quality Complete Selection of Hand & Power Sanding Accessories Excellent Value Index Introduction to Abrasives Abrasive Components... 3 Sandpaper
BLADE REPAIR INSTRUCTION BOOKLET
 BLADE REPAIR INSTRUCTION BOOKLET Contents Section I: Section II: Section III: Section IV: Section V: Section VI: Removing a Blade Refer to this section if you need to remove the blade from an oar shaft.
How-to-Install. Laminate Countertops and Sheet Laminate. FREE brochure Reverso en español
 FREE brochure Reverso en español How-to-Install Laminate Countertops and Easy to install instructions provided inside Multiple colors available for unique design options Durable and easy to care for Accessory
APPLICATION NOTE - SR001. Cold Weather Application
 APPLICATION NOTE - SR001 Cold Weather Application Silent Running is best applied with the ambient, material and substrate temperature in the range of 65-85 degrees F. Lower temperatures will result in
How to make climbing grips. By,
 How to make climbing grips By, Items needed: * Items may be needed depending on your preference. - Carving Foam - Level Table - Cardboard - Pen - Ruler - Straight Edge - Box cutter - Hot melt glue gun
BIPPMM03 (Published) Book specs- Dates: / / Lang: ENG01 Applic: PPM
 Book specs- Dates: / / Lang: ENG01 Applic: PPM") BIPPMM03 (Published) Book specs- Dates: 20060412 / 20060412 / 20060412 Lang: ENG01 Applic: PPM Installing the Milnor Diaphragm in the Single Stage Press This document applies to models MP160Axx, MP1604xx,
BIPPMM03 (Published) Book specs- Dates: 20060412 / 20060412 / 20060412 Lang: ENG01 Applic: PPM Installing the Milnor Diaphragm in the Single Stage Press This document applies to models MP160Axx, MP1604xx,
Restoring the Bouyancy Tanks on 6878
 Restoring the Bouyancy Tanks on 6878 On March 31, 2001 I became the proud owner of Albacore 6878, a Skeene built in 1980. The boat was in pretty good shape, but like many Skeene and Ontario Yachts (non-foam
Project: Trebuchet Overview: This medieval launcher would reek. Materials: 3/4 plywood, 2 of 5/8 threaded. Minimum Cutting Area: 2 sheets of plywood
 Project: Trebuchet Overview: This medieval launcher would reek havoc on enemies castles. However, the modern day conversion using 20lbs of weight will easily through a tennis ball the length of a gymnasium.
Kam Aero 43% Extra 300.
 Stab Sheeting Kam Aero 43% Extra 300. Stabs / Elevator: Make your skins using the same method as you did for the fuselage foam parts. The stabs require 8 sheets (4 per stab) of 4 x 48 A grain sheeting.
DYNATRAC BALL JOINT REBUILD INSTRUCTIONS V5.0
 DYNATRAC PRODUCTS 2007-2018 JEEP JK HEAVY DUTY BALL JOINT JP44-2X3050-C DYNATRAC BALL JOINT REBUILD INSTRUCTIONS V5.0 WARNING: Improper use or installation of this product can cause major failures that
Eagle clad double-hung window installation instructions
 Eagle clad double-hung window installation instructions These instructions are for typical installation in new typical wood frame wall construction. These instructions and methods are not intended for
#85-2-5A: PAINT STRIPPING AND FINISH ANALYSIS AND CORRECTION - (Aug 7, 1985)
") #85-2-5A: PAINT STRIPPING AND FINISH ANALYSIS AND CORRECTION - (Aug 7, 1985) "Please discard previous bulletin 85-2-5 due to this updated information." The corrosion protection provided by the factory
#85-2-5A: PAINT STRIPPING AND FINISH ANALYSIS AND CORRECTION - (Aug 7, 1985) "Please discard previous bulletin 85-2-5 due to this updated information." The corrosion protection provided by the factory
Reliable solutions with optimised performance
 Reliable solutions with optimised performance 3M innovation provides quality you can count on in a full line of premium engineered abrasives and convenient all-purpose abrasive products for use in stock
All Terrain Flares 2014 Chevy Silverado
 Page 1/8 Components: 1. Front Flares (2) 2. Rear Flares (2) Tools required: - Utility knife - #2 Phillips driver - Socket wrench - 13 mm Socket - 6 mm Allen Wrench - T-15 Torx bit - Trim Removal Tool -
FIXED SHOWER SCREEN For Wall Mount Hinges QCI5283
 FIXED SHOWER SCREEN For Wall Mount Hinges QCI5283 QCI5283 Page 1 Date Certified: 06/16/2016 Parts List with wall mount clamp ITEM NO. DESCRIPTION QTY. 1 FIXED GLASS PANEL 1 2 WALL MOUNT CLAMP 1 3 U-CHANNEL
Typical Group D Rear Acoustical Cover Installation
 SERIES 60 SERVICE MANUAL 1. Gear Case Cover 5. Bolt 2. Gear Case 6. Acoustical Cover 3. Acoustical Cover Snap 7. Acoustical Cover 4. Acoustical Cover Clip 8. Nut Figure 1-179 Typical Group D Rear Acoustical
Installation Guide. Pionite Decorative Surfaces One Pionite Road, Auburn, Maine PIONITE ( )
") Installation Guide A Subsidiary of Panolam Surface Systems SMPBRO00-012 6/14 Pionite decorative laminates are designed for finished interior surfaces which require high impact, wear and stain resistance
Installation Guide A Subsidiary of Panolam Surface Systems SMPBRO00-012 6/14 Pionite decorative laminates are designed for finished interior surfaces which require high impact, wear and stain resistance
176 S. New Holland Road Gordonville, PA Tel: Fax: Summit Tower
 176 S. New Holland Road Gordonville, PA 17529 Tel: 717-768-0066 Fax: 717-768-8569 A S S E M B LY M A N U A L Summit Tower Summit Tower Assembly Manual revised 9/07/05 Dear Customer, Thank you for your
Section 914. JOINT AND WATERPROOFING MATERIALS
 914.01 Section 914. JOINT AND WATERPROOFING MATERIALS 914.01. General Requirements. Joint and waterproofing material for use in concrete construction must meet the requirements of this section. 914.02.
LU6X-130 Instructions and Parts List (including LU6X Basic) Operating Instructions
 Operating Instructions") LORTONE LU6X-130 Item # 061-092 LU6X Basic Item # 061-090 LU6X-130 Instructions and Parts List (including LU6X Basic) Operating Instructions Introduction The LU6X is one the most versatile pieces of equipment
LORTONE LU6X-130 Item # 061-092 LU6X Basic Item # 061-090 LU6X-130 Instructions and Parts List (including LU6X Basic) Operating Instructions Introduction The LU6X is one the most versatile pieces of equipment