An adjacent sauna must be well insulated and located to leave a gap of at least 10 cm (4 ) for air to circulate between the sauna and the steam room.
|
|
|
- Lee Lewis
- 5 years ago
- Views:
Transcription

1
2 Please read through these instructions carefully before starting assembly or installation work. There must be no form of heating in the steam room, apart from the steam itself. The ambient temperature outside the steam room must not exceed 35 C (95 F). The materials in the wall and roof sections must not be subjected to temperatures in excess of 55 C (130 F) for example due to heat from water pipes, an adjacent sauna, or a sealed cavity above the steam room etc. An adjacent sauna must be well insulated and located to leave a gap of at least 10 cm (4 ) for air to circulate between the sauna and the steam room. NOTE: The sections are joined together using the silicone and screws provided. The plastic must not be subjected to stress or undue pressure, nor forced into position. The silicone adhesive must be allowed to set for 48 hours before the plastic sections are subjected to any strain.
3 Floor: The steam room must stand on a fully finished floor of quarry tiles, marble or non-slip, heat-resistant seamless vinyl flooring with a low migration factor. The floor should slope towards a drain, which is best placed in the middle of the steam room. The floor under the plastic sections must be completely clean, totally level and perfectly smooth. Electricity supply: Steam room lighting is to be 24 volt max. For steam generator installation, please refer to the instructions supplied with the generator. Ventilation: The gap between the bottom edge of the door and the door sill serves as the air intake vent for the steam room.
4 Installing a shower, fragrance dispenser or automatic cleaning unit in the steam room: Plumbing work and installation is to be carried out in connection with steam room assembly and before the outer wall covering is put in place. Inspection: Inspect the steam room as soon as it has been unpacked for any sign of damage to the sections or the plastic materials.
5 Action: Notify your supplier immediately of any damage to materials or components. If the damage is sufficient to require replacement of a section, this must be done before assembly begins. Tylö and its agents are not responsible for any damage incurred during transport or assembly, nor for any consequential costs. Cleaning: Rinse seats and flooring each time the steam room has been used. To maintain a high level of hygiene in the steam room, the floor should be scrubbed regularly with a germicidal agent especially in the corners and under seats. Use a mild soapy solution for cleaning plastic surfaces in the steam room. Do not use scouring powders, aggressive or strong alkaline solvents, high-pressure power washers etc. Contact Tylö if you are in doubt about how to get rid of stubborn stains. Materials warranty: The materials warranty for Tylö steam rooms is rendered invalid if the manufacturer's instructions are not observed.
6 IMPORTANT! Use only 100% silicone. The silicone adhesive must be allowed to set for 48 hours before the plastic sections are subjected to any strain. Plastic materials must not be subjected to stress or undue pressure. Do not force or press the sections into place. To avoid damaging the plastic, use the rubbersleeved anchors provided when fitting accessories such as the thermometer, lighting brackets etc. Please see pages for details. Observe special care when assembling transparent sections that are painted on the reverse. Touch up any damage to the paint before putting the outer wall covering in place. Please refer to page 34 for further information on painting. The steam room should not be subjected to temperatures in excess of 55 C (130 F). Do not use high-pressure power washers for cleaning. Make sure that no obstruction is placed within 70 cm (24'') of the steam head nozzle. If any wall panel is heavily loaded (for example, with glazed tiles etc.), it must be reinforced with a separate, selfsupporting framework.
 from the outside corner.")
7 Fall towards the drain in steam rooms with corner seats The floor must start to slope towards the drain on the inside of the floor flanges of the plastic sections. In rooms with corner seats, the fall must start at a distance of 57 cm (22 ) from the outside corner. See the sketch above.

8 Installation in restricted spaces. Assemble the sections which are to be furthest from the door first (sections in the example below). Then fit the roof section 4. Continue assembly work in the sequence indicated. (Other sequences may sometimes be more suitable depending on the shape of the room in which the assembly is to be fitted.) As long as the steam room assembly is not sealed to the floor, it can easily be moved around to give more space for maneuver.

9

10 For the purpose of this illustration Tylö Elysée 7 F components have been used. Other types of steam room are assembled according to the same principle. When assembling Excellent equipment, please turn to pages All surfaces which are to be glued together with silicone, must first be sanded slightly to produce a rough surface

11 Apply the adhesive sealing strip as shown in figures A and B.

12 Press out a bead of silicone as shown along the edge of the section, which will abut the next section. The silicone must be thick enough (approx. 5 mm or 1/4 ) to both seal and secure adjacent sections.

13 Screw the plastic sections together using the wooden battens and screws supplied, as shown in fig. 1. Use five (5) bolts per wall to connect wall panels together. Make sure that the battens are placed edge to edge and are pressed in over the flanges as far as possible. Check that the sections are correctly positioned and adjust them if necessary. If necessary, clean off any surplus silicone using a cloth moistened with a mild solvent such as paraffin / kerosene.


14 Continue to assemble the remaining sections in the same manner (example shows Elysée 7F).

15 Fitting the door frame. Unscrew the hinges from the frame and lift off the door. Give the frame the same surface treatment as the flanges on the sections: use sandpaper to make the surfaces to be glued rougher, but do not apply silicone at this stage. Attach the floor seal underneath the door sill (fig. B). Erect the frame and hold it in place using screw clamps as shown. Drill the holes, see fig A. Note: No sealing strip is to be installed between the door and frame. N.B. It is important that the holes in the flanges on the plastic sections are larger than those in the door frame. The screws must not press against the plastic. Remove the screw clamps and apply silicone on the surface as shown (fig. A) before screwing the frame into position.


16 Clean and assemble the roof sections in the same way as the wall sections. Begin with an end roof section which can be fitted into place over the wall assembly. See examples above (type 8 F) and below (12 G). Ceiling panels should be glued with silicone to the top of wall panels prior to bolting batons together

17 The wooden blocks supplied are used to distribute the pressure evenly over the sections. The roof section is attached to the door frame in the same way as shown on page 15, figure A.

18 Drill holes to install the steam head, and sensor and lighting. See examples on pages 33-34, and refer to the separate instructions supplied with the respective product. Seal carefully round all holes with silicone. Contact your plumber and electrician for advice about laying pipes and electric cables, before you lift the steam room carefully into place. Only those items described in the assembly instructions may be placed on top of the steam room roof or up against the wall. Steam outlet location Single outlet: Place under any of the corner seats. Twin outlets: Place under the seats in a corner, as shown in the sketches above. Adjust the steam head so that the jet of steam travels horizontally below the seats for as far as possible before meeting any obstruction. Make sure that there are no obstructions placed within 70cm (27 ) of the steam head nozzle. Page 19: Schematic diagram showing installation of steam generator. Please follow the instructions supplied with generator carefully. IMPORTANT! If a switch is fitted between the incoming electric supply and the steam generator, this switch may only be used when servicing the steam generator.
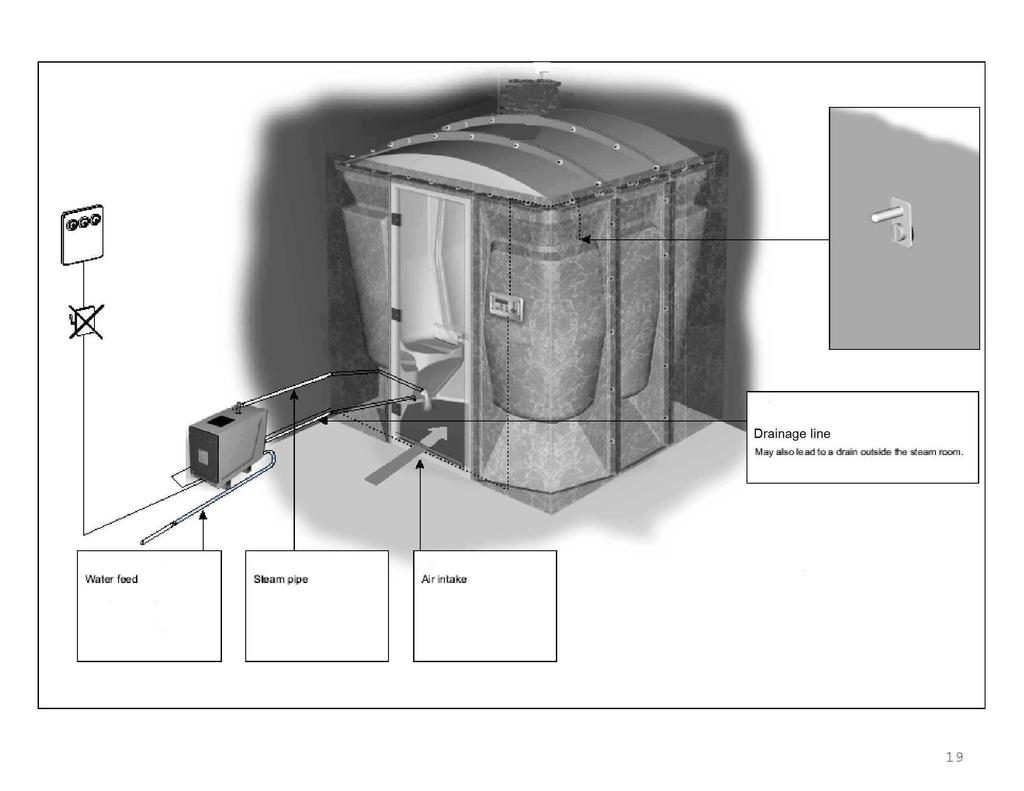
19
20 When all the wall and roof sections have been fitted, the steam room should be moved into position. Make sure that the floor has been cleaned first so that the silicone sealant adheres properly. Press out a liberal amount of silicone to fill the gap between the plastic sections and the floor (fig. B, page 21). Plywood, particleboard etc. (supplied by others) may be used as paneling on the outer walls. Heat insulation is not necessary because the temperature in the steam room is relatively low. In fact, there will be more steam if the room is not insulated. When the steam room is in place and the silicone has been left to dry for 48 hours, the exterior paneling can be screwed into place against the wooden profiles and battens on the walls open to the room. The outer wall panels should rest on the existing floor, using suitable distance pieces of a material unaffected by moisture. The paneling can then be finished in the material of your choice: plastic wall covering, wooden panels, wallpaper or paint etc. If any wall panel is heavily loaded (for example, with glazed tiles etc.), it must be reinforced with a separate, selfsupporting framework. The space in between the plastic sections and the outer walls and/or outer roof, if any, must be ventilated with ventilation holes at both roof and floor level.

21
22 Steam Door 101G

23

24

25

26

27

28

29

30
31

32

33

34
35
1/4 FRAMELESS DOOR WITH INLINE PANEL 1413A-1713A-1813A
 1/4 FRAMELESS DOOR WITH INLINE PANEL 1413A-1713A-1813A F AB GLASS AND MIRROR www.fabglassandmirror.com Call: +1 888-474-2221 Fax: (614)-334-4919 Office Timing: 8:30-18:00 EST info@fabglassandmirror.com
INFINITE RANGE - HINGE DOOR
 INFINITE RANGE - HINGE DOOR HINGE DOOR + 1 SIDE RETURN PANEL (CORNER) Please read these instructions before installing, as incorrect fitting will invalidate the guarantee-carry out each stage before moving
CORNER ENTRY ENCLOSURE
 CORNER ENTRY ENCLOSURE SUPREME INSTALLATION INSTRUCTIONS IMPORTANT - Please read before installation Please read these instructions carefully before starting installation and keep in a safe place for future
tile redi redi DOOR Redi Redi Swing Slide g TM TM...Opening Doors to Stunning Showers! TM TM SERIES: CONFIGURATION: MOUNTING PACKAGE:
 redi DOOR INSTALLATION INSTRUCTIONS tile redi Redi Redi Swing Slide g TM TM...Opening Doors to Stunning Showers! TM TM SERIES: CONFIGURATION: MOUNTING PACKAGE: 1100 Door-Door Framed sliding doors RDQCI5023
INSTALLATION INSTRUCTIONS. Deluxe Continuous Hinge Inline Door & Panel Shower Enclosure QCI5230
 INSTALLATION INSTRUCTIONS Deluxe Continuous Hinge Inline Door & Panel Shower Enclosure QCI5230 QCI5230 Rev 0 6 shower new QCI5230 Rev 0 Page 2 Certified 06/20/2016 Parts List A. Curb (w/ weep holes) (1)
Double Swing Door With Header QCI5114
 Double Swing Door With Header QCI5114 QCI5114 REV. 0 Page 1 of 9 Certified 06/22/2016 MAINTENANCE: Two primary materials are used to manufacture your new shower enclosure: tempered glass and anodized aluminum.
UNIT No FRAMELESS PIVOT SHOWER DOOR
 INSTALLATION INSTRUCTIONS UNIT No. 3600 FRAMELESS PIVOT SHOWER DOOR NEED INSTALLATION HELP? Call 1-800-45-BASCO (452-2726) Monday - Friday 8:00 A.M. - 4:30 P.M. Eastern Time QCI0020 Rev. 3 Page 1 of 8
INSTALLATION INSTRUCTIONS FRAMELESS CONTINUOUS HINGE SHOWER ENCLOSURE QCI5233
 INSTALLATION INSTRUCTIONS FRAMELESS CONTINUOUS HINGE SHOWER ENCLOSURE QCI5233 QCI5233 Rev 0 Page 1 Certified 06/20/2016 INSTALLATION NOTES: Unpack your unit carefully and inspect for freight damage. Lay
UNIT No. 15 & 16 SHOWER DOOR INSTALLATION INSTRUCTIONS
 UNIT No. 15 & 16 SHOWER DOOR INSTALLATION INSTRUCTIONS Page 2 of 7 MAINTENANCE: Two primary materials are used to manufacture your new Basco enclosure; tempered glass and anodized aluminum. To assure a
Portofino Installation Guide
 vjul16 (for 17 or 24 mm Surface Wall Profiles) DO NOT ASSEMBLE WITHOUT FULLY READING THESE INSTRUCTIONS Page 2 Thank you for purchasing this Portofino shower enclosure. Please study these instructions
FRAMED PANEL / DOOR / PANEL CONTINUOUS HINGE SHOWER ENCLOSURE INSTALLATION INSTRUCTIONS
 FRAMED / DOOR / CONTINUOUS HINGE SHOWER ENCLOSURE INSTALLATION INSTRUCTIONS QCI5229 Rev 0 6 INSTALLATION NOTES: Unpack your unit carefully and inspect for freight damage. Lay out and identify all parts
QCI0029 REV. 1 Page 1 of 11 Certified 07/06/05
 QCI0029 REV. 1 Page 1 of 11 Certified 07/06/05 MAINTENANCE: Two primary materials are used to manufacture your new Basco enclosure: tempered glass and anodized aluminum. To assure a long lasting finish
IMPORTANT INSTALLATION GUIDE VALENCIA ANGLE CORNER SHOWER READ ALL INSTRUCTIONS CAREFULLY BEFORE STARTING THE INSTALLATION
 INSTALLATION GUIDE VALENCIA ANGLE CORNER SHOWER SEALANT REQUIRED TO COMPLETE THIS INSTALLATION: (Supplied) Sika Sikasil NG (Arctic White) To seal the WHITE shower door and returns to the shower tray. Usage:
Vinyl Windows and Doors Manufactured by Pella Corporation
 Vinyl Windows and Doors Manufactured by Pella Corporation Part Number: V981255 2009 Pella Corporation INSTALLATION INSTRUCTION - INSTRUCCIONES DE INSTALACIÓN FOR BOW WINDOWS WITHOUT HEAD AND SEAT BOARD
FRAMELESS DOOR / PANEL WITH WALL MOUNT HINGES QCI5274
 FRAMELESS DOOR / PANEL WITH WALL MOUNT HINGES QCI5274 QCI0274 QCI5274 REV. Rev. 1 0 Page Page 1 1 Date Certified: Certified 06/16/2016 10/01/10 Parts List with wall mount hinges ITEM NO. Part # DESCRIPTION
VALENCIA CORNER DOOR WITH RETURN
 VALENCIA CORNER DOOR WITH RETURN INSTALLATION GUIDE SEALANT REQUIRED TO COMPLETE THIS INSTALLATION: ( not supplied) Sika Silaflex NG To seal the WHITE shower door and returns to the shower tray. Usage:
Deauville Installation Guide
 vjul16 (for 17 or 24 mm Surface Wall Profiles) DO NOT ASSEMBLE WITHOUT FULLY READING THESE INSTRUCTIONS Page 2 Thank you for purchasing this Deauville shower enclosure. Please study these instructions
INSTALLATION INSTRUCTIONS FRAMELESS CONTINUOUS HINGE SHOWER ENCLOSURE QCI5232
 INSTALLATION INSTRUCTIONS FRAMELESS CONTINUOUS HINGE SHOWER ENCLOSURE QCI5232 QCI5232 Rev 0 Page 1 Certified 06/20/2016 INSTALLATION NOTES: Unpack your unit carefully and inspect for freight damage. Lay
675 Quick N Stall Neo Angle Framed Hinge Shower Enclosure
 INSTALLATION INSTRUCTIONS 675 Quick N Stall Neo Angle Framed Hinge Shower Enclosure Call Technical Dept @ 1-800-452-2726 QCI1003 Page 1 of 9 Certified 10/01/09 INSTALLATION NOTES: Unpack your unit carefully
Double Frameless Swing Door QCI5247
 INSTALLATION INSTRUCTIONS Double Frameless Swing Door QCI5247 WALL MOUNT HINGES QCI5247 REV. 0 Page 1 Certified 06/16/2016 Parts List with wall mount hinges *Quantities may vary **Quantities double where
Frameless Heavy Glass Door with Wall Mount Hinges
 INSTALLATION INSTRUCTIONS Frameless Heavy Glass Door with Wall Mount Hinges QCI-5245 QCI5245 REV. 0 Page 1 Certified 06/16/16 Frameless Door with Wall Mount Hinges ITEM NUMBER DESCRIPTION QUANTITY 1 DOOR
PRIME SHOWER ENCLOSURE INSTALLATION INSTRUCTIONS
 PRIME SHOWER ENCLOSURE INSTALLATION INSTRUCTIONS IMPORTANT DreamLine reserves the right to alter, modify or redesign products at any time without prior notice. For the latest up-to-date technical drawings,
Unit No. 6150, 7150 Deluxe Framed Sliding Tub/Shower Enclosure
 INSTALLATION INSTRUCTIONS Unit No. 6150, 7150 Deluxe Framed Sliding Tub/Shower Enclosure QCI0023 Rev. 1 Page 1 of 8 Certified 8/20/10 MAINTENANCE: Two primary materials are used to manufacture your new
Frameless Door QCI5284
 Frameless Door QCI5284 F AB GLASS AND MIRROR www.fabglassandmirror.com Call: +1 888-474-2221 Fax: (614)-334-4919 Office Timing: 8:30-18:00 EST info@fabglassandmirror.com INSTALLATION INSTRUCTIONS Frameless
Frameless Inline Door QCI5254
 INSTALLATION INSTRUCTIONS Frameless Inline Door QCI5254 FRAMELESS DOOR / PANEL QCI5254 REV. 0 Page 1 Cer fied 06/16/2016 Parts List with wall mount hinges *Quanes may vary QCI5254 REV. 0 Page 2 Cer fied
Solutions. Installation Instructions. Ref Description Illustration Qty. A Shower Tray* mm Radius Curved Panel* Universal. Curved Quad Panel*
 Solutions Parts Supplied Installation Instructions Ref Description Illustration ty Shower Tray* *Shape of tray may vary from illustration B 550mm Radius Curved Panel* *If your tray is uadrant you will
Portofino Case2 Installation Guide
 Portofino Case2 Installation Guide vjun16 (for 17 or 24 mm Surface Wall Profile) DO NOT ASSEMBLE WITHOUT FULLY READING THESE INSTRUCTIONS Page 2 Thank you for purchasing this Portofino Case 2 shower enclosure.
INSTALLATION INSTRUCTIONS
 EDGE PIVOT DOOR EPDSC0760 EPDSC0800 EPDSC0900 EPDSC1000 ESPSC0760 ESPSC0800 ESPSC0900 ESPSC1000 PIVOT DOOR IN ALCOVE PIVOT DOOR & SIDE PANEL INSTALLATION INSTRUCTIONS IMPORTANT - Please read before installation
Framed Single Swing Shower Enclosure Steam Continuous Hinge
 INSTALLATION INSTRUCTIONS Framed Single Swing Shower Enclosure Steam Continuous Hinge QCI-5111 NEED INS TA LLA TIO N HELP? Cal l 1-800-45-BAS C O (452-2726 ) M on da y - Fr iday 8 :00 A.M. - 4:30 PM..
INSTALLATION INSTRUCTIONS
 INSTALLATION INSTRUCTIONS BUILDERS CHOICE FRAMED Shower Height Swing Door Model: L533 Rev. 09.03.13 MAINTENANCE: Two primary materials are used to manufacture your new Aquatic enclosure; tempered glass
VALENCIA RONDO DOOR WITH RETURN
 VALENCIA RONDO DOOR WITH RETURN INSTALLATION GUIDE SEALANT REQUIRED TO COMPLETE THIS INSTALLATION: ( not supplied) Sika Silaflex NG To seal the WHITE shower door and returns to the shower tray. Usage:
Frameless Fixed Panel Slider
 INSTALLATION INSTRUCTIONS Frameless Fixed Panel Slider QCI-5279 SINGLE ROLLER WITH ANTI-JUMP DOUBLE ROLLERS QCI5279 Rev Page Certified 08/09/6 Tools: To install your New Shower Enclosure, you may need
Vinyl Windows Manufactured by VPI Quality Windows
 Vinyl Windows Manufactured by VPI Quality Windows Part Number: 531&591 Installation 531 & 591 SERIES SLIDING AND HUNG WINDOW INSTALLATION INSTRUCTIONS Installation Instructions for Typical Construction.
DESIGN QUADRANT SINGLE DOOR
 DESIGN QURANT SINGLE DR DQSSC0800 DQSSC0900 DQSSC1000 800mm SINGLE DR 900mm SINGLE DR 1000mm SINGLE DR INSTALLATIN INSTRUCTINS IMPRTANT - Please read before installation Please read these instructions
Corner Potting Store Assembly Instructions
 Corner Potting Store Assembly Instructions English SS225E Before assembly We recommend that time is taken to read the instructions before starting assembly, then follow the easy step by step guide. The
738 SERIES PIVOT SHOWER DOOR
 INSTALLATION INSTRUCTIONS 738 SERIES PIVOT SHOWER DOOR Copyright Alumax Bath Enclosures 1997. All rights reserved. Page 1 of 8 LIMITED WARRANTY AND REMEDY Alumax Bath Enclosures warrants to its dealers,
Side and rear window, assembly overview
 64-7 Side and rear window, assembly overview 1 - Side/rear window Removing Unbroken Page 64-9 Broken Page 64-11 Installing Page 64-13 Curing time Page 64-21 Re-sealing Page 64-25 2 - PUR adhesive sealant
INSTALLATION INSTRUCTIONS INSTALLATION INSTRUCTIONS
 MUSTEE FIBERGLASS SHOWERWALL INSTALLATION INSTRUCTIONS DIRECT MOUNTING TO STUDWALLS INSTALLATION INSTRUCTIONS 3636C - NEO ANGLE SHOWER RECEPTOR 3636DT - DOUBLE THRESHOLD SHOWER RECEPTOR IMPORTANT: FITS
Frameless Inline Door With Return QCI5263
 INSTALLATION INSTRUCTIONS Frameless Inline Door With Return QCI5263 WALL MOUNT HINGES FRAMELESS DOOR / PANEL / RETURN PANEL QCI5263 REV. 0 Page 1 Certified 06/17/2016 Parts List with wall mount hinges
SLIDING DOOR for CORNER installation ONLY - this door closes to side panel -
 by KUDOS INSTALLATION INSTRUCTIONS SLIDING DOOR for CORNER installation ONLY - this door closes to side panel - Please read these instructions throughout before installing as incorrect fitting will invalidate
A-935 RODA WALL MOUNT HINGES
 INSTALLATION INSTRUCTIONS A-935 RODA WALL MOUNT HINGES NEED INSTALLATION HELP? Call 1-800-45-BASCO (452-2726) Monday - Friday 8:00 A.M. - 4:30 P.M. Eastern Time FRAMELESS DOOR / PANEL CELESTA QCI0274 REV.
LUXURY CURVED QUADRANT SINGLE DOOR
 LUXURY CURVD QUADRANT SINGL DOOR 5332 5331 5333 5334 5335 760 x 900mm SINGL DOOR 900mm x 900mm SINGL DOOR 1000mm x 900mm SINGL DOOR 1100mm x 900mm SINGL DOOR 1200mm x 900mm SINGL DOOR INSTALLATION INSTRUCTIONS
User Manual and Installation Instructions
 Nivano CTe height adjustable Changing Table User Manual and Installation Instructions Guarantee This product is guaranteed against all defects in manufacture for a period of one year This does not affect
Frequently Asked Questions
 1. What is the difference between new construction and retrofit? The difference is in the overall jamb depth and required components: For new construction, the flash flange on the head of the unit is left
ALLORA SWING PANEL INSTALLATION INSTRUCTIONS
 ALLORA SWING PANEL INSTALLATION INSTRUCTIONS Before Installation Please check that your Allora Swing Panel is undamaged SEQUENCE OF INSTALLATION These instructions are also available from the Athena website:
Installation Instructions
 Installation Instructions Alpha SolarSmart On Roof Kits for the Installation of Alpha Solar Collectors onto Tile and Slate Type Roofs For Technical help or for Service call... ALPHA HELPLINE Tel: 0 77
340 & 350 SERIES BATH ENCLOSURES
 INSTALLATION INSTRUCTIONS 340 & 350 SERIES BATH ENCLOSURES 800-643-1514 www.alumaxbath.com Copyright Alumax Bath Enclosures 2010. All rights reserved. LIMITED WARRANTY AND REMEDY ALUMAX BATH ENCLOSURES
INSTALLATION INSTRUCTIONS
 INSTALLATION INSTRUTIONS BUILDERS HOIE FRAMED Shower Height Neo Angle Swing Door Model: L061 Rev. 09.20.13 MAINTENANE: Two primary materials are used to manufacture your new Aquatic enclosure: tempered
B A T H R O O M G L A S S
 mistley B A T H R O O M G L A S S vaug16 Page 2 Thank you for purchasing this Trinity shower screen. Please study these instructions carefully before assembly and installation and check all supplied parts
FRAMED SLIDING DOOR FOR TUB OR SHOWER ENCLOSURE 6150A-7150A
 FRAMED SLIDING DOOR FOR TUB OR SHOWER ENCLOSURE 6150A-7150A F AB GLASS AND MIRROR www.fabglassandmirror.com Call: +1 888-474-2221 Fax: (614)-334-4919 Office Timing: 8:30-18:00 EST info@fabglassandmirror.com
TUB SHOWER Framed Sliding Enclosure
 INSTALLATION INSTRUCTIONS 8775-9775 - SHOWER Framed Sliding Enclosure Call Technical Dept @ 1-800-452-2726 QCI1000 Page 1 of 6 Certified 10/01/09 INSTALLATION NOTES: Unpack your unit carefully and inspect
300C6 CONTINUOUS HINGE SEMI-FRAMELESS DOOR KIT
 300C6 CONTINUOUS HINGE SEMI-FRAMELESS DOOR KIT LIMITED WARRANTY AND REMEDY Alumax Bath Enclosures warrants to its dealers, customers, and all subsequent purchasers and users, that the products supplied
INSTALLATION INSTRUCTIONS. UNIT No. 160/760 THIN-LINE SHOWER ENCLOSURE
 INSTALLATION INSTRUCTIONS UNIT No. 160/760 THIN-LINE SHOWER ENCLOSURE QCI0011 Rev. 0 Page 1of 10 Certified 10/18/2006 MAINTENANCE: Two primary materials are used to manufacture your new Basco enclosure;
INSTALLATION INSTRUCTIONS IMPERVIA SLIDING PATIO DOOR WITH FINS
 2008 Pella Corporation Part Number: 803V0101 INSTALLATION INSTRUCTIONS IMPERVIA SLIDING PATIO DOOR WITH FINS Installation Instructions for Typical Wood Frame Construction. These instructions were developed
FRAMED SLIDING DOOR FOR TUB OR SHOWER ENCLOSURE INSTALLATION INSTRUCTIONS
 FRAMED SLIDING DOOR FOR OR SHOWER ENCLOSURE INSTALLATION INSTRUCTIONS QCI5023 REV. 0 Page 1 Certified 06/22/2016 INSTALLATION NOTES: Unpack your unit carefully and inspect for freight damage. Lay out and
PL-91. Frameless Door with Panel. 202 Anderson Ave., Belvue, KS Phone: Fax:
 202 Anderson Ave., Belvue, KS 66407 Phone: 800-669-9867 Fax: 800-393-6699 www.onyxcollection.com 800-643-1514 www.alumaxshowerdoor.com PL-91 Frameless Door with Panel Full Showers Bench Seat Showers PL91-0318
How to operate (folding)
") How to operate (folding) LEFT HAND STACKING OUTWARD OPENING How to operate (folding) RIGHT HAND STACKING OUTWARD OPENING LOCK BOTH LEVER HANDLE AND FLAT HANDLE UTILISING THE D-HANDLE LOCATED ABOVE THE
How to operate (folding) LEFT HAND STACKING OUTWARD OPENING How to operate (folding) RIGHT HAND STACKING OUTWARD OPENING LOCK BOTH LEVER HANDLE AND FLAT HANDLE UTILISING THE D-HANDLE LOCATED ABOVE THE
Maintenance and other important non-personal injury and non-material damage instructions or statements that should be observed.
 VIGO INDUSTRIES INSTALLATION GUIDE FOR SHOWER ENCLOSURE ()! SAFETY PRECAUTIONS This Installation Guide uses the following symbols to indicate important information. Always observe the instructions indicated
Installation Instructions. This leaflet must be read thoroughly before commencing installation. 1 P a g e. Version 2.
 Installation Instructions This leaflet must be read thoroughly before commencing installation Version 2.6 January 2017 1 P a g e Contents Page Product overview. Page 3 Do s & Don ts. Page 3 Recommended
Phone # La Jolla Doors. Block Frame Installation Manual Aluminum Frame with either Vinyl or Aluminum Panels
 Phone # 800-440-8785 www.lajolladoors.com La Jolla Doors Block Frame Installation Manual Aluminum Frame with either Vinyl or Aluminum Panels Thank you for choosing La Jolla Doors In this manual you will
FLEX 28 / 32 / 42 x 72
 FLEX 28 / 32 / 42 x 72 SHOWER DOOR INSTALLATION INSTRUCTIONS IMPORTANT DreamLine reserves the right to alter, modify or redesign products at any time without prior notice. For the latest up-to-date technical
IMPORTANT INSTALLATION GUIDE VALENCIA SQUARE CORNER SHOWER READ ALL INSTRUCTIONS CAREFULLY BEFORE STARTING THE
 INSTALLATION GUIDE VALENCIA SQUARE CORNER SHOWER NOTE: Acrylic wall, tray and tapware not included. Supplied handles may differ from image. SEALANT REQUIRED TO COMPLETE THIS INSTALLATION: (Not supplied)
340 & 350 SERIES DELUXE FRAMELESS BYPASS
 BATH ENCLOSURES An Alcoa Company Tel: 800-643-1514 Fax: 870-234-3181 www.alumaxbath.com INSTALLATION INSTRUCTIONS 340 & 350 SERIES DELUXE FRAMELESS BYPASS BATH ENCLOSURES Copyright Alumax Bath Enclosures
Unit No. 135, 735 Deluxe Pivot Inline Door & Panel Shower Enclosure
 INSTALLATION INSTRUCTIONS Unit No. 135, 735 Deluxe Pivot Inline Door & Panel Shower Enclosure NEED INSTALLATION HELP? Call 1-800-45-BASCO (452-2726) Monday - Friday 8:00 A.M. - 4:30 P.M. Eastern Time QCI0004
Balustrade Systems / Installation Instructions
 A. PARTS AND SUPPLIES NEEDED FOR INSTALLATION Hardware included for each 10 section of rail: 2 3 x 1-1/2 L-brackets 4 1-3/4 x 3/16 Blue hex-head screws for anchoring the L-brackets to the newel cap, column
Allora ALCOVE ENCLOSURE INSTALLATION BEFORE INSTALLATION CHECK THAT YOUR ALLORA SHOWER ENCLOSURE SYSTEM IS UNDAMAGED
 Allora ALCOVE ENCLOSURE INSTALLATION BEFORE INSTALLATION CHECK THAT YOUR ALLORA SHOWER ENCLOSURE SYSTEM IS UNDAMAGED ALCOVE SHOWER Your shower can be installed to open Left hand or Right hand by rotating
Installation Instructions
 www.marlite.com Effective Date 03/01/2018 ARTIZAN FRP, SYMMETRIX FRP, ENVUE FRP, STANDARD FRP Installation Instructions Statements expressed in this technical bulletin are recommendations for the application
Continuous Hinge Frameless Single Swing Shower Enclosure QCI-5214
 INSTALLATION INSTRUCTIONS Continuous Hinge Frameless Single Swing Shower Enclosure QCI-5214 QCI5214 Rev. 1 Page 1 of 8 Certified 09/19/18 MAINTENANCE: Two primary materials are used to manufacture your
Deluxe Continuous Hinge Framed Door & Inline Panel with Return Panel Shower Enclosure
 INSTALLATION INSTRUCTIONS Deluxe Continuous Hinge Framed Door & Inline Panel with Return Panel Shower Enclosure QCI0235 Page 1 of 11 Certified 08/20/10 MAINTENANCE: Two primary materials are used to manufacture
DURASTALL SHOWER STALL ASSEMBLY INSTALLATION REPAIR PARTS FOR ONE OF THE FOLLOWING MODELS:
 DURASTALL SHOWER STALL ASSEMBLY INSTALLATION REPAIR PARTS FOR ONE OF THE FOLLOWING : MODEL: 80 (32 ) 140 (36 ) Cabinet (rigid corners) with Standard Base complete with Curtain and Valve assembly. MODEL:
6400, 8400 and 9400 Series Sliding Patio Door
 Contemporary 3 Panel Classic 5 Panel French Panel 6400, 8400 and 9400 Series Sliding Patio Door (O) Fixed Panel Left (X) Operating / Mullion Panel Right (X) Operating / Lock Panel Left (O) Fixed Panel
Installation Instructions
 Installation Instructions Bespoke Glass Design In A Box Typical Installation Guidance Installation Instructions Important Information Please read these instructions carefully before starting installation
Vinyl Windows and Doors Manufactured by VPI Quality Windows
 Vinyl Windows and Doors Manufactured by VPI Quality Windows Part Number: 511_Installation ENDURANCE CASEMENT\AWNING\PW INSTALLATION INSTRUCTIONS Installation Instructions for Typical Construction These
Unit No. 135, 735 Deluxe Pivot Inline Door & Panel Shower Enclosure
 INSTALLATION INSTRUCTIONS Unit No. 135, 735 Deluxe Pivot Inline Door & Panel Shower Enclosure NEED INSTALLATION HELP? Call 1-800-45-BASCO (452-2726) Monday - Friday 8:00 A.M. - 4:30 P.M. Eastern Time QCI0004
Sauna & Steam. Traditional Sauna Installation Instruction Manual
 Traditional Sauna Installation Instruction Manual Oceanic Ltd, Pountney Street, Wolverhampton, WV2 4HX Phone: 01902 450 550 sales@oceanic-saunas.co.uk www.oceanic-saunas.co.uk Contents 1.Introduction................................................
Life* Installation Instructions & User Care Instructions. (381kg) (60stone) (840lbs) (254kg) (40stone) (560lbs) (100kg) (220lb) (15stone)
 (60stone) (840lbs) (254kg) (40stone) (560lbs) (100kg) (220lb) (15stone)") Installation Instructions & User Care Instructions Trimmable Formers (381kg) (60stone) (840lbs) (254kg) (40stone) (560lbs) (100kg) (220lb) (15stone) i Installer- please read all instructions carefully
Installation Instructions & User Care Instructions Trimmable Formers (381kg) (60stone) (840lbs) (254kg) (40stone) (560lbs) (100kg) (220lb) (15stone) i Installer- please read all instructions carefully
SERIES: CONFIGURATION: MOUNTING PACKAGE: 1200 Door-Door Frameless, sliding door
 SERIES: CONFIGURATION: MOUNTING PACKAGE: 1200 Door-Door Frameless, sliding door RDQCI5022 Rev.0 Page 1 Certified 06/01/2016 Tools: To install your New Shower Enclosure, you may need the following: Pencil
Potting Store Assembly Instructions
 Before assembly We recommend that time is taken to read the instructions before starting assembly, then follow the easy step by step guide. The instruction sheet is only a guide to the assembly. Certain
DESIGN TRIPLE PANE BATH SCREEN
 DESIGN TRIPLE PANE BATH SCREEN DBTSC1500 INSTALLATION INSTRUCTIONS IMPORTANT - Please read before installation Please read these instructions carefully before starting installation and keep in a safe place
INSTALLATION INSTRUCTIONS
 INSTALLATION INSTRUCTIONS BUILDERS CHOICE FRAMED Bypass Door Model: L0516 (Tub Height), L0517 (Shower Height) Rev. 09.20.13 INSTALLATION NOTES: Unpack your unit carefully and inspect for freight damage.
FITS MUSTEE 32 X 32 SHOWER RECEPTOR
 MUSTEE FIBERGLASS SHOWERWALL FITS MUSTEE 32 X 32 SHOWER RECEPTOR IMPORTANT: SEE BACK PAGE FOR SHOWER DOOR (ENCLOSURE) LISTING Before you assemble and install your MODEL 732 three-piece Molded Fiberglass
Playaway Swiss Cottage Assembly Instructions
 Playaway Swiss Cottage Assembly Instructions English SS288C IMPORTANT SAFETY INFORMATION Adult assembly is required. Checks and maintenance needs to be carried out on the main parts (fixings etc.) at regular
Installation Guide for Andersen 400 Series Tilt-Wash Transom and 200 Series Narroline Transom Windows
 for Andersen 400 Series Tilt-Wash Transom and 200 Series Narroline Transom Windows Congratulations! You have just purchased one of the many fine Andersen products. Proper assembly, installation and maintenance
Vanity Installation Instructions
 Vanity Installation Instructions Segments of these instructions will relate to your vanity. Please read these instructions thoroughly and ensure the appropriate instructions are used during the installation
PREMIER PENTAGON SHOWER ENCLOSURE
 PREMIER PENTAGON SHOWER ENCLOSURE 71677 00 / Issue 1 / 13 SAFETY Please read these instructions carefully and keep for future reference. Incorrect fitting will invalidate the guarantee. Handle glass with
VANITY INSTALLATION INSTRUCTIONS
 VANITY INSTALLATION INSTRUCTIONS Congratulations and thank you for your purchase. These cabinets have been designed and assembled to a very high standard and if installed correctly will provide you with
Deauville Installation Guide
 vjul16 (for Recessed Wall Profiles) DO NOT ASSEMBLE WITHOUT FULLY READING THESE INSTRUCTIONS Page 2 Thank you for purchasing this Deauville shower enclosure. Please study these instructions carefully before
Contemporary 3 Panel Classic 5 Panel French Panel
 Contemporary 3 Panel Classic 5 Panel French Panel (X) Operating / Lock Panel Left (O) Fixed Panel Right Note : Glazing Beads For All Panel Face To The Exterior 2 Panel XO Left Is Shown Above Opposite =
INFINITE RANGE - CENTRE FOLDING DOOR
 INFINITE RANGE - CENTRE FOLDING DOOR CENTRE FOLDING DOOR ONLY ( RECESS) Please read these instructions before installing, as incorrect fitting will invalidate the guarantee-carry out each stage before
Frameless Fixed Panel Slider QCI5279
 Frameless Fixed Panel Slider QCI5279 F AB GLASS AND MIRROR www.fabglassandmirror.com Call: +1 888-474-2221 Fax: (614)-334-4919 Office Timing: 8:30-18:00 EST info@fabglassandmirror.com Frameless Fixed Panel
Heavy Glass Frameless Shower Door With Return Panel
 202 Anderson Ave., Belvue, KS 66407 Phone: 800-669-9867 Fax: 800-393-6699 www.onyxcollection.com Heavy Glass Frameless Shower Door With Return Panel Full Showers with Return PL92-0118 R S K Parts List
Installation Guide. Evolve bi-fold. 8. Door restrictor- optional p9. 1. Before you start p2. 9. Adjustment. 2. Measuring and surveying p2
 Evolve bi-fold Installation Guide 1. Before you start p2 8. Door restrictor- optional p9 2. Measuring and surveying p2 3. Configuration details p4 4. Installation p5 5. Glazing p5 6. Glazing packer details
890 SERIES PIVOT STEAM DOOR
 BATH ENCLOSURES An Alcoa Company Tel: 800-643-1514 Fax: 870-234-3181 www.alumaxbath.com INSTALLATION INSTRUCTIONS 890 SERIES PIVOT STEAM DOOR Copyright Alumax Bath Enclosures 1997. All rights reserved.
INSTALLATION INSTRUCTION Square-Top gully
 INSTALLATION INSTRUCTION Square-Top gully! Read the installation instructions carefully before installation. Only a qualified plumber should install the floor drain. Our on-going product development may
UNIT No. 135/735 THIN-LINE SHOWER ENCLOSURE
 INSTALLATION INSTRUCTIONS UNIT No. 135/735 THIN-LINE SHOWER ENCLOSURE QCI0004 REV. 1 Page 1 of 10 1-800 NE INSTA ED LLATI HELP ON? C -45-B all ASCO (452Mon 2726 8:00 day - Frida ) A.M. y Easte - 4:30 P.M.
Step-by-Step Installation Instructions for
 Step-by-Step Installation Instructions for Customer helpline number: 01604 633607 8892_Step_By_Step_900_Quad_V5.indd 1 1/9/10 18:01:22 Before Starting: Please read and understand these instructions. Not
INSTALLATION INSTRUCTIONS
 INSTRUCTIONS FURNITURE SAPPHIRE Vanity BEFORE YOU BEGIN Please read these instructions carefully to familiarise yourself with the required tools, materials, and installation sequences. Follow the sections
Dubnium 11 Installation Instructions & Parts List
 Dubnium 11 Installation Instructions & Parts List Illustration Dubnium, H1 Handle Right Hand: Open Out Page 1 of 25 IMPORTANT This shower screen / enclosure must be installed by suitably qualified individuals.
Method of Build 1. Fire. Sound
 Method of Build 1 General Viso Fire & Acoustic in the solid form differs from most other systems as it can be erected using 12.5mm & 15.0mm boards within the same Aluminium framework. Also hidden fix board
26- H i n g e d P a t i o D o o r s - I n s w i n g
 Contents Hinged Patio Doors - Inswing Basic Unit Details... 2 Options / Accessories Accessibility Option... 5 Andersen Grilles... 6 Extension s... 7 Anchoring Methods... 8 Joining Details... 9 Suggested