INSTALLATION INSTRUCTIONS GRILLE GUARD FORD ESCAPE
|
|
|
- Nigel Lester
- 6 years ago
- Views:
Transcription
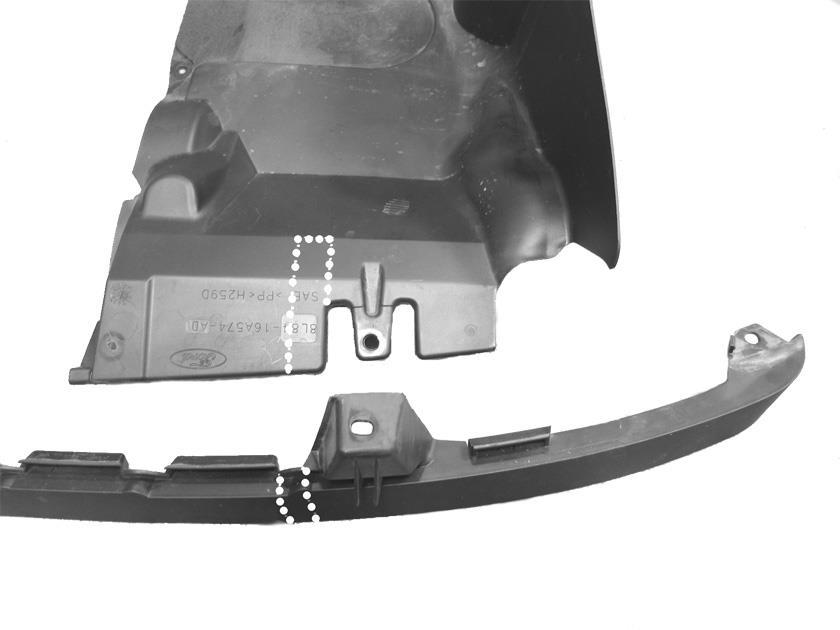
1 INSTALLATION INSTRUCTIONS GRILLE GUARD FORD ESCAPE PARTS LIST: 1 Grille Guard mm x 30mm Hex Bolts 1 Driver/Left Frame Mounting 4 10mm Lock Washers 1 Passenger/Right Frame Mounting 6 10mm x 27mm OD x 3mm Flat Washers 1 Driver/Left Top 4 10mm x 20mm OD x 2mm Flat Washers 1 Passenger/Right Top 4 10mm Nylon Lock Nuts mm x 25mm Rod Bolt mm x 30mm Hex Bolts mm x 25mm Bolt Plate 4 8mm Lock Washers 1 8mm Insert Tool 6 8mm x 24mm OD x 2mm Flat Washers mm Threaded Inserts 2 8mm Nylon Lock Nut mm x 30mm Hex Head Bolts mm x 30mm Phillips Screw 12 12mm ID x 24mm OD x 2.5mm Flat Washers 2 6mm Lock Washer 6 12mm Nylon Lock Nuts 2 6mm x 12mm OD x 1.6mm Flat Washer mm x 25mm Button Head Bolts Passenger/ Right side Top 10mm Rod Bolt (pictured w/10mm Flat Washer and 10mm Nylon Lock Nut) Driver/Left Side Top Passenger/ Right Side Frame Mounting 8mm Threaded Insert Tool (pictured w/insert, 8mm Hex Bolt and 8mm Flat Washer) Driver/Left Side Frame Mounting PROCEDURE: 1. REMOVE CONTENTS FROM BOX. VERIFY ALL PARTS ARE PRESENT. READ INSTRUCTIONS CAREFULLY BEFORE STARTING INSTALLATION. DO NOT ATTEMPT INSTALLATION ALONE; PERSONAL INJURY OR DAMAGE TO THE VEHICLE MAY RESULT. CUTTING IS REQUIRED. 2. Starting from under the front of the vehicle, remove the front factory plastic shroud and the air dam and place them on a clean, stable working surface. Pay close attention to the location of the factory hardware for easy reassembly. 3. Locate the three factory holes in the bottom of the passenger side of the cross member. Insert (1) 10mm x 25mm Rod Bolt in and through the factory holes as shown in Figure Next, locate the two factory holes on the upright end of the front cross member. On 2008 Models: These two factory holes will be threaded. Continue on to Step 5. On Models: These two factory holes are not threaded, (Figure 2). Select the 8mm Threaded Insert Tool, (1) 8mm Threaded Insert, (1) 8mm Flat Washer and (1) 8mm x 30mm Hex Bolt. Assemble the tool as per Figure 3A & 3B. Insert assembly into the factory hole, hold tool handle and assembly up tight against the crossmember and tighten hex bolt until insert is Page 1 of 5
2 fully expanded into hole, (Figure 4). NOTE: Do not over tighten or a pull out may occur. Once Metal Insert is fully compressed, remove the bolt and tool from the Metal Insert. Repeat this step for second hole and for installation of the remaining Threaded Metal Inserts for the driver side Mounting installation. NOTE: It is not necessary but to make installation of the Threaded Inserts easier, remove the plastic bumper cover. 5. Position the passenger side Mounting up to the cross member and over the previously installed Rod Bolt. Secure Mounting to Rod Bolt with (1) 10mm Flat Washer and (1) 10mm Nylon Lock Nut, (Figure 6). Do not tighten hardware at this time. 6. Attach the Mounting to the (2) threaded holes in the end of the crossmember Models: Use (2) 10mm x 30mm Hex Bolts, (2) 10mm Lock Washers and (2) 10mm Flat Washers, (Figure 5 & 6). Do not tighten hardware at this time Models: Insert (2) 8mm x 30mm Hex Bolts, (2) 8mm Lock Washers and (2) 8mm Flat Washers into the threaded inserts installed in Step 4, (Figure 5 & 6). Do not tighten hardware at this time. 7. Move up to the passenger side of the grille opening. Locate and remove the fastener at the top-left hand corner of the grille opening, (Figure 7). Insert (1) 8mm x 25mm Bolt Plate into and down through the factory hole left by the plastic fastener, (Figure 8). 8. Select the passenger side Top and hang it from the previously installed Bolt Plate with (1) 8mm Flat Washer and (1) 8mm Nylon lock Nut, (Figure 9). Do not tighten at this time. 9. Repeat steps 3-8 for the driver side installation. 10. With assistance, position the Grille Guard up to the outside of the Mounting s and Top s. Attach Grille Guard to Mounting s using (6) 12mm x 30mm Hex Bolts, (12) 12mm Flat Washers and (6) 12mm Nylon Lock Nuts, (Figure 10). Do not tighten at this time. 11. Attach Grille Guard to the Top s with (2) 10mm x 25mm Button Head Bolts, (4) 10mm Flat Washers and (2) 10mm Nylon Lock Nuts, (Figure 11). Do not tighten at this time. 12. Level and adjust Grille Guard and tighten all hardware at this time. 13. One at a time, hold each of the splash guards and the spoiler up into position to determine the area that will need to be removed to clear the Mounting s. To maintain strength, only remove the minimum amount of material to clear the Mounting s. Using a hacksaw, cut out 3/4 wide slot on each marked location on the air dam shown in Figure 12A & 12B. NOTE: The air dam will be in three pieces when re-installed. 14. Cut out a 1-1/4 x 4 wide slot in each marked location on both plastic splash guards as shown in Figure 12A & 12B. Once the air dam and plastic shroud are cut re-install them using the factory screws removed in Step 2. NOTE: (2) longer 6mm x 30mm Screws, (2) 6mm Lock Washers and (2) 6mm Flat Washers have been included to go through the Mounting s for the Grille Guard, the spoiler and the splash guards, (Figure 12A & 12B). 15. Do periodic inspections to the installation to make sure that all hardware is secure and tight. To protect your investment, wax this product after installing. Regular waxing is recommended to add a protective layer over the finish. Do not use any type of polish or wax that may contain abrasives that could damage the finish. For stainless steel: Aluminum polish may be used to polish small scratches and scuffs on the finish. Mild soap may be used also to clean the Grille Guard. For gloss black finishes: Mild soap may be used to clean the Grille Guard. Page 2 of 5


3 model pictured. NOTE: Holes are not threaded Insert 10mm Rod Bolt in here...and out here Fig 1 Fig 2 On 2008 models, these (2) factory holes are threaded to mm 8mm Insert Tool 8mm Threaded Insert 8mm Flat Washer 8mm x 30mm Hex Bolt Fig 3A Fig 3B Insert assembly into the factory hole, hold tool handle and assembly up tight against the crossmember and tighten hex bolt until insert is fully expanded into hole, (Figure 4). NOTE: Do not over tighten or a pull out may occur. Fig 4 Page 3 of 5
 10mm Lock Washers (2) 10mm Flat")
 8mm x 30mm Hex")


4 2008 Models (2) 10mm x 30mm Hex Bolts (2) 10mm Lock Washers (2) 10mm Flat Washers Models (2) 8mm Threaded Inserts (2) 8mm x 30mm Hex Bolts (2) 8mm Lock Washers (2) 8mm Flat Washers Fig 5 Remove this plastic fastener 10mm Rod Bolt 10mm Lock Washer 10mm Flat Washer 10mm Nylon Lock Nut Fig 6 Fig 7 8mm x 25mm Bolt Plate Bolt Plate 8mm Flat Washer 8mm Nylon Lock Nut Fig 8 Fig 9 Page 4 of 5


5 (3) 12mm x 30mm Hex Bolts (3) 12mm Flat Washers Fig 10 (3) 12mm Nylon Lock Nuts Fig 11 10mm x 25mm Button Head Bolt 10mm Flat Washers 10mm Nylon Lock Nut Cut out a 1-1/4 wide x 4 long slot in each splash guard to clear the Mounting s Fig 12A Fig 12B Replace factory hardware for this mounting location with the included: 6mm x 30mm Phillips Screw 6mm Lock Washer 6mm Flat Washer Cut out (2) 3/4 wide slots in the spoiler Installation Complete Replace factory hardware for this mounting location with the included: 6mm x 30mm Phillips Screw 6mm Lock Washer 6mm Flat Washer Page 5 of 5
INSTALLATION INSTRUCTIONS
 TEL1-866-XANATOS INSTALLATION INSTRUCTIONS PART#: BB080800\BB080800A 2 CITY BAR FOR JEEP PATRIOT 4X4 & 4X2 08-09 PARTS LIST: 1 City Bar 2 12-1.75mm x 50mm Hex Head Bolts 1 Center Tube Bracket 4 12-1.75mm
INSTALLATION INSTRUCTIONS GRILLE GUARD 09-ON DODGE RAM PART #
 INSTALLATION INSTRUCTIONS GRILLE GUARD 09-ON DODGE RAM PART # PARTS LIST: Qty Description Qty Description 1 Grille Guard 8 12-1.75mm x 35mm Hex Bolts 2 Brackets (for trucks without 22 12mm x 30.1mm OD
INSTALLATION INSTRUCTIONS
 TEL:1-866-XANATOS INSTALLATION INSTRUCTIONS PART#: 17A110200MSS\17A110200MA MODULAR GRILL GUARD FOR NISSAN FRONTIER 05-10//PATHFINDER 05-07 1 guard, center section 1 brush guard, left side 1 brush guard,
INSTALLATION INSTRUCTIONS GRILLE GUARD RAM 1500 PART # 5058/5058-2
 INSTALLATION INSTRUCTIONS GRILLE GUARD PART # 5058/5058-2 PARTS LIST: Qty Description Qty Description 1 Grille Guard 8 12-1.75mm x 35mm Hex Bolts 2 Upper Frame Mounting s (for trucks without tow hooks
8mm x 25mm "Z" Bolt Plates. (2) Tube Spacers. (2) 12mm Bolt Plates w/ Nut
 Tube Spacers. (2) 12mm Bolt Plates w/ Nut") PARTS LIST: 1 Grille Guard 10 12mm Lock Washers 1 Driver/Left Side Frame Mounting Bracket 8 12mm Hex Nuts 1 Passenger/Right Side Frame Mounting Bracket 2 10-1.50mm x 25mm Button Head Bolts 1 Driver/Left
PARTS LIST: 1 Grille Guard 10 12mm Lock Washers 1 Driver/Left Side Frame Mounting Bracket 8 12mm Hex Nuts 1 Passenger/Right Side Frame Mounting Bracket 2 10-1.50mm x 25mm Button Head Bolts 1 Driver/Left
Passenger/Right Front Mounting Bracket
 PARTS LIST: 1 Driver side running board 1 8mm Insert Installation Tool 1 Passenger side running board 4 10-1.50mm x 35mm Hex Bolt 1 Driver 10 10mm x 24mm OD x 2.2mm Flat Washer 1 Passenger 6 10mm Lock
INSTALLATION INSTRUCTIONS PART#:17A096400MSS\17A096400MA MODULAR GRILL GUARD FOR TOYOTA TACOMA 05-09
 INSTALLATION INSTRUCTIONS PART#:17A096400MSS\17A096400MA MODULAR GRILL GUARD FOR TOYOTA TACOMA 05-09 1 guard, center section 1 brush guard, left side 1 brush guard, right side 1 wire guard insert, left
INSTALLATION INSTRUCTIONS SIDE BAR FORD ESCAPE & MAZDA TRIBUTE PART #
 INSTALLATION INSTRUCTIONS SIDE BAR 2008-2010 FORD ESCAPE & MAZDA TRIBUTE PART # 50136 50137 PARTS LIST: 1 Driver/Left Sidebar 2 10-1.50mm x 35mm Bolt Plate 1 Passenger/Right Sidebar 2 10-1.50mm x 30mm
3" SIDEBAR CHEVY TRAVERSE/GMC ACADIA/07-10 SATURN OUTLOOK/07-09 BUICK ENCLAVE (EXCL BUICK ENCLAVE)
") PARTS LIST: 1 Driver/Left Sidebar 6 s 1 Passenger/Right Sidebar 6 12mm ID x 32mm OD x 3mm Flat Washers 1 Driver/Left Mounting 6 s 1 Passenger/Right Mounting 4 10mm Lock Washers 1 Driver/Left Mounting 4
PARTS LIST: 1 Driver/Left Sidebar 6 s 1 Passenger/Right Sidebar 6 12mm ID x 32mm OD x 3mm Flat Washers 1 Driver/Left Mounting 6 s 1 Passenger/Right Mounting 4 10mm Lock Washers 1 Driver/Left Mounting 4
(2) 25mm x 20mm x 5mm Adhesive Backed Foam Pads. 100mm x 50mm x 1.0mm Adhesive Backed Foam. (2) Spacer Plates. Passenger/Right Side Frame Mounting
 25mm x 20mm x 5mm Adhesive Backed Foam Pads. 100mm x 50mm x 1.0mm Adhesive Backed Foam. (2) Spacer Plates. Passenger/Right Side Frame Mounting") PARTS LIST: 1 Grille Guard 10 12mm Lock Washers 1 Driver/Left Frame Mounting 16 12mm x 32mm OD x 3mm Flat Washers 1 Passenger/Right Frame Mounting 8 12mm Hex Nuts 1 Driver/Left Side Top Support 2 10-1.50mm
PARTS LIST: 1 Grille Guard 10 12mm Lock Washers 1 Driver/Left Frame Mounting 16 12mm x 32mm OD x 3mm Flat Washers 1 Passenger/Right Frame Mounting 8 12mm Hex Nuts 1 Driver/Left Side Top Support 2 10-1.50mm
INSTALLATION INSTRUCTIONS GRILLE GUARD CHEVY TAHOE / AVALANCHE 1500/ SUBURBAN 1500 PART # /502795
 (W) INSTALLATION INSTRUCTIONS GRILLE GUARD PART # 502794/502795 PARTS LIST: 1 Grille Guard 2 12-1.75mm x 140mm Hex Bolts 2 Frame Mounting Brackets 8 12-1.75mm x 30mm Hex Bolts 2 Lower Support Brackets
Driver/Left Top. Support Bracket
 PARTS LIST: 1 Grille Guard 8 10mm Lock Washers 1 Driver/Left Frame Bracket 8 10mm Hex Nuts 1 Passenger/Right Frame Bracket 2 8-1.25mm x 25mm Button Head Bolts 1 Driver/Left Bottom Support Bracket 2 8mm
XHD Bull Bar w/ Dual Row LED Light Bar (10-17 Jeep JK)
") XHD Bull Bar w/ Dual Row LED Light Bar (10-17 Jeep JK) PARTS LIST: 1 Driver/Left Side Bull Bar Upright 8 10-1.5mm Hex Nuts 1 Side Bull Bar Upright 4 10-1.5mm Nylon Lock Nuts 1 Top Cross Bar 2 Light Bar
XHD Bull Bar w/ Dual Row LED Light Bar (10-17 Jeep JK) PARTS LIST: 1 Driver/Left Side Bull Bar Upright 8 10-1.5mm Hex Nuts 1 Side Bull Bar Upright 4 10-1.5mm Nylon Lock Nuts 1 Top Cross Bar 2 Light Bar
INSTALLATION INSTRUCTIONS
 TEL -866-XANATOS INSTALLATION INSTRUCTIONS PART#: 7D5000SS\7D500A GRILL GUARD FOR DODGE SPRINTER 07-09 PARTS LIST: 8 6 Grille Guard Driver/Left Frame Mounting Passenger/Right Frame Mounting Driver/Left
GRILLE GUARD SPRINTER VAN (EXCLUDES X4) INCLUDES MERCEDES, FREIGHTLINER AND DODGE PARTS LIST:
 INCLUDES MERCEDES, FREIGHTLINER AND DODGE PARTS LIST:") PARTS LIST: 1 Grille Guard 8 12mm Hex Nuts 1 Driver/Left Side Frame Mounting Bracket 2 10-1.50mm x 25mm Button Head Bolts 1 Passenger/Right Side Frame Mounting Bracket 4 10mm x 20mm OD x 2mm Flat Washers
PARTS LIST: 1 Grille Guard 8 12mm Hex Nuts 1 Driver/Left Side Frame Mounting Bracket 2 10-1.50mm x 25mm Button Head Bolts 1 Passenger/Right Side Frame Mounting Bracket 4 10mm x 20mm OD x 2mm Flat Washers
INSTALLATION INSTRUCTIONS
 TEL:1-866-XANATOS INSTALLATION INSTRUCTIONS FOR 07-13 CHEVY SILVERADO 1500 PART#RU-CHSI07-B PARTS LIST: 1 Main Body 28 12mm x 37mm OD x 3mm Large Flat Washers 1 Driver/Left Brush Guard 8 12-1.75mm x 40mm
10-1.5mm x 40mm Hex Bolt 1 Driver/Left Front Inner Support Bracket (2WD & 4WD Vehicles W/O Skid Plate Only) 2
 2") PARTS LIST: 3" ROUND SIDEBARS 1 Driver/Left sidebar 4 12mm x 32mm OD x 3mm Flat Washer 1 Passenger/Right sidebar 4 12mm x 24mm OD x 2.5mm Flat Washer 1 Driver/Left Mounting Bracket 6 12mm Lock Washers
PARTS LIST: 3" ROUND SIDEBARS 1 Driver/Left sidebar 4 12mm x 32mm OD x 3mm Flat Washer 1 Passenger/Right sidebar 4 12mm x 24mm OD x 2.5mm Flat Washer 1 Driver/Left Mounting Bracket 6 12mm Lock Washers
10-1.5mm x 40mm Hex Bolt 1 Driver/Left Front Inner Support Bracket (2WD & 4WD Vehicles W/O Skid Plate Only) 2
 2") PARTS LIST: 1 Driver/Left sidebar 4 12mm x 32mm OD x 3mm Flat Washer 1 Passenger/Right sidebar 4 12mm x 24mm OD x 2.5mm Flat Washer 1 Driver/Left Mounting Bracket 6 12mm Lock Washers 1 Passenger/Right
PARTS LIST: 1 Driver/Left sidebar 4 12mm x 32mm OD x 3mm Flat Washer 1 Passenger/Right sidebar 4 12mm x 24mm OD x 2.5mm Flat Washer 1 Driver/Left Mounting Bracket 6 12mm Lock Washers 1 Passenger/Right
(W) INSTALLATION INSTRUCTIONS 3" ROUND & 4" OVAL SIDEBAR (90-DEG BENT END) DODGE RAM 1500 QUAD CAB PART #DZ /DZ /DZ /DZ
 INSTALLATION INSTRUCTIONS 3 ROUND & 4 OVAL SIDEBAR (90-DEG BENT END) DODGE RAM 1500 QUAD CAB PART #DZ /DZ /DZ /DZ") (W) INSTALLATION INSTRUCTIONS 3" ROUND & 4" OVAL SIDEBAR (90-DEG BENT END) PART #DZ 372231/DZ 372233/DZ 372237/DZ 372239 PARTS LIST: 3" ROUND & 4" OVAL SIDEBAR (90-DEG BENT END) Qty Description Qty Description
(W) INSTALLATION INSTRUCTIONS 3" ROUND & 4" OVAL SIDEBAR (90-DEG BENT END) PART #DZ 372231/DZ 372233/DZ 372237/DZ 372239 PARTS LIST: 3" ROUND & 4" OVAL SIDEBAR (90-DEG BENT END) Qty Description Qty Description
INSTALLATION INSTRUCTIONS / DODGE RAM CREW CAB 2500/3500
 INSTALLATION INSTRUCTIONS 225019 / 225019-2 2010 DODGE RAM CREW CAB 2500/3500 PARTS LIST: Qty Description Qty Description 1 Driver/Left Side Bar 4 Plastic Square Retainer 1 Side Bar 2 12mm x 120mm Hex
INSTALLATION INSTRUCTIONS
 TEL:1-866-XANATOS INSTALLATION INSTRUCTIONS PART # RN-FOF1SCC-09-91 CUTLASS RUNNING BOARDS PARTS LIST: 5 STAINLESS AND ALUMINUM SIDEBARS 2 Left or right Sidebars 10 8-1.25mm x 30mm Hex Bolts 2 Driver/Left
INSTALLATION INSTRUCTIONS 3 ROUND & 4 OVAL SIDEBAR (90-DEG BENT END) DODGE RAM MEGA CAB PART NUMBER SB1214S SB1214B
 DODGE RAM MEGA CAB PART NUMBER SB1214S SB1214B") INSTALLATION INSTRUCTIONS PART NUMBER SB1214S SB1214B PARTS LIST: Qty Description Qty Description 1 Driver/Left Sidebar 4 12mm x 32mm OD x 3mm Flat Washers 1 Passenger/Right Sidebar 4 12mm Lock Washers
INSTALLATION INSTRUCTIONS PART NUMBER SB1214S SB1214B PARTS LIST: Qty Description Qty Description 1 Driver/Left Sidebar 4 12mm x 32mm OD x 3mm Flat Washers 1 Passenger/Right Sidebar 4 12mm Lock Washers
VIEWPOINT ALUMINUM RUNNING BOARD TOYOTA RAV4
 PARTS LIST: VIEWPOINT ALUMINUM RUNNING BOARD 1 Driver/Left Running Board 4 10-1.5mm x 50mm T-Bolt 1 Passenger/Right Running Board 12 10mm Plastic Retainers 1 Driver/Left Bracket 2 10-1.50mm x 40mm Hex
INSTALLATION INSTRUCTIONS 6 OVAL BENT END SIDEBARS DODGE RAM 1500, CREW CAB PART#: /241533B
 PARTS LIST: 1 Driver/Left Sidebar 24 8mm x 24mm x 2mm Flat Washers 1 Passenger/Right Sidebar 12 8mm Lock Washers 3 Driver/left, Passenger Center and Rear 6 8mm Hex Nuts 3 INSTALLATION INSTRUCTIONS 6 OVAL
INSTALLATION INSTRUCTIONS 3 BULL BAR 99-04, 04 "HERITAGE" F-150/250LD 2WD, 97-04, 04 "HERITAGE" 4WD WD EXPEDITION/ WD EXPEDITION PART
 INSTALLATION INSTRUCTIONS 3 BULL BAR PART #B-F1971;B-F2971 PARTS LIST: 1 Bull Bar 2 12-1.75mm x 130mm x 40mm Hex Bolts 1 Driver/Left Mounting Bracket 4 12-1.75mm x 35mm Hex Bolts 1 Passenger/Right Mounting
Before returning this product to the store of purchase
 Before returning this product to the store of purchase Contact Dee Zee if you experience the following problems: Missing Parts Installation Problems/Questions Warranty Questions 1.800.779.2102 Hours of
INSTALLATION INSTRUCTIONS 3"/4 BENT END SIDEBARS FORD F-150 SUPERCREW PART # DZ /DZ
 INSTALLATION INSTRUCTIONS 09-12 FORD F-150 SUPERCREW PART # DZ 372697/DZ 372699 PARTS LIST: 1 Driver/Left Sidebar 4 1/2 Lock Washers 1 Sidebar 4 12mm x 32mm OD x 3mm Flat Washers 1 Driver/Left Mounting
INSTALLATION INSTRUCTIONS ELEVATION FRONT BUMPER CHEVY SILVERADO
 INSTALLATION INSTRUCTIONS ELEVATION FRONT BUMPER PARTS LIST: 1 Heavy Duty Bumper Assembly 6 12-1.75mm x 50mm Hex Bolts 1 Driver Mounting Bracket 30 12mm x 37mm OD x 3mm Flat Washers 1 Passenger Mounting
(6) Plastic Retainers. Passenger/Right. Passenger/Right Support Brackets
 Plastic Retainers. Passenger/Right. Passenger/Right Support Brackets") PART#R102580 PARTS LIST: 1 Driver/Left HD Running Board 4 8mm Bolt/Nut Plates 1 Passenger/Right HD Running Board 4 8mm Plastic Retainers 2 Driver/Left & Center Mount Bracket 14 8mm-1.25 x 30mm Hex Bolts
PART#R102580 PARTS LIST: 1 Driver/Left HD Running Board 4 8mm Bolt/Nut Plates 1 Passenger/Right HD Running Board 4 8mm Plastic Retainers 2 Driver/Left & Center Mount Bracket 14 8mm-1.25 x 30mm Hex Bolts
INSTALLATION INSTRUCTIONS DODGE RAM 2 & 4WD 1500 PART # P5058
 INSTALLATION INSTRUCTIONS 2009-13 DODGE RAM 2 & 4WD 1500 PART # P5058 PARTS LIST: Qty Description Qty Description 1 Grille Guard 12 12-1.75mm Hex Nuts 2 Upper Frame Mounting s (for trucks without tow hooks
INSTALLATION INSTRUCTIONS 1PC FRONT BUMPER JEEP JK WRANGLER
 INSTALLATION INSTRUCTIONS PARTS LIST: 1 1PC Bumper 2 8mm x 25mm Hex Bolts 1 Bull Nose Hoop 2 8mm x 16mm Hex Bolts 1 Fairlead Mounting Bracket 6 8mm x 24mm x 2mm Flat Washers 8 12mm x 35mm Hex Bolts 4 8mm
(2) Plastic Plugs (2) Frame Bracket. Spacers. License Plate Bracket. (2) 12mm Single Bolt Plates. (2) 12mm Double Bolt Plates
 Plastic Plugs (2) Frame Bracket. Spacers. License Plate Bracket. (2) 12mm Single Bolt Plates. (2) 12mm Double Bolt Plates") LDB-CSIL26-FB PARTS LIST: 1 LD1 Bumper Assembly 10 12mm Hex Nuts 1 Driver/left Frame Mounting 6 10-1.5mm x 35mm Hex Bolts 1 Passenger/right Frame Mounting 12 10mm x 27mm OD x 3mm Flat Washers 2 Spacers
LDB-CSIL26-FB PARTS LIST: 1 LD1 Bumper Assembly 10 12mm Hex Nuts 1 Driver/left Frame Mounting 6 10-1.5mm x 35mm Hex Bolts 1 Passenger/right Frame Mounting 12 10mm x 27mm OD x 3mm Flat Washers 2 Spacers
Passenger/Right Center and Rear Support Brackets. Driver/Left Center and
 PARTS LIST: 1 Driver/Left HD Running Board 24 8mm x 24mm OD x 2mm Flat Washers 1 Passenger/Right HD Running Board 12 s 3 Driver/Left front, passenger center/rear Support Brackets 6 8mm-1.25 Hex Nuts 3
(2) 12mm x 40mm Bolt Plate (long) pictured w/plastic retainer. (6) 12mm x 40mm Bolt Plate (short) Support Bracket Driver/left Front
 12mm x 40mm Bolt Plate (long) pictured w/plastic retainer. (6) 12mm x 40mm Bolt Plate (short) Support Bracket Driver/left Front") PARTS LIST: 1 Driver/left Running Board w-1 Backing 8 12mm Plastic Retainers 1 Passenger/right Running Board w-1 Backing 8 12mm x 32mm x 3mm Flat Washers 2 2 inch tall rubber backing (SX & Limited only)
PARTS LIST: 1 Driver/left Running Board w-1 Backing 8 12mm Plastic Retainers 1 Passenger/right Running Board w-1 Backing 8 12mm x 32mm x 3mm Flat Washers 2 2 inch tall rubber backing (SX & Limited only)
INSTALLATION INSTRUCTIONS
 TEL:1-866-XANATOS INSTALLATION INSTRUCTIONS FOR 2017-2018 NISSAN TITAN (EXCLUDES TITAN XD MODELS) PART#AB-NI20 PARTS LIST: 1 Bull Bar 2 8mm Nylon Lock Nuts 1 Driver/Left Side Bull Bar Bracket 2 8-1.25mm
Support. (3)Passenger Support. Brackets. (2) Running Board (example only)
Passenger Support. Brackets. (2) Running Board (example only)") IB(5,4)) RUNNING BOARD PARTS LIST: Item QTY Description Item QTY Description #01 2 Running Board(use for left or right) #10 12 8mm Lock Washers #02 3 Driver Mounting (/Center/Rear) #11 6 8mm Hex Nuts #03
IB(5,4)) RUNNING BOARD PARTS LIST: Item QTY Description Item QTY Description #01 2 Running Board(use for left or right) #10 12 8mm Lock Washers #02 3 Driver Mounting (/Center/Rear) #11 6 8mm Hex Nuts #03
TYGER GUARD. Parts List BEFORE INSTALLATION WARNING TG-GD6D /7. Tyger Guard. Tube Brackets (Bull Bar) passenger or driver side
 passenger or driver side") TYGER GUARD TM BEFORE INSTALLATION TG-GD6D60068 READ INSTRUCTIONS CAREFULLY BEFORE STARTING INSTALLATION. REMOVE CONTENTS FROM BOX AND VERIFY ALL PARTS ARE PRESENT. ASSISTANCE IS RECOMMENDED. CUTTING IS
TYGER GUARD TM BEFORE INSTALLATION TG-GD6D60068 READ INSTRUCTIONS CAREFULLY BEFORE STARTING INSTALLATION. REMOVE CONTENTS FROM BOX AND VERIFY ALL PARTS ARE PRESENT. ASSISTANCE IS RECOMMENDED. CUTTING IS
INSTALLATION INSTRUCTIONS PART#:17A045200MSS\17A045200MA MODULAR GRILL GUARD FOR FORD SUPER DUTY F250/F
 INSTALLATION INSTRUCTIONS PART#:17A045200MSS\17A045200MA MODULAR GRILL GUARD FOR FORD SUPER DUTY F250/F350 08-09 1 guard, center section 1 brush guard, left side 1 brush guard, right side 1 wire guard
TYGER GUARD. Parts List BEFORE INSTALLATION WARNING TG-GD6C /5
 TYGER GUARD TM BEFORE INSTALLATION READ INSTRUCTIONS CAREFULLY BEFORE STARTING INSTALLATION. REMOVE CONTENTS FROM BOX AND VERIFY ALL PARTS ARE PRESENT. ASSISTANCE IS RECOMMENDED. FAILURE TO IDENTIFY DAMAGE
irunning Board Installation Instruction
 Item Part Name QTY Item Part Name QTY 1 Step Bar 2 13 M10 Revit Insert Nuts 5 2 Passenger/Right Mounting Bracket(RB) 3 14 M10-1.5mm x 30mm Hex Bolts 5 3 Driver/Left Front Mounting Bracket(LFB) 1 15 Plastic
TEL:1-866-XANATOS INSTALLATION INSTRUCTIONS GRILL GUARD FOR FORD EXPLORER PART # 17FJ26MA
 \ TEL:1-866-XANATOS INSTALLATION INSTRUCTIONS GRILL GUARD FOR FORD EXPLORER 02-05 PART # 17FJ26MA NOTE: Please read this information before assembling. Complete step by step instruction sheets will be
Grille Guard. Part No. E0026S/B. Dodge Ram Promaster 1500/2500/3500 Cargo Van (Full size) PARTS LIST: Qty Part Description Qty Part Description
 PARTS LIST: Qty Part Description Qty Part Description") ` Grille Guard Part No. E0026S/B www.fx-products.com Fits: 2014 - Current Dodge Ram Promaster 1500/2500/3500 Cargo Van (Full size) PARTS LIST: Qty Part Description Qty Part Description 1 Runner Grille
` Grille Guard Part No. E0026S/B www.fx-products.com Fits: 2014 - Current Dodge Ram Promaster 1500/2500/3500 Cargo Van (Full size) PARTS LIST: Qty Part Description Qty Part Description 1 Runner Grille
TYGER ARMORTM. Parts List BEFORE INSTALLATION WARNING. Customer Support TG-AM2C /8. x1 Driver/Left Side Armor
 TYGER ARMORTM TG-AM2C20028 Customer Support Parts List x1 Driver/Left Side Armor BEFORE INSTALLATION READ INSTRUCTIONS CAREFULLY BEFORE STARTING INSTALLATION. REMOVE CONTENTS FROM BOX AND VERIFY ALL PARTS
INSTALLATION INSTRUCTIONS
 INSTALLATION INSTRUCTIONS SPORTSMAN WINCH MOUNT GRILLE GUARD APPLICATION: 2016-2018 Toyota Tacoma PART NUMBER: 40-93885, 45-93880, 46-23885 ITEM QUANTITY DESCRIPTION TOOLS NEEDED 1 1 WINCH TRAY 15MM SOCKET
Installation Instructions
 Installation Instructions Sure Step (Part # DN260-S4B/ DN260-S4S Part # DN270-S4B/ DN270-S4S) 2009-2010 Dodge Ram1500 Crew Cab & Quad Cab 2010 Ram 2500/3500 Crew Cab For Technical Support/Warranty Information
INSTALLATION INSTRUCTIONS
 AUTOMOTIVE PRODUCTS, INSTALLATION INSTRUCTIONS PLATINUM 4 OVAL STEP BAR (90 BENT END) APPLICATION: 2010-2015 Dodge Ram 2500/3500 Mega Cab PART NUMBER: 21-3570, 21-3575, 23-3570, 23-3575, 25-3570, 25-3575,
INSTALLATION MANUAL FRONT. See pages 2 and 3 of this manual for configuration options. Level of Difficulty. Product Photo (center section only)
") INSTALLATION MANUAL FRONT Level of Difficulty Moderate Product Photo (center section only) All hardware listed below will be provided with the bumpers center section. Additional hardware will be supplied
INSTALLATION MANUAL FRONT Level of Difficulty Moderate Product Photo (center section only) All hardware listed below will be provided with the bumpers center section. Additional hardware will be supplied
INSTALLATION INSTRUCTIONS PART#:17GT23MSS\17GT23MA MODULAR GRILL GUARD FOR CHEVY SILVERADO 1/2 TON 99-02
 INSTALLATION INSTRUCTIONS PART#:17GT23MSS\17GT23MA MODULAR GRILL GUARD FOR CHEVY SILVERADO 1/2 TON 99-02 1 guard, center section 1 brush guard, left side 1 brush guard, right side 1 wire guard insert,
INSTALLATION INSTRUCTIONS CONTOURED LIGHT BAR APPLICATION: CHEVY EQUINOX/ GMC TERRAIN PART NUMBERS: ,
 INSTALLATION INSTRUCTIONS CONTOURED LIGHT BAR APPLICATION: 2010-2014 CHEVY EQUINOX/ GMC TERRAIN PART NUMBERS: 32-21020, 32-21025 ITEM QUANTITY DESCRIPTION TOOLS NEEDED 1 1 CONTOUR BAR TORQUE WRENCH 2 1
INSTALLATION INSTRUCTIONS
 INSTALLATION INSTRUCTIONS PROTRAXX OVAL STEP BAR APPLICATION: 2009-2017 Dodge Ram 1500 Crew/Quad Cab 2010-2017 Dodge Ram 2500/500 Crew Cab PART NUMBER: 21-550, 21-555, 21-50, 21-55 AUTOMOTIVE PRODUCTS,
4" Oval Nerf Bar. Part No. A1007S/B. PARTS LIST: Qty Part Description Qty Part Description
 4" Oval Nerf Bar Part No. A1007S/B Fits: 2009 - Current Dodge Ram 1500 Crew Cab 2001 - Current Dodge Ram 2500/3500 Crew Cab REMOVE CONTENTS FROM BOX. VERIFY ALL PARTS ARE PRESENT. 60-180 min Cutting Not
INSTALLATION INSTRUCTIONS
 INSTALLATION INSTRUCTIONS R5 STEP BOARD APPLICATION: 2009-2017 Dodge Ram 1500 Quad / Crew Cab 2010-2017 Dodge Ram 2500/3500 Crew Cab PART NUMBER: 28-51040, 28-51045, 28-51050, 28-51055 ITEM QUANTITY DESCRIPTION
INSTRUCTIONS INSTRUCCIONES CONSIGNES
 AUTOMOTIVE PRODUCTS, INC. INSTRUCTIONS INSTRUCCIONES CONSIGNES APPLICATION: 2007 13 CHEVY SILVERADO 1500 (except Classic ) MAX WINCH TRAY: HDX 46-22275 SPORTSMAN WINCH MOUNT GRILLE GUARD: 45-92270, 40-92275
INSTRUCTIONS INSTRUCCIONES CONSIGNES
 AUTOMOTIVE PRODUCTS, INC. INSTRUCTIONS INSTRUCCIONES CONSIGNES APPLICATION: 2007-2010 CHEVY/GMC SILVERADO/SIERRA 2500/3500 (EXCLUDES CLASSIC) APP PART #46-23715, 40-92315/45-92310 MAX WINCH TRAY, SPORTSMAN
INSTRUCTIONS INSTRUCCIONES CONSIGNES
 AUTOMOTIVE PRODUCTS, INC. INSTRUCTIONS INSTRUCCIONES CONSIGNES APPLICATION: GMC SIERRA 1500 HDX & SPORTSMAN GRILLE GUARDS (2014 & UP) APPLICATION PART # S 57-3690, 57-3695, 40-3695, 45-3690 ITEM QUANTITY
CRITICAL INFORMATION:
 IMPORTANT ALERT: GM uses a very strong thread-locking compound on all body bolts. Use of an air assisted impact ratchet can cause damage to the threads on factory body mount bolts and the internal nut
INSTALLATION INSTRUCTIONS
 INSTALLATION INSTRUCTIONS E-SERIES STEP BARS / 4 OVAL STEP BARS APPLICATION: 2011-2017 Jeep Grand Cherokee PART NUMBER: 23-3610, 23-3615, 21-3610, 21-3615, 23-73610 ITEM QUANTITY DESCRIPTION TOOLS NEEDED
MODULAR BUMPER INSTALLATION MANUAL
 MODULAR BUMPER INSTALLATION MANUAL Parts List* 1 Center section 1 Side extension, passenger / right 1 Side extension, driver / left 1 Side cap, passenger / right 1 Side cap, driver / left 1 Brush guard,
INSTALLATION INSTRUCTIONS
 INSTALLATION INSTRUCTIONS SNYPER TUBULAR FENDERS APPLICATION: 2007-2017 Jeep Wrangler JK PART NUMBER: 62-1005, 62-1015 ITEM QUANTITY DESCRIPTION TOOLS NEEDED 1,2 2 FRONT FENDERS, DRIVER (1) AND PASSENGER
Installation Instructions: Bumper (Part # SB76850) XJ Jeep Cherokee XRC Rear Bumper
 XJ Jeep Cherokee XRC Rear Bumper") NOTE: Carefully read entire instructions thoroughly before attempting to install this part. Parts Included Qty 93-7789 XJ XRC 1 93-7807 Bumper Mount Bracket: Drvr 1 93-7811 Bumper Mount Bracket: Pass 1
NOTE: Carefully read entire instructions thoroughly before attempting to install this part. Parts Included Qty 93-7789 XJ XRC 1 93-7807 Bumper Mount Bracket: Drvr 1 93-7811 Bumper Mount Bracket: Pass 1
INSTALLATION INSTRUCTIONS 3000 SERIES STEP GUARD (CENTER GRILLE GUARD & BRUSH GUARDS) CHEVROLET SILVERADO 2500 & /4WD PART # 3168 (MB-MC)
 CHEVROLET SILVERADO 2500 & /4WD PART # 3168 (MB-MC)") INSTALLATION INSTRUCTIONS 3000 SERIES STEP GUARD (CENTER GRILLE GUARD & BRUSH GUARDS) CHEVROLET SILVERADO 2500 & 3500 2/4WD PART # 3168 (MB-MC) PACKING LIST 2 ¼ X ¾ BUTTON HEAD BOLTS 8 5/16 X 3/4 BUTTON
INSTALLATION INSTRUCTIONS 3000 SERIES STEP GUARD (CENTER GRILLE GUARD & BRUSH GUARDS) CHEVROLET SILVERADO 2500 & 3500 2/4WD PART # 3168 (MB-MC) PACKING LIST 2 ¼ X ¾ BUTTON HEAD BOLTS 8 5/16 X 3/4 BUTTON
INSTALLATION INSTRUCTIONS
 Do not attempt to install this product on any vehicle other than the one it is designed for and listed above! Parts List 10 3/8 X 1 1/4 Hex Bolt 10 3/8 Lock Washer 4 3/8 Hex Nut 4 3/8 Flat Washer 2 3169)
INSTALLATION INSTRUCTIONS
 PART NO. 3373MB 3373MC 3373MH PRODUCT DESCRIPTION: 3000 SERIES STEP GUARD BLACK (GRILLE GUARD & BRUSH GUARDS) 3000 SERIES STEP GUARD CHROMED (GRILLE GUARD & BRUSH GUARDS) 3000 SERIES STEP GUARD BLACK/CHROMED
INSTALLATION INSTRUCTIONS
 AUTOMOTIVE PRODUCTS, INSTALLATION INSTRUCTIONS ROCK SLIDERS APPLICATION: 2007-2017 Jeep Wrangler JK 2 Door PART NUMBER: 42-7005 ITEM QUANTITY DESCRIPTION TOOLS NEEDED 1,2 2 ROCK SLIDER ASSEMBLY, DRIVER
FRONT BUMPER INSTALLATION INSTRUCTIONS Toyota 4Runner
 Aluminess Products Inc 9402 Wheatlands Ct. #A Santee, CA 92071 619-449-9930 FRONT BUMPER INSTALLATION INSTRUCTIONS 2003-2009 Toyota 4Runner Please read before beginning Stainless steel hardware may bind
INSTALLATION INSTRUCTIONS
 INSTALLATION INSTRUCTIONS PART#:17TS26MSS\17TS26MA MODULAR GRILL GUARD FOR TOYOTA SEQUOIA 2/4WD 01-04 1 guard, center section 1 brush guard, left side 1 brush guard, right side 1 wire guard insert, left
3000 SERIES STEPGUARD
 3000 SERIES STEPGUARD GRILLE GUARD ASSEMBLY INSTRUCTIONS PART NO. 3295B & 3295C 2015 FORD F-150 Do not attempt to install this product on any vehicle other than the one it is designed for and listed above!
TIRE RACK INSTALLATION INSTRUCTIONS Dodge Sprinter
 Aluminess Products Inc 9402 Wheatlands Ct. #A Santee, CA 92071 619-449-9930 TIRE RACK INSTALLATION INSTRUCTIONS 07-11 Dodge Sprinter Please read before beginning Stainless steel hardware may bind together
3000 SERIES STEPGUARD
 3000 SERIES STEPGUARD COMPLETE GRILLE & BRUSH GUARD ASSEMBLY INSTRUCTIONS PART NO. 3293MB, 3293MC & 7293MPS 2009 FORD F-150 2/4WD Do not attempt to install this product on any vehicle other than the one
IMPORTANT: WILL NOT FIT COUNTRYMAN MODELS
 Part #1410-0102-07 2 3 1 IMPORTANT: WILL NOT FIT COUNTRYMAN MODELS Apply masking tape around the bottom grille opening and across the bottom of the upper facto ry grille.. Open the hood and remove the
INSTALLATION INSTRUCTIONS
 INSTALLATION INSTRUCTIONS Trans4mer Grille Guard/Winch Mount Kit 7646 & 766 For GMC Sierra 500 As you read these instructions, you will see NOTES, CAUTIONS and WARNINGS. Each message has a specific purpose.
Installation Instructions:
 NOTE: Carefully read entire instructions thoroughly before attempting to install this part. Parts Included: Qty 93-326EP009 Front Armor: Drvr 1 93-326EP010 Front Fender: Pass 1 90-6774m Hardware Pack:
INSTALLATION INSTRUCTIONS
 INSTALLATION INSTRUCTIONS Trans4mer Grille Guard/Winch Mount Kit 76139 & 7643 For Chevrolet Silverado 1500 As you read these instructions, you will see NOTES, CAUTIONS and WARNINGS. Each message has a
RBP-1215B-RX DODGE RAM QUAD CAB RX3
 RBP-1215B-RX3 2002-2017 DODGE RAM 15-3500 QUAD CAB RX3 Passenger side RX-3 Side Step Drill Template Passenger side rear Modular Bracket (6) L Support Brackets Driver side rear Modular Bracket Driver side
ZROADZ Grille series - LED Installation Guide
 ZROADZ Grille series - LED Installation Guide START HERE The ZROADZ Series Grilles comes into 2 different configurations. One style features the LED Light Bar mounting hidden on the backside, while the
INSTALLATION INSTRUCTIONS
 INSTALLATION INSTRUCTIONS Trans4mer Grille Guard/Winch Mount For 2007 Chevrolet Silverado 1500 and GMC Sierra 1500 Kit 75230 (Black) and 76007 (Stainless) Your safety, and the safety of others, is very
INSTALLATION INSTRUCTIONS
 INSTALLATION INSTRUCTIONS Trans4mer Mounting System Dodge Ram Kit No. 65220, 73132, 75525, 76253 (black) or 65221, 73133, 75530, 76254 (stainless) As you read these instructions, you will see NOTES, CAUTIONS
INSTALLATION INSTRUCTIONS
 PART NO. 911000T 911000PS 915000T 915000PS PRODUCT DESCRIPTION: Sport Bar 2.0, Full size Textured Black Sport Bar 2.0, Full size Polished Stainless Steel Tubes Sport Bar 2.0, Mid size Textured Black PRODUCT
IMPORTANT: PLEASE RETAIN THIS INSTRUCTION MANUAL FOR FUTURE REFERENCE
 IMPORTANT: PLEASE RETAIN THIS INSTRUCTION MANUAL FOR FUTURE REFERENCE 005-07 Cadillac STS Classic 3D Z, Classic Dual Weave, Classic Mesh & Classic Black Mesh Grilles B 7 HR 3 STS Classic 3D Z Grille Part
INSTALLATION INSTRUCTIONS
 INSTALLATION INSTRUCTIONS Trans4mer Grille Guard/Winch Mount Kit 6367 For Chevrolet Silverado 1500, Suburban 1500 and Tahoe As you read these instructions, you will see NOTES, CAUTIONS and WARNINGS. Each
Hiniker Company th St. P.O. Box 3407 Mankato, MN VEHICLE INSTALLATION INSTRUCTIONS FOR: CHEV/GMC 4x4: K1500 SILVERADO/SIERRA
 VEHICLE INSTALLATION INSTRUCTIONS FOR: CHEV/GMC x: 007 03 K500 SILVERADO/SIERRA Page of 5 Hiniker Company 58766 0th St. P.O. Box 307 Mankato, MN 5600 INSTRUCTION SHEET NO: 505 Rev. A August 0, 03 IMPORTANT:
FENDER FLARE. KIT CONTAINS Qty Part Description Qty Part Description TOOLS REQUIRED
 ` FENDER FLARE Part No: FFD3001S TO AVOID BEING SCRATCHED, PLEASE PROTECT THE SURFACE OF THE FENDER FLARE CAREFULLY. REMOVE CONTENTS FROM BOX. VERIFY ALL PARTS ARE PRESENT. 60-180 min Cutting Not Required
RH-412 STEEL DOORS INSTALLATION INSTRUCTIONS
 RH-412 STEEL DOORS INSTALLATION INSTRUCTIONS By following the steps outlined below, the assembly, installation and adjustment of the steel doors, will be a simple process. Let s start with the Driver Side.
Contractors Rack Assembly and Installation Instructions
 Part # 18601 & 16601 Contractors Rack Assembly and Installation Instructions 4751 Littlejohn St. Unit A, Baldwin Park, CA 91706 Page 1 of 12 11/13/08 Thank you for purchasing the Paramount Restyling Contractors
4832A Installation Sheet Part List
 4832A Installation Sheet Part List (1) 4016A-43-003 Qty 1- (2) 4016A-43-002 Qty 1- (3) 4016A-43-001 Qty 2- (4) 4016A-10-005 Qty 1- (5) 4016A-43-004L Qty 1- Mounting Bolt Kit (A) (K) Qty 2 - Qty 6 - M10
INSTALLATION INSTRUCTIONS RH 412 STEEL DOORS
 By following the steps outlined below, the assembly, installation and adjustment of the steel doors, will be a simple process. Let s start with the Driver Side. Note: Having the hood open makes the job
WARNING. Failure to observe these instructions could lead to severe injury or death.
 INSTALLATION INSTRUCTIONS WINCH MOUNTING KIT Part Number: 80156, 80160 Application: 2008 Ford F150 Your safety, and the safety of others, is very important. To help you make informed decisions about safety,
INSTALLATION INSTRUCTIONS MAIN BAR TIPO B 90002, 91002, 91502, 92002, 93002, 94002, 95002, 96002, y PS / B / C
 Parts List: i) 4-7/16" Plastic cap Not Includes: a) 1- Driver Leg 8-3/8x1 1/2" Flat washer Kicker b) 1- Passenger Leg 8-3/8" Hex nut c) 1- Cross bar 4-3/8x 1 1/2" Carriage bolt d) 2- Mounting plate 4-3/8x
INSTALLATION INSTRUCTIONS
 INSTALLATION INSTRUCTIONS Trans4mer Gen II Mount System For 2011-2012 Dodge Ram HD 4500/5500 Bracket Kit 90160 Your safety, and the safety of others, is very important. To help you make informed decisions
Page 1 of 12 DZ /02/15
 Page 1 of 12 Dee Zee Running Board Installation Instructions Congratulations on your purchase of a quality Dee Zee product. Dee Zee is recognized as having the highest quality running boards and accessories
Melamine Plastic Laminate. Toilet Partition Installation Manual
 Melamine Plastic Laminate Toilet Partition Installation Manual PHONE: FAX: 1-866-317-2786 ATTENTION DO NOT MIX FASTENER PACKS EACH FASTENER PACK HAS THE NECESSARY BOLTS, BARRELS AND SCREWS TO INSTALL THE
INSTALLATION INSTRUCTIONS
 INSTALLATION INSTRUCTIONS Trans4mer Grille Guard/Winch Mount Kit 6334 For Chevrolet Silverado 500HD & 3500 This WARN Trans4mer system can be customized to give your Chevy Silverado a wide variety of looks,
INSTALLATION INSTRUCTIONS
 INSTALLATION INSTRUCTIONS Trans4mer Grille Guard/Winch Mount For Chevrolet Silverado 1500HD & 2500 Kit 68162 This WARN Trans4mer system can be customized to give your Chevy Silverado a wide variety of
Toyota 4 Runner and Lexus GX Skid Plate installation instructions.
 Toyota 4 Runner and Lexus GX Skid Plate installation instructions. NOTE: When installing the full set of skid plate start at the rear of the vehicle and work your way forward. NOTE: Torque Specs: Tighten
INSTALLATION INSTRUCTIONS
 INSTALLATION INSTRUCTIONS Trans4mer Gen II Mount System For 2008 Ford Super Duty Kit 80140 (Large Frame Black) and Kit 80150 (Mid Frame Black) and Kit 80155 (Mid Frame Stainless) Your safety, and the safety
WARNING: Read all instructions before assembling this product. KEEP INSTRUCTIONS FOR FUTURE USE
 MARCELINE TWIN OVER TWIN BUNK BED INSTRUCTIONS Distributed in the U.S.A by: Restoration Hardware Baby & Child 11640 Harrel St. Suite B Mira Loma, California 91752 rhbabyandchild.com Distributed in Canada
TRIUMPH TIGER 800 PD NERF
 TRIUMPH TIGER 800 PD NERF 0505-0 Step Before you begin, place the bike on a hard level surface where you have room to work. Lay out the parts included in this kit and compare to the parts list on page
This manual will aid in the assembly of the FireBall V90 and FireBall X90. The assembly of both machines will be identical, unless specified.
 This manual will aid in the assembly of the FireBall V90 and FireBall X90. The assembly of both machines will be identical, unless specified. Step #1 Lay all parts out to verify quantities. (2) 2 x 25-1/4
Framed Perimeter Grille
 Installation Instructions Part Number 89053 I-sheet Rev. A2! CAUTION PRECAUCIÓN ATTENTION Framed Perimeter Grille For proper installation and best possible fit, please read all instructions BEFORE you
Kai Installation Instructions
 Kai Installation Instructions Before Beginning Installation Read through the entire instruction thoroughly A minimum of 2 people are required for this assembly These instructions reflect typical assemblies;