4832A Installation Sheet Part List
|
|
|
- Jeffery Higgins
- 5 years ago
- Views:
Transcription
 4016A-43-002 Qty")
 4016A-43-004L Qty")

 (N) Qty 6 - Qty 1 -")
 (O) Qty 4 - Qty 2-5/16\" x 3/4\"")

4016A-43-004R Qty 1-")
")


1 4832A Installation Sheet Part List (1) 4016A Qty 1- (2) 4016A Qty 1- (3) 4016A Qty 2- (4) 4016A Qty 1- (5) 4016A L Qty 1- Mounting Bolt Kit (A) (K) Qty 2 - Qty 6 - M10 x 25mm Hex Bolt 1/4"-20 Nyloc Nut (B) (M) Qty 4 - Qty 2 - M10 Lock Washer 1/4" Lock Washer (C) (N) Qty 6 - Qty 1 - M10 Flat Washer 5/16" x 3/4" Self Tapping Bolt (D) (O) Qty 4 - Qty 2-5/16" x 3/4" Carriage Bolt M8 x 25mm Hex Bolt (P) Qty 4 - Qty 1-5/16" Flat Washer M8 x 45mm Hex Bolt (F) (Q) Qty 4 - Qty 1-5/16"-18 Nylock Nut M8 Nyloc Nut (6)4016A R Qty 1- (7)4016A Qty 1- (G) (R) Qty 4 - Qty 2-3/8" Nylon Spacer M6 x 25mm Hex Bolt (I) (S) Qty 6 - Qty 2-1/4"-20 x 7/8" Hex Bolt 5/16 x 1.25" Self-tapping screws (J) (T) Qty 14 - Qty 2-1/4" Flat Washer 3/8"-16 x 1" Carriage Bolt (H) (U) Qty 2- Qty 3-3/8"-16 Nylock Nut 5/16" Lock Washer For TECHNICAL SUPPORT Call: Monday - Friday 7:00 A.M. to 4:00 P.M (PST)


2 4832A Installation Instructions for Ford Transit Connect Step 1 Assemble 4832A Instructions are for Passenger side of vehicle. Mirror instructions if installing on Driver side. Step 2 Remove D-Ring from floor of van located on the passenger side near the sliding door. ** Keep Bolt D-Ring location Step 3 Locate weldnut in "C" pillar behind the sliding door.
, one M10 lock washer (B) and one M10 flat washer (C).")


 to the weldnut found in previous step using one")

3 Step 4 Bolt 4016A (1) to the weldnut found in previous step using one M10 hex head bolt (A), one M10 lock washer (B) and one M10 flat washer (C). *Typical installs use the bottom-right slot in the bracket to mount to the "C" pillar. Be sure to have the flange towards the sliding door. **SNUG TIGHTEN (1) (C) (B) (A) Step 5 Locate weldnut in "D" pillar in the rear of the van. This is accessed through the rear doors. The weldnut is located halfway up the "D" pillar. Step 6 Bolt 4016A (2) to the weldnut found in previous step using one M10 hex head bolt (A), one M10 lock washer (B) and one M10 flat washer (C). *Typical installs use the bottom slot in the bracket. Be sure to have the 6 slot face towards the inside of the vehicle. **SNUG TIGHTEN (2) (C) (A) (B)
. *Use the inside slots to mount to shelf.")
 (F) (D) Step 8 Place shelf into passenger side of vehicle.")
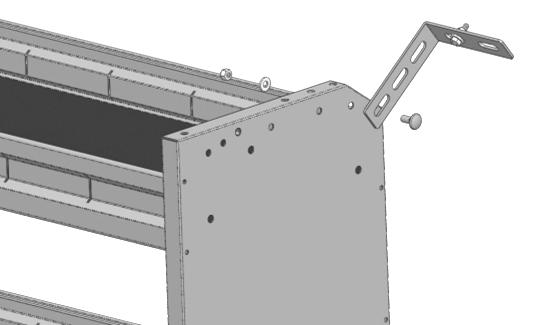
4 Step 7 Bolt 4016A (3) to the bottom of the shelf siding using two 5/16" carriage bolts (D), two 5/16" flat washers and two 5/16" NYLOC nuts (F). *Use the inside slots to mount to shelf. Be sure the orientation is as shown in the image. SNUG TIGHTEN (3) (F) (D) Step 8 Place shelf into passenger side of vehicle. The previously installed bracket ( ) will line up with the D-Ring from Step 2.
 (3).")
 (G) Step 9 Bolt bracket 4016A-43-002 (2) to the")
 and one 1/4\" NYLOC nut (K).")

5 Step 9 Bolt shelf to floor using the D-Ring removed in step 2. Bolt through the rear most slot in bracket (4016A ) (3). Place two nylon spacers (G) in between bracket and floor. SNUG TIGHTEN (3) (G) Step 9 Bolt bracket 4016A (2) to the rear of the shelf using one 1/4" x 7/8" hex bolt (I), two 1/4" flat washers (J) and one 1/4" NYLOC nut (K). Bolt through the 2nd from the top hole, closest to the tapered corner. (see picture) *Typical installation uses the bottom-left most slot on the bracket. SNUG TIGHTEN (J) (I) (2) (K)
, two 1/4\" flat")

 *Typical installation uses the bottom-right")
6 Step 10 Bolt bracket 4016A (1) to the rear of the shelf using one 1/4" x 7/8" hex bolt (I), two 1/4" flat washers (J) and one 1/4" NYLOC nut (K). Bolt through the 2nd from the top hole, closest to the tapered corner on the shelf. (see picture) *Typical installation uses the bottom-right most slot on the bracket. SNUG TIGHTEN (1) (J) (K) (I)

 provided in the hardware kit.")
7 Step 11 Align and position shelf to your liking. Go back and tighten all bolts. Step 12 We recommend securing the rear shelf panel to the floor using two self-tapping screws(s) provided in the hardware kit. (see picture) Your installation is now complete.


8 4832A Installation Instructions for NV200 / City Express Step 1 Assemble 4832A Instructions are for Passenger side of vehicle. Mirror instructions if installing on Driver side. Step 2 Remove D-Rings from floor of van located on the passenger side near the sliding door and in the rear of the vehicle near the back door. ** Keep Bolt D-Ring locations
, one flat washer and one 5/16\" NYLOC nut (F).")
 will line up with the rear DRing mount.")

 (F) (D) (U) (3) (G) Step 4 Bolt front of shelf to floor using")
9 Step 3 Bolt 4016A (3) to the bottom of the shelf panel using one 5/16" carriage bolt (D), one flat washer and one 5/16" NYLOC nut (F). Place shelf into passenger side of vehicle. Bracket (4016A ) will line up with the rear DRing mount. Bolt rear of shelf using a M8 x 45mm hex head (P), one lock washer (U), and one flat washer. Place three nylon spacers (G) under the bracket as shown in the picture. SNUG TIGHTEN (P) (F) (D) (U) (3) (G) Step 4 Bolt front of shelf to floor using the D-Ring removed in step 2. Bolt through the rear most slot in the side panel. Place one nylon spacers (G) (if needed) in between panel and floor. SNUG TIGHTEN
 to the shelf using ¼ hex head bolt (I), with two flat washers (J), and one ¼ nylock nut (K).")
 and one flat washer.")
10 Step 5 Bolt 4016A (4) to the weldnut using one M8 hex head bolt (O), one lock washer (U) and one flat washer. Use the top weldnut. Bolt 4016A (4) to the shelf using ¼ hex head bolt (I), with two flat washers (J), and one ¼ nylock nut (K). **SNUG TIGHTEN (J) (U) (I) (O) (4) (J) (K) Step 5 Bolt 4016A (7) to the upper rear weldnut using a M8 hex head bolt (O), one lock washer (U) and one flat washer. Bolt 4016A (7) to the shelf using ¼ hex head bolt (I), with two flat washers (J), and one ¼ nylock nut (K). (7) (K) (O) (J) (U) (I)

11 Step 11 Align and position shelf. Go back and tighten all bolts. Your installation is now complete.


, one")
 (F) (1) Step 3 Bolt 4016A-10-005 (4)")
12 4832A Installation Instructions for Promaster City Step 1 Assemble 4832A Instructions are for Passenger side of vehicle. Mirror instructions if installing on Driver side. Step 2 Bolt 4016A (1) to side of shelf using one 5/16" carriage bolt (D), one flat washer and one 5/16" NYLOC nut (F). Rear (D) (F) (1) Step 3 Bolt 4016A (4) to the rear side panel of the shelf using one 5/16" carriage bolt (D), one flat washer and one 5/16" NYLOC nut (F). (F) (4) (D)


13 Step 2 Remove D-Rings from floor of van located on the passenger side near the sliding door and in the rear of the vehicle near the back door. D-Ring locations Step 3 Locate the welded stud bolt in the side panel of the vehicle underneath the plastic cap. Step 4 Place shelf assembly into passenger side of van. Be sure to have the tapered corners closest to the van wall. The wheel well should go in between the shelf side panels.
.")


. (G) (2) (F) *Steel shelf is shown.")
14 Step 5 Mount 4016A (2) to welded bolt in the side panel using a flat washer and one M8 NYLOC nut (Q). (B) (2) (D) Step 6 In the rear of the van, mount 4016A (4) to the "D" pillar. Bolt through the bracket and into a slot near the rear door. You can access the backside of mounting location. Bolt using one 1/4" x 7/8" hex bolt (I), two flat washers (J) and one 1/4"-20 NYLOC nut (K). (G) (2) (F) *Steel shelf is shown. Aluminum shelf will mount the same.* ** In some circumstances, different mounting slots and holes may be used to secure shelf.**


15 Step 7 Secure shelf to floor by bolting through each end panel into D-Ring mounting locations. Use D-Ring bolts to mount into floor. Place a nylon spacer (G) in between floor and shelf panel. (G) Your installation is now complete **Steel shelf shown**
4832L Installation Sheet Part List
 4832L Installation Sheet Part List (1) 4016L-43-003 Qty 1- (2) 4016L-43-002 Qty 1- (3) 4016L-43-001 Qty 2- (4) 4016L-10-005 Qty 1- (5) 4016L-43-004L Qty 1- (6)4016L-43-004R Qty 1- (7)4016L-43-006 Qty 1-
40670 Transit Connect/NV200/City Express/ProMaster City Partition
 40670 Transit Connect/NV200/City Express/ProMaster City Partition Top Panel (1) Bottom Panel (1) Transit Connect (2014) Top Angle (1) TC Top MNT BRKT (2) TC Bottom MNT PLT (2) NV200/City Express Top Mount
Installation Guide 40670
 Installation Guide 40670 Kargo Master Rancho Cordova, CA 95742 800-343-7486 CustomerService@KargoMaster.com DATE: Installation Instructions 40670 *PLEASE READ ALL INSTRUCTIONS AND WARNINGS PRIOR TO ASSEMBLING,
40680 Transit Connect/NV200/City Express/ProMaster City Wire Partition
 40680 Transit Connect/NV200/City Express/ProMaster City Wire Partition Top Wire Panel (1) Bottom Wire Panel (1) Bottom Mount Panel (1) Transit Connect Top Angle (1) ProMaster City Top Panel (1) NV200/City
Installation Guide 406TH
 Installation Guide 406TH (High Roof Shown) Kargo Master Rancho Cordova, CA 95742 800-343-7486 CustomerService@KargoMaster.com DATE: Installation Instructions 406TH *PLEASE READ ALL INSTRUCTIONS AND WARNINGS
40993 Parts List. Front Bow Assy.(1) Rear Bow Assy.(1)
 Rear Bow Assy.(1)") 40993 Parts List Front Bow Assy.(1) Rear Bow Assy.(1) Rail Mnt Foot(4) Ladder Hook (2) Ladder Stop (2) Mounting Clip-ProMaster Only (6) Mounting Bracket(6) Long Mounting Rail(2) Short Mounting Rail(2)
40993 Parts List Front Bow Assy.(1) Rear Bow Assy.(1) Rail Mnt Foot(4) Ladder Hook (2) Ladder Stop (2) Mounting Clip-ProMaster Only (6) Mounting Bracket(6) Long Mounting Rail(2) Short Mounting Rail(2)
INSTALLATION GUIDE N5-DS48-4
 INSTALLATION GUIDE N5-DS48-4 Shelving ( steel ) Transit High Roof & Medium Roof Promaster Standard Roof & High Roof Nissan NV High Roof Sprinter Low Roof & High Roof Box Truck / Trailer QUICK START GUIDE
4099T Parts List. Front Bow Assy. (1) Rear Bow Assy. (1) Long Mounting Rail (2) Short Mounting Rail (2)
 Rear Bow Assy. (1) Long Mounting Rail (2) Short Mounting Rail (2)") 4099T Parts List Ver.2 Front Bow Assy. (1) Rear Bow Assy. (1) Small Mnt Foot (2) Large Mount Foot (2) Ladder Hook (2) Ladder Stop (2) Handle Extension (1) Long Mounting Rail (2) Short Mounting Rail (2)
4099T Parts List Ver.2 Front Bow Assy. (1) Rear Bow Assy. (1) Small Mnt Foot (2) Large Mount Foot (2) Ladder Hook (2) Ladder Stop (2) Handle Extension (1) Long Mounting Rail (2) Short Mounting Rail (2)
INSTALLATION INSTRUCTIONS
 NOTE: Bolts should remain hand tight until all bolts are installed. STEP 1 Installing the door base (both sides). 1. Locate the outer, roll cage, mounting bolt (passenger side is shown in the illustration).
TIRE RACK INSTALLATION INSTRUCTIONS Dodge Sprinter
 Aluminess Products Inc 9402 Wheatlands Ct. #A Santee, CA 92071 619-449-9930 TIRE RACK INSTALLATION INSTRUCTIONS 07-11 Dodge Sprinter Please read before beginning Stainless steel hardware may bind together
Instruction Guide 4A90L
 Instruction Guide 4A90L Kargo Master Rancho Cordova, CA 95742 800-343-7486 CustomerService@KargoMaster.com DATE: *PLEASE READ ALL INSTRUCTIONS AND WARNINGS PRIOR TO ASSEMBLING, INSTALLING, AND USING THIS
INSTALLATION GUIDE FTX FLOOR Ford Transit ( 148" Extended Wheelbase )
") INSTALLATION GUIDE 6540-FTX FLOOR Ford Transit ( 148" Extended Wheelbase ) QUICK START GUIDE Phase 1 - Assembly q 1.1 Setup... 3-4 Phase 2 - Installation q 2.1 Install Preparation... q 2.2 Floor Installation...
INSTALLATION GUIDE 6540-FTX FLOOR Ford Transit ( 148" Extended Wheelbase ) QUICK START GUIDE Phase 1 - Assembly q 1.1 Setup... 3-4 Phase 2 - Installation q 2.1 Install Preparation... q 2.2 Floor Installation...
55000/55010 Installation Instructions
 A. Install 55015 B. Bolt roof rails, 55020/55025, to front hoop. C. Assemble 55026 D. To install without drilling into bumper. E. If mounting directly to bumper. A. 55015 Installation Instructions 55000/55010
ASSEMBLY INSTRUCTIONS for :
 ASSEMBLY INSTRUCTIONS for : TMCS_3:1 Version 4 (916) 638-8703 (800) 343-7486 11261 Trade Center Drive Rancho Cordova, CA 95742 www.kargomaster.com Hardware Pack 80080 Hardware List Hardware Pack Cont'
INSTALLATION INSTRUCTIONS GRILLE GUARD 09-ON DODGE RAM PART #
 INSTALLATION INSTRUCTIONS GRILLE GUARD 09-ON DODGE RAM PART # PARTS LIST: Qty Description Qty Description 1 Grille Guard 8 12-1.75mm x 35mm Hex Bolts 2 Brackets (for trucks without 22 12mm x 30.1mm OD
VIEWPOINT ALUMINUM RUNNING BOARD TOYOTA RAV4
 PARTS LIST: VIEWPOINT ALUMINUM RUNNING BOARD 1 Driver/Left Running Board 4 10-1.5mm x 50mm T-Bolt 1 Passenger/Right Running Board 12 10mm Plastic Retainers 1 Driver/Left Bracket 2 10-1.50mm x 40mm Hex
ASSEMBLY INSTRUCTIONS for :
 ASSEMBLY INSTRUCTIONS for : 800 0 TMCS_3:1 (916) 638-8703 (800) 343-7486 11261 Trade Center Drive Rancho Cordova, CA 95742 www.kargomaster.com Tools Needed Hardware Pack Cont' 8' Tape Measure 1/2" End
RBP-1215B-RX DODGE RAM QUAD CAB RX3
 RBP-1215B-RX3 2002-2017 DODGE RAM 15-3500 QUAD CAB RX3 Passenger side RX-3 Side Step Drill Template Passenger side rear Modular Bracket (6) L Support Brackets Driver side rear Modular Bracket Driver side
INSTALLATION INSTRUCTIONS GRILLE GUARD RAM 1500 PART # 5058/5058-2
 INSTALLATION INSTRUCTIONS GRILLE GUARD PART # 5058/5058-2 PARTS LIST: Qty Description Qty Description 1 Grille Guard 8 12-1.75mm x 35mm Hex Bolts 2 Upper Frame Mounting s (for trucks without tow hooks
ASSEMBLY INSTRUCTIONS for : Version 4
 ASSEMBLY INSTRUCTIONS for : Version 4 Hardware Pack 80080 Hardware List Hardware Pack Cont' (a) (j) Qty 4 - Qty 32-1/2" x 2-1/4" Button Head Bolt 5/16" Nylock Nut (b) (k) Qty 4 - Qty 4-1/2" Nylock Jam
INSTALLATION GUIDE. C20-FTL STRAIGHT PARTITION Transit Partition ( Perforated Window, No Access, Steel )
") INSTALLATION GUIDE C20-FTL STRAIGHT PARTITION Transit Partition ( Perforated Window, No Access, Steel ) QUICK START GUIDE Phase 1 - Assembly q 1.1 Setup... q 1.2 Partition Assembly... 3-5 5-6 Phase 2 -
INSTALLATION GUIDE C20-FTL STRAIGHT PARTITION Transit Partition ( Perforated Window, No Access, Steel ) QUICK START GUIDE Phase 1 - Assembly q 1.1 Setup... q 1.2 Partition Assembly... 3-5 5-6 Phase 2 -
Bulkhead Model Number and
 Bulkhead Model Number 96141-3-01 and 96142-3-01 Installing your ProMaster bulkhead is very clear cut following these instructions. Before cutting or drilling in the floor, verify the location of you gas
INSTALLATION GUIDE. C20-NH STRAIGHT PARTITION Nissan NV ( Perforated Window, No Access, Steel )
") INSTALLATION GUIDE C20-NH STRAIGHT PARTITION Nissan NV ( Perforated Window, No Access, Steel ) QUICK START GUIDE Phase 1 - Assembly q 1.1 Setup... q 1.1.1 Unpack components; compare with the bill of materials...
INSTALLATION GUIDE C20-NH STRAIGHT PARTITION Nissan NV ( Perforated Window, No Access, Steel ) QUICK START GUIDE Phase 1 - Assembly q 1.1 Setup... q 1.1.1 Unpack components; compare with the bill of materials...
INSTALLATION INSTRUCTIONS DODGE RAM 2 & 4WD 1500 PART # P5058
 INSTALLATION INSTRUCTIONS 2009-13 DODGE RAM 2 & 4WD 1500 PART # P5058 PARTS LIST: Qty Description Qty Description 1 Grille Guard 12 12-1.75mm Hex Nuts 2 Upper Frame Mounting s (for trucks without tow hooks
INSTALLATION GUIDE. C30-NH STRAIGHT PARTITION Nissan NV ( Swing Door, Steel )
") INSTALLATION GUIDE C30-NH STRAIGHT PARTITION Nissan NV ( Swing Door, Steel ) QUICK START GUIDE Phase 1 - Assembly q 1.1 Setup... q 1.2 Partition assembly... 3 to 4 5 to 6 Phase 2 - Installation q 2.1 Tips
INSTALLATION GUIDE C30-NH STRAIGHT PARTITION Nissan NV ( Swing Door, Steel ) QUICK START GUIDE Phase 1 - Assembly q 1.1 Setup... q 1.2 Partition assembly... 3 to 4 5 to 6 Phase 2 - Installation q 2.1 Tips
INSTALLATION GUIDE NS Double Clamp Ladder Rack NV200 / City Express ( Aluminum )
") INSTALLATION GUIDE 1530-NS Double Clamp Ladder Rack NV200 / City Express ( Aluminum ) QUICK START GUIDE Phase 1 - Assembly q 1.1 Setup... q 1.2 Ladder Rack Assembly... 3-5 5-13 Phase 2 - Installation q
INSTALLATION GUIDE 1530-NS Double Clamp Ladder Rack NV200 / City Express ( Aluminum ) QUICK START GUIDE Phase 1 - Assembly q 1.1 Setup... q 1.2 Ladder Rack Assembly... 3-5 5-13 Phase 2 - Installation q
INSTALLATION GUIDE Locker With Top Shelf Transit Low Roof & Nissan NV Low Roof ( Aluminum )
") INSTALLATION GUIDE 7115 Locker With Top Shelf Transit Low Roof & Nissan NV Low Roof ( Aluminum ) QUICK START GUIDE Phase 1 - Assembly q 1.1 Setup... q 1.2 Locker w/ Top Shelf Assembly... 3-5 6-13 Phase
INSTALLATION GUIDE 7115 Locker With Top Shelf Transit Low Roof & Nissan NV Low Roof ( Aluminum ) QUICK START GUIDE Phase 1 - Assembly q 1.1 Setup... q 1.2 Locker w/ Top Shelf Assembly... 3-5 6-13 Phase
INSTALLATION INSTRUCTIONS SIDE BAR FORD ESCAPE & MAZDA TRIBUTE PART #
 INSTALLATION INSTRUCTIONS SIDE BAR 2008-2010 FORD ESCAPE & MAZDA TRIBUTE PART # 50136 50137 PARTS LIST: 1 Driver/Left Sidebar 2 10-1.50mm x 35mm Bolt Plate 1 Passenger/Right Sidebar 2 10-1.50mm x 30mm
NISSAN NV200 CHEVY CITY EXPRESS WALL LINER KIT INSTALLATION INSTRUCTIONS
 NISSAN NV200 CHEVY CITY EXPRESS WALL LINER KIT INSTALLATION INSTRUCTIONS NOTES: 1. Before commencing, remove all wall liners and D Rings already installed in the vehicle. 2. Consult layout PDF and compare
10-1.5mm x 40mm Hex Bolt 1 Driver/Left Front Inner Support Bracket (2WD & 4WD Vehicles W/O Skid Plate Only) 2
 2") PARTS LIST: 1 Driver/Left sidebar 4 12mm x 32mm OD x 3mm Flat Washer 1 Passenger/Right sidebar 4 12mm x 24mm OD x 2.5mm Flat Washer 1 Driver/Left Mounting Bracket 6 12mm Lock Washers 1 Passenger/Right
PARTS LIST: 1 Driver/Left sidebar 4 12mm x 32mm OD x 3mm Flat Washer 1 Passenger/Right sidebar 4 12mm x 24mm OD x 2.5mm Flat Washer 1 Driver/Left Mounting Bracket 6 12mm Lock Washers 1 Passenger/Right
INSTALLATION INSTRUCTIONS / DODGE RAM CREW CAB 2500/3500
 INSTALLATION INSTRUCTIONS 225019 / 225019-2 2010 DODGE RAM CREW CAB 2500/3500 PARTS LIST: Qty Description Qty Description 1 Driver/Left Side Bar 4 Plastic Square Retainer 1 Side Bar 2 12mm x 120mm Hex
ATTENTION: PLEASE READ AND UNDERSTAND ALL INSTRUCTIONS AND WARNINGS BEFORE ASSEMBLING, INSTALLING OR USING THIS PRODUCT.
 VAN STORAGE SOLUTIONS FOR THE WAY YOU WORK TM INSTALLATION MANUAL BULKHEAD Model Number 96101-3-01 ATTENTION: PLEASE READ AND UNDERSTAND ALL INSTRUCTIONS AND WARNINGS BEFORE ASSEMBLING, INSTALLING OR USING
MODULAR BUMPER INSTALLATION MANUAL
 MODULAR BUMPER INSTALLATION MANUAL Parts List* 1 Center section 1 Side extension, passenger / right 1 Side extension, driver / left 1 Side cap, passenger / right 1 Side cap, driver / left 1 Brush guard,
(6) Plastic Retainers. Passenger/Right. Passenger/Right Support Brackets
 Plastic Retainers. Passenger/Right. Passenger/Right Support Brackets") PART#R102580 PARTS LIST: 1 Driver/Left HD Running Board 4 8mm Bolt/Nut Plates 1 Passenger/Right HD Running Board 4 8mm Plastic Retainers 2 Driver/Left & Center Mount Bracket 14 8mm-1.25 x 30mm Hex Bolts
PART#R102580 PARTS LIST: 1 Driver/Left HD Running Board 4 8mm Bolt/Nut Plates 1 Passenger/Right HD Running Board 4 8mm Plastic Retainers 2 Driver/Left & Center Mount Bracket 14 8mm-1.25 x 30mm Hex Bolts
PPM-5710 JK HEAVY DUTY SKID PLATE ASSEMBLY Version 2.0
 SYNERGY MFG. 870 INDUSTRIAL WAY, SAN LUIS OBISPO, CA (805) 242-0397 PPM-5710 JK HEAVY DUTY SKID PLATE ASSEMBLY Version 2.0 GENERAL NOTES: These instructions are also available on our website; www.synergymfg.com.
Passenger/Right Front Mounting Bracket
 PARTS LIST: 1 Driver side running board 1 8mm Insert Installation Tool 1 Passenger side running board 4 10-1.50mm x 35mm Hex Bolt 1 Driver 10 10mm x 24mm OD x 2.2mm Flat Washer 1 Passenger 6 10mm Lock
INSTALLATION INSTRUCTIONS 3"/4 BENT END SIDEBARS FORD F-150 SUPERCREW PART # DZ /DZ
 INSTALLATION INSTRUCTIONS 09-12 FORD F-150 SUPERCREW PART # DZ 372697/DZ 372699 PARTS LIST: 1 Driver/Left Sidebar 4 1/2 Lock Washers 1 Sidebar 4 12mm x 32mm OD x 3mm Flat Washers 1 Driver/Left Mounting
INSTALLATION INSTRUCTIONS AND PARTS LIST MODEL , O-MEGA II 6 OVAL STEPS
 INSTALLATION INSTRUCTIONS AND PARTS LIST MODEL 583036, 584036 O-MEGA II 6 OVAL STEPS 1. READ INSTRUCTIONS COMPLETELY AND CHECK TO MAKE SURE THAT ALL REQUIRED PARTS (LISTED ON THE SERVICE PARTS LIST) ARE
08+ KAWASAKI KLR PD NERF
 08+ KAWASAKI KLR PD NERF 0505-1299 Before you begin, place the bike on a hard level surface where you have room to work. Lay out the parts included in this kit and compare to the parts list on page 5 of
This Folding Shelf Kit will work in conjunction with our Swing Away Carrier Kit allowing you add additional exterior storage space to your Vanagon.
 Rocky Mountain Westy Folding Shelf Kit Assembly & Installation Instructions Introduction Thank you for purchasing the Rocky Mountain Westy Folding Shelf Kit. We pride ourselves in the products we develop
irunning Board Installation Instruction
 Item Part Name QTY Item Part Name QTY 1 Step Bar 2 13 M10 Revit Insert Nuts 5 2 Passenger/Right Mounting Bracket(RB) 3 14 M10-1.5mm x 30mm Hex Bolts 5 3 Driver/Left Front Mounting Bracket(LFB) 1 15 Plastic
Rear Katerack Installation Instructions
 Rear Katerack Installation Instructions Ram Promaster City 2015+ Frame Kit Part #: CRC 26-1000-001 V1.0.12.04.18 IMPORTANT INSTALLATION STEPS ARE DENOTED USING A STOP SIGN. THESE STEPS MUST BE PERFORMED
Passenger/Right Center and Rear Support Brackets. Driver/Left Center and
 PARTS LIST: 1 Driver/Left HD Running Board 24 8mm x 24mm OD x 2mm Flat Washers 1 Passenger/Right HD Running Board 12 s 3 Driver/Left front, passenger center/rear Support Brackets 6 8mm-1.25 Hex Nuts 3
MAG-CONV Basic, 48, 48R & Midline Front Mount
 Parts Required: Tools Used: Mag Wheels Brakes Brake Rods Mounting Bracket Anti Tippers 7/16" Wrench Screw Driver Rubber Mallet 5/8 Wrench 5mm Allen Wrench Step Execution Figures 1 Remove front 5" total
INSTALLATION INSTRUCTIONS GRILLE GUARD CHEVY TAHOE / AVALANCHE 1500/ SUBURBAN 1500 PART # /502795
 (W) INSTALLATION INSTRUCTIONS GRILLE GUARD PART # 502794/502795 PARTS LIST: 1 Grille Guard 2 12-1.75mm x 140mm Hex Bolts 2 Frame Mounting Brackets 8 12-1.75mm x 30mm Hex Bolts 2 Lower Support Brackets
DuraRac Shelving System
 GM Full Size Van Assembly Installation Instructions Sheet 1 of 13 BEFORE YOU START! IMPORTANT INSTALLATION STEPS ARE DENOTED USING A STOP SIGN. THESE STEPS MUST BE PERFORMED IN THE SPECIFIED ORDER TO ENSURE
Before returning this product to the store of purchase
 Before returning this product to the store of purchase Contact Dee Zee if you experience the following problems: Missing Parts Installation Problems/Questions Warranty Questions 1.800.779.2102 Hours of
Ram Promaster Rack. Installation instructions for
 Installation instructions for Ram Promaster Rack MyGlassTruck.com 200 Acorn Road LOCAL 856-595-9069 WEB www.myglasstruck.com Glassboro, NJ 08028 FAX 856-863-1480 1-844-364-4022 Version 1.0 November 2015
10-1.5mm x 40mm Hex Bolt 1 Driver/Left Front Inner Support Bracket (2WD & 4WD Vehicles W/O Skid Plate Only) 2
 2") PARTS LIST: 3" ROUND SIDEBARS 1 Driver/Left sidebar 4 12mm x 32mm OD x 3mm Flat Washer 1 Passenger/Right sidebar 4 12mm x 24mm OD x 2.5mm Flat Washer 1 Driver/Left Mounting Bracket 6 12mm Lock Washers
PARTS LIST: 3" ROUND SIDEBARS 1 Driver/Left sidebar 4 12mm x 32mm OD x 3mm Flat Washer 1 Passenger/Right sidebar 4 12mm x 24mm OD x 2.5mm Flat Washer 1 Driver/Left Mounting Bracket 6 12mm Lock Washers
K9 KIT INSTALLATION INSTRUCTIONS CROWN VIC KK-K9-F7-K
 K9 KIT INSTALLATION INSTRUCTIONS 1998-2011 CROWN VIC KK-K9-F7-K TOOLS REQUIRED: Power Drill (Cordless preferable) Drill Bit Set Standard Wrench and Socket Set Metric Socket Set Screwdriver Set Torx Bit
owners Model No CAUTION: Read Rules for Safe Operation and Instructions Carefully Safety Assembly Operation Maintenance Parts
 owners manual Model No. 45-03022 SLEEVE HITCH CAUTION: Read Rules for Safe Operation and Instructions Carefully Safety Assembly Operation Maintenance Parts the fastest way to purchase parts www.speedepart.com
Side DuraRac Installation Instructions
 Side DuraRac Installation Instructions Ford Transit Low Roof 130 /148 WB Frame Kit Part #: CRC 22-1010-002 V1.0.08.10.18 IMPORTANT INSTALLATION STEPS ARE DENOTED USING A STOP SIGN. THESE STEPS MUST BE
RH-412 STEEL DOORS INSTALLATION INSTRUCTIONS
 RH-412 STEEL DOORS INSTALLATION INSTRUCTIONS By following the steps outlined below, the assembly, installation and adjustment of the steel doors, will be a simple process. Let s start with the Driver Side.
INSTALLATION INSTRUCTIONS
 INSTALLATION INSTRUCTIONS R5 STEP BOARD APPLICATION: 2009-2017 Dodge Ram 1500 Quad / Crew Cab 2010-2017 Dodge Ram 2500/3500 Crew Cab PART NUMBER: 28-51040, 28-51045, 28-51050, 28-51055 ITEM QUANTITY DESCRIPTION
M2 Assembly. M2 Sub-Assemblies mm Belt Sub-Assembly mm Belt Sub-Assembly Spider Sub-Assembly... 4
 M2 Assembly Table of Contents M2 Sub-Assemblies... 3 630mm Belt Sub-Assembly... 3 702mm Belt Sub-Assembly... 3 Spider Sub-Assembly... 4 Idler Bolt Sub-Assembly... 8 Y Motor Sub-Assembly... 9 X Motor Sub-Assembly...
INSTALLATION INSTRUCTIONS RH 412 STEEL DOORS
 By following the steps outlined below, the assembly, installation and adjustment of the steel doors, will be a simple process. Let s start with the Driver Side. Note: Having the hood open makes the job
Big Block Installation Manual For Systems without A/C
 Big Block Installation Manual For Systems without A/C Billet Specialties, Inc. 500 Shawmut Ave. La Grange, IL 60526 Tech Line (708) 588-0505 Fax (708) 588-7181 Hardware List For Chevrolet Big Block Tru
Assembly Instructions 10 X 10 Aluminum Roof Support
 Assembly Instructions 10 X 10 Aluminum Roof Support Aluminum Roof Support Bolt Package 16-5/16 X 2 ¼ SS Bolt 24-5/16 X 1 SS Bolt 40-5/16 SS Nylon Lock Nuts 16-5/16 SS Flat Washers 28-4 ½ Wood Screws 36-1
PARTITION INSTALLATION INSTRUCTIONS
 PARTITION INSTALLATION INSTRUCTIONS 2015 Chevrolet Tahoe PPV / Part Number 5703FW, FWA & FEW Do not attempt to install this product on any vehicle equipped with third row seating! Parts List Distributed
frame bracket Dodge x 2 & 4 x 4 (6-1/2 & 8 Boxes Includes Mega Cab)
") , Rev 4 02/19 frame bracket 8552026 Dodge 3500 4 x 2 & 4 x 4 (6-1/2 & 8 Boxes Includes Mega Cab) 14 5 7 2 4 11 9 10 17 3 6 1 8 13 15 16 18 12 ITEM PART # DESCRIPTION QTY. 1 00085.50 FLAT WASHER 10 2 00248
, Rev 4 02/19 frame bracket 8552026 Dodge 3500 4 x 2 & 4 x 4 (6-1/2 & 8 Boxes Includes Mega Cab) 14 5 7 2 4 11 9 10 17 3 6 1 8 13 15 16 18 12 ITEM PART # DESCRIPTION QTY. 1 00085.50 FLAT WASHER 10 2 00248
TEL:1-866-XANATOS INSTALLATION INSTRUCTIONS GRILL GUARD FOR FORD EXPLORER PART # 17FJ26MA
 \ TEL:1-866-XANATOS INSTALLATION INSTRUCTIONS GRILL GUARD FOR FORD EXPLORER 02-05 PART # 17FJ26MA NOTE: Please read this information before assembling. Complete step by step instruction sheets will be
Allow 60 from door face
 Setbacks Allow 60 from door face TOOLS NEEDED Tape Measure Marker or Pencil Masonry Drill Bit 3/8 Hammer Drill Hammer Socket Wrenches and Wrench: 9/16, 1/2, 7/16, 1/4 drive socket wrench and 1/2 socket
INSTALLATION GUIDE. C20-DH STRAIGHT PARTITION Sprinter Partition ( Perforated Window, No Access, Steel )
") INSTALLATION GUIDE C20-DH STRAIGHT PARTITION Sprinter Partition ( Perforated Window, No Access, Steel ) QUICK START GUIDE Phase 1 - Assembly q 1.1 Setup... q 1.2 Partition assembly... 3-4 5-6 Phase 2 -
INSTALLATION GUIDE C20-DH STRAIGHT PARTITION Sprinter Partition ( Perforated Window, No Access, Steel ) QUICK START GUIDE Phase 1 - Assembly q 1.1 Setup... q 1.2 Partition assembly... 3-4 5-6 Phase 2 -
K9 KIT INSTALLATION INSTRUCTIONS CROWN VIC with Fire Suppression System Model KK-K9-F7-K-FS
 K9 KIT INSTALLATION INSTRUCTIONS 2005-2011 CROWN VIC with Fire Suppression System Model KK-K9-F7-K-FS TOOLS REQUIRED: Power Drill (Cordless preferable) Drill Bit Set Standard Wrench and Socket Set Metric
INSTALLATION INSTRUCTIONS 3 ROUND & 4 OVAL SIDEBAR (90-DEG BENT END) DODGE RAM MEGA CAB PART NUMBER SB1214S SB1214B
 DODGE RAM MEGA CAB PART NUMBER SB1214S SB1214B") INSTALLATION INSTRUCTIONS PART NUMBER SB1214S SB1214B PARTS LIST: Qty Description Qty Description 1 Driver/Left Sidebar 4 12mm x 32mm OD x 3mm Flat Washers 1 Passenger/Right Sidebar 4 12mm Lock Washers
INSTALLATION INSTRUCTIONS PART NUMBER SB1214S SB1214B PARTS LIST: Qty Description Qty Description 1 Driver/Left Sidebar 4 12mm x 32mm OD x 3mm Flat Washers 1 Passenger/Right Sidebar 4 12mm Lock Washers
INSTALLATION GUIDE. C20-FTM STRAIGHT PARTITION Transit Partition ( Perforated Window, No Access, Steel )
") INSTALLATION GUIDE C20-FTM STRAIGHT PARTITION Transit Partition ( Perforated Window, No Access, Steel ) QUICK START GUIDE Phase 1 - Assembly q 1.1 Setup... q 1.1.1 Unpack components; compare with the bill
INSTALLATION GUIDE C20-FTM STRAIGHT PARTITION Transit Partition ( Perforated Window, No Access, Steel ) QUICK START GUIDE Phase 1 - Assembly q 1.1 Setup... q 1.1.1 Unpack components; compare with the bill
Place the vehicle on a hard level surface and use an appropriate jack and jack stands to raise the vehicle of the ground.
 1937-1939 Chevy Truck Rear Air Bag 4 - Link Kit Installation Instructions 1-866-925-1101 www.totalcostinvolved.com CHECK ALL PARTS INCLUDED IN THIS KIT TO THE PARTS LIST BEFORE INSTALLATING OF THE KIT.
INSTALLATION GUIDE. C30-NL STRAIGHT PARTITION Nissan NV ( Swing Door, Steel )
") INSTALLATION GUIDE C30-NL STRAIGHT PARTITION Nissan NV ( Swing Door, Steel ) QUICK START GUIDE Phase 1 - Assembly q 1.1 Setup... q 1.2 Partition assembly... 3 to 4 5 Phase 2 - Installation q 2.1 Tips on
INSTALLATION GUIDE C30-NL STRAIGHT PARTITION Nissan NV ( Swing Door, Steel ) QUICK START GUIDE Phase 1 - Assembly q 1.1 Setup... q 1.2 Partition assembly... 3 to 4 5 Phase 2 - Installation q 2.1 Tips on
Franklin Mills Stackable Movable Lateral Instructions
 Franklin Mills Stackable Movable Lateral Instructions Table of Contents: Table of contents...1 Tools Required...2 Stationary Shelving Assembly...3-7 Mobile Shelving Assembly...8-16 Rail Assembly...8-11
INSTALLATION MANUAL FRONT. See pages 2 and 3 of this manual for configuration options. Level of Difficulty. Product Photo (center section only)
") INSTALLATION MANUAL FRONT Level of Difficulty Moderate Product Photo (center section only) All hardware listed below will be provided with the bumpers center section. Additional hardware will be supplied
INSTALLATION MANUAL FRONT Level of Difficulty Moderate Product Photo (center section only) All hardware listed below will be provided with the bumpers center section. Additional hardware will be supplied
Support. (3)Passenger Support. Brackets. (2) Running Board (example only)
Passenger Support. Brackets. (2) Running Board (example only)") IB(5,4)) RUNNING BOARD PARTS LIST: Item QTY Description Item QTY Description #01 2 Running Board(use for left or right) #10 12 8mm Lock Washers #02 3 Driver Mounting (/Center/Rear) #11 6 8mm Hex Nuts #03
IB(5,4)) RUNNING BOARD PARTS LIST: Item QTY Description Item QTY Description #01 2 Running Board(use for left or right) #10 12 8mm Lock Washers #02 3 Driver Mounting (/Center/Rear) #11 6 8mm Hex Nuts #03
(W) INSTALLATION INSTRUCTIONS 3" ROUND & 4" OVAL SIDEBAR (90-DEG BENT END) DODGE RAM 1500 QUAD CAB PART #DZ /DZ /DZ /DZ
 INSTALLATION INSTRUCTIONS 3 ROUND & 4 OVAL SIDEBAR (90-DEG BENT END) DODGE RAM 1500 QUAD CAB PART #DZ /DZ /DZ /DZ") (W) INSTALLATION INSTRUCTIONS 3" ROUND & 4" OVAL SIDEBAR (90-DEG BENT END) PART #DZ 372231/DZ 372233/DZ 372237/DZ 372239 PARTS LIST: 3" ROUND & 4" OVAL SIDEBAR (90-DEG BENT END) Qty Description Qty Description
(W) INSTALLATION INSTRUCTIONS 3" ROUND & 4" OVAL SIDEBAR (90-DEG BENT END) PART #DZ 372231/DZ 372233/DZ 372237/DZ 372239 PARTS LIST: 3" ROUND & 4" OVAL SIDEBAR (90-DEG BENT END) Qty Description Qty Description
v1.0 ASSEMBLY GUIDE Mia Wide Bookcase
 v1.0 ASSEMBLY GUIDE Mia Wide Bookcase Components Upon unpacking your bookcase from it s delivery box, you should have the pieces shown. Follow the steps on the next pages to assemble your new bookcase.
INSTALLATION GUIDE TOYOTA 4 RUNNER (2013+) REAR BUMPER
 REAR BUMPER") INSTALLATION GUIDE TOYOTA 4 RUNNER (2013+) REAR BUMPER CONTENTS CONTENTS Rear Bumper (base or dual arm) Installation...................................... 2 Dual Swing Installation..........................................................
INSTALLATION GUIDE TOYOTA 4 RUNNER (2013+) REAR BUMPER CONTENTS CONTENTS Rear Bumper (base or dual arm) Installation...................................... 2 Dual Swing Installation..........................................................
KWIK-KIT KK-S INSTALLATION INSTRUCTION PACKAGE
 KWIK-KIT KK-S-120-02 INSTALLATION INSTRUCTION PACKAGE INSTALLATION INSTRUCTIONS HAVIS KWIK-KIT KK-S-120-02 2002-2007 DODGE/FREIGHTLINER SPRINTER VAN PLEASE READ COMPLETE INSTRUCTIONS PRIOR TO INSTALLATION
SS1062, SS10621 & SS10621E Free Standing PWC & Fishing Boat Hoist SS1062 SS10621 SS10621E
 SS1062, SS10621 & SS10621E Free Standing PWC & Fishing Boat Hoist SS1062 SS10621 SS10621E Midwest Industries, Inc. Page 1 Ida Grove, IA 51445 800.859.3028 www.shorestation.com 0003231 REV A 1/25/05 Bundles
INSTALLATION INSTRUCTIONS KK-K9-C12-K CHEVY IMPALA
 INSTALLATION INSTRUCTIONS KK-K9-C12-K 2000-2005 CHEVY IMPALA READ ALL INSTRUCTIONS PRIOR TO INSTALLATION TOOLS REQUIRED: Power Drill Drill bits1/4 and 5/32 7/l6 wrench and socket 15,18 and\or 19mm socket
INSTALLATION INSTRUCTIONS KK-K9-F14-K K9 KIT FOR FORD EXPEDITION
 INSTALLATION INSTRUCTIONS KK-K9-F14-K-32 32 K9 KIT FOR 2003-2016 FORD EXPEDITION TOOLS REQUIRED: Power Drill Drill Bit Set Standard & Metric Socket Sets Phillips Screw Driver Open End Wrench Set Wire Cutters
INSTALLATION INSTRUCTIONS 6 OVAL BENT END SIDEBARS DODGE RAM 1500, CREW CAB PART#: /241533B
 PARTS LIST: 1 Driver/Left Sidebar 24 8mm x 24mm x 2mm Flat Washers 1 Passenger/Right Sidebar 12 8mm Lock Washers 3 Driver/left, Passenger Center and Rear 6 8mm Hex Nuts 3 INSTALLATION INSTRUCTIONS 6 OVAL
3/4 Rear DuraRac Installation Instructions
 3/4 Rear DuraRac Installation Instructions Ford Transit Low Roof 130 WB Frame Kit Part #: CRC 27-1010-001 V1.0.09.28.18 IMPORTANT INSTALLATION STEPS ARE DENOTED USING A STOP SIGN. THESE STEPS MUST BE PERFORMED
Parts and tools needed for installation- Cleaning and Painting -
 Thank you for the purchase of our JK Rear Trail Doors. We have made these from 6061-T6 aluminum and reinforced them with stiffeners at the top that double as a comfortable armrest and support for Rugged
INSTALLATION INSTRUCTIONS
 TEL -866-XANATOS INSTALLATION INSTRUCTIONS PART#: 7D5000SS\7D500A GRILL GUARD FOR DODGE SPRINTER 07-09 PARTS LIST: 8 6 Grille Guard Driver/Left Frame Mounting Passenger/Right Frame Mounting Driver/Left
E4-WM5-Y525A00 MOUNTING INSTRUCTION
 RAM 2500/3500 4WD B8 5100 (Dual Steering Damper Kit) The installation of these steering dampers must be performed only by experienced and qualified personnel. Read and follow the installation instructions
2015 Current Ford F150/Raptor Adaptive Cruise Control Module Relocation Bracket Installation Instructions
 2015 Current Ford F150/Raptor Adaptive Cruise Control Module Relocation Bracket Installation Instructions PREPARATION 1. Disconnect the negative terminal on the battery. Park the vehicle on level ground
Rear Mount Installation Instructions
 Rear Mount Installation Instructions Ford Transit Low Roof 130 WB Frame Kit Part #: DTC 0809-011 V1.0.10.12.18 IMPORTANT INSTALLATION STEPS ARE DENOTED USING A STOP SIGN. THESE STEPS MUST BE PERFORMED
INSTALL INSTRUCTIONS K9-F14-PT K9/PRISONER TRANSPORTATION SYSTEM FORD EXPEDITION
 INSTALL INSTRUCTIONS K9-F14-PT K9/PRISONER TRANSPORTATION SYSTEM 2003-2017 FORD EXPEDITION HARDWARE: QTY: DESCRIPTION: PART #: 28 ¼-20 x ½ Stainless carriage bolt GSM32022 8 ¼-20 x ¾ Stainless carriage
Camaro License Plate Frame Bracket, V8
 PART #59389 2010-11 Camaro License Plate Frame Bracket, V8 PACKING LIST Before installation, use this checklist to make sure all necessary parts have been included. ITEM QTY CHECK PART NUMBER DESCRIPTION
KAWASAKI KLRE PD NERF HTP4-8-5 & HIGHWAY PEGS HTP4-1-4B
 Thank you for purchasing Happy Trails products. Our products are proudly hand made in Boise Idaho, USA. If you have any questions or concerns about the installation of this product, please contact us directly
(2) 25mm x 20mm x 5mm Adhesive Backed Foam Pads. 100mm x 50mm x 1.0mm Adhesive Backed Foam. (2) Spacer Plates. Passenger/Right Side Frame Mounting
 25mm x 20mm x 5mm Adhesive Backed Foam Pads. 100mm x 50mm x 1.0mm Adhesive Backed Foam. (2) Spacer Plates. Passenger/Right Side Frame Mounting") PARTS LIST: 1 Grille Guard 10 12mm Lock Washers 1 Driver/Left Frame Mounting 16 12mm x 32mm OD x 3mm Flat Washers 1 Passenger/Right Frame Mounting 8 12mm Hex Nuts 1 Driver/Left Side Top Support 2 10-1.50mm
PARTS LIST: 1 Grille Guard 10 12mm Lock Washers 1 Driver/Left Frame Mounting 16 12mm x 32mm OD x 3mm Flat Washers 1 Passenger/Right Frame Mounting 8 12mm Hex Nuts 1 Driver/Left Side Top Support 2 10-1.50mm
Size Grade Torque 9/ ft/lbs. 5/ ft/lbs. 3/ ft/lbs. 7/ ft/lbs ft/lbs.
 8-3 HJ3205,Rev 4 BOlT TORQUE SPECIfICATIONS STANDARD BOlTS: Size Grade Torque 5/6 5 20 ft/lbs. 3/8 5 35 ft/lbs. 7/6 5 56 ft/lbs. /2 5 85 ft/lbs. Size Grade Torque 9/6 5 23 ft/lbs. 5/8 5 70 ft/lbs. 3/4
Trak-Slider Instructions
 Trak-Slider Instructions 1/4-20 x 3/4" Hex Head Bolt 1/4-20 Flanged Hex Nut Gusset 1/4-20 x 1/2" Allen Cap Screw 1/4-20 Nylock Nut Rivet 1/4-20 x 3/8" Pan Head Phillips Machine Screw 1/4 USS Flat Washer
FORD INTERCEPTOR SEDAN READY BUCKLE
 INSTALLATION MANUAL FORD INTERCEPTOR SEDAN READY BUCKLE PART# FT3501RB We recommend you read through the installation guide prior to installation, if you have any questions please call us at 800-516-2322
Assembly Instructions 10 X 10 Aluminum Frame Building
 Assembly Instructions 10 X 10 Aluminum Frame Building 27 97 9 8 47 36 74 52 10 10 X 10 Square Building W/ Dome Includes: The Steel Entry Door with a Dead Bolt Lock assembly and Aluminum Door Frame. Metal
INSTALLATION INSTRUCTIONS
 Do not attempt to install this product on any vehicle other than the one it is designed for and listed above! Parts List 10 3/8 X 1 1/4 Hex Bolt 10 3/8 Lock Washer 4 3/8 Hex Nut 4 3/8 Flat Washer 2 3169)
INSTALLATION INSTRUCTIONS
 TEL:1-866-XANATOS INSTALLATION INSTRUCTIONS PART # RN-FOF1SCC-09-91 CUTLASS RUNNING BOARDS PARTS LIST: 5 STAINLESS AND ALUMINUM SIDEBARS 2 Left or right Sidebars 10 8-1.25mm x 30mm Hex Bolts 2 Driver/Left
STEP 1 STEP 2 LEVELER KIT OPTION MOBILE CASTER KIT OPTION
 B SERIES INDUSTRIAL BENCHES TOOLS REQUIRED FOR ASSEMBLY Socket set, Open end wrench set, Cordless drill with 3/8" socket bit (Magnetic recommended). BEFORE ASSEMBLY Read through the assembly instructions
HAPPY TRAILS PRODUCTS
 Thank you for purchasing Happy Trails products. Our products are proudly hand made in Boise Idaho, USA. If you have any questions or concerns about the installation of this product, please contact us directly
(2) Plastic Plugs (2) Frame Bracket. Spacers. License Plate Bracket. (2) 12mm Single Bolt Plates. (2) 12mm Double Bolt Plates
 Plastic Plugs (2) Frame Bracket. Spacers. License Plate Bracket. (2) 12mm Single Bolt Plates. (2) 12mm Double Bolt Plates") LDB-CSIL26-FB PARTS LIST: 1 LD1 Bumper Assembly 10 12mm Hex Nuts 1 Driver/left Frame Mounting 6 10-1.5mm x 35mm Hex Bolts 1 Passenger/right Frame Mounting 12 10mm x 27mm OD x 3mm Flat Washers 2 Spacers
LDB-CSIL26-FB PARTS LIST: 1 LD1 Bumper Assembly 10 12mm Hex Nuts 1 Driver/left Frame Mounting 6 10-1.5mm x 35mm Hex Bolts 1 Passenger/right Frame Mounting 12 10mm x 27mm OD x 3mm Flat Washers 2 Spacers
Master Your Terrain. (307)
") Master Your Terrain (307) 775 9565 www.tntcustoms.com Rear Swing-out Tire Carrier Jeep TJ/LJ Installation Instructions Congratulations for purchasing a T&T Customs, Inc. Rear Swing-out Tire Carrier for
Master Your Terrain (307) 775 9565 www.tntcustoms.com Rear Swing-out Tire Carrier Jeep TJ/LJ Installation Instructions Congratulations for purchasing a T&T Customs, Inc. Rear Swing-out Tire Carrier for
Illustrated Parts List I Sleeve Hitch. (23 inch tire) ( ) Repair Parts Manual
 ( ) Repair Parts Manual") Illustrated Parts List 2008-01 I0807213 531 30 70-05 Sleeve Hitch (23 inch tire) (45-03021) Repair Parts Manual OWNERS MANUAL Model No. 45-03021 SLEEVE HITCH CAUTION: Read Rules for Safe Operation and
Illustrated Parts List 2008-01 I0807213 531 30 70-05 Sleeve Hitch (23 inch tire) (45-03021) Repair Parts Manual OWNERS MANUAL Model No. 45-03021 SLEEVE HITCH CAUTION: Read Rules for Safe Operation and