Installation Instructions Hard Top Part # ,517701
|
|
|
- Melinda Dawson
- 5 years ago
- Views:
Transcription

 5/16 x 1 Mounting")
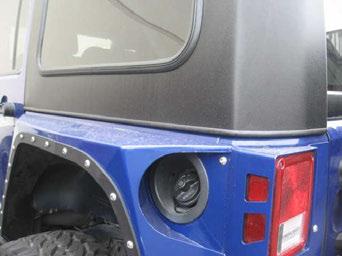
1 Please read instructions entirely before installing this product. This accessory is designed and manufactured primarily to augment the vehicles appearance and to protect the occupants from normal weather conditions. This product is not designed to protect occupants from injury or death in the event of an accident. Always wear your seat belt. Parts Included Qty Parts Included Qty Hardtop Rear Section 1 Rear section Top Bolt 2 Hardtop Front Section 1 Footman Loop 2 Rear Window 1 Flat Washer 6 Rear Window Hardware 1 (bag) 5/16 x 1 Mounting Bolt 6 Door Corner Seal 2 Mounting Nut 6 Step 1: If your vehicle is/was equipped with a softop remove all associated hardware. (Bow assembly, tail gate bar, tailgate bar clamps, ect) Do not remove the front Mucket seals behind the door openings. ( Fig A) Step 2: With assistance carefully place the rear section of the top onto the vehicle lining up the holes in the top and the holes on the body. (3 per side) Attach using included hardware. (Fig B) Do not fully tighten at this time. NOTE: Nuts are included if your vehicle does not have the OEM nut plates. (Fig A) (Fig B)
 Secure all rear section (top and bottom) mounting bolts at this time. It may be helpful to have your assistant push from the outside of the top inwards to help align holes.")
 (Fig D) Step 4: With assistance install the rear window.")
2 Step 3: Install the included front top bolt on the top front corner of the top (4 -Door Only) Fig C Make sure top is aligned evenly on both sides of the vehicle and with the rear door opening. (Fig D) Secure all rear section (top and bottom) mounting bolts at this time. It may be helpful to have your assistant push from the outside of the top inwards to help align holes. NOTE: Due to variances in vehicle manufacturing if a hole is slightly off you can easily open the hole up with a drill bit. Make sure the top is lined up with the bottom door gasket (Fig C) (Fig D) Step 4: With assistance install the rear window. While your assistant holds the window attach window hinge through the holes in the top with the included machine screws. (Fig E) Do not tighten completely. Step 5: Close window and make sure gap on each side of window between glass and top is even. (Fig F) Step 6: When proper placement is reached go back and securely tighten hinge bolts. Raise glass up and install gas struts. (Fig G)


 Step 8: Install the included footman loops")
 Step 9: With assistance carefully place the")
3 Close window and make sure gap on each side of window between glass and top is even. (Fig E) (Fig G) (Fig H) (Fig I) Step 7: Pull the sun visors back and remove the footman loop attached to the top of the windshield frame using a #25 torx bit. (Fig I) Step 8: Install the included footman loops using the previously removed hardware. (Fig J) Step 9: With assistance carefully place the front section on the vehicle. (Fig K)


 Be sure to")

4 (Fig J) (Fig K) Step 10: IMPORTANT- When placing the front deck section on; make sure the rear fits into the OEM seals. (Fig L, M) Be sure to Tuck in the front OEM corner seals (Fig N, O, P) (Fig L) (Fig M)

5 When fitting the front section of the top you need to tuck in the OEM seals (Fig N) NOTE: The instructions for installing this top must be followed and done every time as described when the top is removed and re-installed.
")
6 Incorrect (Fig O)
 NOTE: Do not over tighten, tighter does not always equal better.")
7 Correct (Fig P) Step 12: Secure front section of top to vehicle by attaching the latches to the rear footman loops first then the front latches to the front footman loops on the windshield frame. (Fig Q, R, S) NOTE: Do not over tighten, tighter does not always equal better. The clamp on the latch can be adjusted by turning the nut counter clockwise and the hook clockwise.

 (Fig S)")


8 Make sure front seal is tucked in evenly (Fig Q) (Fig R) (Fig S) Do not over tighten latch, this could cause damages to your top and latch


 (Fig U) Step 14: Pull back top rear corner seal")

9 Step 13: Make sure seal between front section and rear section is evenly spaced and even. (Fig T, U, V) and the front portion runs evenly along top of windshield frame. Make sure the two sections of the top are even. (Fig T) (Fig U) Step 14: Pull back top rear corner seal from the front door. Making sure door is clean, peel back the paper from the seal and place on door. (Fig V) (Fig V) (Fig W) Step 15: Installation is now complete. (Fig A-D)
")
")

10 (Fig A) (Fig B) (Fig C) (Fig D)
11 ADJUSTMENTS / INSTALLATION TIPS Due to variations in construction and assembly procedures during vehicle manufacturing and also dealing with a vehicle that has been on the road for almost 5-10 years, in most cases you will be required to make some sort of adjustments. 1. In many instances the actual steel door on the vehicle will need to be adjusted. You can make adjustments to the lower doors by slightly loosening the door hinge bolts using a T40 torx bit and reposition the door for an improved fit. NOTE: Use caution when doing so. When loosened the doors can move forward, backwards, up and down. 2. Make sure top is sitting in the factory seals correctly. Make sure the seals are not folded or smashed in the wrong position. ( Refer to Fig L-O) 3. If the back side of the door is hitting the top, unhook the windshield latches, loosen the rear mounting bolts and then push top backwards. Re-tighten the rear bolts and re adjust front latches. 4. Make sure vehicle is square In some cases the windshield frame may need to be adjusted. an 1/8 can make a big difference in regards the angles. This would be done by loosening the windshield hinge/bracket bolts. With an assistant pulling or pushing the frame (depending on which way you need to go) retighten the bolts. 5. If the top of the door is hitting the top, you can shim the top. Unlatch the front of the top and remove the rear bolts. You can shim top simply by placing the needed amount of flat washers over the mounting holes on the vehicle and then replace top over and reattach bolts. 6. The OEM seals may need to be changed. Depending on the condition either one or all of the rubber seals needed for a good fit may need to be replaced. (Full Steel Door Seal, Cowl Rubber, Windshield header Seal.) Signs of a seal needing replacement are; worn, dry or flattening of the rubber.
 (Bumpers) CARE AND MAINTENANCE Wash and clean using a soft cloth and non")


12 Compliment your new Top with other quality Smittybilt products (Seat Covers) (Side Steps) (Bumpers) CARE AND MAINTENANCE Wash and clean using a soft cloth and non abrasive soap and water. DO NOT use automotive past wax or something similar that use fillers like Armor all. It is recommend to use something like Auto Glym plastic conditioner. It contains weather resistant resin polymers to help reduce the aging effect cause by sunlight, water and other elements. It is available at most automotive detail outlets.
Installation Instructions Hard Top Part # , Wrangler 2 & 4 Door
 Please read instructions entirely before installing this product. This accessory is designed and manufactured primarily to augment the vehicles appearance and to protect the occupants from normal weather
lnstallation /nstructions Hard Тор Part JEEP072200, JEEP JK Wrangler 2 & 4 Door
 lnstallation /nstructions Part JEEP072200, JEEP074200 Please read instructions entirely before installing this product. This accessory is designed and manufactured primarily to augment the vehicles appearance
RAMPAGE P R O D U C T S. INSTALLATION INSTRUCTIONS BRONCO ZIPPER FASTRACK TOP PART #984xx BRONCO TOOLS REQUIRED
 RAMPAGE P R O D U C T S 84 (+/- 1/4 ) INSTALLATION INSTRUCTIONS BRONCO ZIPPER FASTRACK TOP PART #984xx BRONCO 1966-1977 TOOLS REQUIRED 3/8 WRENCH 7/16 WRENCH ½ WRENCH #2 PHILLIPS SCREWDRIVER 1/8 DRILL
Installation Instructions PREMIUM Replacement Top (Part # )
") 0 7-0 9 U n l i m i t e d ( 4 D o o r ) NOTE: Read entire instructions thoroughly before installing this product. It is recommended to install this Top when temperatures are above 70 degrees. The top can
0 7-0 9 U n l i m i t e d ( 4 D o o r ) NOTE: Read entire instructions thoroughly before installing this product. It is recommended to install this Top when temperatures are above 70 degrees. The top can
Installation Instructions Cage Kit JK Unlimited (4-Dr) Part # 76902
 Part # 76902") Please read instructions entirely before installing this product. Drilling is required to install this part. Parts Included Qty Parts Included Qty Driver Front Upright 1 Pass Side Drill Template (7289)
Please read instructions entirely before installing this product. Drilling is required to install this part. Parts Included Qty Parts Included Qty Driver Front Upright 1 Pass Side Drill Template (7289)
2-Door EXO-Top Roof Rack System
 Page 1/29 Part 13516.01 2-Door EXO-Top Roof Rack System! WARNING The EXO-Top Roof Rack System is rated to a dynamic 300 lb, evenly distributed load. Further loading could result in serious injury or death.
4-Door EXO-Top Roof Rack System
 Page 1/31 4-Door EXO-Top Roof Rack System 13516.02! WARNING The EXO-Top Roof Rack System is rated to a dynamic 300 lb, evenly distributed load. Further loading could result in serious injury or death.
INSTALLATION INSTRUCTIONS KK-K9-C12-K CHEVY IMPALA
 INSTALLATION INSTRUCTIONS KK-K9-C12-K 2000-2005 CHEVY IMPALA READ ALL INSTRUCTIONS PRIOR TO INSTALLATION TOOLS REQUIRED: Power Drill Drill bits1/4 and 5/32 7/l6 wrench and socket 15,18 and\or 19mm socket
RAMPAGE P R O D U C T S. BRONCO ZIPPER FASTRACK TOP PART #984xx BRONCO TOOLS REQUIRED
 RAMPAGE P R O D U C T S 84 (+/- 1/4 ) BRONCO ZIPPER FASTRACK TOP PART #984xx BRONCO 1966-1977 TOOLS REQUIRED 3/8 WRENCH 7/16 WRENCH ½ WRENCH #2 PHILLIPS SCREWDRIVER 1/8 DRILL BIT 9/64 DRILL BIT 5/32 DRILL
K9 KIT INSTALLATION INSTRUCTIONS CROWN VIC with Fire Suppression System Model KK-K9-F7-K-FS
 K9 KIT INSTALLATION INSTRUCTIONS 2005-2011 CROWN VIC with Fire Suppression System Model KK-K9-F7-K-FS TOOLS REQUIRED: Power Drill (Cordless preferable) Drill Bit Set Standard Wrench and Socket Set Metric
K9 KIT INSTALLATION INSTRUCTIONS CROWN VIC KK-K9-F7-K
 K9 KIT INSTALLATION INSTRUCTIONS 1998-2011 CROWN VIC KK-K9-F7-K TOOLS REQUIRED: Power Drill (Cordless preferable) Drill Bit Set Standard Wrench and Socket Set Metric Socket Set Screwdriver Set Torx Bit
INSTALLATION INSTRUCTIONS FOR 1997 to 2006 TJ JEEP UPPER-HALF DOORS
 BULL DAWG SUV DOORS 9/15/2015 The Perfect Companion for your Sport SUV Another quality company by McLaughlin Manufacturing. 4737 Adams Road, Chattanooga, TN 37343 www.bulldawgmfg.com, 800-784-6478, 423-875-4040
Installation for Full Size Polaris Ranger Crew Doors
 Installation for Full Size Polaris Ranger Crew Doors Order of Installation: Heater Doors Wiper on to Windshield Windshield Top & Back Panel Note: Most of the steps in these instructions need to be repeated
Installation Instructions:
 NOTE: Carefully read entire instructions thoroughly before attempting to install this part. (SB76904) Parts Included Qty 94-241CA001 Front Upright: Drvr 1 94-241CA002 Front Upright: Pass 1 94-241CA003
Installation Instructions Replacement Top (Part # ) Unlimited (4 Door) Replacement Top (Part # ) JK (2 Door)
 Unlimited (4 Door) Replacement Top (Part # ) JK (2 Door)") NOTE: Read entire instructions thoroughly before installing this product. It is recommended to install this Top when temperatures are above 70 degrees. The top can contract and stretch an inch or more.
NOTE: Read entire instructions thoroughly before installing this product. It is recommended to install this Top when temperatures are above 70 degrees. The top can contract and stretch an inch or more.
INSTALLATION & OWNER S MANUAL
 Rev. O p. 1 of 16 INSTALLATION & OWNER S MANUAL V4213 BALL CAGE KIT INSTALLATION & OWNER S MANUAL The contents of this envelope are the property of the owner. Be sure to leave with the owner when installation
INSTALLATION INSTRUCTIONS
 INSTALLATION INSTRUCTIONS BRONCO FAST TRAC TOP PART #331-210 BRONCO 1966-1977 Thank you for purchasing Specialty s Convertible Top for your Bronco. It has been designed for great fit and long wear. Please
Half Door Installation Instructions
 Half Door Installation Instructions For: CJ7, CJ8/Scrambler and Wrangler/YJ Part Number: 53028 Note: Wrangler/YJ Use of this product may not allow use of factory side mirrors. Note: Wrangler/YJ Use of
UPPER DOOR KIT P/N
 UPPER DOOR KIT P/N 2879946 Application RZR XP4 1000 Before you begin, read these instructions twice and check to be sure all parts and tools are accounted for. Please retain these installation instructions
UPPER DOOR KIT P/N APPLICATION BEFORE YOU BEGIN ITEMS MARKED (*) ARE INCLUDED IN HARDWARE KIT PN P/N Rev 01 07/14 Page 1 of 6
 ARE INCLUDED IN HARDWARE KIT PN P/N Rev 01 07/14 Page 1 of 6") UPPER DOOR KIT P/N 2880609 APPLICATION RZR 900 BEFORE YOU BEGIN Read these instructions thoroughly and make sure all parts and tools are accounted for. Please retain these installation instructions for
UPPER DOOR KIT P/N 2880609 APPLICATION RZR 900 BEFORE YOU BEGIN Read these instructions thoroughly and make sure all parts and tools are accounted for. Please retain these installation instructions for
RangerWare Fiberglass Door System Installation Instructions P/N
 Page 1 of 9 RangerWare Fiberglass Door System Installation Instructions P/N 2878016 ORDER OF INSTALLATION Note: To assure proper order, read all Accessory Installation Instructions before beginning. 1.
Stop! Read This Important Information.
 Stop! Read This Important Information. Stop, Do Not Proceed, Read This This door replacement kit is designed for the replacement of doors on a Supertop ONLY! This door will not work on any other style
Half Door Installation Instructions
 Half Door Installation Instructions For: CJ5 (1955-1975), CJ6 (All), M38-A1 (1955-1971) Part Number: 53025 WARNING This product is designed primarily to enhance the appearance of the vehicle and to shield
YJ Bow Assembly. Installation Instructions INSTALLATION TIME SKILL LEVEL TOOLS. Vehicle Application: Jeep Wrangler YJ Part Number: 55004
 Installation Instructions YJ Bow Assembly Vehicle Application: Jeep Wrangler YJ 1988 1995 Part Number: 55004 INSTALLATION TIME SKILL LEVEL 2 Hours 2 - Moderately Easy TOOLS 1/8" Bit 10' #2 #50, #45, #50
INSTALLATION INSTRUCTIONS PART#:17GT23MSS\17GT23MA MODULAR GRILL GUARD FOR CHEVY SILVERADO 1/2 TON 99-02
 INSTALLATION INSTRUCTIONS PART#:17GT23MSS\17GT23MA MODULAR GRILL GUARD FOR CHEVY SILVERADO 1/2 TON 99-02 1 guard, center section 1 brush guard, left side 1 brush guard, right side 1 wire guard insert,
Kawasaki Teryx 750 Cab Kit* Caution: Before using this product, read this manual and follow all Safety Instructions.
 Owner s Manual Model: Kawasaki Teryx 750 Kawasaki Teryx 750 Cab Kit* Caution: Before using this product, read this manual and follow all Safety Instructions. Safety Instructions Cab Kit Contents Hardware
Polaris XP Doors (P144202) Installation Instructions
 Installation Instructions") Polaris XP4 000 Doors (P440) Installation Instructions WARNING Pro Armor Door and Net are designed to work together to replace your original equipment nets and/or door. Install both the Pro Armor Door
Polaris XP4 000 Doors (P440) Installation Instructions WARNING Pro Armor Door and Net are designed to work together to replace your original equipment nets and/or door. Install both the Pro Armor Door
INSTALLATION INSTRUCTIONS JEEP SCRAMBLER FAST TRAC TOP PART #108-21X
 INSTALLATION INSTRUCTIONS JEEP SCRAMBLER FAST TRAC TOP PART #108-21X Thank you for purchasing Specialty s Convertible Top for your Jeep vehicle. It has been designed for great fit and long wear. Please
Fabric Replacement Top and Doors
 Fabric Replacement Top and Doors Installation Instructions For: Wrangler/TJ 1997 and Newer Part Number: 51131 WARNING This product is designed to enhance the appearance of the vehicle and to shield the
INSTALLATION INSTRUCTIONS CJ-5 M38A PART # With Doors
 INSTALLATION INSTRUCTIONS CJ-5 M38A1 1955-1975 PART #109-011 With Doors Thank you for purchasing Specialty s Convertible Top for your Jeep vehicle. It has been designed for great fit and long wear. Please
RH-412 STEEL DOORS INSTALLATION INSTRUCTIONS
 RH-412 STEEL DOORS INSTALLATION INSTRUCTIONS By following the steps outlined below, the assembly, installation and adjustment of the steel doors, will be a simple process. Let s start with the Driver Side.
INSTALLATION INSTRUCTIONS RH 412 STEEL DOORS
 By following the steps outlined below, the assembly, installation and adjustment of the steel doors, will be a simple process. Let s start with the Driver Side. Note: Having the hood open makes the job
Installation Instructions and Owner's Manual. Model: CJ3A, and M38, Part Number 51403
 by Installation Instructions and Owner's Manual Model: CJ3A, 1949-1953 and M38, 1950-1951 Part Number 51403 Congratulations on your purchasing decision. Bestop designed this Convertible Top to give you
INSTALLATION INSTRUCTIONS
 NOTE: Bolts should remain hand tight until all bolts are installed. STEP 1 Installing the door base (both sides). 1. Locate the outer, roll cage, mounting bolt (passenger side is shown in the illustration).
FORD INTERCEPTOR SEDAN READY BUCKLE
 INSTALLATION MANUAL FORD INTERCEPTOR SEDAN READY BUCKLE PART# FT3501RB We recommend you read through the installation guide prior to installation, if you have any questions please call us at 800-516-2322
RZR 4 Doors Part # Polaris RZR XP & Turbo ( ) Black
 Black") Racing 3191 N Washington St. Suite 2 Chandler, AZ 85225 1 (800) 708-9803 http://www.racing.com RZR 4 Doors Part # 07-1802 Polaris RZR XP 4 1000 & Turbo (2015-2018) Black Revision No: 01 Revision Date:
Racing 3191 N Washington St. Suite 2 Chandler, AZ 85225 1 (800) 708-9803 http://www.racing.com RZR 4 Doors Part # 07-1802 Polaris RZR XP 4 1000 & Turbo (2015-2018) Black Revision No: 01 Revision Date:
INSTALLATION INSTRUCTIONS Scout II - Fast Trac PART #
 INSTALLATION INSTRUCTIONS Scout II - Fast Trac PART #442-210 Thank you for purchasing Specialty s Convertible Top for your Scout vehicle. It has been designed for great fit and long wear. Please read and
INSTALLATION INSTRUCTIONS KK-K9-F14-K K9 KIT FOR FORD EXPEDITION
 INSTALLATION INSTRUCTIONS KK-K9-F14-K-32 32 K9 KIT FOR 2003-2016 FORD EXPEDITION TOOLS REQUIRED: Power Drill Drill Bit Set Standard & Metric Socket Sets Phillips Screw Driver Open End Wrench Set Wire Cutters
WARNING Indicates a hazardous situation which, if not avoided, could result in death or serious injury. WARNING. Ranger XP Door Kit
 REVISION 04 November, 20 2018 Ranger XP Door Kit Prior to installation, please verify if a revised version of this instruction sheet is available on Knowledge Center. The following symbols may be used
WPS crew Doors Installation instructions
 WPS-132-133 crew Doors Installation instructions ORDER OF INSTALLATION FOR A COMPLETE ENCLOSURE OF A CREW WPS (Weather Protection System) IS AS FOLLOWS: 1. Heater 2. Rear Thresholds - Right Hand & Left
======================================================================================== ( DR / DR) JK WRANGLER MOD RACK
 JK WRANGLER MOD RACK") (10984 4DR / 10982 2DR) JK WRANGLER MOD RACK INSTALLATION SHEET Important Notes: Some brands of windshield light brackets and snorkels may not be compatible with the 10984 MOD Rack System. Body lifts are
(10984 4DR / 10982 2DR) JK WRANGLER MOD RACK INSTALLATION SHEET Important Notes: Some brands of windshield light brackets and snorkels may not be compatible with the 10984 MOD Rack System. Body lifts are
Be sure any accessory used will fit with the soft upper doors before installing. Not all accessories will be compatible.
 Company Name: Spike Power Sports Vehicle Name: Polaris General 2P Product Description: Soft Upper Doors Part Number: 58-1600 Revision: R01 09/19/2018 Contents: 655 Elm Ridge Ave, Canal Fulton OH, 44614
Half Door Installation Instructions
 Half Door Installation Instructions For: CJ5 (1955-1975), CJ6 (All), M38-A1 (1955-1971) Part Number: 53025 Congratulations on your purchasing decision. Bestop designed these Doors to give you years of
8mm x 25mm "Z" Bolt Plates. (2) Tube Spacers. (2) 12mm Bolt Plates w/ Nut
 Tube Spacers. (2) 12mm Bolt Plates w/ Nut") PARTS LIST: 1 Grille Guard 10 12mm Lock Washers 1 Driver/Left Side Frame Mounting Bracket 8 12mm Hex Nuts 1 Passenger/Right Side Frame Mounting Bracket 2 10-1.50mm x 25mm Button Head Bolts 1 Driver/Left
PARTS LIST: 1 Grille Guard 10 12mm Lock Washers 1 Driver/Left Side Frame Mounting Bracket 8 12mm Hex Nuts 1 Passenger/Right Side Frame Mounting Bracket 2 10-1.50mm x 25mm Button Head Bolts 1 Driver/Left
TEL:1-866-XANATOS INSTALLATION INSTRUCTIONS GRILL GUARD FOR FORD EXPLORER PART # 17FJ26MA
 \ TEL:1-866-XANATOS INSTALLATION INSTRUCTIONS GRILL GUARD FOR FORD EXPLORER 02-05 PART # 17FJ26MA NOTE: Please read this information before assembling. Complete step by step instruction sheets will be
WARNING. Failure to observe these instructions could lead to severe injury or death.
 INSTALLATION INSTRUCTIONS WINCH MOUNTING KIT Part Number: 80156, 80160 Application: 2008 Ford F150 Your safety, and the safety of others, is very important. To help you make informed decisions about safety,
Sailcloth Fabric Replacement Top and Doors Installation Instructions
 Sailcloth Fabric Replacement Top and Doors Installation Instructions For: Wrangler/TJ 1997-2002 Part Number: 79121 This product is only designed for the vehicles listed above. DO NOT INSTALL THIS PRODUCT
INSTALLATION INSTRUCTIONS
 INSTALLATION INSTRUCTIONS Accessory FABRIC REAR DOORS (5P) P/N 0SR90-HL4-211B (BLACK) P/N 0SR90-HL4-211C (CAMO) Application SXS1000M5P/M5D Honda Dealer: Please give a copy of these instructions to your
INSTALLATION INSTRUCTIONS
 INSTALLATION INSTRUCTIONS SPORTSMAN WINCH MOUNT GRILLE GUARD APPLICATION: 2016-2018 Toyota Tacoma PART NUMBER: 40-93885, 45-93880, 46-23885 ITEM QUANTITY DESCRIPTION TOOLS NEEDED 1 1 WINCH TRAY 15MM SOCKET
Installation Instructions: Bumper (Part # SB76850) XJ Jeep Cherokee XRC Rear Bumper
 XJ Jeep Cherokee XRC Rear Bumper") NOTE: Carefully read entire instructions thoroughly before attempting to install this part. Parts Included Qty 93-7789 XJ XRC 1 93-7807 Bumper Mount Bracket: Drvr 1 93-7811 Bumper Mount Bracket: Pass 1
NOTE: Carefully read entire instructions thoroughly before attempting to install this part. Parts Included Qty 93-7789 XJ XRC 1 93-7807 Bumper Mount Bracket: Drvr 1 93-7811 Bumper Mount Bracket: Pass 1
INSTALLATION INSTRUCTIONS GRILLE GUARD 09-ON DODGE RAM PART #
 INSTALLATION INSTRUCTIONS GRILLE GUARD 09-ON DODGE RAM PART # PARTS LIST: Qty Description Qty Description 1 Grille Guard 8 12-1.75mm x 35mm Hex Bolts 2 Brackets (for trucks without 22 12mm x 30.1mm OD
INSTALLATION INSTRUCTIONS SIDE BAR FORD ESCAPE & MAZDA TRIBUTE PART #
 INSTALLATION INSTRUCTIONS SIDE BAR 2008-2010 FORD ESCAPE & MAZDA TRIBUTE PART # 50136 50137 PARTS LIST: 1 Driver/Left Sidebar 2 10-1.50mm x 35mm Bolt Plate 1 Passenger/Right Sidebar 2 10-1.50mm x 30mm
Polaris General Doors #06016 Installation & Operations Manual Fits Polaris General
 Polaris General Doors #06016 Installation & Operations Manual Fits Polaris General Before You Start: Please familiarize yourself with all the steps before beginning assembly. Compatibility Info: This Door
Please Do Not Return Your Item to the Retailer
 Please Do Not Return Your Item to the Retailer Thank you for your purchase of an Epic Furnishings item You should enjoy many years of trouble free, dependable use If for any reason you are missing parts,
Sailcloth Fabric Replacement Top and Doors with Tinted Side and Rear Curtains Installation Instructions
 Sailcloth Fabric Replacement Top and Doors with Tinted Side and Rear Curtains Installation Instructions TM For: Wrangler / TJ 2003 - Current Part Number: 79129 Inc. This product is only designed for the
Hardware and Components:
 Hardware and Components: (A) 5/16 x 2 Hex Bolt (B) 5/16 x 2-1/4 Hex Bolt (C) 5/16 x 2-1/2 Hex Bolt (D) 4X 5/16 x 3/4 Hex Bolt (E) 4X 5/16 x 1-1/4 Hex Bolt (F) 11X 5/16 Flat Washer (G) 12X 5/16 Nylock Nut
Installation Instructions Yamaha Rhino Soft Cab Enclosure
 Installation Instructions Yamaha Rhino Soft Cab Enclosure Vehicle Application Yamaha Rhino 2008 Current Part Number: 20301 www.bestoputv.com - We re here to help! Visit our web site and click on Ask a
FreshSesh, PowderHound & Big PowderHound
 FreshSesh, PowderHound & Big PowderHound Carrier (2x) universal mounting bracket (4x) SkiLift (2x) (mounting bracket parts:) Hex Key with Bolt (2x) SkiLift (2x) Button Head Screw (2x) Hex Wrench (1x) Base
INSTALLATION INSTRUCTIONS
 TEL -866-XANATOS INSTALLATION INSTRUCTIONS PART#: 7D5000SS\7D500A GRILL GUARD FOR DODGE SPRINTER 07-09 PARTS LIST: 8 6 Grille Guard Driver/Left Frame Mounting Passenger/Right Frame Mounting Driver/Left
Installation Instructions Trektop NX
 Installation Instructions Trektop NX Vehicle Application: Jeep Wrangler Unlimited TJD 2004 2006 Part Number: 56821 www.bestop.com - We re here to help! Visit our web site and click on Ask a Question. Click
SAFETY. Read and understand all safety precautions and instructions before installing this product.
 SAFETY Your safety and the safety of others is very important. In order to help you make informed decisions about safety, we have provided installation instructions and other information. These instructions
INSTALLATION INSTRUCTIONS
 SG57f GENUINE PARTS INSTALLATION INSTRUCTIONS. DESCRIPTION: Sunroof Wind Deflector. APPLICATION: Pathfinder; Frontier with no roof rails 3. PART NUMBER: 999D4-XR00 4. KIT CONTENTS: Item No. ) ) 3) 4) 5)
INSTALLATION INSTRUCTIONS Super Scout PART #
 INSTALLATION INSTRUCTIONS Super Scout 71-80 PART #443-010 Thank you for purchasing Specialty s Convertible Top for your Scout vehicle. It has been designed for great fit and long wear. Please read and
Contractors Rack Assembly and Installation Instructions
 Part # 18601 & 16601 Contractors Rack Assembly and Installation Instructions 4751 Littlejohn St. Unit A, Baldwin Park, CA 91706 Page 1 of 12 11/13/08 Thank you for purchasing the Paramount Restyling Contractors
Sunrise Deck Assembly Instructions for Kingston Left
 Sunrise Deck Assembly Instructions for Kingston Left It s easiest to build the deck frame first like it will be lying on its back and then after all 4 legs and horizontals are in place, tip the deck toward
GRILLE GUARD SPRINTER VAN (EXCLUDES X4) INCLUDES MERCEDES, FREIGHTLINER AND DODGE PARTS LIST:
 INCLUDES MERCEDES, FREIGHTLINER AND DODGE PARTS LIST:") PARTS LIST: 1 Grille Guard 8 12mm Hex Nuts 1 Driver/Left Side Frame Mounting Bracket 2 10-1.50mm x 25mm Button Head Bolts 1 Passenger/Right Side Frame Mounting Bracket 4 10mm x 20mm OD x 2mm Flat Washers
PARTS LIST: 1 Grille Guard 8 12mm Hex Nuts 1 Driver/Left Side Frame Mounting Bracket 2 10-1.50mm x 25mm Button Head Bolts 1 Passenger/Right Side Frame Mounting Bracket 4 10mm x 20mm OD x 2mm Flat Washers
Palladian/ Keystone Models 202/204 Maintenance Kit
 Palladian/ Keystone Models 202/204 Maintenance Kit Please read all of the instructions before you begin. Confirm that you have all the necessary tools and parts required. Allow about one hour to complete
Installation Instructions Supertop Kit includes 2-Piece Soft Doors
 Installation Instructions Supertop Kit includes 2-Piece Soft Doors Vehicle Application Jeep CJ5 1955 1975 Part Number: 51595 Jeep M-38A1 1951 1962 Part Number: 51595 www.bestop.com - We re here to help!
INSTALLATION INSTRUCTIONS
 PART NO. 3373MB 3373MC 3373MH PRODUCT DESCRIPTION: 3000 SERIES STEP GUARD BLACK (GRILLE GUARD & BRUSH GUARDS) 3000 SERIES STEP GUARD CHROMED (GRILLE GUARD & BRUSH GUARDS) 3000 SERIES STEP GUARD BLACK/CHROMED
WARNING WARNING. CAUTION Indicates a hazard which, if not. NOTICE Indicates an instruc on which, if not
 Prior to installa on, please verify if a revised version of this instruc on sheet is available on Knowledge Center. The following symbols may be used in this document. WARNING Indicates a hazardous situa
Hardware and Components:
 Hardware and Components: (A) 4X 5/16 x 1 Carriage Bolt (B) 2X 5/16 x 2-1/4 Carriage Bolt (C) 2X 5/16 x 3-1/4 Hex Bolt (D) 2X 5/16 x 3/4 Hex Bolt (E) 2X 5/16 x 1-1/4 Hex Bolt (F) 5/16 x 2-1/4 Hex Bolt (G)
Rugged Ridge Body Armor Guard Kit, 5 Pieces, Black (07-Current JK 4-door)
") Rugged Ridge Body Armor Guard Kit, 5 Pieces, Black (07-Current JK 4-door) Installation Time: 60 Minutes Tools Required: Notes: Phillips head screwdriver 3/8 socket or Flat head screwdriver 1/2 socket 7
Rugged Ridge Body Armor Guard Kit, 5 Pieces, Black (07-Current JK 4-door) Installation Time: 60 Minutes Tools Required: Notes: Phillips head screwdriver 3/8 socket or Flat head screwdriver 1/2 socket 7
Installation Instructions SRC OFF ROAD ROOF RACK Wrangler,97-06 Wrangler,04-06 Unlimited Part # s 76711,76713,76715)
") NOTE: Please read this information entirely before installing. To obtain correct installation, we recommend you follow these step-by-step instructions carefully. Please take care when installing this product
NOTE: Please read this information entirely before installing. To obtain correct installation, we recommend you follow these step-by-step instructions carefully. Please take care when installing this product
INSTALLATION INSTRUCTIONS
 INSTALLATION INSTRUCTIONS Trans4mer Gen II Mount System For 2011-2012 Dodge Ram HD 4500/5500 Bracket Kit 90160 Your safety, and the safety of others, is very important. To help you make informed decisions
1104. Clean up the door striker plates with a hand grinder using a wire brush and WD-40.
 Chapter 31 - Misc. Putting VW Back Together (Video Clip 31) 1104. Clean up the door striker plates with a hand grinder using a wire brush and WD-40. 1105. Install both door striker plates on the VW body
Installation Instructions. Mesh Grille
 Installation Instructions Part Number 81114 I-sheet Rev. A1 Mesh Grille For proper installation and best possible fit, please read all instructions BEFORE you begin. For technical assistance or to obtain
Installation Instructions Tigertop
 Installation Instructions Tigertop Vehicle Application Jeep CJ2A 1946 1948 Part Number: 51402 Jeep MB 1941 1945 Part Number: 51402 www.bestop.com - We re here to help! Visit our web site and click on Ask
Installation Instructions Tigertop
 Installation Instructions Tigertop Vehicle Application Jeep CJ5 1976 1983 Part Number: 51407 www.bestop.com - We re here to help! Visit our web site and click on Ask a Question. Click here for more Jeep
INSTALLATION INSTRUCTIONS K9-C20-32 & K9-C CHEVROLET 4 DOOR TAHOE, GMC YUKON, SUBURBAN and YULON XL
 INSTALLATION INSTRUCTIONS K9-C20-32 & K9-C21-32 2007-2014 CHEVROLET 4 DOOR TAHOE, GMC YUKON, SUBURBAN and YULON XL TOOLS REQUIRED: Power drill Drill bit set Standard & metric socket sets Phillips screwdriver
INSTALLATION INSTRUCTIONS 3 BULL BAR 99-04, 04 "HERITAGE" F-150/250LD 2WD, 97-04, 04 "HERITAGE" 4WD WD EXPEDITION/ WD EXPEDITION PART
 INSTALLATION INSTRUCTIONS 3 BULL BAR PART #B-F1971;B-F2971 PARTS LIST: 1 Bull Bar 2 12-1.75mm x 130mm x 40mm Hex Bolts 1 Driver/Left Mounting Bracket 4 12-1.75mm x 35mm Hex Bolts 1 Passenger/Right Mounting
Installation Instructions:
 NOTE: Carefully read entire instructions thoroughly before attempting to install this part. Parts Included: Qty 93-326EP009 Front Armor: Drvr 1 93-326EP010 Front Fender: Pass 1 90-6774m Hardware Pack:
Assembly Instructions
 Unite Panel System Hinge Door July 2016 #12 x / slotted hex washer head bolt Figure 1 threshold bracket frame Detail F threshold bracket threshold bracket (installed) #12 x / slotted hex washer head bolt
Laminate Cabinet Installation Instructions
 Laminate Cabinet Installation Instructions www.easygaragestorage.com/installation How To Use These Instructions Thank you for your purchase! Please read each step of this manual thoroughly to ensure proper
C L A S S I C. Deluxe. Snow Thrower Cab. Assembly and Care Instructions
 C L A S S I C Deluxe Snow Thrower Cab Assembly and Care Instructions Deluxe Snow Thrower Cab Assembly and Care Instructions Before you begin please unpack the carton and check that you have all your parts.
OPERATOR'S MANUAL 46" SNOW BLADE. Model Numbers OEM IMPORTANT: READ SAFETY RULES AND INSTRUCTIONS CAREFULLY
 OPERATOR'S MANUAL 46" SNOW BLADE Model Numbers 190-833-OEM IMPORTANT: READ SAFETY RULES AND INSTRUCTIONS CAREFULLY MTD PRODUCTS INC. P.O. BOX 368022 CLEVELAND, OHIO 44136-9722 PRINTED IN U.S.A. FORM NO.
INSTALLATION INSTRUCTIONS GRILLE GUARD RAM 1500 PART # 5058/5058-2
 INSTALLATION INSTRUCTIONS GRILLE GUARD PART # 5058/5058-2 PARTS LIST: Qty Description Qty Description 1 Grille Guard 8 12-1.75mm x 35mm Hex Bolts 2 Upper Frame Mounting s (for trucks without tow hooks
HONDA RIDGELINE (KIT #601) Installation Instructions (to be used in addition to owners manual)
 Installation Instructions (to be used in addition to owners manual)") HONDA RIDGELINE (KIT #601) Installation Instructions (to be used in addition to owners manual) IMPORTANT NOTE: Read before beginning installation. These instructions replace all of Step 1 of the instructions
HONDA RIDGELINE (KIT #601) Installation Instructions (to be used in addition to owners manual) IMPORTANT NOTE: Read before beginning installation. These instructions replace all of Step 1 of the instructions
** Do Not Contact the Store ** For Assistance, including missing or broken parts, Call Customer Service at:
 3/01/2007 VISIT THE LITIME WEB SITE: WWW.LITIME.COM ** Do Not Contact the Store ** For Assistance, including missing or broken parts, Call Customer Service at: 1 (800) 225-3865 Double Shed Doors for Back
SAFETY. Read and understand all safety precautions and instructions before installing this product.
 SAFETY Your safety and the safety of others is very important. In order to help you make informed decisions about safety, we have provided installation instructions and other information. These instructions
INSTALL INSTRUCTIONS K9-F14-PT K9/PRISONER TRANSPORTATION SYSTEM FORD EXPEDITION
 INSTALL INSTRUCTIONS K9-F14-PT K9/PRISONER TRANSPORTATION SYSTEM 2003-2017 FORD EXPEDITION HARDWARE: QTY: DESCRIPTION: PART #: 28 ¼-20 x ½ Stainless carriage bolt GSM32022 8 ¼-20 x ¾ Stainless carriage
START HERE BEFORE YOU BEGIN FIG 1 STEP 2
 PROFESSIONAL INSTALL RECOMMENDED REAR MODULAR / MULTI LED ROOF MOUNTS PART#: Z350040 / Z350050 REAR ROOF LED LIGHT MOUNTS Parts included (1) - Driver Side Roof Mount Upright (1) - Passenger Side Roof Mount
55000/55010 Installation Instructions
 A. Install 55015 B. Bolt roof rails, 55020/55025, to front hoop. C. Assemble 55026 D. To install without drilling into bumper. E. If mounting directly to bumper. A. 55015 Installation Instructions 55000/55010
Classic Roll Tarp. Installation Instructions. Attention Dealers: Please give this owners manual to the customer when the product is delivered.
 Serving the Truck & Trailer Industry Since 1944 Classic Roll Tarp Attention Dealers: Please give this owners manual to the customer when the product is delivered. Call 800-535-9545 www.aeroindustries.com
Tech Sheet. T4 Interior conversion kit how to - fitting instructions. 1. Rear seat belts. 2.
 Page 1 of 8 T4 Interior conversion kit how to - fitting instructions Thank you for purchasing our T4 interior conversion kit. This kit will enable you to convert any SWB left hand loading door T4 into
Installation Instructions
 Instructions Created by an: Sidekick/Tracker 4 Door & 2 Door Roof Racks for Solid Tops (SKU# KEB-RR-4D & KEB-RR-2D) Installation Instructions Revised 4-16-14 Notice: These instructions (Pictures and Text)
INSTALLATION GUIDE 2009-CURRENT HUMMER H3T PRODUCT CODE:
 INSTALLATION GUIDE 2009-CURRENT HUMMER H3T PRODUCT CODE: 268 June 22, 2010 TOOLS NEEDED COMPONENTS INCLUDED P2 Tip 3/8" Drill Rubber Gasket(s) x 2 Bracket(s) x 2 1/2" Drill Bit Bulkhead Flange #2 Phillips
INSTALLATION INSTRUCTIONS PART#:17A045200MSS\17A045200MA MODULAR GRILL GUARD FOR FORD SUPER DUTY F250/F
 INSTALLATION INSTRUCTIONS PART#:17A045200MSS\17A045200MA MODULAR GRILL GUARD FOR FORD SUPER DUTY F250/F350 08-09 1 guard, center section 1 brush guard, left side 1 brush guard, right side 1 wire guard
Installation Instructions Hinged Roof Rack
 Installation Instructions Hinged Roof Rack Application: Jeep Wrangler Unlimited 2004 - Current Part Number: 41435-01 www.bestop.com - We re here to help! Visit our web site and click on Ask a Question
Installation Instructions Sailcloth Replace-a-top
 Installation Instructions Sailcloth Replace-a-top Upper Door Skins Not Included Vehicle Application Jeep Wrangler TJ 2003-2006 Tinted Glass Windows Part Number: 79141 www.bestop.com - We re here to help!
INSTALLATION INSTRUCTIONS. PLASMA TV WALL MOUNT TILT Universal (RGTU-210) WARNINGS WARNING
 WARNINGS WARNING") PLASMA TV WALL MOUNT TILT Universal (RGTU-210) S CAUTION CAUTION CAUTION A alerts you to the possibility of serious injury or death if you do not follow the instructions. A CAUTION alerts you to the possibility
PLASMA TV WALL MOUNT TILT Universal (RGTU-210) S CAUTION CAUTION CAUTION A alerts you to the possibility of serious injury or death if you do not follow the instructions. A CAUTION alerts you to the possibility